
Steam Fast SF-450 - Steam Appliance Salton - Free user manual and instructions
Find the device manual for free Steam Fast SF-450 Salton in PDF.


| Product Type | Garment Steamer |
| Brand | Salton |
| Model | Steam Fast SF-450 |
| Power | 1500 W |
| Water Tank Capacity | 1.2 L |
| Heat-Up Time | Approximately 1 minute |
| Steam Flow Rate | Up to 30 g/min |
| Dimensions (H x W x D) | 28 x 15 x 30 cm |
| Weight | 1.5 kg |
| Power Cord Length | 2.5 m |
| Material | Plastic body with stainless steel nozzle |
| Color | White and blue |
| Functions | Vertical steaming, removable crease brush |
| Safety Features | Auto shut-off, overheat protection |
| Maintenance | Descaling every 3 months recommended |
| Included Accessories | Fabric brush, crease attachment, measuring cup |
| Repairability Index | 6/10 |
| Warranty | 1 year |
Frequently Asked Questions - Steam Fast SF-450 Salton
User questions about Steam Fast SF-450 Salton
0 question about this device. Answer the ones you know or ask your own.
Ask a new question about this device
Download the instructions for your Steam Appliance in PDF format for free! Find your manual Steam Fast SF-450 - Salton and take your electronic device back in hand. On this page are published all the documents necessary for the use of your device. Steam Fast SF-450 by Salton.
USER MANUAL Steam Fast SF-450 Salton
Model: SF-450
salton® salton salton
IMPORTANT SAFEGUARDS
When using electrical appliances, basic safety precautions should always be followed including the following:
- Read all instructions.
- Do not touch hot surfaces. Use handles or knobs.
- To protect against electrical hazards, do not immerse cord, plug or the appliance in water or other liquid.
- Cl ose supervision is necessary when any appliance is used by or near children.
- Unplug from outlet when not in use and before cleaning. Allow to cool before putting on or taking off parts, and before cleaning the appliance.
- Do not operate any appliance with a damaged cord or plug or after the appliance malfunctions, or has been damaged in any manner. Return appliance to Salton for examination, repair or adjustment. See Warranty.
- The use of accessories or attachments not recommended by Salton may cause hazards.
- Do not use outdoors.
- Do not let cord touch hot surfaces.
- Prior to connecting or disconnecting plug from wall outlet, turn any control to 'Off'.
- Do not use appliance for other than its intended use.
- Do not leave unit unattended while in use.
- Avoid contact with hot parts. Keep hands, hair, and clothing away from these parts to prevent risk of injury to persons and or burns that could occur.
- Do not operate Steamer without properly filling the Water Container.
- Always keep the Hose and Nozzle elevated above the Water Container. Do not lay the Hose on the floor.
- Burns can occur by touching hot parts, hot water or steam.
SAVE THESE INSTRUCTIONS
GROUNDED PLUG
To reduce the risk of electric shock this appliance has a grounded plug.
(2 blades and 1 pin) If the plug does not fit fully into the electrical outlet contact a qualified electrician. Do not modify the plug in any way or use an adaptor.
DESCRIPTION OF PARTS
1. Control Handle
Situated at the end of the Hose and sits just before the Nozzle. It is designed to be heat free and is safe to grasp. Use the Control Handle to aim the direction of the steam released from the Nozzle.
2. Nozzle
Located at the end of the Hose. Always hang the Nozzle end of the Hose on the Hanger Rod when not in use. Keep the Nozzle pointed upward as water may condense and drip.
3. Hanger Rod
Designed to conveniently hang the Nozzle and Hose and also can support garments for steaming.
4. Hose
Extends from the Base of the Unit. Do not pull on the Hose with extreme pressure or you may cause damage and leakage of steam.
5. On/Off Switch
6. Water Container
Fill through the removable water valve in the bottom and should be placed in the reservoir on the Base. Avoid spilling excess water into the reservoir as this could cause the Steamer to expel water from the Nozzle. Holds enough water for approximately 30 minutes of continuous operation. Do not try to substitute another Water Container for the one designed for this unit.

7. Water Level Indicator
Can be seen visually in the Water Container. Do not operate the Steamer without water in the Water Container.
8. Steamer Base
Houses the Reservoir and Water Container. It also supports the Hanger Rod and Hose.
9. Casters
Allows the unit to roll freely.
10. Power Cord
11. Drain Plug
For convenient drainage of the Water Reservoir.
ACCESSORIES
Fabric Brush
Your Steamer is supplied with an accessory Fabric Brush, which can be used to gently brush the nap of fabric such as corduroy. To install simply snap into the appropriate slot in the Nozzle when the Steamer is off and cool. NOTE: Do not use the Brush on delicate fabrics such as silk or satin. (See Ill. 2)
Lint Remover
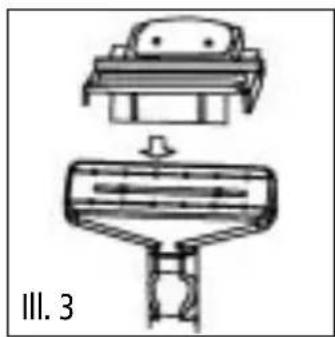
The supplied lint removal tool may be used with the Steamer or by itself. To install on the Steamer make certain the unit is off and cool. Simply snap the tool on the Nozzle. (See III. 3)
Squeegee
Another feature of Steamer is the ability to clean. Live steam dissolves greasy film and dirt. To take advantage of this, your unit is equipped with a Squeegee to allow the cleaning of windows, mirrors and other glass surfaces. To install the Squeegee merely snap it into the appropriate slot in the Nozzle when the unit is off and cool. (See Ill. 4)


ASSEMBLY
Hanger Rod
Place the appliance on a steady surface. The bottom rod is threaded on one end. Screw the two larger rods together. Insert the bottom of the rod into the holder on the unit base and screw the set screw until tight.
NOTE: Do not over tighten. Screw the top rod, with hook, into the top of the large rod. (See III. 5)
Steamer Hose
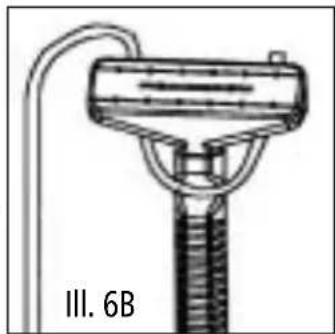
Screw the end of the Steamer Hose with the knurled knob onto the threaded pipe on the top of the steamer unit. (See III. 6A) NOTE: Do not use excessive force in tightening the knob. Tighten by hand until it no longer turns. Hang the Nozzle from the Hanger Rod. (See III. 6B) Prior to filling the Water Container, be certain that the Steamer's Drain Plug is properly installed and tightened to prevent leaking.
Water Container
Turn the Water Container upside down and inspect to see the valve and spring assembly are functioning. Place the Container in the reservoir. Ensure that it is seated securely.
HOW TO USE
- Ensure that the On/Off Switch is in the 'Off' position. Set the unit on the floor and remove the Water Container. Check the inside of the Container for sediment. Turn the Container upside down and push the valve open and allow to close two or three times to insure it is functioning smoothly. If the Container has been stored with water inside, it may be necessary to
remove the water and clean the Container. Follow the steps in the Care and Cleaning section.
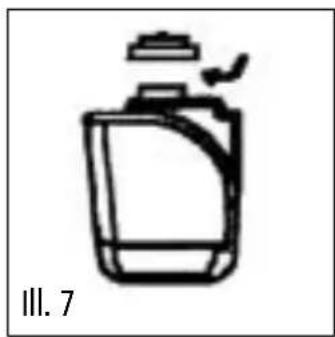
- Remove the Water Container by the handle and turn upside down. (III. 7) Unscrew the valve in the center of the Container and pour cold water into the opening or hold under a source of running water until the Container is filled to the desired level.


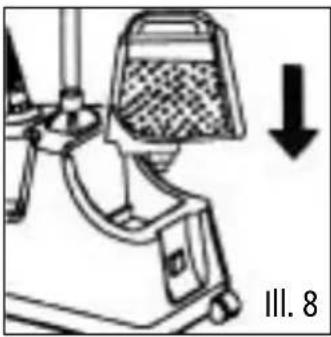
Replace the valve and return the Container to the upright position. Place the Water Container onto the base and make certain it is seated properly in the cavity. (III. 8)
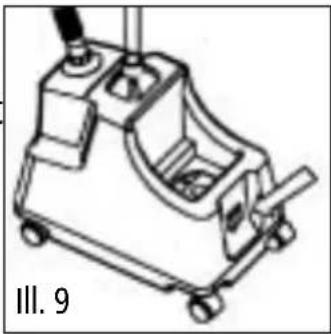
- Plug the Power Cord into a 120 Volt A.C. outlet. Turn the On/Off Switch to the 'On' position. (III. 9) The Switch will light up. Steam will be produced from the Nozzle in a few seconds.
IMPORTANT: If the Water Tank runs dry while the unit is in operation, switch the On/Off Switch to 'Off'.
-
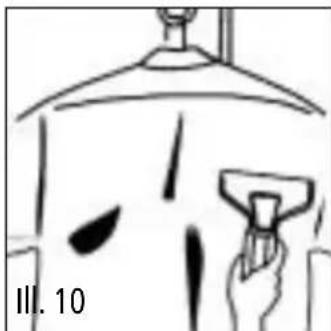
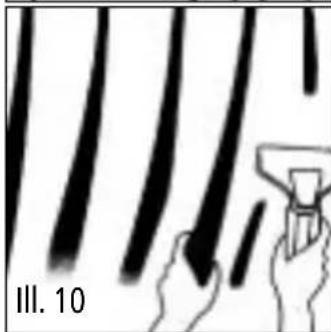
Grasp the Control Handle with the Nozzle facing upward. Beginning at the bottom of the fabric will allow the steam to rise inside and outside removing wrinkles. Slowly move the Nozzle from the bottom to the top of the fabric. (III. 10)
-
Remove the Nozzle from the garment and smooth the fabric with your free hand.
IMPORTANT:
- Do not operate the Steamer without water. This will shorten the life of the Steamer.
- During operation the Steamer Hose may gurgle. This is a normal result of condensation collecting inside the Hose. Simply lift the Control Handle upward until the Hose is extended to its full height. The gurgling will disappear when the excess
moisture inside the Hose has had a chance to drain back into the Base.
- If the steamer stops producing steam then starts again, you may wish to examine the inside of the reservoir. The most common reason for this effect is the accumulation of sediment from mineral laden water. Clean the offending sediment from inside the unit by following the steps in the 'Care and Cleaning' section.
- If tap water is being used, we recommend that the unit be drained occasionally to reduce lime buildup. If in a hard water area, the use of distilled water is recommended to prolong the life of the unit.
- It is not necessary to drain the unit if using distilled water.
HELPFUL HINTS
- Pressing will be easier if there are fewer creases in the object to be steamed.
- Shaking out the article prior to steaming will avoid excess creasing.
- Towels, handkerchiefs and napkins should be draped over a rod or steam pressed in place over a towel rack.
- Heavier fabrics may require repeated steaming.
- With practice you will gain speed and efficiency. You will soon learn which fabrics will require multiple steam applications.
CARE AND CLEANING
- Turn the On/Off Switch to the 'Off' position and unplug from the power source.
-
Wait for the Steamer to cool completely for at least 30 minutes.
-
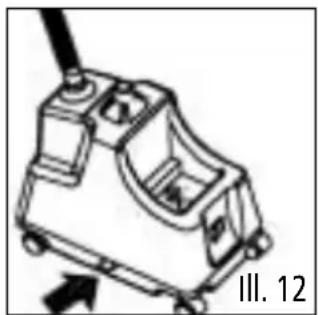
Remove and drain the Water Container. Drain the unit by removing the Drain Plug and allowing the contents of the reservoir to drain. (III. 12) Tip the unit in the direction of the Drain Plug to remove the remaining water. Replace the Plug. NOTE: It is not necessary to drain the unit is using distilled water.
-
Remove the Steamer Hose, Hanger Rod and Water Tank.
-
Remove excess water from the reservoir by lifting the unit and pouring. Flush the Reservoir area with fresh water to clean any residue from the water source.
-
Pour fresh water into threaded pipe of the Steam Hose. Then remove water from the reservoir to clean any residue inside the Steamer. If there is too much residue, you may use soft water to soak and flush the reservoir.
-
Re-attach the Hose, Hanger Rod and Water Container and store the unit.
TROUBLESHOOTING GUIDE
| PROBLEM | CAUSE | SOLUTION |
| Steamer fails to heat | Steamer not plugged in or auto shut-off engaged | Plug into electric outlet.Check Water Container is not empty.Reset On/Off Switch. |
| No steam Water level is low. Turn On/Off Switch 'Off' | and refill Water Container. | |
| Water drips from Nozzle or Nozzle gurgles | Condensation in Hose Hold the Hose | se vertical and allow water to drain back to tank. |
| Steam is intermittent | Sediment in container Clean reservoir | and Water Container. |
LIMITED WARRANTY
SALTON warrants that this appliance shall be free from defects in material and workmanship for a period of one year from the date of purchase. During that period these defects will be repaired or the product will be replaced at SALTON's option without charge. This warranty covers normal domestic usage and does not cover damage which occurs in shipment or failure which results from alteration, accident, misuse, abuse, glass breakage, neglect, commercial use, or improper maintenance.
TO RETURN FOR SERVICE
- Securely package and return the product PREPAID to: SALTON CANADA, 81A Brunswick, Dollard-des-Ormeaux, Quebec, H9B 2J5
- Be sure to enclose your name, address, postal code and description of defect.
- To ensure prompt "In-Warranty" service, be sure to include a proof of purchase. We recommend you take the necessary precaution of insuring the parcel.
- For repairs not covered by the Warranty, you will be advised of the cost of repair in advance, and upon receipt of your cheque or money order, the repairs will be completed and the product returned to you.
- IMPORTANT SAFEGUARDS
- SAVE THESE INSTRUCTIONS
- GROUNDED PLUG
- DESCRIPTION OF PARTS
- CONTROL HANDLE
- NOZZLE
- HANGER ROD
- HOSE
- ON/OFF SWITCH
- WATER CONTAINER
- WATER LEVEL INDICATOR
- STEAMER BASE
- CASTERS
- POWER CORD
- DRAIN PLUG
- ACCESSORIES
- FABRIC BRUSH
- LINT REMOVER
- SQUEEGEE
- ASSEMBLY
- STEAMER HOSE
- HOW TO USE
- IMPORTANT
- HELPFUL HINTS
- CARE AND CLEANING
- LIMITED WARRANTY
- TO RETURN FOR SERVICE
Brand : Salton
Model : Steam Fast SF-450
Category : Steam Appliance