
48-22-9519 - Rotary hammer MILWAUKEE - Free user manual and instructions
Find the device manual for free 48-22-9519 MILWAUKEE in PDF.


| Product Type | Rotary Hammer |
| Brand | Milwaukee |
| Model Number | 48-22-9519 |
| Power Source | Corded Electric |
| Voltage | 120 V AC |
| Amperage | 8.5 A |
| Motor Power | 1020 W |
| Impact Energy (EPTA) | 2.6 J |
| No-Load Speed | 0-1300 RPM |
| Impact Rate | 0-4500 BPM |
| Drilling Capacity (Concrete) | 1-1/8 in. (28 mm) |
| Drilling Capacity (Steel) | 1/2 in. (13 mm) |
| Drilling Capacity (Wood) | 1-1/2 in. (38 mm) |
| Chuck Type | SDS Plus |
| Vibration Level (Drilling) | 13.5 m/s² |
| Weight | 5.6 lbs (2.5 kg) |
| Length | 14.2 in (360 mm) |
| Height | 8.1 in (206 mm) |
| Width | 3.5 in (89 mm) |
| Power Cord Length | 12 ft (3.7 m) |
| Safety Features | Anti-vibration handle, overload clutch, lock-on button |
| Maintenance | Periodic lubrication, carbon brush replacement, chuck cleaning |
| Accessories Included | Side handle, depth stop rod, carrying case |
| Repairability | Serviceable carbon brushes, replaceable chuck, parts available |
Frequently Asked Questions - 48-22-9519 MILWAUKEE
User questions about 48-22-9519 MILWAUKEE
0 question about this device. Answer the ones you know or ask your own.
Ask a new question about this device
Download the instructions for your Rotary hammer in PDF format for free! Find your manual 48-22-9519 - MILWAUKEE and take your electronic device back in hand. On this page are published all the documents necessary for the use of your device. 48-22-9519 by MILWAUKEE.
USER MANUAL 48-22-9519 MILWAUKEE
natural_image
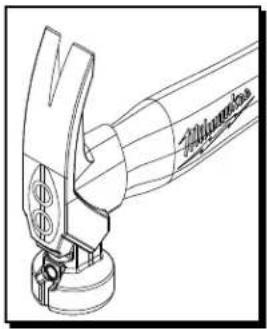
Technical line drawing of a mechanical component with curved and straight sections (no text or symbols)Model 48-22-9419
Shown with milled face

natural_image
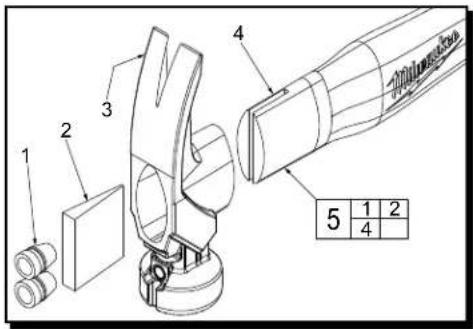
Technical line drawing of a robotic arm joint (no text or symbols)FIG. PART NO. DESCRIPTION OF PART NO. REQ.
1 Steel Wedge (2)
2 Wood Wedge (1)
3 ---- Hammer Head (Milled: 48-22-9419, Smooth: 48-22-9519) (1)
4 ---- Hickory Hammer Handle (1)
5 14-46-9419 Handle Replacement Kit (1)


MILWAUKEE Hickory Replacement Instructions
USE CAUTION and Wear safety glasses when performing the following procedure.

- Before beginning, line up the wooden wedge with the slot in the top of the replacement handle. With a pencil, make a mark on the thick side of the wooden wedge where the top of the handle ends. This will allow you to see when the wooden wedge is fully inserted down into the handle slot. It is important not to exceed the slot depth with the wedge, as this can cause damage to the new handle.
- After cutting the old handle off below the head, turn the head over and punch the remaining handle material out from the top of the 'eye' of the hammer head. Insert slotted end of the new replacement handle into the bottom of the hammer head. Firmly tap the bottom of handle with a mallet or other hammer to tightly set the handle into eye of the head, but not so far as to 'peel' or cut into the wood of the handle at the bottom of the eye. Rely on the mechanical bond of the wood and steel wedges to make the head-to-handle connection strong.
-
Next place the thin tip of the wooden wedge into the slotted end of the handle that is protruding out of the top of the hammer head. It is normal for the wooden wedge to be wider than the slot and eye opening. Firmly tap the wooden wedge all the way to the pencil mark on wedge, so that the wedge is fully inserted in the handle slot. There should be approximately 1/2" of the wedge protruding past the end of the handle. DO NOT continue driving the wedge in any further.
-
After driving the wooden wedge in, trim off excess wedge and handle material as close to the top of the head as possible. USE CAUTION when cutting off excess material. Position the two steel wedges on trimmed end of handle and wood wedge to get an idea of spacing. Position the larger steel wedge to the wider front of the eye, and the smaller steel wedge to the back of the eye. When you have wedges evenly spaced in the eye, not in contact with the side of the eye, firmly tap the wedges in, one at a time completely flush with the trimmed surface.
- To keep the cut end of the handle from losing moisture and shrinking inside the hammer head, put a few drops of mineral or 'butcherblock' oil on the end grain to help retain the moisture content. This will prolong the service life of the handle.
Brand : MILWAUKEE
Model : 48-22-9519
Category : Rotary hammer