
VE66DTH - Audio/video converter ATEN - Free user manual and instructions
Find the device manual for free VE66DTH ATEN in PDF.


| Product Type | 6x6 Dante Audio Interface with HDMI |
| Model | VE66DTH |
| Brand | ATEN |
| Audio Inputs | 6 x Balanced Mono Line/Mic (3 x 5-pole terminal blocks); supports dynamic and condenser microphones |
| Audio Outputs | 6 x Balanced Mono Line (3 x 5-pole terminal blocks) |
| Video Input | 1 x HDMI 2.0 (HDCP 2.2) |
| Video Output | 1 x HDMI 2.0 (HDCP 2.2) |
| Max Video Resolution | 4096 x 2160 / 3840 x 2160 @ 60Hz (4:4:4), 4K HDR |
| Audio Format | Uncompressed, 24-bit, selectable 44.1/48/88.2/96 kHz; latency 1 ms (default) |
| Network Interface | 1 x RJ-45 (Dante), PoE support |
| Phantom Power | 48V for condenser microphones, per channel switchable |
| Audio De-embedding/Embedding | De-embed HDMI stereo audio to Dante; embed Dante audio to HDMI output |
| Power Supply | DC 5V via adapter (8.9W) or PoE (48V, 11.1W) |
| Dimensions (L x W x H) | 17.42 x 15.49 x 2.88 cm (6.86 x 6.10 x 1.13 in) |
| Weight | 0.85 kg (1.87 lb) |
| Housing | Metal |
| Operating Temperature | 0°C to 40°C |
| Storage Temperature | -20°C to 60°C |
| Humidity | 0 – 80% RH, non-condensing |
| Compliance | FCC Class A, RoHS |
| Warranty | 2 years limited (varies by region) |
Frequently Asked Questions - VE66DTH ATEN
User questions about VE66DTH ATEN
0 question about this device. Answer the ones you know or ask your own.
Ask a new question about this device
Download the instructions for your Audio/video converter in PDF format for free! Find your manual VE66DTH - ATEN and take your electronic device back in hand. On this page are published all the documents necessary for the use of your device. VE66DTH by ATEN.
USER MANUAL VE66DTH ATEN
STATEMENT: This equipment has been tested and found to comply with the limits for a Class A digital device, pursuant to Part 15 of the FCC Rules. These limits are designed to provide reasonable protection against harmful interference when the equipment is operated in a commercial environment. This equipment generates, uses, and can radiate radio frequency energy and, if not installed and used in accordance with the instruction manual, may cause harmful interference to radio communications. Operation of this equipment in a residential area is likely to cause harmful interference in which case the user will be required to correct the interference at his own expense.
FCC Caution: Any changes or modifications not expressly approved by the party responsible for compliance could void the user's authority to operate this equipment.
Warning: Operation of this equipment in a residential environment could cause radio interference.
This device complies with Part 15 of the FCC Rules. Operation is subject to the following two conditions:
(1) this device may not cause harmful interference, and
(2) this device must accept any interference received, including interference that may cause undesired operation.
KCC Statement
This product is RoHS compliant.

User Information
Online Registration
Be sure to register your product at our online support center:
International http://eservice.aten.com
Telephone Support
For telephone support, call this number:
| International 886-2 | 8692-6959 |
| China 86-400-810-0 | 810 |
| Japan 81-3-5615-5811 | |
| Korea 82-2-467-6789 | |
| North America 1-888 | 8-999-ATEN ext 4988 |
| 1-949-428-1111 | |
User Notice
All information, documentation, and specifications contained in this manual are subject to change without prior notification by the manufacturer. The manufacturer makes no representations or warranties, either expressed or implied, with respect to the contents hereof and specifically disclaims any warranties as to merchantability or fitness for any particular purpose. Any of the manufacturer's software described in this manual is sold or licensed as is.
Should the programs prove defective following their purchase, the buyer (and not the manufacturer, its distributor, or its dealer), assumes the entire cost of all necessary servicing, repair and any incidental or consequential damages resulting from any defect in the software.
The manufacturer of this system is not responsible for any radio and/or TV interference caused by unauthorized modifications to this device. It is the responsibility of the user to correct such interference.
The manufacturer is not responsible for any damage incurred in the operation of this system if the correct operational voltage setting was not selected prior to operation. PLEASE VERIFY THAT THE VOLTAGE SETTING IS CORRECT BEFORE USE.
Package Contents
◆ 1 VE66DTH 6 x 6 Dante Audio Interface with HDMI
◆ 6 5-Pole Terminal Blocks
◆ 4 Foot Pads
◆ 1 Mounting Kit
◆ 1 Power Adapter
◆ 1 User Instructions
Note: 1. Check to make sure that all the components are present and that nothing got damaged in shipping. If you encounter a problem, contact your dealer.
2. Read this manual thoroughly and follow the installation and operation procedures carefully to prevent any damage to the unit, and/or any of the devices connected to it.
Table of Contents
EMC Information....ii
RoHS ii
User Information ....iii
Online Registration ....iii
Telephone Support ....iii
User Notice ....iii
Package Contents ....iv
About this Manual vii
Conventions......viii
Product Information ix
1. Introduction
Overview....1
Features 2
Planning the Installation 3
Requirements 3
Considerations 3
Components 4
VE66DTH Front View 4
System Status LEDs 4
VE66DTH Rear View 5
2. Hardware Setup
Rack Mounting the VE66DTH Unit 7
Rack Mounting 7
Connecting the VE66DTH Unit 9
3. Operation
Operating the VE66DTH over an IP Lan 11
Firmware Upgrades 11
Downloading the Firmware Upgrade Package ..... 11
Starting the Upgrade 12
Dante Firmware Update Manager 12
Firmware Upgrade Tool 13
Web GUI 14
Looking Up the Login IP Address 14
Logging In 15
Upgrading the Firmware 17
Uploading SSL Certificate 20
Access Control 21
Converting Analog Signal into DanteTM Signal 22
Dante Interface Transceiver 23
Appendix
Safety Instructions....25
General 25
Rack Mounting 27
Technical Support 28
International 28
North America 28
Specifications 29
Limited Warranty 31
About this Manual
This user manual is provided to help you get the most from the VE66DTH unit. It covers all aspects of installation, configuration, and operation. An overview of the information found in the manual is provided below.
Chapter 1, Introduction introduces you to the 6 x 6 Dante Audio Interface with HDMI. Its purpose, features, installation considerations, and panel components are presented and described.
Chapter 2, Hardware Setup describes the steps that are necessary to quickly and safely set up your installation.
Chapter 3, Operation explains the firmware upgrade utility, web GUI, and additional applications.
An Appendix provides a list of safety instructions and precautions, contact information for ATEN technical support, product specifications, and other technical information.
Note:
- Read this manual thoroughly and follow the installation and operation procedures carefully to prevent any damage to the unit or any connected devices.
- ATEN regularly updates its product documentation for new features and fixes. For an up-to-date VE66DTH documentation, visit http://www.aten.com/global/en/
Conventions
This manual uses the following conventions:
MonospacedIndicates text that you should key in.
[ ] Indicates keys you should press. For example, [Enter] means to press the Enter key. If keys need to be chorded, they appear together in the same bracket with a plus sign between them: [Ctrl+Alt].
- Numbered lists represent procedures with sequential steps.
◆ Bullet lists provide information, but do not involve sequential steps.
→Indicates selecting the option (on a menu or dialog box, for example), that comes next. For example, Start → Run means to open the Start menu, and then select Run.

Indicates critical information.
Product Information
For information about all ATEN products and how they can help you connect without limits, visit ATEN on the Web or contact an ATEN Authorized Reseller. Visit ATEN on the Web for a list of locations and telephone numbers:
| International http://www.aten.com |
| North America http://www.aten-usa.com |
This Page Intentionally Left Blank
Chapter 1
Introduction
Overview
ATEN VE66DTH is a Dante-enabled six-input/six-output Audio Interface with HDMI. Using DanteTM – the most popular audio networking solution created by Audinate, the VE66DTH is capable of delivering uncompressed, close-to-zero latency digital audio signals across your standard IP network. The VE66DTH transmits and receives up to 6-channel of audio inputs and outputs via a Dante network— the audio inputs can support not only the line input but also the dynamic and condenser microphones at the same time. Additionally, the device can also provide condenser microphones with 48V Phantom power supply. With its built-in PoE (Power over Ethernet), the VE66DTH can be powered by a compatible PSE device through Ethernet cable. Moreover, the VE66DTH provides flexible audio capability with audio de-embedding and embedding. It can de-embed HDMI stereo audio signals to the Dante networking system and embed Dante audio signals into the HDMI output.
The VE66DTH is tailor-made to a wide range of environments, such as conference centers, concert halls, entertainment facilities or wherever that requires implantation of Dante-based professional audio devices for extended and flexible networked AV applications. Users of the VE66DTH can benefit from improved system performance, reduction in cabling and more to installations of all sizes.
Features
- Features Dante™ networked audio interface – a complete audio networking solution that distributes uncompressed, multi-channel audio transmission via standard Ethernet networks, with near-zero latency and perfect synchronization
- Integrates up to 6-channel balanced mono audio Line/Mic input signals onto a Dante-enabled audio system and supports both dynamic and condenser microphones
◆ Provides 48V Phantom power supply to condenser microphones
AES67 support - Easy to use and set up – User can use “Dante Controller” for the simple setup
- Delivers up to 6-channel balanced mono audio Line outputs from the Dante network to the audio system
◆ Supports HDMI 2.0 input with HDCP 2.2 compliant—the HDMI input can de-embed HDMI stereo audio to the Dante network
◆ Supports HDMI 2.0 local output—the VE66DTH can embed the Dante audio into HDMI output - Supports PoE – power can be supplied by a compatible PSE device through Ethernet cable
Planning the Installation
Requirements
Prepare the following before installing the VE66DTH unit:
◆ 1 HDMI source device
◆ 1 HDMI display
◆ 1 to 6 Audio source
◆ 1 Audio mixer amplifier & speaker
◆ 1 Cat 5e/6/6a, ATEN 2L-2801 Cat 5e, or ATEN 2L-2910 Cat 6 cable
Considerations
- The maximum transmission distance varies at different parts of the transmission:
| Connection Interface Distance | ||
| HDMI source to the VE66DTH | HDMI 3 m | |
| VE66DTH to the HDMI display | HDMI 3 m |
Audio
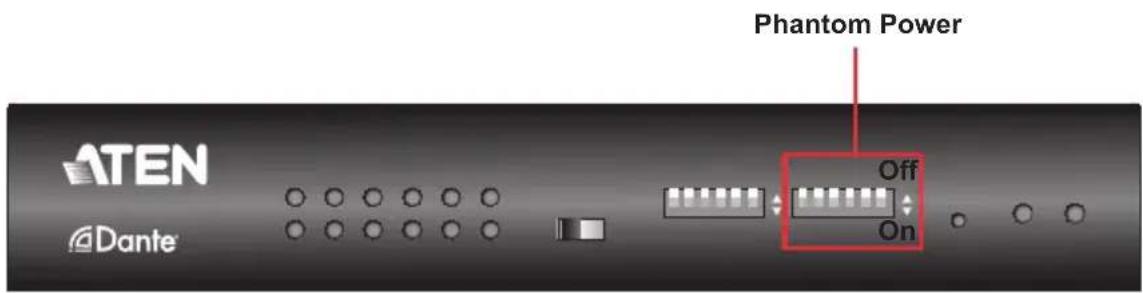
- Phantom power is used with condenser microphones. Dynamic microphones and line input do not require power.
- To avoid damaging your unbalanced dynamic microphones and line input, do not turn on the phantom power on your VE66DTH. Verify whether your condenser microphones will safely operate at +48V DC.
Make sure the +48V phantom power is off when you connect a line level source.
Make sure the condenser microphones are connected before turning on the phantom power on your VE66DTH.
Components
VE66DTH Front View

| No. | Component Description | |
| 1 | HDMI Out Audio Selection Switch | Press the switch to send out the HDMI audio source. |
| 2 | Mlc Input PRE-AMP Switch | Switch to enable and send out the Pre-amp audio inputs. |
| 3 | Mlc Input PHANTOM Power Switch | Switch to enable and send out the Phantom Power audio inputs. |
| 4 | Reset Button Press and hold this button for more than 8 seconds to reset the VE66DTH to its factory default settings. | |
System Status LEDs
You can find the unit's LEDs on the top and front panel as illustrated below. See the table below for details on LED indication.
| No. | LED Indication Description | |
| 5 | Dante Link LED Lights orange The connection to the Dante or AES67 link is stable. | |
| Off There is no connection to the Dante or AES67 link. | ||
| 6 | Power LED Lights green The unit is receiving power. | |
| Off There is no power supply to the unit. | ||
| 7 | Audio Line Output Status LEDs | Lights orange The audio signal is transmitting. |
| Off The audio signal is not transmitting. | ||
| 8 | Audio Mic/Line Input Status LEDs | Lights orange The audio signal is transmitting. |
| Off The audio signal is not transmitting. |
Note:
- The Audio Mic/Line Input Status LED blinks to indicate that the firmware upgrade is in progress.
VE66DTH Rear View

| No. | Component Description |
| 1 | Power Jack Connects to the Power Adapter. |
| 2 | Audio Mic/Line Input Ports |
| 3 | HDMI Output Port |
| 4 | HDMI Input Port Connects to an HDMI source device via an HDMI cable. |
| 5 | Dante Link Port (Ethernet) |
| 6 | Grounding Terminal |
| 7 | Audio Line Output Port |
This Page Intentionally Left Blank
Chapter 2
Hardware Setup

-
Please review the safety information regarding the placement of this device in Safety Instructions, page 25.
-
Do not power on the VE66DTH until all the necessary hardware is connected.
Rack Mounting the VE66DTH Unit
Rack Mounting
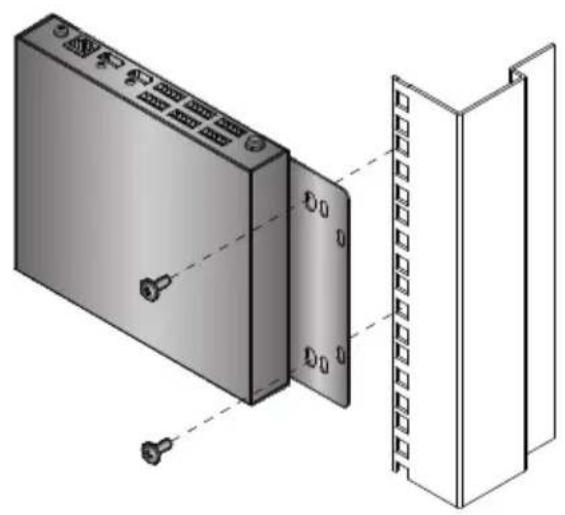
Use the VE-RMK 1U Rack Mount Kit to rack-mount the VE66DTH. For more information about this accessory, go to www.aten.com/products
For convenience and flexibility, the VE66DTH can be mounted on system racks. To rack mount a unit, follow the steps below.
- Screw the mounting bracket into the bottom of the unit as shown in the diagram below.

- Screw the bracket into any convenient location on the rack.
Note: The screws are not provided. We recommend that you use M5 x 12 Philips Type I cross, recessed type screws.
natural_image
Diagram of a device with labeled ports and connectors, showing internal components connected to a wall-mounted panel (no text or symbols present)Connecting the VE66DTH Unit
Follow the steps below to connect the VE66DTH to audio and HDMI sources, an HDMI display, and other controls as required.

- Ground the VE66DTH by connecting one end of a grounding wire to the ground terminal and the other end to a suitable grounded object.
Note: Do not omit this step. Proper grounding helps to prevent damage to the unit from power surges or static electricity.
- Use an HDMI cable to connect an HDMI source to the HDMI Input Port.
- Use an HDMI cable to connect an HDMI-enabled display.
- The HDMI output audio could be selected from Local HDMI input, Dante Audio input, or mute.
Note: The HDMI output will be terminated, if the Local HDMI input is unplugged or without any input signal.
- Connect up to six audio in sources to the Mic / Line Input Ports.
Note: Please turn on the Pre-amp or Phantom Power if necessary.
- Connect to the speakers, audio mixer or amplifier up to six channels to the Line Output Ports.
- To allow Dante audio over IP matrix and extension application. Use an Ethernet cable to connect the Dante Link Port to a network switch.
a) The Dante Link LED lights solid orange when the connection is stable. - (Optional) Plug the Power Adapter cable into the Power Jack on the VE66DTH. The VE66DTH can be powered on via an Ethernet cable if the Dante Link Port (Ethernet) is connected to a PoE network switch.
a) The Power LED lights solid green when the power supply is stable.
Note: The VE66DTH prioritizes the power supply from the power adapter when the Power Adapter is plugged in.
- Power on all the connected devices.
Chapter 3
Operation
Operating the VE66DTH over an IP Lan
The VE66DTH is operated over an IP LAN. Setting up the units on a network allows point to- point, point-to-multipoint, and multipoint-to-multipoint computer to console operation by connecting multiple VE66DTH or Dante built-in devices on the same IP LAN. User can download the Dante Controller to the setup from the ATEN VE66DTH product page or the Audinate official website below.
http://www.audinate.com/products/software/dante-controller?lang=en
Firmware Upgrades
The purpose of the Windows-based Firmware Upgrade Utility is to provide an easy process for upgrading the VE66DTH. The program comes as part of a Firmware Upgrade Package that is specific for each device.
As new firmware versions become available, new firmware upgrade packages are posted on our website. Check the website regularly to find the latest information and packages.
Downloading the Firmware Upgrade Package
To download the firmware upgrade package, follow the steps below.
- Go to the download link below:
https://www.aten.com/global/en/supportcenter/downloads/ - Type in VE66DTH in the field below "Download materials for other products" and press OK.
- Choose the firmware upgrade package that you wish to install (usually the most recent) and download it to your computer.
Starting the Upgrade
There are two subsystems that needed to be upgraded for the VE66DTH. To upgrade the firmware of your VE66DTH, follow the steps below.
-
For the first subsystem, upgrade the VE66DTH with firmware VE66DTH_upgrade_V1.0.0XX.img using Web GUI or Firmware Upgrade Tool.
-
Web GUI: The VE66DTH's firmware can be upgraded through the VE66DTH's Web GUI. To upgrade the firmware of your VE66DTH through the Web GUI, see Upgrading the Firmware, page 17.
-
Firmware Upgrade Tool: The VE66DTH's firmware can be upgraded through the Firmware Upgrade Tool. To upgrade the firmware of your VE66DTH through the Firmware Upgrade Tool, download the Firmware Upgrade Tool from our website. For detailed steps, see Firmware Upgrade Tool, page 13.
-
For the second subsystem, upgrade the Dante Module with firmware dante_V1.0.0XX.dnt using the Dante Firmware Update Manager. For more details, see Dante Firmware Update Manager, page 12.
Dante Firmware Update Manager
The Dante Module is controlled by the Dante Controller. For more details and to download the Dante Controller, refer to the Audinate official website below.
http://www.my.audinate.com/products/software/dante-controller
To upgrade the firmware of your VE66DTH through the Dante Firmware Update Manager, download the Dante Firmware Update Manager from the Audinate official website below.
http://www.my.audinate.com/latest-firmware-update-manager
For more details on how to use the Audinate Dante Firmware Update Manger, refer to the user guide below.
http://www.my.audinate.com/system/files/release/AUD-MAN-Firmware_Update_Manager-v2.7.pdf
Firmware Upgrade Tool
- Go to the download link below:
https://www.aten.com/global/en/supportcenter/downloads/ - Type in VE66DTH in the field below "Download materials for other products" and press OK.
- Scroll down the page to find Firmware upgrade tool zip file under "Software & Drivers". Click the file to download.
- Unzip and execute the downloaded Firmware Upgrade Tool.
- Follow the on-screen instructions to install the Firmware Upgrade Tool.
- Execute the Firmware Upgrade Tool and wait for the scanning to finish.
- Select your VE66DTH from the device list and follow the on-screen instructions to upgrade the firmware.
Web GUI
The ATEN VE66DTH can be remotely configured via web GUI, accessed through a web browser and allows you to perform firmware upgrade, upload SSL certificate, and setup access control for IP Installer.
Looking Up the Login IP Address
Follow the steps below to download IP Installer utility, and use the utility to look up the IP address of your VE66DTH.
- Go to the download link below:
https://www.aten.com/global/en/supportcenter/downloads/ - Type in VE66DTH in the field below "Download materials for other products" and press OK.
- Scroll down the page to find IP Installer zip file under "Software & Drivers". Click the file to download.
- Unzip and execute the downloaded IP Installer. The Network Device IP Installer screen appears.
- Click Enumerate to search for ATEN devices in the network. The detected devices are shown in Device List.
- Use the IP address of VE66DTH to log into the web GUI for firmware upgrade.
Note: The VE66DTH will not be discovered by the IP Installer if the Access Control is set to Disable. See Access Control, page 21.
Logging In
On a computer with web access, open a web browser and type the IP address you obtained using IP Installer Utility. This screen appears.
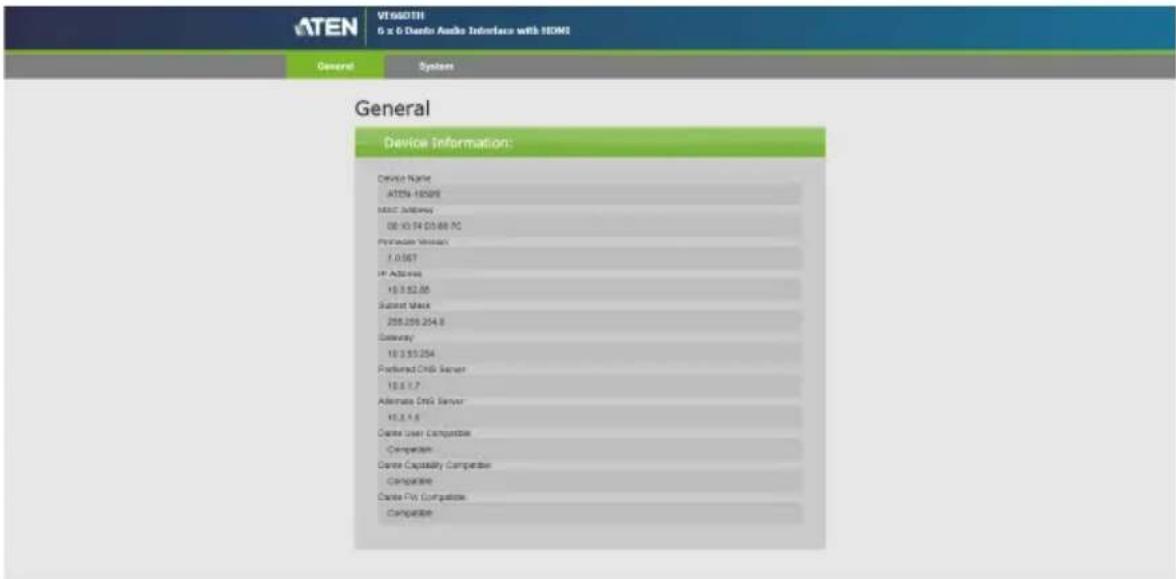
| System Settings Description | ||
| General | Device Name Indicates the device name of the VE66DTH. | |
| MAC Address Indicate the MAC address of the VE66DTH. | ||
| Firmware Version | Indicates the device firmware version of the VE66DTH. | |
| IP Address Indicates the IP address of theVE66DTH. | ||
| Subnet Mask Indicates the subnet mask of theVE66DTH. | ||
| Gateway Indicates the gateway of theVE66DTH. | ||
| Preferred DNS Server | Indicates the preferred DNS server of theVE66DTH. | |
| Alternate DNS Server | Indicates the alternate DNS server of theVE66DTH. | |
| Dante User Compatible | Shows the compatibility between the Dante User and the VE66DTH.◆ Compatible: The Dante User and the VE66DTH is compatible.◆ Non Compatible: The Dante User and the VE66DTHis not compatible. Please download and upgrade the firmware to dante_V1.0.0XX.dnt through the Dante Firmware Update Manager. See Dante Firmware Update Manager, page 12. | |
| Dante Capability Compatible | Shows the compatibility between the Dante Capability and the VE66DTH.◆ Compatible: The Dante Capability and the VE66DTH is compatible.◆ Non Compatible: The Dante Capability and the VE66DTHis not compatible. Please download and upgrade the firmware to dante_V1.0.0XX.dnt through the Dante Firmware Update Manager. See Dante Firmware Update Manager, page 12. | |
| Dante FW Compatible | Shows the compatibility between the Dante Firmware and the VE66DTH.◆ Compatible: The Dante Firmware and the VE66DTH is compatible.◆ Non Compatible: The Dante Firmware and the VE66DTHis not compatible. Please download and upgrade the firmware to dante_V1.0.0XX.dnt through the Dante Firmware Update Manager. See Dante Firmware Update Manager, page 12. | |
Upgrading the Firmware
To upgrade the firmware of your VE66DTH, follow the steps below.
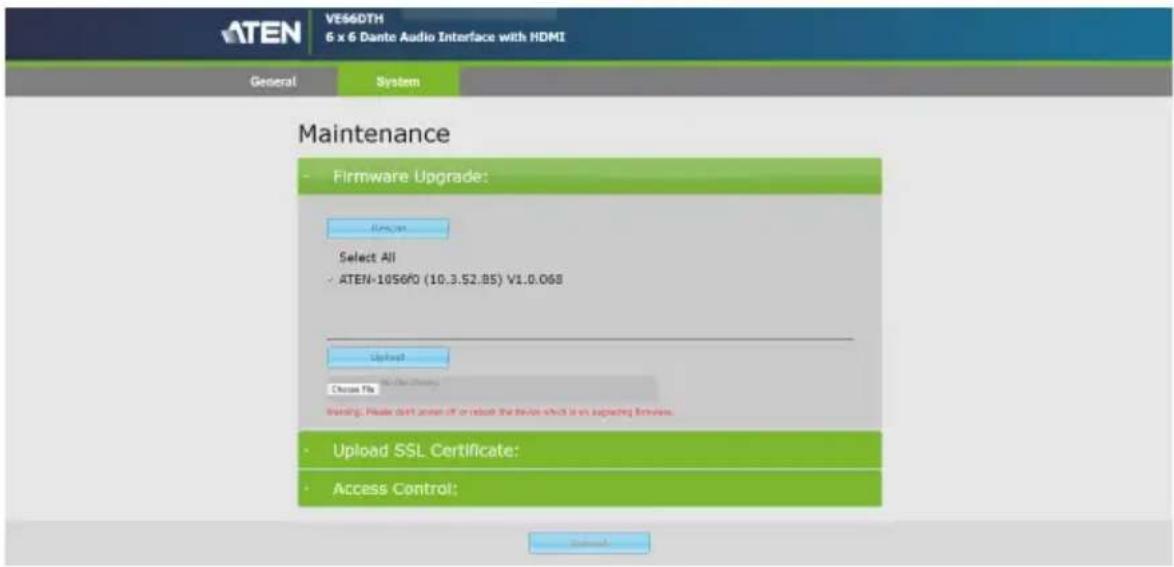
- From the VE66DTH's web GUI, select System.
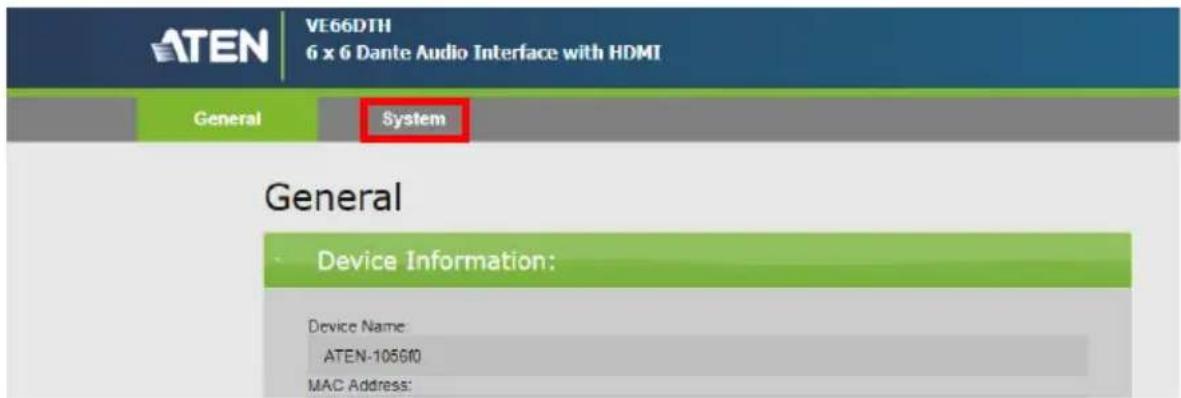
- The System page appears.

- Check the VE66DTH you wish to upgrade, or check the Select All to upgrade all the VE66DTHs in the network, then click Choose File.

4. Select the downloaded firmware file and click Open.

5. Click Upload to begin to firmware upgrade.

6. Wait for the firmware upgrade process to finish.

- The VE66DTH will reboot itself after the firmware upgrade has completed.

- Now the VE66DTH has rebooted, and the firmware upgrade was successful.
Uploading SSL Certificate
To secure the audio output and sessions for the VE66DTH, you can apply SSL encryption.
Note: Before you begin to encrypt SSL, you are required to purchase an SSL certificate from a trusted certificate authority and save the files to a computer with access to the VE66DTH's web interface.
To upload an SSL certificate, follow the steps below.
- From the System page, select Upload SSL Certificate. This screen appears.

- Select Choose File under Certificate to upload the SSL certificate.
- Select Choose File under Private Key to upload the SSL private key.
- Click Upload.
If the SSL certificate have not been configured, a warning message appears every time you enter the VE66DTH's web GUI. Click Advanced and select Proceed to with IP address.

Access Control
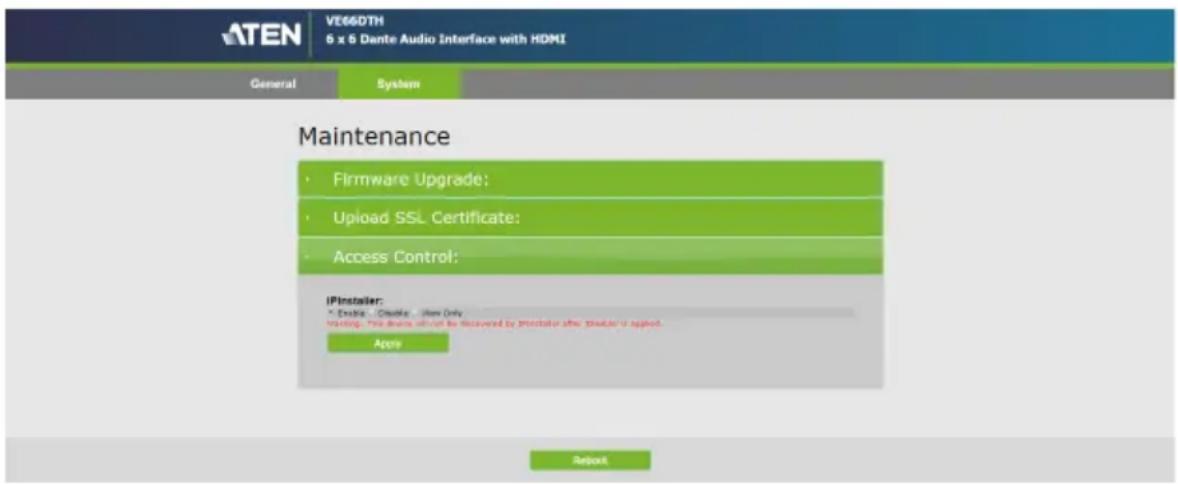
Access control allows you to set the accessibility for the IP Installer to discover the VE66DTH in your local network. To allow the installed VE66DTH to be discovered by the IP Installer, follow the steps below.
- From the System page, select Access Control. This screen appears.
-
Select Enable and click Apply.
-
Enable: Allows the VE66DTH to be configured, and discovered by the IP Installer.
◆ Disable: Disallows the VE66DTH to be discovered by the IP Installer. - View Only: Only allows the VE66DTH to be discovered by the IP Installer.
Converting Analog Signal into Dante ^TM Signal
Please refer the diagram below to convert an analog signal into a Dante ^TM signal.
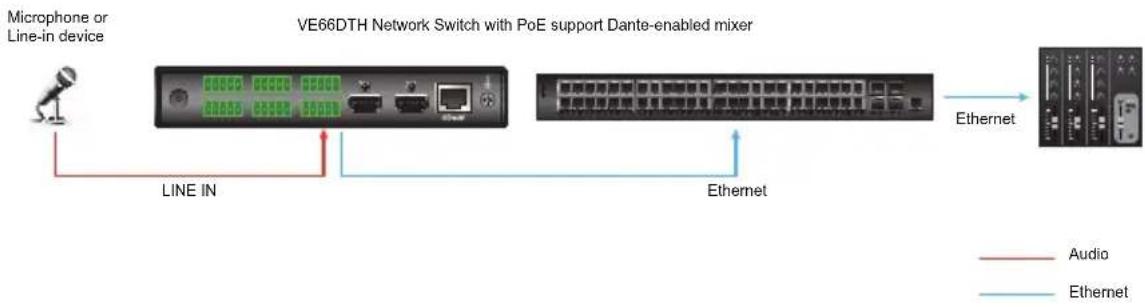
flowchart
graph LR
    A["Microphone or Line-in device"] --> B["LINE IN"]
    B --> C["Ethernet"]
    C --> D["Ethernet"]
    D --> E["Ethernet"]
    style A fill:#f9f,stroke:#333
    style B fill:#ccf,stroke:#333
    style C fill:#cfc,stroke:#333
    style D fill:#fcc,stroke:#333
    style E fill:#ffc,stroke:#333
Note: The VE66DTH is used to integrate up to 6 analog LINE signals into a Dante ^TM networking system.
Please refer the diagram below to convert a Dante ^TM signal into an analog signal.

flowchart
graph LR
    A["Dante-enabled mixer Audio speakers and amplifiers"] --> B["VE66DTH Network Switch with PoE support"]
    B --> C["Ethernet Ethernet LINE OUT"]
    C --> A
    style A fill:#f9f,stroke:#333
    style B fill:#ccf,stroke:#333
    style C fill:#cfc,stroke:#333
    style_D["Audio"] stroke:#ff0,stroke-width:2px
    style_E["Ethernet"] stroke:#ff0,stroke-width:2px
Note: Via the VE66DTH, audio speakers and amplifiers that do not support Dante ^TM networked audio interface can be integrated into a Dante ^TM networking system.
Dante Interface Transceiver
The VE66DTH can be used as a Dante Interface as a transmitter and a receiver. If it is used as a transmitter, it could connect audio inputs devices to Dante Cloud. If it is used as a receiver, it could extend the audio output with non-Dante implemented audio mixer and amplifier.

flowchart
graph TD
    A["1st VE66DTH"] --> B["Audio Source"]
    A --> C["HDMI Source"]
    A --> D["Rear View"]
    D --> E["Powe Adapter"]
    D --> F["Audio Mixer Amplifier & Speaker"]
    D --> G["HDMI Display"]
    D --> H["Dante cloud Internet / LAN"]
    I["2nd VE66DTH"] --> J["Powe Adapter"]
    I --> K["Audio Mixer Amplifier & Speaker"]
    I --> L["Dante Cloud Internet / LAN"]
This Page Intentionally Left Blank
General
- This product is for indoor use only.
- Read all of these instructions. Save them for future reference.
◆ Follow all warnings and instructions marked on the device. - Do not place the device on any unstable surface (cart, stand, table, etc.). If the device falls, serious damage will result.
- Do not use the device near water.
Do not place the device near, or over, radiators or heat registers. - The device cabinet is provided with slots and openings to allow for adequate ventilation. To ensure reliable operation, and to protect against overheating, these openings must never be blocked or covered.
- The device should never be placed on a soft surface (bed, sofa, rug, etc.) as this will block its ventilation openings. Likewise, the device should not be placed in a built-in enclosure unless adequate ventilation has been provided.
- Never spill liquid of any kind on the device.
- Unplug the device from the wall outlet before cleaning. Do not use liquid or aerosol cleaners. Use a damp cloth for cleaning.
- The device should be operated from the type of power source indicated on the marking label. If you are not sure of the type of power available, consult your dealer or local power company.
- The device is designed for IT power distribution systems with 230V phase-to-phase voltage.
- To prevent damage to your installation it is important that all devices are properly grounded.
- The device is equipped with a 3-wire grounding type plug. This is a safety feature. If you are unable to insert the plug into the outlet, contact your electrician to replace your obsolete outlet. Do not attempt to defeat the purpose of the grounding-type plug. Always follow your local/national wiring codes.
Do not allow anything to rest on the power cord or cables. Route the power cord and cables so that they cannot be stepped on or tripped over.
If an extension cord is used with this device make sure that the total of the ampere ratings of all products used on this cord does not exceed the extension cord ampere rating. Make sure that the total of all products plugged into the wall outlet does not exceed 15 amperes.
- To help protect your system from sudden, transient increases and decreases in electrical power, use a surge suppressor, line conditioner, or uninterruptible power supply (UPS).
- Position system cables and power cables carefully; Be sure that nothing rests on any cables.
- Never push objects of any kind into or through cabinet slots. They may touch dangerous voltage points or short out parts resulting in a risk of fire or electrical shock.
- Do not attempt to service the device yourself. Refer all servicing to qualified service personnel.
- If the following conditions occur, unplug the device from the wall outlet and bring it to qualified service personnel for repair.
- The power cord or plug has become damaged or frayed.
◆ Liquid has been spilled into the device. - The device has been exposed to rain or water.
- The device has been dropped, or the cabinet has been damaged.
- The device exhibits a distinct change in performance, indicating a need for service.
- The device does not operate normally when the operating instructions are followed.
- Only adjust those controls that are covered in the operating instructions. Improper adjustment of other controls may result in damage that will require extensive work by a qualified technician to repair.
Rack Mounting
Before working on the rack, make sure that the stabilizers are secured to the rack, extended to the floor, and that the full weight of the rack rests on the floor. Install front and side stabilizers on a single rack or front stabilizers for joined multiple racks before working on the rack.
- Always load the rack from the bottom up, and load the heaviest item in the rack first.
- Make sure that the rack is level and stable before extending a device from the rack.
- Use caution when pressing the device rail release latches and sliding a device into or out of a rack; the slide rails can pinch your fingers.
- After a device is inserted into the rack, carefully extend the rail into a locking position, and then slide the device into the rack.
Do not overload the AC supply branch circuit that provides power to the rack. The total rack load should not exceed 80 percent of the branch circuit rating.
- Make sure that all equipment used on the rack – including power strips and other electrical connectors – is properly grounded.
- Ensure that proper airflow is provided to devices in the rack.
- Ensure that the operating ambient temperature of the rack environment does not exceed the maximum ambient temperature specified for the equipment by the manufacturer.
- Do not step on or stand on any device when servicing other devices in a rack.
Technical Support
International
- For online technical support – including troubleshooting, documentation, and software updates: http://support.aten.com
- For telephone support, see Telephone Support, page iii:
North America
| Email Support support@aten-usa.com | ||
| Online Technical Support | Troubleshooting Documentation Software Updates | http://www.aten-usa.com/support |
| Telephone Support 1-888-999-ATEN ext 4988 | ||
When you contact us, please have the following information ready beforehand:
Product model number, serial number, and date of purchase
- Your computer configuration, including operating system, revision level, expansion cards, and software
◆ Any error messages displayed at the time the error occurred
◆ The sequence of operations that led up to the error
◆ Any other information you feel may be of help
Specifications
| Function VE66DTH | ||
| Audio Inputs | ||
| Interfaces Line/Mic Input: 3 x 3.5 mm Captive Screw Connector, 5-Pole; Analog Mono, Balanced | ||
| Audio Outputs | ||
| Interfaces Line Output: 3 x 3.5 mm captive Screw Connector, Analog Mono, Balanced | ||
| Audio | ||
| Format Uncompressed, | 24-bit, selectable at 44.1, 48, 88.2, or 96kHz | |
| Latency: Deterministic, based on user selection: 1.0 ms (default) | ||
| Frequency Response: 20Hz ~ 20kHz, +/- 0.3dB | ||
| THD + Noise: < -65dB (0.1%) (1kHz, 1Vrms @ 0dBV) | ||
| S/N: >80dB (1kHz, 1Vrms @ 0dBV) | ||
| Cross Talk: < -50dB (15kHz, 1Vrms @ 0dBV) | ||
| Input 8 Audio Channels | (6 x Analog Input & 1 x HDMI Stereo Audio) | |
| Output 8 Audio Channels | (6 x Analog Output & 1 x HDMI Stereo Audio Embedded from HDMI/Dante) | |
| Video Input | ||
| Interfaces 1 x HDMI Type | A Female (Black) | |
| 1 x HDB-15 (VGA) Male (Blue) | ||
| Impedance HDMI: 100 Ω | ||
| Max. Distance 1.8 m | ||
| Video Output | ||
| Interfaces 1 x HDMI Type | A Female (Black) | |
| Function | VE66DTH | |
| Impedance HDMI: 100 Ω | ||
| Video | ||
| Max. Resolutions HDMI: | ◆Up to 4096 x 2160 / 3840 x 2160 @60Hz (4:4:4) | |
| Compliance HDMI 2.0 (3D, Deep Color, 4K); 4K HDR | ||
| HDCP 2.2 Compatible | ||
| Control | ||
| Ethernet 1 x RJ-45 Female (Silver) through Dante | ||
| Switches | ||
| Video Output Port Selection | 1 x Slide Switch – HDMI Output Audio Selection (From HDMI In / Dante / Off) | |
| Selection 6 x Slide Switch – Mic Input Pre-amp ON/OFF | ||
| Phantom Power 6 x Slide Switch – Mic Input Phantom Power ON/OFF | ||
| Reset 1 x Pushbutton | ||
| Connectors | ||
| Power 1 x DC Jack (Black) or,1 x RJ-45 Female (Silver) PoE | ||
| Unit To Unit 1 x RJ-45 Female through Dante | ||
| Power | ||
| Consumption DC 5V; 8.9W; 41BTUDC48V; 11.1W; 52BTU | ||
| Environmental | ||
| Operating Temperature 0 - 40°C | ||
| Storage Temperature -20 - 60°C | ||
| Humidity 0 x 80% RH, Non-Condensing | ||
| Physical Properties | ||
| Housing Metal | ||
| Weight | 0.85 Kg (1.87 lb) | |
| Dimensions (L x W x H) | 17.42 x 15.49 x 2.88 cm (6.86 x 6.10 x 1.13 in.) | |
Limited Warranty
ATEN warrants its hardware in the country of purchase against flaws in materials and workmanship for a Warranty Period of two [2] years (warranty period may vary in certain regions/countries) commencing on the date of original purchase. This warranty period includes the LCD panel of ATEN LCD KVM switches. Select products are warranted for an additional year (see A+ Warranty for further details). Cables and accessories are not covered by the Standard Warranty.
What is covered by the Limited Hardware Warranty
ATEN will provide a repair service, without charge, during the Warranty Period. If a product is detective, ATEN will, at its discretion, have the option to (1) repair said product with new or repaired components, or (2) replace the entire product with an identical product or with a similar product which fulfills the same function as the defective product. Replaced products assume the warranty of the original product for the remaining period or a period of 90 days, whichever is longer. When the products or components are replaced, the replacing articles shall become customer property and the replaced articles shall become the property of ATEN.
To learn more about our warranty policies, please visit our website: http://www.aten.com/global/en/legal/policies/warranty-policy


- KCC Statement
- User Information
- Online Registration
- Telephone Support
- User Notice
- Package Contents
- Table of Contents
- Introduction
- Hardware Setup
- Operation
- Appendix
- About this Manual
- Note:
- Conventions
- Product Information
- Chapter 1
- Introduction
- Overview
- Features
- Planning the Installation
- Requirements
- Considerations
- Components
- System Status LEDs
- Chapter 2
- Hardware Setup
- Rack Mounting the VE66DTH Unit
- Rack Mounting
- Connecting the VE66DTH Unit
- Chapter 3
- Operation
- Operating the VE66DTH over an IP Lan
- Firmware Upgrades
- Downloading the Firmware Upgrade Package
- Starting the Upgrade
- Dante Firmware Update Manager
- Firmware Upgrade Tool
- Web GUI
- Looking Up the Login IP Address
- Logging In
- Upgrading the Firmware
- Select the downloaded firmware file and click Open.
- Click Upload to begin to firmware upgrade.
- Wait for the firmware upgrade process to finish.
- Uploading SSL Certificate
- Access Control
- Converting Analog Signal into Dante TM Signal
- Dante Interface Transceiver
- General
- Technical Support
- International
- North America
- Limited Warranty
- What is covered by the Limited Hardware Warranty
Brand : ATEN
Model : VE66DTH
Category : Audio/video converter