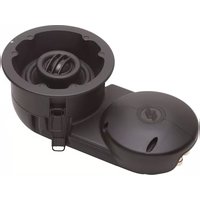
CM4PR - Loudspeaker Niles - Free user manual and instructions
Find the device manual for free CM4PR Niles in PDF.


| Product Type | In-ceiling speaker |
| Brand | Niles |
| Model | CM4PR |
| Driver Size | 4 inches |
| Impedance | 8 ohms |
| Power Handling (RMS) | 50 watts |
| Power Handling (Peak) | 100 watts |
| Frequency Response | 60 Hz - 20 kHz |
| Sensitivity | 86 dB |
| Cutout Diameter | 5.4 inches |
| Mounting Depth | 3.5 inches |
| Dimensions (Overall) | 6.5 x 3.5 inches (diameter x depth) |
| Weight | 1.5 lbs |
| Grille Material | Painted aluminum |
| Baffle Material | ABS plastic |
| Connector Type | Spring-loaded terminals |
| Recommended Amplifier Power | 10-100 watts per channel |
| Climate Rating | Indoor only |
| Installation Type | New construction or retrofit |
| Included Accessories | Cutout template, mounting screws, paint shield |
| Maintenance | Wipe with a dry cloth; do not use liquids |
| Safety | Turn off amplifier before installation; ensure secure mounting |
| Warranty | 5 years limited |
Frequently Asked Questions - CM4PR Niles
User questions about CM4PR Niles
0 question about this device. Answer the ones you know or ask your own.
Ask a new question about this device
Download the instructions for your Loudspeaker in PDF format for free! Find your manual CM4PR - Niles and take your electronic device back in hand. On this page are published all the documents necessary for the use of your device. CM4PR by Niles.
USER MANUAL CM4PR Niles
Thank you for choosing the Niles CM Series Loudspeakers. With proper installation, use, and care, your loudspeakers will deliver years of listening enjoyment. For information on the complete line of advanced Niles products, please visit us at: www.nilesaudio.com
TABLE OF CONTENTS
| Introduction | 3 |
| Features and Benefits 3 | |
| Parts Guide 4 | |
| Installation Considerations 4 | |
| Installing the Loudspeaker 6 | |
| Painting the Grilles 8 | |
| Installing the Grilles 8 | |
| Loudspeaker Applications 8 | |
| Specifications | 10 |
INTRODUCTION
The designer aesthetics, superior sonic performance, and ease of installation of CM loudspeakers put them in a class above competitive products. The CM4PR loudspeaker features our advanced Rear Wave Control enclosure that is uniquely designed for retrofit installations and optimized for high quality, predictable sound performance and reduced sound bleed into adjacent rooms. The low profile, magnetically attached grilles blend into any room's decor.
FEATURES AND BENEFITS
DESIGNER AESTHETICS
Magnetically attached MicroThin™ round speaker grilles ensure a clean, unobtrusive designer appearance that blends with the room's aesthetics. Optional square grilles provide added design flexibility.
The CM4PR Rear Wave Control enclosure is uniquely designed to fit through the loudspeaker's ceiling opening—ideal for retrofit installations. The enclosure is shaped and sized for high quality, predictable sound performance while significantly reducing unwanted sound from bleeding into adjacent rooms and spaces.
INSTALLATION EASE
Three easy to use, spring tensioned mounting clips permit quick installation and compensate for uneven mounting surfaces. Weather-resistant construction enables installation in moist areas such as in bathrooms or outdoors under eaves.
INSTALL WITH CONFIDENCE
The best-built loudspeakers deserve the best protection—the Niles Lifetime Limited Warranty.

NILES®
PARTS GUIDE
PACKAGE CONTENTS - CM4PR
(1) CM4PR loudspeaker with Rear Wave Control enclosure, (1) Magnetically attached round grill, (1) Hole template with painting standoffs, (1) Owner's manual, (1) Warranty card
INSTALLATION CONSIDERATIONS
Recommended tools for installation:
- Cordless screwdriver • Measuring tape • Painters tape
• One inch #2 Phillips tip • Stud fi nder • Drop cloth
• 1/8" Drill bit • Spackle • Rubber gloves - Drywall saw • Wire stripper • Optional - a 24" x 24"
- Laser plumb bob • Cable ties
- 12" -14" Coat hanger wire
- Pencil
piece of R19 insulation
CM4PR

These require a 4-5/8" (11.75 cm) diameter hole opening with a minimum of 3-5/16" (8.42 cm) depth when measured from the interior face of the drywall, plus at least 5" (11.75 cm) clearance to one side of the loudspeaker opening for the Rear Wave Control enclosure. To the sides of the hole you will need 1" for the mounting tabs to clamp the speaker to the drywall.
Figure 1. CM4PR loudspeaker installation dimensions
[CoNTINued oN NeXT pAGe]
INSTALLATION CONSIDERATIONS CONTINUED
NOTE: BE VERY CAREFUL WHEN LOCATING THE SPEAKERS. VERIFY ALL LOCATIONS ARE CLEAR OF OBSTRUCTIONS BEFORE CUTTING THE FIRST HOLE.
Each speaker requires two-conductor wiring of sufficient gauge. The gauge depends on the length of the wire. For recommendations, please refer to (Figure 2).
| Length of wire from speaker to amplifier Wire Gauge | |
| Less than 80 feet | 16 |
| 80 to 200 feet 14 | |
| More than 200 feet 12 | |
Figure 2. Speaker Wire Gauge Guide
When running loudspeaker wire inside walls or ceilings, use special jacketed cable (CL-2 or CL-3 rating) to protect the wire and for fi re prevention. In some municipalities, conduit is required. For a trouble-free installation, low voltage wire such as loudspeaker wire must be in accordance with the National Electrical Code and any applicable provisions of the local building code. If you are unsure of the correct installation techniques, wire jacket, or type of conduit to use, consult a professional audio/video installer, building contractor, or the local building and inspection department.

NILES®
INSTALLING THE LOUDSPEAKERS
It is often easier to lay the speakers out on the floor and then transfer the locations to the ceiling with a laser plumb bob. If you are using new construction brackets, place string across the centers of the bracket to provide a way to align the bracket to the laser. Remember, you will need 1" to the sides of the mounting hole for the mounting clamps to secure the speaker to the drywall and you will need at least 5" of clearance to one side within the opening for the CM4PR's Rear Wave Enclosure.
- Once you have determined a possible position for the hole cutout, drill a 1/8" pilot hole just barely through the ceiling (1/2" to 5/8" deep in most homes) in the center of your proposed loudspeaker location. BE VERY CAREFUL NOT TO DRILL THROUGH EXISTING WIRES, PIPES, OR STRUCTURE. IF YOU FEEL ANY EXTRA RESISTANCE AS YOU ARE DRILLING, STOP.
- Cut a foot-long piece of coat hanger. Bend the wire (creating a right angle) leaving 3-5/16" at one end (this allows for the extra width of the Rear Wave Enclosure). Poke the "L-shaped" wire into the pilot hole and turn it in a complete circle and move it into the ceiling cavity to make sure you have approximately 3-5/16" of depth within the ceiling. If the wire's movement is obstructed by anything, fill the hole(s) with spackle and try another location (If there is any risk of uninsulated electrical connections within the ceiling area, use insulating gloves or other materials or consult with an installation professional before proceeding).
- If the coat hanger moves freely in a complete circle and you have sufficient depth, tape the template to the ceiling and proceed to layout the other speakers. Once you are comfortable with all speaker locations, use a pencil to lightly outline the circular template.
- Drill the starting point of your cut with a 1/4" bit.
- If you are cutting drywall, use a sheetrock or keyhole saw. Cut the hole with the saw at a 45° angle. That way the drywall section can be replaced cleanly if there is an unseen obstruction behind the wall. IMPORTANT: BE VERY CAREFUL NOT TO SAW THROUGH EXISTING WIRES, PIPES, OR STRUCTURE. IF YOU FEEL EXTRA RESISTANCE AS YOU ARE CUTTING, STOP.
NOTE: DO NOT INSTALL LOUDSPEAKERS BEFORE THE DRYWALL HAS BEEN COMPLETELY FINISHED AND PAINTED.
- Prep the speaker wire by stripping 1/4"-1/2" from each speaker lead. Twist the strands or tin the leads with solder to ensure there are no stray strands that could short and possibly harm the amplifier.
[CoNTINued oN NeXT pAGe]
- The speaker has black and red spring-loaded connectors attached to the Rear Wave Control enclosure (Figure 3). Black is for the negative (-) wire and red for the positive (+). It is important to observe correct wiring polarity. If you have wire other than black and red, make sure you connect it the same on the amplifier end as the speaker end. Failure to do so will adversely affect the loudspeakers' performance. Supports are provided to secure the speaker wire with wire ties. (not included)
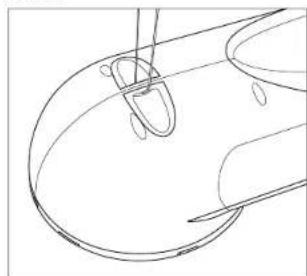
- A safety wire anchor is provided on the Rear Wave Control enclosure should you be required to secure the loudspeaker assembly to a roof beam or rafter (Figure 4).
- Once the speaker wires and safety wire are connected, raise the mounting clips to a vertical position as shown in Figure 5 and carefully slide the loudspeaker with attached Rear Wave Control enclosure into the opening hole (Figure 5). CM4PR loudspeakers feature spring loaded mounting clamps that allow the speaker to remain flush with the ceiling To remove a CM4PR from the ceiling, simply grasp the bezel edge and pull on the speaker slowly. This will cause the mounting clamps to disengage and free the loudspeaker.
NOTE: DO NOT CARRY THE SPEAKER BY THE TWEETER OR TWEETER POST. THIS MAY DAMAGE THE SPEAKER.

natural_image
Cartoon illustration of a character with large eyes and antennae (no text or symbols)Figure 3. Securing the speaker wire with a wire tie.
natural_image
Line drawing of a medical or surgical procedure with two tools, no text or symbols presentFigure 4. Attaching a safety wire.

Figure 5. Inserting the loudspeaker into the opening hole.

NILES®
PAINTING THE GRILLES
CM4PR loudspeaker grilles can be painted without priming, but the fabric scrim must fi rst be removed. The installation template has die cut standoffs that can be used to position the grille off the ground while painting. Use several light coats sprayed from different sides and angles to cover all surfaces and not fi ll in any holes. If you do fi ll some holes, use compressed air to open them before the paint dries. It may be helpful to dilute the paint.
INSTALLING THE GRILLES
The MicroThin™ speaker grille installs magnetically over the speaker. Carefully center the grill over the speaker and let the magnets do their work, verifying that the grill sets flush against the ceiling at all edges.
LOUDSPEAKER APPLICATIONS
The CM4PR Loudspeakers are designed to be installed in any standard ceiling where larger, bulkier loudspeakers would not fit. Additionally, their Rear Wave Control enclosure will minimize sound bleeding through to adjacent rooms, permitting even greater installation possibilities. While sold individually, optimum sound coverage may be obtained by installing pairs of CM4PR loudspeakers. When choosing a location, thought should be given to the sound coverage of the loudspeaker, and ease of running the speaker wire.
LOUDSPEAKER APPLICATIONS (CONTINUED)
SINGLE SPEAKER APPLICATIONS
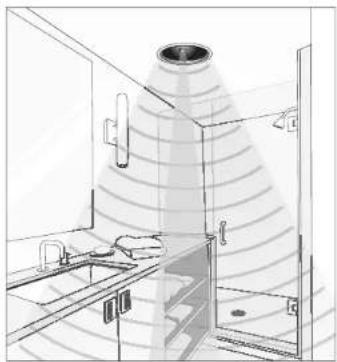
CM4PR loudspeakers are ideal for small rooms where positioning two larger loudspeakers is not practical. Examples would be a small kitchen, bathroom, hallway, or small bedroom. Locate the loudspeaker as close to the center of the room as possible for the most even distribution of sound (Figure 9). Avoid installing the loudspeaker near a corner to prevent a "boomy" or diffracted sound.
natural_image
Architectural sketch of a kitchen interior with a conical funnel and sink (no text or symbols)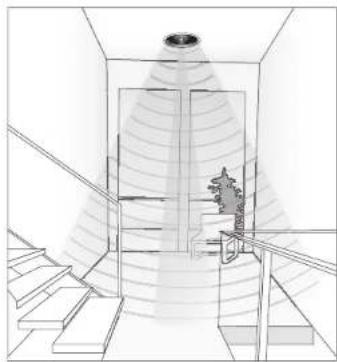
natural_image
Architectural line drawing of a staircase with a central door and ceiling-mounted sensor array (no text or symbols)Figure 9. Single Loudspeaker Application

NILES®
SPECIFICATIONS
| Model Woofer | Tweeter / Midrange | Recommended Amplifier Power | Normal Impedance | Frame Dimensions with Grille | Hole Cut-Out Dimensions | Depth (5/8" Drywall Ceiling) | |
| CM4PR | 3.5" Mineral Filial Polypropylene | 1" Tefanon 25-100 watts | 8 ohm nominal: 6 ohm minimum | 5 -1/2" (14.0 cm) | 4-5/8" (11.75 cm) | 3-5/16" (8.4 cm) | |
NOTES
| BY PHONE (IN USA) |
| 1-800-BUY-HIFI (289-4434) |
| BY PHONE (OUTSIDE USA) |
| 1-760-710-0992 |
| CUSTOMER SERVICE HOURS |
| 8:00 AM to 5:30 PM PT |
| TECHNICAL SUPPORT HOURS |
| 6:00 AM to 4:00 PM PT |
| ON THE WEB |
| www.nilesaudio.com |
| EMAIL TECHNICAL SUPPORT |
| techsupport@nilesaudio.com |
| EMAIL FOR PRODUCT SUGGESTIONS |
| productsuggestions@nilesaudio.com |

NILES®
BLENDING HIGH FIDELITY AND ARCHITECTURE®
1969 Kellogg Avenue, Carlsbad, CA 92008
1-760-710-0992
1-800-BUY-HIFI - www.nilesaudio.com
©2011 The AVC Group, LLC. All rights reserved. Niles, the Niles logo and Blending High Fidelity and Architecture are registered trademarks of The AVC Group, LLC. MicroThin is a trademark of The AVC Group, LLC. All other trademarks are the property of their respective owners. We reserve the right to change specifications, descriptions and prices without notice. The technical and other information contained herein is not intended to set forth all technical and other specifications. Designed and engineered in the USA. 9901197 Rev A
- INTRODUCTION
- FEATURES AND BENEFITS
- DESIGNER AESTHETICS
- INSTALLATION EASE
- INSTALL WITH CONFIDENCE
- NILES®
- PARTS GUIDE
- PACKAGE CONTENTS - CM4PR
- INSTALLATION CONSIDERATIONS
- INSTALLATION CONSIDERATIONS CONTINUED
- INSTALLING THE LOUDSPEAKERS
- NOTE: DO NOT INSTALL LOUDSPEAKERS BEFORE THE DRYWALL HAS BEEN COMPLETELY FINISHED AND PAINTED.
- NOTE: DO NOT CARRY THE SPEAKER BY THE TWEETER OR TWEETER POST. THIS MAY DAMAGE THE SPEAKER.
- PAINTING THE GRILLES
- INSTALLING THE GRILLES
- LOUDSPEAKER APPLICATIONS
- LOUDSPEAKER APPLICATIONS (CONTINUED)
- SINGLE SPEAKER APPLICATIONS
- NOTES
Brand : Niles
Model : CM4PR
Category : Loudspeaker