
Direct Access - Computer keyboard TRUST - Free user manual and instructions
Find the device manual for free Direct Access TRUST in PDF.


| Product type | Computer keyboard |
| Model | Direct Access |
| Brand | Trust |
| Connectivity | Wired USB 2.0 |
| Keyboard layout | QWERTY (US) / QWERTZ (EU) depending on variant |
| Number of keys | 104 keys (including numeric keypad) |
| Multimedia keys | Yes, dedicated shortcuts (volume, play/pause, etc.) |
| Dimensions (L x W x H) | 440 x 140 x 25 mm |
| Cable length | 1.5 m |
| Weight | 680 g |
| Power supply | USB bus-powered (5V, 100mA) |
| System requirements | Windows 7/8/10/11, macOS 10.12+, Linux with USB HID support |
| Maintenance | Clean with a soft, slightly damp cloth; disconnect before cleaning |
| Safety precautions | Keep away from liquids and extreme heat; do not disassemble |
| Spare parts availability | Not available as spare parts; product is non-repairable |
| General information | Designed for everyday office and home use; plug-and-play installation |
Frequently Asked Questions - Direct Access TRUST
User questions about Direct Access TRUST
0 question about this device. Answer the ones you know or ask your own.
Ask a new question about this device
Download the instructions for your Computer keyboard in PDF format for free! Find your manual Direct Access - TRUST and take your electronic device back in hand. On this page are published all the documents necessary for the use of your device. Direct Access by TRUST.
USER MANUAL Direct Access TRUST
Thank you very much for purchasing this product from the Trust range. We wish you hours of fun with it. Please read this manual carefully before using the product.
Registration
Register your purchase now at the Trust Internet site, www.trust.com so that you are able to receive optimal guarantee and service support. You will be automatically informed of developments to your product and of other Trust products. You will also have the chance to win some spectacular prizes.
Copyright statement
No part of this instruction manual may be reproduced or transmitted, in any form or by any means, electronic or mechanical, including photocopying, recording, or information storage and retrieval systems, for any purpose other than the purchaser's own personal use, without prior written permission from the manufacturer.
Disclaimer statement
The manufacturer specifically disclaims all warranties, either express or implied, including, but not limited to, implied warranties for the marketability and suitability for a particular purpose, with respect to the software, the accompanying product manual(s) and written material, and all other accompanying hardware. The manufacturer reserves the right to revise or make improvements to its product at any time and without obligation to notify any person of such revisions or improvements.
In no event shall the manufacturer be liable for any consequential or incidental damages, including any loss of business profits or any other commercial damages, arising out of the use of its products.
All company or product names are trademarks or registered trademarks of their respective owners.
Contents
- Introduction ...... 2
1.1 Conventions used in this manual....2
1.2 Contents of the package....2
1.3 Minimum system requirements ...... 2
- Safety....3
2.1 General information 3
-
Connecting....3
-
Installation 4
4.1 Trust Software Installer .... 4
4.2 Installing the software 5
- Keyboard functions....7
5.1 Description of multimedia buttons....7
5.2 Setting the multimedia buttons 8
5.3 OSD menu 9
5.4 CD / Video Player....10
5.4.1 CD Player....10
5.4.2 Video player 11
-
Troubleshooting....12
-
Specifications....12
-
Trust Customer Care Centers 13
1. Introduction
This instruction manual is intended for users of the Trust Direct Access Keyboard. If you have any questions, please consult one of the Trust Customer Care Centers. You can find more information about these Customer Care Centers on the last page of this electronic manual, as well as at the back of the quick installation manual.
1.1 Conventions used in this manual
The following conventions have been used in this manual to indicate instructions:
‘System’ This is a specific term used in a program. These are the terms used by, for example, Microsoft Windows 98.
[DIR] Key in the text shown in square brackets [...].
(term) The text between the parentheses (....) is the English term, e.g. (File) used in the figure referred to.
Additional information will be shown as follows:
Note: The Touch Manager software will not be installed if you do not except the license agreement!
The examples assume that the letter “D” has been assigned to your CD-ROM drive. If your system uses a different drive letter for your CD-ROM drive, for example “E”, you should replace “D” by “E”.
1.2 Contents of the package
Please check the contents of the package before reading the instruction manual. It should contain the following:
- Direct Access Keyboard
- Palm support
- PS/2 to DIN adapter
- Quick installation manual
- CD-ROM containing the drivers, software and instruction manuals
If anything is missing or damaged, please contact one of the Trust Care Centers. You can find more information at the back of this instruction manual.
1.3 Minimum system requirements
- Pentium 75 processor
• DIN or PS/2 keyboard connection - 16MB RAM
- 4MB free hard disk space
• 4x speed CD-ROM drive - Windows 95
• Sound card (recommended)
2. Safety
2.1 General information
- Do not use the device in a damp environment, such as a bathroom, a damp basement, a swimming pool, etc.
- Do not try to repair the device yourself.
- Under the following circumstances, have the device repaired by qualified personnel:
a) The cable or plug is damaged or worn.
b) Liquid has entered the device.
c) The device has fallen and/or the casing has been damaged.
d) The performance of the device is clearly becoming worse.
- Position the device so that the cables cannot be damaged.
- If the device must be cleaned, use a damp cloth. Do not use a liquid cleaner or a spray.
- Make sure that the keyboard is not used in a dusty room. This will shorten the life span of the device.
3. Connecting
- Switch off the computer and remove the power plug from the wall socket.
- Remove the old keyboard from your computer.
- Attach the palm support to the Direct Access Keyboard.
- Determine which type of connection your computer has for the keyboard: DIN or PS/2. If necessary, refer to the instruction manual for your computer and/or motherboard.
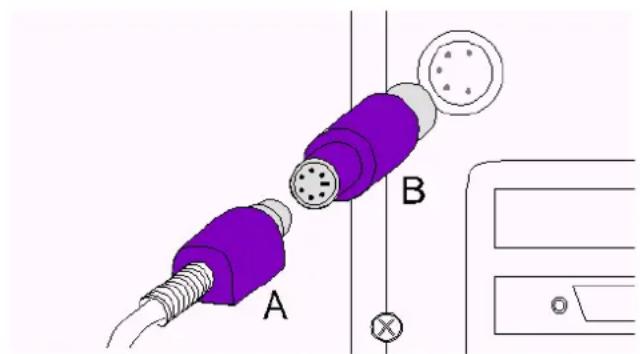
- For a PS/2-connection: Connect the keyboard's plug (figure 1, A) to the computer's keyboard connection.
- For a DIN-connection: Connect the keyboard's plug (figure 1, A) to the PS/2-DIN adapter (figure 1, B). Next, connect the adapter to the computer's keyboard connection.
- Insert the computer's power plug back into the wall socket.
natural_image
Diagram of two purple connectors labeled A and B connected to a terminal block (no text or symbols beyond labels)Figure 1: Connecting

4. Installation
This chapter describes how to install the software supplied.
Note: First, remove the software for your previous keyboard, if installed.
4.1 Trust Software Installer
- Start Windows.
- Insert the CD-ROM into your CD-ROM drive.
- Click on 'Start' and select 'Run' (see figure 2).
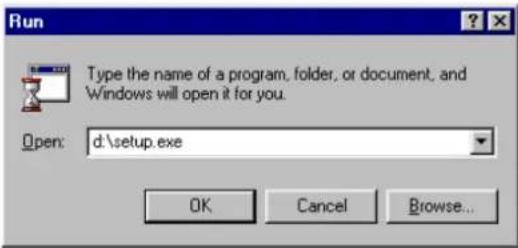
Figure 2: Starting set-up
- In the command line, type 'd:\setup' and click on 'OK'. Figure 3 will appear.

Figure 3: Trust Software Installer
- Select the language you wish the Trust Software Installer to be displayed in. Figure 4 will appear.

Figure 4: Trust Software Installer
- Select an option from the menu.
4.2 Installing the software
- Start the Trust Software Installer (chapter 4.1).
- Select 'Install Touch Manager 3.20' from the main menu. Figure 5 will appear.

Figure 5: Installing Touch Manager

- Click on 'Next'. Figure 6 will appear.

Figure 6: Touch Manager installation
- Click on 'Yes' to accept the license agreement. Figure 7 will appear.
Note: The Touch Manager software will not be installed if you do not except the license agreement!
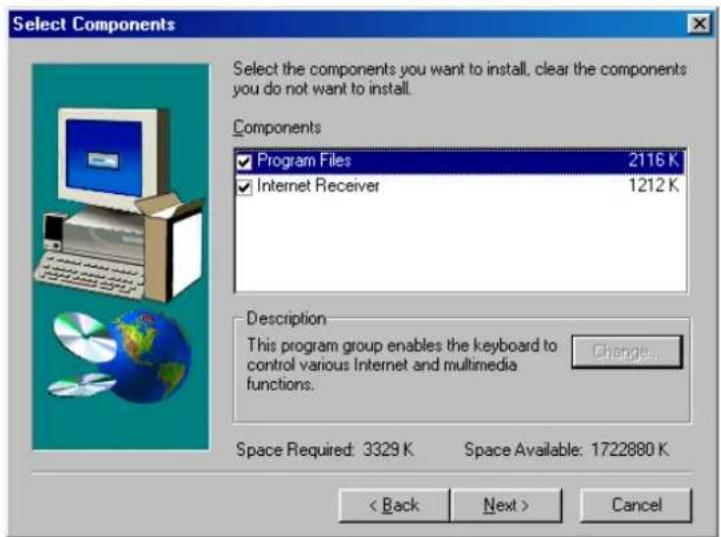
Figure 7: Touch Manager installation
- Select which options you wish to install by placing a tick in the check-box or by removing the tick from the check-box.
The default setting installs everything. The 'Program Files' must be installed if you wish to use the Multimedia buttons. The 'Internet Receiver' is a news program that retrieves the latest news from the Internet.
- Click on 'Next' to continue the installation. A number of files will now be copied. The installation has now been completed. You may be asked whether you wish to restart your computer. If so, choose 'Yes'.
5. Keyboard functions
5.1 Description of multimedia buttons
Your keyboard has 17 extra multimedia buttons for use in Windows 95, 98, NT4 and 2000 (figure 8). The following functions are installed as standard:
| Multimedia buttons | Function |
| WWW Starts your Internet browser. | |
| Calculator Start the Windows calculator. | |
| Xfer Sends the result of, for example, the calculator to an open editor. | |
| Prev Returns a music CD to the previous track. | |
| Play/Pause Plays/Pauses a CD or film. | |
| Stop Stops a CD or film. | |
| Next Continues to the next track of a music CD. | |
| Record Records sound using the sound recorder. | |
| Rewind Rewinds the sound recorded with the sound recorder. | |
| Menu/? Changes the settings (see chapter 4.2). | |
| Eject Opens the CD driver tray. | |
| Mute Turns the sound on/off. | |
| Volume Volume control. | |
| Windows Switches between the open applications. | |
| Close | Closes an open application. |
| Coffee | Starts the screen saver. |
| Suspend | Turns on the PC's “sleep setting” (if supported by your system). |
Table 1: Description of the multimedia buttons

Figure 8: Multimedia buttons

5.2 Setting the multimedia buttons
All the multimedia buttons are ready for use once the driver has been installed. Follow the points below if you wish to change the functions of the multimedia buttons:
- Right click on the icon in the taskbar (figure 9).

Figure 9: Taskbar icon
-
Select 'Touch Manager' and, if necessary, place a tick in front of the 'Configure Button' option.
-
Next, right click on the icon in the taskbar again and select 'Touch Manager' followed by 'Show'. Figure 10 will appear.

Figure 10: Touch Manager menu
- On the screen, click on the multimedia button that you wish to change. Figure 11 will appear.
Note: The 'Windows', 'Mute', 'Volume' and 'Suspend' buttons cannot be changed.


Figure 11: Programming the multimedia buttons
- Click on 'Attach Application to Button'.
- Using the 'Browse' button, select the program that you wish to start using this button and click on 'Open'. Next, click on 'OK' to save the setting.
- If you wish to assign a standard function to a programmed multimedia button, click on 'Select Predefined Functions' and select the function from the list that you wish to assign. Next, click on 'OK' to save the setting.
- Right click on the icon in the taskbar (figure 9) and select 'Touch Manager'. Remove the tick in front of the 'Configure Button' option.
5.3 OSD menu
The OSD menu (On-Screen Display) is displayed on the monitor when the multimedia button is used. The OSD menu may be adjusted or even turned off. This is carried out as follows:
- Right click on the icon in the taskbar (figure 9).
- Select 'OnScreen Display'. Figure 12 will appear.

Figure 12: Requesting the OnScreen Display settings
- Select 'Settings'. A new window will be displayed in which you can alter the OSD menu settings, such as letter size and display time.
- Choose 'Select Color' or 'Select Font' to respectively change the colour or the font of the OSD menu.
- Select 'Disable' to turn off the OSD menu.
5.4 CD / Video Player
A CD player for music CD's and a video player for films are also included in the software for the Direct Access Keyboard.
5.4.1 CD Player
The CD Player is started automatically when a music CD is inserted into your CD-ROM drive. It is also possible to start the CD Player manually.
- Click on 'Start', 'Programs' and then 'Trust'.
- Select 'Direct Access Keyboard'.
- Click on 'CD Player'. Figure 13 will appear.

Figure 13: Music CD player
| Button D | Description Function | |
| A | Power Plays a CD. | |
| B | Status screen Time information about the current CD in the CD-ROM drive. | |
| C | Intro search Plays the first 10 seconds of the music track. | |
| D | Shuffle Plays random music tracks. | |
| E | Fast access Go directly to a CD track by clicking on the number. | |
| F | Control CD player control. | |
| G | Repeat Repeats the entire CD or current music track. | |
| H | Program Change the play list. | |
| I | Change CD Change between more than one CD-ROM drive (if you have more than one in your system). | |
| J | Time Format Change the time format for the status screen. | |
| K | Volume control Change the volume. | |
| L | Mute | Turns the sound volume off. |
| M | Eject | Opens/closes the CD-ROM tray. |
Table 2: Description of figure 13
5.4.2 Video player
The Video Play starts automatically when there is no CD in your CD-ROM drive and you press one of the following buttons on the keyboard: 'Prev', 'Play/Pause', 'Stop' or 'Next'.
It is also possible to start the Video Player manually.
- Click on 'Start', 'Programs' and then 'Trust'.
- Select 'Direct Access Keyboard'.
- Click on 'Video Player'. Figure 14 will appear.

Figure 14: Video Player
| Button Description Function | ||
| A | Power Closes Video | Player. |
| B | Information Displays | information about the current film. |
| C | Control Video Player | control. |
| D | Status screen Time | information about the current Video CD in the CD-ROM drive. |
| E | Rotation control Scroll through the film by turning the knob. | |
| F | Frame rate up/down | Changes the frame rate during slow motion playback. |
| G | Snapshot Saves the | current image of the film as a Windows Bitmap file. |
| H | Screen size Changes | the size of the playback screen. |
| I | Repeat Choose between single or endless playback of the film. | |
| J | Video CD Video CD | plays automatically when pressed. |
| K | Load Opens a video | file. |
| L | Slow reverse/forward | Plays the film in slow motion either backwards or forwards. |
Table 3: Description of figure 14

6. Troubleshooting
| Problem Cause Possible | solution | |
| Multimedia buttons do not react. | The driver has not been installed correctly. | Remove the driver and reinstall it (see chapter 4). |
| The keyboard layout is not correct. | The layout has been configured incorrectly. | Change the keyboard layout using the 'Keyboard' icon in the 'Control Panel'. |
| The CD Player cannot find the music CD. | The CD Player is configured for another CD-ROM drive. | Switch to the correct CD-ROM drive (see chapter 5.4.1). |
| If there is more than one CD-ROM drive, the wrong CD tray opens when the 'Eject' button on the keyboard is pressed. | The wrong CD-ROM drive is configured as the default CD-ROM drive. | Change this as follows: Go to the 'Control Panel' and double click on 'Multimedia'. In the 'CD Music' tab, change the default CD-ROM drive (for example, from d: to e:). |
Table 4: Troubleshooting
Check the FAQ's on the Internet (www.trust.com). You can also register your product via www.trust.com so that you are able to receive optimal guarantee and service support. You will be automatically informed of developments to your product and of other Trust products. You will also have the chance to win some spectacular prizes.
If you still have any problems after trying these solutions, please contact one of the Trust Customer Care Centers. You can find more information on the last page of this electronic manual, as well as at the back of the quick installation manual. Please have the following information available:
• The article number. This is: 11938 / 11985 / 11986 / 11987 / 11988 / 11989.
- Your hardware information.
- A good description of what precisely does not work.
- A good description of when the problem precisely takes place.
7. Specifications
| Normal buttons 104 or 105 (varies per language) |
| Multimedia buttons 17 function button in Windows 95/98/NT4 and 2000: Internet, Calculator, Xfer, Windows, Close, CD Player, Record, Rewind, Menu, Eject, Mute, Volume, Coffee break and Suspend (most are programmable) |
| Windows 95 buttons 3 |
| Connection PS/2 or DIN with adapter |
Table 5: Technical specifications
- Trust Customer Care Centers
| Inhabitants of Great Britain and Ireland should contact: | |
| From:9:30 - 17:00 | GB OfficeInternet www.trust.comE-mail support-uk@trust.comFax +44-(0)1376-514633Tel. +44-(0)1376-500000 |
| Inhabitants of Italy should contact: | |
| From:9:00 - 13:00/ 14:00 -18:00 | Italian OfficeInternet www.trust.comE-mail support-it@trust.comFax 051-6635843Tel. 051-6635947 |
| Inhabitants of France and North Africa should contact: | |
| From:9:00 - 17:00 | French OfficeInternet www.trust.comE-mail support-fr@trust.comFax +33-(0)1-48174918Tel. +33-(0)1-48174931 |
| Inhabitants of Germany should contact: | |
| From:9:00 - 17:00 | German OfficeInternet www.trust.comE-mail support-de@trust.comFax 02821-58873Tel. 0800-00TRUST (=0800-0087878) |
| Inhabitants of Spain should contact: | |
| From:9:00 - 17:00 | Spanish OfficeInternet www.trust.comE-mail support-es@trust.comFax +31-78-6543299Tel. +31-78-6549999 |
| Inhabitants of the Netherlands should contact: | |
| From:9:00 - 17:00 | Dutch OfficeInternet www.trust.comE-mail support-nl@trust.comFax 078-6543299Tel. 0800-BELTRUST (=0800-23587878) or 078-6549999 |
| Inhabitants of all other European countries should contact: | |
| From:9:00 - 17:00 | European Head OfficeInternet www.trust.comE-mail support@trust.comFax +31-78-6543299Tel. +31-78-6549999 |
- Registration
- Copyright statement
- Disclaimer statement
- Contents
- Introduction
- Conventions used in this manual
- Contents of the package
- Minimum system requirements
- Safety
- General information
- Connecting
- Installation
- Trust Software Installer
- Installing the software
- Keyboard functions
- Description of multimedia buttons
- Setting the multimedia buttons
- OSD menu
- CD / Video Player
- CD Player
- Video player
- Troubleshooting
- Table 4: Troubleshooting
- Specifications
Brand : TRUST
Model : Direct Access
Category : Computer keyboard