EJE-A2050(SS) - Juicer Elba - Free user manual and instructions
Find the device manual for free EJE-A2050(SS) Elba in PDF.


| Product Type | Juicer |
| Brand | Elba |
| Model | EJE-A2050(SS) |
| Power Consumption | 250 W |
| Rated Voltage | 220-240 V ~ 50/60 Hz |
| Juice Container Capacity | 1.0 L |
| Pulp Container Capacity | 1.5 L |
| Feeding Chute Diameter | 75 mm |
| Speed Settings | 2 speeds (Low/High) |
| Housing Material | Stainless Steel |
| Blade Material | Stainless Steel |
| BPA-Free | Yes |
| Safety Lock | Yes (motor only runs when properly assembled) |
| Non-Slip Feet | Yes |
| Dimensions (W x D x H) | 25.0 x 20.0 x 30.0 cm |
| Weight | 2.0 kg |
| Dishwasher Safe Parts | Pulp container, juice container, lid, strainer |
| Cleaning Brush Included | Yes |
| Spare Parts Available | Strainer, pusher, lid, juice cup, pulp container |
| Warranty | 1 year |
Frequently Asked Questions - EJE-A2050(SS) Elba
User questions about EJE-A2050(SS) Elba
0 question about this device. Answer the ones you know or ask your own.
Ask a new question about this device
Download the instructions for your Juicer in PDF format for free! Find your manual EJE-A2050(SS) - Elba and take your electronic device back in hand. On this page are published all the documents necessary for the use of your device. EJE-A2050(SS) by Elba.
USER MANUAL EJE-A2050(SS) Elba
ELBA
JUICE EXTRACTOR
Model: EJE-A2050(SS)
Owner's Manual
Please read this manual carefully before operating your set.
Retain it for future reference.
Record model number and serial number of the set.
See the label attached on the s quote this information to your dealer when you require service.
For The Warranty Terms & Conditions, Please Refer To Warranty Certificate.
IMPORTANT SAFEGUARDS
When using this appliance, basic precautions should always be followed, including the following:
- Read all instructions before use.
- Do not use the appliance if the stainless steel grater and filter assembly is damaged.
- Do not contact the plug or power cord with wet hands.
- Do not let the plug remains plugged when not in use.
-
Do not immerse power cord, plug or the motor base into water or any other liquids.
-
Do not use this appliance when the plug or power cord is damaged or the plug is not properly inserted.
-
Never bend or bind the power cord or apply by excessive force, otherwise it may cause damage. If the power cord is damaged, it must be replaced by the manufacturer or after-sales service center to avoid hazards.
-
Keep the power cord out of children. Do not let the power cord hang over the edge or the table or worktop on which the appliance stands.
-
Operate the appliance on a dry and stable surface.
-
Do not carry the appliance during operation.
- Do not operate the appliance continuously for more than 3 minutes.
- Do not operate the appliance without any loading.
-
Only use the food pusher as supplied. Never put your fingers or any other sharp objects into the feeder tube.
-
Do not touch the cutting blades at the bottom of the stainless steel grater and filter assembly.
-
Before removing the juicer cover, switch off and wait for the filter to stop.
-
Always make sure the appliance is properly and completely assembled before operating. The unit will not turn on unless it is properly assembled.
-
Before disassembling the appliance, switch off the power and wait for the filter to stop operating.
-
Before cleaning the appliance, make sure the control switch have turn to "0" position. Switch off the power and unplug the plug from wall outlet then slowly remove the parts.
-
This appliance is not intended for use by persons (including children) with reduced physical, sensory or mental capabilities, or lack of experience and knowledge, unless they have been given supervision or instruction concerning use of the appliance by a person responsible for their safety.
-
Children should be supervised to ensure that they do not play with the appliance.
-
This appliance is intended to be used in household and similar applications.
-
Save this instructions for future reference.
DESCRIPTION OF PARTS
- Motor base
-
Control switch
-
0 Stop / no power
● 1 Low speed -
2 High speed
-
Safety locking arms
- Pulp container
- Pulp chute/ Juicer cover
- Food pusher
- Juicer collector assembly
- Juice jug
- Rubber feet
- Spout cover
- Light indicator
- Stainless steel grater and filter
- Feeder tube
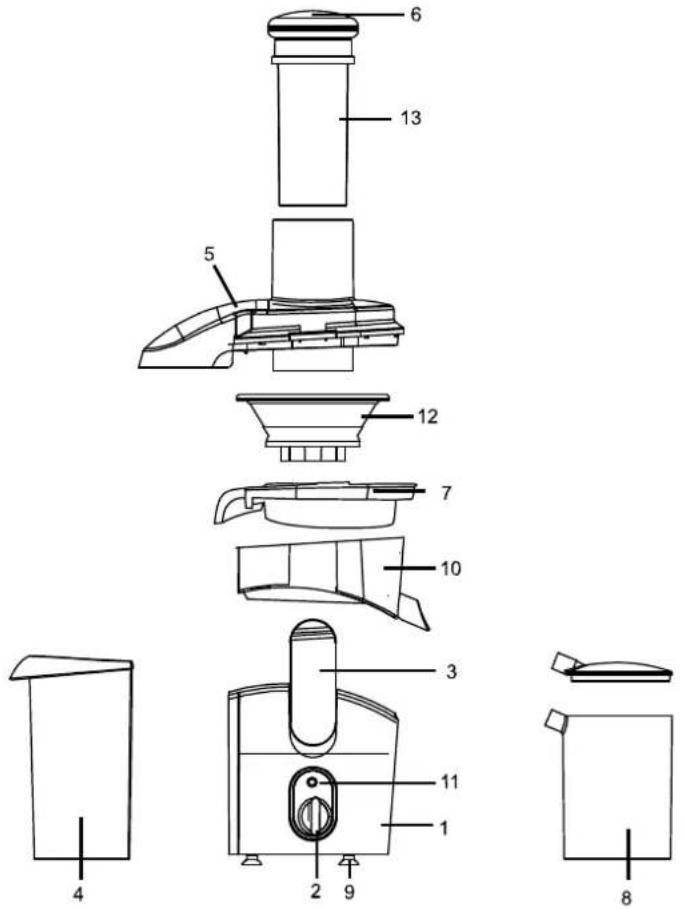
ASSEMBLE THE APPLIANCE

(Figure 1)

(Figure 2)
- Place the motor base on a stable surface.
- Place the spout cover on the motor base with the spout hole at the right hand side (facing the direction of the safety locking arms).
- Swivel the spout cover until it fits on the motor base.
-
Insert the juicer collector assembly on the spout cover.
-
Hold the stainless steel grater and filter assembly as per figure 2.
• Install the stainless steel grater and filter assembly into the motor base. - Twist the filter assembly and gently push down until it is seated on the motor base.
NOTE: The top edge of the grater should not be higher than the edge of the juice collector assembly when properly installed.

(Figure 3)
- Place the pulp chute/ juicer cover on top of the juice collector assembly so that the facing of the pulp chute is on the opposite side of the spout.
- Lock the pulp chute/juicer cover by raising the safety locking arms until it clicks into the grooves located on both side of the pulp chute / juicer cover.
NOTE: Push the safety locking arms until it "clicks" otherwise the juice extractor will not operate when turning on the power.

(Figure 4)
- Slide the pulp container into position under the pulp chute/ juice cover.
- Place the juice jug or a glass under the spout.
- Insert the food pusher into the feeder tube.
- Connect the plug to wall outlet.
NOTE: Do not power on the appliance with food loaded into the feeder tube!
PREPARATION OF FRUITS AND VEGETABLES
- Wash the fruits and vegetables that need to be extracted.
- Peel fruits that have inedible skins such as citrus fruits, pineapples, melons, papayas, etc.
- Pit all fruits with seeds such as peaches, nectarines, cherries, etc.
- Fruits and vegetables such as apples, carrots and cucumbers will not need to be cut into small pieces. Unless the fruits or vegetables are too big to be fit into the feeder tube, slice it before starting to extract.
OPERATING THE APPLIANCE
- After assembling the appliance, connect the plug into the wall outlet.
- Power on the appliance and the light indicator will be on (in red).
WARNING: Before power on the appliance, make sure the control switch is turned to speed "0" (no power).
- Turn the switch either to speed '1' or '2' depending on the type of fruits or vegetables that is being extracted. Soft fruits or vegetables such as berries, melons, cucumbers, tomatoes, etc, should be extracted on speed "1". Harder fruits and vegetables such as apples, celery, carrots, etc. should be extracted at speed '2'.
WARNING: Never put any fruits or vegetables in the feeder tube until the appliance is power on.
- Insert the fruits or vegetables into the feeder tube. Use the food pusher, gently guide the food down to the juice collector assembly. To extract the maximum amount of juice, always push the food pusher down slowly. IMPORTANT: DO NOT PLACE HANDS OR FOREIGN OBJECTS INTO THE FEEDER TUBE. ALWAYS USE THE FOOD PUSHER.
- If the pulp container is full it can be emptied during extracting. Turn the switch to speed '0' and tilt the pulp container from the pulp chute/ juice cover.
- Insert the juice jug cover to separate froth being poured from the fresh juice extracted. If you prefer to have juice with froth, remove the juice jug cover for direct fresh juice pouring.
DISASSEMBLE THE APPLIANCE
IMPORTANT: Before disassembling the appliance, make sure that the control switch is in the '0' position, the plug has been removed from the wall outlet and the motor has completely stopped operating.
- Remove the food pusher from the feeder tube.
- Remove the pulp container by holding onto the feeder tube and tilting the juicer slightly and take out the pulp container.
- Remove the juice jug.
- Hold the pulp chute/ juicer cover and lift up the safety locking arms from the grooves on the side of the pulp chute/ juicer cover.
- Lift up to remove the pulp chute/ juicer cover.
- Remove the spout cover (together with the stainless steel grater) by placing one hand under the spout and another hand holding under the spout cover edge (opposite the spout) and lift it upwards.
NOTE: Be careful when handling the grater and filter assembly as the as the cutting blades are very sharp.
CLEANING AND MAINTENANCE
- Turn the control switch to the speed '0' and wait for the motor to stop operating.
- Unplug the plug from the wall outlet.
- Disassemble the juicer( refer to disassemble the appliance).
-
Clean the following parts with soapy water. A mild detergent is recommended to clean the parts. Rinse the parts well and dry thoroughly.
-
pulp container
- pulp chute/ juicer cover
- food pusher
- juicer jug assembly
- spout cover
- juice jug
-
feeder tube
-
Rinse the stainless steel grater and filter assembly/ cutting blades with clean water. Use the cleaning brush gently clean away pulp from the filter and cutting blades. If the holes of the filter are blocked with pulp, soak the filter assembly into hot water to remove the pulp and clean with the nylon brush again. Allow to dry on a cloth or paper towel before reassembling the juicer.
-
Wipe the motor base and safety locking arms with a soft dry cloth.
HELPFUL HINTS
- A small amount of lemon juice can be added into the apple juice to prevent juice from turning into brown colour.
- Do not use bananas or avocados as they do not contain juice and will clog the juicer.
- Allow the juicer to run for one minute before turning '0' speed to allow any excess juice to be extract from the pulp.
- Plastic bag can be put in the pulp container for easy clean-up.
Technical Specifications:
Voltage : AC 220-240V, 50/60Hz
Power : 500W
ELBA
Brand : Elba
Model : EJE-A2050(SS)
Category : Juicer