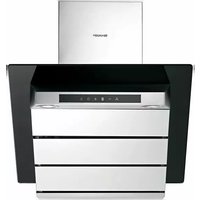
KL610TBLMEU - Range hood SHARP - Free user manual and instructions
Find the device manual for free KL610TBLMEU SHARP in PDF.


| Brand | Sharp |
| Model | KL610TBLMEU |
| Product Type | Range Hood |
| Supply Voltage | 220-240 V ~ 50 Hz |
| Motor Power | 275 W |
| Lamp Power | 2 x 1.5 W |
| Max Flow Rate | 495 m³/h |
| Insulation Class | Class I |
| Minimum Installation Height (Electric Cooktop) | 65 cm |
| Minimum Installation Height (Gas Cooktop) | 65 cm (recommended 65-75 cm) |
| Control Type | Push button with digital display |
| Fan Speeds | Multiple speeds with boost mode |
| Boost Mode | Yes, 7 minutes automatic duration |
| Automatic Timer | Yes, 15 minutes |
| Filter Type | Aluminum (washable) + optional charcoal |
| Aluminum Filter Cleaning Interval | Every 2-3 weeks |
| Charcoal Filter Replacement | Every 6 months (if used in recirculation mode) |
| Lamp Type | LED (replaceable) |
| Safety Features | Grounded plug, child safety (ages 8+), automatic shut-off |
| Warranty | 2 years from purchase date |
| Compatible Flue Diameter | Minimum 120 mm (optional 150 mm adapter) |
| Energy Saving Recommendation | Clean filters regularly, use normal speeds |
Frequently Asked Questions - KL610TBLMEU SHARP
User questions about KL610TBLMEU SHARP
0 question about this device. Answer the ones you know or ask your own.
Ask a new question about this device
Download the instructions for your Range hood in PDF format for free! Find your manual KL610TBLMEU - SHARP and take your electronic device back in hand. On this page are published all the documents necessary for the use of your device. KL610TBLMEU by SHARP.
USER MANUAL KL610TBLMEU SHARP
natural_image
Red square icon with a white water droplet symbol (no text or numbers)Cooking
EN
User Manual

natural_image
Red icon of a kitchen chimney (no text or symbols)Hood
KL-610TBLM-UK
KL-610TBLM-CH
KL-610TBLM-EU
KL-910TBMH-UK
KL-910TBMH-CH
KL-910TBMH-EU
Table Of Contents
1 Pre-Installation Safety Rules 4
2 Technical Specifications 6
3 General Appearance....7
4 Assembling of Appliance 8
5 Assembly of Air Discharge Outlet 9
6 Assembly of Flues 10
7 Operation....11
8 Cleaning and Maintenance....12
9 Replacement Of Lamps 12
10 Troubleshooting 13
11 Service & Warranty 14
Dear Customer,
Thank you for choosing a Sharp Home Appliance. We hope you enjoy using your new product, and recommend that you carefully read these instructions and take note of our recommendations for care and maintenance. This will help to ensure trouble free operation for many years to come.
Important Safety-Related Information
• These instructions contain useful information to help you get to know the features and get the best out of your new appliance.
• Always keep this user manual close to your appliance.
WARNING: Read this user manual carefully before starting to use your appliance to be able to prevent risks of dangerous situations, fire, electric shock and personal injury. Please follow the instructions at all times.
• This appliance should be assembled by a qualified installer.
- Appliance must be grounded.

RISK OF ELECTRIC SHOCK: Dangerous voltage.

CAUTION: Risk of injury or damage to properties.

WARNING: Risk of serious injury or death.
1 Pre-Installation Safety Rules
- Follow the instructions in this manual. Sharp cannot be held liable for accidents, damages or fire that might occur as a result of failure to follow the instructions in this manual. The User manual is an integral part of the appliance and must be kept.
• This cooker hood is intended for domestic use only.
WARNING: Use of your appliance beyond its intended purpose might cause damage or hazardous situations, and leads to the warranty being voided.
- The appliance must only be used over Electric or Gas cookers.
- The hood must be mounted at a minimum of 65 cm and maximum 70 cm to the cooking surface of electric cookers.
- Do not mount this appliance on the wall using plaster or silicon. Mount only on the surface.
- Since maintenance might be required on the air outlet flue, do not secure the appliance on furniture or shelves that do not allow easy disassembly.
- The flue outlet of the cooker hood shouldn't be connected to flues which have warm gas connections such as water heater, stove, natural gas.
- Risk of fire is higher with oil that is used frequently. Food that is cooked in the deep fryer and with oil must be cooked under supervision.
- Avoid high flame cooking since faults may occur in the appliance due to fire hazard and the high heat that will be generated.
- The aluminum oil filter must be on during operation, and these filters must be cleaned periodically. Otherwise oil deposit on the filter might lead to deflagration.
- Assembly and electric connection must be performed by authorized people.
-
Call the nearest Authorized Service in case of any failure.
-
Energy inlet cord shouldn't be subject to heating, jamming or crushing during assembly.
- While performing lamp replacement and cleaning processes on the appliance, the cord must be disconnected or the fuse must be turned off.
- Problems that could prevent the aluminium flap at the flue outlet to be turned off when the motor is not operative must be eliminated.
- This appliance is not intended to be used by people with physical, sensory and mental impairments (including children) or those who do not have adequate experience and knowledge regarding its use, unless they are under the supervision of a person responsible for the safety of the appliance.
- This appliance can be used by children of 8 years and older, people with physical, sensory or mental capability deficiency or people with lack of experience or knowledge; as long as they are provided with supervision or instructions for the safe use of the appliance and they understand the dangers.
- Operating voltage of your appliance is 220 - 240 Volt \~ 50. A grounded plug has been mounted on the mains cable of your appliance. That cable must be connected to a grounded socket.
- In case of any deflagration, switch off the cooker hood and cooking appliances, and cover the flame. Never use water to extinguish the fire.
- While the electric cooker hood and other electric appliances operate simultaneously, negative pressure in the room shouldn't exceed 4 Pa (4 X 10 bar).
- Since the packing materials could be dangerous, keep them away from children.
Safety Information to Be Considered During Cleaning and Maintenance
- The cable of the appliance must be disconnected or the fuse must be turned off prior to all cleaning and maintenance processes.
- Appliance shouldn't be cleaned with steam cleaning devices.
- The fire risk gets higher due to oil deposits if cleaning and maintenance are not performed. Therefore, get your appliance cleaned and maintained regularly.
- Repairing should be done by technical service personnel.
Efficient ventilation
In order to allow for ventilation kitchen windows must be kept closed. In order to create air flow, operate the cooker hood and cooker simultaneously. Suction power will be affected in a positive way. After your cooking has finished, leave the appliance on for a while to let it extract the remaining odour and vapour.
IMPORTANT NOTE
You must be careful when using the appliance simultaneously with other appliances (e.g. gas, diesel fuels, coal, wood, etc. burning heaters, shower heaters), which use the same air in the environment. Because the cooker hood might affect the fire adversely since it discharges the air in the atmosphere. This warning doesn't apply to flueless use.
2 Technical Specifications
| Model | KL-610TBLM-UKKL-610TBLM-CHKL-610TBLM-EUKL-910TBMH-UKKL-910TBMH-CHKL-910TBMH-EU |
| Supply voltage 22 | 20-240 V 50Hz |
| Lamp power (W) | 2 x 1.5 W |
| Motor power(W) 275 W | |
| Flow rate ( m^3/h ) | 495 |
| Insulation Class Q | LASS I |
- Specifications of the device and this manual may be modified without prior notification.
- Complies with the AEEE Regulation.

This product complies with the 2004/108/EC (Regulation on Electromagnetic Compliance) and 2006/95/EC (Regulation on Low Voltage Devices (LVD)) Directives.
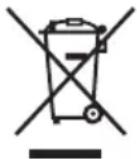
This device complies with the Directive on the Control of Waste Electrical and Electronic Equipment.
Consumer Services General Information
This Operating Manual has been prepared for Sharp cooker hoods.
This cooker hood is designed for use over a cooker. Make sure that your wall can stand the weight of your cooker hood. Processes such as breaking, cutting, etc. to be performed on the wall or closet during assembly must be borne by the user. Your cooker hood is suitable for use with a flue system, or flueless use (by using a charcoal filter). Before starting the assembly, pay attention to the problems you may encounter during assembly. Assembly must be carried out by a trained, specialized and authorized person.
Safety Information to Be Observed During Transportation and Shipping
Your device must be kept in its original package to protect from damage during transportation and shipping.
Keep the product in normal position during transportation. Do not drop the device during transportation and protect it against impacts.
Damages and faults that occur during transportation after the delivery of the appliance to the customer are not covered by the warranty.
Liability Limitation
All technical information, instructions of use, information on the operation and maintenance of the device provided in this manual includes the latest information regarding your product. Sharp does not take any responsibility for damages and injuries that might be caused due to not observing the instructions in this user manual, using the device outside its intended use, unauthorized repairs or modifications on the device and using spare parts not provided by Sharp.
3 General Appearance

Figure 1
Dimensions given in technical drawings are in mm.
The purpose of this image is to inform you about the parts of your appliance. The parts may vary depending on the model of the appliance. Images are for reference only.
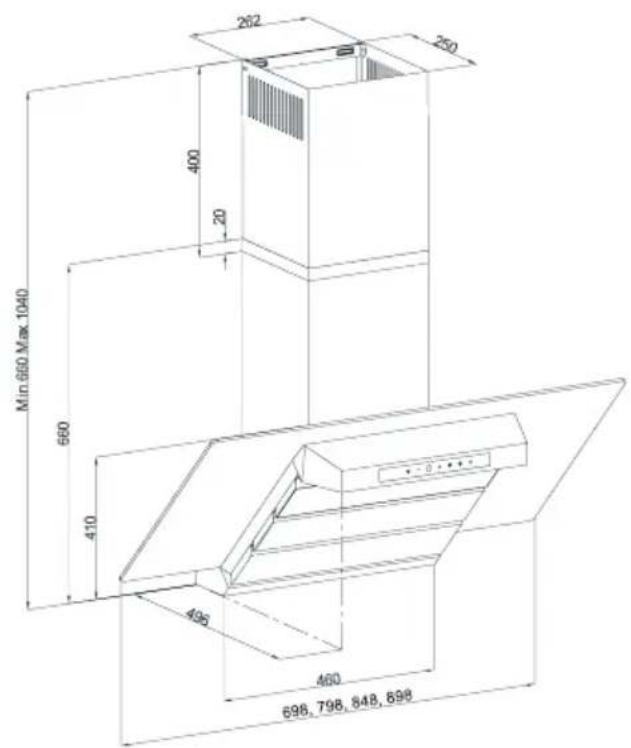
Figure 2
- Inner Flue
- Outer Flue
- Control Panel
- Cooker Lighting
- Tempered Glass
Position of Cooker Hood
Distance between the cooker and the cooker hood must be considered prior to assembly. This distance must be minimum 45 cm and maximum 65 cm in electric cookers.
This distance must be minimum 65 cm and maximum 75 cm in gas cookers.

4 Assembling of Appliance

Figure 3 : Installation Diagram and Components
- Inner Flue
- Outer Flue
- Cooker Hood Hanging Plates
- Body
- 4 x 5.5 60 Hanging Screws
- 4x ∅10 mm Plastic Wall Plugs
- 2x 3.9 x22 Flue Connection Plate Screws
- Flue Connection Plate
- 2x ∅6 mm Plastic Wall Plug
5 Assembly of Air Discharge Outlet

Figure 4
1 ∅150/120 mm Flue Adapter (Option)
2 2x 3.5x9.5 Screw
3 ∅120/150 mm Plastic Flue
4 Body
Attach the plastic flue to the product's body (Figure 4).
- Connect the flue adapter to the plastic flue when required.
- Assemble the cooker hood with the help of the assembly scheme.
For this;
- Affix the assembly pattern on the wall, at the specified height (See the minimum and maximum distances intended for the worktop, in the assembly pattern). Perforate points A, B, C and D. (Figure 3)
- Insert ∅10mm wall plugs into the holes drilled as A, B, C and D, and screw down the screws at the points A + B, in such a way as to remain 5mm space between the screw head and the wall. (Figure 3)
Affix the hanging plate of the cooker hood on the body of the cooker hood with 3 x M5x35 screws (Figure 3 - 4).
- Hang it on the wall with the hanging plate of the cooker hood. If the cooker hood is not parallel, loosen or tighten M5x35 screws to make the cooker hood parallel.
- Tighten A + B (5) fixing screw on the wall, and completely secure the product from its points D and C.
6 Assembly of Flues

Figure 5 : Installation of the Sheet Metal Flue
- Outer Flue
- Inner Flue
- Flue Fixing Screws
- Flue Connection Plate
Fit the air outlet pipe of the product to the plastic flue 1 or 2. Figure 5
The outer and inner sheet metal flues (Figure 5) are encased one within the other.
For this;
- The cooker hood is set in the midst, and then the flue connecting plate (8) is directly affixed to the wall, under the cover or points E and F are marked after performing a measurement. Figure 3
- Drill points E and F with ∅6mm drill bit, and insert ∅6mm plastic wall plugs (9). Insert the flue connection plate with 3,9x22 screws (7). Figure 3
- Mount the Outer Flue (1) to the body of cooker with screws (2). Secure the inner flue (2) on flue connection plate (4)
by using screws. Figure 5
7 Operation

Information: Switch on the cooker hood when you start the cooking process but switch it off a couple of minutes after the end of the cooking process. The steam in the kitchen is eliminated most effectively by this way.
Turning on the fan: Press the Fan On/Off button. Turn up the fan level with + button or turn down with - button.
Turning On/Off Light
You can turn on or turn off the lighting independently from the fan.
Automatic Timer: When the button is pushed on, a timing function is activated for a period of 15 minutes, and once the timing starts, also the digital screen gives a signal, and the motor stops automatically after 15 minutes.
Cleaning Periods of the Metal Filter:
Filters must be cleaned when "C" signal is seen on the digital screen or depending on use after every 2-3 weeks. When the filters are cleaned and mounted in their places, press button (▼) for more than 3 seconds in order to delete "C" signal (when the product is inactive). Letter "E" will appear on the display, and the product will switch to normal operation. If the operation is desired to continue without deleting "C" signal, when you push on (▼) button, active operation will be observed for 1 sec. and then "C" signal will reappear and the motor will continue to run.
Boost Ventilation Mode:
The model you have purchased has a boost mode for energy efficiency.
When the product is switched to maximum speed while it is operated, a 'b' symbol shall be displayed on the screen. Boost symbol indicates that (boost ventilation) mode is active on the model. Product shall operate for 7 minutes in this mode and 'b' symbol shall flash on the screen during this period. After 7 minutes, product shall automatically switch down one speed level and shall resume operation in the lower speed level
Note: It is not possible to use timer feature in the boost mode.

"C" mark will appear every 60 hours of usage.
8 Cleaning and Maintenance
WARNING: Ensure that the appliance is unplugged or fuse is turned off before all cleaning and maintenance operations.
A) Cleaning and Maintenance Time
The hood must be cleaned and maintained regularly to ensure its usage life and performance.
Deposit of oil and dirt in aluminium filters of the hood may affect its normal operation.
Unnecessary oil residue on the inner parts of the device and its flue increases the risk of fire. The charcoal filter(s) inside the inner part, which are required for flueless use, may be used for a specific duration. They cannot be cleaned and washed. Thus, charcoal filter(s) must be replaced regularly. You can procure the charcoal filters suitable for your appliance from authorized retailers.
- Aluminium filters must be cleaned every 2 - 3 weeks.
This cleaning and maintenance should be performed regularly to prevent formation of oil residues on your kitchen furniture and walls.
B) Cleaning the Appliance
- Cut the power to your hood by unplugging it or turning off its fuse.
- Do not clean the appliance with vapour or a cleaning appliance that uses vapour.
- Do not clean the hood surface with unsuitable cleaning materials. Otherwise, colour changes may occur on the product.
- The outer surface of the appliance must be cleaned using Inox surface cleaner and a soft cloth. Device must be dried after cleaning. The glass parts of devices should be cleaned with a suitable cleaning material.
C) Opening the side peripheral suction panel
To remove the side peripheral suction panel, hold from the right and left front points and pull towards yourself.
D) Disassembly of Aluminium Filter
Press the locking latch of the aluminium filters backwards and pull below the appliance to remove.
E) Cleaning Operation
Submerge the aluminium filter in hot water with dish detergent and wait for some time; then clean with a soft brush. Rinse with hot water after cleaning. Repeat this operation if necessary. You can wash the aluminium filter in dishwasher on normal program with 55 degrees.
WARNING: Take care not to cause damage on the grid while cleaning the aluminium filters. Colour changes may be observed on the filters when hard cleaning materials are used. This won't adversely affect the appliance and is not cause of malfunction.
9 Replacement Of Lamps

WARNING: Disconnect the electrical supply of the cooker hood.
Leave the lamps to cool down first because they could burn your hands when they are hot.
Replacement of Lamp
To replace the lamp, remove the glass cover on the lamp with an object that will not scratch the surface of product, as shown in Figure 6. Remove the lamp by pulling downwards, and replace with a new one.

natural_image
Illustration of a magnifying glass with a handle, no text or symbols present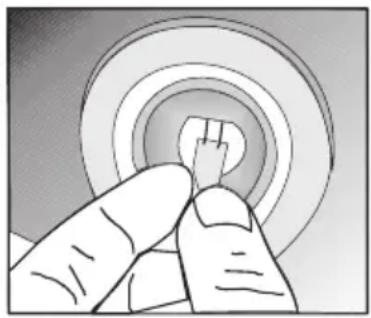
natural_image
Illustration of a hand touching a circular target with concentric rings (no text or symbols)Figure 6
Disposal of your appliance in an environment-friendly way

In order to prevent uncontrolled waste disposal from damaging the environment or human health, please set this appliance apart from other waste types and ensure its responsible recycling to support the sustainable reuse of material resources. Please contact the retailer you purchased the product from or other local establishments to receive information on where and how to take this appliance for environmentally safe recycling. This product must not be mixed with other trade waste for recycling.
Recommendations for Energy Saving
If you use your appliance with charcoal filters, replace them regularly.
Regularly clean your aluminium filters. Since dirty filters will block the air passage, you might have to use the appliance at a higher speed. Use your product at its normal speeds. Use at higher speed would cause an increase in the energy consumption.
Package information
The product package is made of recyclable materials. Do not dispose of the packaging waste together with the household waste or other wastes, dispose of it through your local recycling centre.
8 Troubleshooting
Should you experience any problems with your appliance, please first check the troubleshooting guide below. If this does not solve the problem, please contact Sharp via the contact information in this manual or through the website.
| PROBLEM CAUSE REMEDY | ||
| Appliance doesn't operate. | It is not plugged in properly. Plug it tightly. | |
| There's no power in the socket. Check the fuse and the socket. | ||
| Power On/Off switch isn't pressed. Press the power on/off switch. | ||
| Lighting is not functioning. | Appliance might not be plugged in. Make sure the power cord is plugged in. | |
| Appliance key may not be functioning. Check the button. | ||
| Dirty air enters through the flue. | Check the aluminium flap at the flue outlet. | The flap should cover the air outlet when the appliance is not running. Remove the obstacles that prevent this closing. |
| Performance of the appliance is not adequate or the appliance makes too much noise during operation. | Diameter of the flue may not be sufficient (Minimum ∅120 mm). | Make sure that the diameter of the flue is at least ∅120 mm. |
| If you use the cooker hood without a flue, make sure that the charcoal filters are not older than 6 months. | Replace the charcoal filters. | |
| Be attentive to ventilate your kitchen adequately, in order to provide an airflow. | Let the environment be ventilated by opening the windows. | |
11 Service & Warranty
If you are unable to resolve a problem using the checks covered in the last few pages, do not attempt to service cooker hood yourself.
In the unlikely event of the product requiring repair, please contact the Customer Support Centre. Telephone: 0333 577 7230 Lines are open Mon to Fri 09.00 to 20.00 & Sat and Sun 10.00 to 16.00 Vestel UK the licence partner for Sharp guarantees that for a period of 2 years from the date of purchase the enclosed product will be free from defects in materials and workmanship. Vestel UK agrees to provide for the repair or, at its option, the replacement of a defective product. Vestel UK reserves the right to replace defective parts, or the product, with new or refurbished items. Items that are replaced become the property of Vestel UK. To benefit from this guarantee, any fault that occurs must be notified to Vestel UK, or it's appointed Service Facility, within two years from the date the product was purchased. Proof of purchase, such as a receipt or invoice, must be provided. If the product is exchanged, the replacement shall be covered by the unexpired portion of the original guarantee.
This guarantee shall only apply to faults that are due to an electrical or mechanical breakdown. It does not cover faults or damage caused by accident, misuse, fair wear and tear, neglect, tampering with the product, or repair other than by a Service Facility appointed by Vestel UK.
The product is intended for private domestic use only. The guarantee will not apply if the product is used in the course of a business, trade or profession.

Service & Support
Visit our website:
www.sharphomeappliances.com
Or contact us:


YouTube

- Table Of Contents
- Dear Customer,
- Important Safety-Related Information
- Pre-Installation Safety Rules
- Safety Information to Be Considered During Cleaning and Maintenance
- Efficient ventilation
- IMPORTANT NOTE
- Consumer Services General Information
- Safety Information to Be Observed During Transportation and Shipping
- Liability Limitation
- Position of Cooker Hood
- Assembling of Appliance
- Assembly of Air Discharge Outlet
- Assembly of Flues
- For this;
- Operation
- Turning On/Off Light
- Cleaning Periods of the Metal Filter:
- Boost Ventilation Mode:
- Cleaning and Maintenance
- A) Cleaning and Maintenance Time
- B) Cleaning the Appliance
- C) Opening the side peripheral suction panel
- D) Disassembly of Aluminium Filter
- E) Cleaning Operation
- Replacement Of Lamps
- Replacement of Lamp
- Disposal of your appliance in an environment-friendly way
- Recommendations for Energy Saving
- Package information
- Troubleshooting
- Service & Warranty
Brand : SHARP
Model : KL610TBLMEU
Category : Range hood