
DER200W - Frying Pan Avanti - Free user manual and instructions
Find the device manual for free DER200W Avanti in PDF.


| Type | Electric Range |
| Brand | Avanti |
| Model | DER200W |
| Cooking Surface | Vitroceramic hob with 4 cooking zones |
| Cooking Zone 1 & 3 (Front Left & Rear Right) | ∅ 180 mm (7") - 1700 W |
| Cooking Zone 2 & 4 (Rear Left & Front Right) | ∅ 145 mm (5.7") - 1200 W |
| Oven Type | Natural convection electric oven |
| Oven Heating Elements | Bake element (lower) 1800 W, Broil element (upper) 1800 W |
| Oven Functions | Bake, Broil, Oven Light |
| Oven Thermostat Range | Warm to 450 °F (232 °C) |
| Control Knobs | 6 knobs: 4 hob controls, 1 oven function selector, 1 oven thermostat |
| Included Accessories | 2 oven shelves, 1 broiler tray, 6 knobs, anti-tip bracket, 4 leveling legs |
| Removable Storage Drawer | Yes, under oven |
| Oven Light Bulb | 120V 60Hz, 15W, E14, high temperature (300°C/570°F) |
| Safety Features | Anti-tip bracket, residual heat indicator, child lock (no knob push-to-turn for hob) |
| Cleaning Recommendations | Clean hob with scraper and damp cloth; oven interior with soapy water; avoid abrasive cleaners |
| Oven Door Removal | Yes, for cleaning (two types of hinges) |
| Warranty | 1 year full on parts and labor; 30 days on glass and finish; excludes commercial use |
| Electrical Requirements | Properly grounded per local codes; consult a qualified installer |
Frequently Asked Questions - DER200W Avanti
User questions about DER200W Avanti
0 question about this device. Answer the ones you know or ask your own.
Ask a new question about this device
Download the instructions for your Frying Pan in PDF format for free! Find your manual DER200W - Avanti and take your electronic device back in hand. On this page are published all the documents necessary for the use of your device. DER200W by Avanti.
USER MANUAL DER200W Avanti
natural_image
Line drawing of a simple electric stove with four burners and a door (no text or symbols)
US
CAUTION:
BEFORE USE, PLEASE READ AND FOLLOW ALL SAFETY RULES AND OPERATING INSTRUCTIONS.
Avanti has a policy of continuous improvement on its products and reserves the right to change materials and specifications without notice.
 |  WARNING WARNING |
| ALL RANGES CAN TIPINJURY TO PERSON COULD RESULTINSTALL ANTI-TIP DEVICE PACKED WITH RANGESEE INSTALLATION INSTRUCTIONS |
CONTENTS
TABLE OF CONTENTS
Parts & Features 4-5
Before Using Your Electric Range....6
Precautions and Recommendations.... 7-8
How to Use the Vitroceramic Hob 9-10
How to Use the Natural Convection Electric Oven 11-13
Care And Maintenance.... 14-16
Troubleshooting 17
Service.... 18
Warranty 19
Figure 1

- Cooktop
- Control panel
- Door handle
- Oven light
- Backguard
- Leveling legs
- Removable storage drawer
- Rating plate
- Oven vent
- Glass oven door
- Anti-tip bracket
- Broil element
- Broiler tray
- Shelves
- Bake element
VITROCERAMIC COOKING HOB
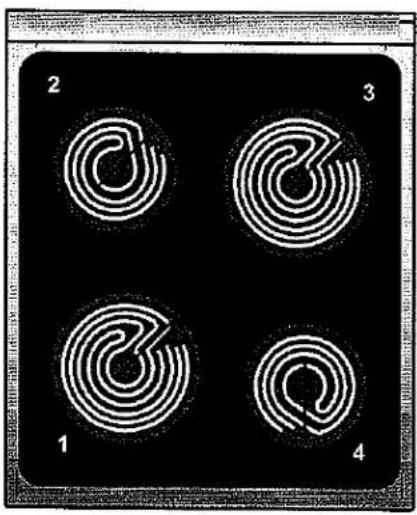
- Cooking zone ∅ 180 mm (7" 3/32) - 1700 W
- Cooking zone ∅ 145 mm (5" 23/32) - 1200 W
- Cooking zone ∅ 180 mm (7" 3/32) - 1700 W
- Cooking zone ∅ 145 mm (5" 23/32) - 1200 W
Attention: Disconnect the appliance from the mains if the ceramic hob is cracked and call the AVANTI After Sales Service.
Figure 2
natural_image
Four circular maze patterns labeled 1 to 4, arranged in a 2x2 grid on a black background (no text or symbols beyond labels)CONTROL PANEL

CONTROLS DESCRIPTION
Cooking hob controls:
- Front left cooking zone (1) control knob
- Rear left cooking zone (2) control knob
- Rear right cooking zone (3) control knob
- Front right cooking zone (4) control knob
- Cooking zones residual heat indicator
- Cooking zones power indicator light
Oven controls:
- Electric oven switch knob
- Electric oven thermostat knob
- Oven temperature indicator light

WARNING!!
HAVE THIS RANGE INSTALLED BY A QUALIFIED INSTALLER.
Improper installation, adjustment, alteration, services, or maintenance can cause injury or property damage. Consult a qualified installer, or service agency.
Before Using Your Electric Range
√ Remove the exterior and interior packing.
√ Remove the protective film on steel and aluminium parts
√ Check to be sure you have all of the parts listed below:
- 2 oven shelves
- 6 knobs
- Anti-tip bracket
- 4 leveling legs
• Broiler Tray
√ Clean the interior surface with lukewarm water using a soft cloth.
√ Have your range installed and properly grounded by a qualified installer in accordance with the Installation Instructions.
√ Do not attempt to repair or replace any part of your range unless it is specifically recommended in this manual.
√ Do not remove permanently affixed labels, warnings, or plates from the product. This may void the warranty.
√ The installer should leave these instructions with the consumer who should retain for local inspector's use and for future reference.
√ Please observe all local and national codes and ordinances.
Important:
This appliance is designed and manufactured solely for the cooking of domestic (household) food and is not suitable for any non domestic application and therefore should not be used in a commercial environment.
The appliance warranty will be void if the appliance is used within a non domestic environment i.e. a semi commercial, commercial or communal environment.
Read the instructions carefully before installing and using the appliance.
It is advised to follow these instructions:
√ Clean the interior of the oven with cloth soaked in water and a non-abrasive detergent, then dry carefully.
√ Furnish the interior of the oven-by-insert shelves and tray.
√ Turn the oven on to the maximum temperature to eliminate possible traces of grease from the bottom element. The same operation should be followed for broil element.
IMPORTANT PRECAUTIONS AND RECOMMENDATIONS
After having unpacked the appliance, check to ensure that it is not damaged. In case of doubt, do not use it and consult your supplier or a professionally qualified technician.
Packing elements (i.e. plastic bags, polystyrene foam, nails, packing straps, etc.) should not be left around within easy reach of children, as these may cause serious injuries.
The packaging material is recyclable and is marked with the recycling symbol △.
√ Do not attempt to modify the technical characteristics of the appliance as this may become dangerous to use.
√ Do not carry out cleaning or maintenance operations on the appliance without having previously disconnected it from the electric power supply.
√ After use, ensure that the knobs are in OFF position.
√ Do not allow children or other incapable people to use the appliance without supervision.
√ During and after use of the range, certain parts will become very hot. Do not touch hot parts.
√ Keep children away from the range when it is in use.
√ This range is supplied with a protective film on steel and aluminium parts. This film must be removed before installing/using the appliance.
√ Fire risk! Do not store flammable material in the oven or in the bottom drawer.
√ Make sure that electrical cables connecting other appliances in the proximity of the range cannot come into contact with the hob or become entrapped in the oven door.
√ Do not line the oven walls with aluminium foil. Do not place shelves, pans, backing trays, broil tray or other cooking utensils on the base of the oven chamber.
√ The manufacturer declines all liability for injury to persons or damage to property caused by incorrect or improper use of the appliance.
√ To avoid any possible hazard, the appliance must be installed by qualified personnel only. Any repairs by unqualified persons may result in electric shock or short circuit. In order to avoid possible injuries to your body or to the appliance, do not attempt any repairs by yourself. Such work should be carried out by qualified service personnel only.
√ Danger of burns! The oven and cooking accessories may become very hot during operation. Make sure children are kept out of reach and warn them accordingly. To avoid burns use kitchen clothes and gloves when handling hot parts or utensils.
√ Stand away from the range when opening oven door. Hot air or steam which escapes can cause burns to hands, face, and/or eyes.
√ Never clean the oven with a high-pressure steam cleaning device, as it may provoke a short circuit.
√ This appliance is intended for use in your household. Never use the appliance for any other purpose!
√ If you should decide not to use this appliance any longer (or decide to substitute an older model), before disposing of it, it is recommended that it be made inoperative in an appropriate manner in accordance to health and environmental protection regulations, ensuring in particular that all potentially hazardous parts be made harmless, especially in relation to children who could play with old appliances. Remove the door before disposal to prevent entrapment.
IMPORTANT PRECAUTIONS AND RECOMMENDATIONS FOR USE OF ELECTRICAL APPLIANCES
Use of any electrical appliance implies the necessity to follow a series of fundamental rules. In particular:
√ Never touch the appliance with wet hands or feet;
√ Do not operate the appliance barefooted;
√ Do not allow children or disabled people to use the appliance without your supervision.
The manufacturer cannot be held responsible for any damages caused by improper, incorrect or unreasonable use of the appliance.
GENERAL INFORMATION

WARNING!!
- This appliance shall not be used for space heating. This information is based on safety considerations.
- All openings in the wall behind the appliance and in the floor under the appliance shall be sealed.
- Keep appliance area clear and free from combustible materials, gasoline, and other flammable vapors.
- Do not obstruct the flow of ventilation air.
- Disconnect the electrical supply to the appliance before servicing.
- When removing appliance for cleaning and/or service;
A. Disconnect AC power supply.
B. Carefully remove the range by pulling outward.
CAUTION: Range is heavy; use care in handling. - The misuse of oven door (e.g. stepping, sitting, or leaning on them) can result in potential hazards and/or injuries.
- When installing or removing the range for service, a rolling lift jack should be used. Do not push against any of the edges of the range in an attempt to slide it into or out of the installation. Pushing or pulling a range (rather than using a lift jack) also increases the possibility of bending the leg spindles or the internal coupling connectors.

WARNING!!
ELECTRICAL GROUNDING INSTRUCTIONS
The range must be electrically grounded in accordance with local codes or, in the absence of local codes, with the National Electrical Code, ANSI/NFPA No. 70-latest edition. Installation should be made by a licensed electrician.
FOR PERSONAL SAFETY, THIS APPLIANCE MUST BE PROPERLY GROUNDED.
If an external electrical source is utilized, the installation must be electrically grounded in accordance with local codes or, in the absence of local codes, with the national Electrical Code, ANSI/NFPA 70.
Electrical installation should comply with national and local codes.
REPLACEMENT PARTS
Only authorized replacement parts may be used in performing service on the range. Replacement parts are available from factory authorized parts distributors. Contact the nearest AVANTI parts distributor in your area.
VITROCERAMIC HOB
The ceramic surface of the hob allows a fast transmission of heat in the vertical direction, from the heating elements underneath the ceramic glass to the pans set on it.
The heat does not spread in a horizontal direction, so that the glass stays "cool" at only a few centimeters from the cooking plate.
The 4 cooking zones are shown by painted disks on the ceramic surface.
IMPORTANT NOTE:
The heating elements incorporate a thermolimiter that switches the element ON/OFF during all settings to protect the ceramic glass from overheating.
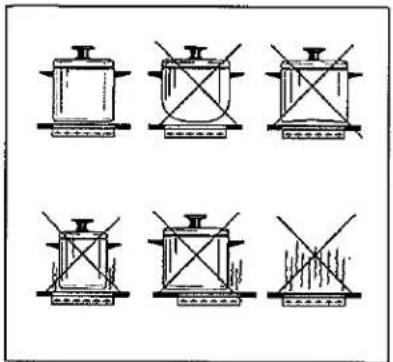
The use of incorrect pans and/or wrong pan positioning will cause the temperature limiter to operate more frequently, resulting in a reduction of cooking performance.
Figure 4
○○
○●

COOKING ZONES
Incorporating the heating element (fig. 5a or 5b) you can control and light up by selecting from the 12 positions on the control knob (fig. 4).
The heat intensity can be regulated continuously from "OFF" to "12" (max).
VERY IMPORTANT: TO SWITCH ON, ALWAYS LIGHTLY PRESS THE CONTROL KNOB THEN TURN IT.
Check that the hob is clean and then switch on by press and turning the control knob.
Figure 5a

natural_image
Abstract spiral pattern enclosed in a circle, no text or symbols presentFigure 6
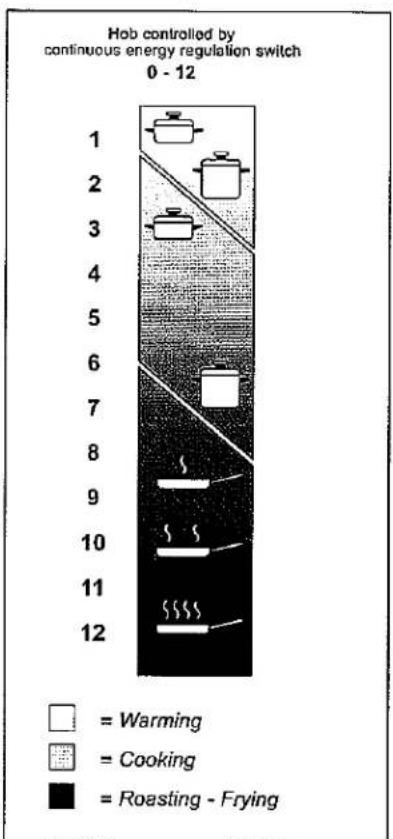
ELECTRIC HOTPLATE USAGE TABLE
| Position of switch | Type of cooking |
| OFF | Switched OFF |
| 12 | For melting operations (of butter or chocolate) |
| 234 | To keep foods warm or heat small quantities of water. |
| 456 | To heat greater quantities of water and to whip creams and sauces. |
| 67 | Slow boiling, e.g. spaghetti, soups, boiled meats, to continue steam heating of roast meats and stews. |
| 78 | For all kinds of fried foods, steaks, cutiets and cooking without a lid. |
| 8910 | For browning of meat, cooked potatoes, fried fish and for boiling large quantities of water. |
| 1112 | Rapid frying, grilled steaks, etc. |
Figure 5b

natural_image
Abstract spiral pattern with concentric circles and a central arrow (no text or symbols)Figure 7
natural_image
Simple line drawing of a circular object above a stylized figure (no text or symbols)Figure 8
RESIDUAL HEAT WARNING LIGHT
IMPORTANT
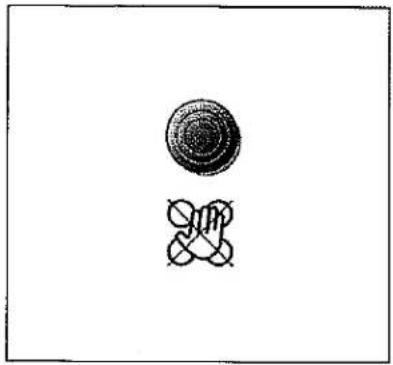
When the ceramic hob is working, the pilot light in the control panel (pos. 10 of fig. 3) will be on.
When the hob temperature is above 140 °F (60 °C), the warning light in the control panel (pos. 9 of fig. 3) will come on to indicate that the hob is hot. This light will stay on even after the hob has been switched off to indicate that the hob is still hot.
The residual heat persists for some time after the hob has been switched off.
During this time avoid touching the hob and take particular care if there are children nearby.
The light will go out automatically when the hob temperature drops below 140 °F (60 °C).
HINTS FOR SAFE USE OF THE HOBS
- Before switching on, check which knob controls the required cooking zone. You are advised to place the saucepan on the hob before switching on and to take it off after switching off.
- To switch on, always lightly press the control knob then turn it.
- Use saucepans with an even flat bottom (be careful of cast iron saucepans). Uneven bottoms can scratch the pyroceram surface. Check that the bottom is clean and dry.
- The diameter of the pan should match that of the cooking zone (or be slightly bigger) to make the most of the energy.
- Pots with aluminium bottoms may leave silver streaks or spots on the hob.
- Do not leave wet or damp lids on the hob.
- Do not use the top if the surface is broken or damaged.
- If you note a crack in the cooktop, switch the appliance off immediately and call the AVANTI After-Sales Service.
- Do not bend over the hobs when they are on.
- Do not leave aluminium foil, greaseproof paper etc. or plastic on the hob when it is hot.
- Remember that the hobs stay hot for quite a long time (approx. 30 min.) after they have been switched off.
- Scrupulously follow the cleaning instructions.
- Do not drop heavy or sharp objects on the glass ceramic cooktop.
- Never cook the food directly on the glass ceramic cooktop, but in special pans or containers.
Figure 9

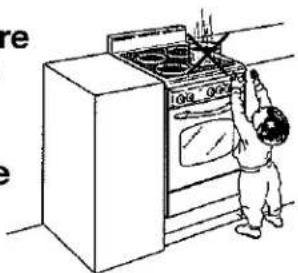
Make sure that the handles of cookware do not stick out over the edge of the range, to avoid them being knocked over by accident. This also makes it more difficult for children to reach the cooking pots/pans.
natural_image
Illustration of a child using a portable stove to clean or install (no text or symbols present)HOW TO USE THE NATURAL CONVECTION ELECTRIC OVEN
GENERAL FEATURES
The conventional oven is provided with 2 heating elements which are:
- Bake element 1800 W (Lower heating element)
- Broil element 1800 W (Upper heating element)
USING THE OVEN FOR THE FIRST TIME
It is advised to follow these instructions:
- Insert shelves and tray.
- Upon first use, it is advisable to operate the oven at the maximum temperature (thermostat control knob on position 450 °F (232 °C) for 60 minutes in the position □ and for another 15 minutes in the position □ to eliminate possible traces of grease on the heating elements.
Attention: the oven door becomes very hot during operation. Keep children away.
VERY IMPORTANT The oven/broil shall be used always with the door closed.
WARNING: The door is hot, use the handle.
OPERATING PRINCIPLES
Heating and cooking in this oven are obtained in the following ways:
a. by normal convection
The heat is produced by the bake heating element.
b. by radiation
The heat is radiated by the infra red broil element (use with the oven door closed).
OVEN THERMOSTAT (fig. 10)
This only sets the cooking temperature and does not switch the oven on. Rotate clockwise until the required temperature is reached (from WARM to 450 °F (232 °C). The temperature indicator light signals when the heating elements are switched on or switched off.
Figure 10


| TEMPERATURE SETTING TABLE | ||
| Knob setting | Temperature in °F | Temperature in °C |
| WARM | 150 | 65 |
| 200 | 200 | 93 |
| 250 | 250 | 121 |
| 300 | 300 | 149 |
| 350 | 350 | 177 |
| 400 | 400 | 204 |
| 450 | 450 | 232 |
Figure 11
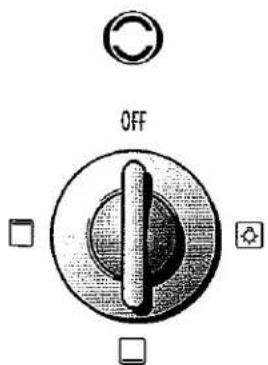
FUNCTION SELECTOR KNOB (Fig. 11)
Rotate the knob clockwise to set the oven for one of the following functions.

OVEN LIGHT
The oven is equipped with a light that illuminates the oven to enable visually controlling the food that is cooking.
By turning the knob onto this setting (see picture aside) we light the oven cavity (15 W). The oven remains lighted while any of the functions is on.

BAKE
In this position only the lower element is switched on. Heat is distributed by natural convection. The thermostat can be set between WARM and the maximum position.

BROILING
The infra-red broil heating element is switched on. The heat is diffused by radiation. Use with the oven door closed and the thermostat knob between WARM and the maximum position.
For correct use see chapter "BROILING"
Before using the broil, preheat for about five minutes.
Always broil with the oven door closed.
Caution: The oven door becomes very hot during operation.
Keep children well out of reach.
COOKING ADVICE
OVEN COOKING
Before introducing the food, preheat the oven to the desired temperature.
For a correct preheating operation, it is advisable to remove the tray from the oven and introduce it together with the food, when the oven has reached the desired temperature. Check the cooking time and turn off the oven 5 minutes before the theoretical time to recuperate the stored heat.
Figure 12

Figure 13

natural_image
Diagram of two stacked rectangular trays with internal grid patterns and directional arrows indicating flow or movement (no text or symbols)Figure 14

Figure 15

BROILING
Very important: the broil element must always be used with the oven door closed.
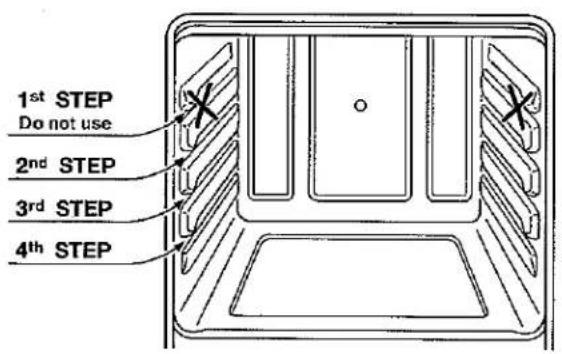
- Position the shelf on the second level from the top (fig. 12).
- Turn on the broil element, as explained in the preceding paragraphs and let the oven preheat for about 5 minutes with the door closed.
- Place the food to be cooked above the broiler tray.
- Introduce the broiler tray (fig. 13) in the oven. The broiler tray should be placed above the shelf and it should be centered with the broil element (fig. 12).
Do not broil without using the broiling pan.
Important: Use always suitable protective gloves when inserting/removing the broiling pan, shelves, pans on other cooking utensils from the oven.
WARNING
VERY IMPORTANT
Before any operation of maintenance disconnect the appliance from the electrical mains supply.
Do not use steam jet cleaners because the humidity could infiltrate into the appliance making it dangerous.
GENERAL RECOMANDATION
√ Important: Before any operation of cleaning and maintenance disconnect the appliance from the electrical supply.
√ It is advisable to clean when the appliance is cold and especially for cleaning the enamelled parts.
√ Avoid leaving alkaline or acidic substances (lemon juice, vinegar, etc.) on the surfaces.
√ Avoid using cleaning products with a chlorine or acidic base.
The oven must always be cleaned after every use, using suitable products and keeping in mind that its operation for 30 minutes on the highest temperature eliminates most grime reducing it to ashes.
ENAMELLED PARTS
√ All the enamelled parts must be cleaned with a sponge and soapy water only or other non-abrasive products.
√ Dry preferably with a chamois leather.
If acid substances such as lemon juice, tomato conserve, vinegar etc. are left on the enamel for a long time they will etch it, making it opaque.
STAINLESS STEEL ELEMENTS
√ Stainless steel parts must be rinsed with water and dried with a soft and clean cloth or with a chamois leather.
√ For difficult dirt, use a specific non-abrasive product available commercially or a little hot vinegar.
INSIDE OF OVEN
This must be cleaned regularly.
With the oven warm, wipe the inside walls with a cloth soaked in very hot soapy water or another suitable product.
REPLACING THE OVEN LIGHT
Before any maintenance is started involving electrical parts of the appliance, it must be disconnected from the power supply.
- Let the oven cavity and the broil element cool down;
- Switch off the electrical supply;
- Remove the protective cover;
- Unscrew and replace the bulb with a new one suitable for high temperatures (300°C-570°F) having the following specifications: 120V 60 Hz, 15W, E14
- Refit the protective cover.
NOTE: Oven bulb replacement is not covered by your warranty.
.VITROCERAMIC SURFACE
Before cleaning the top, make sure that it is switched off.
Remove any encrustation using a special scraper which can be purchased separately (fig. 16).
Remove dust using a damp cloth.
Detergents can be used as long as they are not abrasive or corrosive.
All residues of detergent must be eliminated with a damp cloth.
Keep all objects that could be melted by the heat away from the top: plastic objects, aluminium foil, sugar or sugary products.
If an object melts on the top, remove immediately (while the top is still hot) using a special scraper to avoid permanent damage to the pyroceram surface.
Avoid using knives and pointed objects as they could damage the surface of the top.
Also avoid using abrasive sponges or wire wool which can permanently scratch the pyroceram surface.
ATTENTION: MOST IMPORTANT!
If cleaning the glass ceramic hob using a special scraper tool take extra care to avoid damaging to the seal at the edges of the glass ceramic surface.
OVEN SHELF INSTALLATION AND REMOVAL
The oven shelves are provided with a security block to prevent accidental extraction. They must be inserted operating as per figure 17.
To pull them out remove shelf in the inverse order.
Keep attention to insert the shelves correctly (see side figure).
OVEN DOOR
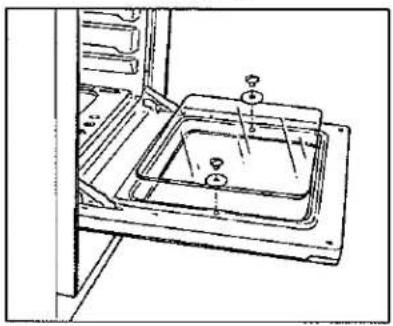
The internal glass of the oven door can be easily removed for cleaning by unscrewing the two lateral fixing screws (fig. 18).
REMOVABLE STORAGE DRAWER
The drawer (fig. 19) comes out like a normal drawer.
To remove the drawer open and lift it.
Figure 16

natural_image
Hand using a power tool to clean granular material on a circular surface (no text or symbols visible)Do not use steam jet cleaners because the humidity could infiltrate into the appliance making it dangerous.
Do not scratch the cooktop with cutting or sharp objects.
Do not use the cooktop as a work surface.
Figure 17

Figure 18
natural_image
Technical line drawing of a mechanical assembly with mounting holes and a central component (no text or symbols)Figure 19

natural_image
Pure technical line drawing of a structural bracket assembly without any text or symbolsDo not store flammable material in the oven or in the bottom drawer.
Figure 20a

Figure 20b

natural_image
Line drawing of hands installing or adjusting a rectangular panel inside a kitchen appliance (no text or symbols)REMOVING THE OVEN DOOR
Type A
To facilitate oven cleaning, it is possible to remove the door. Please follow the instructions carefully:
- Open the door completely.
- Push down the lever "L" and, keeping it in this position, slowly close the door in order to block the hinge (fig. 20a).
- Grip the door (as indicated in fig. 20b) and, while closing it, release the two hinges as shown in fig. 20c.
- Rest the door on a soft surface.
Figure 20c

DOOR ASSEMBLY
- Grip the door with your hands placed near the hinges and raise the levers "H" with your forefingers (fig. 20c)
- Insert the hinges in their position until levers "H" are hooked.
- Open the door completely to obtain the release of levers "L".
Figure 21a

natural_image
Technical line drawing of a mechanical assembly with no visible text or symbolsFigure 21b

natural_image
Technical line drawing of a mechanical bracket with an arrow indicating a specific component (no text or symbols present)Figure 21

natural_image
Line drawing of hands installing or adjusting a rectangular panel on a tray (no text or symbols)REMOVING THE OVEN DOOR
Type B
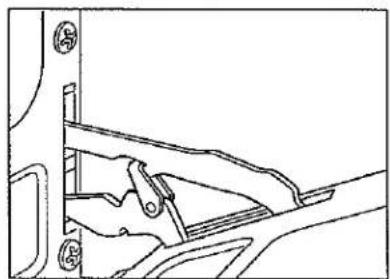
The oven door can easily be removed as follows:
- Open the door to the full extent (fig. 21a).
- Attach the retaining rings to the hooks on the left and right hinges (fig. 21b).
- Hold the door as shown in fig. 21.
- Gently close the door and withdraw the lower hinge pins from their location (fig. 21c).
- Withdraw the upper hinge pins from their location (fig. 21d).
- Rest the door on a soft surface.
- To replace the door, repeat the above steps in reverse order.
Figure 21c
natural_image
Technical line drawing of a mechanical assembly with no visible text or symbolsFigure 21d

natural_image
Technical line drawing of a mechanical bracket or bracket assembly (no text or symbols)TROUBLE SHOOTING GUIDE
| PROBLEM | POSSIBLE CAUSE |
| Surface units will not maintain a rolling boil or frying rate is not fast enough. | You must use pans that are absolutely flat. |
| Pan bottoms should closely match the diameter of the surface unit selected. | |
| Food cook slowly. | Improper cookware being used. |
| Surface units do not operate. | You have blown a household fuse or tripped a circuit breaker. |
| The surface units are not plugged in all the way. | |
| You have not set the control knobs correctly. | |
| Control knobs will not turn. | If it is a surface unit control knob, you are not pushing in before turning. |
| If it is oven control knob, you are trying to turn the knob to wrong direction. | |
| Oven light does not work. | Light bulb is loose or defective. |
| Switch operating oven light is broken. | |
| Oven does not work. | You have blown a household fuse or tripped a circuit breaker. |
| You have not set the control knobs correctly. | |
| Food does not broll properly. | The oven control knob not set at BROIL. |
| Improper rack position being used. | |
| Cookware is not suited for broiling. | |
| Oven thermostat is defective. | |
| Food does not bake properly. | The oven control knob does not set properly. |
| Rack position is incorrect. | |
| Incorrect cookware or cookware of improper size is being used. | |
| Oven thermostat is defective. |
SERVICE FOR YOUR ELECTRIC RANGE
We are proud of our customer service organization and the network of professional service technicians that provide service on your Avanti appliances.
With the purchase of your Avanti appliance, you can have the confidence that if you ever need additional information or assistance, the Avanti Products Customer Service team will be here for you. Just call us toll-free.
AVANTI PRODUCTS CUSTOMER SERVICES
| Product Information800-323-5029 | Whatever your questions are about our products, help is available. |
| Part Orders800-220-5570 | You may order parts and accessories that will be delivered directly to your home. You may order these items by personal check, money order, Master Card, or Visa. |
| In-Home Repair Service800-220-5570 | An Avanti Products authorized service center will provide expert repair service, scheduled at a time that is convenient for you. Our trained Servicers know your appliance inside and out. |
WARRANTY - ELECTRIC RANGE
| LENGTH OF WARRANTY | WE WILL PAY FOR |
| FULL ONE-YEAR WARRANTY FROM DATE OF PURCHASE ON ALL PARTS EXCEPT GLASS PARTS IN RENTAL OR COMMERCIAL USE, THE WARRANTY PERIOD IS 90 DAYS. | REPLACEMENT PARTS AND REPAIR LABOR TO CORRECT DEFECTS IN MATERIALS OR WORKMANSHIP. SERVICE MUST BE PROVIDED BY AN AUTHORIZED SERVICE COMPANY. |
| FULL 30-DAY WARRANTY FROM DATE OF PURCHASE ON GLASS PARTS AND FINISH OF PORCELAIN ENAMEL, PAINTED OR BRIGHT METAL FINISHED PARTS. | REPLACEMENT PARTS AND REPAIR LABOR TO CORRECT DEFECTS IN MATERIAL OR WORKMANSHIP. SERVICE MUST BE PROVIDED BY AN AUTHORIZED SERVICE COMPANY. |
| WE WILL NOT PAY FOR | |
| A. Service calls to:1. Correct the installation of your range.2. Instruct you how to use your range.3. Replace house fuses or correct house wiring.4. Replace owner-accessible light bulbs.B. Pickup and delivery. Your range is designed to be repaired in the home.C. Damage to your range caused by accident, misuse, fire, flood, acts of God, or use of products not mentioned in this manual.D. Repairs to parts or systems caused as a result of unauthorized modifications made to the appliance.E. Repairs when your range is used in other than normal, single-family household use. | |
AVANTI PRODUCTS SHALL NOT BE LIABLE FOR INCIDENTAL OR CONSEQUENTIAL DAMAGES.
Some states do not allow the exclusion or limitation of incidental or consequential damages, so this exclusion or limitation may not apply to you. This warranty gives you specific legal rights, and you may also have other rights that vary from state to state.
This warranty is not valid outside the Continental United States.
rif. 1672.U
The manufacturer cannot be held responsible for possible inaccuracies due to printing or transcription errors in the present booklet.
The manufacturer reserves the right to make all modifications to its products deemed necessary for manufacture or commercial reasons at any moment and without prior notice, without jeopardising the essential functional and safety characteristics of the appliances.
- CAUTION:
- CONTENTS
- TABLE OF CONTENTS
- VITROCERAMIC COOKING HOB
- CONTROL PANEL
- CONTROLS DESCRIPTION
- Cooking hob controls:
- Oven controls:
- WARNING!!
- Before Using Your Electric Range
- Important:
- It is advised to follow these instructions:
- IMPORTANT PRECAUTIONS AND RECOMMENDATIONS
- IMPORTANT PRECAUTIONS AND RECOMMENDATIONS FOR USE OF ELECTRICAL APPLIANCES
- GENERAL INFORMATION
- ELECTRICAL GROUNDING INSTRUCTIONS
- REPLACEMENT PARTS
- VITROCERAMIC HOB
- IMPORTANT NOTE:
- COOKING ZONES
- RESIDUAL HEAT WARNING LIGHT
- IMPORTANT
- HINTS FOR SAFE USE OF THE HOBS
- HOW TO USE THE NATURAL CONVECTION ELECTRIC OVEN
- GENERAL FEATURES
- USING THE OVEN FOR THE FIRST TIME
- OPERATING PRINCIPLES
- OVEN THERMOSTAT (fig. 10)
- FUNCTION SELECTOR KNOB (Fig. 11)
- OVEN LIGHT
- BAKE
- BROILING
- COOKING ADVICE
- OVEN COOKING
- WARNING
- VERY IMPORTANT
- GENERAL RECOMANDATION
- ENAMELLED PARTS
- STAINLESS STEEL ELEMENTS
- INSIDE OF OVEN
- REPLACING THE OVEN LIGHT
- .VITROCERAMIC SURFACE
- ATTENTION: MOST IMPORTANT!
- OVEN SHELF INSTALLATION AND REMOVAL
- OVEN DOOR
- REMOVABLE STORAGE DRAWER
- REMOVING THE OVEN DOOR
- Type A
- DOOR ASSEMBLY
- Type B
- TROUBLE SHOOTING GUIDE
- SERVICE FOR YOUR ELECTRIC RANGE
- AVANTI PRODUCTS SHALL NOT BE LIABLE FOR INCIDENTAL OR CONSEQUENTIAL DAMAGES.
Brand : Avanti
Model : DER200W
Category : Frying Pan