
HB29S - Flat Panel Mount Chief - Free user manual and instructions
Find the device manual for free HB29S Chief in PDF.


| Product Type | Flat Panel Mount |
| Brand | Chief |
| Model | HB29S |
| Compatible Screen Sizes | 32" to 65" |
| VESA Compatibility | 200x200 to 600x400 mm |
| Weight Capacity | 125 lbs (56.7 kg) |
| Tilt Range | +5° to -15° |
| Swivel Range | ±90° |
| Level Adjustment | ±3° |
| Mounting Pattern | Universal rails with adapter brackets |
| Material | Steel with powder coat finish |
| Color | Black |
| Wall Plate Dimensions | 24.5" x 13.3" (622 x 338 mm) |
| Overall Depth (min/max) | 2.9" to 22.4" (74 to 569 mm) |
| Installation | Mounts to wood studs or concrete |
| Cable Management | Integrated cable clips and cover plates |
| Warranty | 10 years |
| Included Hardware | Mounting screws, bolts, spacers, bubble level, and hex tools |
| Cleaning and Maintenance | Wipe with a soft, dry cloth. Avoid harsh chemicals. |
| Safety | Certified for safety by UL/ETL, includes security screws to prevent theft |
| Spare Parts and Repairability | Replacement parts available through Chief support |
Frequently Asked Questions - HB29S Chief
User questions about HB29S Chief
0 question about this device. Answer the ones you know or ask your own.
Ask a new question about this device
Download the instructions for your Flat Panel Mount in PDF format for free! Find your manual HB29S - Chief and take your electronic device back in hand. On this page are published all the documents necessary for the use of your device. HB29S by Chief.
USER MANUAL HB29S Chief
INSTALLATION INSTRUCTIONS
MODEL: HB-29S Custom Projector Bracket
Unpack carton and verify contents. If any listed parts are missing, immediately contact a Chief Customer Service representative by calling 1-800-582-6480.
PARTS
| (1) BRACKET, Custom HB (4) NUT, Flange, Hex, 5/16-18 | |
| (4) SCREW, Phillips Machine, M6-1.00 x 16mm | (4) FLAT WASHER, Standard Machine Screw 6mm |
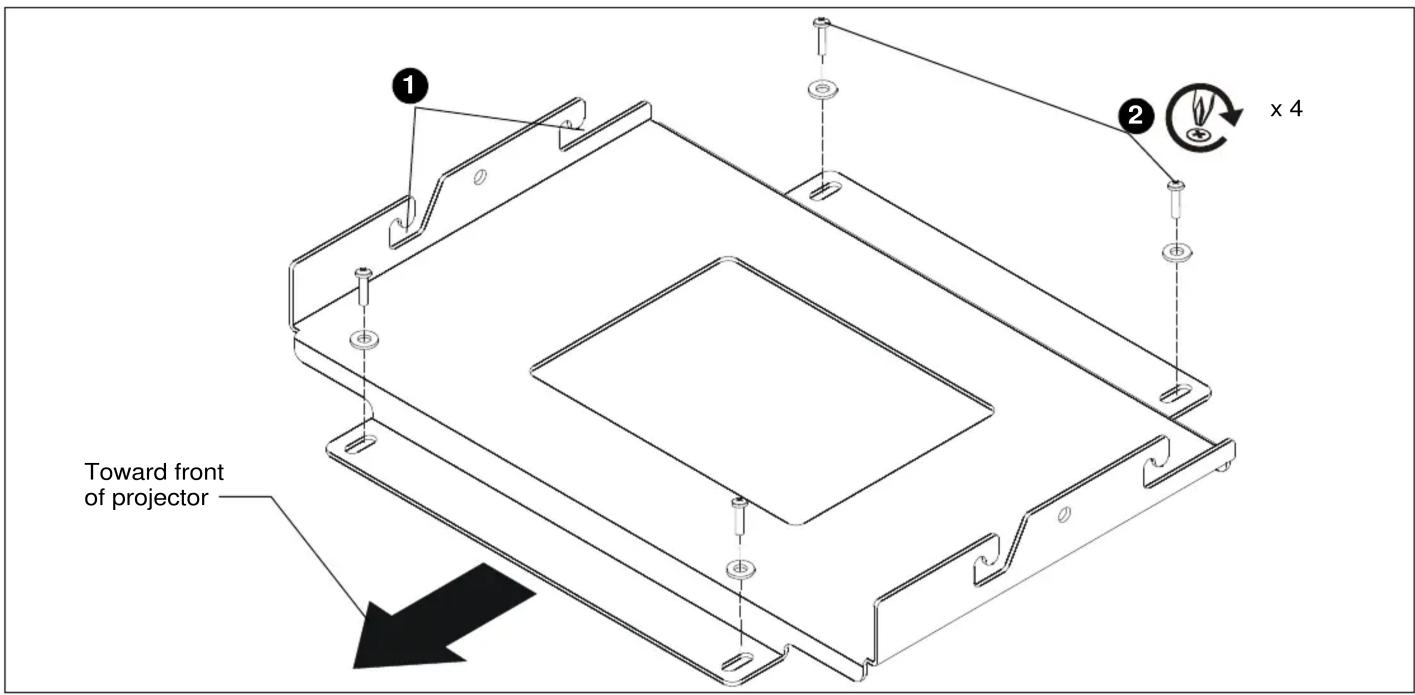
Figure 1:
INSTALLATION

WARNING: IMPROPER INSTALLATION MAY RESULT IN SERIOUS PERSONAL INJURY! All components must be securely fastened to each other and to the ceiling, and the ceiling must be capable of supporting five times the total weight of the installation.

CAUTION: This HB bracket mount is designed to support the weight of only one projector per mount. DO NOT attempt to attach more than one projector to the same mount!
- Place custom HB bracket on underside of the projector and line up the four screw holes on the bracket with the four corresponding holes on the projector. Ensure that the side hooks open towards back of the projector. (See Figure 1)
- Attach HB bracket to projector using four M6-1.00 x 16mm Phillips machine screws through washers and spacers into projector. Install each screw partially to make sure all screws are aligned correctly before tightening the screws to the bracket. (See Figure 1)
Continued...
Milestone AV Technologies, and its affiliated corporations and subsidiaries (collectively, "Milestone"), intend to make this manual accurate and complete. However, Milestone makes no claim that the information contained herein covers all details, conditions or variations, nor does it provide for every possible contingency in connection with the installation or use of this product. The information contained in this document is subject to change without notice or obligation of any kind. Milestone makes no representation of warranty, expressed or implied, regarding the information contained herein. Milestone assumes no responsibility for accuracy, completeness or sufficiency of the information contained in this document.

CHIEF®
Our Mounts. Your Vision.
Chief Manufacturing, a division of Milestone AV Technologies
8803-000120
8401 Eagle Creek Parkway, Savage, MN 55378
©2008 Milestone AV Technologies
• P: 800.582.6480 / 952.894.6280 • F: 877.894.6918 / 952.894.6918
9/30/08
INSTALLATION INSTRUCTIONS
Continued...

CAUTION: Installing a ceiling mount requires the presence of two persons familiar with mechanical installations. A third assistant is recommended.
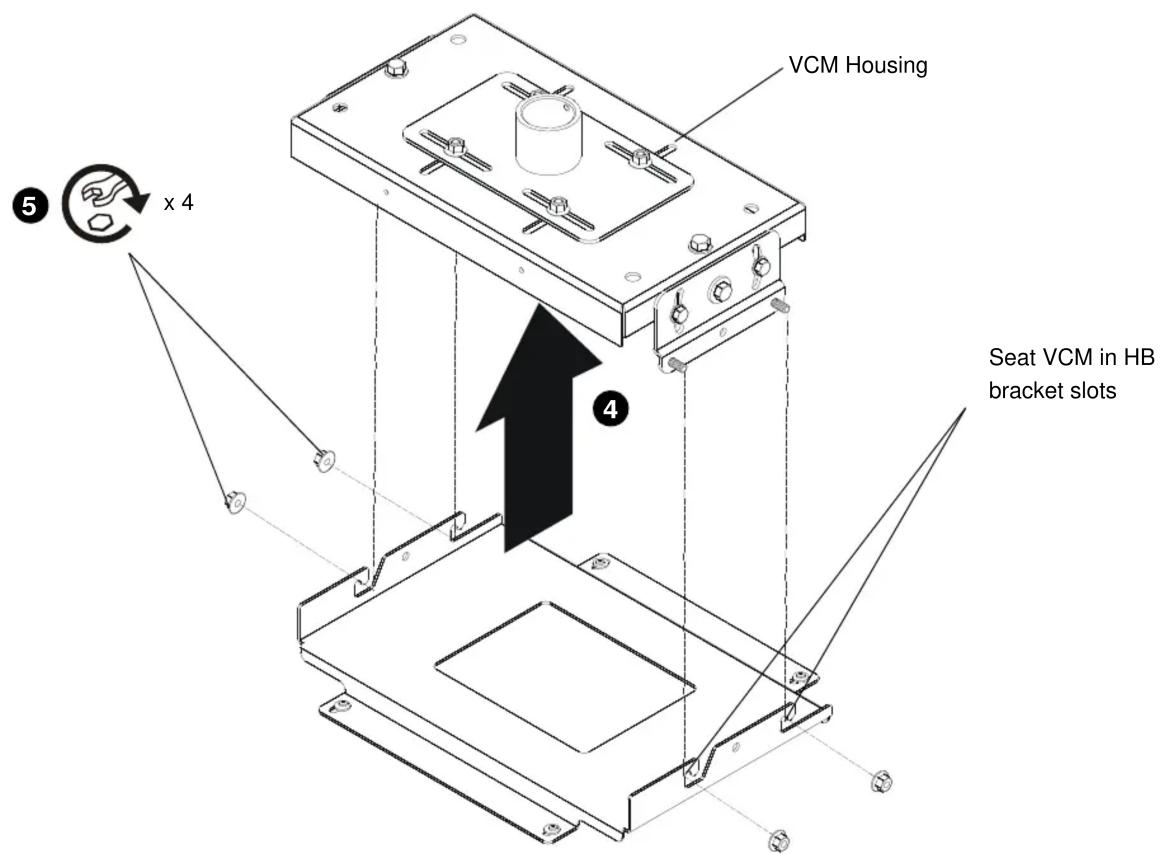
Figure 2:
- Attach VCM housing to your method of support and tighten firmly so the VCM housing is square to the screen.
- With help of assistants, lift the projector and install it to the four studs extending from the VCM housing. Ensure that the VCM housing is seated in slots on HB bracket. (See Figure 2)
- Tighten the four 5/16" flange nuts. (See Figure 2)
Chief® is a registered trademark of Milestone AV Technologies. All rights reserved.
Brand : Chief
Model : HB29S
Category : Flat Panel Mount