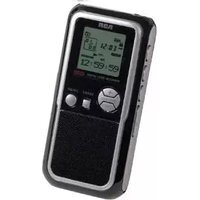
RP5130 - Mp3 player AUDIOVOX - Free user manual and instructions
Find the device manual for free RP5130 AUDIOVOX in PDF.


| Product Type | MP3 Player with Voice Recording |
| Brand | Audiovox |
| Model | RP5130 |
| Power Supply | 2 x AA batteries (alkaline recommended) |
| Battery Life Indicator | Yes, displayed on LCD |
| Recording Modes | Dictation (DICT) and Conference (CONF) |
| Recording Quality Levels | LP, SP, HQ, SHQ |
| Maximum Recording Time (LP) | Approx. 140 hours |
| Maximum Recording Time (SP) | Approx. 70 hours |
| Maximum Recording Time (HQ) | Approx. 25 hours |
| Maximum Recording Time (SHQ) | Approx. 17 hours |
| Playback File Format | MP3 |
| Display | LCD with folder, file, battery, and status icons |
| Key Lock | Yes, slide switch |
| Auto Power Off | After 3 minutes of inactivity |
| Bookmark Function | Yes, up to 10 per file |
| Erase Functions | Erase individual file or all files in a folder |
| Memory Format | Yes, formats internal memory |
| Maintenance | Clean with soft dry cloth |
| Precautions | Avoid shock, heat, moisture; remove batteries if not used for a month |
| FCC Compliance | Class B digital device, Part 15 |
Frequently Asked Questions - RP5130 AUDIOVOX
User questions about RP5130 AUDIOVOX
0 question about this device. Answer the ones you know or ask your own.
Ask a new question about this device
Download the instructions for your Mp3 player in PDF format for free! Find your manual RP5130 - AUDIOVOX and take your electronic device back in hand. On this page are published all the documents necessary for the use of your device. RP5130 by AUDIOVOX.
USER MANUAL RP5130 AUDIOVOX
It is important to read the instructions prior to using your product for the first time. It is important to make manual adjustments for your new product.


Power Supply • (battery power) 2 x "0.5A"
ESD Remark: In case of malfunction due to electromagnetic discharge, just reset the product (disconnect and reconnect the power sources may be required) to restore normal operation.
FCC information
This device complies with Part 15 of the FCC Rules. Operation is subject to the following two conditions: (1) this device may not cause harmful interference, and (2) this device must accept any interference received, including interference that may cause undesired operation.
This equipment has been tested and found to comply with the limits for a Class B digital device, pursuant to Part 15 of the FCC Rules. These limits are designed to provide reasonable protection against harmful interference in a residential installation. This equipment generates, uses, and can radiate radio frequency energy and, if not installed and used in accordance with the instructions, may cause harmful interference to radio communications.
However, there is no guarantee that interference will not occur in a particular installation. If the equipment does cause harmful interference to radio or television reception, which can be determined by turning the equipment off and on, the user is encouraged to try to correct the interference
by one or more of the following
measures: - Reorient or relocate the receiving antenna - Increase the separation between the equipment and receiver
- Increase the separation between the equipment and
from that to which the receiver is connected
- Consult the dealer or
an experienced radio/TV technician for help.
an experienced radio/
technician for help
Changes or modifications not expressly approved by the party responsible for compliance could void the user's authority to operate the equipment.
Service information: This product should be serviced only by those specially trained in appropriate servicing techniques. For instructions on how to obtain service, refer to the warranty included in the user manual.
Maintenance
Clean the unit with a soft, dry or damp chamois leather. Do not use solvents.
Precautions for the unit
Do not use the unit
immediately after
transportation from a cold place to a warm place.
Condensation problems may
result. Avoid shock to the unit.
especially during recording.
Recorded data can be damaged.
Do not store the unit
near fire, places with high
temperature of phase void direct surface.
• Do not escape at store wall
in place with frequent data electricity or electrical power
- Down the unit with a soft
leacher. Never 100 obohns.
• The crit must only be open
• Do not want this neighbor.
in rain or moisture.
Important battery
precautions
• Any battery may present
a mix of 1-2, except of chemical lum if abroad. De
not try to charge a battery
that is not intended to be recharged, do not incorporate.
and do not puncture.
• Non-rechargeable batteries, such as alkaline batteries, may
leak if left in your product
for a long period of time. Remove the batteries from
the product if you are not
going to use it for a month or
• If your product uses more
than one battery, do not mix
types and make sure they are inserted correctly. Always
replace all batteries at the same time. Mixing old and new batteries
may cause them to leak.
• If a battery leaks, avoid contact with the leaked fluid immediately. If contact occurs,
wash the affected area with soap and water. If the fluid gets into your eyes,
seek medical attention. Please help to protect the
environment by recycling
or disposing of batteries properly.
according to health, health, and local regulations.
Before you begin
Unpacking your player Auto power shut down
You should have the following:
• one USB cable
• one user manual
• one quick start guide Using earphones and external microphone
Installing batteries
this player can be operated by 2 quarters. You can make a deal with
This player can be operated by 2 quarters. You can make a deal with
- den to open. a constructed, no record can be made from built in
den to open. a constructed, no record can be made from built in
- pela tie matching
indikations.
indications.
- Missed the battery
Compartment cost
Refer to the battery level indicator daily for battery level.
Replace with new batteries when
the indicator is empty.
Turn off the page first
before replacing batteries.
In power implementation
time how to be set again.
The player will be automatically
turned off left side for three minutes.
Using earphones and
external microphone
- which earphones are connected to oral nutrient from
connected, sound output from the quake will be mixed.
+ When an external microphone is mounted on a wall
a coaxial, no score can be made from the built-in
microphone.
Player on/off
Press and hold to turn on the
player: Press and hold ■ to turn off
Keys lock
To avoid accidental key activation,
slide the key lock switch toward the lock icon (A) to lock the keys.
Reverse the step to unlock the
keys
General controls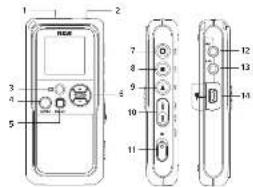
- Built-in microphones
- Rounding indicator
- ① creates bookmarks
- MENU - press once to access folders, press and hold to access the paper menu for various settings
- ERASE - erases files
- VOLUME +/- adjust volume, select / becomes in the player menu adjusts secretary during AVR recording
Display 1. Voice recording folder (1-4)
2. File selected
3. Total number of files in a folder
4. Playback in progress
5. Rersealing in progress
6. Playback speed
7. Total session time for recording
8. Music folder
9. Battery loss indicator 10. Key lock function activated
11. Time, date, record time
12. Bookmark
13. Recording conditions
14. Automotz voice recording activated
15. Area for display messages (refer to the next section)
16. Playback mode, play one or play all
17. Recording qualities
18. Key time is activated
Display messages
They show at the bottom of the display during operation. Refer to the
| ALL | Select all the movie's Poppack by Erasing All Files |
| APPEND | Australia: Jacking Apparistic |
| CUT-2 | Can Be Real (Carting) |
| CUT-4 | Can Be Real (Carting) |
| DELETE | Dukes in Sex using Selected Five |
| #0 FULL | Mature full |
| #0 FULL | Receivables |
| MMDD | Short time by entry mode |
| 12 HOUR | 12 hour time directly mode |
| 24 HOUR | At most daily mode |
| TIME | Time entry mode |
| INSRT | Meeting: Reading New Replandion |
| INTO | Introduction to the Service of Playback |
| OFF | Off: Summer Time Eventoring |
| ON | On: Summer Time Recordings |
| ON M3D | Something (Joules) |
| TONE | Beeping Sound on Setting Sound (Sound) |
| NO FORE | No beeping sound Setting Sound |
| VOL 12 | Volume of Viable |
| YEAR | Year Setting Year |
| LOCKED | Key closed |
| FORMAT | Security, Memory |
| SPEED | Sound of Daylight |
| WAT... | Until a boy |
| 90%+ | Inside a play program |
| PAUGE | Playback is supposed |
| LADATT | Balance limit a low |
| DALELLA | Balance limit a high |
| DEC 01 | Dukes the selected (to see, if it hit) |
Setting day and time
Once day and time are set, you can always read on the display the recording date and time of your recorded messages. Normal recording is still possible without setting. However, no correct recording date and time can be referred to your recorded messages.
Follow the steps below for setting
day and time:
- Press to turn on the player.
- Press and hold.
MENU for about
3 seconds and then colour the
the release the bottom. The first
men, item, 201
- Papa MENU radio received
and YEAR shares.
• If day and time have not been
will previously, the proper does in size 3 automatically alter:
in step 2 simultaneously and turn on,
- When YEAR should press the net or VOLUME +/- to adjust the value (default year: 2016) and then press MENU in cardium.
- After year is set, you will then be graded to set month, day, 12/24 hour display, hour and minute. Follow the operations in step 4 for settings

Basic operations Select folder
1. Press MENU
2. Puses
3. Press VOLUME also in actual
listening volume.
4. Press and holder to move
make quick search within a
body.
5. Press free or without to guide
to the forward for next board.
6. Press to your playback.
7. Press to your playback.
8. Press to cover
the desired folder.
9. Press to store
overa recordings. Folder is
for storing MP3 files.
* "Aids" displayed if
you are at the first file in the
and press or at the last
and it is available. See
information for many details. Select fi to
To select a specific fi is for play-back.
1. Select the future you need.
2. From we or see select the fi in your want, if the fi is you won it in the current future, you can press or see select it directly in both stop and play media. Normal playback
1. Select a tighter and a hile.
2. Press ▶ to start playback.
3. Press ▶ to pause playback, press again to resume. The MENU key: two too functions
Accessing folders Press MENU repeatedly to select folders.
Foker: 1 × 2 × 3 × 4 × 5 × 6 × 7 Press MENU repeatedly
Accessing player menu 1. Press and hold MENU for about 2 seconds and then release the buttons. The first menu item, DCT or COAF II, is displayed. Press and hold MENU for about 2 seconds, then press MENU again repeatedly to select the following menu items: Record conditions (DKTCONF) ↓ Record quality (PSNHQSHG) ↓ AVR (unref) Creating a bookmark The feature allows you to create an interruption point in the recorded messages for quick reference. 1. During playback, press (□) more to set a bookmark, the bookmark can flash on the display. • The month-and-date information is displayed, followed immediately by the counters for the bookmarks. Current bookmark + 10 - note number of bookmarks 2. You can create multiple bookmarks until "8x FULL" is displayed.
Using MENU key
Bookmark
Deleting bookmarks
- Push MENU repeatedly to
select a 10-er H 61.
- When playback is stopped.
press and hold □ for 2
bookmarks in Use file.
You can decide to be 10 bookmarks.
in a time when the
maximum limit is reached. "llb>500" will be shown
• If there are bookmarks in
the currently playing h is,
prising the book is through the bookmarks
first before skipping to the
prevention of real life.
Recording
Setting recording mode
You can select between two
recording modes - natural recording and 2011 automatic voice
recording.
Manual Operation
- While playback is stopped.
select a destination folder
14 of by pressing MENU repeatedly.
- Press HEC to start recording.
Increasing time will be
- To pause recording, press REC
once, press again to resume
AVR (Automatic Voice Recording)
This feature places the place to
- Press and hold MENU for
about 2 seconds and then
release the button. The first menu panel, DCF or COW
- Ashen on clashing
- From MENU again repeatedly until 6/8/25, plus no drag
- Press member
VOLUME =1-10
AVR on and AVR
off OFF
- Price is called up your selection and exit
setting.
- Press REC to enter AVR mode.
- Page AVR
recording. adj.st 12-23-
the sensitivity of: 1/2 cm
by pressing
VOLUME, MIN
call show an display j.e.g
increase sensitivity level when
recording source is far from the player of the recording
the paper is called the environment is quiet.
- Start dietation. Recording
- Prax gln and ACR precoding
- Repeat the 2-3 and use
Afs. Offic consection.
• During rescuing the recording indicator
lights When in A/B
standby mode of when recording it saved the
recording indicators fl areas
• You can record up to 39
exceeding 500 files in total.
When the maximum time is
reached, "a>100" call to
• The first reliable or two
may be eat when you will be eating from
This sound's use to turn
on the AVH feature. It is
a good practice in nature. same 'sounds' or say a short.
word to activate the AVR
Before you Engin actuariedication.
• To view the remaining
time and other recording information, press and hold
▶ during recording.
Setting recording quality
You can select among fear
recording quantities. Default is HQ
Definition
+ LP (Long Play) allows
about 140 hours recording + sr (standard play) alone
about 70 hours recording.
• HQ (High Quality) allows about 25 hours recording
+ SHQ (Super High Quality)
allow about 17 hours
recoming
- Press and hold menu for
from 2 seconds and then release the button. The 11 oz
menu item, DICT or CONF
8 ashes on display 2. Box MENU
again repeatedly
UME UP, SP, HQ
or display:
- Select smecg IP,
SP. HQ and SHO by pressing VOLUME
- Trew ■ to conf in your
wiction and oil setting.
∴ m = 3/11
Setting recording condition You can select between text recording conditions, default is DCT Definition
- CONF (Conference) - In a more open area and recording scores is far from the place. - DICT (Dictation) - in a more enclosed area and recording scores is close to the place.
or CONF II ises en display.
2. Select recording condition by pressing HAN or VOLUME 3. Press ■to confirm your selection and exit setting. Erasing selected file
To delete a file:
1. Press MENU regularly to select a to der 11-6 or 20.
2. Press H# or ##o select a file.
3. Press ERASE once and 051.07 for the currently selected file number will flash on the display. 4. Press and hold ERASE for three seconds to conh rn deeting (or press ■to cancel enwing fi el)
Erasing files
Erasing all files in a folder. To delete all files in a specific folder: 1. Press MENU repeatedly to select a folder (I-5). 2. While playback is stopped, press repeatedly until ALL appears on the display. 3. Press ERASE and DEL ALL will flash on the display. 4. Press and hold ERASE for about three seconds, all files in the selected folder will be erased completely (or press to cancel erasing all files). (1) This instruction is for reference only. IntroScan: This feature allows playback of the first three seconds of each file in a folder. 1. Press MENU repeatedly to select a folder (I-6). 2. Press 100 or 90 until ALL shows on display. 3. Press ▶ to start intro scan, and INTRO will show on display. 4. Press ■ to stop playing current file. Press to quit intro scan. Play one/all: You can choose to play a specific file or all files. 1. Press and hold MENU for about 2 seconds and then release the button. The first menu item, DICT or CONF, will show on display. 2. Press MENU repeatedly until ONE or ALL flashes on display. 3. Press M/H or VOLUME +/- to select between ONE and ALL. 4. Press ■ to confirm your selection and exit setting. ■ If ONE is selected, the player will stop after the selected file is played. If ALL is selected, the player will stop after all files in a folder are played. Tones: You can activate this feature so that a sound can be heard when you press any key (including during playback and recording). 1. Press and hold MENU for about 2 seconds and then release the button. The first menu item, DICT or CONF, will show on display. 2. Press MENU again repeatedly until BEEP flashes on display. 3. Press M/H or VOLUME +/- to set beep sound ON/OFF. 4. Press ■ to confirm your selection and exit setting. Speed: You can adjust the playback speed. 1. Press ▶ to start playback of a selected file. 2. During playback, press MENU once, SPEED shows on display. 3. Press M/H or VOLUME +/- to select between FAST, SLOW, and no speed indication. 4. Press ▶ to confirm and start playback at the selected speed. Format (caution: All data inside the memory will be erased): You can format the internal memory when needed, e.g., compatibility problems, etc. The procedures are as follows: 1. Turn on the recorder. 2. Press ERASE, and the number for the currently selected folder will flash on the display.
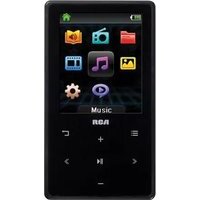
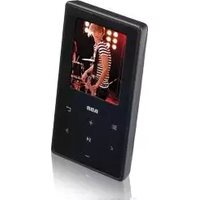
Brand : AUDIOVOX
Model : RP5130
Category : Mp3 player