
GMK329BM - Assembly kits American International - Free user manual and instructions
Find the device manual for free GMK329BM American International in PDF.


| Product Type | Mounting Kit |
| Brand | American International |
| Model | GMK329BM |
| Compatible Devices | Car stereos and accessories |
| Material | High-grade plastic and metal |
| Dimensions (L x W x H) | 6.5 x 4.2 x 1.8 inches |
| Weight | 0.6 lbs (approx.) |
| Power Supply | Not required (passive component) |
| Primary Function | Secure mounting for aftermarket devices |
| Installation Type | DIY with basic tools |
| Included Components | Brackets, screws, and mounting hardware |
| Color | Black |
| Maintenance | Wipe with dry cloth; avoid liquids |
| Cleaning Instructions | Use a soft, dry cloth; no solvents |
| Safety Precautions | Use appropriate tools; disconnect power during installation |
| Spare Parts Availability | Replacement screws and brackets sold separately |
| Repairability | Modular design; parts can be replaced individually |
| Warranty | 1 year limited warranty |
| Country of Origin | China |
| Certifications | RoHS compliant |
Frequently Asked Questions - GMK329BM American International
User questions about GMK329BM American International
0 question about this device. Answer the ones you know or ask your own.
Ask a new question about this device
Download the instructions for your Assembly kits in PDF format for free! Find your manual GMK329BM - American International and take your electronic device back in hand. On this page are published all the documents necessary for the use of your device. GMK329BM by American International.
USER MANUAL GMK329BM American International
VEHICLE APPLICATIONS
Chevrolet
2015 COLORADO
GMC
2015 CANYON
NOTE: THIS INSTALLATION KIT REQUIRES PROFESSIONAL INSTALLATION. MAJOR SUB-DASH MODIFICATION IS REQUIRED TO FIT RADIO.
GMK329BM Mounting Kit
DASH DISASSEMBLY INSTRUCTIONS
- Unsnap and remove center dash trim piece from around the radio and climate controls.
- Remove (4) screws from the radio and climate controls.
- Remove radio and climate controls. Unplug all harnesses and antenna connections.
- Remove the climate controls and 2 Air vents, to be installed into GMK329BM panel.
KIT ASSEMBLY INSTRUCTIONS
Single DM Mount Applications
- Attach the left and right side brackets to the main bracket.
- Insert pocket (part # UNIPOC) into lower section of the main frame.
-
Attach left and right side brackets to the rear of the pocket using screws supplied.
-
Insert DIN sleeve from your new radio into the upper section of the installation kit.
-
Depress the tabs from inside the sleeves opening upward, outward, and downward to secure sleeve to the installation kit.
-
Install radio into sleeve and lock into place.
-
Attach a rear support bracket to the rear of the new radio and adjust as necessary to attach to the rear support stud located on the back of the pocket using the small phillips screw supplied with kit (optional).
-
Attach (1) of the metal spring clips included to each of the
(3) mounting studs on the rear side of the kit.
- Reinstall climate controls and 2 air vents onto the GMK329BM panel.

KIT ASSEMBLY INSTRUCTIONS
Single ISO Mount Applications
- Attach the left and right side brackets to the main bracket (See Figure C).
- Insert pocket (part # UNIPOC) into lower section of the main frame.
- Attach left and right side brackets to the rear of the pocket using screws supplied.
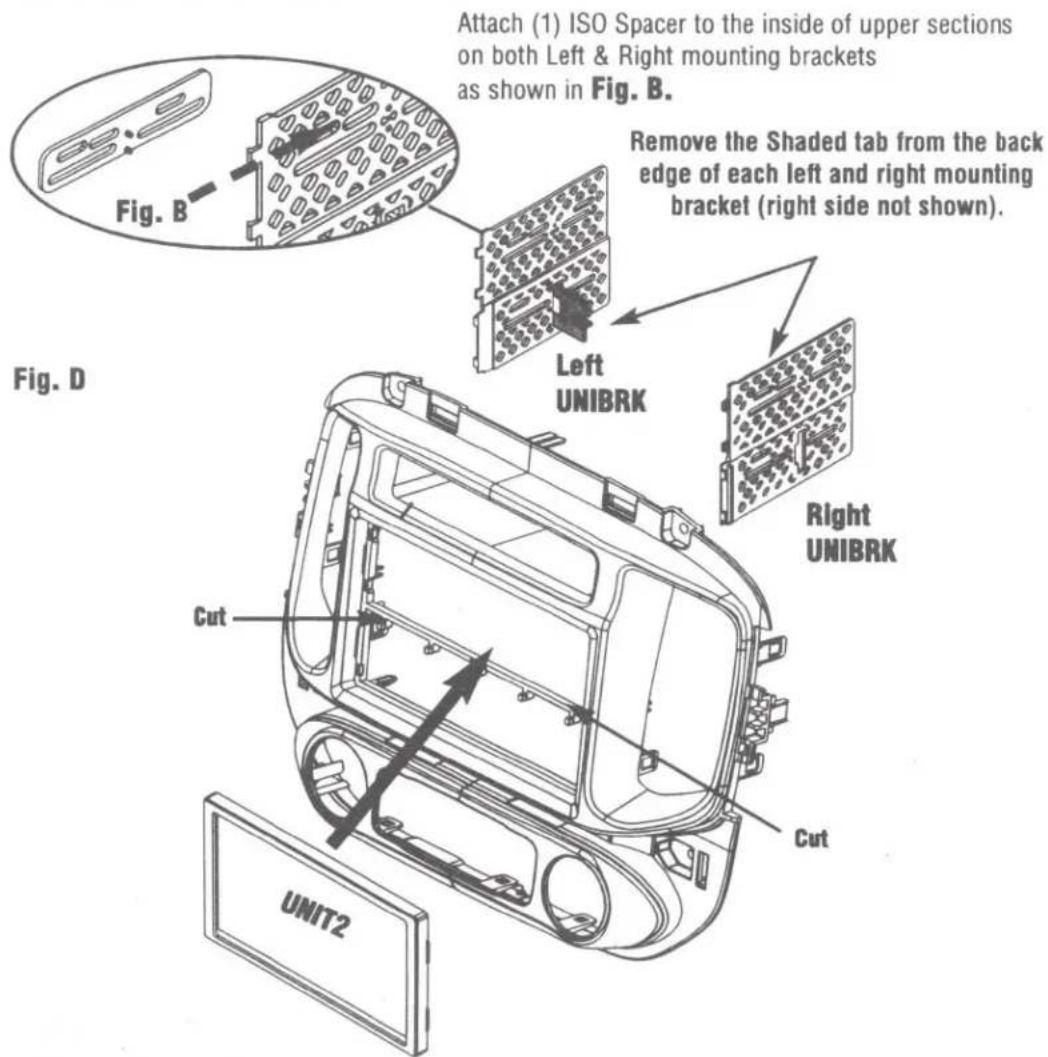
- Attach (1) ISO Spacer to the inside of upper section on both Left & Right mounting brackets as shown in Fig. B.
- Insert ISO mountable radio between ISO mount brackets and loosely attach to sides of radio using screws provided with radio when possible or hardware included with kit.
NOTE: Use longer screws in kit for upper radio location. - Slide radio component forward or backward for desired look and tighten screws.
-
Attach a rear support bracket to the rear of the new radio and adjust as necessary to attach to the rear support stud located on the back of the pocket using the small phillips screw supplied with kit (optional).
NOTE: ISO trim ring (UNIT1) may be used in place of after-market radio's trim rings. -
Attach (1) of the metal spring clips included to each of the
(3) mounting studs on the rear side of the kit.
- Reinstall climate controls and 2 air vents onto the GMK329BM panel.

KIT ASSEMBLY INSTRUCTIONS
Double DIN Mount Applications
-
Remove the Shaded tab from the back edge of each left and right mounting bracket (right side not shown).
-
Cut and remove center rib from main bracket and file smooth.
-
Attach the left and right side brackets to the main bracket (See Figure D).
-
Insert ISO mountable radio between ISO mount brackets and loosely attach to sides of radio using screws provided with radio when possible or hardware included with kit.
NOTE: Use longer screws in kit for upper radio location.
-
Slide radio component forward or backward for desired look and tighten screws.
-
Attach a rear support bracket to the rear of the new radio and adjust as necessary to attach to the rear support stud located on the back of the pocket using the small phillips screw supplied with kit (optional).
-
Attach (1) of the metal spring clips included to each of the (3) mounting studs on the rear side of the kit.
-
Reinstall climate controls and 2 air vents onto the GMK329BM panel..
NOTE: ISO trim ring (UNIT2) may be used in place of after-market radio's trim rings. For ISO mount applications, mount after-market radio components to side brackets using screws provided with radio when possible or hardware included with kit.
MOUNTING KIT
GMK329BM
2015 CHEVROLET COLORADO
2015 GMC CANYON
SINGLE DIN/ISO w/POCKET or DBL DIN

Brand : American International
Model : GMK329BM
Category : Assembly kits