
E15TC75HSS - Waste Compactor ELECTROLUX - Free user manual and instructions
Find the device manual for free E15TC75HSS ELECTROLUX in PDF.


| Product Type | Trash Compactor |
| Brand | Electrolux |
| Model | E15TC75HSS |
| Dimensions (Width x Depth x Height) | 15 in x 24 in x 34 in |
| Weight | 100 lbs |
| Power Supply | 120 V, 60 Hz, 15 A |
| Finish | Stainless Steel |
| Compaction Force | Up to 3,000 lbs |
| Cycle Time | Approximately 20 seconds |
| Capacity | Up to 30 gallons of uncompacted waste |
| Key Lock | Yes, child safety lock |
| Auto Shut-Off | Yes |
| Removable Bucket | Yes, with bag holder |
| Deodorizer | Built-in charcoal filter |
| Installation Type | Under counter or freestanding |
| Noise Level | Less than 60 dB |
| Spare Parts Available | Compactor bags, filters, bucket, key |
| Repairability Index | 8/10 |
| Warranty | 1 year limited |
| Additional Features | Anti-jam mechanism, reversible operation |
Frequently Asked Questions - E15TC75HSS ELECTROLUX
User questions about E15TC75HSS ELECTROLUX
0 question about this device. Answer the ones you know or ask your own.
Ask a new question about this device
Download the instructions for your Waste Compactor in PDF format for free! Find your manual E15TC75HSS - ELECTROLUX and take your electronic device back in hand. On this page are published all the documents necessary for the use of your device. E15TC75HSS by ELECTROLUX.
USER MANUAL E15TC75HSS ELECTROLUX
natural_image
Abstract geometric logo design with curved and straight lines forming a stylized 'D' shape (no text or symbols)Use & Care Guide
Trash Compactor
natural_image
Exterior view of a modern office building (no signage)Electrolux
Finding Information
Please read and save this guide
Thank you for choosing Electrolux, the new premium brand in home appliances. This Use & Care Guide is part of our commitment to customer satisfaction and product quality throughout the service life of your new appliance.
We view your purchase as the beginning of a relationship. To ensure our ability to continue serving you, please use this page to record important product information.
Keep a record for quick reference
Purchase date
Electrolux model number
Electrolux serial number

NOTE
Registering your product with Electrolux enhances our ability to serve you. You can register online at www.electroluxusa.com or by dropping your Product Registration Card in the mail.
Questions?
For toll-free telephone support in the U.S. and Canada: 1-877-4ELECTROLUX (1-877-435-3287)
For online support and Internet production information visit http://www.electroluxusa.com
Table of contents
Finding information 2
Safety 3
- Important Safety Instructions 3
Features 4
• How the Compactor Works 4
Installation 6
• Free Standing 6
• Built-in Installations 6
- Leveling the Compactor 6
Preparation 7
- Use of Key Lock Switch 7
- Install Odor Control Disk 7
• Install Bag 7
Operation 8-9
- Compacting 8
- Clock / Auto Delay 8
- Battery Backup 8
- Compacting Tips 9
- Bag Removal 9
Maintenance 9-11
- Cleaning 9,10
- Troubleshooting 11
Warranty 12
Important Safety Instructions
Read all instructions before using this appliance.
Save these instructions for future reference.
Do not attempt to install or operate your appliance until you have read the safety precautions in this manual. Safety items throughout this manual are labeled with a WARNING or CAUTION based on the risk type.

WARNING
READ ALL INSTRUCTIONS CAREFULLY BEFORE OPERATING COMPACTOR.
Basic precautions should always be taken when using an electrical appliance – including the following:
-
Close supervision is necessary when any appliance is operated near children. Do not allow the appliance to be used as a toy, or to run unattended at any time. Turn key to "OFF" and remove it to lock the compactor. Store the key out of reach to prevent children or others from operating or tampering with the compactor.
-
Do not push trash into compactor drawer with hands or feet. Trash might contain broken glass, sharp pieces of metal, etc., which would cause injury.
-
Do not compact volatile material. Paint, oily rags, lighter fluid cans, and paint thinner cans could combust spontaneously and cause an explosion and/or fire.
-
Do not compact aerosol cans or any other containers still holding toxic chemicals, insecticides, or combustible contents. Fumes may be released which are hazardous to health.
-
Do not compact lighted cigarettes, cigars, or other hot or burning items.
-
Do not overload the compactor.
-
Be careful when removing and carrying bag. Broken glass or other sharp objects may pierce bag. Do not overload trash bag with heavy material such as glass.
-
Do not operate this unit with an extension cord.
-
Use only Electrolux approved accessories.
-
Do not touch moving parts.
-
Do not take this appliance apart. Incorrect reassembly can cause electrical shock when operated.
-
Do not operate with a damaged power cord, plug, motor, or after damage of any kind. Have the compactor examined, and all repairs made, by an authorized serviceman.
-
This compactor is FOR HOUSEHOLD USE ONLY. Use it only as described in this manual.
-
Unplug the appliance from outlet before servicing.

WARNING
GROUNDING INSTRUCTIONS

natural_image
Technical line drawing of a plug and electrical outlet (no text or symbols)IMPORTANT: TO REDUCE THE RISK OF ELECTRIC SHOCK - PLEASE READ CAREFULLY.
FOR PERSONAL SAFETY, THIS APPLIANCE MUST BE PROPERLY GROUNDED. The power cord on this appliance is equipped with a three-prong (grounding) plug which mates with a standard three-prong (grounded) receptacle as illustrated above.
If there is a two-prong outlet located where you will install the compactor, it is your responsibility to have it replaced with a properly grounded three-prong wall receptacle. No adapter shall be used with this product.
DO NOT, UNDER ANY CIRCUMSTANCES, CUT OR REMOVE THE THIRD (GROUND) PRONG FROM THE POWER CORD PLUG.
The GREEN (or GREEN & YELLOW) conductor in the cord is the grounding wire. Never connect the GREEN (or GREEN & YELLOW) wire to a live terminal.
A 120 volt, 60 Hz., A.C., 15 amp fused and grounded electrical supply is required (time-delay fuse or circuit breaker is recommended). It is recommended that a SEPARATE CIRCUIT serving only this appliance be provided.
DO NOT USE AN EXTENSION CORD WITH THIS APPLIANCE.

How the compactor works
The compactor compresses household trash up to 1/6 of its original volume. It will compact normal household trash including milk cartons, glass and plastic bottles, containers and jars, tin cans, wrappings, boxes, food wastes, etc.
When you start the compactor, an electrically powered ram moves down into the trash bucket, compresses the trash and then returns to the "UP" position and shuts off automatically.
NOTE: The ram travels about 2/3 of the way down into the trash bucket. Because of this, the trash bucket must be at least 1/3 full before you will notice any compression.
Your compactor has been designed to require minimum space without loss of capacity whether free-standing or built-in.
Free Standing
As shipped, the Compactor is only configured for built in installations. This appliance can be converted from built-in to free-standing with the use of Toe Kick Accessory Kit Model ETC15TKH (sold separately). If additional cord length is required for free-standing installation, remove the cord clamp and wire tie on the back of the unit.
caution: Failure to use Toe Kick Accessory Kit Model ETC15TKH in a free-standing installation may cause the compactor to be unstable during operation.
Built-in Installations
mounting straps

Two under-counter mounting straps are provided. Use these straps to secure the compactor to the underside of a countertop. Fasten the slotted end of the straps to the compactor using the holes in the top of the compactor cabinet as shown.
NOTE: When installing compactor under granite or solid-surface countertops, bend the mounting straps so they can be secured to the adjacent cabinetry.
undEr-countEr opEning
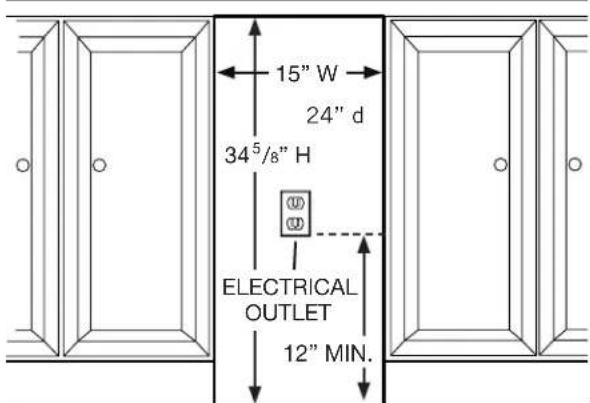
The compactor requires an under-counter opening 15-in. wide, 34^5/8 -in. high, and 24-in. deep.
Plan to provide an electrical outlet in the opening that meets all applicable electrical codes and requirements. See "Grounding Instructions" section on Page 3 for specific information.
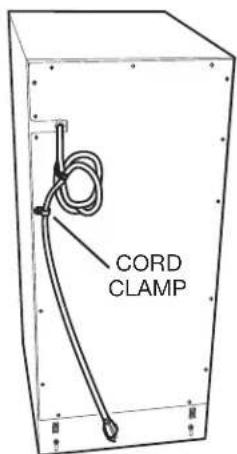
cord cLamp
The compactor is equipped with a 6-ft. long power cord. Use the cord clamp to prevent excess power cord from being pinched beneath the cabinet during installation or service.
Leveling the Compactor
Your compactor has four adjustable levelers; (2) rollers in the rear and (2) legs in the front. They allow you to adjust for uneven floors and also trim the unit up to fit an under-counter installation.
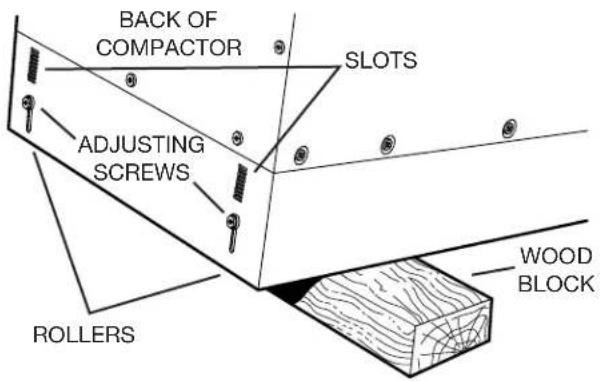
To level the back of the compactor:
Tip the back of compactor up and onto a wood block. Loosen the adjusting screws only far enough to move the rollers to a higher or lower slot. Retighten the adjusting screws and remove the wood block.

To level the front of the compactor:
Tip the front of compactor up and onto a wood block. Turn the leveling legs in or out to the desired position. Remove the wood block.
Use of Key Lock Switch
The key lock switch on your compactor is provided for your protection as a safety measure.

When the key lock switch is in the "OFF" and "LOCK" positions, the compactor will not operate. Remove the key to keep children from operating the unit or to prevent anyone from tampering with it.

When the key lock switch is in the "ON" position, the compactor is ready for operation. The key cannot be removed when in the "ON" position.
NOTE: Opening the door during operation will stop the unit. If the compactor is stopped during its cycle, it will always move back UP when the door is closed.
Install Odor Control Disk
Your Compactor is equipped with an odor control disk that will last up to six months when installed in the trash compactor. The odor disk comes packaged in a foil pouch and is activated once the pouch is opened. The compactor has an electronic control that automatically advances the odor disk every 30 days until 6 months have expired.
Optional – You may write dates on the odor disk labels in this manner:
- When pouch is opened, write the "Activation Date" on top of disk in space provided.
- Write dates on the GREEN month indicator labels in this manner: Month 1 Label "Advance Date" = 1 month from "Activation Date" Month 2 Label "Advance Date" = 2 months from "Activation Date" Month 3 Label "Advance Date" = 3 months from "Activation Date" Month 4 Label "Advance Date" = 4 months from "Activation Date" Month 5 Label "Advance Date" = 5 months from "Activation Date
- Write date on the RED month indicator label in this manner: Month 6 Label "Replacement Date" = 6 months from "Activation Date"
Caution: The odor control disk contains material that may cause moderate eye irritation. Avoid contact with eyes. Harmful if swallowed. Wash skin or clothing thoroughly with soap and water after handling. Do not reuse empty foil pouch.
-
Remove the disk from the foil envelope, swing open the odor disk door, and place disk face down on tray. Make sure green label that says "Month 1" faces odor disk door.
-
Press "Reset" to start the timer. The odor status LED will be GREEN.
- The disk will advance to the next month after 30 days have passed or by pressing
"Advance". Once the disk advances, the next 30 day period begins.
- At the conclusion of the 5 ^th month the odor status LED will FLASH GREEN to signal the disk is on its last month.
- At the conclusion of the 6 ^th month the odor status LED will turn RED to signal the disk must be replaced.
- Discard the used disk in the trash, insert a new disk and press "Reset".
Odor disk, Model ETC15ODH, is available from your Electrolux Distributor.
Install Bag
With the door open and the trash bucket extended to the furthest position, place a bag into the bucket. Fold the bag over the top rim of the bucket, on all sides.
"Press the bag into all corners of the bucket and smooth the bottom."

natural_image
Line drawing of a hand operating a door panel with a handle, no text or symbols present

natural_image
Line drawing of hands lifting a large sack into a metal box (no text or symbols)Smooth and shape the bag carefully - this will prevent the bag from being torn by the ram during compaction.
Secure the bag in place over the 2 buttons on each side of the bucket. The bag has prepunched slots for this purpose.

natural_image
Line drawing of a coffin placed inside a bed, no text or symbols presentCompacting Delay Start / Clock
The compactor is now ready to use.
FOR BEST RESULTS, ALWAYS FILL EACH NEW BAG COMPLETELY BEFORE OPERATING THE COMPACTOR. DOING SO WILL MINIMIZE BAG PULL-UP AND TEARING.
- Slide trash bucket closed completely.
- Turn Key Lock Switch to "ON" position.
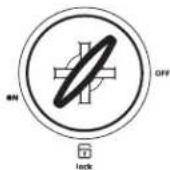
Key Lock Switch
- Select 1 of 2 compact modes:

Normal Compact Mode
Press "Start" button and close door - ram will travel downward into trash bucket and compact trash. At bottom of ram stroke, ram automatically reverses and moves upward out of trash bucket. Total cycle time will be 45 seconds or less. At top of stroke, compactor automatically shuts itself off and is ready to receive more trash.
Hold Compact Mode

Press "Start" button and close door - ram will travel downward into trash bucket and compact trash. At bottom of ram stroke, ram will shut off. Press "Start" button again to reverse ram upward out of trash bucket. At top of stroke, compactor automatically shuts itself off and is ready to receive more trash.
- Press "Start" button.

flowchart
graph LR
    A["Start Button"] --> B["stop button"]
    B --> C["run mode"]
    B --> D["delay start"]
- Close door to begin compacting. Compactor will automatically shut itself off when compaction cycle is completed.
- Compacting cycle may be stopped at any time by opening door. Once stopped, ram will always move upward when door is closed.

The compactor is equipped with a delay start /clock feature that allows you to compact your trash at a time of your choice (such as every evening).
- To set clock time: Press and hold "Set Clock" button until display flashes. Use the "+" and "-" buttons to set current time.
- To set delay start time: Press and hold "Set Delay" button until clock display flashes. Use "+" and "-" buttons to set delay time. Press "Set Delay" button again, until clock display shows current time.
- To activate delay start: Press "Delay Start" button. LED above button will light and clock display will show delay start time. Once clock reaches delay start time, ram will compact and hold trash for 2 hours, then return to previous position.
- To interrupt delay start during 2-hour hold period: Open door and press "Start" button. Close door and ram will return to UP position and stop. Open door to add additional trash to bucket. Close door and ram will return to hold position for remainder of 2-hour hold period.
- To cancel delay start: Press "Delay Start" button. Close door and ram will return to previous position.
Battery Backup

The compactor is equipped with a battery backup, to maintain clock settings in the event of a loss of power to the unit.
Remove the battery cover and install a 9-Volt battery (not included).
NOTE: The battery backup will not provide power to operate ram.
Compacting Tips Cleaning
- Although it is not necessary to compact until the drawer is full or nearly so, it is suggested that for maximum compaction, you start the compactor each time a significant amount of trash is added.
- At full stroke, the ram does not travel all the way to the bottom of the trash bucket. Trash in the bottom 1/3 of the bucket will be crushed during subsequent compacting.
- Glass bottles can make a loud noise when they break during compaction. This is normal. Bottles do not always break during the first cycle. Breaking glass and associated noise may occur several cycles later depending on type and volume of trash.
- Bottles and large cans compact best when laid flat near the center of the trash bucket.
-
Place a couple of folded sheets of newspaper, or a large paper grocery bag on top of the load to be compacted when :
-
compacting large or several glass bottles or jars (or any items that might shatter). This will help prevent glass fragments and particles from flying out of bucket into mechanism.
-
compacting unwrapped messy food waste. This will help keep the power ram clean.
-
Compacting extreme uneven loads may cause the trash bucket to shift forward which may cause the door to open and interrupt the compaction cycle. Gently push and hold door closed to activate the ram until it returns to the up position. Open the trash bucket and reposition any objects that may be causing the uneven load. Close the door and re-activate the compaction cycle by pressing the start button.
- There are certain types of trash that create exceptionally strong odors such as raw meat, fish, grapefruit rinds, personal hygiene items, and disposable diapers. You may not wish to put such items into your compactor.
- If the compactor will not be used for an extended period of time, such as during vacation, remove the bag to prevent a build-up of undesirable odor.

CAUTION
DO NOT COMPACT AEROSOL CANS OR ANY OTHER CONTAINERS STILL HOLDING OR WHICH HELD TOXIC CHEMICALS, INSECTICIDES, OR COMBUSTIBLE CONTENTS. FUMES MAY BE RELEASED THAT ARE HAZARDOUS TO HEALTH OR MAY RESULT IN FIRE OR EXPLOSION.
Do not put paint, oily rags, lighter fluid cans, paint thinner cans, etc., in your compactor. Doing so could result in spontaneous combustion causing a fire and/or explosion.
NEVER PUSH TRASH INTO THE BUCKET WITH HANDS OR FEET. Trash might contain broken glass, sharp pieces of metal, etc., which could cause injury.
Bag Removal
- Slide out trash bucket.
- Release bucket latches and lower front of bucket.
-
Unbutton bag from bucket and close by twisting bag top. Fasten with twist-tie provided.
-
Lift and slide bag from bucket.

natural_image
Line drawing of a person hanging from a machine, no text or symbols presentEXCEPT FOR CLEANING DESCRIBED IN THE FOLLOWING SECTION, ALL SERVICE SHALL BE PERFORMED BY AN AUTHORIZED SERVICE REPRESENTATIVE.
Your compactor has been designed with easy access for cleaning when required.
The interior and exterior of the cabinet are finished with a durable baked-on enamel finish.
Do not use harsh or gritty cleanser or scouring pads which may mar the finish of the compactor. Use a mild detergent solution on these surfaces.

CAUTION
Glass fragments and other sharp trash pieces may be on or around the surfaces to be cleaned. Carefully remove these objects before wiping down any surfaces.
REMOVE TRASH BUCKET AND CLEAN INTERIOR

Cleaning (continued) Cleaning (continued)
- Pull out trash bucket until it stops.
- Remove (1) screw from each of the bucket slides.
- Press down on left and right bucket slide release tabs while pulling the bucket out of the unit.
- Vacuum and clean cabinet base, track channels, and bucket, particularly in corners.
- Wash the cabinet interior with a mild detergent solution.
- When finished cleaning the cabinet, install the trash bucket by reversing steps 2 and 3.
CLEAN COMPACTION PLATE

- The ram is equipped with a compaction plate that can be removed for easy cleaning.
- Make sure the trash bucket is empty and without a bag.
- Push the trash bucket into the cabinet. Unlatch and lower the bucket front.
- Press the compaction plate release tab on the front of the ram to disengage the plate. The plate can be removed by pulling down and away from the ram.
- Once removed the compactor plate can be washed in a mild detergent solution or placed in a dishwasher.
- Re-install the compactor plate by inserting the tab (on the rear of the plate) into the slot (at in the rear of the ram). Press up on the front of the plate until it securely latches in place.
CLEAN RAM

-
Make sure the trash bucket is empty and pushed into the cabinet.
-
Turn the Key Lock Switch to "ON" position.

- Select the "Hold" compact mode.

- Press the "Start" button.

- Close the door.
The ram will travel downward into the trash bucket and stop at the bottom of its stroke.

CAUTION
Glass fragments and other sharp trash pieces may be on or around the surfaces to be cleaned. Carefully remove these objects before wiping down any surfaces.
-
Open the door. Unlatch and lower the bucket front. Vacuum top of ram and clean with a mild detergent solution.
-
When finished cleaning: Raise and re-latch bucket front, press "Start" button, and close door. The ram will return to the top of its stroke and automatically shut itself off. Open door, slide bucket out, install bag, and select compact mode. Compactor is now ready to receive trash.
Troubleshooting
Before you call for service, check these handy hints which may save you the cost of a service call:
- Is electric cord plugged in securely?
- Has a house fuse blown or a circuit breaker tripped?
- Is the door pushed firmly shut?
- Is the key switch in the "ON" position?
- If trash bucket is difficult to close, check to see if any trash has fallen behind the bucket - preventing it from closing completely.
- The motor has an automatic thermal cutout. If you have compacted repeatedly, this protector may have opened the circuit. Wait a few minutes and the cutout will reset automatically.
- The trash bucket must be at least 1/2 full of trash before any appreciable amount of compacting will be apparent - as the ram does not travel all the way to the bottom of the bucket. Trash in the bottom 1/3 of the bucket will be crushed during subsequent compacting.
- On rare occasions, a large can placed near the outer edge of the trash bucket may become wrapped around the edge of the ram. This could interfere with proper ram operation. To correct, simply open the door, unlatch and open the front of the bucket, and remove the can. BE CAREFUL WHEN HANDLING SHARP OBJECTS!
- In the unlikely event that the interlock actuator (on the inside of the door) breaks off, the compactor will not operate. DO NOT ATTEMPT TO OPERATE COMPACTOR IN ANY OTHER MANNER. A replacement actuator can be ordered from your Electrolux Distributor.
Major Appliance Warranty Information
Your appliance is covered by a one year limited warranty. For one year from your original date of purchase, Electrolux will repair or replace any parts of this appliance that prove to be defective in materials or workmanship when such appliance is installed, used, and maintained in accordance with the provided instructions
Exclusions
This warranty does not cover the following:
- Products with original serial numbers that have been removed, altered or cannot be readily determined.
- Product that has been transferred from its original owner to another party or removed outside the USA or Canada.
- Rust on the interior or exterior of the unit.
- Products purchased "as-is" are not covered by this warranty.
- Products used in a commercial setting.
- Service calls which do not involve malfunction or defects in materials or workmanship, or for appliances not in ordinary household use or used other than in accordance with the provided instructions.
- Service calls to correct the installation of your appliance or to instruct you how to use your appliance.
- Expenses for making the appliance accessible for servicing, such as removal of trim, cupboards, shelves, etc., which are not a part of the appliance when it is shipped from the factory.
- Service calls to repair or replace appliance light bulbs, air filters, water filters, other consumables, or knobs, handles, or other cosmetic parts.
- Labor or in-home service costs during the additional limited warranty periods beyond the first year from your original date of purchase.
- Pickup and delivery costs; your appliance is designed to be repaired in the home.
- Surcharges including, but not limited to, any after hour, weekend, or holiday service calls, tolls, ferry trip charges, or mileage expense for service calls to remote areas, including the state of Alaska.
- Damages to the finish of appliance or home incurred during transportation or installation, including but not limited to floors, cabinets, walls, etc.
- Damages caused by: services performed by unauthorized service companies; use of parts other than genuine Electrolux parts or parts obtained from persons other than authorized service companies; or external causes such as abuse, misuse, inadequate power supply, accidents, fires, or acts of God.
DISCLAIMER OF IMPLIED WARRANTIES; LIMITATION OF REMEDIES
CUSTOMER'S SOLE AND EXCLUSIVE REMEDY UNDER THIS LIMITED WARRANTY SHALL BE REPAIR OR REPLACEMENT AS PROVIDED HEREIN. CLAIMS BASED ON IMPLIED WARRANTIES, INCLUDING WARRANTIES OF MERCHANTABILITY OR FITNESS FOR A PARTICULAR PURPOSE, ARE LIMITED TO ONE YEAR OR THE SHORTEST PERIOD ALLOWED BY LAW, BUT NOT LESS THAN ONE YEAR. ELECTROLUX SHALL NOT BE LIABLE FOR CONSEQUENTIAL OR INCIDENTAL DAMAGES SUCH AS PROPERTY DAMAGE AND INCIDENTAL EXPENSES RESULTING FROM ANY BREACH OF THIS WRITTEN LIMITED WARRANTY OR ANY IMPLIED WARRANTY. SOME STATES AND PROVINCES DO NOT ALLOW THE EXCLUSION OR LIMITATION OF INCIDENTAL OR CONSEQUENTIAL DAMAGES, OR LIMITATIONS ON THE DURATION OF IMPLIED WARRANTIES, SO THESE LIMITATIONS OR EXCLUSIONS MAY NOT APPLY TO YOU. THIS WRITTEN WARRANTY GIVES YOU SPECIFIC LEGAL RIGHTS. YOU MAY ALSO HAVE OTHER RIGHTS THAT VARY FROM STATE TO STATE.
If You Need Service
Keep your receipt, delivery slip, or some other appropriate payment record to establish the warranty period should service be required. If service is performed, it is in your best interest to obtain and keep all receipts. Service under this warranty must be obtained by contacting Electrolux at the addresses or phone numbers below.
This warranty only applies in the USA, Puerto Rico and Canada. In the USA and Puerto Rico, your appliance is warranted by Electrolux Major Appliances North America, a division of Electrolux Home Products, Inc. In Canada, your appliance is warranted by Electrolux Canada Corp. Electrolux authorizes no person to change or add to any obligations under this warranty. Obligations for service and parts under this warranty must be performed by Electrolux or an authorized service company. Product features or specifications as described or illustrated are subject to change without notice.
USA
1-877-435-3287
Electrolux Major Appliances North America
P.O. Box 212378
Augusta, GA 30907
Canada
1-800-265-8352
Electrolux Canada Corp.
5855 Terry Fox Way
Mississauga, Ontario, Canada L5V 3E4
- Use & Care Guide
- Electrolux
- Finding Information
- Please read and save this guide
- Keep a record for quick reference
- NOTE
- Questions?
- Table of contents
- Important Safety Instructions
- WARNING
- READ ALL INSTRUCTIONS CAREFULLY BEFORE OPERATING COMPACTOR.
- Basic precautions should always be taken when using an electrical appliance – including the following:
- GROUNDING INSTRUCTIONS
- IMPORTANT: TO REDUCE THE RISK OF ELECTRIC SHOCK - PLEASE READ CAREFULLY.
- How the compactor works
- Free Standing
- Built-in Installations
- cord cLamp
- Leveling the Compactor
- Use of Key Lock Switch
- Install Odor Control Disk
- Install Bag
- Compacting Delay Start / Clock
- Normal Compact Mode
- Hold Compact Mode
- Battery Backup
- Compacting Tips Cleaning
- CAUTION
- Bag Removal
- Cleaning (continued) Cleaning (continued)
- Troubleshooting
- Major Appliance Warranty Information
- Exclusions
- DISCLAIMER OF IMPLIED WARRANTIES; LIMITATION OF REMEDIES
- If You Need Service
- USA
- Canada
Brand : ELECTROLUX
Model : E15TC75HSS
Category : Waste Compactor