
CBP-12 - Battery Bolt - Free user manual and instructions
Find the device manual for free CBP-12 Bolt in PDF.


| Product Type | Rechargeable Battery Pack |
| Brand | Bolt |
| Model | CBP-12 |
| Battery Chemistry | Lithium-ion (Li-ion) |
| Nominal Voltage | 12V |
| Capacity | 3,000 mAh (estimated) |
| Energy | 36 Wh |
| Dimensions | Approx. 150 x 80 x 20 mm |
| Weight | Approx. 300 g |
| Charging Time | 4-6 hours (with standard charger) |
| Cycle Life | 500+ cycles |
| Operating Temperature | -20°C to 60°C |
| Protection Features | Overcharge, overdischarge, short circuit, overcurrent |
| Connector Type | XT60 (common for 12V packs) |
| LED Indicator | Charge level and status |
| Rechargeable | Yes |
| Certifications | CE, RoHS |
| Warranty | 1 year |
| Storage | Store at 40-60% charge, in a cool dry place |
| Disposal | Recycle at authorized battery collection points |
Frequently Asked Questions - CBP-12 Bolt
User questions about CBP-12 Bolt
0 question about this device. Answer the ones you know or ask your own.
Ask a new question about this device
Download the instructions for your Battery in PDF format for free! Find your manual CBP-12 - Bolt and take your electronic device back in hand. On this page are published all the documents necessary for the use of your device. CBP-12 by Bolt.
USER MANUAL CBP-12 Bolt
CBP-12
COMPACT BATTERY PACK
User's Manual
Copyright © 2017 Gradus Group.
Bolt and other names of Bolt products are trademarks of Gradus Group. Other product and corporate names mentioned herein are trademarks of their respective holders.
Thank you for choosing Bolt.
The Bolt P12 Compact Battery Pack will extend the flash capacity and boost the recycle speed of your flash unit. Its compact design and compatibility with a range of AA battery types make it easy and convenient to use. The easy-loading battery tray fits 12 AA batteries and is designed to ensure fast and effortless battery installation and replacement. Battery power indicators display remaining charge. Integrated thermal and surge protection automatically prevents overheating and damage to the P12 and your flash.
Precautions
- Please read and follow these instructions, and keep this manual in a safe place.
- Do not attempt to disassemble or repair this product. There are components inside that can produce a hazardous electric shock.
- Keep this product and AA batteries away from children.
- Keep this unit away from water and any flammable gases or liquids.
- Clean the unit with only a soft, dry cloth.
- This product is not water resistant. Keep it away from rain, snow, and humidity.
- If you detect smoke or a burning smell coming from the battery pack, immediately stop operation. Once smoking has subsided, remove the batteries to prevent the product from igniting or melting, and take the product to an authorized service center for repair.
- Do not store this product at temperatures above 104°F (40°C).
- Remove all batteries from the battery pack before long-term storage.
Contents
Overview 6-7
Installing Batteries 8-9
Using the P12 with a Flash....10
High-Voltage Indicator 11
Battery Indicator Lights....12-13
Using the Soft Case 14
Cleaning the Compact Battery Pack....15
Troubleshooting 16-17
Specifications....18
Warranty....19

Overview
- High-voltage indicator
- Battery indicator lights
- Power button
- Battery tray
- Battery bay
- Battery tray release buttons
- Carry case
- Flash cable
Battery Warnings
- Always follow the warnings and instructions printed on the batteries to avoid activities that could cause the batteries to leak corrosive liquid, generate heat, or explode.
- Dispose of batteries properly. Never heat them or throw them into a fire, as this could cause the batteries to leak corrosive liquids, generate heat, or explode.
Installing Batteries and Powering the P12
The P12 Compact Battery Pack requires that all 12 AA batteries are installed in order to operate the unit. Two battery types can be used:
- Alkaline (1.5 V)
• Nickel-metal hydride, or Ni-MH (1.2 V)
Important!
- All 12 batteries must be installed. The P12 will not operate with less than 12 batteries.
- When removing the batteries, be careful not to touch the contacts.
- Replace all batteries at the same time. Do not mix battery types or brands, or insert used and new batteries together.
To install the batteries, unplug the battery pack from your flash unit, and follow these steps:
- Press both battery tray release buttons to release the battery tray, and remove it from the P12.
- With the battery tray lying flat, insert six batteries in the battery bays. Make sure that each battery is installed in the proper orientation.
- Turn the battery tray over, and repeat step two for the remaining six batteries.
- Insert the battery tray into the pack by sliding the tray into the slot, and pressing it in until it clicks into place.
Note: The battery tray can be inserted into the pack in either orientation—there is no up or down.
Turn on the P12 by pressing and holding the power button until the indicator lights illuminate.
Turn off the P12 by pressing and holding the power button until the indicators turn off again.
Using the P12 with a Flash
The P12 provides a fast flash recycle time and hundreds of full-power flashes with each set of batteries used. To operate your flash with the battery pack, follow these steps:
- Install the appropriate batteries into your flash, and turn it on.
Note: The P12 provides high-voltage output when the flash is firing, but it doesn't power the flash's operation or display. Batteries are required for the flash to operate with the P12.
-
If your flash does not have an auto recognition function, set the custom function to recognize an external power source.
-
Mount the flash onto your camera's hot-shoe mount, or make the appropriate connections to your camera if the flash is standing alone.
-
Plug the output connector on the flash cable into the flash's external power port.
-
Press and hold the P12's power button until the battery indicator lights and high-voltage indicator turn on. The P12 is now ready to power your flash.
10 | Using the P12 with a flash
10 | Using the P12 with a flash
10 | Using the P12 with a flash
10 | Using the P12 with a flash
10 | Using the P12 with a flash
High-Voltage Indicator
The high-voltage indicator alerts you to the status of the P12.
| High-voltage indicator Function | |
| Steady light High-voltage output is | normal. The P12 is connected to the flash. |
| Off There is no high-voltage output. | The P12 automatically switches to standby mode, and it will automatically turn off in approximately 30 minutes. |
| Blinks continuously Error/malfunction message. | |
| Blinks twice per second Overheat protection has been activated. (95°C ±5°C) | |
| Blinks three times per second Surge protection has been activated. | |
| Blinks four times per second Recycling speed is too slow. | |
Battery Indicator Lights
| Indicator lights Battery level | |
| 4 100% to 80% | |
| 3 79% to 60% | |
| 2 59% to 40% | |
| 1 39% to 20% | |
| 1 blinking 19% to 10% | |
To get the most from your P12 Compact Battery Pack:
- Use the P12 in environments with moderate temperatures. When some battery types are cold, they begin to lose their ability to supply power. However, this doesn't mean they've lost their charge. They will regain the ability to supply power when their temperature returns to a more moderate level.
Tip: If you're shooting in a very cold environment, you can address this issue by alternating sets of AA batteries. Keep one set indoors at room temperature, or in an interior pocket next to your body, while using the other set. Switch the two sets when the one in use starts losing its ability to power your flash.
- High temperature can cause some battery types to drain more quickly. If you have to shoot in a hot environment, plan ahead for reduced battery capacity.
- To conserve battery life, turn the flash unit off or disconnect the P12 from it during long standby periods. Very little power is consumed when the P12 is in standby mode. The amount may vary according to working conditions and the specific flash model used with the pack.
- Don't fire more that 20 full-power flashes in a row, as this can overheat and damage your flash. Refer to your flash unit's manual for information on its continuous full-power flash capacity and limitations.
Using the Soft Case
Make sure the P12 is correctly oriented in the case. The flash cable should extend out of the top of the case, and the indicator lights should be visible.
Close the top flap over the P12, and adjust the touch-connect strap for a secure and snug fit.
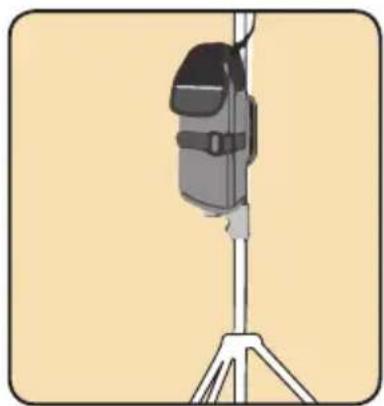
Use the loops on the back of the case to carry the P12 on your belt in vertical or horizontal orientation. They can also be used to attach the case to a carrying strap or light stand.


Cleaning the Compact Battery Pack
If the metal contacts in the battery tray become dirty or corroded, you can clean them with isopropyl (rubbing) alcohol and a cotton swab. An eraser can also be used to rub corrosion off of the contacts.
Do not touch the metal contacts with your fingers, because they can transfer oil and residues.
Keep the outside of the pack clean by removing dust and dirt with a soft cloth. Never attempt to wash the pack in water or use a flammable solution to clean it.
Troubleshooting
| Problem Solution | |
| The P12 has fresh batteries installed and is connected to a flash unit, but when the power button is pressed, the indicator lights blink once and then shut off. After that, the power won’t turn on. | The batteries are installed in the wrong orientation. Check each battery in the tray to ensure it’s installed correctly. |
| The high-voltage indicator blinks continuously. | There has been an error or malfunction. Turn off the P12, and check the flash connections and the batteries in the P12 as well as the flash. |
| During use, the high-voltage indicator starts to blink twice per second, and the P12 doesn’t supply power to the flash. | Overheat protection has been activated.The P12 activates this function when there is a danger of overheating due to repeated rapid firing. Once the P12 has cooled down, the blinking will stop, and operation can resume. |
| The high-voltage indicator blinks three times per second. | Surge protection has been activated. This can be caused by flash malfunction. Turn off your flash, and restart it. If the problem persists, take your flash to a certified service center. |
| The high-voltage indicator blinks four times per second. | This indicates that the batteries are low, and that the P12 is taking too long to recycle the flash. Replace the batteries in the P12. |
| Only one of the battery indicators is illuminated, and it's blinking. | There is less than 20% battery power remaining. Replace the batteries in the P12. |
Specifications
| Operating voltage 14.4 to 20 V DC | |
| Operating current | Max: 12 AShutdown Current: ≤3 μA |
| Operating temperature 32°F to 122°F (0°C to 50°C) | |
| Storage temperature -4°F to 140°F (-20°C to 60°C) | |
| Storage humidity 35% to 95% | |
| Power AA batteries (×12) | |
| Dimensions (W × H × D) 3.3 × 7.7 × 1.3 in. (8.6 × 19.6 × 3.3 cm) | |
| Weight (without batteries) 11.5 oz. (326.4 g) |
One-Year Limited Warranty
This BOLT product is warranted to the original purchaser to be free from defects in materials and workmanship under normal consumer use for a period of one (1) year from the original purchase date or thirty (30) days after replacement, whichever occurs later. The warranty provider's responsibility with respect to this limited warranty shall be limited solely to repair or replacement, at the provider's discretion, of any product that fails during normal use of this product in its intended manner and in its intended environment. Inoperability of the product or part(s) shall be determined by the warranty provider. If the product has been discontinued, the warranty provider reserves the right to replace it with a model of equivalent quality and function.
This warranty does not cover damage or defect caused by misuse, neglect, accident, alteration, abuse, improper installation or maintenance. EXCEPT AS PROVIDED HEREIN, THE WARRANTY PROVIDER MAKES NEITHER ANY EXPRESS WARRANTIES NOR ANY IMPLIED WARRANTIES, INCLUDING BUT NOT LIMITED TO ANY IMPLIED WARRANTY OF MERCHANTABILITY OR FITNESS FOR A PARTICULAR PURPOSE. This warranty provides you with specific legal rights, and you may also have additional rights that vary from state to state.
To obtain warranty coverage, contact the BOLT Customer Service Department to obtain a return merchandise authorization ("RMA") number, and return the defective product to BOLT along with the RMA number and proof of purchase. Shipment of the defective product is at the purchaser's own risk and expense. For more information or to arrange service, visit www.boltflashes.com or call Customer Service at 212-594-2353.
Product warranty provided by the Gradus Group.
www.gradusgroup.com
BOLT is a registered trademark of the Gradus Group.
© 2017 Gradus Group LLC. All Rights Reserved.

BOLT®
A Gradus Group Brand
Limited Warranty
Bolt®
www.boltflashes.com
- CBP-12
- COMPACT BATTERY PACK
- THANK YOU FOR CHOOSING BOLT
- PRECAUTIONS
- CONTENTS
- OVERVIEW
- BATTERY WARNINGS
- INSTALLING BATTERIES AND POWERING THE P12
- IMPORTANT
- TO INSTALL THE BATTERIES, UNPLUG THE BATTERY PACK FROM YOUR FLASH UNIT, AND FOLLOW THESE STEPS
- USING THE P12 WITH A FLASH
- 10 | USING THE P12 WITH A FLASH
- HIGH-VOLTAGE INDICATOR
- BATTERY INDICATOR LIGHTS
- TO GET THE MOST FROM YOUR P12 COMPACT BATTERY PACK
- USING THE SOFT CASE
- CLEANING THE COMPACT BATTERY PACK
- ONE-YEAR LIMITED WARRANTY
- BOLT®
Brand : Bolt
Model : CBP-12
Category : Battery