
HR-48N RM - Oven Grunkel - Free user manual and instructions
Find the device manual for free HR-48N RM Grunkel in PDF.


| Product Type | Electric Oven |
| Brand | Grunkel |
| Model | HR-48N RM |
| Installation Type | Built-in |
| Dimensions (H x W x D) | 59.5 x 59.5 x 54.8 cm |
| Weight | Approx. 30 kg |
| Power Supply | 220-240 V, 50/60 Hz |
| Total Power Consumption | 2500 W |
| Energy Efficiency Class | A |
| Oven Capacity | 77 L |
| Main Functions | Convection, Grill, Defrost, Light |
| Temperature Range | 50 °C - 250 °C |
| Control Type | Knobs and Timer |
| Display | Analog Clock/Timer |
| Interior Light | Yes |
| Cleaning Method | Manual cleaning with damp cloth |
| Safety Features | Child lock, Cool touch door, Auto shut-off |
| Spare Parts Availability | Contact Grunkel service center |
| Repairability | Repair by qualified technician recommended |
| Accessories Included | Baking tray, Wire rack |
| Manual Languages | English, other languages available online |
Frequently Asked Questions - HR-48N RM Grunkel
User questions about HR-48N RM Grunkel
0 question about this device. Answer the ones you know or ask your own.
Ask a new question about this device
Download the instructions for your Oven in PDF format for free! Find your manual HR-48N RM - Grunkel and take your electronic device back in hand. On this page are published all the documents necessary for the use of your device. HR-48N RM by Grunkel.
USER MANUAL HR-48N RM Grunkel
natural_image
Black portable toaster oven with control knobs and a visible dish inside (no text or symbols)ELECTRIC OVEN Mod. HR-48N RM
230V, 50Hz., 2000W INTRUCTION MANUAL


www.grunkel.com

grunkel

natural_image
Black square portable toaster oven with control knobs and a visible inner rack (no text or symbols)HORNO Mod. HR-48N RM
230V, 50Hz., 2000W MANUAL DE USUARIO


www.grunkel.com

@grunkel
ÚNICAMENTE PARA USO DOMÉSTICO.
IMPORTANT SAFETY INSTRUCTIONS
When using your Toast Oven, basic safety precautions should always be observed, including the following:
- Read all instructions.
- Do not touch hot surfaces. Always use handles or knobs.
- Close supervision is necessary when any appliance is used by or near children.
- To protect against electric shock, do not immerse cord, plug or any parts of the oven in water or any other liquids.
- Do not let cord hang over edge of table or counter, or touch hot surfaces.
- Do not operate appliance with damaged cord or plug or after the appliance malfunctions or has been damage in any manner. Return appliance to the nearest authorized service facility for examination, repair or adjustment.
- The use of accessory attachments not recommended by the appliance manufacturer may cause hazard or injury.
- Do not place on or near a hot gas or electric burner.
- When operating the oven, keep at least four inches of free space on all sides of the oven to allow for adequate air circulation.
- Unplug from outlet when not in use and before cleaning. Allow to cool before putting on or taking off parts, and before cleaning.
- To disconnect, turn the time control to OFF, then remove the plug. Always hold the plug, and never pull the cord.
- Extreme caution must be used when moving a drip pan containing hot oil or other hot liquids.
13 Do not cover crumb tray or any part of the oven with metal foil. This may cause the oven to overheat. -
Use extreme caution when removing the tray, racks or disposing of hot grease or other hot liquids.
-
Do not clean the inside of the oven with metal scouring pads, pieces can break off the pad and touch electrical parts, creating a risk of electric shock.
- Over sized foods or metal utensils must not be inserted in a toaster oven as they may create a fire or risk of electric risk.
- A fire may occur if the oven is covered or touching flammable material, including the curtains, draperies, walls, and the like, when in operation. Do not store any item on top of the appliance when in operation.
- Extreme cautions should be exercised when using cooking or baking containers constructed of anything other than metal or ovenproof glass.
- Be sure that nothing touches the top or bottom elements of the oven.
- Do not place any of the following materials in the oven: cardboard, plastic, paper, or anything similar.
- Do not store any materials other than manufacturer's recommended accessories in this oven when not in use.
- Always wear protective, insulated oven gloves when inserting or removing items from the hot oven.
- This appliance has a tempered, safety glass door. The glass in stronger than ordinary glass and more resistant to breakage. Tempered glass can still break around edges. Avoid scratching door surface or nicking edges.
- This appliance is OFF when the Timer Control button is in the "OFF" position.
- Do not use outdoors.
- Do not use appliance for other than intended use.
www.grunkel.com
grunkel
SAVE THESE INSTRUCTIONS
For Household Use Only
Getting To Know Your New Oven
MAIN COMPONENT
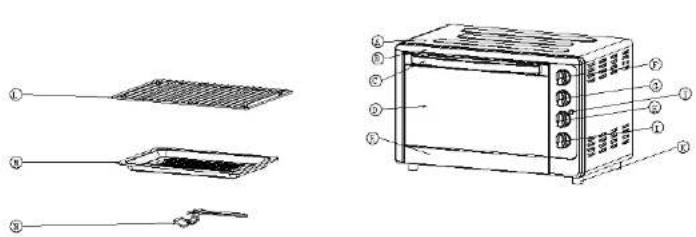
At Housing
B: Front Plate
C: Door Handle
D: Glass Door
E: Lower Door Frame
F: Temperature Control Knob
G: Oven Switch Knob
H:Lamp & Convection Control Knob
L: Timer Control Knob
J: Oven Lamp
K: Foot
L-Wire Rack
M.Bake Tray
N: Bake Tray handle
www.grunkel.com
grunkel
natural_image
Three simple line drawings of a rectangular object with internal structure, possibly a tray or container, arranged vertically (no text or symbols)Technical Specifications
Voltage: 230V, 50Hz.
Power: 2000W
Illustrations may differ from actual product.
Read all the sections of this booklet and follow all the instructions carefully.
Before Using Your New Electric Oven
▲Before using your toaster oven with convection for the first time, be sure to:
- Read all of the instruction included in this manual.
- Make sure that the oven is unplugged and the Time control is in the "OFF" position.
- Wash all the accessories in hot, soapy water or in the dishwasher.
- Thoroughly dry all accessories and re-assemble in oven, plug oven into outlet and you are ready to use your new toaster oven.
- After re-assembling your oven, we recommend that you run it at the highest temperature (250°C) on the toast function for approximately 15 minutes to eliminate any packing residue that may remain after shipping. This will also remove all traces of odor initially present.
Please Note: Initial start-up operation may result in minimal smell and smoke (about 15 minutes). This is normal and harmless. It is due to burning of the protective substance applied to the heating elements in the factory.
Operation
- Place the wire rack on the unit support guide.
- Place food on the wire rack.
- Brush food with sauces or oil, as desired.
- Food should be placed as close as possible to the top heating element without touching it.
- Turn timer knob to the appreciate min.
- Turn food over midway through the prescribed cooking time.
- When broiling is complete, turn the time control to "OFF".
WARNING: TO AVOID RISK OF INJURY OR BURNS, DO NOT TOUCH HOT SURFACES WHEN OVEN IS IN USE. ALWAYS USE OVEN MITTS.

CAUTION: Always use extreme care when removing bake tray, wire rack or a any hot container from a hot oven. Always use the rack handle, or an oven mitt when removing hot items from the oven.
www.grunkel.com
@grunkel
Using your Lamp & Convection oven
Please familiarize yourself with the following oven functions and accessories prior to first use:
● Temperature Control: choose the desired temperature from 100°C to 250°C for baking, broiling or toasting.
- Timer Control: when you activate the timer segment of the control, turn to the right (clockwise) to toast or use as a timer. The timer bell will ring at the end of the programmed time.
- Heating Control: There're four stages switch function selector: Off/Upper heater/Lower heater /Upper and lower heater
● Neon Lamp: Choose the desired function and the neon lamp will correspondingly light.
● Inner Lamp: Swith the function knob to “☐” or “☐☐”
● Convection fan: When the desired temperature and Heating is chosen, switch the function knob
to “☐” . The convection fan will start operating.
● Baking Tray: For use in broiling and roasting meat, poultry, fish and various food.
● Tray Handle: Allows you to pick up the wire rack, and baking tray when they are hot.
HOW TO BAKE
a) Place the removable rack into the desired position.
b) Insert the baking tray and close the oven door.
c) Turn the timer knob to the desired cooking time.
d) Turn the heater selector knob to BAKE
e) When finished baking, turn the timer to "OFF" position to switch off the oven.
HOW TO BROIL
a) Insert the removable bake rack with food and bake tray.
b) Keep the glass door half-open.
c) Turn the heat selector knob to BROIL □
d) When finished broiling, turn the timer to "OFF" position to switch off the oven.
www.gruhkel.com
grunkel
posición "OFF"
a) Turn the function control knob to TOAST
b) Place food to be toast onto the wire rack.
c) Turn the timer control knob to "OFF".
d) Bell will ring to signal the end of the toast cycle.
Note: Wire Rack should be positioned in the middle of the oven with the indentations pointing down.

CAUTION: When sliding trays out of oven, always support the rack. Do not let go until you are sure the rack is cold securely.
Care & Cleaning
Warning: Be sure to unplug the oven and allow it to cool before cleaning.
Any spattering that occurs while cooking and comes into contact with the continuous coating is oxidized while the oven is in operation. If desired, wipe the walls with a damp sponge, cloth or nylon scouring pad and mild detergent. DO NOT USE STEEL WOOL SCOURING PADS, ABRASIVE CLEANERS OR SCRAPE THE WALLS WITH A METAL UTENSIL, AS ALL OF THESE METHODS MAY DAMAGE THE CONTINUOUS CLEAN COATING.
All accessories should be washed in hot soapy water or can be cleaned in a dishwasher. The door can be wiped with a damp sponge and wiped dry with a paper or cloth towel. Clean the outside with a damp sponge. DO NOT USE AN ABRASIVE CLEANER AS IT MAY DAMAGE THE EXTERIOR FINISH.
DO NOT USE AN ABRASIVE CLEANER OR STEEL WOOL SCOURING PAD ON THE DRIP PAN AS IT MAY DAMAGE THE PORCELAIN ENAMEL FINISH.
LET ALL PARTS AND SURFACES DRY THOROUGHLY PRIOR TO PLUGGING OVEN IN AND USING.
www.grunkel.com
grunkel
grunkel
NORMAS DE GARANTIA OFICIAL GRUNKEL


- @grunkel
- ÚNICAMENTE PARA USO DOMÉSTICO.
- IMPORTANT SAFETY INSTRUCTIONS
- grunkel
- SAVE THESE INSTRUCTIONS
- For Household Use Only
- Technical Specifications
- Before Using Your New Electric Oven
- Operation
- Using your Lamp & Convection oven
- HOW TO BAKE
- HOW TO BROIL
- Care & Cleaning
- NORMAS DE GARANTIA OFICIAL GRUNKEL
Brand : Grunkel
Model : HR-48N RM
Category : Oven