
Ice Breaker Blender PBT2000 - Blender SUNBEAM - Free user manual and instructions
Find the device manual for free Ice Breaker Blender PBT2000 SUNBEAM in PDF.


| Product Type | Blender |
| Brand | Sunbeam |
| Model | Ice Breaker Blender PBT2000 |
| Power | 700 W |
| Capacity | 1.5 L |
| Jar Material | Plastic (Tritan) |
| Blade Material | Stainless Steel |
| Number of Speeds | 3 speeds + Pulse |
| Functions | Blending, ice crushing, smoothies, milkshakes |
| Safety Features | Lid lock, non-slip feet |
| Cord Length | 1 m |
| Dimensions (H x W x D) | 40 x 18 x 18 cm |
| Weight | 3.2 kg |
| Dishwasher Safe Parts | Jar, lid, blade assembly |
| Warranty | 2 years |
Frequently Asked Questions - Ice Breaker Blender PBT2000 SUNBEAM
User questions about Ice Breaker Blender PBT2000 SUNBEAM
0 question about this device. Answer the ones you know or ask your own.
Ask a new question about this device
Download the instructions for your Blender in PDF format for free! Find your manual Ice Breaker Blender PBT2000 - SUNBEAM and take your electronic device back in hand. On this page are published all the documents necessary for the use of your device. Ice Breaker Blender PBT2000 by SUNBEAM.
USER MANUAL Ice Breaker Blender PBT2000 SUNBEAM
natural_image
White Sunbeam blender with clear glass body and control knob (no visible text or symbols on body)Contents
Sunbeam's Safety Precautions 1
Features Of Your Ice Breaker Blender 2
Before Using Your Ice Breaker Blender 3
Using your Ice Breaker Blender 3
Handy Blending Hints 5
Care And Cleaning 5
Ice Breaker Blender Recipes 6
Warranty 17
Important Instructions - Retain For Future Use
Sunbeam's Safety Precautions
SAFETY PRECAUTIONS FOR YOUR SUNBEAM BENCHTOP BLENDER.
- Ensure fingers are kept well away from the blades when in use.
- Do not blend warm/hot ingredients. Always cool ingredients to room temperature before blending. Hot/warm ingredients can eject out of the jug when a sudden steaming is caused.
• Always operate on a flat surface. -
Ensure the control dial is in the 'off' position before plugging into the power outlet.
-
Take care when removing the jug from the base, emptying the bowl/jug or during fitting and removal of blade system, as blades are extremely sharp.
- Warn of potential injury from misuse
- Switch off the appliance and disconnect from supply before changing accessories or approaching parts that move in use.
Sunbeam is very safety conscious when designing and manufacturing consumer products, but it is essential that the product user also exercise care when using an electrical appliance. Listed below are precautions which are essential for the safe use of an electrical appliance:
- Read carefully and save all the instructions provided with an appliance.
- Always turn the power off at the power outlet before you insert or remove a plug. Remove by grasping the plug - do not pull on the cord.
- Turn the power off and remove the plug when the appliance is not in use and before cleaning.
- Do not use your appliance with an extension cord unless this cord has been checked and tested by a qualified technician or service person.
- Always use your appliance from a power outlet of the voltage (A.C. only) marked on the appliance.
- Refer to "Care and Cleaning" section for details on how to clean surfaces in contact with food.
- Appliance can be used by persons with reduced physical, sensory or mental capabilities or lack of experience and knowledge if they have been given supervision or instruction concerning use of the appliance in a safe way and if they understand the hazards involved.
- This appliance shall not be used by children. Keep the appliance and its cord out of reach of children.
- Children should be supervised to ensure that they do not play with the appliance.
- The temperature of accessible surfaces may be high when the appliance is operating.
- Never leave an appliance unattended while in use.
-
Do not use an appliance for any purpose other than its intended use.
-
Do not place an appliance on or near a hot gas flame, electric element or on a heated oven.
- Do not place on top of any other appliance.
- Do not let the power cord of an appliance hang over the edge of a table or bench top or touch any hot surface.
- Do not operate any electrical appliance with a damaged cord or after the appliance has been damaged in any manner. If damage is suspected, return the appliance to the nearest Sunbeam Appointed Service Centre for examination, repair or adjustment.
- For additional protection, Sunbeam recommend the use of a residual current device (RCD) with a tripping current not exceeding 30mA in the electrical circuit supplying power to your appliances.
- Do not immerse the appliance in water or any other liquid unless recommended.
- Appliances are not intended to be operated by means of an external timer or separate remote control system.
- This appliance is intended to be used in household and similar applications such as: staff kitchen areas in shops, offices and other working environments; farm houses; by clients in hotels, motels and other residential type environments; bed and breakfast type environments.
- If the supply cord is damaged, it must be replaced by the manufacturer, its service agent or similarly qualified persons in order to avoid a hazard.
If you have any concerns regarding the performance and use of your appliance, please visit the Sunbeam Website or contact Sunbeam Consumer Care - details are on the back page. Ensure the above safety precautions are understood.
Features Of Your Ice Breaker Blender
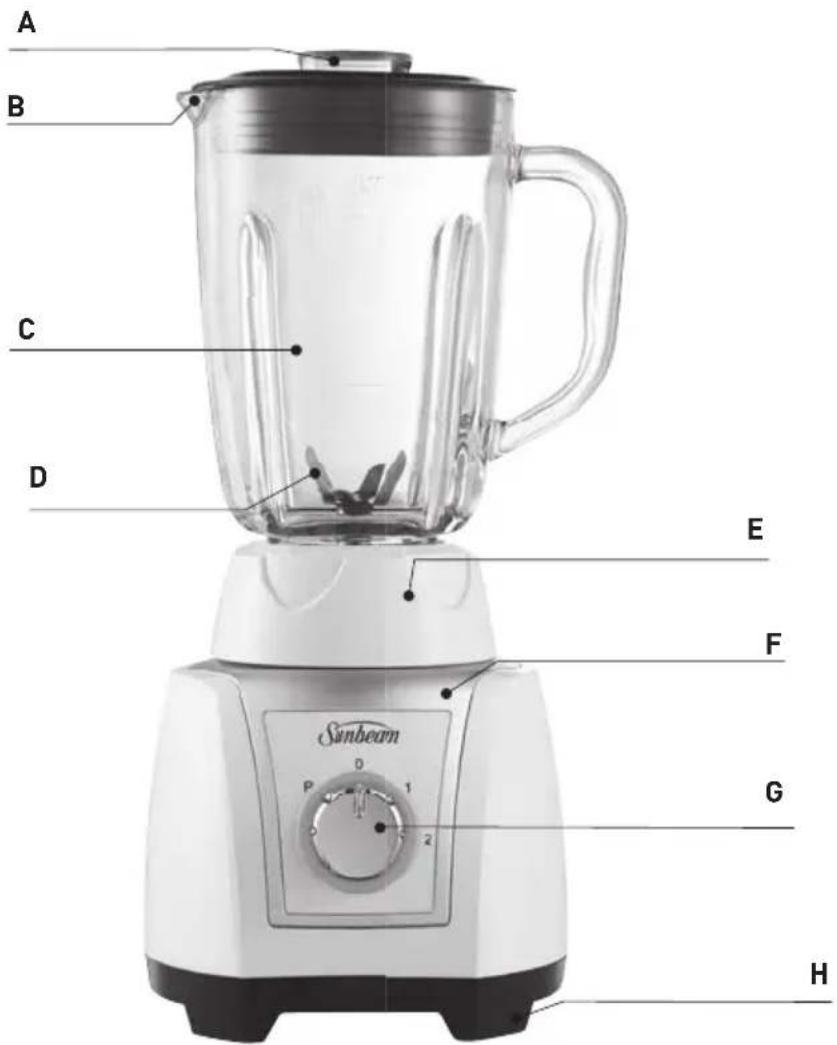
A. Ingredient Cup
Handy 30ml ingredient cup.
B. Jug Lid With Pouring Hole
Pouring hole allows you to easily add ingredients during blending, without removing the lid.
C. 1.25L Glass Jug
The 1.25L glass jug features an easy to pour lip and is marked in both cups and litres (L) for ease of use.
D. 6 Way Stainless Steel Blade System
The heavy-duty, stainless steel blade with a six-blade construction, crushes ice cubes, produces a smooth consistency when pureeing and combines ingredients perfectly for a smoothie.
E. Detachable Blade Assembly
The detachable blade assembly unit unscrews from the glass blending jug for convenient and thorough cleaning.
F. 550 Watt Motor
G. 2 Speed Control
The easy to grip control dial allows you to select one of two speeds or the Pulse option.
H. Non-Slip Feet
Before Using Your Ice Breaker Blender
Important: Always ensure your blender is unplugged from the power outlet before fitting or removing the blade assembly. Always handle the blade assembly with caution, as the blades are extremely sharp.
Wash and Dry Parts
Note: Before using your Ice Breaker Blender, we recommend removing the six-blade system for thorough cleaning.
Remove carefully the Blade system from the glass jug by turning it clockwise. Remove the ingredient cup from the lid. Wash the blade assembly, ingredient cup, lid and glass jug in warm soapy water. Rinse and allow thorough air drying.
Note: When removing the blade assembly from the jug you may need to slightly tilt the blade so that it slides out easily.
Re-assemble the six-blade system in the glass jug
Place carefully the blade assembly in the glass jug. Ensure that the blade assembly is firmly in place by turning it anticlockwise.
Do not remove the stainless steel blades from the blade assembly. The blender jug will leak if the six-blade system is not assembled correctly.
Using Your Ice Breaker Blender
- Place the blender jug onto the motor base.
Note: Do not switch 'ON' the Ice Breaker Blender without the lid in position.
- Place ingredients into the glass jug. Do not exceed the maximum indicated level - 1.25L.
- Position the lid with ingredient cup onto the blender jug. Ensure the lid is firmly in place.
- Using the selector dial, select the desired blending speed 1, 2 or PULSE. Speeds 1-2 will provide continuous blending until the dial is turned to the 'off' position. The Blending Guide on page 4 shows the functions that can be performed and the suggested speeds to use.
Note: Although the lid fits firmly to the glass jug, we advise when blending liquid ingredients, to place your hand on the lid as you initially select the blending speed/function. As the 550 watt motor could cause the liquid to surge up causing leakage. Once you have started blending you can remove your hand.
Note: Do not operate for more than 2 minutes at a time. Further ingredients can also be added whilst blending by removing the ingredient cup and pouring ingredients through the hole in the lid.
- After you have completed blending, turn the control dial to the 'off' position.
Using your Ice Breaker Blender
| Processing Task | Food Suggested | Setting | Suggested Processing Procedure |
| Aerating Milkshakes, Smoothies | 1 Use chilled | milk. Blend until desired consistency is achieved. | |
| Chopping Nuts, Chocolate, Garlic or Herbs | 2 Process 1/2 | cup at a time, to ensure evenly sized pieces. | |
| Crumbing | Bread Crumbs | 2 | Tear bread roughly. Process until desired consistency. |
| Biscuit Crumbs 1 | Break into pieces | and process until crumbed. | |
| Crushing Ice 2 | Add 1/4 cup of water | Use the PULSE button 3-4 times in succession for crushed ice. | |
| Emulsifying | Salad Dressing | 1 | Blend until well combined. Oil may be added to the mixture during processing through the pouring hole in the lid. |
| Mixing Batters, Cakes 1 Process | ingredients until just combined.DO NOT OVERPROCESS. | ||
| Pureeing Soups, Vegetables, Fruits | 2 Blend until smooth. | ||
Handy Blending Hints
- Nothing can beat a blender for making smooth purees and sauces or for whipping up frothy drinks - from healthy breakfast shakes to frozen daiquiris.
- Use your blender for chopping small amounts of food like nuts, bread crumbs and whole spices.
- Turn any oil-based salad dressing into a creamy style dressing by blending it until slightly thickened.
- Food items for blending should be cut into cubes (approximately 2-3cm), this will assist in achieving an even result.
- Ensure the lid is firmly and securely placed on the jug. Do not operate the blender without the lid on, if you wish to add any additional ingredients remove the ingredient cup and add as necessary.
- Never fill above the maximum level indicator 1.25L. When blending very liquid substances do not fill the jug above 1L to avoid spilling.
-
To ensure efficient mixing when blending dry mixtures, it may be necessary to stop the blender and push ingredients down the sides of the jug with a spatula.
-
When pureeing fruit or vegetables, cooked or raw, cut into small pieces to facilitate blending.
- When making bread crumbs, use 2 to 3 day old bread, leaving crusts on, to minimise the possibility of clumping. If only fresh bread is available, dry it out for a few minutes in a low heated oven.
- When blending a variety of ingredients together, blend the liquids first, then add dry ingredients.
- Always ensure stones are removed from fruit and bones from meat as these can harm the blades.
- Don't allow a used blender to sit for too long as the food will dry onto the blades, making it very difficult to clean. If you can't clean the blender straight away, pour some warm water in it and allow to soak.
- Do not process hot/warm liquids in your blender. Allow to cool to room temperature before blending.
Care And Cleaning
Quick Cleaning Method.
Half fill the blender with warm water and a small amount of detergent. Turn to PULSE button for 10-20 seconds. Then remove the jug and rinse it under running water.
For Thorough Cleaning.
Turn the blender jug upside down. Unscrew the blade assembly from the jug by placing the open end of the ingredient cap at the base of the blade assembly. Wash the blender lid, ingredient cup, blade assembly and blender jug in warm soapy water.
Caution: Take care when cleaning the blades as they are extremely sharp.
Note: The jug, seal, locking ring, lid and feeder cap may be washed in a dishwasher.
To Clean The Motor Base.
Use a damp, soft sponge with mild detergent and wipe over the motor base.
Note: Never immerse the motor base in water.
Ice Breaker Blender Recipes
Thai Pesto Makes 1½
1 bunch coriander, roughly chopped
1 clove garlic
1 stalk lemon grass, chopped
1 long red chilli, chopped
1 cup cashew nuts, roasted
^2/_3 cup peanut oil
1 teaspoon lemon juice
Salt and pepper, to taste
- Place coriander, garlic, lemon grass, chilli and cashews in blender. Place the lid securely onto the jug.
- With motor operating on speed 1 remove measuring cup and gradually add the all oil in a thin slow stream.
- Store in a clean, covered container in the refrigerator for up to one week.
Serving suggestion: A great dressing for salad. Toss 1-2 tablespoons of pesto through lettuce mix.
Roasted Garlic Aioli Makes 1½
2 egg yolks
3 cloves garlic
2 tablespoons white wine vinegar
2 tablespoons water
1 teaspoon Dijon mustard
1 cup olive oil
Salt and pepper, to taste
- Preheat oven to 200^ C. Wrap garlic in foil and place in oven for 15 minutes or until garlic is soft. Discard the skins.
- Place egg yolks, garlic, vinegar, water, and mustard in blender. Place the lid securely onto the jug.
- With motor operating on speed 1, remove measuring cup and gradually add the oil in a thin slow stream. Season to taste.
- Store in a clean, covered container in the refrigerator for up to one week.
Serving suggestion: Lovely with fresh vegetable crudite.
Ice Breaker Blender Recipes (continued)
Thai Red Curry Paste Makes 2 cups
24 small dried red chillies
10 long red chillies, chopped
8 cloves garlic
6 kaffir lime leaves
2 lemon grass stalk, chopped
12 cup peanuts, roasted
4 tablespoons fresh coriander, chopped
2 tablespoons grated galangal
2 tablespoons ground dried coriander
3 teaspoons caster sugar
1 teaspoon ground black pepper
2 teaspoons ground cumin
2 teaspoons lemon juice
1 teaspoon salt
1 teaspoon shrimp paste
Salt and pepper, to taste
1. Place dried chillies in a bowl and cover with boiling water. Set aside for 10 minutes. Drain, remove seeds.
2. Place all ingredients in the blender. Place the lid securely onto the jug.
3. Blend on speed 2 for 1 minute or until ingredients form a chunky paste. Season to paste.
4. Store in a clean, covered container in the refrigerator for up to one week.
Serving suggestion: Toss with fresh pasta for a quick and easy meal.
Caesar Salad Dressing Makes 1 cup
3 anchovy fillets
^1/_2 clove garlic
2 tablespoons crème friache
2 tablespoons lemon juice
2 teaspoons Dijon mustard
1 teaspoon sugar
14 cup grated parmesan
^3/_4 cup olive oil
Salt and pepper, to taste
- Place all ingredients in blender, omitting the oil. Place the lid securely onto the jug.
- Pulse for 20 seconds, or until ingredients are well mixed.
- With motor operating on speed 1, remove measuring cup and gradually add the oil in a thin slow stream. As mixture thickens, increase speed 2, until all the oil has been added.
- Store in a clean, covered container in the refrigerator for up to one week.
Serving suggestion: Great alternative to mayonnaise in sandwiches.
Ice Breaker Blender Recipes (continued)
Beetroot, Crème Friache Makes 2 cups and Mint Dip
400g beetroot, peeled, roughly chopped
^1/_3 cup crème friache
^1/_3 cup olive oil
1 tablespoon fresh mint
Salt and pepper, to taste
- Place all ingredients in blender. Place the lid securely onto the jug.
- Blend on Speed 2 until smooth. Season to taste.
- Store in a clean, covered container in the refrigerator for up to one week.
Serving suggestion: Great on lamb burgers.
Traditional Hummus Makes 1½ cups
400g can chickpeas, drained, rinsed
^1/_2 clove garlic, crushed
2 tablespoons lemon juice
12 teaspoon sesame oil
^1/_3 cup olive oil
Salt and pepper, to taste
- Place all ingredients in blender. Place the lid securely onto the jug.
- Blend on Speed 2 until smooth. Season to taste.
- Store in a clean, covered container in the refrigerator for up to one week.
Serving suggestion: For a tasty twist add a big dollop to pumpkin soup.
Ice Breaker Blender Recipes (continued)
Indian Lentil Soup Serves 8 cups with Minted Yoghurt
2 tablespoons olive oil
2 carrots, peeled, chopped
2 celery stalk, chopped
2 onions, chopped
3 cloves garlic
500g dried red lentils, rinsed
1 tablespoon curry powder
1 teaspoon ground coriander
1 teaspoon ground cumin
1 12 cups plain Greek yoghurt
14 cup freshly chopped mint
2 12 litres salt reduced chicken stock
1 teaspoon lemon juice
12 teaspoon ground cumin
Salt and pepper, to taste
- Heat oil in a large pot over medium heat. Add carrots, celery, onion and garlic, cooking until tender.
- Add lentils, curry powder, cumin and coriander, cooking until fragrant. Add stock and bring to a simmer, lower heat and cook for 1 hour or until lentils are softened. Set aside and allow lentils to cool to room temperature.
- Once cooled, in batches blend on speed 2 until smooth. Season.
- Place yoghurt, mint, coriander and basil in blender. Place the lid securely onto the jug.
- Blend on speed 1 until smooth. Season to taste.
- Bring to a simmer before serving. Serve with a dollop of minted yoghurt.
Caramelized Onion Serves 5 cups and Gorgonzola Soup
50g butter
2 onions, chopped
2 cloves garlic, crushed
1 leek, chopped
400g potatoes, peeled, chopped
1 12 litres chicken stock
100g blue cheese
Salt and pepper, to taste
- Melt butter in a medium saucepan over medium heat. Add onions, leek and garlic; cooking until light, golden brown, approximately 15-20 minutes.
- Add potatoes and stock to saucepan, bring to a simmer and cook for 20 minutes or until tender. Set aside and allow soup to cool to room temperature.
- Once cooled, in batches blend on speed 2 until smooth. Season to taste.
- Bring to a simmer before serving. Crumble blue cheese over soup, serve.
Ice Breaker Blender Recipes (continued)
Spicy Vegetable Soup Serves 6 cups
30g butter
2 carrots, peeled, sliced
2 celery stalks, sliced
1 leek, finely chopped
2 cloves garlic, crushed
1 medium parsnip, peeled, chopped
2 medium sweet potatoes, peeled, chopped
2 teaspoons coriander seeds
1½ litres vegetable stock
2 long red chillies, chopped, deseeded
12 cup coconut cream
-
Melt butter in a medium pot over medium heat. Add leek and garlic, carrots, celery cooking until caramelised.
-
Add parsnips, sweet potato, coriander, stock, bring to a simmer and cook for 20 minutes or until tender. Stir through chilli and coconut cream. Set aside and allow to cool to room temperature.
-
Once cooled, in batches blend on speed 2 until smooth. Season.
-
Bring soup to a simmer before serving.
Creamy Pumpkin Soup Serves 6 cups
50g butter
2 onions, chopped
2 cloves garlic, crushed
1 kg butternut squash, peeled, cubed
1 litre vegetable stock
^1/_2 cup parmesan cheese
^1/_3 cup double cream
Salt and pepper, to taste
-
Melt butter in a medium pot over medium heat. Add onions and garlic, cooking until tender.
-
Add pumpkin and stock; bring to a simmer and cook for 25-30 minutes or until tender. Set aside and allow to cool to room temperature.
-
Once cooled, in batches blend on speed 2 until smooth.
-
Add remaining ingredients, stirring to combine. Serve to taste.
-
Bring soup to a simmer before serving.
Ice Breaker Blender Recipes (continued)
Caramel Thick Shake Makes 2
2 scoops caramel ice cream
1 cup milk
Grated chocolate to serve
- Place all ingredients in blender. Place the lid securely onto the jug.
- Blend on setting 1 for 30 seconds, or until all ingredients are well mixed.
- Serve in tall glass with grated chocolate.
Ultimate Chocolate Thick Shake Makes 2
3 scoops chocolate ice cream
1 cup vanilla custard
12 cup milk
Ice to serve
- Place all ingredients in blender. Place the lid securely onto the jug.
- Blend on setting 1 for 30 seconds, or until all ingredients are well mixed.
- Pour into glasses, over ice.
Banana Smoothie Makes 2
2 large, ripe bananas, peeled
1 cup milk
^1/_2 cup plain Greek yoghurt
1 teaspoon honey
1. Place all ingredients in blender. Place the lid securely onto the jug.
2. Blend on setting 1 for 30 seconds, or until all ingredients are well mixed.
3. Pour into glasses.
Breakfast Smoothie Makes 2
1 ripe banana, peeled
1 cup milk
12 cup rolled oats
100g frozen strawberries
1 tablespoon honey
- Place all ingredients in blender. Place the lid securely onto the jug.
- Blend on setting 2 for 30 seconds, or until all ingredients are incorporated.
- Pour into glasses.
Ice Breaker Blender Recipes (continued)
Vanilla Milk Shake Makes 2
2 scoops vanilla ice cream
1 cup milk
^1/_2 teaspoon vanilla essence
1. Place all ingredients in blender. Place the lid securely onto the jug.
2. Blend on setting 1 for 30 seconds, or until all ingredients are well mixed.
3. Pour into glasses.
Mango Milk Shake Makes 2
1 mango, peeled, chopped (stone removed)
1 scoop vanilla ice cream
1 cup milk
1 tablespoon Greek yoghurt
1. Place all ingredients in blender. Place the lid securely onto the jug.
2. Blend on setting 2 for 30-40 seconds, or until all ingredients are well mixed.
3. Pour into glasses.
Raspberry and Apple Frappe Makes 2
2 cups frozen raspberries
1 12 cups apple juice
1 tablespoon sugar syrup (refer to recipe on page 17)
8 ice cubes
- Place all ingredients in blender. Place the lid securely onto the jug.
- Pulse for 1 minute until all ingredients are well mixed.
- Serve over ice.
Pineapple Mint Frappe Makes 2
2 cups pineapple juice
13 cup mint leaves
10 ice cubes
- Place all ingredients in blender. Place the lid securely onto the jug.
- Blend on setting 2 for 30 seconds or until all ingredients are well mixed.
- Pour into glasses.
Ice Breaker Blender Recipes (continued)
Sugar Syrup Makes 2 cups
1 cup caster sugar
1 cup water
1. Place sugar and water into a small saucepan over medium heat. Bring to a simmer and gently swirl the pot occasionally until all the sugar has dissolved, approximately 10 minutes.
Tip: Sugar syrup can be added to drinks for a touch of extra sweetness or can be infused with your favourite flavours eg. citrus rinds.
Pina Colada Makes 2
100mls pineapple juice
30mls white rum
40mls coconut cream
- Place all ingredients in blender. Place the lid securely onto the jug.
- Blend on speed 2 for 1 minute, or until all ingredients are well mixed.
- Serve over ice.
Mango Daiquiri Makes 2
1 mango, peeled and diced
50mls white rum
30mls mango liqueur
30mls lemon juice
30mls sugar syrup
12 cup small ice cubes
- Place all ingredients in blender. Place the lid securely onto the jug.
- Blend on speed 2 for 1 minute, or until all ingredients are well mixed.
- Pour into glasses.
Affogato Cocktail Makes 2
40mls vodka
20mls maple syrup
15mls espresso coffee
15mls Kahlua
2 scoops ice cream
Ice to serve
- Place all ingredients in blender. Place the lid securely onto the jug.
- Blend on speed 1 for 30 seconds, or until all ingredients are well mixed.
- Serve over ice.
Ice Breaker Blender Recipes (continued)
Pine-Lime Splice Makes 2
100mls pineapple juice
60mls lime juice
60mls thickened cream (35% milk fat)
20mls melon liqueur
- Place all ingredients in blender. Place the lid securely onto the jug.
- Blend on speed 2 for 1 minute, or until all ingredients are well mixed.
- Serve over ice.
Ice Breaker Blender Recipes (continued)
Baby food can be made using the Blender by simply processing fresh fruit or vegetables that have been boiled, steamed or microwaved until tender.
Baby food/puree can be frozen in a clean ice cube tray in portions. Ensure trays are covered with cling wrap. Once frozen, transferred to a resealable bag. Portions can then be thawed as you need them.
Try some of the following combinations:
- Apple and pear
- Banana and strawberry
- Pear and banana
- Pumpkin and corn
- Peas and zucchini
- Potato and pumpkin
- Pumpkin, sweet potato and zucchini
• Zucchini, squash and carrot - Beans, peas and zucchini
Note

This Sunbeam product is covered by a 12 month replacement or repair warranty, which is in addition to your rights under the Australian Consumer Law (if your product was purchased in Australia) or New Zealand Consumer Guarantees Act (if your product was purchased in New Zealand).
Upon receipt of your claim, Sunbeam will seek to resolve your difficulties or, if the product is defective, advise you on how to obtain a replacement or refund.
To assist us in managing warranty claims, we recommend you register your product as soon as practicable after purchase by creating a MySunbeam account on our website and uploading a copy of your original receipt.
In order to make a claim under our warranty, you must have the original proof of purchase documentation for the product and present it when requested (if not already uploaded to our website).
Should your product develop any defect within 12 months of purchase because of faulty materials or workmanship, we will replace or repair it, at our discretion, free of charge. A product presented for repair may be replaced by a refurbished product of the same type rather than being repaired. Refurbished parts may be used to repair the product.
Our replacement or repair warranty only applies where a defect arises as a result of faulty material or workmanship during the warranty period. Your warranty does not cover misuse or negligent handling (including damage caused by failing to use the product in accordance with this instruction booklet), accidental damage, or normal wear and tear.
Your warranty does not:
• cover freight or any other costs incurred in making a claim, consumable items, accessories that by their nature and limited lifespan require periodic renewal (such as filters and seals) or any consequential loss or damage; or
• cover damage caused by:
- power surges, power dips, voltage supply problems, or use of the product on incorrect voltage;
- servicing or modification of the product other than by Sunbeam or an authorised Sunbeam service centre;
- use of the product with other accessories, attachments, product supplies, parts or devices that do not conform to Sunbeam specifications; or
- exposure of the product to abnormally corrosive conditions; or
- extend beyond 3 months if the product is used in commercial, industrial, educational or rental applications.
The benefits given to you by our warranty are in addition to other rights and remedies under law in relation to the product.
In Australia our goods come with guarantees that cannot be excluded under the Australian Consumer Law. You are entitled to a replacement or refund for a major failure and for compensation for any other foreseeable loss or damage. You are also entitled to have the goods repaired or replaced if the goods fail to be of acceptable quality and the failure does not amount to a major failure.
Our goods also come with guarantees that cannot be excluded under the New Zealand Consumer Guarantees Act.
If your warranty claim is not accepted, we will inform you and if requested to do so by you, repair the product provided you pay the usual charges for such repair. You will also be responsible for all freight and other costs.
Should your product require repair or service after the warranty period, contact your nearest Sunbeam service centre. For a complete list of Sunbeam's service centres, visit our website or call our customer care line for advice on: 1300 881 861 in Australia, or 0800 786 232 in New Zealand.
Should you experience any difficulties with your product during the warranty period, please contact Sunbeam Customer Care:
Australia
www.sunbeam.com.au
1300 881 861
Units 5 & 6,
13 Lord Street,
Botany NSW 2019
Australia
New Zealand
www.sunbeam.co.nz
0800 786 232
Level 6, Building 5,
Central Park,
660-670 Great South Road
Greenlane, Auckland
New Zealand
Sunbeam
Need help with your appliance?
Contact our Customer Care Team orvisit our website for information and tipson getting the most from your appliance.
AUSTRALIA
Visit: www.sunbeam.com.au
Phone: 1300 881 861
Mail: Units 5 & 6, 13 Lord Street, Botany NSW 2019
NEW ZEALAND
Visit: www.sunbeam.co.nz
Phone: 0800 786 232
Mail: Level 6, Building 5, Central Park, 660–670 Great South Road, Greenlane, Auckland

Sunbeam Corporation PTY LTD | ACN 000 006 771
Sunbeam is a registered trade mark.
Sunbeam is a division of Newell Brands.
Due to continued product improvements,
product illustrations and photographs in this User Guide may differ slightly from the actual product.


- Contents
- Important Instructions - Retain For Future Use
- Sunbeam's Safety Precautions
- SAFETY PRECAUTIONS FOR YOUR SUNBEAM BENCHTOP BLENDER.
- Sunbeam is very safety conscious when designing and manufacturing consumer products, but it is essential that the product user also exercise care when using an electrical appliance. Listed below are precautions which are essential for the safe use of an electrical appliance:
- Features Of Your Ice Breaker Blender
- Ingredient Cup
- Jug Lid With Pouring Hole
- 1.25L Glass Jug
- 6 Way Stainless Steel Blade System
- Detachable Blade Assembly
- 550 Watt Motor
- 2 Speed Control
- Non-Slip Feet
- Before Using Your Ice Breaker Blender
- Wash and Dry Parts
- Re-assemble the six-blade system in the glass jug
- Using Your Ice Breaker Blender
- Handy Blending Hints
- Care And Cleaning
- Quick Cleaning Method.
- For Thorough Cleaning.
- To Clean The Motor Base.
- Ice Breaker Blender Recipes
- Thai Pesto Makes 1½
- Roasted Garlic Aioli Makes 1½
- Ice Breaker Blender Recipes (continued)
- Thai Red Curry Paste Makes 2 cups
- Caesar Salad Dressing Makes 1 cup
- Beetroot, Crème Friache Makes 2 cups and Mint Dip
- Traditional Hummus Makes 1½ cups
- Indian Lentil Soup Serves 8 cups with Minted Yoghurt
- Caramelized Onion Serves 5 cups and Gorgonzola Soup
- Spicy Vegetable Soup Serves 6 cups
- Creamy Pumpkin Soup Serves 6 cups
- Caramel Thick Shake Makes 2
- Ultimate Chocolate Thick Shake Makes 2
- Banana Smoothie Makes 2
- Breakfast Smoothie Makes 2
- Vanilla Milk Shake Makes 2
- Mango Milk Shake Makes 2
- Raspberry and Apple Frappe Makes 2
- Pineapple Mint Frappe Makes 2
- Sugar Syrup Makes 2 cups
- Pina Colada Makes 2
- Mango Daiquiri Makes 2
- Affogato Cocktail Makes 2
- Pine-Lime Splice Makes 2
- Note
- Your warranty does not:
- • cover damage caused by:
- Australia
- New Zealand
- Sunbeam
- Need help with your appliance?
Brand : SUNBEAM
Model : Ice Breaker Blender PBT2000
Category : Blender