
NVR-845 SBBU - Soundbar NEVIR - Free user manual and instructions
Find the device manual for free NVR-845 SBBU NEVIR in PDF.


| Product Type | Soundbar |
| Brand | Nevir |
| Model | NVR-845 SBBU |
| Dimensions (W x H x D) | Approx. 90 x 7 x 8 cm |
| Weight | Approx. 2.5 kg |
| Power Supply | AC 100-240V, 50/60Hz |
| Power Consumption | 30 W (typical) |
| Standby Power | < 0.5 W |
| Audio Output Channels | 2.0 or 2.1 (with subwoofer) |
| Total RMS Power | 40 W |
| Frequency Response | 50 Hz - 20 kHz |
| Connectivity | Bluetooth 5.0, Optical, AUX, USB |
| Bluetooth Version | 5.0 |
| Supported Audio Formats | MP3, WMA, WAV, FLAC |
| Remote Control | Included (CR2025 battery) |
| Wall Mountable | Yes (brackets included) |
| Equalizer Presets | Music, Movie, News, Flat |
| Input Sensitivity | 500 mV |
| Signal-to-Noise Ratio | > 70 dB |
| Speaker Drivers | 2 x full-range, 2 x tweeter |
| Material | Plastic with metal grille |
| Color | Black |
| Warranty | 2 years (varies by region) |
| Package Contents | Soundbar, remote, batteries, optical cable, power adapter, wall mount kit, manual |
Frequently Asked Questions - NVR-845 SBBU NEVIR
User questions about NVR-845 SBBU NEVIR
0 question about this device. Answer the ones you know or ask your own.
Ask a new question about this device
Download the instructions for your Soundbar in PDF format for free! Find your manual NVR-845 SBBU - NEVIR and take your electronic device back in hand. On this page are published all the documents necessary for the use of your device. NVR-845 SBBU by NEVIR.
USER MANUAL NVR-845 SBBU NEVIR
natural_image
Black rectangular object with a vertical seam and small protrusions on the left side (no text or symbols visible)
natural_image
Two black cylindrical objects with flanged bases, no visible text or symbols1 Altavoces
10 Entradas AUDIO L/R: Conectar a un dispositivo de audio externo.
11 Soporte
Mando a Distancia
Instalación
natural_image
Illustration of two cylindrical objects with circular components, one being cut and the other holding a circular object (no text or symbols)
natural_image
Two vertical structural components with curved arrows indicating rotation, no text or symbols presentOption B: Horizontal
natural_image
Diagram showing three sequential steps of a mechanical component being cut, with no visible text or symbols.natural_image
Pure mechanical assembly diagram without any text, numbers, or symbolsnatural_image
Simple line drawing of a mechanical tool with a circular component and a cylindrical body (no text or symbols)
natural_image
Simple line drawing of a mechanical device with a circular component and a tool inserted (no text or symbols)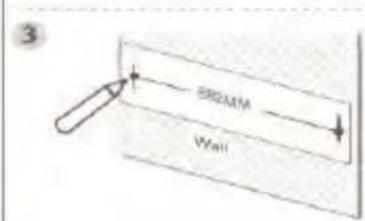


Información técnica
natural_image
Front view of a black rectangular electronic device with no visible text or symbols
natural_image
Two black cylindrical speakers with base plates, no visible text or symbols on the devices themselves.Please read this instruction manual before you operate the player and keep the manual for your reference in future.
Controls and Connections
Pairing Bluetooth Enabled Devices
The first time you use your Bluetooth device with this player, you will need to connect or "pair" it with the player first.
- Switching to Bluetooth mode. The blue indicator will flash slowly, indicating that the system has entered pairing mode and will be searchable by your Bluetooth enabled device.
- Alternatively, press the PAIR button on the unit to enter pairing mode.
- Activate your Bluetooth enabled device and select the search mode. "NVR-845SBBU" will appear on your Bluetooth device list.
- Select "NVR-845SBBU" in the pairing list. The blue indicator will light up solidly if pairing succeeds.
- To disconnect the Bluetooth function, press the PAIR button for 2 seconds, or disable the function from your Bluetooth enabled device. The blue indicator will flash slowly.
AUDIO L/R socket
Use the supplied RCA cable to connect with audio output socket of the connected audio device, such as a media player, to the unit's AUDIO L/R socket.
USB connection (input only)
This soundbar can play audio files that are stored on a USB stick. Connect your USB stick (not included) to the USB socket for playback.
Instructions
General Operation
Standby/ON
- When you first connect the main unit to the mains socket via the AC adaptor, the main unit will be in Standby mode.
- Long press the POWER button on the unit or shortly press POWER button on the remote control to switch the unit ON/OFF.
- Press and hold the POWER button again to switch the unit back to Standby mode. The power indicator will light up red.
- Disconnect the AC adaptor from the mains socket if you want to switch the unit OFF completely.
Mode Selection
Press the MODE button repeatedly on the unit or the button on the remote control to switch betweenUSB, Audio L/R, and Bluetooth modes.
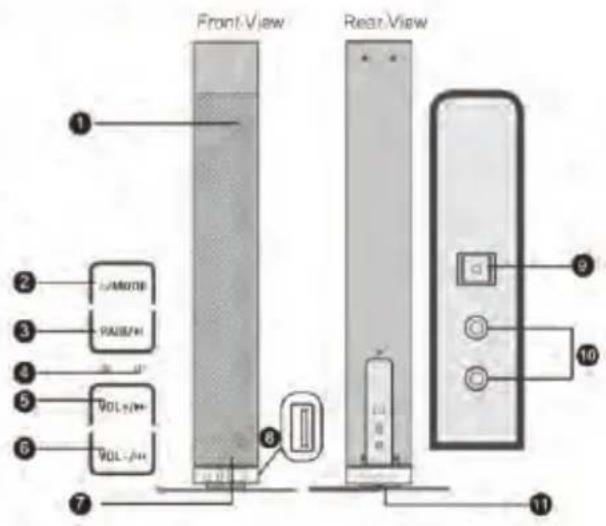
1 Speakers
2 / Mode: Long press to switch the unit between on and standby mode. Shortly press to select your preferred source.
3 PAIR/▶: Under Bluetooth and USB mode, Shortly press this button to Play/Pause music playback. Under AUX mode, short press this button to mute the sound. Long press this button to disconnect the Bluetooth connection when the devices has successfully paired with speaker.
4 LED Indicators
5 VOL +/▶▶: Long press to increase the volume level. Shortly press to skip to next track (in Bluetooth and USB mode only).
6 VOL -/ 194 : Long press to decrease the volume level. Shortly press to skip to previous track (in Bluetooth and USB mode only).
7 Remote Control Sensor
8 USB Socket (input only)
9 DC Power Socket
10 AUDIO L/R Sockets: Connect to an external audio device.
11 Stand


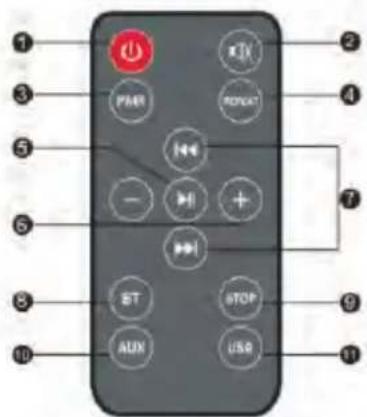
Remote Control
- Power: Switch the unit between on and standby mode
2 : Mute or resume the sound
3 PAIR: Press this button to disconnect the bluetooth connection when the devices has successfully paired with speaker.
4 REPEAT: Under USB mode, when playing music, press "REPEAT" will repeat current playing.(Note: Bluetooth and AUX cannot support REPEAT)
5 ▶ : Shortly press this button to Play/Pause music
6 -/+ : Decrease/increase the volume level.
7: In Bluetooth or USB mode, skip to the previous/next audio file.
8 BT: Select to enter Bluetooth mode
9 STOP: Under USB mode, press this button to stop playing. This function cannot work under Bluetooth and AUX mode.
10 AUX : Select this mode for RCA audio inputs.
11 USB : Select this mode for USB playback.

Installation
This soundbar unit can be used either as a single soundbar or as a pair of tube speakers. Installation options include:
Option A:
Two tube speakers installed on stands
Option B:
Single soundbar positioned horizontally with rubber feet
Option C:
Single soundbar wall-mounted
Option A: Stand mounting
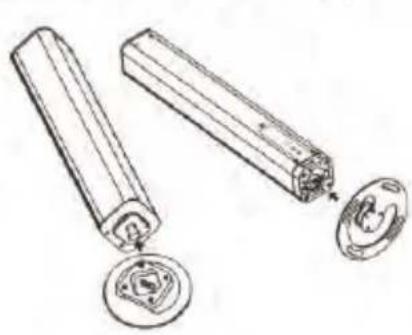
Attach a stand each to the two separate pieces and twist to secure, as illustrated below.
natural_image
Diagram showing two cylindrical components with circular features, one partially open and the other with a circular inset (no text or symbols)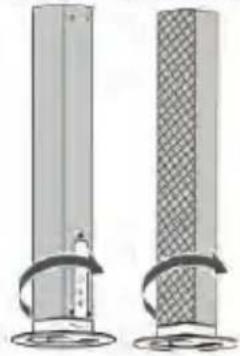
natural_image
Two vertical cylindrical objects with circular bases, one with a curved arrow indicating rotation or movement (no text or symbols)Option B: Horizontal mounting
- Align the two separate pieces and twist to secure, as illustrated below.

natural_image
Diagram showing three stages of a mechanical assembly with arrows indicating motion (no text or symbols)
2. Rubber feet installation
You can extend the height of the unit, if required. To do so, attach the supplied rubber feet as follows.
- Ensure the surface of the soundbar is clean prior to attaching the rubber feet.
- Turn the unit upside down.
- Remove the backing paper from the rubber feet.
- Stick the rubber feet to the bottom of the unit, as illustrated below.

natural_image
Technical line drawing of a mechanical bracket with two end caps and a close-up inset showing a cylindrical component (no text or symbols)Option C: Wall mounting
- Wall-mounted installation must be carried out by qualified personnel only. Incorrect assembly can result in severe personal injury and property damage! (If you intend to install this product yourself, you must check for installations such as electrical wiring and plumbing, which may be hidden inside or behind the wall).
- Be aware of the health hazard associated with asbestos fibre potentially present in structure when drilling.
- It is the installer's responsibility to verify and confirm that the wall will safely support the total load of the unit and wall brackets.
• Additional tools (not included) are required for the installation. Do not over-tighten screws. Use an electronic stud finder to check the wall type before drilling and mounting.


Technical data
| Product Type | Soundbar System |
| Input Interface | 1×USB playback port |
| Output interface | 1×RCA |
| Power output | 20W |
| Product dimension (L×W×H) | 925×60×60MM |
| Power supply | DC 12V 1.5A |
FAQS
If you encounter problems when using this unit, check the following points before requesting service.
| Problem | Solution |
| No power | Ensure that the AC adaptor of the apparatus is properly connected. |
| Ensure that there is power at the AC outlet | |
| Press the POWER button to turn the unit on. | |
| Remote control does not work | Reduce the distance between the remote control and the unit, |
| Insert the battery with its polarities (+/-) aligned as indicated. Please check the battery is installed correctly | |
| Replace the battery. | |
| Aim the remote control directly at the sensor on the front of the unit. | |
| No response from the unit | Disconnect the reconnect the AC adaptor, then turn the unit on again. |
| Unable to find the soundbar in the Bluetooth device list when pairing | Ensure you have paired the unit with your Bluetooth enabled device. |
| Ensure the Bluetooth function is activated on your Bluetooth enabled device. |
Product Warning and Maintenance
- The machine uses DC 12V power adaptor. Please don't use any other different voltage power supply to avoid any damage and harm.
- Do not drop speakers to avoid damaging internal structure.
- Do not use this product in wet environment to avoid water droplets into the speaker.
- Do not use any chemical solvent to wipe the surface of machine.
- This speaker is high sealing design. Do not attempt to disassemble this speaker.

The European Directive 2002/96 /EC on Waste Electrical and Electronic Equipment (WEEE) required that old household electrical appliances must not be disposed of in the normal unsorted municipal waste stream. Old appliances must be collected separately in order to optimize the recovery and recycling of the material they contain, and reduce the impact on human health and the environment. The crossed out "wheeled bin" symbol on the product remind you of your obligations that when you dispose of the appliance, it must be separately collected.
Besides that, waste batteries and/or accumulator must be removed prior to delivery of WEEE, thought the separated collection channels provided for this purpose (distributors and/or facilities from Local Authorities)
- Mando a Distancia
- Instalación
- Option B: Horizontal
- Controls and Connections
- Pairing Bluetooth Enabled Devices
- AUDIO L/R socket
- USB connection (input only)
- Instructions
- General Operation
- Standby/ON
- Mode Selection
- Remote Control
- Installation
- Option A: Stand mounting
- Option B: Horizontal mounting
- Rubber feet installation
- Option C: Wall mounting
- FAQS
- Product Warning and Maintenance
Brand : NEVIR
Model : NVR-845 SBBU
Category : Soundbar