JLR-0801 - Washing machine Jocel - Free user manual and instructions
Find the device manual for free JLR-0801 Jocel in PDF.


| Product Type | Automatic Drum Washing Machine |
| Brand | Jocel |
| Model | JLR-0801 |
| Dimensions (H × D × W) | 850 × 590 × 595 mm |
| Weight | 74 kg |
| Power Supply | 220–240 V ~ 50 Hz |
| Maximum Working Current | 10 A |
| Washing Power | 200 W |
| Spinning Power | 700 W |
| Water Heating Power | 1800 W |
| Water Pressure Range | 0.03 – 1 MPa |
| Nominal Load (Cotton) | 7 kg |
| Maximum Spin Speed | 1400 rpm |
| Washing Programs | 11 (Cotton, Synthetic, Wool, Cashmere, Underwear, Woolen Blankets, Sport, Handwash, Quick Wash, Drain, Spin) |
| Temperature Selection | Cold (–), 30°C, 40°C, 50°C, 60°C, 70°C, 90°C (depending on program) |
| Spin Speed Selection | 0, 400, 600, 800, 1000, 1200, 1400 rpm |
| Delayed Start | 0.5 to 24 hours (30-minute increments) |
| Additional Functions | Prewash, Extra Rinse, Rinse Hold, Economy, Key Lock |
| Display | Digital screen showing time, temperature, speed, options, and error codes |
| Detergent Drawer | 3 compartments: prewash (1), main wash (2), softener/additives (3) |
| Filter Cleaning | Monthly (located at bottom front) |
| Inlet Filter Cleaning | Regularly to prevent blockages |
| Safety Features | Child lock, door lock during operation, thermal protection, anti-flood design |
| Spare Parts | Water inlet hose, drainage hose, filter, transport safety screws, levelling feet |
| Installation Requirements | Separate earthed socket (15A fuse), water supply with pressure 0.03-1 MPa, drainage height 80-100 cm |
| Warranty / Support | Contact Jocel assistance (Portugal): Telef. 00 351 252 910351, assistencia@jocel.pt |
Frequently Asked Questions - JLR-0801 Jocel
User questions about JLR-0801 Jocel
0 question about this device. Answer the ones you know or ask your own.
Ask a new question about this device
Download the instructions for your Washing machine in PDF format for free! Find your manual JLR-0801 - Jocel and take your electronic device back in hand. On this page are published all the documents necessary for the use of your device. JLR-0801 by Jocel.
USER MANUAL JLR-0801 Jocel
natural_image
Cartoon illustration of a smiling woman holding a basket at a table with flowers, outdoors near clouds and birds (no text or symbols)
natural_image
Front view of a silver washing machine with blue glass interior (no visible text or symbols)conteúdos
Antes de usar a máquina de lavar
natural_image
Illustration of a snowman, a washing machine, and a prohibition sign (no text or symbols on the main elements)natural_image
Cartoon illustration of a washing machine with arms and legs, next to a prohibition symbol (no text or labels)natural_image
Cartoon illustration of a washing machine with angry expression and a smiling sun, accompanied by an exclamation mark (no text or symbols)natural_image
Simple line drawing of a washing machine connected to a plug with a prohibition symbol (no text or labels)● Usar
natural_image
Simple line drawing of a smiling face with a bandage and a prohibition symbol (no text or labels)precauções
natural_image
Illustration of an open box, a fan with steamers, and a washing machine (no text or symbols)Fig. 1
natural_image
Illustration of hands cleaning a washing machine with no text or symbolsTelef. 00 351 252 910351
Fax: 00 351 252 910367
E-mail: assistencia@jocel.pt
Http://www.jocel.pt
JOCEL®
Automatic Drum Washing Machine
JLR0801
natural_image
Cartoon illustration of a smiling woman holding a basket at a table with flowers, outdoors near clouds and birds (no text or symbols)
natural_image
Front view of a silver washing machine with blue water filter (no visible text or symbols)Contents
Before Using the washing machine
Part Names.....Inside front cover
Warnings....1-3
Installation 4-5
Control Panel 6-7
How to use the washing machine
Programm Selection 8
Preparations.... 9
Washing Methods 10-11
Maintenance
Maintenance 12
Trouble-shooting 13
Description of option....14
Technical Specifications....15
Part names

| Caution and Warning Symbols | |
 | For your safety, any instructions in this manual with this "Warning" sign shall be strictly followed. |
 | For your safety and to prevent damages to the washing machine, any instructions in this manual with this "Stop" sign shall be strictly followed.This diagram may vary slightly with the layout of the washing machine you have just purchased due to technical improvements. |
Precaution
● Safety
1. A separate earthed socket is required for the power supply. After installation of the washing machine,the power plug should be accessible.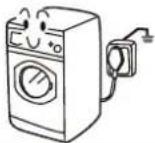 |   |
3. Fuses in the power circuit should be rated for 15A.   | 4. For your safety, dry hands before touching the washing machine and wear appropriate footwear. |
5. Do not use inflammable detergents or dry-cleaning agents. Do not use inflammable spray containers in close vicinity to the washing machine. In the event of gas leaks, remove the washing machine plug and do not connect.   | 6. The door of the washing machine will become very hot during the water-heating process. Avoid contact with the door during the heating process. For safety, keep children away from the washing machine. |
7. Do not allow children play with the packing materials after unpacking.  | |
Precautions
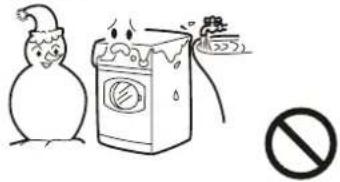
- The washing machine must not be installed outside or in a very humid area as drops of water may form on electrical components. If drops of water have splashed on the warming on the washing machine, leave it dry before use.
natural_image
Illustration of a snowman next to a washing machine with a prohibition symbol (no text or labels)- The washing machine should be place in a well-ventilated area separating it from nearby walls or furniture.

natural_image
Cartoon illustration of a washing machine with arms and legs, next to a prohibition symbol (no text or labels)- Keep away from heat sources and direct sunlight to prevent plastic and rubber components from aging.

natural_image
Cartoon illustration of a washing machine with flames and a warning symbol (no text or labels)- During installation, ensure that the electric cable is not trapped by the washing machine and avoid damage to the electric cable.

natural_image
Simple line drawing of a washing machine connected to a power outlet with a prohibition symbol (no text or labels)Use
- Before starting the wash programme, ensure that the washing machine is correctly connected to the water supply. In the event of water leakage, turn off the water supply and reconnect, or call the Service Center.

natural_image
Illustration of a faucet with water droplets and a hand holding a tool, alongside a warning symbol (no text or labels)- Keep the door slightly open when the washing machine is not being used. Never cover the machine with a plastic sheet.

natural_image
Simple line drawing of a smiling face next to a book with a 'no' symbol (no text or labels)Precautions
3.Do not place heavy objects or container with water on the washing machine,so as to prevent deformation of the flat surface and plastic parts. [IMAGE] [IMAGE] | 4.Do not wash articles containing polystyrene or similar elastic materials.  |
5.Before washing,do up zippers and ensure that buttons are securely fastened. Place small items,such as socks,belts,etc. in a small washing bag or a pillow-case . To protect the washing machine,do not wash garments containing wire parts. [IMAGE] [IMAGE] | 6.Do not open the detergent drawing during the wash cycle. [BKC7C] [BKC7C] |
7.The door is fitted with a self-lock device and can not be opened until 2-3 minutes after the end of the programme.You are not recommended not to force the door open before the programme end. Do not open the door if the water level is above the lower part of the door.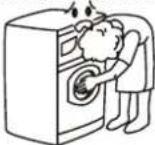 [IMAGE] [IMAGE] | 8.At the end of the wash cycle,turn off the water supply to prevent water leakage,unplug the washing machine and thoroughly clean the trim so as not to dirty the laundry in the next wash cycle.  |
| 9.If the supply cord is damaged,it must be replaced by the manufacturer,its service agent or similarly qualified persons in order to avoid a hazard. | 10.The appliance should be connected to the water mains using new hose-sets and that the old should not be used.For washing machines with ventilation openings in the base,that a carpet must not obstruct the openings. |
Installation
Unpacking and Installation
- So as to prevent unsteadiness during installation, remove all the transport safety packing, including the polystyrene base (Fig. 1). Drops of water seen on the packing, base and/or glass of the door are the normal result of tests run in the factory with water before shipment.

natural_image
Illustration of a box, fan, and washing machine (no text or symbols)Fig. 1
●Removing the transport safety screws (Fig. 2)
- The transport safety screws were designed for fixing objects in the washing machine. Before using the washing machine:
- Cirmgyrate the transport fixing screws widdershins by screwdriver to uninstall the transport fixing screws.
- Remove the transport fixing screws together with rubber gasket on it. You will find two plastic wedges.
- Remove the back reinforcement, you will find the third plastic wedge
- Cirmgyrate the three plastic wedges by 90 degree.
- Take out of the plastic wedge.
- Find the orifice-stem in the packing box and remove the tectorial on it.
- Stick the orifice-stem to the orifice.
● Installation and horizontal levelling of the washing machine
The washing machine comes with four adjustable levelling feet. Adjust the feet before starting the machine to make sure it is in a perfectly horizontal position.


2
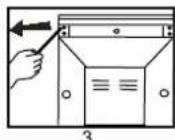
3

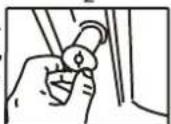
5

6

Fig.2

Fig.3
Reminder:
When open the shrink package, you will find a board which has four holes, as shown in Fig4, This board must be fixed before using. It is dampproof and can also be used for reducing the noise. Lay down the machine, screw off the four feet, put the four fix hole of the board right on the fix hole of the feet, then screw on the feet to fix the board as shown in Fig5.
Fig.4

Fig. 5

Installation
Connection of water inlet hose and washing machine
-
Place the threaded end of the water inlet hose on the water inlet valve connector. threaded end of
-
Check that the connection is correct by tightening the threaded end on the connector.
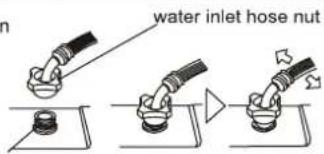
water inlet valve connector
Positioning the drainage hose
- The free end must be at a height of between 80 and 100cm . The drainage hose must be fastened on the rear panel with the retaining clip.
- Fix the drainage hose in the correct position with the support supplied. It is inadvisable to lengthen the hose; if necessary, contact the Service Centre. The extension must not exceed 250 cm in length (an overlong extension could cause the water to drain while the washing machine is still loading). The diameter of the extension hose must be the same as that of the original drainage hose.
Note: the free end must not be immersed in water. Connect the drainage hose securely in order to prevent leakage.


Connection of power supply
Check the following items before connection to the power supply.
- whether the socket is able to support the washing machine's maximum load (the socket and the power cable must be able to support a maximum current of no less than 15A).
- whether the mains voltage conforms to the required value.
- if the power socket to which the washing machine is connected is not the same as the plug, replace it with a suitable one; alternatively, consult a specialised engineer or the Service Centre for a suitable socket. The washing machine must be correctly earthed.
- the supplementary earth cable is not necessary if the power socket is earthed.
- the supplementary earth cable is installed at the top of the rear panel of the washing machine and earthed if the power supply socket has no earth connection.
Note: do not connect the supplementary earth cable to the water hose or heating pipe.
Control Panel
Control Panel

| A Program knobBy turning this knob, it is possible to select the desired programRefer to "Program Guide" to select the Program .The program selector knob is at the same time a power swith; when the knob is at "∅", the washing machine is off; when the knob is in the other 11 positions, the washing machine is on. |  |
| B Temperature buttonBy pressing and holding down this button, it is possible to select the desired washing temperature (--, 30,40,50,60,70, 90°C). Refer to "Program Guide" to Select the maximum temperature of each programWhen selected, the temperature is displayed in the digital display area on the screen.Caution: Cold wash is selected when the symbol "--" is displayed in the temperature display area | |
| C Speed buttonBy pressing and holding down this button, it is possible to select the desired spin speed (0, 400, 600, 800, 1000,1200, 1400rpm). Refer to the "Program Guide" to choose the maximum speed of each program. When selected, the speed value is displayed inthe digital display area of the screen.Caution: the washing machine does not spin when the number "0" is displayed in the speed display area of the screen. The washing machine spins at 1400 rpm when "1400" is displayed in the speed display area of the screen. | |
| D Start / Pause buttonWhen the electric cable of the washing machine is plugged in and a program is selected, after the washing temperature, spinning speed and other required functions are set, lightly press this button, ":" will be displayed and operation will start. During a wash cycle, press this button lightly, the ":" sign will stop blinking and operation will pause. Press it again to resume operation.Note: After operation is suspended, the washing temperature, spinning speed and other functions can be reset. After that, press the Start/Pause button to continue operation. | |
| E EconomicPress this button to shorten the washing and heating time (for cotton and synthetic). It is suitable for less soiled laundry. | |
Control Panel Operating Functions
F "Rinse hold" button
When you press this button, the screen displays the 'Rinse hold' symbol. The washing machine does not drain the water after the last rinse, but the laundry remains in soak. The 'Rinse hold' symbol flashes. To spin the laundry, press this button again or the "Start/Pause" button. The 'Rinse hold' symbol disappears from the screen and the program continues to the end. The 'rinse hold' function is used to prevent the laundry creasing when left in the drum for a long time after spinning.
This function can be selected in "cotton", "synthetic" and "woolen blankets" program
G Extra rinse button
When you press this button, the screen displays the extra rinse symbol. The washing machine performs an extra rinse before the soak stage during the wash cycle and the extra rinse symbol flashes. At the end of the extra rinse stage, the extra rinse symbol disappears from the screen and the program continues to the end. This function can not be selected in "drain" and "spin" program
H "Prewash" button
Press this button before starting the program if the laundry is heavily soiled. The screen displays the prewash symbol. The washing machine performs a prewash after it has started and the prewash symbol flashes, and the water flows into compartment 1 of the detergent drawer. At the end of the prewash, the relevant symbol disappears from the screen and the washing machine performs the main wash. This function can be selected in "cotton", "synthetic" and "woolen blankets" program
I "Delayed start"
Press this button before starting the program if you wish to delay the start of the wash cycle. Then press the "Delayed start" button. Each time the "Delayed start" button is pressed, the time increases from 0.5 to 24 hours at 30-minute intervals. After having set the time period of the delayed start, the relevant symbol appears on the screen. The main program starts when the time set expires and the symbol disappears from the screen. The delay time set also includes the program length, and so it must be longer than the program length selected. If not, the washing machine starts washing without delaying the start. This function can not be selected in "drain" and "spin" program
J Screen
The screen displays the wash time remaining, the temperature selected, the speed selected, the options and the alarm warning, etc. (for details see 'description of the screen').
K Detergent drawer
Directions for program selection are printed on the detergent drawer handle. When you open the detergent drawer, you will see three detergent compartments. Compartment 1: pour the detergent into this compartment only if you select prewash. Compartment 2: pour the detergent into this compartment for wash programs from 1 to 8;
Compartment 3: pour into this compartment any additives, eg. softener or bleach, etc., to soften or whiten the laundry.

D+1 combined buttons for button lock
After having started the program, enable the button lock by pressing the "Delayed start" and "Start/Pause" buttons for 3 seconds. The screen displays "SAFE ON" in the digital display area. In order to cancel the button lock, press the two buttons again for 3 seconds, and "SAFE OFF" is displayed in the digital display area of the screen. This function can prevent outside interference during the wash cycle. For example, by chance, a child presses a button or turns the program selector, possibly causing the program to stop. Caution: disable it after the screen displays "End" if the button lock is enabled during the wash cycle.
Program Selection
| Mode Selection | Recommended Laundry | Temp°C | Recommended Heating Temp °C | Spin Speed | Recommended Spin speed | ||
| Program selector Position | Program | ||||||
| 1 |  | Cotton | Cotton fabrics | 0-90 | 60 | 0-1400rpm | 1000rpm |
| 2 | [CX28] | Synthetic | Fast colors and medium-soiled synthetics fabrics | 0-60 | 60 | 0-1200rpm | 800rpm |
| 3 | [X8CE] | Wool | Wool | 0-40 | 40 | 0-400rpm | 400rpm |
| 4 |  | Cashmere | Wool and silk | 0-40 | 40 | 0-400rpm | 400rpm |
| 5 |  | Underwear | Cotton | 0-90 | 90 | 0-400rpm | 400rpm |
| 6 |  | Woolen blankets | / | 0-60 | 60 | 0-600rpm | 600rpm |
| 7 | [53AT] | Sport | Cotton | 0-40 | 40 | 0-1000rpm | 800rpm |
| 8 | [7THZ] | Handwash | / | 0-40 | 40 | 0-400rpm | 400rpm |
| 9 | [2TTB] | Quick wash | / | 0-60 | 60 | 0-1400rpm | 1000rpm |
| 10 | [SW4X] | Drain | / | / | / | / | / |
| 11 |  | Spin | / | / | / | 400-1400rpm | 1000rpm |
| 0 |  | Power off | |||||
Preparations
1.Power supplyConnect the washing machine to the power supply (220-240V~/50Hz) | 2. Water connectionTurn on the tap. Water must be clean and clear.Note: Before use, check for leakage in the joints between the tap and the inlet hose by turning on the tap.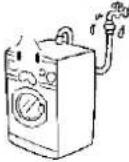 |
| 3. Detergent selectionNot only is the washing machine's performance determined by the quality of detergent used, but also washing efficiency.Use special non-foaming detergent to get good washing resultsUse specific detergents for synthetic and woolen goods. Do not use dry cleaning agents such as trichloroethylene and similar products.Note: Do not add more detergent than needed. | 4. Preparing the laundrySort out clothes according to fabric (cotton, synthetics, wool or silk) and to how dirty they are.Separate white clothes from coloured ones. Wash them first by hand to check if they fade or run.Empty pockets (keys, coins, etc.) and remove the harder decorative objects (e.g. brooches).Garments without hems are to be put into wash bag (it is best not to wash them in a washing machine). Close zippers and hooks, make sure the buttons are sewn on tightly and place small items such as socks, belts, bras, etc. in the wash bag.Unfold large pieces of fabric such as bed sheets, bedspreads, etc.Turn shirts inside out. This washing machine is for domestic use only. Do not use it for purposes other than that for which it was designed. Follow the instructions given on the label of each garment and wash only machine-washable garments. Close zippers and hooks, make sure the buttons are sewn on tightly and place small items such as socks, belts, bras, etc. in the wash bag.Unfold large pieces of fabric such as bed sheets, bedspreads, etc.Turn shirts inside out. This washing machine is for domestic use only. Do not use it for purposes other than that for which it was designed. Follow the instructions given on the label of each garment and wash only machine-washable garments. |
Washing Methods
- Laundry loading Open the door, put in the laundry inside. Close the door tightly.
Notes:1) When using the washing machine the first time, let it run unloaded for one program to prevent the laundry from being tainted by oil or dirty water from the washing machine.
2) Do not overload the washing machine.
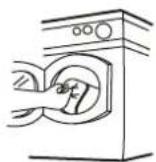
Load Reference

- Adding detergent Slide out the detergent drawer and put the right amount of detergent and softening agent into the corresponding compartments, depending on the wash cycle. Push the drawer back in gently.
Note: 1) For pre-washing program, detergent should be added to both compartments 1 and 2. Compartment 2 allows only solid detergents. For other programs, do not add detergent to compartment 1.
2) Do not overuse softener; otherwise, it will damage the artificial fibers.

natural_image
Line drawing of a hand washing a washing machine with hands cleaning it (no text or symbols)- Selecting the program Select the program best suited to the type of fabric so you get the best washing results. Turn the program knob clockwise to select the program you want.
Washing Methods
- Select the wash temperature and spin speed.
Press and hold down the "Temperature" button until the desired temperature is selected or the symbol "--" for no water heating. Press and hold down the "Speed" button until the desired speed is selected or the position "0" is selected for no spin. See "Program Guide" for selecting temperature and spin speed. It is advisable to select the recommended value.
- Select the desired options
Select the options desired, as required. Please refer to the chapters "Control panel" and "Program Guide".
- Start program
Press the "Start/Pause" button. The washing machine starts operating automatically according to the program set.
- End of program
The washing machine stops automatically at the end of the wash cycle. "End" is displayed on the screen. Turn the program selector to "○", open the door, take the laundry out of the drum, turn off the water supply and disconnect the plug from the power socket.
How to save electricity and water while washing:
- Collect clothes for one full wash load.
- Do not overload the washing machine.
- Select a right washing load.
- Prewash only heavily soiled items, and then wash them together with others.
- Choose the super quick wash or delicate wash for slightly soiled laundry.
- Choose the correct temperature: set the temperature above 60^ only for heavily soiled laundry.
- Use the right amount of detergent; using too much detergent will not make the laundry cleaner.
- Use softener; your laundry will be much softer and easier to iron.
- Use fabric conditioner to prevent static electricity and make ironing easier.
Maintenance
| 1. Turn off the water and electricity supply after every wash. Open the door to prevent the formation of moisture and odors. If the washing machine is left idle for a long period, drain any remaining water in the machine and replace the drainage hose. | 2. Unplug the machine during cleaning and maintenance. Use a soft cloth dampened with soapy Liquid to clean the machine case and rubber components. Do not use corrosive or abrasive chemicals or solvents. | |||
3. Clean the detergent compartment regularly.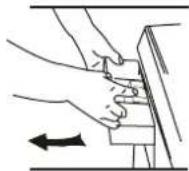 Fig.(a) Fig.(a) | 4. Cleaning the Filter (once a month).Press the lower edge of the filter compartment cover to open (Fig.1-2);Remove the filter by Turning counterclockwise; (Fig.3);Flash clean with running water;Filter replacement is the reverse of removal.Caution: Attention shall be paid to ensure that the filter is replaced correctly to avoid possible leakage.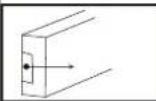 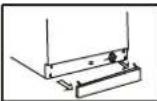  Fig. 1 Fig. 2 Fig. 3 Fig. 1 Fig. 2 Fig. 3 | |||
5. To prevent blockages to the water supply or the ingress of contaminants, clean the water inlet and inlet water filter regularly.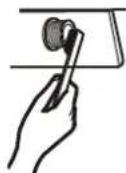 7. If the washing machine is left idle for a long period turn off the water and electricity supply and open the door slightly to prevent the formation of moisture and odors. 7. If the washing machine is left idle for a long period turn off the water and electricity supply and open the door slightly to prevent the formation of moisture and odors. | 6.If the machine is to be moved a distance location,replace the vibration mounting locks which were removed during installation as snown below.  Insert the package supporting horizontally, turn it clockwise or counterclockwise 90 degree. Insert the package supporting horizontally, turn it clockwise or counterclockwise 90 degree. Insert the gasket and the bolt and then tighten it Insert the gasket and the bolt and then tighten it | |||
Trouble-shooting
| The following problems are not always caused by faults, Before calling the Service Center, please check to see if the faults can be self-corrected. | |
| Problem | Possible cause |
| The washing machine does not start | Poor connection to power supplyPower failureDoor is not properly closed (Err 1)The machine is not switched on |
| Washing machine cannot be filled with water | Water tap is not turned onWater pressure is less than 0.03MpaThe inlet hose is kinkedWater supply failureThe program knob is not properly setThe door is not properly closed |
| The machine is draining while is being filled | The height of the drainage hose is below 80cm (it should be within 80~100cm) |
| Drainage failure | Drainage hose is blockedDrainage hose end exceed 100cm above the floor levelThe filter is blocked |
| Strong vibration during spinning | Not all packing bolts have been removedWashing machine is located on an uneven surface or is not levelMachine load is over 7kg. |
| Operation stops before completion of a wash cycle | Water or electricity failureWashing machine is in a soaking cycleWashing machine gives an error message. |
| Excessive foam in the drum, which is spilled to the distribution drawer | The detergent is not a low-foaming typeExcessive use of detergent |
Description of options
- Power-failure memory function: This machine has power-failur memory function. it can memorise the operating status, if there is sudden power failure or if it is necessary to oper the door to load more laundry. When power is restored, the wash cycle resumes from where it was interrupted.
- This washing machine memorises the previous wash settings for each programme. You only have to press the "Start/Pause" button to select the programme, if necessary, change the settings before starting the washing machine.
- The display messages on the digital screen are as follows:
1 hour and 16 minutes left.
0:01 1 minute left.
60 Preset washing temperature is 60oC. -
- Cold wash.
800 Preset spinning speed is 800 rpm.
SAFE On Keyboard is locked.
SAFE OFF Keyboard is unlocked.
End End of a program.
Ecc1 Door is still open after the washing machine has started.
Correction: Shut the door properly. If the probem persists, please contact the Service Center
Err2 Drainage error.
Correction: Clean the filter and check the drain hose for blockage. If problem still persists, please contact the Service Center.
Err3 Temperature sensor error (this message appears at the end of a cycle).
Correction: Please Contact the Service Center for repair.
Err4Heater error (this message appears at the end of a cycle).
Correction: Contact the Service Center for repair.
ErrS Water inlet error.
Correction: Check the tap and the water pressure; if the problem still persists, please contact
the Service Center.
Err6 Motor error.
Correction: Please contact the Service Center.
Err7 Motor error.
Correction: Please contact the Service Center.
ErrB Water exceeds protective level.
Correction: Please contact the Service Center.
E-10 Water level switch error.
Correction: Please contact the Service Center.
Unb After the last rinsing cycle finishes, spinning fails completely due to animbalance of
the laundry
- Cold wash.
- Keyboard lock function:
After a program is started, lockiong can be enabled by pressing the "Delay" button and the "Start/Pause" button at the same time for 3 seconds. The program can no longer be changed by pressing the options button or turning the program selector, and at the same time the washing machine emits an audible signal as a reminder that the buttons are locked. To unlock the button lock function, press the "Delay" and "Start/Pause" buttons again for 3 seconds. - To cancel a program or select a new program and options during the wash cycles (with the button lock disabled.
a) Turn the program knob at " 🔊 " and the program is automatically canceled. Turn the program selector again to choose another program.
b) If you wish to select an option during the wash cycle,, press the "Start/Pause" button, then select the desired option and press the "Start/Pause" button again.
Caution: - The Rinse hold function can be selected directly without pressing first the "Start/Pause" button
- The options available for each program are shown in the "Program Selection Guide"
Technical Specifications
| Specification\Model | JLR0801 |
| Power supply | 220-240V~/50Hz |
| Max working current (A) | 10 |
| Water pressure (MPa) | 0.03 ≤ P ≤ 1 |
| Washing power (W) | 200 |
| Spinning power (W) | 700 |
| Nominal load (Kg) | 7 |
| Spinning speed (r/min) | 1400 |
| Washing programs | 11 |
| Water heating power (W) | 1800 |
| Dimensions (H×D×W) (mm) | 850 ×590×595 |
| Weight (Kg) | 74 |
Wiring Circuit

Meaning of crossed out wheeled dustbin: Do not dispose of electrical appliances as unsorted municipal waste, use separate collection facilities. Contact you local government for information regarding the collection systems available. If electrical appliances are disposed of in landfills or dumps, hazardous substances can leak into the groundwater and get into the
food chain, damaging your health and well being.
When replacing old appliances with new ones, the retailer is legally obligated to take back your old appliance for disposals at least free of charge.

This appliance is not intended for use by persons (including children) with reduced physical, sensory or mental capcabilities, or lack of experience and knowledge, unless they have been given supervision or instruction concerning use of the appliance by a person responsible for their safety
Children should be supervised to ensure that they to not play with the appliance. The appliance is to be the water mains using new hose-sets and that old hose-sets should not be reused.
JOCEL®
TECHNICAL ASSISTANCE
Telef. 00 351 252 910351
Fax: 00 351 252 910367
E-mail: assistencia@jocel.pt
Http://www.jocel.pt
JOCEL®
Lavadora Automática De Tambor
JLR0801

natural_image
Cartoon illustration of a smiling woman holding a basket at a table with flowers, outdoors near clouds and birds (no text or symbols)
natural_image
Front view of a silver washing machine with blue water filter (no visible text or symbols)Contenido
Antes de usar la lavadora
natural_image
Simple line drawing of a smiling face next to a book and a prohibition symbol (no text or labels)Atenciones
natural_image
Illustration of open boxes and a washing machine (no text or symbols)Fig. 1
A Perilla de programa
Telef. 00 351 252 910351
Fax: 00 351 252 910367
E-mail: assistencia@jocel.pt
Http://www.jocel.pt


- conteúdos
- ● Usar
- precauções
- JOCEL®
- Automatic Drum Washing Machine
- Contents
- Precaution
- ● Safety
- Precautions
- Use
- Installation
- Unpacking and Installation
- ●Removing the transport safety screws (Fig. 2)
- ● Installation and horizontal levelling of the washing machine
- Reminder:
- Connection of water inlet hose and washing machine
- Positioning the drainage hose
- Connection of power supply
- Control Panel
- Control Panel Operating Functions
- F "Rinse hold" button
- G Extra rinse button
- H "Prewash" button
- I "Delayed start"
- J Screen
- K Detergent drawer
- D+1 combined buttons for button lock
- Program Selection
- Preparations
- Washing Methods
- Maintenance
- Trouble-shooting
- Description of options
- Technical Specifications
- Wiring Circuit
- TECHNICAL ASSISTANCE
- Contenido
- Antes de usar la lavadora
- Atenciones
- A Perilla de programa
Brand : Jocel
Model : JLR-0801
Category : Washing machine