
Beomaster 3300 - Amplifier BANG & OLUFSEN - Free user manual and instructions
Find the device manual for free Beomaster 3300 BANG & OLUFSEN in PDF.


| Product Type | Stereo Receiver / Amplifier |
| Brand | Bang & Olufsen |
| Model | Beomaster 3300 |
| Power Output | 2 x 55 W RMS (8 ohms) |
| Total Harmonic Distortion | < 0.05% |
| Frequency Response | 20 Hz – 20 kHz (±0.5 dB) |
| Inputs | Phono, Tuner, Aux, Tape |
| Outputs | Speakers (A and B), Headphone, Tape out |
| Tuner Bands | FM, AM (MW/LW) |
| Speaker Impedance | 4 – 16 ohms |
| Dimensions (W x H x D) | 475 x 110 x 300 mm |
| Weight | 8.5 kg |
| Power Supply | 230 V / 50 Hz (depending on version) |
| Power Consumption | Max 200 W |
| Cleaning | Use a soft, dry cloth. Do not use solvents. |
| Safety Notes | Do not expose to moisture or heat. Disconnect power when cleaning. |
| Spare Parts Availability | Contact Bang & Olufsen service center or authorized dealers. |
| Manual Pages | 24 pages |
Frequently Asked Questions - Beomaster 3300 BANG & OLUFSEN
User questions about Beomaster 3300 BANG & OLUFSEN
0 question about this device. Answer the ones you know or ask your own.
Ask a new question about this device
Download the instructions for your Amplifier in PDF format for free! Find your manual Beomaster 3300 - BANG & OLUFSEN and take your electronic device back in hand. On this page are published all the documents necessary for the use of your device. Beomaster 3300 by BANG & OLUFSEN.
USER MANUAL Beomaster 3300 BANG & OLUFSEN

The Beomaster 3300 receiver is the master of
the Beosystem 3300. The other units in the Beosystem 3300 are:
- the Terminal 3300 remote control
- the Beocord 3300 tape recorder
- the Beogram CD 3300 compact disc player
- the Beogram 3300 record player
The sloping sensi-touch panel on the front gives access to all the primary functions. All you have to do is touch the area below the appropriate text or symbol.
The switches and controls underneath the hinged aluminium lid give access to all the secondary functions.
To open the lid press the extreme left-hand side of the narrow front strip. Close the lid again by pressing it down gently until you hear a 'click'.
How to use this manual
● This manual explains how to set up the Beomaster 3300 receiver ready for use.
- It also explains how to operate the Beomaster and the other units in the Beosystem 3300 using the controls on the Beomaster.
● Operation by remote control is explained in a paragraph of its own dealing especially with the Terminal 3300.
● Each control referred to in the instructions is indicated by a small box with the appropriate text or symbol inside it.
For the UK market only
IMPORTANT
The wires in the mains lead supplied with this apparatus are coloured in accordance with the following code: Blue: Neutral Brown: Live
As the colours of the wires in the mains lead of this apparatus may not correspond with the coloured markings identifying the terminals in your plug proceed as follows:
The wire which is coloured blue must be connected to the terminal which is marked with the letter N or coloured black.
The wire which is coloured brown must be connected to the terminal which is marked with the letter L or coloured red.
Ensure that your equipment is connected correctly. If you are in any doubt, consult a qualified electrician.
Table of contents
| Setting up | 4 |
| Where to put the Beomaster | 4 |
| Connections | 4 |
| Stand-by mode | 6 |
| Switching on | 7 |
| Switching off | 8 |
| Muting | 8 |
| Tuning in on AM and FM stations | 9 |
| Fine-tuning FM stations | 10 |
| FM stereo | 10 |
| Adjusting sound | 11 |
| Volume | 11 |
| Bass and treble | 12 |
| Balance | 12 |
| Loudness | 13 |
| Remote control | 14 |
| How to use the Terminal 3300 | 14 |
| Battery replacement | 16 |
| Maintenance | 17 |
| Optional equipment | 18 |
| Headphones | 18 |
| Master Control Link | 18 |
| WB 3300 wall bracket | 20 |
| Technical specifications | 21 |
Setting up
Where to put the Beomaster
The Beomaster must be placed on a firm surface. Avoid placing it in direct sunlight, near radia-
tors or other sources of heat. Do not obstruct the ventilation apertures in any way.
Connections
Loudspeakers
Two sets of loudspeakers can be connected to the Beomaster at a time: one set (speaker set 1) in the lower pair of speaker sockets and the other set (speaker set 2) in the upper pair of speaker sockets.
Plug the left-hand speaker into the socket marked LEFT and the right-hand speaker into the socket marked RIGHT.
The loudspeakers connected to the upper pair of speaker sockets (speaker set 2) can be cut in and out using the SPEAKER 2 switch under the hinged aluminium lid. If the switch is set to ON, the speakers will be cut in.
The Beomaster is designed for loudspeakers with an impedance of no less than 8 ohms.

↑

Antennae
In order to pick up the FM and AM stations available in your area you must connect both an FM antenna and an AM antenna. (AM tuner range only in type nos. 2952 and 2955).

If FM reception is good in your area, you may rely on an indoor FM antenna to pick up the signals. The indoor antenna (part no. 8902010) is available as an optional accessory from your Bang & Olufsen dealer. Attach it to the Beomaster as indicated on the diagram.


Record player
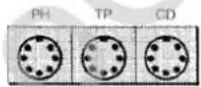
Connect the Beogram 3300 record player or any other Bang & Olufsen record player with Datalink to the 7-pin DIN socket marked PH.
Tape recorder
Connect the Beocord 3300 tape recorder or any other Bang & Olufsen tape recorder with Datalink to the 7-pin DIN socket marked TP.
Compact disc player
Connect the Beogram CD 3300 compact disc player to the 7-pin DIN socket marked CD.
Stand-by mode
Once connected to the mains supply the Beomaster is in so-called stand-by mode and ready for use. The stand-by mode is indicated by a red light on the right-hand side of the operation panel.
The Beomaster is designed to be left in stand-by mode when not in use.
Switching on
Switch on simply by selecting any of the music sources available in your Beosystem 3300.
Touch the area immediately below the appropriate text:
CD if you want to listen to the compact disc player. If you press ▶ on the Beogram CD 3300 to start playing a compact disc, the Beomaster switches on automatically.
PH if you want to listen to the record player. If you press PLAY on the Beogram 3300 to start playing a record, the Beomaster switches on automatically.
TP if you want to listen to the tape recorder. If you press ▶ on the Beocord 3300 to start playback, the Beomaster switches on automatically.
P1 if you want to listen to one of the FM P2 radio stations preset on P1, P2, P3 or P4.
P3 P4
P5 if you want to tune in on AM or FM radio stations using the horizontal frequency scale and the large tuning wheel.
Whenever you switch on, the source selected will start playing at the preset volume level stored in the Beomaster.
You may also switch on by pressing MUTE or by pressing either of the two volume controls and □. This will turn on the source you were last listening to, at the previously adjusted volume level.
Switching off
Switch off by pressing ☐ on the right-hand side of the operation panel.
The Beomaster will revert to stand-by mode. The other units in the Beosystem, if any, will also revert to stand-by mode.
Muting
Press MUTE to make the sound disappear immediately.
This is useful if you want temporary silence without switching off. Press MUTE again to recall the sound.
Tuning in on AM and FM stations
Open the hinged lid to gain access to the tuning wheels and the frequency scales.
If you want to tune in on AM stations, press [P5]. (The AM tuner range is only available in Beomasters with the type nos. 2952 or 2955.)
Set the bands switch LW MW FM to LW (long waves) or MW (medium waves).
Place the tip of your index finger in the hollow in the large wheel to the right and turn the wheel to find the station of your choice.
If you set the bands switch to FM, you can tune in on FM stations as well using the large tuning wheel.
The four vertical frequency scales P1, P2, P3, and P4 enable you to tune in on four different FM stations separately, i.e. to preset four of your favourite FM stations.
Press P1 and tune in on the FM station you want on P1 by turning the tiny wheel underneath the P1 frequency scale.
Proceed to preset other FM stations on P2, P3, and P4 using the appropriate tuning wheels.
The next time you want to listen to one of the FM stations on P1, P2, P3, or P4, just press [P1], [P2], [P3], or [P4] as required.
Fine-tuning FM stations
Ideally, tuning on FM must be done with the automatic frequency control (AFC) cut out. To do so, set the AUTO MONO switch to MONO.
Proceed to tune in on the FM station desired according to the instructions in the preceding paragraph.
Check that the lights in the two sets of bars immediately above the stand-by indicator glow with equal intensity. This is an indication that the FM station is tuned precisely.
If they don't glow with equal intensity, move the appropriate frequency pointer slightly until you obtain equal intensity.
Cut in the AFC function again by setting AUTO MONO to AUTO. The AFC function ensures that the FM stations do not drift.
FM stereo
The FM stereo indicator will light up whenever you are tuned to an FM station transmitting a stereo signal. If a stereo signal is weak, the stereo indicator light will disappear intermittently instead of glowing constantly.
The sound from FM stations producing a weak stereo signal can be improved if you switch to mono sound. To do so, set the AUTO MONO switch to MONO.
Do not forget that if you switch to mono sound, the AFC function will also be cut out.
Adjusting sound
Volume
Press △ to raise the volume level.
Press ☑ to lower the volume level.
By tapping △ or ▼ lightly, you can raise or lower the volume level by smaller degrees than if you keep your finger on the volume controls.
The current volume level is indicated by the red light bars on the left ranging from 10 to 80.
Whenever you switch on, the Beomaster will start playing at a preset level. This level can be set to suit your own personal taste:
Adjust the volume level as usual, then set the spring-loaded VOL. STORE switch under the hinged lid to STORE.
When you lift your finger, the switch will automatically return to its upper position.
50 is the maximum volume level you can preset.
If the Beomaster is disconnected from the mains, the preset level will return to 30, which is the level the Beomaster is preset to when it leaves the factory.
You may find that the volume level rises noticeably when you switch to FM. This is because some FM stations transmit at unusually high levels. Please consult your Bang & Olufsen dealer if you want to have the incoming FM level attenuated.
Bass and treble
Open the hinged lid to gain access to the BASS and TREBLE sliders.
Adjust the bass tones by pushing the BASS slider up (more bass) or down (less bass).
Adjust the treble tones by pushing the TREBLE slider up (more treble) or down (less treble).
The centre position (0) indicates the medium setting of both sliders.
Balance
Open the hinged lid to gain access to the BALANCE slider.

The balance can be shifted by pushing the BALANCE slider up (less sound in the left speaker) or down (less sound in the right speaker).
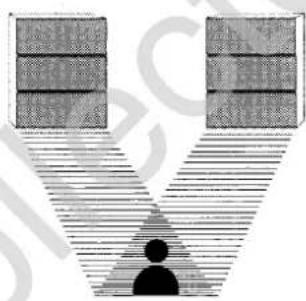

Balance is an indication of the distribution of sound in the two loudspeakers. The sound is equally distributed when the BALANCE slider is in its centre position (0).
Loudness
Open the hinged lid to gain access to the LOUDN. switch.
Set the switch to LOUDN. to cut in the loudness function.
Set the switch to OFF to cut out the loudness function.
The loudness function is used to compensate for the human ear's lack of sensitivity to high and low frequencies when listening at low volume levels. It 'boosts' the low and high frequencies so that the music becomes more dynamic and natural sounding.
Remote control
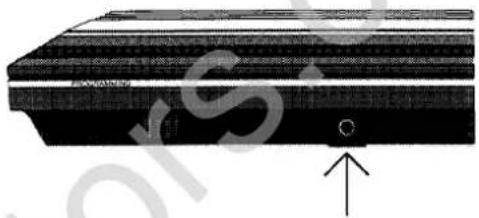
The Terminal 3300 enables you to operate all the primary functions in your Beosystem 3300 by remote control, e.g. adjusting volume, playing a compact disc, a record or a tape, or switching from one radio station to another. The Beomaster 3300 is provided with an infrared-receiver (see diagram) which picks up all the commands sent by the Terminal 3300.

How to use the Terminal 3300
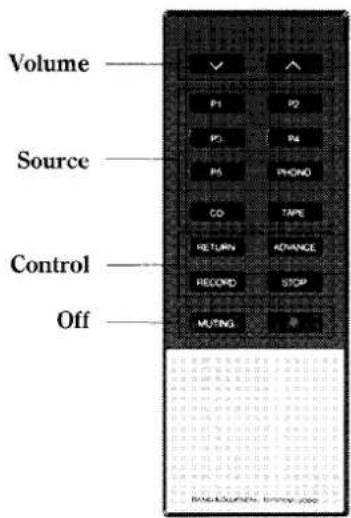
The following list gives you a brief explanation of how to use the buttons on the Terminal 3300.
Volume

Press to lower or raise the volume level.

Press to start playing a record on the Beogram 3300 record player.
Source

Press to hear the radio stations on P1 up to P5.

Press to start playing a compact disc in the Beogram CD 3300 compact disc player.
Off
MUTING
Press to make the sound disappear immediately.
Press again to recall the sound.
0
Press to switch off the entire Beosystem 3300.
TAPE
Press to start playing a tape in the Beocord 3300 tape recorder.
Control
RETURN
Press repeatedly to step backward through the tracks on a compact disc or a tape or to move the tonearm on the record player backward.
If you press RETURN once during recording, the Beocord 3300 rewinds to the nearest 4 sec. pause.
ADVANCE
Press repeatedly to step forward through the tracks on a compact disc or a tape or to move the tonearm on the record player forward.
RECORD
Press twice to start recording on the Beocord 3300 tape recorder.
STOP
Press to stop playing a record, a compact disc or a tape.
Press to stop recording. Press a second time to stop the record or the compact disc you are recording from * . Press TAPE and then STOP to cancel the recording mode.
* Subject to copyright law.
Battery replacement
If the Beosystem 3300 does not respond to your commands, it may be because the battery in the Terminal 3300 needs replacement.
Open the lid of the battery compartment by inserting a screwdriver or another pointed object into the slot provided and gently prying it open.
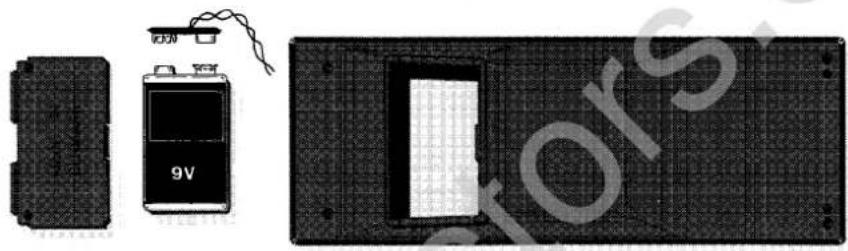
Use only a 9 volt alkaline battery.
Maintenance
Use a dry, soft cloth to wipe dust off the Beomaster. Window cleaner on a dry cloth will remove any fingerprints and grease stains.
Do not use denatured alcohol to clean the Beomaster.
Optional equipment
Headphones
Headphones, e.g. the Bang & Olufsen Form 1 or Form 2 stereo headphones, can be connected to the Beomaster 3300 through the headphones socket on the front.
If you connect headphones, the speakers in the lower pair of speaker sockets (speaker set 1) will automatically be cut out.
Master Control Link
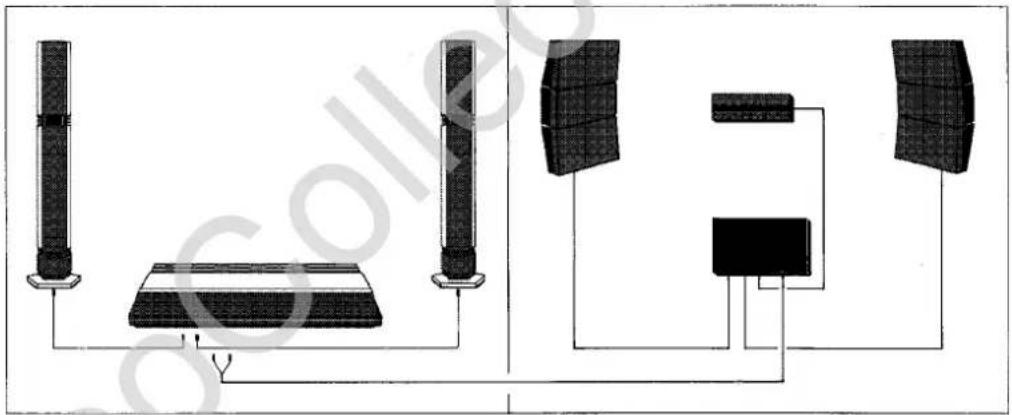
A Master Control Link 2 system can be connected to the Beomaster 3300. This enables you to operate and listen to all the units in the Beosystem 3300 in any room in your house where you have installed a Master Control Link unit.
Operation may be either by remote control using the Terminal 3300 or directly on the Master Control Link unit.
Please note!
● The Master Control Link unit in the Link room gives you no indication of stand-by mode.
● The loudspeakers in the Link rooms will not be cut out automatically when the Beosystem is switched off. This means that the next time you switch on, the loudspeakers will be playing in the same Link rooms as before.
- Muting the Beomaster in the Center room will mute all the loudspeakers within the Master Control Link system.
- The loudspeakers connected to the Beomaster in the Center room will always be cut in when you switch on. If they are connected to the upper pair of speaker sockets (speaker set 2), you can of course cut them in and out as required using the SPEAKER 2 switch.
These limitations are due to the one-way communication between the Beomaster 3300 and the Master Control Link 2. For standard operation of the Master Control Link system, please refer to the manual supplied with each Master Control Link unit.
WB 3300 wall bracket
The WB 3300 wall bracket is specially designed for the Beosystem 3300. It enables you to hang all the units on the wall with excellent concealment of leads and cables.

All the Bang & Olufsen equipment referred to in this paragraph is available from your Bang & Olufsen dealer as optionally purchased extras.
Technical specifications
| Type No. | 2951/2952/2955 |
| Long-term max. output power, IEC | 2x60 watts/8 ohms |
| Total harmonic distortion IHF | <0.1%/25 watts 20-20,000 Hz |
| Dynamic headroom | 1.6 dB/8 ohms |
| Intermodulation IHF | <0.1% |
| Response vs. frequency: | |
| Phono | 20-20,000 Hz ±1.5 dB |
| Tape | 20-20,000 Hz ±1.5 dB |
| Wideband damping factor | 32 |
| Input sensitivity/impedance: | |
| Phono 7-pin Datalink | 0.40 mV/47 kohms |
| Tape 7-pin Datalink | 40 mV/150 kohms |
| CD 7-pin Datalink | 66 mV/150 kohms |
| Overload level: | |
| Phono | 50 mV |
| Tape | 5 V |
| CD | 8 V |
| Signal-to-noise ratio: | |
| Phono A-weighted | >75 dB |
| Tape A-weighted | >77 dB |
| CD A-weighted | >77 dB |
| Channel separation | >50 dB |
| Output: | |
| Tape | 500 mV/470 ohms |
| Headphones | Max. 15 V/220 ohms |
| Bass control at 40 Hz | +9 -14 dB |
| Treble control at 12,500 Hz | +9 -14 dB |
| FM range | 87.5 - 108 MHz |
| FM aerial impedance | 75 ohms |
| Usable sensitivity mono | 17 dBf-1.9 μV/75 ohms |
| Usable sensitivity stereo | 23 dBf-3.9 μV/75 ohms |
| 50 dB quieting sensitivity mono | 23 dBf-3.9 μV/75 ohms |
| 50 dB quieting sensitivity stereo | 43 dBf-39 μV/75 ohms |
| Signal-to-noise ratio 65 dBf mono | 72 dB |
| 65 dBf stereo | 67 dB |
| Frequency response | 30-15,000 Hz ±1.8 dB |
| Distortion at 65 dBf mono | 0.3% |
| Distortion at 65 dBf stereo | 0.35% |
| Intermodulation mono | 0.05% |
| Intermodulation stereo | 0.25% |
| Capture ratio | 1.7 dB |
| Adjacent channel selectivity | 5 dB |
| Alternate channel selectivity | 60 dB |
| Spurious response | 110 dB |
| Image response ratio | 75 dB |
| IF response ratio | 110 dB |
| AM suppression | 55 dB |
| Stereo channel separation | 36 dB |
| Subcarrier product rejection | 55 dB |
| Power supply | 2951: 220 (110-130-240) V |
| 2952/2955: 240 (110-130-220) V | |
| Power frequency | 50-60 Hz |
| Power consumption | 10-135 watts |
| Power consumption stand-by | 5 watts |
| Dimensions WxHxD | 62 x 7 x 25 cm / 24 1/2 " x 2 3/4 " x 10" |
| Weight | 7 kg / 15.4 lbs |
| Type nos. 2952 and 2955 only: | |
| LW range | 150-350 kHz |
| MW range | 520-1610 kHz |
| LW sensitivity 20 dB s/n ratio | 120 μV |
| MW sensitivity 20 dB s/n ratio | 100 μV |
| S/n ratio 10 mV | >45 dB |
| Distortion 10 mV 30% mod. | 0.5% |
| Subject to change without notice | |
International guarantee
This Bang & Olufsen product carries a guarantee against defects in workmanship and materials. It is a national guarantee, extended by Bang & Olufsen to the country in which the product was bought. The terms of the guarantee apply principally to the country of purchase but will be met by authorized Bang & Olufsen dealers in other countries. The guarantee period applying to the country of purchase takes priority over guarantee periods applying in other countries, even where differences exist.
In order to obtain service under this guarantee from a dealer in a country other than that in which the product was bought, the guarantee form must be completed in full and presented to the dealer.
BANG & OLUFSEN
DK-7600 STRUER
DENMARK
- THE BEOMASTER 3300 RECEIVER IS THE MASTER OF
- HOW TO USE THIS MANUAL
- FOR THE UK MARKET ONLY
- IMPORTANT
- SETTING UP
- WHERE TO PUT THE BEOMASTER
- CONNECTIONS
- LOUDSPEAKERS
- ANTENNAE
- RECORD PLAYER
- TAPE RECORDER
- COMPACT DISC PLAYER
- STAND-BY MODE
- SWITCHING ON
- SWITCHING OFF
- MUTING
- TUNING IN ON AM AND FM STATIONS
- FINE-TUNING FM STATIONS
- FM STEREO
- ADJUSTING SOUND
- VOLUME
- BASS AND TREBLE
- BALANCE
- LOUDNESS
- REMOTE CONTROL
- HOW TO USE THE TERMINAL 3300
- SOURCE
- CONTROL
- BATTERY REPLACEMENT
- MAINTENANCE
- OPTIONAL EQUIPMENT
- HEADPHONES
- PLEASE NOTE
- WB 3300 WALL BRACKET
- INTERNATIONAL GUARANTEE
Brand : BANG & OLUFSEN
Model : Beomaster 3300
Category : Amplifier