
ICF-1700 - Cellphone Planet - Free user manual and instructions
Find the device manual for free ICF-1700 Planet in PDF.


| Product Type | Cellular Phone |
| Brand | Planet |
| Model | ICF-1700 |
| Dimensions (H x W x D) | 4.6 x 2.1 x 0.6 inches (117 x 53 x 15 mm) |
| Weight | 3.5 oz (100 g) |
| Battery Type | Lithium-ion, 1000 mAh |
| Standby Time | Up to 200 hours |
| Talk Time | Up to 4 hours |
| Display | 1.8-inch TFT color screen, 128x160 pixels |
| Network | GSM 850/900/1800/1900 MHz |
| Main Functions | Voice calls, SMS, FM radio, MP3 player, camera (0.3 MP), torchlight |
| Connectivity | Bluetooth 2.1, micro USB 2.0, 3.5mm headphone jack |
| Memory | microSD slot up to 32 GB (not included), internal 64 MB |
| Charging | Standard micro USB charger, 5V / 500mA |
| Cleaning | Wipe with dry soft cloth; avoid liquids and solvents |
| Safety | Do not expose to extreme temperatures; use only approved accessories |
| Spare Parts / Repairability | Battery and housing replaceable; service by authorized centers |
| Additional Features | Dual SIM (optional), alarm clock, calculator, calendar, vibration mode |
| Manufacturer | Planet |
Frequently Asked Questions - ICF-1700 Planet
User questions about ICF-1700 Planet
0 question about this device. Answer the ones you know or ask your own.
Ask a new question about this device
Download the instructions for your Cellphone in PDF format for free! Find your manual ICF-1700 - Planet and take your electronic device back in hand. On this page are published all the documents necessary for the use of your device. ICF-1700 by Planet.
USER MANUAL ICF-1700 Planet
Copyright
Copyright (C) 2012 PLANET Technology Corp. All rights reserved.
The products and programs described in this User's Manual are licensed products of PLANET Technology, This User's Manual contains proprietary information protected by copyright, and this User's Manual and all accompanying hardware, software, and documentation are copyrighted. No part of this User's Manual may be copied, photocopied, reproduced, translated, or reduced to any electronic medium or machine-readable form by any means by electronic or mechanical. Including photocopying, recording, or information storage and retrieval systems, for any purpose other than the purchaser's personal use, and without the prior express written permission of PLANET Technology.
Disclaimer
PLANET Technology does not warrant that the hardware will work properly in all environments and applications, and makes no warranty and representation, either implied or expressed, with respect to the quality, performance, merchantability, or fitness for a particular purpose.
PLANET has made every effort to ensure that this User's Manual is accurate; PLANET disclaims liability for any inaccuracies or omissions that may have occurred.
Information in this User's Manual is subject to change without notice and does not represent a commitment on the part of PLANET. PLANET assumes no responsibility for any inaccuracies that may be contained in this User's Manual. PLANET makes no commitment to update or keep current the information in this User's Manual, and reserves the right to make improvements to this User's Manual and/or to the products described in this User's Manual, at any time without notice.
If you find information in this manual that is incorrect, misleading, or incomplete, we would appreciate your comments and suggestions.
CE mark Warning
The is a class B device, In a domestic environment, this product may cause radio interference, in which case the user may be required to take adequate measures.
WEEE Warning

To avoid the potential effects on the environment and human health as a result of the presence of hazardous substances in electrical and electronic equipment, end users of electrical and electronic equipment should understand the meaning of the crossed-out wheeled bin symbol. Do not dispose of WEEE as unsorted municipal waste and have to collect such WEEE separately.
Trademarks
The PLANET logo is a trademark of PLANET Technology. This documentation may refer to numerous
hardware and software products by their trade names. In most, if not all cases, their respective companies claim these designations as trademarks or registered trademarks.
Revision
User's Manual for PLANET Touch Screen Internet Multimedia Phone
Model: ICF-1700
Rev: 1.0 (2012, January)
Part No. EM-ICF-1700v1_v1.0
Table of Contents
Chapter 1 Introduction ...... 6
1.1 OVERVIEW....6
1.2 FEATURES ....6
1.3 PACKAGE CONTENT ....7
1.4 PHYSICAL DETAILS 8
Chapter 2 Installation....13
2.1GETTING START 13
Chapter 3 LCD Menu ....15
3.1 MAIN MENU 15
3.2 BASIC FUNCTION 16
Chapter 4 Video Phone Setting ......25
4.1 SYSTEM INFO 25
4.2 NETWORK 26
4.3 ACCOUNT....30
4.4 CALL....33
4.5 DISPLAY....36
4.6 SOUND 39
4.7 LANGUAGE 41
4.8 DATE TIME 42
4.9 MAINTAIN 43
4.10 AUDIO 46
4.11VIDEO....48
4.12 CALL FIREWALL 50
Chapter 5 Phone Application....52
5.1 PHONE 52
5.2 CALL OPTIONS ....55
5.3 CONTACTS 57
5.4 CALL LOG 63
5.5 MEMORY KEY....65
5.6 NETWORK PHONEBOOK....66
5.7 MWI....67
Chapter 6 Other Application....68
6.1 EMAIL....68
6.2 CALCULATOR 71
6.3 NOTE PAD 73
6.4 BROWSER....74
6.5 RECORDER....74
6.6 ALARM CLOCK 76
6.7 GALLERY 76
6.8 FILE MANAGER....78
6.9 CAMERA 80
6.10 MUSIC....81
6.11 SCREEN CALIBRATION 83
6.12 CALENDAR....83
6.13 PINGBOX 83
Chapter 7 Android Setting....84
7.1 ANDROID SETTINGS....84
7.2 VoIP SETTINGS....89
7.3 CALL SETTINGS....93
7.4 ADVANCED SETTINGS....96
7.5 ABOUT PHONE....98
Chapter 8 Web page configuration description .... 100
8.1 BASIC 101
8.2 VOIP 102
8.3 PHONE 107
8.4.MAINTENANCE 108
8.5 SYSTEM LOGOUT 110
Appendix A Specifications....111
Appendix B Firmware Upgrade 114
Appendix C Auto provision 115
1.1 Overview
PLANET's Video Conferencing products, ICF-1700, bring you a vivid video conferencing experience through the Internet. No PC is required and none of the usual complications of complex web camera, sound card and software settings and specialized data connections. Furthermore, the ICF-1700 has a built-in 7" LCD monitors in a telephone form factor ideal for desktop use.
The ICF-1700 compliant with the SIP 2.0 standard, which means you can have a seamless conferencing experience with other SIP compliant video conferencing systems, voice gateway, IP phones, ATA and IP PBX System. With SIP Proxy Server, MCU support, the ICF-1700 from PLANET make communications with your business partners quick and cost-effective.
The ICF-1700 has the multiple language features and it base on based on Android OS 2.1 which can provide the friendly operation interface for which user. It also can connect with the external USB disk to manage the media file or input the photograph to show the media information.
The feature video outputs which can be used to connect to external monitor for group meetings for showing video or photographs, it with outstanding picture and sound quality, the PLANET Internet Video Conferencing Phone offers you a superior communications experience via the Internet.
1.2 Features
Hardware Features
■ 7" Color adjustable LCD touch screen with 800x480 pixels
■ Built-in High Quality tiltable 2Mega pixel CMOS camera
■ Full duplex hands-free speakerphone
■ Ergonomic handset (acoustical cochlea)
■ 1 x WAN and LAN: support switch mode
■ Compliant IEEE 802.3af PoE standard
Network Feature
■ DHCP Client on WAN
■ Main DNS and secondary DNS server
■ NTP Client
■ QoS with DiffServ
TR-069
■ MD5 authentication
■ Network tools in telnet server: including ping, trace route, telnet client
VOIP Features
■ Compliant with SIP 2.0
■ 4 SIP servers, and 3 backup SIP servers
■ Voice Gain Setting, VAD, CNG
■ Support SIP domain, SIP authentication (none, basic, MD5),
■ DNS name of server, Peer to Peer/ IP call
DTMF Relay
■ Customized music rings
■ Support STUN
■ SMS based on SIP
■ Professional Speaker/HD Voice
■ Phone book records export/import
■ XML phone book
■ Media player(mp3, wav, wma)
■ USB disk & System files management
■ Support VoIP(SIP/RTP) encryption
Management
■ System Base on Android 2.1
■ Multilanguage realizes localization
■ Third party android application, e.g. email, IM, internet Radio, web browser
■ Application market
■ Web ,telnet and keypad management
■ Management with different account right
■ Encrypted configuration files download with AES
1.3 Package Content
The contents of your product should contain the following items:
■ Video phone x 1
■ Power Adapter x 1
■ CD-ROM x 1
■ Quick Guide x 1
■ RJ-45 cable x 1
1.4 Physical Details
The following figure illustrates the components of ICF-1700
Front Panel

| No. | Item No. Item | ||
| 1 | Handset 2 Handset Cord | ||
| 3 | LCD Display 4 Video Camera | ||
| 5 | Soft Key 1 to 4 6 Numeric Keypad | ||
| 7 | Line button 1 to 4 8 Volume button(down/Mute/Up) | ||
| 9 | Navigation key 10 Menu key | ||
| 11 | Return key 12 Headset key. | ||
| 13 | Resend key 14 Home Key | ||
| 15 | Confirm key. | 16 | Delete key. |
| 17 | Hands-free key. | 18 | Hook |
| 19 | Speaker | ||
Keypad

| No. | Icon Description | |
| A |  | Telephone four keys are respectively corresponding to the screen of the four Soft key keys, different window representing the different attribute. |
| B |  | Line button on the dial pad corresponding agreement with the Sip. |
| C |  | Digital keyboard. |
| D |  | Entering the function menu. You can browse through the menu all functions of the system are applied, and the execution of the application. |
| E |  | Headset key. |
| F |  | Resend key. The phone will automatically dial the last outgoing call. |
| G |  | Return key. Click on this button will jump out the current window. |
| H |  | The hands-free key. |
| I |  | Home key. Click on this button will return to idle screen. |
| J |  | Volume control key. You can be in the player program or call ringing using this key to adjust the volume size. |
 | Mute key-In the call mode, press this button you can hear other's voices, but the others cannot hear your voice; press this button again to leave this mode. In the call state, you can press this button to turn off the ring tips. | |
| K |  | Confirm key. |
| L |  | Navigation key. |
| M |  | Delete key. |
Rear Panel


| No. | Icon Description | |
| 1 |  | DC Power Interface,12 V DC input |
| 2 |  | Bridge interface Network interface, connect with computer. |
| 3 |  | Wan interface, connect with internet. |
| 4 |  | Specification RJ9, Used to connect the handle when calling |
| 5 |  | Specification RJ9, connect with hand-set. |
| 6 |  | USB port for insert the external storage to manage the file. |
| 7 |  | The mini HDMI output the video signal to the external monitor. |
| 8 |  | Use the camera lever to adjust the camera view angle. |
Chapter 2
Installation
2.1 Getting Start
This chapter illustrates basic installation of ICF-1700, the processes is shown as below.
![graph LR A["Internet"] --> B["Cable/DSL Modem"] B --> C["Switch/Router"] C --> D["ICF-1700"]](/content/2026/05/1078438/images/aabcbdc1c3b2db962819a498710a00a1485c0fe782f2bb4ff360dfcc10056f6c.jpg)
Step1: Connecting Handset
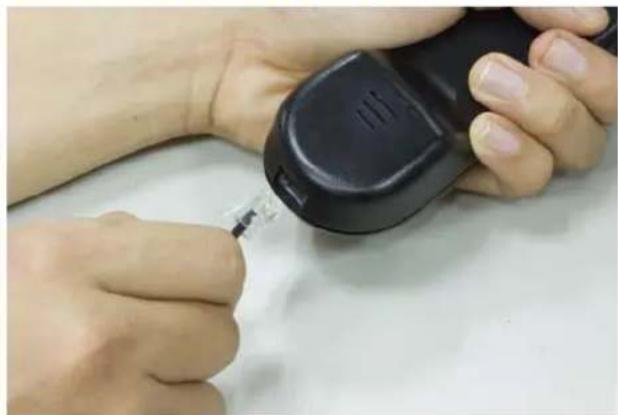
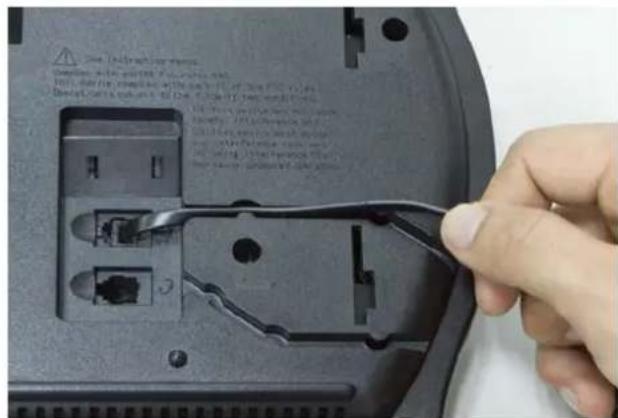
Plug in the Handset cable into the back of the base station. Put the cable into the cable groove.
Step2: Attaching the Stand
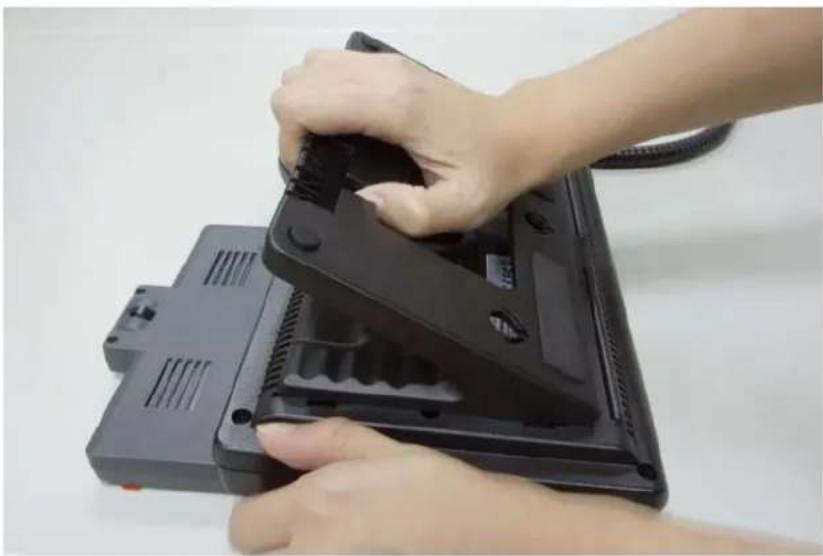
Mounting the stand at the media phone rear panel, make sure the latch on the stand and the hole on the media phone matched. Hold the stand and pull down gently.
Step3: Connecting AC Power and Network
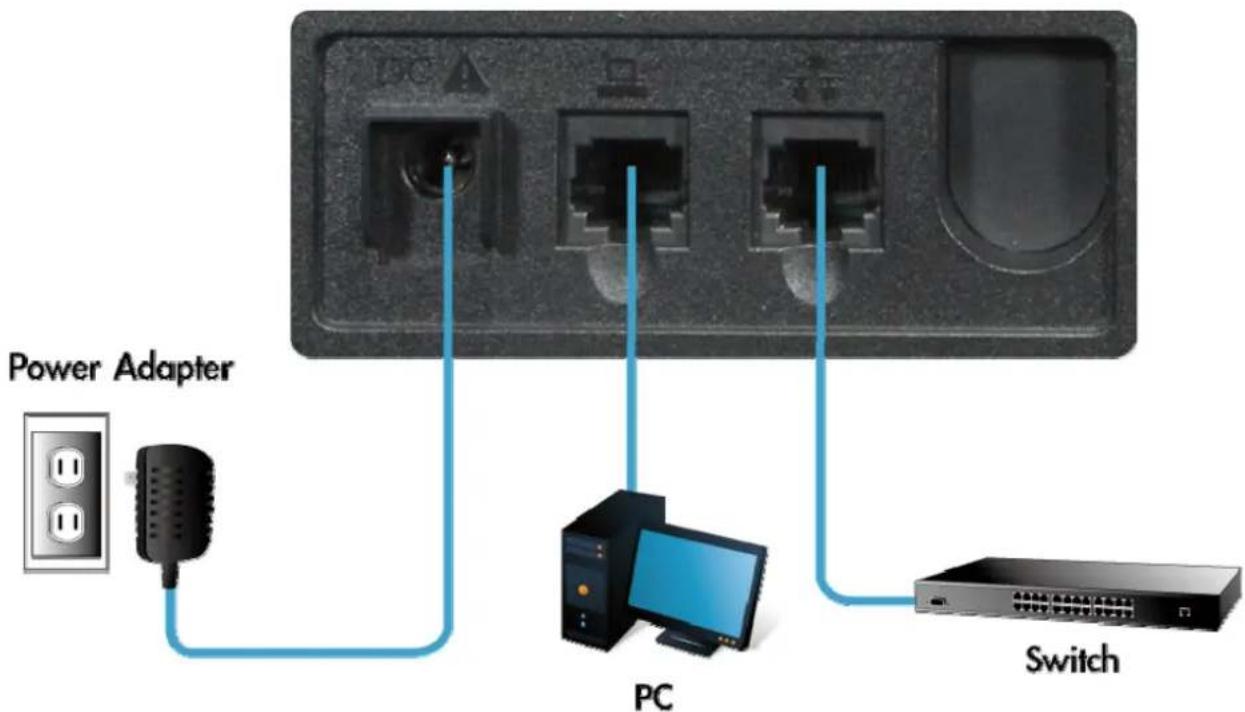
Connect an Ethernet cable from your desktop computer to the PC port 📄 on the Media Phone. Plug the other Ethernet cable into your already prepared network connection 🌐
| Note | 1. Use the power adapter shipped with the unit to ensure correct functionality.2. The Media Phone supports IEEE 802.3af at its Network port [icon] and can be powered from IEEE802.3af PSE (Power Sourcing Equipment) Either power from AC adapter or from 802.3af is required.3. If the network connection standby desktop show for [icon], please check the network configuration is correct and the equipment such as Internet is normal or not.If unit connection shows for [icon], standby desktop to connect to the network state display that network is connected to normal, at this time the phone can be related to the Internet, such as Internet phone related operations. |
3.1 Main Menu
The controls of multimedia touch screen will changed dynamically, it depends on your executing task.
Open Applications:
Click icon "Application", and the menu will appeared.


Scroll:
Drag up or down to scroll screen. In some screens (such as webpage), you can scroll from one side to the other side. Drag your finger to scroll will not choose or activate anything on the screen.
Rapid sliding finger to scroll the screen:
You can wait for rolling stop, or you also can tap or touch any position on the screen to stop it. Tap or touch to stop scrolling does not choose or activate anything on the screen.
3.2 Basic Function
3.2.1 Screen Keyboard
If the Android in some places needs to input, click on the input box will automatically pop-up screen keyboard( Installed input method with the on-screen keyboard, different input method is not the same ), such as follow:

| Item Description | |
| Type in capital letters | Shift key, tap shift key can switch the uppercase lowercase. |
| Delete character | Delete character, tab key to delete a character, if you want to delete many characters, tap the icon for a long time. |
| Type in digital, punctuation and symbols | Tap key, as this time will switch to digital, punctuation and symbols input interface. |
| Space | Space symbol. |
| Enter | Enter symbol, tap this key can switch to next line. |
Finished entering text, you can press the return key to close the screen keyboard
3.2.2 Status Bar
The status bar on the right standby desktop is given information about Multimedia Video Phone:
| Icon Item Description | ||
 | Network status (normal) | Displays the network connection is normal. Tap the icon directly into the network settings. |
 | Network status (failure) | Shows no network connection. Need to check the network settings and connections are correct. |
 | USB | Display phone successful recognition of USB equipment. You can tap the icon directly to switch into the USB application wizard. |
 | Missed calls | Show that there are missed calls. You can click on the icon directly to switch into the call record. |
 | Headset mode | Show that into the headset mode. You can tap the icon directly to switch into the dialing mode. |
 | Silent mode | Show that station is silent mode; in the standby interface directly click the mute button to cancel the mute. |
 | Hands-free mode | Show that phone is in hands-free status. |
 | Open the DND | Show that the phone on Do Not Disturb feature, when there is an incoming call screen displayed without ringing, and there is also a call on DND state, it will have a missed call icon appeared in the status bar. |
 | Call forward | Show that opened the call forward function. |
 | Auto answer | Show that opened the auto answer function |
 | Black list | If a contact is added to the blacklist, then open the blacklist function, this phone call will do not come in contact. |
 | Alarm clock | If it sets alarm clock, on the status bar will display the alarm clock icon. |
 | New record | Show that phone has new unread recordings. |
3.2.3 Notification Panel
Notification panel which shows the default content was that the network connection status, click the drop-down panel can view network status; when there is a new call, notification panel will display to view the current call, you can tap to enter the call interface; if there is a missed call, it will display missed call icon, you can click the icon to view the details; or you can choose to clear all things at the notification panel; when there has unread recordings, the unread recordings will display at the panel.
3.2.4 Main Screen
Multimedia Video Phones will go directly to the main screen after startup. It will display the application's shortcut and it has three screens, you can tap to slide the screen from left to right to switch the different screens.
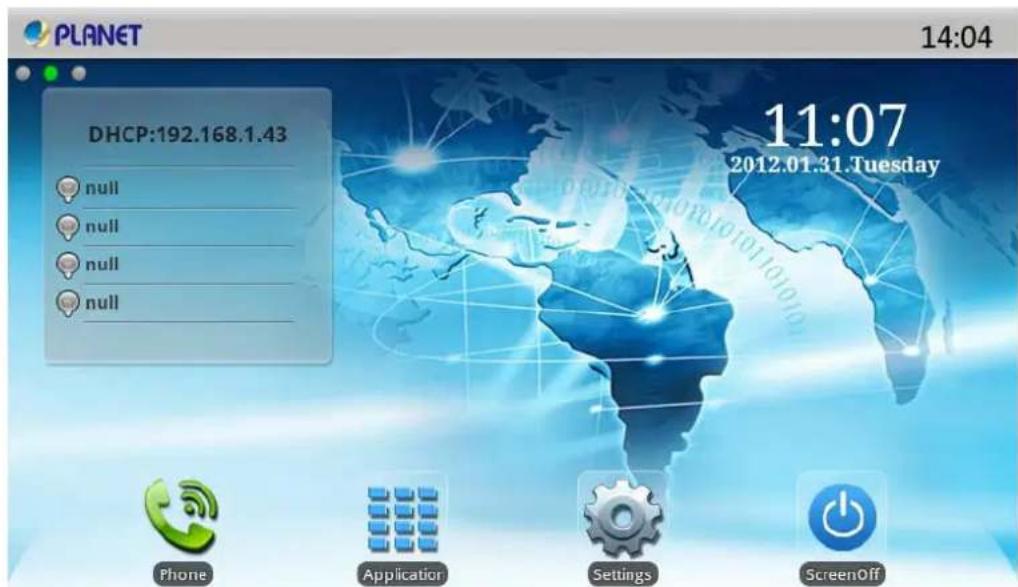
Click the application icon will jump to the following diagram interface, touch the boards will review the applications. You can add many application to the main screen, long press the shortcut, then the screen will return to the main screen, put-off the icon then it will be add on the main screen.

| Icon Item Description | ||
 | Phone | You can dial a phone call, hotline on call, also can through the digital keyboard for manual dialing |
 | With e-mail functions, set the account contact will automatically synchronize to a mailbox account, you can view the message directly on the phone. | |
 | Calculator | With simple calculation operations such as add, subtract, multiply, divide and advanced operations function of the calculator. |
 | Note pad | Recorded a number of important events, or during a call you can press the “Note pad” to record information such as phone number and so on. |
 | Memory Key | You can go through the rapid predefined contact button for a speed dial. |
 | Contacts | The phone book can through system to synchronize with the PC such as Outlook address books and so on. Support search, add, remove, and edit functions. |
 | Browser | Through the connection of computer network, you can browse any website. |
 | Recorder | Provide call recording, message, and the machine recording. You can easier to make voice records and notes. |
 | Alarm Clock | Customized to display the time around the world. |
 | Settings | It contains the phone settings, network settings, screen settings and so on, you can be in the corresponding menu corresponding set. |
 | Gallery | View photos stored on the phone, or through the USB storage device storing photos or images, you can enter the photo gallery for dynamic playing. |
 | File Manager | You can easily manage the files. |
 | Camera | Through the camera you can take High-definition pictures and make other operations. |
 | Message | Like the mobile phone, with messages to write, read and send function. |
 | Music | Song music player. You can be using other applications while using the music player. |
 | MWI | When the phone is enabled the auto answer function to switch to the voice mail, calls will automatically turn to voice mail. |
 | Screen calibration | Calibrate the screen to guarantee the correct of the screen. |
 | Calendar | Enter into the calendar you can view the “year, month, day and the day of the week”. |
If there are extra or unwanted application shortcuts, you can long press the shortcut then the trash icon appears at the bottom of the screen, so we can remove the application icon in the dustbin. Please see the following figure:

3.2.5 Desktop Widgets
Long press the desktop, pop-up "Add to Home Screen" list, tap the "Widgets", tap the widgets you want to display on the desktop, the desktop will show you the required widgets. This easy to operate and quick, which saves the time and look beautiful.
| Icon Item Description | ||
 | Analog clock | Analog clock with a dial in the form displayed on the desktop, can be placed on the desktop of any space position, it is convenient to check the time. Desktop display: Desktop display: |
 | Digital clock | Digital clock displayed with white fonts, “time, year、month、day、day of the week”; On the desktop, you can move to any empty place. Desktop display: Desktop display: |
 | Search | The default search bar is the Google’s Quick Search Box, You can enter any content you want to search to find.Desktop display:Google |
 | Call set | You can through Call set widget to set the phone, click the DND can directly enable the DND mode; Click the Call forward will jump to the incoming call forward interface; click the Auto answer will open the auto answer function; click on the Call firewall will jump into the call firewall interface.Desktop display:DND Call forward Auto answer Call firewall |
 | Phone status | Phone status widget displays the phone's registration information, it contains IP information, which is DHCP mode orManual mode;Telephone registration form: if not registered lines showed that grey lamp;If primary server registered successfully showed that "green light, telephone number and the main server" address ;If backup server registered successfully showed that "yellow light, phone number and backup server" address;Desktop display: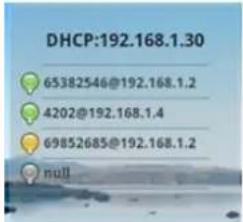 |
 | Picture frame | In the photo album can be put the picture that you like, that seems to be good.Desktop display: |
 | Music | If the telephone music stored inside the music, it can directly use the desktop widget to play music.At any time to enjoy the fun of music. You can also choose to suspend or jump to the next song.Desktop display: |
Long press the desktop, pop-up "Add to Home Screen" list, tap "Folders" and enter to the "Select folder" list, select the appropriate file to add to the desktop:
| Icon Item | Description | |
 | New folder: | You can move the application shortcuts on the desktop to the new folder. |
 | Notes: | It will show recently added content's title, tap the title to view the detailed information. |
 | All contacts: | Show all contacts in it. |
 | Starred contacts: | Show favorites contacts in it; tap a contact to view detailed information. |
 | Contacts with phone numbers: | It will show the contact which has the number and do not show the contact which has no phone number. |
4.1 System info
Tap "Settings" can directly enter into the default window "System". It displays the current system information state.
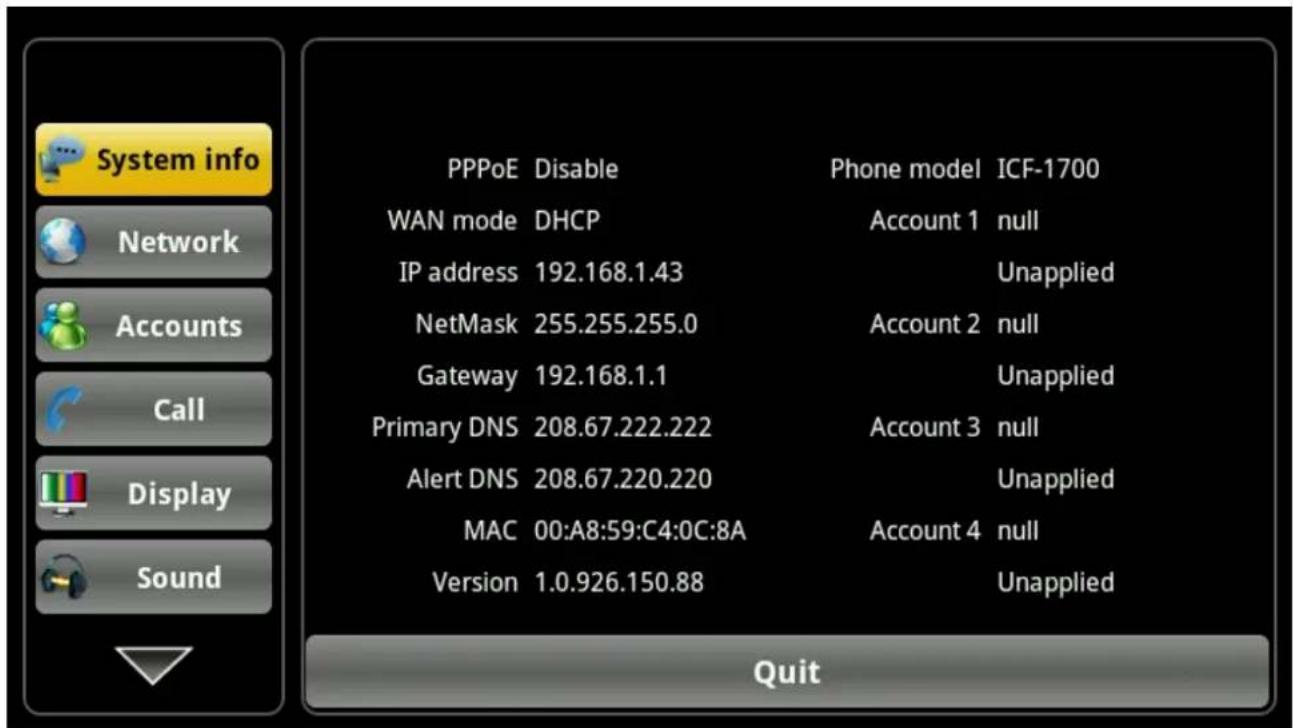
| Item Description | |
| PPPoE | Display connection status of the PPPoE, there are three display state: Disable、connection and the IP address. |
| WAN mode | Display the selected network mode, dynamic mode or static mode. |
| IP address | Displays the current network model used by the IP address. |
| NetMask | Displays the current network model used by the subnet mask. |
| Gateway | Displays the current network model used in the default gateway. |
| Primary DNS | Displays the current network model used in the primary server address. |
| Alert DNS | Displays the current use of the network model of secondary server addresses. |
| MAC | Displays the current MAC address to use. |
| Phone model | Display the current phone models. |
| Version | Displays the current version number of the phone. |
| Local number | Display the current configuration of the local number, in the desktop widget display detailed information. |
4.2 Network
4.2.1 Network
Tap "Network", enter into "Network" interface, default interface is "DHCP": At each interface configuration completed click the "save" button to save the success, and will pop up" saved successfully" tips box.
DHCP interface
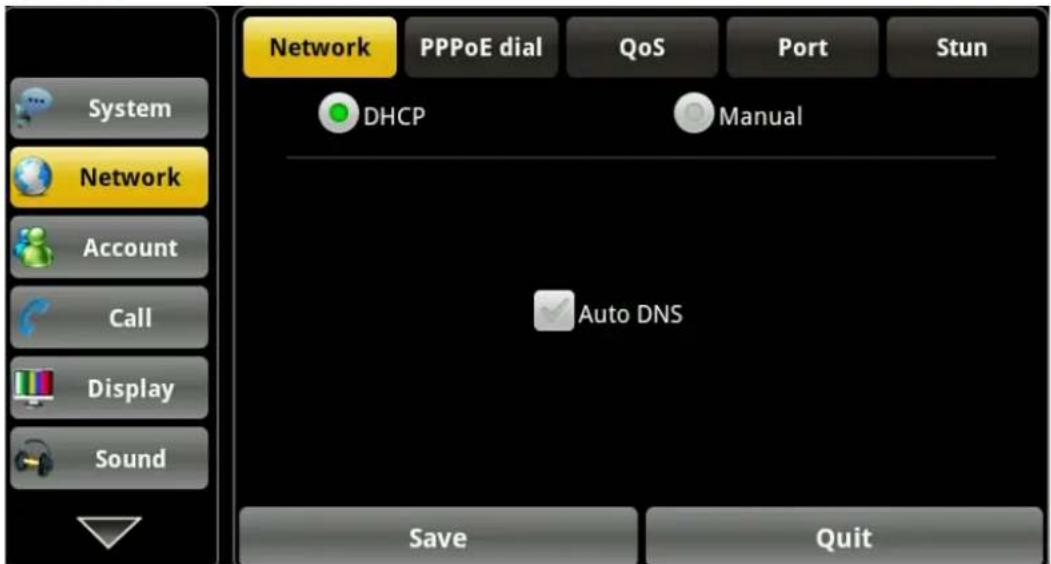
Manual interface

| Item Description | |
| DHCP | You can select whether to use DHCP assigned DNS server to connect network. |
| Manual | IP: Input your assigned IP address.NetMask: Input your assigned subnet mask.Gateway: Input your assigned gateway.Primary DNS: Input your assigned DNS address.Backup DNS: Input your assigned backup DNS address. |
4.2.2 PPPoE dial
Tap "Network", enter into "PPPoE" interface, after configuration completed click the "save" button to save the success, and will pop up" saved successfully" tips box.

| Item Description | |
| PPPoE dial | username: Input your assigned PPPoE account name .password: Input your assigned PPPoE password .Connect when Boot complete: Whether PPPoE connection is turned on automatically when boot.Connect when Boot complete: Whether PPPoE connection is on automatically when failed.Enabled PPPoE: whether to enable PPPoE.After the configuration parameters, if you click “Connect” button, if can connect to the network using PPPoE mode at once ; if you click “ok” button, it will only save the configuration parameters; if you click “cancel” button, the parameters you have been set will not be saved. |
4.2.3 QoS
Touch "Network"--> "QoS", Select or modify the default settings and click interface, complete the bottom of the "Save" successful configuration information.

| Item Description | |
| QoS | DiffServ enable: Set whether to enable Differentiated Services.DiffServ value: Set Differentiated Services configuration parameter values, if you set normal level, the value are 0x00. |
4.2.4 Port
Touch "Network" --> "Port", Select or modify the default settings and click interface, complete the bottom of the "Save" successful configuration information.

| Item Description | |
| Port Media | initial port(10000-60000):Set the phone to open media initial port, this port assignment is dynamic allocation.(Size 10000--60000)Media port quantial:Set the maximum number of allocated RTP port,default value is 200. |
4.2.5 Stun
Tap "Network" --> "Stun" to configure info, after configuration click "Save" button to save successfully.

| Item Description | |
| Stun | Stun server: Input Stun server address. |
| Stun port: Input Stun port. | |
4.3 Account
On the "Account" settings screen, you will see "Account1" screen, and on the right there is a "Advanced Settings" button, the first page of the configuration is done you can click on the "Advanced Settings" jump to the second page, then click Next Jump three, and so on, a total of five, and each page has a "Basic settings" button, you can always return to the first page. After the entire configuration interface at the bottom click the "Save" to save configuration information. You can also save individual pages.
(Note: 1,2,3,4 configurations is the same account, will not repeat it here.)
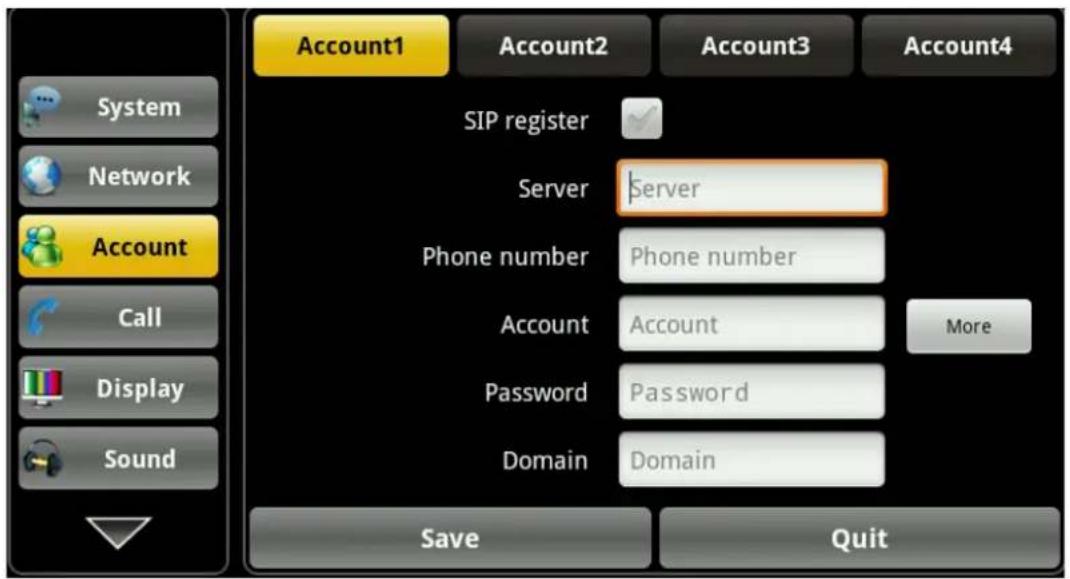
| Item Description | |
| Account | SIP register: Configure enable/disable register.☑ disable register, ☑ enable register.Server: Set SIP registration server address, support for the domain name in the form of address.Phone number: Configure the number registered to the SIP server. If empty, no registration launched.Account: Set SIP registration account.Password: Set SIP registration password.Domain: Configure the SIP domain name (the user can no configuration, the system will automatically configure). |
More Setting
| Item Description | |
| First page | Display name: Configure the display name, when called to do the calling party (caller name not given) shows that this configuration parameter. Allow the English alphabet input (does not support Chinese).Server Name: Configure the SIP registration server name.Server port: Configure the SIP register server signal port.Register timeout(s): Configure SIP server registrations expire time, default is 60 seconds. If the server requires the registration period is greater than or less than the time configured the phone, the phone can automatically modify the recommended time limit for the server and re-register.DTMF mode: Set DTMF transmit mode, there are four:DTMF_RELAYDTMF_RFC2833DTMF_SIP_INFODTMF_AUTODifferent server vendors can provide different models.RFC protocol edition: Configure phone to use protocol version.When your phone needs to communicate with gateway which uses SIP1.0, like CISCO5300, you need to configure RFC2543. RFC3261 is used by default. |
| Second page | RFC privacy edition: Configuration uses anonymous security exhaled support RFC3323 and RFC3325.Transport protocol: Configuration using the transport protocol, TCP or UDPBan anonymous: Configure whether to banned anonymous call.Enable strict proxy: Compatible with special server, using source address of opposite side when return message, no longer using address in the via field.Enable subscribe: After successful registration, subscription information, you can subscribe to the state of someone else or voice mail, etc.Enable via rport: Configuration can support RFC3581, rport mechanism is used for internal the network, and requires a SIP server support, used to maintain internal and external network device NAT connection |
| Third page | Enable prack: Configure whether to support SIP-PRACK function (mainly ring tones will be used) recommends using the default configurationEnable uri convert: Convert # to %23 when send URIEnable DNS SRV: Configure whether to support RFC2782 protocol edition.Enable display name quote: For compatibility with server configuration issue signaling display name in quotes to expand up.Enable CLIR: If the caller does not agree to the called party phone display their phone number, you can apply to the telecommunications sector that Calling Line Identification Restriction (CLIR) business function, you can limit the called party phone display their phone number. |
| Forth page | Use stun: Enable/Disable SIP STUNStun Server: Configure the SIP STUN server address.Stun port: Configure the SIP STUN server port.Backup server: Configure a backup server address. When the primary server is not connected, the user can make calls using the backup server communication (only when the primary server cannot connect, the backup server before connection); When the primary server connection, the phone will automatically switch back to the primary server.Backup server port: Configure the SIP backup server port. |
4.4 Call
Incoming call settings for each interface in finishing configuring parameters after click "save", you can save the success.
4.4.1 General
Light on "call" --> "General" interface. After configure, tap "Save" button to save successfully.

| Item Description | |
| Phone | Do not disturb: Enabled the “Do not disturb”, the phone will not allow incoming phone calls, but in the missed calls will be prompt.Call waiting: Set whether to enable the call waiting function.Default calling mode: Set the default dialing phone calls, video or voice.Default answering mode: Set the default answer mode phone, video or voice.Caller Address Display: Enabled, Have telephone call fashionable, will show the incoming call number to belong to additional information. Have telephone call fashionable, will show the incoming callAuto answer: Set whether to enable “Auto answer” feature.No answer time: No Answer calls to set the response time in seconds. The default time is 30 seconds. |
4.4.2 Dial Plan
Tap "Call"-->" Dial" into the closing number of rules interface can be configured after clicking the "Save" button prompts "Save successful."

| Item Description | |
| Dial Plan Use E164: Enabled accord with E164 rules, will directly out of number.Use # as dial key: Enabled, in the non-pre-dial mode, enter the number the "#", will be in direct exhaled number.Dial with fixed length (1-30): Enabled, in the non-pre-dial mode, enter the number after a specified length will make the call directly.Dial timeout (3-99): When enabled, in the non-pre-dial mode, Input number after the specified time will be automatic exhale the number.Dial plan prefix: Enabled, In need of exhaled number before the automatic add prefix number out. |
4.4.3 Account
Tap "Call "-->" Account 1, 2, 3, 4" into the service interface can be configured after clicking the "Save" button prompts "Save successful"
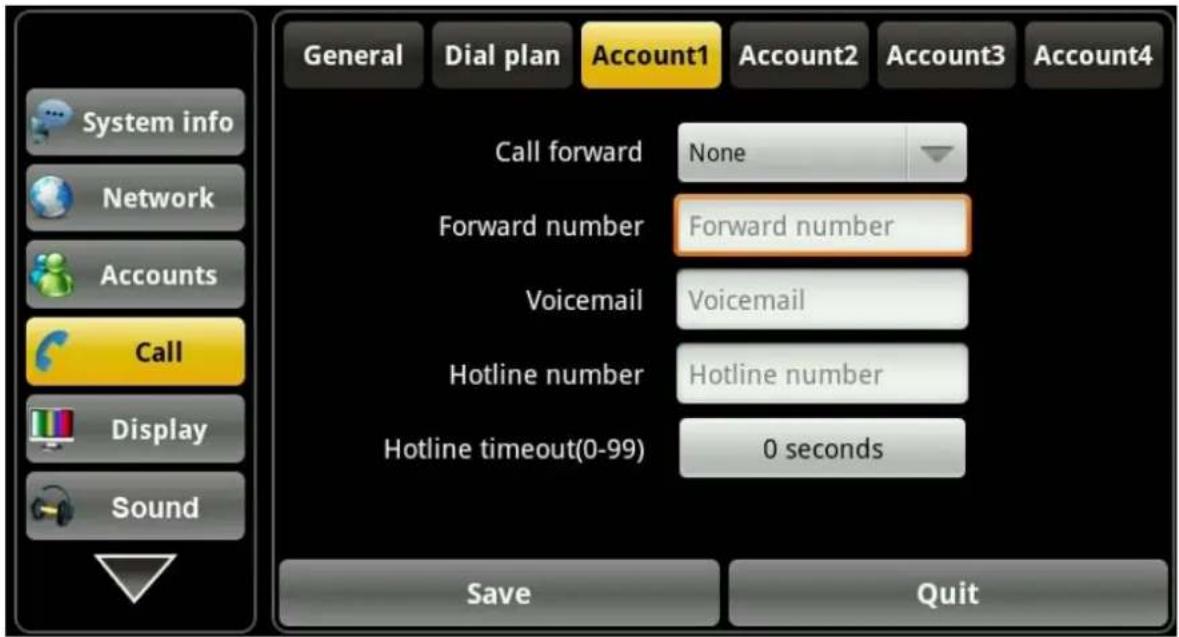
| Item Description | |
| Service | Call forward: Set the call forwarding feature is enabled (“Always”, “No answer” and “Busy” and “Close forward”)Forward number: Set forwarding number for each sip line.Voicemail: Set each sip line to listen to the voice mail number.Hot line number: Configuration the hotline number for the sip line.Hotline timeout (0-99): Set the hotline number of waiting time after remove the handle. Not set, default is 0, immediately exhale hotline number after the hook. |
4.5 Display
Tap "Display settings", then select "Display" to switch to display interface configuration parameters. Click Save to complete.
4.5.1 Screen saver
Tap "Display", then select "Screen saver" to switch to display interface configuration parameters, click "Save" to complete.

| Item Description | |
| Screen | Screen saver mode: Choose the screen saver mode; there are Close LCD, Album and Clock 3 kinds of mode selection.Timeout: The input phone into the state of the screen saver waiting time, The unit is a minute.Device period: Settings prohibit run time parameters such as. |
4.5.2 Hibernate
Tap "Display settings", then select "Hibernate" to switch to display interface configuration parameters, Click "Save" to complete.

| Item Description | |
| Hibernate | Enable hibernate: Enable, The phone after the specified time enter a state of dormancy.Hibernate timeout: he input phone enters a dormant state waiting time, The unit is a minute. |
4.5.3 Display
Tap "Display settings", then select "Display" to switch to display interface configuration parameters, Click "Save" to complete.
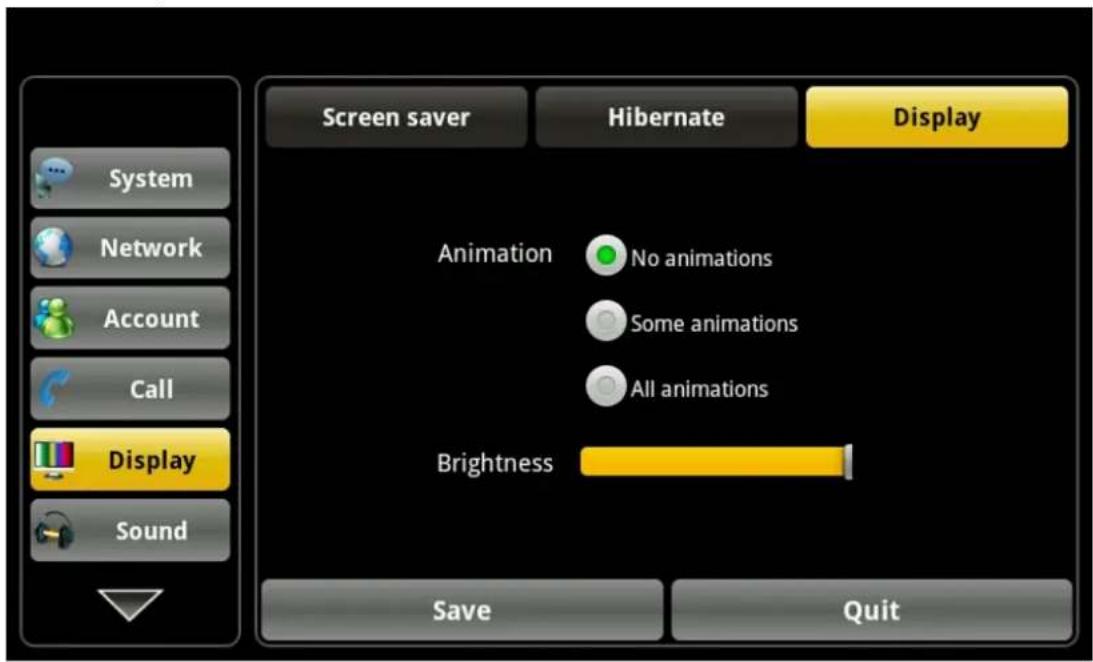
| Item Description | |
| Display Animation | Set the window animation mode, There are No animations, Some animations and All animations 3 kinds of mode selection.Brightness: Adjust screen brightness of display. |
4.6 Sound
Tap "Sound" then select "Tone" to switch to Sound interface configuration parameters, click Save to complete.
4.6.1 Tone
Tap "Sound settings", and then select "Tone" to switch to Tone interface configuration parameters, click Save to complete.

| Item Description | |
| Sound Phone | ringtone: Set of incoming process bell play.Notification ringtone: Set sends a notification process bell play.Audible touch tones: Enable, Using the dialing keyboard process will play button sound.Audible selection: Enable, Screen selection will play sound. |
4.6.2 Volume
Tap "Sound", then select "Volume" to switch to Volume interface configuration parameters, clicks Save to complete.

| Item Description | |
| Number receiving rules | Incoming call volume: Regulation of incoming calls volume size.Notification volume: Regulation of notification volume size.Media volume: Regulation of media volume size.Silent mode: Set whether to enable silence, If you enable the mute, Will come into effect in addition to alarm and media outside of all sound. |
4.7 Language
Tap "Phone settings" then select "Language" to switch to language interface. Set phone language environment. The default selection of English.

| Item Description | |
| Select your language | Click the drop-down menu to select the language as below: English, French , Arabic, German, Italian, Korean, Portuguese, Russian, Spanish , Turkish and Chinese (Traditional/Simplified) |
4.8 Date time
Lightly press the" phone settings" -- >" Date time" to switch to a time setting interface. After configuration by clicking the "save" button successfully saved.
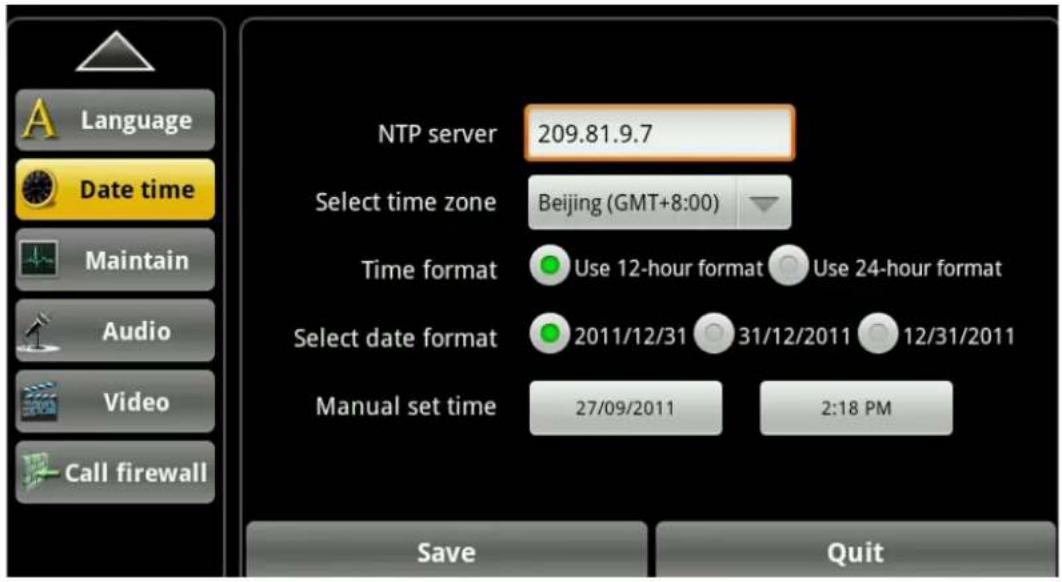
| Item Description | |
| Date time | NTP server: Configuring the phone to get the NTP server address for the current time.Select time zone: The user selects the current time zone that you are.Time format: Users select the current time format to use is "a 12-hour format" or "24-hour format."Select date format: Users select the current date format to use. The "year - month - day", "Day - Month - Year" and "Month - Day - Year" in three formats.Manual set time: The user to manually set the current date and time. |
4.9 Maintain
Tap "Setting"--> "Maintain" to enter into the "Update" interface.
4.9.1 Update
Tap "Maintain", then select "Update" to switch to update page. Input password to configuration parameters and click Save to complete

| Item Description | |
| Update Server | The input to upgrade the server address.File name: Input the need to upgrade the file name.Mode: Selection of automatic upgrading method: Do not upgrade, Reboot after upgrade and a specified time after the upgrade.Time interval: Input automatic update interval.Protocol: Select the protocol used by the automatic upgrade, Include: ftp, http and tftp.Next page: click “Next page” to switch.Manual upgrade: Click, Immediately upgrade. |

| Item Description | |
| Next | User: Input the upgrade server by use of the account.Password: Input the upgrade server by use of the password.Back: click “Back” to switch to previous page. |
4.9.2 Menu password
Tap "Maintain"—>“Menu password” enter into password, then click “save” to save successfully.

| Item Description | |
| Menu password | Current password: system's default password:123456New password: input new password.Confirm new password: repeat to input the new password. |
4.9.3 Reset factory
Tap "Maintenance" -- >" Reset factory " into the factory settings interface, in the input box password input menu, click the "reset button" telephone", will pop up whether to restore the factory settings" dialog box, click "confirm" that will restore the factory settings, click" Cancel" does not make any operation.

| Item Description | |
| Reset factory | Reset phone: click “Reset phone” to reset. |
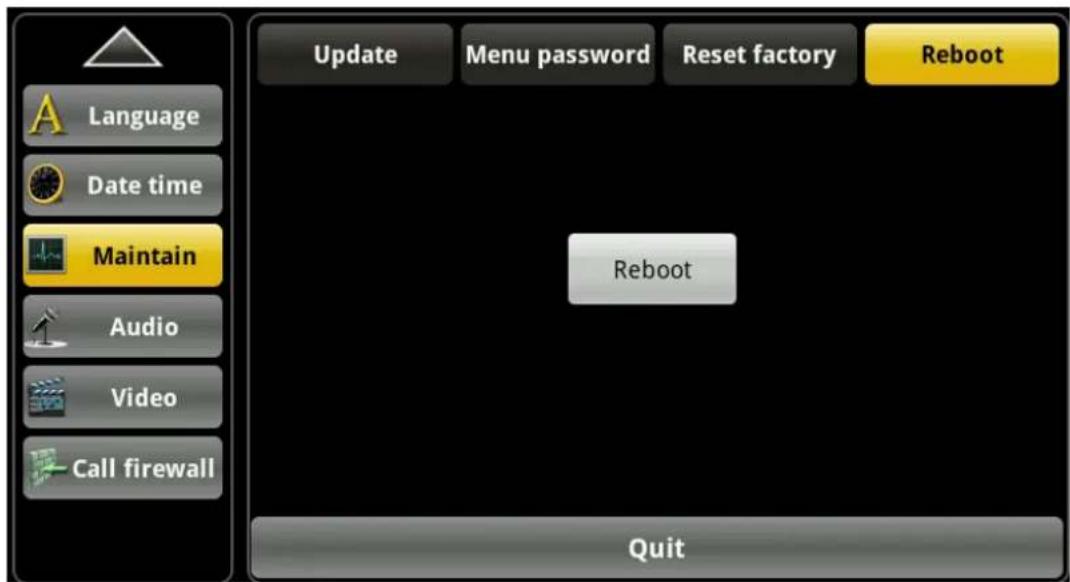
4.9.4 Reboot
Tap the" Maintenance" -- >" Reboot "into the configuration interface, click the" reboot" button, click "OK" to restart the phone, click" Cancel" no operation.
4.10 Audio
Touch "Phone" --> "Audio", enter the detailed screen.
4.10.1 Audio
Touch "Audio"--> "Audio", enter audio settings screen. After configuration, click the "Save" button to save successfully.

| Item Description | |
| Audio | Voice encoding:Set voice encoding type in the process of the communication. There are first, second and third voice encoding. You can choose "G711A", "G711U", "G722", "G723", "G729", "ILBC", "AMR", "ARM-WB" eight kinds of voice encoding options.First audio codec:Set the first priority using voice coding during a voice call.Second audio codec:Set the second priority using voice coding during a voice call.Third audio codec:Set the third priority using voice coding during a voice call.Use VAD:Configure whether to enable VAD. Silence detection; If you enable VAD, then, G.729 payload length cannot be set greater than 20ms |
4.10.2 Audio param
Touch "Audio"--> "Audio param", enter audio param settings screen, after configuration, click the "Save" button to save successfully.

| Item Description | |
| Audio param | G729 payload length: Set G729 payload length of the voice coding.DTMF payload type: Set DTMF payload type, values between 96 and 127 base.ILBC payload type: Set ILBC payload type, values between 96 and 127 base.ILBC payload length: Set ILBC payload length.G723 bit rate: Set the rate of G723, choose 5.3kb / s or 6.3kb / s. |
4.11 Video
Touch "Phone Set" --> "Video", enter the settings screen.
4.11.1 Video param
Touch "Video"--> "Video param", enter audio settings screen, after configuration, click the "Save" button to save successfully.
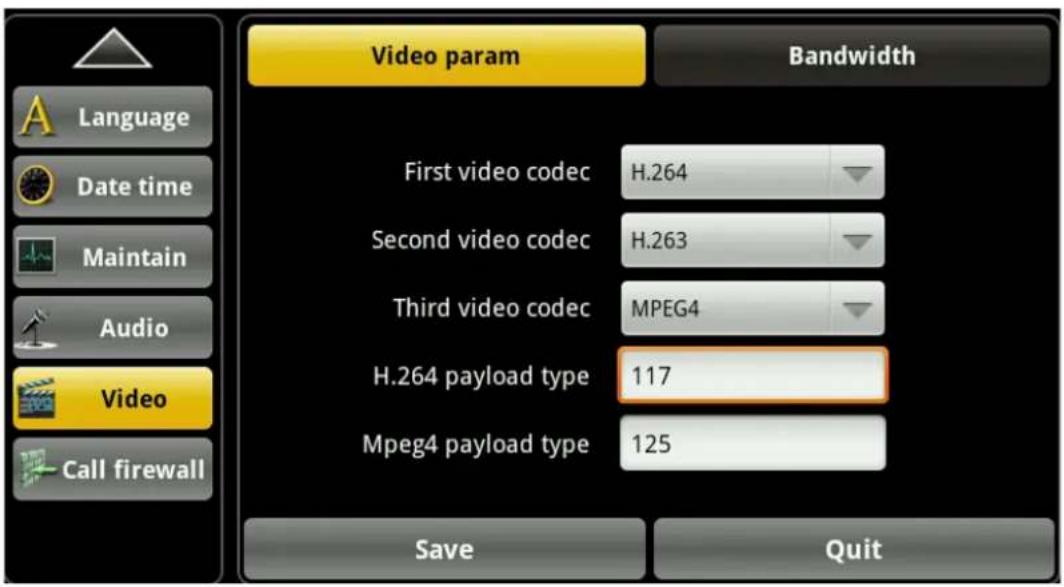
| Item Description | |
| Video param | Video encoding: Set video encoding type in the process of the communication. There are first, second and third video encoding. You can choose "H.263", "H.264", "MPEG4"three kinds of video encoding options.First video codec: Set the first priority using the video encoding during a voice callSecond video codec Set the second priority using the video encoding during a voice callThird video codec: Set the third priority using the video encoding during a voice callH.264 payload type: Set payload type of H.264, value between 96 and 127 bases.Mpeg4 payload type: Set payload type of Mpeg4, value between 96 and 127 bases. |
4.11.2 Bandwidth
Touch "Video"--> "Bandwidth", enter Bandwidth settings screen, after configuration, click the "Save" button to save successfully.

| Item Description | |
| Bandwidth | Media Bandwidth: Set the video frame rate of receiving during a video call. You can choose “64Kbps”, “192Kbps”, “256Kbps”, “384Kbps”, “512Kbps”, “768Kbps”, “1Mbps”, “1.6Mbps”, “2Mbps nine kinds of video encoding options.Video Resolution: Set video encoding resolution during a call, there are common QCIF, 4CIF high definition clarity and a total of three CIF resolutions available. |
4.12 Call firewall
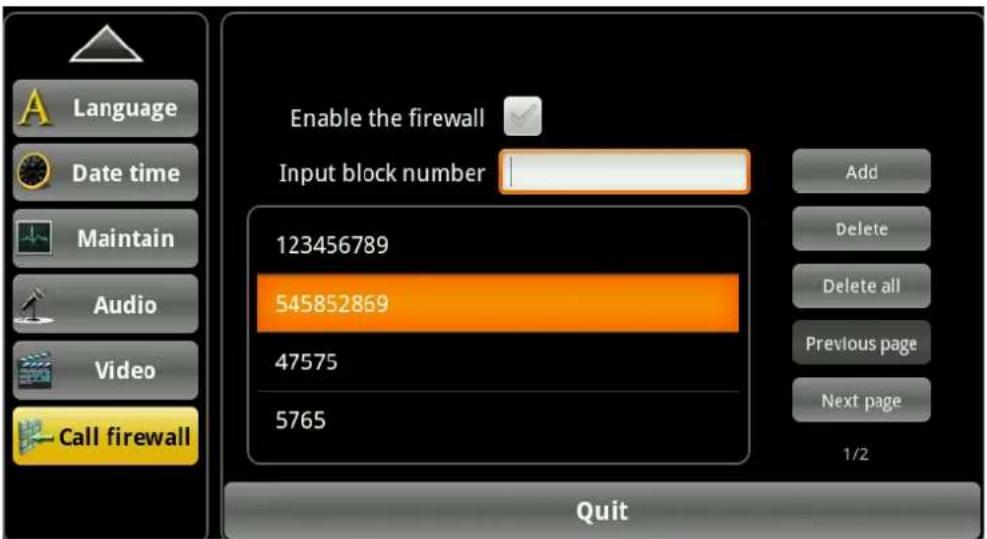
Tap "Phone Settings "-->" Call firewall" into the Call firewall interface. After configuration, click "Save" can be successfully saved.

Call firewall interface
Delete selected status interface
| Item Description | |
| Call firewall | Enable the firewall: Enabled, there is a notification hints in the notification bar. When a number is added to the blacklist, the phone will reject the number of incoming calls without any prompts.Input block number: Enter your number to join the “Call firewall”.Add: Click the "Add" button to add the number to “call firewall”.Delete: A telephone message of a selected, click the "Delete" button to remove the number from the “call firewall”.Previous page: When added to the incoming call firewall number more than one page and need to flip up and down will show" a page" button. Next page: When adding “Call firewall” number more than one page will display "Previous page" button. M/N: Where M represents the current number of pages, N represents the total number of pages. |
5.1 Phone

Dialing on the dialer view
You can directly dial a phone number.
- Press the phone icon in the launcher.
-
Select the line to dialing (SIP1, SIP2, SIP3, and SIP4).
-
Enter telephone number on the keypad, if it is wrong, you can select to delete. If you want to delete the entire input, please long press.
-
To make a call, perform the following steps:
-
Enter the full number, tap the "Audio" or "Video" button; In the talking state, the icon will be shown
Use the memory key
- Press the "Memory key" icon in the launcher.
- Tap the contact you want to call and tap "OK" button or double-click to the contact;
- Tap the "Video" or "Audio" button to dial.
Use the call log
- Press the "Phone" icon in the launcher.
-
Tap the "Call log" tab, select the number you want to call, when the content is larger than one screen, use a finger sliding up and down the screen to view.
-
Tap the audio call button or video call button on the right, and select a line to dial (SIP1, SIP2, SIP3, and SIP4).
You can also use the Redial key. In the dialer view or the standby, press the Redial key will dial the call log number in the last breath.
Use the contacts
Touch the Contacts icon 📁 in the launcher, or enter the dialer view, tap the “Contacts” tab, select a contact you want to call, a context menu will be shown, select the “Call contact” and select a line to dial.
Answer the ringing
When you receive a call from the contact occurs when talking views displays the caller's local picture, name, phone number and location as shown in Figure:
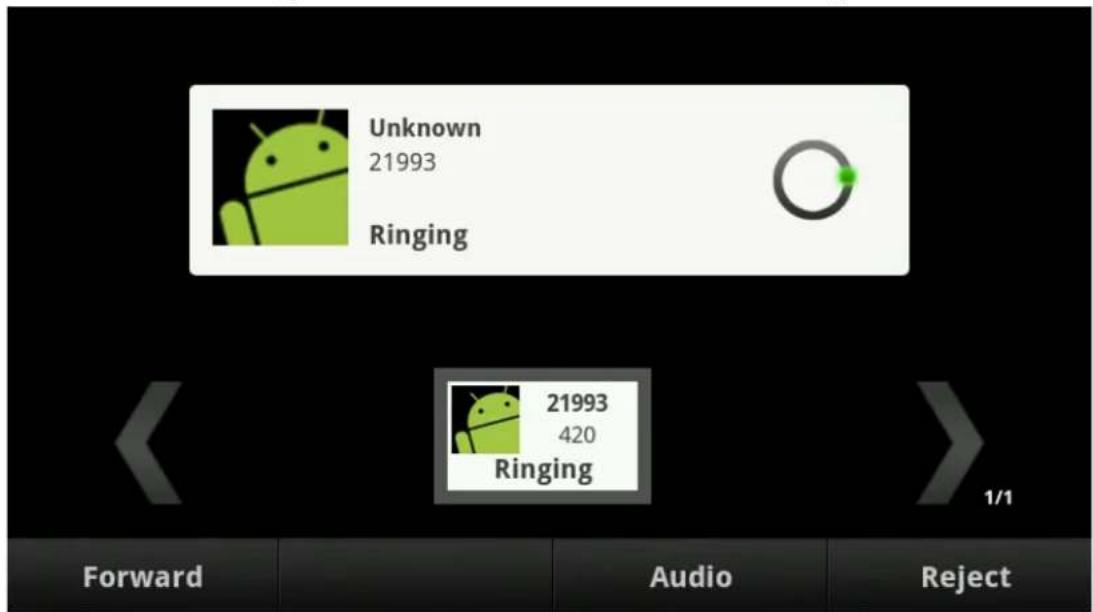
Ringing view (Unknown contact)
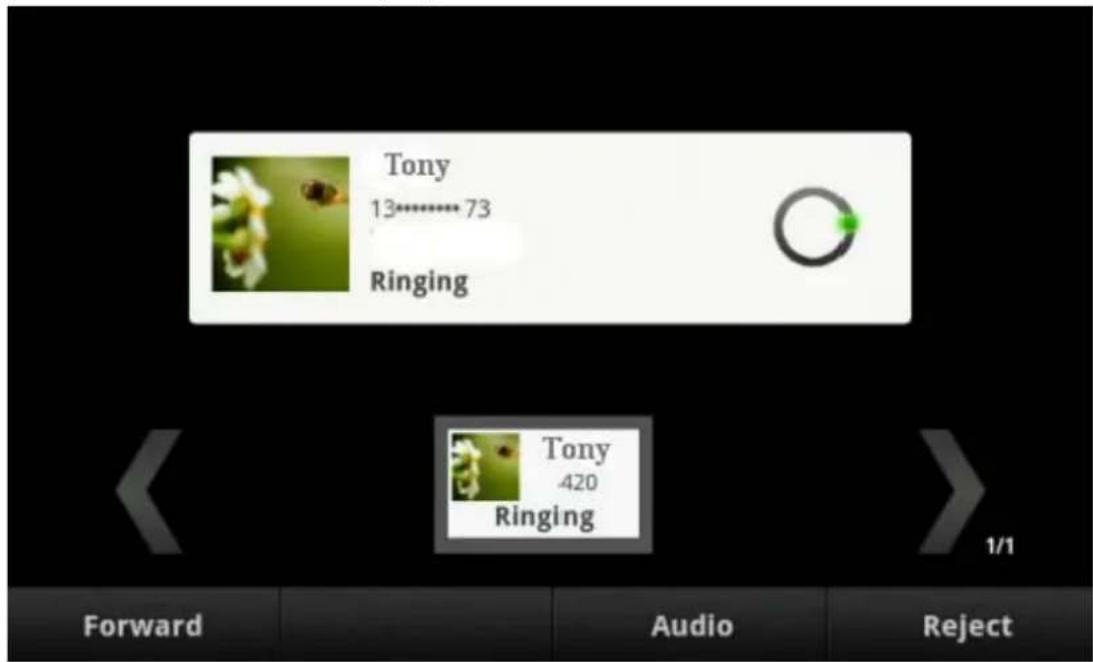
Ringing view (Known contact)
When you receive an incoming call is not from a stored contact, the call will appear on the screen of default contact picture, phone numbers and the location (need be opened in the Call settings), the name will be displayed as Unknown. In the ringing view, you can choose a "forward", "Video", "Audio" or "Reject", by simply pressing the corresponding button or the soft key.
5.2 Call options
Video call
You can make a video call by the following way:
- If the remote terminal supports video calls, you can tap the "Video" button to enter the video call.
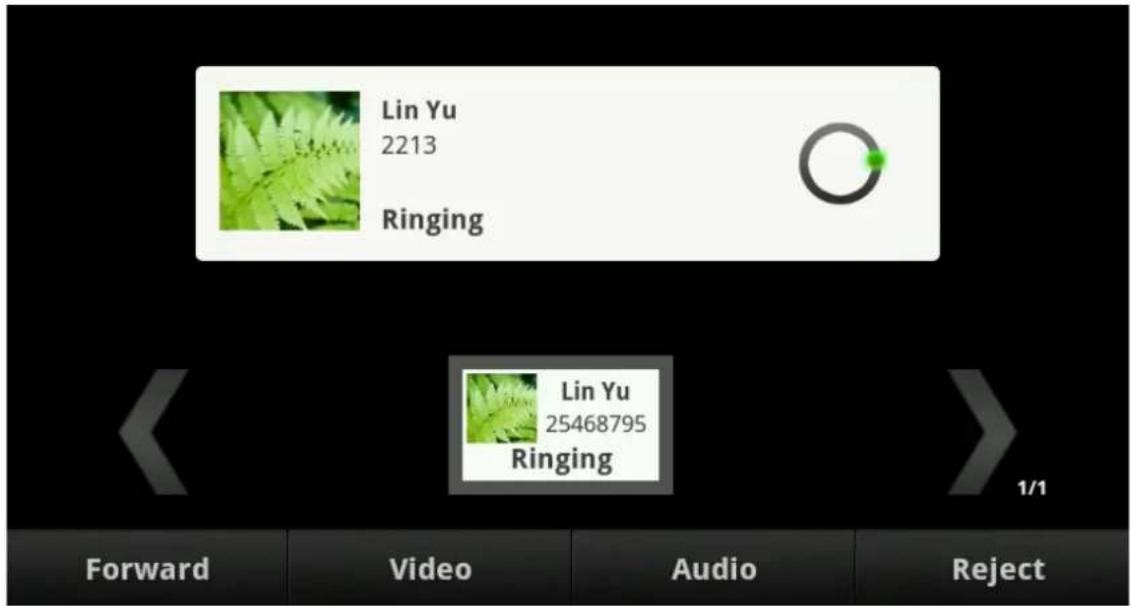
Video calling interface

Video talking interface
- Tap the video button to start a video invite in the audio talking, waiting for the "Accept" of the others to enter the video call.
- When you receive a remote video invite in the audio talking, tap the "Accept" button to enter the
video call.
In the video talking, press button 📋 to switch the different views of video.
If you want go back to the audio talking, tap the button
| Note | If you want to enter the tripartite conference from video talking, the video will be stop first. The conference cannot support video call. |
Call recording
You can press the button 🔒 to record the talking, the view Ⓞ will be shown, and the record button will turn ☐. Press the button Ⓥ to stop recording. The record file will be shown in the “Talking record” content of the Record application, as the Figure:
Hold/resume the call
During the talking, tap the "Hold" button to hold the current call, then we cannot hear each other. The state "Holding" will be shown in the current contact card, you can tap the "Resume" button to resume the call.
Call mute
During the talking, you can tap the button to mute the call, then the remote cannot hear your
voice, but you can hear the others'. The button will turn in the mute state; tap again will recover the talking.
Attended transfer
You can complete the Attended transfer by the following ways:
-
Press the "Transfer" button, input the third number and dial, tap the "Transfer" button again to complete attended transfer after remove answered.
-
If there are two or more talking calls, tap the "Transfer" button and select the attended number to Complete attended transfer.
Blind transfer
Press the "Transfer" button, input the third number, and tap "Transfer" to transfer the current call to the third one.
Three-ways conference
If there are two or more talking calls, tap the "Conference" button and select a number to enter the tripartite conference with the current call.
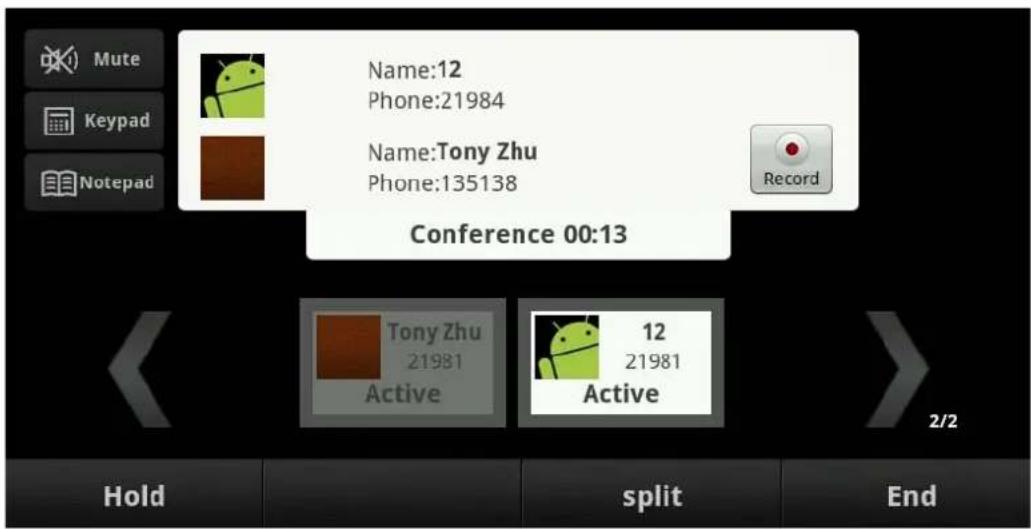
Three-way conference interface
Multi-line calls
This phone supports multi-line calls. When there are two or more calls, you can tap "Transfer" or "Conference" button and select "New call" to make a new call, and it can support up ten calls exists at the same time. The current talking will be highlight shown. Changing the current, you can press the small contact card and do resume to talking with it.
Voicemail
Go to "Settings"—"Call settings"—"Auto answer", select answer mode "Forward voice mail", and go to "Call settings"—"Voicemail" to set the voicemail number of each line. If it is no answers when ringing, the call will enter to the voicemail.
5.3 Contacts

Telephone contact address book, but also through the system with Outlook and other PC address book synchronization. A contact can store multiple numbers, email and residential information.
Search contacts
You can search the contact on the multimedia phone by the contact's first name (Chinese Pinyin names with initials).
-
Open your contacts.
-
Press the Search button
-
Start entering the name of the contact you're searching for. As you type, contacts with matching names appear below the search box. Such as contact name for the Planet, number 123456, then enter P, you will see in the text field below Planet, when multiple pieces of information match, the information will bed is played.
-
Touch a matching contact in the list to open its Details screen. Or touch the Magnifying Glass icon to open a screen with a list of matching contacts.
New contact
- Open your contacts.
- Press Menu and touch New contact.
- Add a picture for a contact, Touch the Picture Frame icon to select a picture to display next to the
name in your lists of contacts and in other applications

when editing contacts, In the existing
photo slide finger down the list select the photo, save selected photos will automatically return to the editing interface, to change the picture, tap the Contacts icon to select "Use this photo", "Remove the icon", "Change Icon."
- In the first and last name field, enter the contact's first and last name, and then click Add a contact's phone, e-mail and other information.
- Touch a category's plus button to add more than one entry for that category-for example, to add both work and home numbers.
- When you're finished, touch Done.
Figure:

Contacts interface1
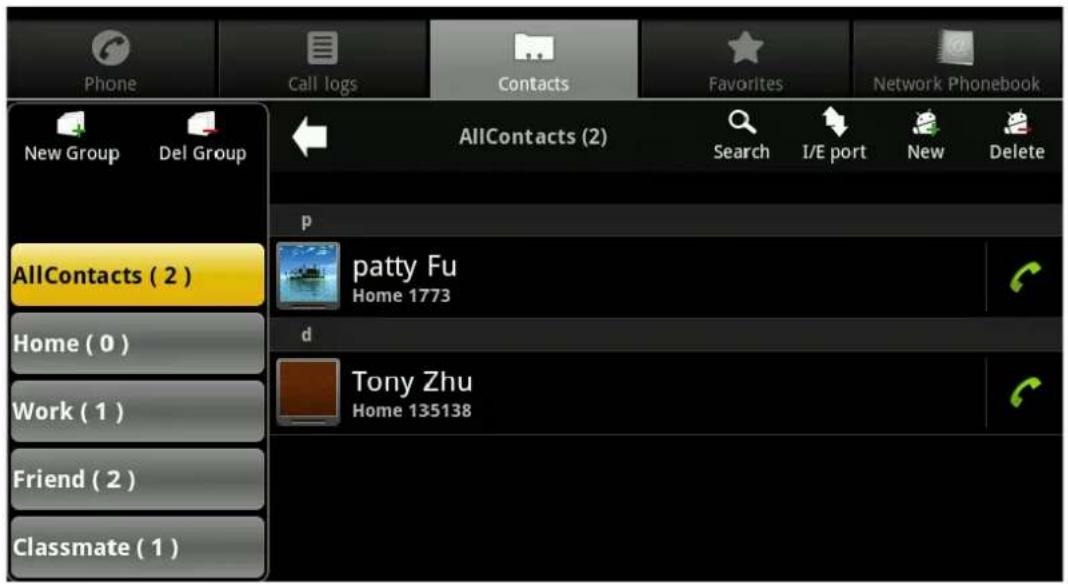
Contacts interface2
Delete a contact
- Open your contacts or favorites.
- Press Menu ≡ and touch Delete Manager.
- Select the contact you want to delete, then tap the "Picture Trash" to delete or you can bulk delete, tap the contact you want to delete button to the right, making the state checked
- Press Menu ≡ and touch Delete selected. If you want to delete all, press Menu ≡ and touch Select All, he all contacts will be checked, then press Menu ≡ and touch Delete selected.
Set a ringtone for a contact
- Open your contacts
- Touch the name of a contact in the list to view its details.
- Press Menu ≡ and touch Options.
- In the scrolling list of ringtones that opens, touch the one to play when the contact calls. The ringtone plays a sample.
- Touch OK.
After the contact calls, just to set the tone will be played.
Add contacts to the blacklist
- Open your contacts or favorites.
- Long Press a contact name will show a pop-up prompt box, touch "Add to blacklist", you can reject all calls from that contact.
Add a contact to your favorites
You can add contacts to frequently used favorites, allowing you convenient call the contact.
- Open your contacts
- Touch a contact to view its details.
- Touch the star to the right of the contact's name. The star turns gold ★ or long Press a contact name will show a pop-up prompt box, touch "Add to favorites".
Set a contact's default phone number
A default phone number appears below the contact's name in the Contacts list. The default phone number is used when you initiate a call or send a text message from the list by touching & holding a contact.
- Open your contacts or favorites
- Touch the name of a contact in the list to view its details.
- Touch & hold the phone number to use as the contact's default phone number.
- Touch Make default number in the menu that opens. The default phone number is marked with a checkmark √
Later in contact through the call, you can call directly to set just the default number.
Importing and exporting contacts
If you have contacts stored in vCard/CSV format on an SD card, or USB storage, you can import them into Contacts on your phone. You can export contacts in vCard/CSV format onto an SD card or USB storage, to back them up to a computer or other device. And you can send a contact via email
- Open your contacts.
- Press Menu ≡ and touch Import/Export.
- Touch a type you want to select:
Import
You can copy individual or group contacts in vCard/CSV format onto your SD card or USB storage and then import them into your phone. You may also have contacts stored on an SD card from another device. Refer to your phone's owners' guide for details about working with SD cards.
■ Touch Import from SD card or Import from USB storage (depending on your model of phone).
If you have more than one vCard file on the SD card or USB storage, touch the option to import a single contact file, multiple contact files, or all of the contact files. The contacts are imported.
Export
You can export all of the contacts on your phone to your SD card or USB storage, as a group vCard/Csv file. You can then copy this file to a computer or another device that can work with files in this format, such as an address book application.
■ Touch Export to SD card or Export to USB storage (depending on your model of phone).
■ Touch OK to confirm.
Contacts create a file with the .vcf/.csv extension on your SD card or USB storage. This file contains all of your contacts
New Group
- Touch New Group,
- Input the new group name then touch OK.
- touch the new group you create then touch Add, in the open view, Select the contacts you want to add to the group, when you are fished press the return key to save;
- If the contact list is too long, you can tap + quickly search contact.
- You can also tap the New button, a new contact into the group.
Edit Group
- Touch & hold a group
- Press Menu and touch Set ringtone,
- Touch the icon right of the contact and marked it, the press Menu and touch Remove from group can remove it from this group. If you want to clear all the contacts in this group, press Menu and touch Select all then press Menu again and touch Remove from group.
- Long touch & hold then touch Edit group name can rename the group.
Send SMS or Email
- Long touch & hold the group you want
- Touch Send SMS or Send Email
Delete Group
Long touch & hold the group you want, Touch Delete this group, when you are finished, touch OK
5.4 Call log
The Call log is a list of all the calls you've placed, received, or missed. It offers a convenient way to redial a number, return a call, or add a number to your Contacts.
The figure:

Interface of all calls 1
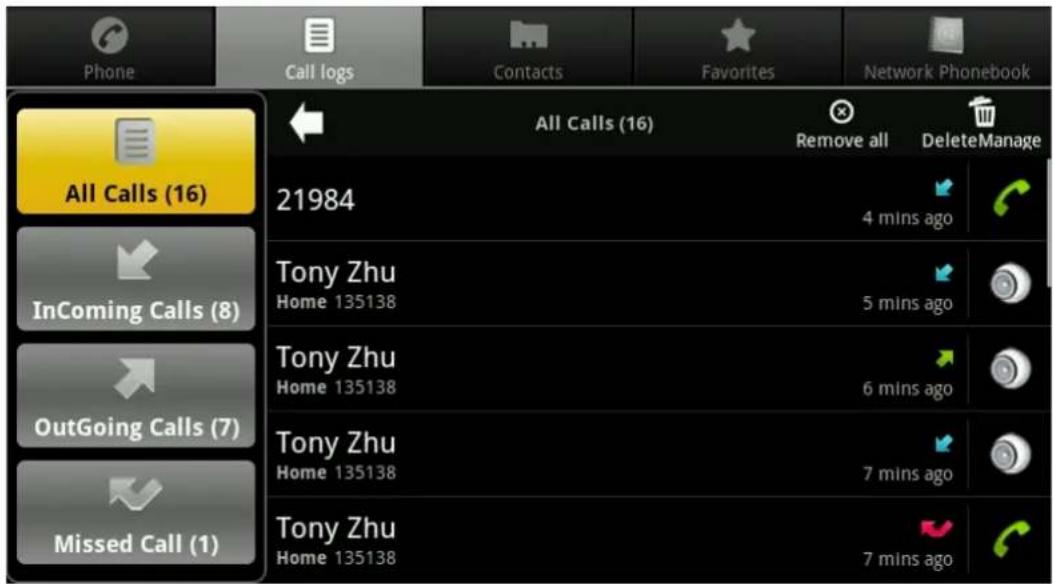
Interface of all calls 2
To view missed calls
■ When you have a missed call, the Notification bar will appear on the missed call icon 📁, Open Notification and touch Missed call to view missed call log.
■ Open Call log or have the Phone /Contacts tab open, touch the Call log tab, calls are listed with the
most recent at the top. The missed call would be marked with icon ♥. You also can press Menu and touch Missed Calls to view all missed calls.
Other actions on a Call log entry
■ Touch a Call log entry to open a screen where you can call the contact again, send the contact a message, add the number to your Contacts, and learn more about the original call.
■ Press Menu and touch Incoming Calls, Outgoing Calls, Missed Calls, and All Calls to view the type you selected.
Working with the Call log
Clear call log
■ Remove one: Touch & hold the entry then touch remove from call log in the menu that opens. You can remove it which you selected from call log. ;
■ Clear by type: Press Menu and touch Clear call log, you can select one or more types you want to clear. When you are finished, touch OK.
▶ Dial a number in the Call log
■ Touch the icon or 📷 at the right of the entry, then select a line and touch OK.
■ Touch & hold the entry to open a menu with options for communicating with that contact in other ways.
■ Long touch & hold the entry to open a menu with options then touch Call *** after select a line touch OK or touch Edit number before call, it will open the dial-up interface. You can call the number which you edit with you select from call log.
Add an entry's number to your Contacts
■ Touch & hold the entry. Touch Add to contacts in the menu that opens, in the list of contacts that opens, touch Create new contact at the top, or scroll to find and then touch an existing contact to which you want to add the number.
■ Long touch & hold the entry. Touch Add to contacts in the menu that opens, in the list of contacts that opens, touch Create new contact at the top, or scroll to find and then touch an existing contact to which you want to add the number.
Add an entry's number to call firewall
■ Long touch & hold the entry. Touch Add to call firewall in the menu that opens. If you enable the firewall function calls, the call will be denied access.
5.5 Memory Key

You can pre-set speed dial buttons for quick dial.
View Speed Dial Information
Touch "speed dial", the terminal will display the current speed dial information interface 16; the default button on the display is empty. You can tap the screen at the top of the "1,2,3" to switch to another interface. Speed Dial can be set to a total of 48 speed dial information. If you configure the speed dial, then the corresponding button on the display you configure the number corresponding to the name. You can also use the navigation keys on the terminal to view the configured speed dial button, orange background that the currently selected speed dial button.
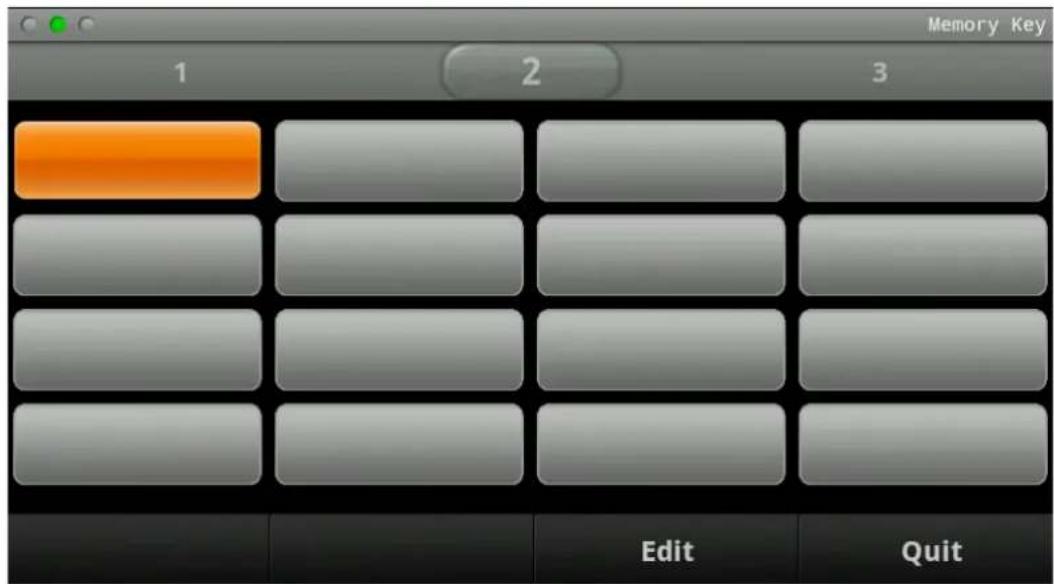
Speed Dial Management
Editing Speed Dial
Open your Memory Key, touch & hold a null button, then touch Edit
Add a contact name, number, call the line (SIP1/2/3/4), and call type (video / voice). When you are finished, touch OK
Deleting Speed Dial
Open your Memory Key, touch & hold the button you want to delete, and then touch Delete. When you are finished, touch OK.
Dialing With Speed Dial
Open your Memory Key, touch & hold the button you want to dial, then touch Dial.

5.6 Network Phonebook
Multimedia Video Phone terminal can be downloaded from the Internet users of the stored contact information, if you use Network Phonebook, you can follow these steps:
- Set of configuration parameters related to the network phone book.
Touch Application → Contacts → Network phonebook to configuration the server, file name and refresh time.
| Item Description | |
| Server | Enter the network address of the server where the phone book, such as 192.168.1.249:8080 / |
| File name | Configure the network phone book name, file name and server to be consistent, otherwise the download fails, such as netcontacts |
| Refresh time | Configuring the phone to the server to update the data interval, in hours, default is 24 hours. |
- Use the Network Phonebook
■ Open you Network Phonebook press Menu ≡ and touch Refresh. Terminal server will be configured to download specified file to the SD card, and display relevant information (group name, contact name, number). At this point the user can view the network of contacts in the phone book information and associated operations.
■ Touch & hold a entry for dialing
■ Long touch & hold the entry. You can touch Voice Call ***, Edit number before call, Send text message to *** or Add to Call firewall.
5.7 MWI

Easily view voice messages, quickly listen in voice messages.
Touch the MWI icon 📋 on the home screen or in the Launcher, you can view voice messages information.
Set the number to listen in voice messages
Touch "Settings"—> "Call"—> "Account"—>, then touch "Voicemail" enter the number to listen in voice messages.
View and Listen in voice messages
On the MWI screen, you can view count of unread voice messages and count of read messages when there were voice messages, and touch listen icon corresponding line to listen in voice message. If you do not set the number to listen in voice messages, touch will open a dialog to open voice mail settings screen or enter numbers in the dial pad to dial.
| Note | When there is a new voice message, you can touch new voice message notification on status bar to open MWI screen. |
6.1 Email

Press the E-mail, the phone will skip to the email interface. The first time used to configure users a usable account and user name.
As shown in the following image:
Click next, and you will enter the interface of account type selecting. You can choose among the following three options: POP3, IMAP and Exchange. Introduction to the configuration of Exchange:
Gmail account
- In the Contact interface, you can press and select "more"----> "account" ----> "add account"
(You can also directly tap "Email" application to enter the interface );

- Input your user name and password to click on the "next"
Domain\Username : gmail.com\username (.*@gmail.com)
Password: password
Exchange Server: m.google.com
QQ account
From web log on QQ mailbox, in the mailbox "Settings"-" experience room "" Exchange mobile terminal synchronization service "-" I want to open"
- In the Contact interface you can press and select "more" ----> "account" ----> "add account" (or you can directly tap "Email" application to enter);
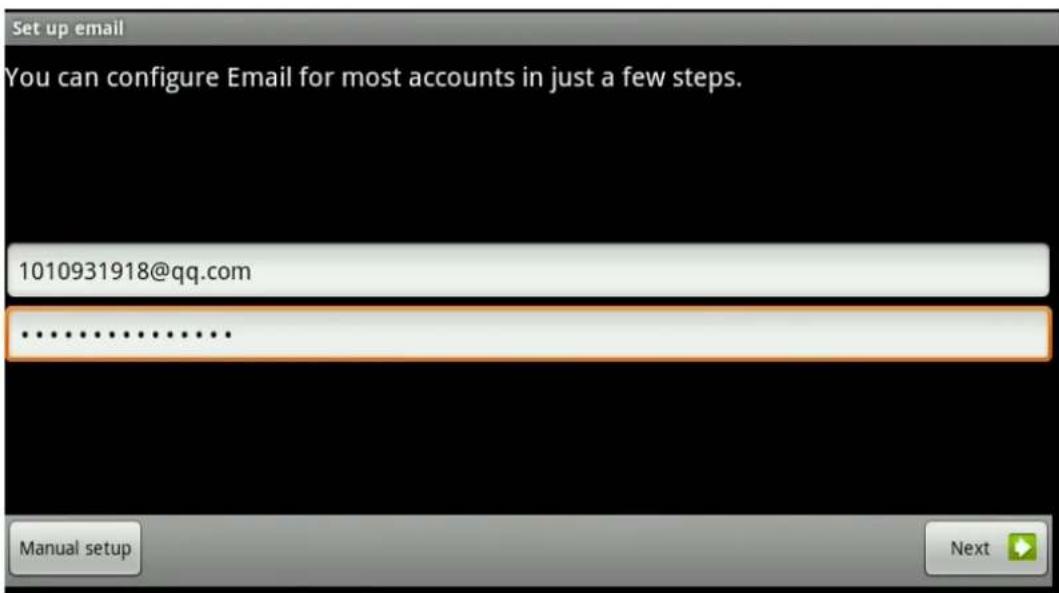
- Input your QQ user name and password, and then click on the "Next";
Domain\Username : gmail.com\username ( **@gmail.com ) ;
Password: Input your password;
Exchange server: ex.qq.com.
Click "Next" to the Exchange server Settings.
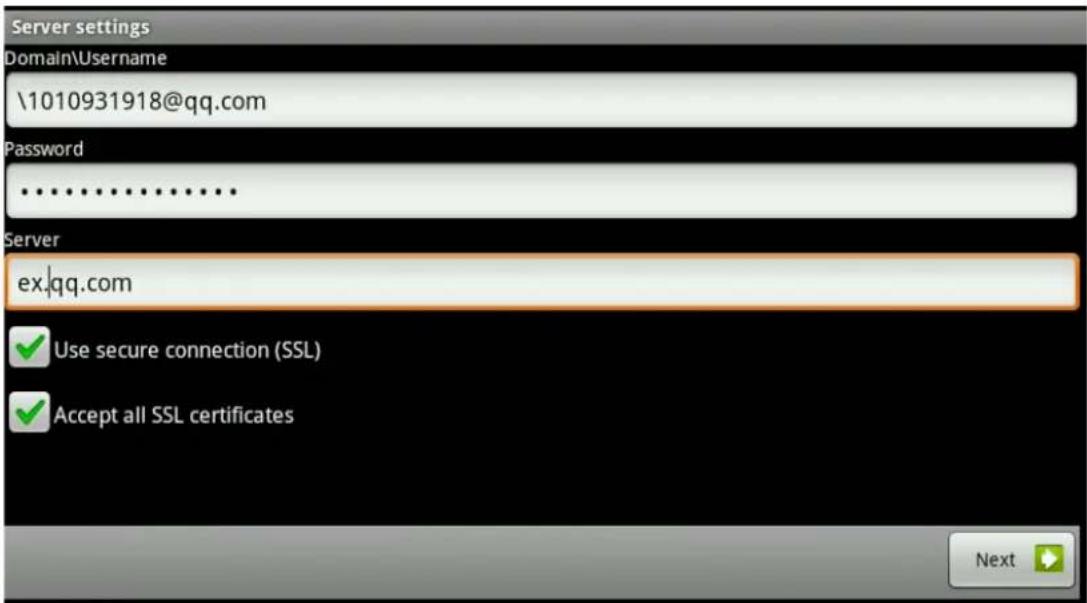
After the completion of the configuration click next to account options interface:
In the interface can choose email "Email checking frequency" for "Automatic (Push)", "Never", "Every 5 minutes", "Every 10 minutes", "Every 15 minutes", "Every 30 minutes" and "Every hour" and so on, can any configuration; can choose the number of need synchronization: "One day", "Three days", "One week", "Two weeks" or "One month" mail quantity; still can choose "Send email from this account by default", "Notify me when email arrives", "Sync contact from this account".
Click on the next step into the account name set interface, you can set "Give this account a name (optional)" and "Your name (display on outgoing message)". Click "Done", you can go directly to the inbox view mail.
In the Inbox interface, you can press 📄, and then can choose to "Refresh", "Compose",
"Folders" and "Accounts" and "Account settings". The "Folder" contains "Inbox", "Drafts",
"Outbox", "sent", "Trash" and so on. Click on the "account," you can go into the current account, and you click on the interface of the boards menu button will appear "add account" screen, you can add a new account.
There.
Long press an email, it will pop up a tip box in which you can choose "Open", "Delete", "Forward", "Reply all" or "Reply" for operation; "Account settings" which has been mentioned groups all the Settings together. We will not repeat it here.
6.2 Calculator

The use of calculators
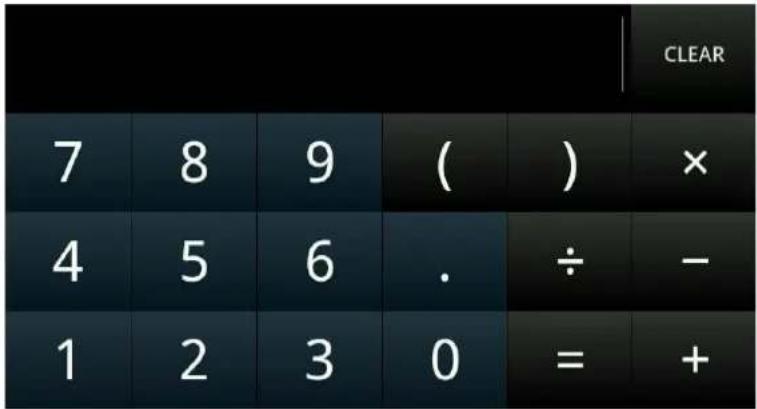
In "calculator" touch of digital and function, as you use the same standard calculator. Touch the addition, subtraction, multiplication, and division button, box will appear in the show the corresponding operation symbols, to let you know executing operation.
Basic panel
Touch "Calculator", you will enter the calculator basic panel. As above, in the basic panel including the electronic calculator the most basic function, and add, subtract, multiply and divide arithmetic, is very simple, very practical.
Advanced panel
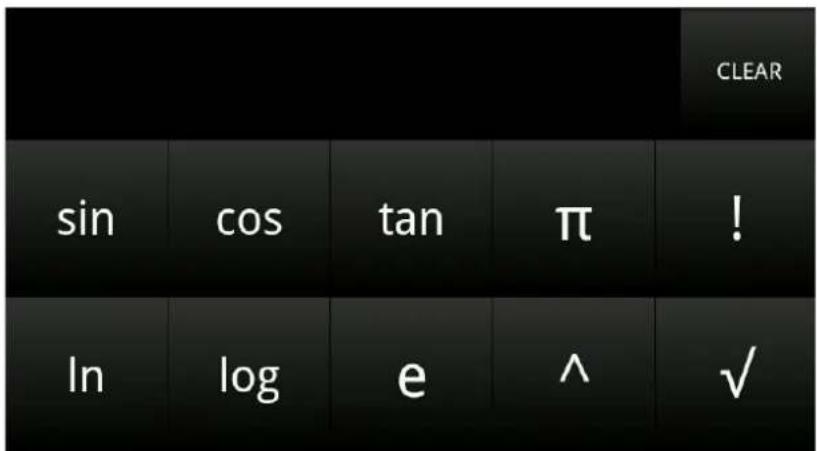
In the basic panel, you can touch "menu" button, select the" advanced panel "or in the basic panel,
fingers from right to left sliding can also enter the" advanced panel "; In the advanced panel, you can touch "menu" button, select "basic panel", or with your finger from left to right, also can return to slide" basic panel ".
| Item Description | |
| sin, cos, tan | A numerical calculation of the triangle function values |
| π | Calculate a constant of π factorial. |
| ! | Calculation of a number factorial. |
| In | Calculating the natural logarithm of a number. |
| log | Calculating the logarithm of a number. |
| e | Calculate a constant of e factorial. |
| ^ | Calculation of a number n time power. |
| √ | Calculating the square root of a number. |
View history
Open the calculator, you can telephone to the up or down navigation keys; check once on a calculator in historical data.
Clear history
Open the calculator, you can press the "menu" button, select "clear history", can keep clear of all the historical data before.
Edit text
You can long press box, choose their needs to use the input method, input text. If the input box existing words, in the window that appears, still can choose the following operations: "Select all", "Select text", "Cut all", "Copy all", "Input method", etc.
Exit calculator
Press the return key boards can exit and close calculator applications.
6.3 Note pad

You can write down memo anywhere at any time, in order to you the complete information needs, or memory of things.
Add memo record
You can touch "Add note", or press the "menu" button, select the "Add note", to the edit notepad interface, at this time you need to input information recorded, and then press the return key save, or press the "menu" button, select "Discard" don't save exit editing screen. At the same time on the phone in the process, you can also touch notepad icon, into the notepad editing screen, then add the memo that you need information.
View memo information
You can touch "Note pad", and then choose to view the memo, can touch view information.
Edit memo information
You can touch " Note pad ", select the need to modify the information, and then press "menu" button to choose "edit text", enter the notepad editing screen, after modification completion, press the return key to be saved, or press the "menu" button to choose "Discard" don't save exit editing screen.
Edit memo information title
You can touch " Note pad ", and then select need to modify title, press "menu" button to choose "Edit the title", in the dialog box to pop up in the title, after complete modification touch "ok" button to save, and exit title edit window. You can also in text editing screen, press "menu" button to select "Edit title", and then ditto operation.
Delete memo information
You can touch "Note pad", choose the memo need to delete the information, press "menu" button, select "Delete", and will delete the selected memo information.
In addition, you can also long press to delete information, in the window that appears choose "Delete" can.
Closed notepad
Press the return key can exit notepad application.
6.4 Browser

Terminal can let you surf the Internet and web browsing, use a computer with the same. The default page is Google search home page; you can make changes to the set home page.
Open web
For the first time, touch "Browser" into the browser, the default page is Google search home page, if you set the default page, jump into the home page of the set. The pre-installed browser is not out of the function, when once again into the browser, may be the last time the return key in before the interface.
Input the website
Press the Menu button on the phone will be search option, can be directly in the search box input for the contents of the search. When web site content to many, small display, you can drag on the screen will appear the following tips:
Press the Menu button on the phone, will appear the browser all of these functions
You click on the browser Settings, can make more detailed Settings
6.5 Recorder

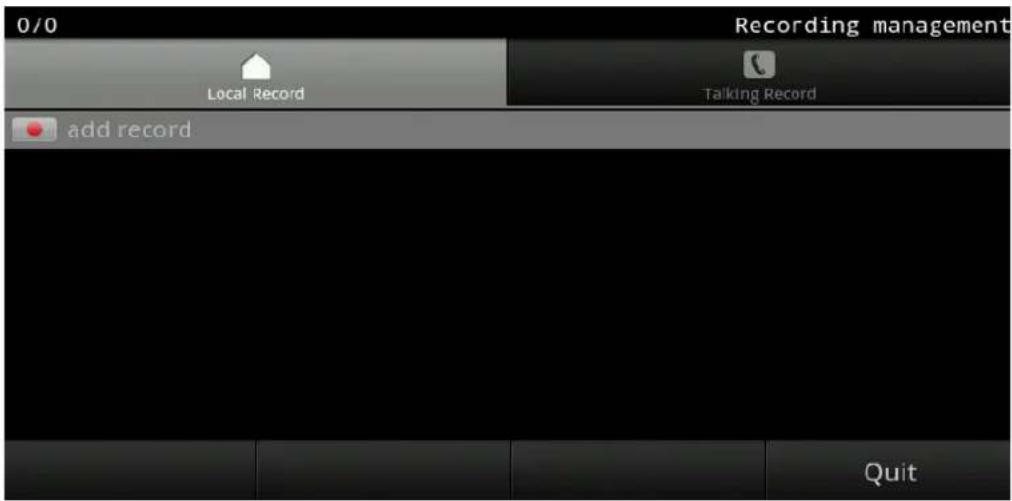
You can at any time and place to personalize the recording. Touch "Recorder" to open the recorder application.
The recording documents mainly include local recording and call the recording two kinds.
Talking Record is carried on in the process of recording phone call, or it is Local Record.
Add record
Open the recorder, touch "Add record" to the recording interface, touch "Record" button to begin the tape, the tape complete, touch "Stop" button over the tape, then pop-up save confirmation window, the user need according to "Ok" or "Cancel". As shown in figure
Play the recorder
You can use the navigation key up and down the sound recording, touch choose "Play" button into the tape recorder playing interface, touch "Play" began to play the tape, played on the process can touch "Pause" temporarily stopped play the tape, so can realize the play and pause switch.
You can also use finger directly touch a recording documents into play interface, and then recorded playing.
Delete the recorder
You can use the up and down navigation button, select a recording documents, then touch "Delete" button, delete the selected the tape documents.
Backup the recorder
When you plug in an external device after, there will be the tape "backup" option, touch "backup" selection need backup tape, then touch "Ok" start backup, or touch "Cancel" button to cancel the backup.
Close the recorder
Press the return key or touch "Quit", exit and finish record application.
6.6 Alarm Clock

Use system comes with alarm clock
Open the alarm after application, press the Menu button can add alarm, then can set the alarm time, the bell, vibration, the number of repetitions and set the alarm remind events
■ Press the Menu button can also display and hidden on the left of the clock
■ Press the Menu button can also to alarm for advance Settings, in mute still rang the bell, alarm, etc
6.7 Gallery

You can easily browse pictures, photos and videos
Browse Pictures
You can touch "Gallery" icon on the home screen or in the Launcher, open a gallery album, press "Option" key, and select "Slideshow", Phone screen that can slide in the form of each picture to show you.
You can also manually check each picture by picture on both sides of left and right buttons, for switching the picture to view each picture to the purpose.
General Settings
| Item Description | |
| Display size | Select the display size of pictures and videos |
| Sort order | Select the sort order of pictures and videos |
| Confirm deletions | Show confirmation before deleting a picture or video |
Slideshow settings
| Item Description | |
| Slideshow interval | Select how long each slide displays in the show. |
| Slideshow transition | Select the effect used when moving from one slide to the next. |
| Repeat Slideshow | Play slideshow more than once. |
| Shuffle slideshow | Show pictures in random order. |
Batch choose delete and batch to share
In a file or directory, the video is press the "menu" button to select "Multiselect", and then select need operation images or video, click "Delete" or "Cancel", can achieve a batch delete and cancellation of the selected purpose.
Add
In the process of browsing, pictures can enlarge, reduce, and set to wallpaper, set to contact icon, share, and delete, rotate and clip operation, with camera application of basic similar picture operation, here no longer statement.
6.8 File Manager

With the File Manager can easily organize multiple files. The view of the File Manager as the Figure 1 and Figure 2:

Figure 1
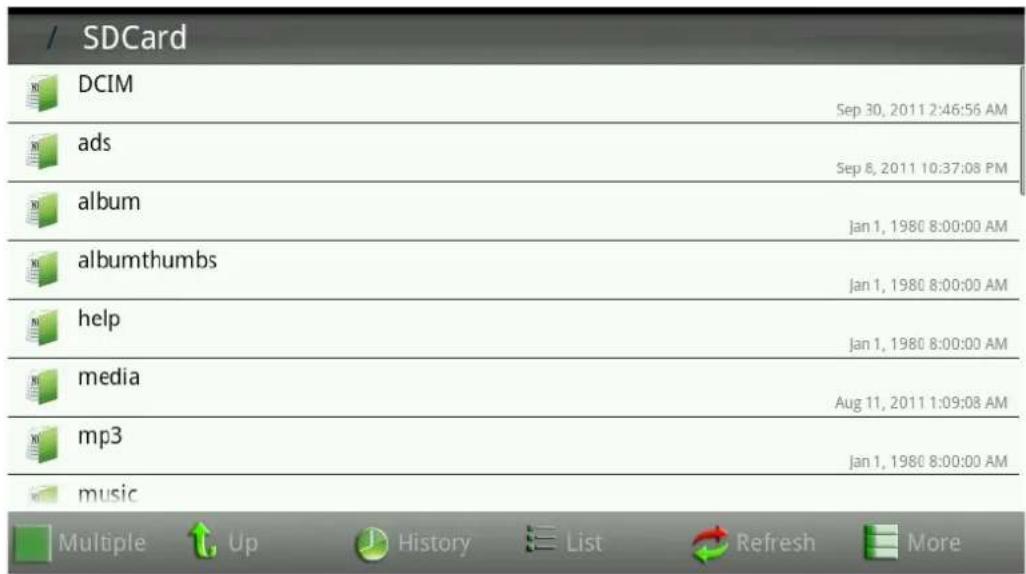
Figure 2
"Figure 1" is showing files as icon, "Figure 2" is showing files as a list, the views as list can present the modified time of the files (need to be checked in the settings).
Long press a file will show a context menu has operations like "Open", "Copy", "Cut", "Paste", "Delete", "Rename", "Select/Cancel" and "Properties".
| Item Description | |
| Multiple | Tap the “Multiple” button, multiple files can be selected. |
| Up | Tap the “Up” button, can return to the parent directory. |
| History | Tap the “History” button, can show the resent history of operations. |
| Icon/List | Tap the “Icon/List” button, will show files as difference view. |
| Refresh | Tap the “Refresh” button, will refresh the views. |
| More | Tap the “More” button, will show more operations like “New Folder”, “New File”, “Paste”, “Search”, “APK Manager”, “Settings”, “Multiple/Cancel” and “Exit”, as shown in the Figure 3 |

Figure 3
| Item Description | |
| New Folder | Create a new folder. |
| New File | Create a new file. |
| Paste | It will past the copied and cut file. |
| Search | You can choose “Case sensitive” or “Exact match” to search the files that match the input. |
| APK Management | Tap "APK Manager"-->tap --> you can select "All software, System software, User software or Refresh List"--> select one application, then it will pop up a list--> you can choose "Start Software, Uninstalling Software, Backup Software or Details", then you can know more details. |
| Settings | Into the APK Backup Directory to configure prefix hide, file size display and document time (list) shown. And can show the memory of SD card, the total capacity and available space, phone the total internal storage capacity and available space, U disk state cannot exist or an exception. |
| Multiple/.. | Multichoice, when click it, you can select Multiple Files, then long press screen to open、copy、cut or do other operations. |
| Exit | Get out the file manager application. |
6.9 Camera

You can take pictures with friends to share at any time and place.
Photographs
The user can press lightly "camera", the phone screen shows the picture. Then lightly in the lower right corner of the photos button to take pictures, also can be in before taking pictures, and enlarge on the image processing, in order to achieve better shooting demand.
In the photo window, users can also tap the "Menu" button, select the "Gallery", it is easy to access all the pictures in the gallery, including already photographs.
Shooting Settings
The user can light press the "menu" button, select "Settings", into the camera Settings interface, store location and photo quality Settings.
Browse photos
After taking the picture, you can tap the upper right corner of the small photo icon to view photos.
Users can use finger touch photos, photo below shows amplifier and narrow button, the user can through the amplifier or narrow button to set the picture as wallpaper or contact icon
The user taps the "Done" or return button to exit photo view window.
Photo processing
View photos in the process, tap the "Menu" button, select the "spin" on the photo to the left or right rotation, and rotation are automatically saved; or select the "pruning", and then trim operation is complete, click on "save "button to save, or click on the" give up "button to discard.
Delete photos
In the photo viewer window, lightly tap the upper right corner of the "delete" button; you can delete the corresponding photos.
Share photos
In the photo viewer window, lightly tap the "Share" button; you can add photos to the corresponding information, to share with friends. At the same time also can press lightly "set" button corresponding to fast set as wallpaper or photo contact icon.
Turn off the camera
In the photo window, lightly tap the Back button to exit and close the camera application.
6.10 Music

High-quality sound from a phone, it is becoming a perfect listening experience.
Press the music icon to open the application.
Music files viewing
You can view the music files in different ways by pressing the “Artists”, “Albums”, “Songs”, “Playlists” and “Now playing” tab.
Music files playing
Press the option button, according to the different option item; you can "Party Shuffle" or "Shuffle all". Long press an artist in the "Artists" content, select "Play" in the context menu, you can play all the songs of the artist.
Long press an album in the “Albums” content, select “Play” in the context menu, you can play all the songs of the album.
Long press a playlist in the "Songs" content, select "Play" in the context menu, you can play all the songs of the playlist.
Long press a song in the "Songs" content, select "Play" in the context menu, you can play it.
Music files deleting
Long press an artist or an album or a song, select the "Delete" in the context menu, you can achieve the purpose of deleting music files. Note that deleted files are permanently deleted and cannot be recovered.
Music files searching
Long press a piece of music files, select the "Search" in the context menu, then need to select "Browser" or "Music" in the search for the music files.
Make ringtone
Long press a piece of song, select "Use as phone ringtone" in the context menu, it will set the song to ringtone.
Playlist playing
Press "Now playing" tab to open the views, then tap the playlist icon, enter the now playing list, you can select a song and long press it, select "Add to playlist" in the context menu, select "New", then you can create a playlist.
Or you can go back to the "Now playing" views, select "Add to playlist" in the option menu to create a playlist.
Add music to playlist
Long press an artist or an album or a song, and select "Add to playlist" in the context menu.
Delete music from playlist
Enter the playlist view, long press the song, select "Delete" in the context menu to delete it from this playlist.
Difference between the default playlist and the list of user-defined
The default playlist only can be Played and Edited, but the user-defined can be Played, Deleted and Renamed.
Music settings
In the “Now playing” view, the “Repeat off”, “Repeat all songs” and “Repeat current song” can be set by press the Repeat button.
6.11 Screen Calibration

Screen calibration uses the five calibration method. After using the phone a long time, there may be inaccurate, then set the "upper left", "upper right" and "left down" and "right down" and "middle" five icons through the screen calibration procedures to adjust the screen, and let the screen in a state of accurate.
Touch "Calibration" application, and input 123456 then you can start calibration.
6.12 Calendar

You can view the current "year, month, day" and "day of week" through the calendar, so it is convenient for you to arrange your daily routine.
6.13 PingBox

Check to see whether the network is connected successfully, so you can know the status of network connection better and faster. You can input IP address or Domain name to check.
7.1 Android settings
Tap "Settings" to enter settings interface to configure.

WAN
Tap "Settings", the default selection is" Basic settings", select "WAN" to switch to "WAN" interface.
| Item Description | |
| Status | Display telephone's currently using IP, gateway, subnet mask, and the primary DNS backup DNS. |
| Ethernet configuration | Network: After enabled, the phone will try to connect network.Ethernet configuration: Click to pop-up"Configure Ethernet device" dialog to the follow configuration, after configured, you can click "ok" button to make settings take effect.Network devices: Physical configuration.DHCP: Use DHCP to connect network.DNS server address automatically: Whether to use DHCP assigned DNS server to connect network.Static IP: Whether to use static IP for network connection.IP: Input your assigned IP address.Netmask: Input your assigned subnet mask.Gateway: Input your assigned gateway.DNS 1: Input your assigned DNS address.DNS 2: Input the secondary DNS address. |
| PPPoE set Username: Input your assigned PPPoE account name.Password: Input your assigned PPPoE password.Connect when Boot complete: Whether PPPoE connection is turned on automatically when boot.After the configuration parameters, if you click “Connect” button, if can connect to the network using PPPoE mode at once; If you click “ok” button, it will only save the configuration parameters; if you click “cancel” button, the parameters you have been set will not be saved. | |
| Shuffle slideshow | Show pictures in random order. |
Sound & display
Tap "Basic settings", then select "sound & display" to switch to sound & display interface.
| Item Description | |
| Volume Set | Silent mode: Set whether to enable silence, If you enable the mute, Will come into effect in addition to alarm and media outside of all sound.Ringer volume: Regulation of Incoming call volume and Notification volume sizeMedia volume: Regulation of media volume size |
| Ring Set | Phone ringtone: Set of incoming process bell play.Notification ringtone: Set sends a notification process bell play. |
| Tone set Audible | touch tones: Enable, Using the dialing keyboard process will play button sound.Audible selection: Enable, Screen selection will play sound. |
| Screen Saver set | Enable screen saver: Enable, The phone after the specified time will enter the screen saver mode.Screen saver timeout: The input phone into the state of the screen saver waiting time, The unit is a minute.Screen saver mode: Choose the screen saver mode; There are Close LCD, Album and Clock 3 kinds of mode selection.Screen saver prohibit operation period: Settings prohibit run time parameters such as. |
| Hibernate set | Enable hibernate: Enable, The phone after the specified time enter a state of dormancy.Hibernate timeout: he input phone enters a dormant state waiting time, The unit is a minute. |
| Display Set | Animation: Set the window animation mode, There are No animations, Some animations and All animations 3 kinds of mode selection.Brightness: Adjust screen brightness of display. |
| U-Disk notification | Enable, When u-disk install and uninstall will play the corresponding notification alert tone. |
| Note | 1, If at the same time enables hibernation and screensavers, The phone will first enter the screen saver, Then enter a state of dormancy.2, Prohibit the run time parameters are introducedProhibition of the use of run time: Enable, in a specified time period do not run screen saver, Direct Close LCD.The first period start time: Set the first time start timeThe first period end time: Set the first time end timeThe second period start time: Set the second time start timeThe second period end time: Set the second time end time |
Configuration management
Tap "Settings", and then select "Configuration management" to switch to Configuration management interface.
| Item Description | |
| Auto provision | Server: The input to upgrade the server address.Protocol: Select the protocol used by the automatic upgrade, Include: ftp, http and tftp.Account: Input the upgrade server by use of the account.Password: Input the upgrade server by use of the password.File name: Input the need to upgrade the file name.Time interval: Input automatic update interval.Mode: Selection of automatic upgrading method: Do not upgrade, Reboot after upgrade and a specified time after the upgrade.Manual upgrade: Click, Immediately upgrade. |
| Network phonebook | Server: Input telephone network, where the server address.File name: Configure the network phone book name, The same name with the files on the server, Otherwise, a failed download.Refresh time: Configure phone update data time interval, The unit is the hour. |
| TR-069 | Server: Input the TR069 address of the server, hidden by default, in the setting of TR069 interface press dtmf button can investigate enter the server address input box.Account: Input registers that are used by the TR069 server account.Password: Input registers that are used by the TR069 server password.Automatic login: Enable, Phone reboot after use to save the user name and password, Do not need to manually input.Local sequence number: Display the local tr069 sequence number. |
| Note | About the auto provision, the phone to register and configure automatic updates server address, the phone will at intervals of to the server to check for updates and upgrades. Please see the specific automatically upgrade instructions in the appendix C. |
Language & keyboard
Tap "Basic settings", then select "language & keyboard" to switch to language & keyboard interface.
| Item Description | |
| Select locale | Settings phone language environment, The default selection of English. |
| Text settings | Set the phone by the use of the Android keyboard, Google input method、Meng Tian input method etc. |
| Note | Users through the Android market to install third party input method will be automatically added to the language and keyboard settings. |
Date & time
Tap the "Basic Settings", and then choose "Date & time" switch to the date and time settings interface.
| Item Description | |
| Auto | When enabled, the phone will automatically get the current time through the SNTP server time. |
| Automatic timing server Settings | Configuring the phone to get the SNTP server address for the current time. |
| Set the date | The user manually set the current date. |
| Select time zone | The user selects the current time zone that you are. |
| Set the time | The user set the current time manually. |
| Use the 24-hour format | When enabled, the time will be a 24-hour format. |
| Select the date format | Select a date display format, for year - month - day, day - month - year and month - day - year three models to choose from. |
| Note | 1. Users automatically for opening time, need to configure the available time server address and select the corresponding time zone, while ensuring that the phone is in network status, or can't get state the correct time.2. Enable automatic time, will not be able to manually set the time and date. |
7.2 VoIP Settings
Tap "Settings" and select "VoIP Settings" to switch to VoIP setup interface.
| Settings | ||||
| Basic settings | VOIP | Call settings | Advanced settings | About phone |
| SIP1 set number:65895632 server:192.168.1.2 reg:registered | ||||
| SIP2 set number:58964235 server:192.168.1.2 reg:unapplied | ||||
| SIP3 set number:4202 server:192.168.1.4 reg:registered | ||||
| SIP4 set Using the backup server:192.168.1.2 | ||||
| Line set | ||||
| Item Description | |
| SIP set | Set each sip account parameters related to registration, such as sip server address, the configuration is complete click "OK" button. |
| Line set | Set the phone line key on the keyboard corresponding to each sip line. |
| Voice | Set voice parameters in the process of calls, such as voice coding, whether to enable VOD, etc. |
| Video | Set video parameters in the process of video calls, such as encoding resolution, frame rate, etc. |
| Qos | DiffServ enable: Set whether to enable Differentiated Services.DiffServ value: Set Differentiated Services configuration parameter values, if you set normal level, the value are 0x00. |
| Port | Media initial port(10000-60000):Set the phone to open media initial port, this port assignment is dynamic allocation.(Size 10000--60000)Media port quantial:Set the maximum number of allocated RTP port,Default value is 200. |
SIP registration parameters:
| Item Description | |
| Server | Set SIP registration server address, support for the domain name in the form of address. |
| Account | Set SIP registration account. |
| Password | Set SIP registration password. |
| Phone Number | Configure the number registered to the SIP server. If empty, no registration launched. |
| SIP Register | Configure enable/disable register.□ disable register,√ enable register |
| Display name | Configure the display name, when called to do the calling party (caller name not given) shows that this configuration parameter. Allow the English alphabet input (does not support Chinese). |
| Server Name | Configure the SIP registration server name. |
| Domain realm | Configure the SIP domain name (the user can no configuration, the system will automatically configure). |
| Server port | Configure the SIP register server signal port. |
| Register expire time (seconds) | Configure SIP server registration expire time, default is 60 seconds. If the server requires the registration period is greater than or less than the time configured the phone, the phone can automatically modify the recommended time limit for the server and re-register |
| DTMF mode | Set DTMF transmit mode, there are three:● DTMF_RELAY● DTMF_RFC2833● DTMF_SIP_INFO● DTMF_AUTODifferent server vendors can provide different models. |
| RFC protocol edition | Configure phone to use protocol version. When your phone needs to communicate with gateway which uses SIP1.0, like CISCO5300, you need to configure RFC2543. RFC3261 is used by default |
| RFC privacy edition | Configuration uses anonymous security exhaled, support RFC3323 and RFC3325. |
| Transport protocol | Configuration using the transport protocol, TCP or UDP |
| Ban anonymous call | Configure whether to banned anonymous call. |
| Enable strict proxy | Compatible with special server, using source address of opposite side when return message, no longer using address in the via field. |
| Enable subscribe | After successful registration, subscription information, you can subscribe to the state of someone else or voice mail, etc. |
| Enable via rport | Configuration can support RFC3581, rport mechanism is used for internal the network, and requires a SIP server support, used to maintain internal and external network device NAT connection |
| Enable prack | Configure whether to support SIP-PRACK function (mainly ring tones will be used) recommends using the default configuration |
| Enable uri convert | Convert # to %23 when send URI |
| Enable DNS SRV | Configure whether to support RFC2782 protocol edition. |
| Enable display name quote | For compatibility with server configuration issue signaling display name in quotes to expand up |
| Use stun | Enable/Disable SIP STUN; |
| Stun Server | Configure the SIP STUN server address. |
| Stun port | Configure the SIP STUN server port. |
| Backup server | Configure a backup server address. When the primary server is not connected, the user can make calls using the backup server communication (only when the primary server cannot connect, the backup server before connection); When the primary server connection, the phone will automatically switch back to the primary server. |
| Backup server port | Configure the SIP backup server port. |
Voice coding settings parameters:
| Item Description | |
| First codec | Set the first priority using voice coding during a voice call. |
| Second codec | Set the second priority using voice coding during a voice call. |
| Third codec | Set the third priority using voice coding during a voicecall. |
| Fourth codec | Set the fourth priority using voice coding during a voice call. |
| Fifth codec | Set the fifth priority using voice coding during a voice call. |
| Sixth codec | Set the sixth priority using voice coding during a voice call. |
| Seventh codec | Set the seventh priority using voice coding during a voice call. |
| Eighth codec | Set the eighth priority using voice coding during a voice call. |
| G729 payload length | Set G729 payload length of the voice coding |
| DTMF payload type | Set DTMF payload type, values between 96 and 127 base |
| ILBC payload type | Set ILBC payload type, values between 96 and 127 base |
| ILBC payload length | Set ILBC payload length |
| G723 bit rate | Set the rate of G723, choose 5.3kb / s or 6.3kb / s |
| VAD | Silence detection; If you enable VAD, then, G.729 payload length can not be set greater than 20ms |
Video encoding settings parameters
| Item Description | |
| Accept video mode | Set accept video mode during a voice call.Three ways for choice:Manual accept video, Auto accept video and Auto reject video. |
| First video codec | Set the first priority using the video encoding during a voice call |
| Second video codec | Set the second priority using the video encoding during a voice call |
| Third video codec | Set the third priority using the video encoding during a voice call |
| Video packet size | Set during the video call the size of a single video packet. |
| H.264 payload type | Set payload type of H.264, value between 96 and 127 base |
| Mpeg4 payload type | Set payload type of Mpeg4, value between 96 and 127base |
| Video resolution | Set video encoding resolution during a video call, There are four ways for choice: QCIF, QVGA, CIF and 4CIF. |
| Media Bandwidth | Set the video frame rate of receiving during a video call. |
7.3 Call settings
Tap "Settings" and select "Call Settings" switch to the Call interface.
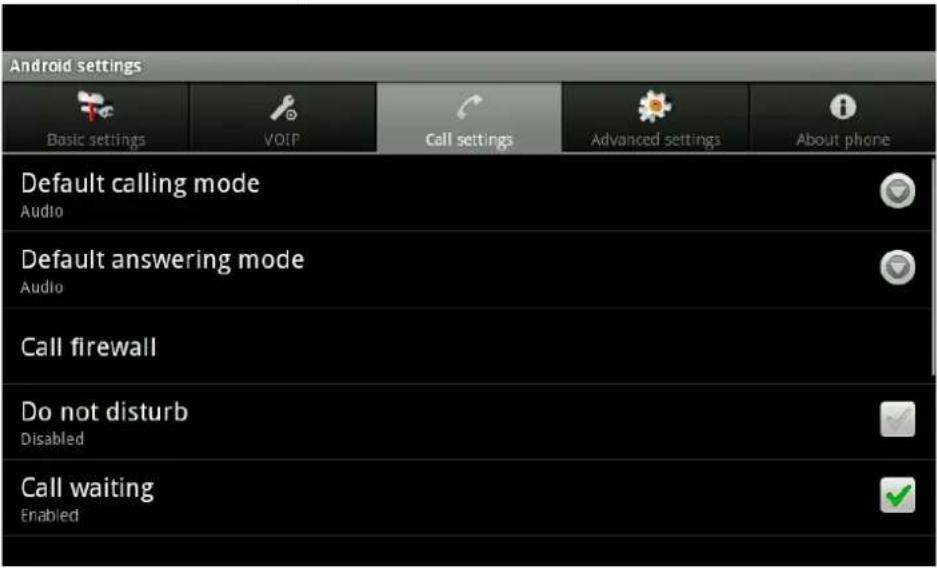
| Item Description | |
| Default dialing | Set the default dialing phone calls, video or voice. |
| Default answer | Set the default answer mode phone, video or voice. |
| Call firewall | Call blacklist: When enabled, a notification will be show on the notification bar. When a number is added to the blacklist, the phone will reject the number of incoming calls, without any prompts.Blacklist: Click to view all the blacklist numbers successfully added, at the same time in check process can click on a blacklist number to delete, menu option can also add and delete. |
| Do not disturb | Enabled the “Do not disturb”, the phone will not allow incoming phone calls, but in the missed calls will be prompt. |
| Call waiting | Set whether to enable the call waiting function. |
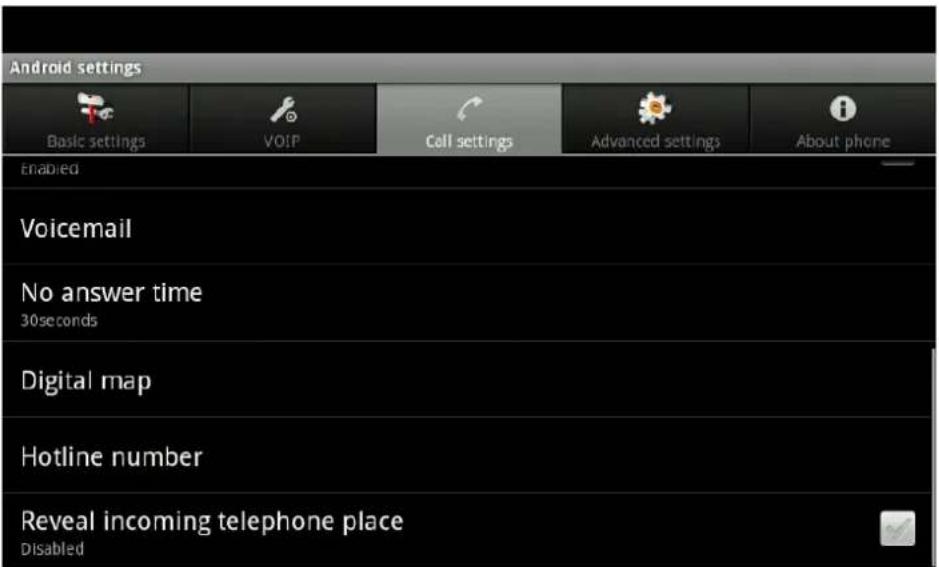
| Item Description | |
| Call forward Call forward: | Set whether to enable “Call forwarding” feature.Forward mode: You can choose “Always”, “No answer” and “Busy”.Forward number: Set forwarding number for each sip line. |
| Auto answer Auto answer: | Set whether to enable “Auto answer” feature.Answer mode Set answer mode: "Forward voice mail" or “Auto answer” |
| Voicemail Check for voicemail | : Whether to enable each sip lineNumber to dial for checking voicemail: Set each sip line to listen to the voice mail numberNumber to sending calls to voicemail: Set voice mail number for each line |
| No answer time | No Answer calls to set the response time in seconds. |
| Digital map Use E164 | : Enabled, accord with E164 rules, will directly out of numberUse with # as dial key: Enabled, in the non-pre-dial mode, enter the number the “#”, will be in direct exhaled number.Use fixed length: Enabled, in the non-pre-dial mode, enter the number after a specified length will make thecall directly.Digital with fixed length(1-30): Enter the number of fixed length(1-30)Use time out: Enabled, in the non-pre-dial mode, Input number after the specified time will be automatic exhale the number.Dial time out (3-99): Enter the number of overtime income effect of time in seconds.Dial plan prefix: Enabled, In need of exhaled number before the automatic add prefix number out.Outside line prefix: Input prefix number |
| Hot number Hot line: | Configure the hotline number for the sip line.Hot line time out (0-99): Set the hotline number of waiting time after remove the handle. Not set, default is 0, immediately exhale hotline number after the hook |
| Reveal incoming telephone place | Enabled, Have telephone call fashionable, will show the incoming call number to belong to additional information. Have telephone call fashionable, will show the incoming call number to belong to additional information. |
| Note | 1、At the same time Settings “Do not disturb”, “Auto answer” and “call forward”, the transfer effect priority is “Do not disturb” >> “Auto answer”>> “call forward”.2、Digital Map :“Use E164”, “Use with # as dial key”, “Use fixed length”; “Use time out” are in effect under the condition of non pre dial. |
7.4 Advanced settings

Location & security
Tap "Advanced Settings" and then select "location and security" switch to the location and security settings interface.
| Item Description | |
| Set menu password | Set the password to enter the configuration items. |
| Visible password | Show password as you type. |
| Use secure credentials | Allow applications to access secure certificates and other credentials. |
| Install from SD card | Install encrypted certificates from SD card. |
| Set password | Set or change the credential storage password. Default configuration password: 123456. |
| Clear storage | Clear credential storage of all contents and reset its password. |
Privacy
Tap "Advanced Settings" and then select "Privacy" switch to the privacy settings interface.
| Item Description | |
| Factory data reset | Clear all user information on the phone, and the entire configuration to the default configuration. |
| Reboot | Click to restart the phone. |
Applications
Tap "Advanced Settings" and then select "Applications" switch to the application settings interface.
| Item Description | |
| Unknown sources | Allow install of non-Market application |
| Manage applications | Manage and remove installed application |
| Running services | View and control currently running services |
| Development | Set options for application developmentUSB debugging: Debug mode when USB is connected.Allow mock locations: Allow mock locations. |
Accounts & sync
Tap "Advanced Settings" and then select "Account & sync" switch to account and sync settings interf
| Item Description | |
| Background data | Application can sync、send and receive data at any time. |
| Auto-sync | Application sync data automatically. |
| Add account | You can configure an Exchange account. |
SD card and memory
Tap "Advanced Settings" and then select "SD card and memory" switch to the SD card and memory settings interface
| Item Description | |
| Total space | Display the total storage capacity of the size of the SD card. |
| Available space | SD card shows the remaining available storage space size. |
| Unmount SD card | Must first uninstall SD card, can remove its safety. |
| Format SD card | Format(erase) the SD card |
| Internal phone storage | Shows the total memory size of the phone. |
| Available space | Show the available phone memory space. |
Search
Tap "Advanced Settings" and then select search" switch to search settings interface.
Tap "search" to switch to search settings interface.
| Item Description | |
| Google search settings | Show page proposal: When enabled, input display Google advice. |
| Searchable items | You can choose to search for content on the phone, include: browser, contacts, applications and music. |
| Clear search shortcuts | Clear shortcuts to recently chosen search results. |
7.5 About phone
Tap "Settings" and then select "About phone" switch to "About phone" settings interface.
| Settings | ||||
| Basic settings | VOIP | Call settings | Advanced settings | About phone |
| Status | ||||
| Legal information | ||||
| System tutorial Learn how to use your phone | ||||
| Local Serial Number | ||||
| Model number broadcom_cmp | ||||
| Item Description | |
| Status | Display phone status information.My phone number: Display phone number on each line.Mobile network type: Whether a successful connection displayed telephone.MAC address: Show the physical address of the phone.Up time: Shows the running time of the phone boot. |
| Legal information | Shows open-source licensing information. |
| System tutorial | Display open-source licensing information |
| Model number | Display phone model. |
| Firmware version | Shows the android version number. |
| Kernel version | Display system of Linux kernel version. |
| Build number | Display phone version information. |
Chapter 8

Web page configuration description
When both of the ICF-1700 phone and your PC are successfully connected to the network, enter the IP address and the web browser port about your phone as the URL such as http://xxx.xxx.xxx.xxx (xxx means the IP address for the media phone), then you can see the login page shows as the following picture. Enter the user name and password and click "Logon" button to the detailed interface.

8.1 Basic
8.1.1 Status
BASIC
| STATUS | ||
| Network | ||
| WAN | ||
| MAC Address | 00:a8:59:c4:0c:8a | |
| IP Address | 192.168.1.12 | |
| Phone Number | ||
| SIP LINE 1 | 21981@192.168.1.2 :5060 | Registered |
| SIP LINE 2 | @ :5060 | Unapplied |
| SIP LINE 3 | @ :5060 | Unapplied |
| SIP LINE 4 | @ :5060 | Unapplied |
| Version: VOIP PHONE version:1.0.877.112.88 | ||
| Item Description | |
| Network | Shows the configuration information on WAN: Including the IP address and the MAC address. |
| Phone Number | Shows the phone numbers provided by the SIP LINE 1-4 servers. The last line shows the version number and issued date. |
8.2 VOIP
8.2.1 SIP

| Item Description | |
| SIP Line Select | Choose line to set info about SIP, there are 4 lines to choose. You can switch by [Load] button. |
| Register Status | Shows whether the phone has been registered the SIP server, if not, show Unapplied. |
| Server Name | Set the server name. |
| Server Address | Input your SIP server address. |
| Server Port | Set your SIP server port. |
| Account Name | Input your SIP register account name. |
| Password | Input your SIP register password. |
| Phone Number | Input the phone number assigned by your VoIP service provider. Phone will not register if there is no phone number configured. |
| Display Name | Set the display name. |
| Proxy Server Address | Set proxy server IP address. (Usually, Register SIP Server configuration is the same as Proxy SIP Server. But if your VoIP service provider give different configurations between Register SIP Server and Proxy SIP Server, you need make different settings) |
| Proxy Server Port | Set your Proxy SIP server port. |
| Proxy Username | Input your Proxy SIP server account. |
| Proxy Password | Input your Proxy SIP server password. |
| Domain Realm | Set the sip domain if needed, otherwise this VoIP phone will use the Register server address as sip domain automatically. (Usually it is same with registered server and proxy server IP address). |
| Enable Register | Start to register or not by selecting it or not. |
| Advanced SIP Setting | |||
| Backup Server Address: | Backup Server Port: | 5060 | |
| Register Expire Time | 60 seconds | RFC Protocol Edition | RFC3261 |
| NAT Keep Alive Interval | 60 seconds | RFC Privacy Edition | NONE |
| User Agent | Voip Phone 1.0 | Server Type | COMMON |
| Signal Key | DTMF Mode | DTMF_AUTO | |
| Media Key | Transport Protocol | UDP | |
| Local Port | 5060 | Subscribe Expire Time | 300 seconds |
| Enable Subscribe | ☐ | Enable user=phone | ☑ |
| Enable Keep Authentication | ☐ | Signal Encode | ☐ |
| NAT Keep Alive | ☐ | Rtp Encode | ☐ |
| Enable Via rport | ☐ | Enable Session Timer | ☐ |
| Enable PRACK | ☑ | Answer With Single Codec | ☑ |
| Long Contact | ☐ | Auto TCP | ☐ |
| Enable URI Convert | ☐ | Enable Strict Proxy | ☐ |
| Enable DNS SRV | ☐ | Enable GRUU | ☐ |
| Ban Anonymous Call | ☐ | Enable Displayname Quote | ☐ |
| APPLY | |||
| Item Description | |
| Backup Server Address | Phone backup server address, if the primary server is not successfully registered then enabled the backup server. |
| Register Expire Time | Set expire time of SIP server register, default is 60 seconds. If the register time of the server requested is longer or shorter than the expire time, the phone will change automatically the time into the time recommended by the server, and register again. |
| NAT Keep Alive Interval | Set examining interval of the server, default is 60 seconds |
| User Agent | Set the user agent if you have, the default is VoIP Phone 1.0. |
| Signal Key | Set the key for signal encryption. |
| Media Key | Set the key for RTP encryption. |
| Local port | Set sip port of each line. |
| Enable Subscribe | Enable the option, the phone will receive the notify from the server. |
| Enable Keep Authentication | Enable or Disable. Keep Authentication. If it is enabled, system will take the last authentication field which is passed the authentication by server to the request packet. It will decrease the server's repeated authorization work |
| NAT Keep Alive | If some servers refuse to register with too short interval time and have no packets sending to device in private network to keep NAR alive, you could set this function ON. It needs to set the keep alive interval time less than the NAT server's. |
| Enable Via rport | Enable or disable system to support RFC3581. Via rport is a special way to realize SIP NAT. |
| Enable PRACK | Enable/Disable SIP PRACK function (basically is used at). Suggest using the default configuration. |
| Long Contact | Set more parameters in contact field, connect with SEM server. |
| Enable URI Convert | Convert # to %23 when send the URI. |
| Enable DNS SRV | Support DNS looking up with _sip.udp mode |
| Ban Anonymous Call | Set to ban anonymous Call. |
| Backup Server port | Configure the backup server port. |
| RFC Protocol Edition | Select SIP protocol version to adapt for the SIP server which uses the same version as you select. For example, if the server is CISCO5300, you need to change to RFC2543; else phone may not cancel call normally. System uses RFC3261 as default. |
| RFC Privacy Edition | Set Anonymous call out safely; Support RFC3323 and RFC3325. |
| Server Type | Select the special type of server which is encrypted, or has some unique requirements or call flows. |
| DTMF Mode | Select DTMF sending mode, there are three modes:* DTMF_RELAY* DTMF_RFC2833* DTMF_SIP_INFO.Different service providers may provide different mode. |
| Transport Protocol | Set transport protocols, TCP or UDP. |
| Subscribe Expire Time | Overtime of resending subscribe packet. Suggest using the default configuration. |
| Enable user=phone | Is the highest authority on the system? |
| Signal Encode | Enable/Disable Signal Encrypt. |
| RTP Encode | Enable/Disable RTP Encrypt. |
| Enable Session Timer | Enable/Disable Session Timer to support RFC4028 or not. It will refresh the SIP sessions. |
| Answer With Single Codec | Enable/Disable the function. When call is incoming, phone replies SIP message with just one codec which phone supports. |
| Auto TCP | Set to use automatically TCP protocol to guarantee usability of transport when message is above 1300 byte. |
| Enable Strict Proxy | Support the special SIP server-when phone receives the packets sent from server, phone will use the source IP address, not the address in via field. |
| Enable GRUU | Set to support GRUU. |
| Enable Display name Quote | Set to make quotation mark to display name as the phone sends out signal, in order to be compatible with server. |
8.2.2 Stun Configuration
By STUN server, the phone in private network could know the type of NAT and the NAT mapping IP and port of SIP. The phone might register itself to SIP server with global IP and port to realize the device both calling and being called in private network.
![graph LR A["Gateway"] -->|What's my ip ?| B["NAT"] B --> C["STUN Server"] D["Private Network"] -->|Send request to Stun server from 5060 port| E["NAT Mapping port 12345"] F["Public Network"] --> C G["Want to receive data from 5060 port"] --> A H["Stun server tell customer public network IP and 12345…](/content/2026/05/1078438/images/ca29d3e6a49affb816166afa3f54da0cbcac90a12f1d0821356fed7edfdc48c8.jpg)
VOIP

| Item Description | |
| STUN NATTransverse | Shows STUN NAT Transverse estimation, true means STUN can penetrate NAT, while False means not. |
| STUN Server Addr | Set your SIP STUN Server IP address. |
| STUN Server Port | Set your SIP STUN Server IP port. |
| STUN Effect Time | Set STUN Effective Time. If NAT server finds that a NAT mapping is idle after time out, it will release the mapping and the system need send a STUN packet to keep the mapping effective and alive. |
| Use Stun | Enable / disable SIP STUN. |
| Note | SIP STUN is used to realize SIP penetration to NAT. If your phone configures STUN Server IP and Port (default is 3478), and enable SIP Stun, you can use the ordinary SIP Server to realize penetration to NAT. |
8.3 PHONE
8.3.1 DSP
PHONE
| DSP Configuration | |||
| First Codec | g711Ulaw64k | Second Codec | g711Alaw64k |
| Third Codec | g729 | Fourth Codec | None |
| Fifth Codec | None | Sixth Codec | None |
| Seventh Codec | None | Eighth Codec | None |
| Signal Standard | China | DTMF Payload Type | 101 |
| ILBC Payload Type | 97 (96-127) | ILBC Payload Length | 20 ms |
| AMR Payload Type | 108 (96-127) | AMR-WB Payload Type | 109 (96-127) |
| G723 Bit Rate | 6.3kb/s | G729 Payload Length | 20ms |
| VAD | |||
| First Video Codec | H.264 | Second Video Codec | H.263 |
| Third Video Codec | Mpeg4 | Video Packet Size | 1200 Bytes |
| H.264 Payload Type | 117 (96-127) | Mpeg4 Payload Type | 125 (96-127) |
| Video Bit Rate | 768kbps | Video Frame Rate | 25fps |
| Video Resolution | CIF(352*288) | ||
| APPLY | |||
| Item Description | |
| First Codec | The fist preferential DSP codec:G.711A/u,G.722,G.723,G.729,iLBC,ARM,ARM-WB |
| Second Codec | The second preferential DSP codec:G.711A/u,G.722,G.723,G.729,iLBC,ARM,ARM-WB |
| Third Codec | The third preferential DSP codec:G.711A/u,G.722,G.723,G.729,iLBC,ARM,ARM-WB |
| Fourth Codec | The fourth preferential DSP codec:G.711A/u,G.722,G.723,G.729,iLBC,ARM,ARM-WB |
| Fifth Codec | The fifth preferential DSP codec:G.711A/u,G.722,G.723,G.729,iLBC,ARM,ARM-WB |
| Sixth Codec | The sixth preferential DSP codec:G.711A/u,G.722,G.723,G.729,iLBC,ARM,ARM-WB |
| Seventh Codec | The seventh preferential DSP codec:G.711A/u,G.722,G.723,G.729,iLBC,ARM,ARM-WB |
| Eighth Codec | The eighth preferential DSP codec:G.711A/u,G.722,G.723,G.729,iLBC,ARM,ARM-WB |
| Signal Standard | Select Signal standard. |
| DTMF payload Type | Configure a dual - tone multi-frequency's effective payload. |
| ILBC Payload Type | Set the ILBC load type, value based on 96-127. |
| ILBC Payload Length | Set the ILBC payload length. |
| ARM Payload Type | Set the ARM payload type. |
| ARM-WB Payload Type | Set the ARM-WB payload type. |
| G723 Bit Rate | Select the G.723 rate, it has two rates.(5.3kb / s or 6.3kb / s) |
| G729 Payload Length | Configure the G729 audio coding Payload length. |
| VAD | Mute detection; if you enable VAD, G.729 payload length cannot be set more than 20ms. |
| First Video Codec | The fist preferential video codec: H.263, H.264, Mpeg4. |
| Second Video Codec | The second preferential video codec: H.263, H.264, Mpeg4. |
| Third Video Codec | The third preferential video codec: H.263, H.264, Mpeg4. |
| Video Packet Size | Video packet size. |
| H.264 Payload Type | Set the H.264 payload type, value based on 96-127. |
| Mpeg4 Payload Type | Set the Mpeg4 payload type, value based on 96-127. |
| Video Bit Rate | Set the Video Bit Rate. |
| Video Frame Rate | Set the Video Frame Rate. |
| Video Resolution | Set video resolution: QCIF, CIF and 4CIF. |
8.4. MAINTENANCE
8.4.1 Auto Provision
MAINTENANCE

| Item Description | |
| SES Address | Set FTP/TFTP/HTTP server IP address for auto update. The address can be IP address orDomain name with subdirectory. |
8.4.2 Account
You can add or delete user account, and change the authority of each user account in this web page.
MAINTENANCE
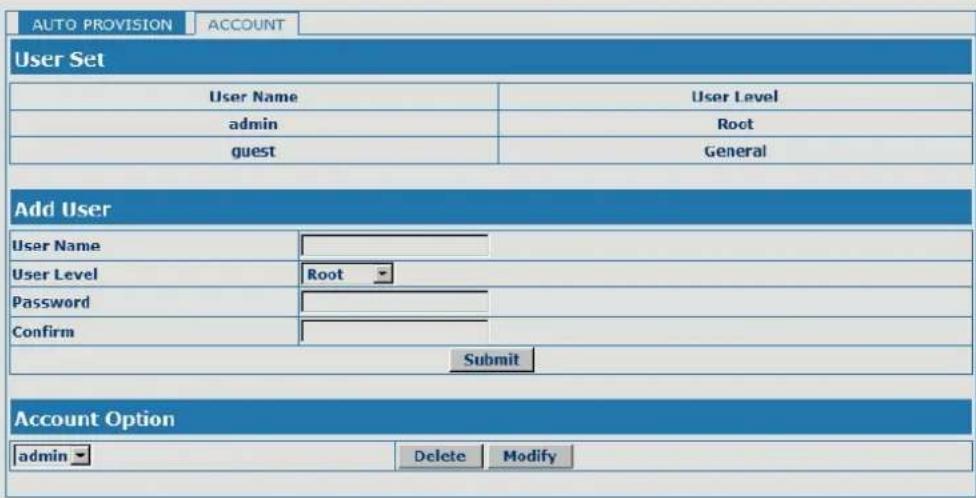
| Item Description | |
| User Set | |
| User Name, User Level, admin, Root, guest, General | User-set Six configuration items. |
| Add User | |
| User Name | Set account user name. |
| User Level | Set user level. Root user has the right to modify configuration, General can only read. |
| Password | Set the password. |
| Confirm | Confirm the password. |
| Account Option | |
| Select the account and click the Modify to modify the selected account, and click the Delete to delete the selected account.General user only can add the user whose level is General. | |
8.5 System Logout
8.5.1 Logout
System Logout

| Item Description | |
| Logout | Click "logout" and you will exit web page. If you want to enter it next time, you need input user name and password again. |
Appendix A Specifications
| Model | ICF-1700 | |
| Hardware | ||
| Port | WAN | 1 x 10/100Base-T RJ-45 for LAN (IEEE 802.3af POE compliant) |
| LAN | 1 x 10/100Base-T RJ-45 for PC | |
| Handle | 1 x RJ9 | |
| Headset | 1 x RJ9 | |
| USB | 1 x USB 2.0 | |
| Video Output 1 x | Mini HDMI | |
| Camera | Tiltable 2Mega pixel CMOS camera | |
| Audio/Video Input | 1 x Ergonomic handset(acoustical cochlea) | |
| Audio/Video Output | 1 x built-in 7" TFT LCD, adjustable angle with 800x480 pixels1 x Full duplex hands-free speakerphone | |
| LED indicator | 1 x PWR LED1 x Speaker LED1 x Mute key LED | |
| Software | ||
| Video Standard | Video Codec | H.263, H.264, MPEG4 |
| Video solution | QCIF、CIF、QVGA | |
| Video format | mp4、3gp and flv | |
| Audio Standard | G.711A/u, G.7231 high/low, G.729a/b, G.722,G.726,iLBC,AMR-NB,AMR-WB | |
| Image format | PEG、PNG、GIF and BMP | |
| Network Standard IEEE 802.3 / IEEE 802.3u / IEEE 802.3af | ||
| Network protocol | SIP 2.0 RFC 3261,TCP/IP, UDP, RTP,HTTP, ARP,ICMP,DNS, DHCP(client),NTP, Telnet | |
| Echo cancellation G.168 | ||
| Access Mode Static IP, PPPoE, DHCP | ||
| Phone Features | ||
| Network | System files managementWAN/LAN: support switch modeIEEE 802.3af PoE on WANDHCP Client on WANMain DNS and secondary DNS serverNTP ClientQoS with DiffServTR-069 | |
| MD5 authenticationNetwork tools in telnet server: including ping, trace route, telnet client | ||
| Basic Feature | 4 SIP servers, and 3 backup SIP serversVoice Gain Setting, VAD, CNGSupport jitter bufferSupport SIP domain, SIP authentication (none, basic, MD5),DNS name of server, Peer to Peer/ IP callDTMF Relay : support Inband, SIP info, RFC2833Customized music ringsSupport STUNSMS based on SIPVolume(handfree/handset/headset/ring) adjustmentProfessional Speaker/HD Voice | |
| SIP application | ForwardTransfer (blind/attended/alert)HoldingWaiting3 ways conferencePaging and intercomCall park/ pickupJoin callRedial and unredialClick to dialSecondary dialing automatically | |
| Call control features | Flexible dial mapHotlineEmpty calling no. reject serviceBlack list for reject authenticated callWhite list, limit callDo no disturb, auto answerCaller ID, CLIR (reject the anonymous call)CLIP (make a call with anonymous),Dial without register | |
| Advanced Application | Friendly graphic menuMultilanguage realizes localization:English, French , Arabic, German, Italian, Korean, Portuguese, Russian, Spanish , Turkish and Chinese (Traditional/Simplified)Human voice caller ID indication● Human voice num keypad indication● Predial● Voice recording during talking/auto answer/local● Incoming calls /outgoing calls / missing calls. Each support100 records.● Support Phonebook 2000 records● Phone book records export/import● XML phone book● Photo frame● Media player(mp3, wav, wma)● USB disk file management● System files management● Support VoIP(SIP/RTP) encryption (e.g. RC4) | |
| Management | ● Android 2.1● Third party android application, e.g. email, IM, internet Radio, web browser● Application market● Desktop/Google search● Desktop widget● Web ,telnet and keypad management● Management with different account right● Automatic upgrades/configuration deployment● Encrypted configuration files download with AES● Support pushing message | |
Appendix B Firmware Upgrade
Please follow the step to upgrade the firmware as below
- Create a directory named implinux in the USB disk, and copy the update file to this directory, and then insert the USB into the phone.
- Phone reboot will automatically compare the update version number in the USB disc and telephone own version number, if not the same version and higher than the existing version, the phone will automatically upgrade. (Upgrade all system).
Appendix C Auto provision
Here are some notices for the auto provision as below:
- Automatic upgrade application must be made before a version of the file version.txt as follow:
version: 1.0.837.35.64
server: 192.168.1.249
image: planet.tar.gz
protocol: ftp
user: planet
password: planet
Note
| version: Phone version, this version can be arbitrarily fill, But the version number cannot be same as telephone version number, Otherwise do not upgrade. |
| server: Upgrade using the server address |
| image: The need to upgrade the file, the suffix name must use tar.gz |
| protocol: Upgrade the protocol used, For example ftp, tftp, http etc. |
| user: According to the protocol used, fill in the corresponding user name |
| password: According to the protocol used, fill in the corresponding password. And the user name and the password must be the same. |
- In the automatic upgrade interface configuration parameters, file name must be filled in with version.txt. Other settings, According to the table in the configuration, then upgrade.
- After the upgrade is complete, telephone notification bar will have to upgrade notification. Click it will pop up asking whether to upgrade the new version of the dialog, Click OK, then image upgrade.
- COPYRIGHT
- DISCLAIMER
- CE MARK WARNING
- WEEE WARNING
- TRADEMARKS
- REVISION
- TABLE OF CONTENTS
- CHAPTER 1 INTRODUCTION ...... 6
- CHAPTER 2 INSTALLATION....13
- CHAPTER 3 LCD MENU ....15
- CHAPTER 4 VIDEO PHONE SETTING ......25
- CHAPTER 5 PHONE APPLICATION....52
- CHAPTER 6 OTHER APPLICATION....68
- CHAPTER 7 ANDROID SETTING....84
- CHAPTER 8 WEB PAGE CONFIGURATION DESCRIPTION .... 100
- APPENDIX A SPECIFICATIONS....111
- APPENDIX B FIRMWARE UPGRADE 114
- APPENDIX C AUTO PROVISION 115
- 1.1 OVERVIEW
- 1.2 FEATURES
- HARDWARE FEATURES
- NETWORK FEATURE
- VOIP FEATURES
- MANAGEMENT
- 1.3 PACKAGE CONTENT
- 1.4 PHYSICAL DETAILS
- CHAPTER 2
- INSTALLATION
- 2.1 GETTING START
- THE IN-GRAPH DEVICES
- USE IN THIS APPLICATION
- NOTE: THE IN-GRAPH DEVICES MAY NOT USE ANY OTHER DEVICES OR TOOLS, SO I HAVE USED THEM TO USE ANY OTHER DEVICES OR TOOLS, SO I CAN USE THEM TO USE ANY OTHER DEVICES OR TOOLS, SO I CAN USE THEM TO USE ANY OTHER DEVICES OR TOOLS, SO I CAN USE THEM TO USE ANY OTHER DEVICES OR TOOLS, SO I CAN USE THEM TO USE ANY OTHER DEVICES OR TOOLS, SO I CAN USE THEM TO USE ANY OTHER DEVICES OR TOOLS, SO I CAN USE THEM TO USE ANY OTHER DEVICES OR TOOLS, SO I CAN USE THEM TO USE ANY OTHER DEVICES OR TOOLS, SO I CAN USE THEM TO USE ANY OTHER DEVICES OR TOOLS
- NOTE: THE IN-GRAPH DEVICES MAY NOT USE ANY OTHER DEVICES OR TOOLS, SO I HAVE USED THEM TO USE ANY OTHER DEVICES OR TOOLS, SO I CAN USE THEM TO USE ANY OTHER DEVICES OR TOOLS, SO I CAN USE THEM TO USE ANY OTHER DEVICES OR TOOLS, SO I CAN USE THEM TO USE ANY OTHER DEVICES OR TOOLS, SO I CAN USE THEM TO USE ANY OTHER DEVICES OR TOOLS
- NOTE: THE IN-GRAPH DEVICES MAY NOT USE ANY OTHER DEVICES OR TOOLS, SO I HAVE USED THEM TO USE ANY OTHER DEVICES OR TOOLS, SO I CAN USE THEM TO USE ANY ONE DEVICE OR TOOL, SO I CAN USE THEM TO USE ONE DEVICE OR TOOL, SO I CAN USE THEM TO USE ONE DEVICE OR TOOL, SO I CAN USE THEM TO USE ONE DEVICE OR TOOL, SO I CAN USE THEM TO USE ONE DEVICE OR TOOL
- NOTE: THE IN-GRAPH DEVICES MAY NOT USE ANY OTHER DEVICES OR TOOLS
- NOTE: THE IN-GRAPH DEVICES MAY NOT USE ANY OTHER DEVICES OR TOOLS, SO I HAVE USED THEM TO USE ANY OTHER DEVICES OR TOOLS, SO I CAN USE THEM TO USE ANY OTHER DEVICES OR TOOLS, SO I CAN USE THEM TO USE ANY OTHER DEVICES OR TOOLS
- NOTE: THE IN-GRAPH DEVICES MAY NOT USE ANY OTHER DEVICES OR TOOLS, SO I HAVE USED THEM TO USE ANY OTHER DEVICES OR TOOLS, SO I CAN USE THEM TO USE ANY OTHER DEVICES OR TOOLS, SO I CAN USE THEY TO USE ANY OTHER DEVICES OR TOOLS
- NOTE: THE IN-GRAPH DEVICES MAY NOT USE ANY OTHER DEVICES OR TOOLS, SO I HAVE USED THEM TO USE ANY OTHER DEVICES OR TOOLS, SO I CAN USE THEM TO USE ANY OTHER DEVICES OR TOOLS
- NOTE: THE IN-GRAPH DEVICES MAY NOT USE ANY OTHER DEVICES OR TOOLS, SO I HAVE USED THEM TO USE AN OTHER DEVICE OR TOOL
- NOTE: THE IN-GRAPH DEVICES MAY NOT USE ANY OTHER DEVICE OR TOOLS
- NOTE: THE IN-GRAPH DEVICES MAY NOT USE AN ADDITIONAL ITEM ON A COMPUTER SCREEN THAT IS USED BY THESE ITEMS
- NOTE: THE IN-GRAPH DEVICES MAY NOT USE ANY OTHER DEVICES OR TOOLS, SO I HAVE USED THEM TO USE ANY OTHER DEVICES OR TOOLS
- NOTE: THE IN-GRAPH DEVICES MAY NOT USE ANY OTHER DEVICES OR TOOLS, SO I CAN BE USED THEM TO USE ANY OTHER DEVICES OR TOOLS
- NOTE: THE IN-GRAPH DEVICES MAY NOT USE ANY OTHER DEVICES OR TOOLS, SO I CAN BE USED THEM TO USE ANY OTHER PRODUCTS OR TOOLS
- NOTE
- 3.1 MAIN MENU
- OPEN APPLICATIONS
- SCROLL
- RAPID SLIDING FINGER TO SCROLL THE SCREEN
- 3.2 BASIC FUNCTION
- 3.2.1 SCREEN KEYBOARD
- 3.2.2 STATUS BAR
- 3.2.3 NOTIFICATION PANEL
- 3.2.4 MAIN SCREEN
- 3.2.5 DESKTOP WIDGETS
- 4.1 SYSTEM INFO
- 4.2 NETWORK
- 4.2.1 NETWORK
- 4.2.2 PPPOE DIAL
- 4.2.3 QOS
- 4.2.4 PORT
- 4.2.5 STUN
- 4.3 ACCOUNT
- 4.4 CALL
- 4.4.1 GENERAL
- 4.4.2 DIAL PLAN
- 4.4.3 ACCOUNT
- 4.5 DISPLAY
- 4.5.1 SCREEN SAVER
- 4.5.2 HIBERNATE
- 4.5.3 DISPLAY
- 4.6 SOUND
- 4.6.1 TONE
- 4.6.2 VOLUME
- 4.7 LANGUAGE
- 4.8 DATE TIME
- 4.9 MAINTAIN
- 4.9.1 UPDATE
- 4.9.2 MENU PASSWORD
- 4.9.3 RESET FACTORY
- 4.9.4 REBOOT
- 4.10 AUDIO
- 4.10.1 AUDIO
- 4.10.2 AUDIO PARAM
- 4.11 VIDEO
- 4.11.1 VIDEO PARAM
- 4.11.2 BANDWIDTH
- 4.12 CALL FIREWALL
- 5.1 PHONE
- DIALING ON THE DIALER VIEW
- USE THE MEMORY KEY
- USE THE CALL LOG
- USE THE CONTACTS
- ANSWER THE RINGING
- 5.2 CALL OPTIONS
- VIDEO CALL
- CALL RECORDING
- HOLD/RESUME THE CALL
- CALL MUTE
- ATTENDED TRANSFER
- BLIND TRANSFER
- THREE-WAYS CONFERENCE
- MULTI-LINE CALLS
- VOICEMAIL
- 5.3 CONTACTS
- SEARCH CONTACTS
- NEW CONTACT
- DELETE A CONTACT
- SET A RINGTONE FOR A CONTACT
- ADD CONTACTS TO THE BLACKLIST
- ADD A CONTACT TO YOUR FAVORITES
- SET A CONTACT'S DEFAULT PHONE NUMBER
- IMPORTING AND EXPORTING CONTACTS
- IMPORT
- EXPORT
- NEW GROUP
- EDIT GROUP
- SEND SMS OR EMAIL
- DELETE GROUP
- 5.4 CALL LOG
- THE FIGURE
- TO VIEW MISSED CALLS
- OTHER ACTIONS ON A CALL LOG ENTRY
- WORKING WITH THE CALL LOG
- CLEAR CALL LOG
- DIAL A NUMBER IN THE CALL LOG
- ADD AN ENTRY'S NUMBER TO YOUR CONTACTS
- ADD AN ENTRY'S NUMBER TO CALL FIREWALL
- 5.5 MEMORY KEY
- VIEW SPEED DIAL INFORMATION
- SPEED DIAL MANAGEMENT
- EDITING SPEED DIAL
- DELETING SPEED DIAL
- DIALING WITH SPEED DIAL
- 5.6 NETWORK PHONEBOOK
- 5.7 MWI
- SET THE NUMBER TO LISTEN IN VOICE MESSAGES
- VIEW AND LISTEN IN VOICE MESSAGES
- 6.1 EMAIL
- GMAIL ACCOUNT
- QQ ACCOUNT
- 6.2 CALCULATOR
- THE USE OF CALCULATORS
- BASIC PANEL
- ADVANCED PANEL
- VIEW HISTORY
- CLEAR HISTORY
- EDIT TEXT
- EXIT CALCULATOR
- 6.3 NOTE PAD
- ADD MEMO RECORD
- VIEW MEMO INFORMATION
- EDIT MEMO INFORMATION
- EDIT MEMO INFORMATION TITLE
- DELETE MEMO INFORMATION
- CLOSED NOTEPAD
- 6.4 BROWSER
- OPEN WEB
- INPUT THE WEBSITE
- 6.5 RECORDER
- ADD RECORD
- PLAY THE RECORDER
- DELETE THE RECORDER
- BACKUP THE RECORDER
- CLOSE THE RECORDER
- 6.6 ALARM CLOCK
- 6.7 GALLERY
- BROWSE PICTURES
- GENERAL SETTINGS
- BATCH CHOOSE DELETE AND BATCH TO SHARE
- ADD
- 6.8 FILE MANAGER
- 6.9 CAMERA
- PHOTOGRAPHS
- SHOOTING SETTINGS
- BROWSE PHOTOS
- PHOTO PROCESSING
- DELETE PHOTOS
- SHARE PHOTOS
- TURN OFF THE CAMERA
- 6.10 MUSIC
- MUSIC FILES VIEWING
- MUSIC FILES PLAYING
- MUSIC FILES DELETING
- MUSIC FILES SEARCHING
- MAKE RINGTONE
- PLAYLIST PLAYING
- ADD MUSIC TO PLAYLIST
- DELETE MUSIC FROM PLAYLIST
- DIFFERENCE BETWEEN THE DEFAULT PLAYLIST AND THE LIST OF USER-DEFINED
- MUSIC SETTINGS
- 6.11 SCREEN CALIBRATION
- 6.12 CALENDAR
- 6.13 PINGBOX
- 7.1 ANDROID SETTINGS
- WAN
- SOUND & DISPLAY
- CONFIGURATION MANAGEMENT
- LANGUAGE & KEYBOARD
- DATE & TIME
- 7.2 VOIP SETTINGS
- SIP REGISTRATION PARAMETERS
- 7.3 CALL SETTINGS
- 7.4 ADVANCED SETTINGS
- LOCATION & SECURITY
- PRIVACY
- APPLICATIONS
- ACCOUNTS & SYNC
- SD CARD AND MEMORY
- SEARCH
- 7.5 ABOUT PHONE
- CHAPTER 8
- WEB PAGE CONFIGURATION DESCRIPTION
- 8.1 BASIC
- 8.1.1 STATUS
- 8.2 VOIP
- 8.2.1 SIP
- 8.2.2 STUN CONFIGURATION
- 8.3 PHONE
- 8.3.1 DSP
- MAINTENANCE
- 8.4.1 AUTO PROVISION
- 8.4.2 ACCOUNT
- 8.5 SYSTEM LOGOUT
- 8.5.1 LOGOUT
- APPENDIX B FIRMWARE UPGRADE
- APPENDIX C AUTO PROVISION
Brand : Planet
Model : ICF-1700
Category : Cellphone