
NVR-326 - Radio NEVIR - Free user manual and instructions
Find the device manual for free NVR-326 NEVIR in PDF.


| Product Type | Radio |
| Brand | Nevir |
| Model | NVR-326 |
| Frequency Range | AM 540-1600 kHz, FM 88-108 MHz |
| Power Source | AC 230V ~ 50Hz |
| Backup Power | 9V battery (PP3) |
| Power Output | 300 mW |
| Functions | AM/FM Radio, Clock, Alarm, Snooze, Sleep Timer |
| Controls | Snooze/Sleep Off, Alarm Set, Time Set, Sleep Set, Hour Set, Minute Set, On/Off/Auto/Alarm Selector, Tuning, Volume, AM/FM Selector |
| Antenna | FM wire antenna (external antenna possible) |
| Auto Indicator | Yes |
| Display | Clock display (flashes on power interruption) |
| Alarm Modes | Radio wake (AUTO) or Buzzer wake (ALARM) |
| Snooze Duration | 9 minutes |
| Sleep Timer | Up to 59 minutes countdown |
| Battery Backup Purpose | Maintain clock and alarm time during power failure |
| Cleaning Instructions | Soft cloth, mild detergent; do not use solvents |
| Safety Warning | Disconnect mains plug when not in use; avoid rain/moisture |
| Regulatory Compliance | UNE EN 60065 |
| Replacement Power Cord | Only by authorized service |
Frequently Asked Questions - NVR-326 NEVIR
User questions about NVR-326 NEVIR
0 question about this device. Answer the ones you know or ask your own.
Ask a new question about this device
Download the instructions for your Radio in PDF format for free! Find your manual NVR-326 - NEVIR and take your electronic device back in hand. On this page are published all the documents necessary for the use of your device. NVR-326 by NEVIR.
USER MANUAL NVR-326 NEVIR
MANUAL DE INSTRUÇÕES
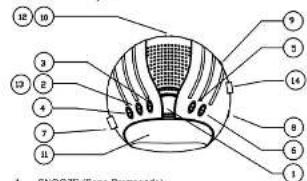
1 SNOOZE (Sono Prorrogado)
-
SLEEP (Domir)
-
MINUTE (Minuto
-
HOUR (Hora)
-
TIME (Hora deo relógio)
-
ALARM (Alarme)
-
ON/OFF/AUTO/ALARM (Luga /Desiga/Automático/Warmo)
-
TUNNIG (Contro e de Sintonia)
-
-VOLUME = (Controle de Volume)
-
Antena Fio FM
-
Inglendar 6170
-
Indicador AUTO
-
EM-AM (Sicartes de Provenza)
-
FM AM (deletor de Frequenza)
-
ALARM OFF BUTTON
- AFSEM SE FCTOR
NA PARTE DEBAIXO DO APARELHO
-
SNOOZE/SLEEP OFF BUTTON
-
ALARM SET BUTTON
-
TIME SET BUTTON
-
SLEEP SET BUTTON
E. HOUR SET BUTTON
-
MINUTE SET BUTTON
-
ON/OFF/AUTO/ALARM SELECTOR
-
TUNING CONTROL
-
VOLUME CONTROL
10 FM ANTENNA (FOR EXTERNAL ANTENNA)
11 AUTO INDICATOR
12 MAIN PLUG (AC CORD)
13 ALARM OFF BUTTON
14 AM/FM SELECTOR
AC POWER OPERATION
Before connecting to the power supply ensure that the supply corresponds to the information on the rating
abel on the bottom of the apparatus.
WARNING
Disconnect the mains plug from the supply socket when not in use. To prevent fire or shock hazard do not
expose the apparatus to rain or moist
CLOCK
- Set the On/Off/Auto/Alarm Switch (7) to 'OFF. Connect the Mains Lead to the power supply. The clock
display will flash on and off indicating a power interruption and that the display time is incorrect.
- To set the correct time, press the Time Set
together, until the correct time is displayed
- Open the Clock Battery Compartment door and fit a PP3 (or equivalent) 9V battery. The purpose of this
battery is to store the information relating to alarm time, and to keep the clock functioning in the event of
disconnection from the mains supply or power interruption. Should this occur, the clock will continue to
ka
ALARM
- To set the alarm time, press the Alarm Set Button (2) and Minute Set Button (6), or Hour Set Button (5).
together, until the required alarm time is displayed
- Switch the On/Off/Auto/Alarm Switch (7) to either 'AUTO' or 'ALARM' position for choice of wake by
radio or wake by buzzer respectively. The Auto indicator (11) will illuminate and alarm is now set to
activate at the required time
- The alarm can be temporarily stopped for 9 minutes by pressing the Snooze/Sleep Off Button (1). This
can be repeated until press the Alarm Button (2)
- The alarm will activate again after 24 hours unless the On/Off/Auto/Alarm Switch (7) is set to 'OFF'
Note: When setting alarm time always remember to release the Minute Set or Hour Set or Hour Set Button
before releasing the Alarm Set Button to ensure that the real time will not be affected
SLEEP
-
Set the On/Off/Auto/Alarm Switch (7) to 'OFF', 'AUTO' or 'ALARM' position.
-
Press the Sleep Set Button (4) and Minute Set Button (6) together. The sleep time will be displayed and
count down from 59 minutes to zero. Release the button when the required sleep time is displayed
- The radio will now open
SI RADIO
RADIO The FM brand received the
The FM band required the AC cord for FM arc, this should be uncoiled and positioned for best reception. Set the CoCoVIA to Wiern English (7) to 'ON' position.
-
Adjust the Tuning Control (8) to select the
-
Adjust the Turning Control (8) to select the 3.
-
Adjust the Volume Control (R) as required.
-
Adjust the volume control (3) as required
-
To turn off the radio, set the On/Off/Auto/Alarm Switch (7) in OFF, if the radio does not switch off tax
-
To turn on the radio, set the Off/OFF/Nature/High Switch (7) to OFF. If the radio does not switch it may be caused by inadvertent operation of the Sleep Set Button (4). To cancel this presses the
May be caused by a turnover up Spruce/Sleep Off, Butan (1) rec
- Adjust the Switch (16) to the required waveband
BATTERY BACK-UP
insect a 9-watt battery (not included) in the compartment located in the cabinet bottom; use preferably a long-life battery. In case of temporary power failure, the battery will keep the time settings even if the display won't show.
Note: The effectiveness of this feature depends entirely on the freshness of your battery. The circuit will not keep the right time if the battery is old or of poor quality.
CLEANING
Clean the cabinet with a soft cloth moistened with water or mid detergent. Do not use solvents such as alcohol, benzene or thinner, as the may damage the cabinet finish. Make sure to disconnect the mains lead from the supply before cleaning. Please retain these instructions for future reference.
SPECIFICATIONS
Frequency Range: AM 540-1600KHz
FM 88-108 MHz
Power Source : AC 230V - 50 Hz
DCSV (For back-up)
Power Output 300 mW
In order to fulfill ruling UNE EN 60065, we indicate that if the flexible wire is damaged, it can only be substituted by a technical service recognized by NEVIR, S.A., as per special tooling is required.
Brand : NEVIR
Model : NVR-326
Category : Radio