
Fauno CL - Mp3 player Sunstech - Free user manual and instructions
Find the device manual for free Fauno CL Sunstech in PDF.


| Product Type | MP3 Player |
| Brand | Sunstech |
| Model | Fauno CL |
| Power Source | Rechargeable battery (via USB) |
| Charging | Via USB cable connected to PC |
| Audio Format | MP3 (assumed) |
| Recording | Built-in microphone |
| FM Radio | Yes, with auto search and preset |
| Memory Expansion | Micro SD card slot |
| Controls | Play/Pause, Previous/Next, Volume, Menu (M), On/Off |
| Equalizer Modes | Natural, Rock, Pop, Classic, Soft, Jazz, DBB |
| Repeat Modes | Normal, Repeat One, Folder, Repeat Folder, Repeat All, Random, Intro |
| Display | LCD screen (assumed) |
| Connectors | USB, Earphone (3.5mm) |
| Warranty | 2 years (excluding misuse) |
| Language Support | Multiple languages via settings |
Frequently Asked Questions - Fauno CL Sunstech
User questions about Fauno CL Sunstech
0 question about this device. Answer the ones you know or ask your own.
Ask a new question about this device
Download the instructions for your Mp3 player in PDF format for free! Find your manual Fauno CL - Sunstech and take your electronic device back in hand. On this page are published all the documents necessary for the use of your device. Fauno CL by Sunstech.
USER MANUAL Fauno CL Sunstech
- The warranty of this product is for 2 years since the purchase date.
- The warranty will exclude breakdowns caused by bad use of the product, wrong installation or installation in not desirable places for a proper maintenance of the product, rips, updates of the products that are not the supplied by the brand, pieces wore away for its use or for not domestic or inappropriate use. Also are excluded breakdowns caused for manipulations of the products by people or companies alien to our company.
- For any request regarding the warranty terms, the purchase receipt must be attached.
The unit is been charged when connected with PC via USB cable no matter its power on or not
1.Overview

natural_image
Top-down schematic of a mobile phone casing with labeled ports (no text or symbols present)- Play [▶] / Pause [Ⅱ]
- USB Connector
- Power ON/OFF
- Earphone Connector
- Micro SD card slot
- Previous [◀] / Backward [◀]
- Next [▶] / Forward [▶]
- VOLUME
- MENU
2. On/Off
2.1 Powering on: Push the On/Off button to on position.
2.2 Powering Off: Push the On/Off button to Off position.
3. Music Play
3.1 Switch the on/off button to turn on the player, After entering main menu, By using « or » buttons to
select the Music Mode and press M button to enter playing song mode.
3.2 Press Play [▶] / Pause [Ⅲ] button to start playing the selected song
3.3 Press «or» buttons to jump to the previous or next song.
3.4 Hold ◀ or ➞ buttons long to move your song forward or rewind it
3.5 Press M button long to show the LYRIC and press M again to return it.
3.6 In music playing or stop mode, First pres VOL button. Then press 4 or 8 button to
decrease or increase the Volume.
3.7 Hold M button long to back to the main menu.
4. Record Mode
4.1 After entering main menu, By using « or »
buttons to select the Record Mode and pin M button to enter Recording mode.
4.2 Press Play [▶] / Pause [Ⅲ] button to start
recording.
4.3 Press Play [▶]7 Pause [III] button to pause or continue recording
4.4 Hold M button long
when finish recording
4.5 Hold M button long to back to the main menu.
5. Voice Mode
5.1 After entering main menu, By using « or » buttons to select the Record Mode and press
buttons to select this Record Mode and prefer M button to enter Voice mode.
5.2 Press Play [▶] / Pause [Ⅱ] button to start
5.3. Press 📄 or ➞ buttons to jump to the previous
6.5 Price Work buttons to jump to the previous or next voice.
5.4 Hold «or» buttons long to move your record
5.5 In voice playing or stop mode. First press
VOL button, Then press◀ or ▶ button to
5.6 Hold M button long to back to the main menu
6. Radio Mode
6.1. After entering main menu, By using « or » buttons to select the Radio Media and press
buttons to select the Radio Mode and press M button to enter radio mode.
6.2 You can press ◀ or » buttons to change the frequency by 0.1MHz
6.3 Hold press ◀ or ▶ buttons long to start the
FM radio auto search function,It when an FM channel is detected
6.4 Press M button to enter FM setting menu
Auto search can be selected, After auto
search finish, Press Play button to choose preset frequencies.
6.5 You can adjust the Volume, First press VOL
button, Then press the Volume. ◀ or ▶ button to decrease or increase
6.6 Hold M button long to back to the main menu.
7. Setting Mode
7.1 After entering main menu, By using « or »
buttons to select the Setting Mode and press M button to enter Setting mode.
7.2 Backlight
7.2.1 After entering setting mode, Select backlight and press M button to enter the backlight setting screen, press
7.3 Language
7.3.1 After entering setting mode, Select Language and press M button to enter the language options list, press or buttons to select your preferred language and press M button to confirm.
7.4 Power off
7.4.1 After entering setting mode, Select power
7.4.2 You can set off time and the sleep time.
In the stop mode, The player will be off or in sleep mode automatically based on the duration you set. You may set "0" to disable these functions.
7.5 Contrast
7.5.1 After entering setting mode, Select contrast and press M button to enter the contrast setting screen, Press «or» buttons to adjust the contrast Values and press M button to confirm after finish setting contrast.
7.5 Memory Information 7.6.1 After entering setting mode, Press«or» buttons to select memory info, and press M button to wee the current memory info of the player.
8. Other
8.1 Repeat mode set
8.1.1 In playing mode, Press M button to enter the sub-menu, Select repeat mode and press M button to enter the repeat mode selection screen, 7 repeat mode are available: Normal/repeat one/folder/repeat folder/repeat all/random/intro.
8.2 EQ mode set
8.2.1 In playing mode, Press M button to enter the sub-menu, Select EQ mode and press M button to enter the EQ mode selection screen, 7EQ mode are available: Natural/ROCK/POP/Classic/Soft/Jazz/DBB
8.3 Delete files
8.3.1 In stop mode, Press M button to enter the deletion function. Press »button to select delete file or delete all and press M button to confirm you selection. Then press «or» buttons to select the file you want to delete, and press M button to confirm. Select'YES' or "NO" by press «or» buttons. Then press M button to confirm
8.3.2 Exit this function by holding M button long.
Instructions Manual (English)
Setting the time and day
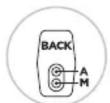
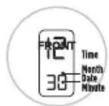
-
Press A button Twice. (Date and Time displays when pressed once)
-
When the month figue appears, press M to set the month.


-
Press the A button once again, the date figue appears and press M to adjust the date.
-
Press the A button once again, the hour fique appears and press M to set the time.

-
Press the A button once again, the minute figue appears and press M to set the time.
-
When you adjust one amongst the month, date, time or minute - keep pressing the A button until the desired figure appears and press M to adjust.
- Press M to see the date.
- Generally the A button is used to select the function (Month, Date, Time and Mintue).
- The M button is used to adjust the function
Manual de Instrucciones (Spanish)

Brand : Sunstech
Model : Fauno CL
Category : Mp3 player