
KD3E1MG - Kitchen INDESIT - Free user manual and instructions
Find the device manual for free KD3E1MG INDESIT in PDF.


| Product Type | 50cm Free Standing Electric Cooker |
| Brand | Indesit |
| Model | KD3E1MG (also KD3E1/G, KD3E11/G, KD3E1/IR) |
| Overall Dimensions (HxWxD) | 900-915 x 500 x 600 mm (approx.) |
| Oven Volume | 58 litres |
| Oven Power Consumption | 1950 W |
| Oven Functions | Conventional, Grill, Slow Cook (S) |
| Number of Hotplates | 4 sealed hotplates |
| Hotplate Control | 6-position rotary knobs |
| Grill Control | 6-position rotary knob |
| Timer | Mechanical timer (on selected models) |
| Oven Lighting | 25W 300°C SES lamp |
| Adjustable Feet | Yes, height adjustable from 900 to 915 mm |
| Oven Shelf Supports | Removable, dishwasher safe |
| Inner Door Glass | Removable for cleaning |
| Electrical Supply | 240V~50/60Hz |
| Power Supply Cable | H05RR-F 3x4 mm² (not supplied) |
| Warranty | Subject to conditions (see manual) |
Frequently Asked Questions - KD3E1MG INDESIT
User questions about KD3E1MG INDESIT
0 question about this device. Answer the ones you know or ask your own.
Ask a new question about this device
Download the instructions for your Kitchen in PDF format for free! Find your manual KD3E1MG - INDESIT and take your electronic device back in hand. On this page are published all the documents necessary for the use of your device. KD3E1MG by INDESIT.
USER MANUAL KD3E1MG INDESIT
50cm Free Standing Electric Cooker
Instructions for installation and use
KD3E1/G
KD3E11/G
KD3E1/IR
Contents
| Introduction 3 | |
| Installation 4 | |
| Safety Information 6 | |
| Features 8 | |
| Control Panel 9 | |
| Use of hotplates 10 | |
| Hotplates General Information Notes 10 | |
| Choosing Your Utensils 13 | |
| Grilling 14 | |
| Grill Chart 15 | |
| Conventional Oven 16 | |
| Conventional Oven cooking charts - Meat | 17 |
| Conventional Oven cooking charts - Baking | 18 |
| Using the Main Oven for Other Functions | 19 |
| Care and Cleaning | 20 |
| Cooking Results Not Satisfactory? | 21 |
| Something Wrong With Your Cooker? | 22 |
| Technical Characteristics | 22 |
| If it Still Won’t Work... | 23 |
| Key Contacts | Back Cover |
You must read these instructions prior to using your appliance and retain them for future use.
Introduction
Your new appliance is guaranteed* and will give lasting service. This guarantee is only applicable if the appliance has been installed in accordance with the installation instructions detailed in this booklet.
To help make best use of your cooking equipment, please read this booklet carefully.
The cooker is designed specifically for domestic use and responsibility will not be accepted for use in any other installation.
When the cooker is first used an odour may be emitted, this will cease after a period of use.
When first using the cooker ensure that the room is well ventilated (e.g. open a window or use an extractor fan) and that persons who may be sensitive to the odour avoid any fumes. It is suggested that any pets be removed from the room until the smell has ceased. This odour is due to temporary finish on oven liners and elements and also any moisture absorbed by the insulation.
* The guarantee is subject to the provisions that the appliance:
(a) Has been used solely in accordance with the Users Instruction Book.
(b) Has been properly connected to a suitable supply voltage as stated on the rating plate attached to this equipment.
(c) Has not been subjected to misuse or accident or been modified or repaired by any person other than the authorised employee or agent.
(d) Has been correctly installed.
Installation
WARNING – THIS APPLIANCE MUST BE EARTHED.

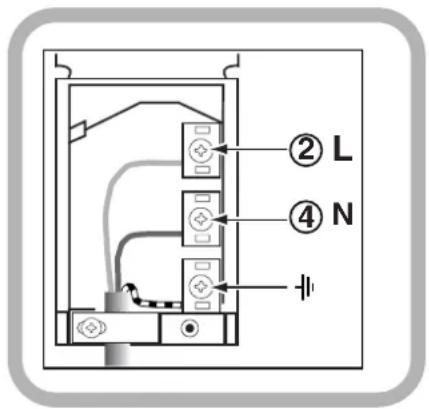
Fig. B
Electrical connection
Electric cookers come without a power supply cable. The cooker is designed to operate on an electricity supply which conforms to the electrical data shown on the Rating Plate. The cooker can be connected to the mains only after removing the back panel of the cooker itself with a screwdriver.
N.B.: the following installation procedure must be carried out by a qualified electrician. The electrical installation must comply with the IEE Regulations, Building & local By-Lays.
For the installation of the feeding cable carry out the following operations:
● Using a screwdriver, prise on the side tabs of the terminal board cover (see fig. A);
●Pull and open the junction blok lid
Important: the wires in the mains lead are coloured in accordance with the following code:
Green & Yellow Earth
Blue Neutral
Brown Live
As the colours of the wires in the mains lead may not correspond with the coloured markings identifying the terminals in your plug, proceed as follows: Green & Yellow wire to terminal marked "E" or 1/2 or coloured Green or Green & Yellow.
Brown wire to terminal marked "L" or coloured Red.
Blue wire to terminal marked "N" or coloured Black (see fig. B).
●fix the feeding cable in the special cable stop and close the cover.
N.B.: the power supply cable must have these minimum requirements:
Type: H05RR-F
Section: 3x4 mm 2
Ensure that the mains cable is routed away from any brackets affixed to the rear panel and is not trapped to the rear wall when pushing the cooker into position between cabinets.
Installation
Siting the Cooker

The height of the cooker can be adjusted by means of adjustable feet in the plinth (900mm - 915mm). Adjust the feet by tilting the cooker from the side. Then install the product into position.
NOTE: This appliance must not be fitted on a platform.
The cooker is designed to fit between kitchen cabinets spaced 500mm apart. The space either side need only be sufficient to allow withdrawal of the cooker for servicing. It can be used with cabinets one side or both as well as in a corner setting. It can also be used free-standing.
Adjacent side walls which project above hob level, must not be nearer to the cooker than 150mm and should be protected by heat resistant material. Any overhanging surface or cooker hood should not be nearer than 650mm.
Moving the Cooker
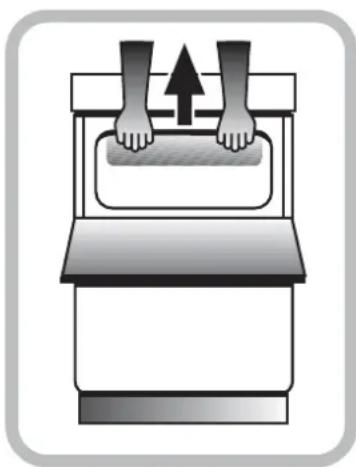
Before moving your cooker check that it is cool, and switch off at the cooker control unit.
Movement of your cooker is most easily achieved by lifting the front as follows: Open the grill door sufficiently to allow a comfortable grip on the underside front edge of the oven roof, avoiding any grill elements.
Note: Take care in moving the cooker as it is heavy.
Take care to ensure that any floor covering is not damaged.
Splashplate optional, apply to Parts Department (see Back Cover for contact number.)
Splash Panel Kit (Wall Mounted)
Safety Information
When used properly your appliance is completely safe but as with any electrical product there are certain precautions that must be observed. PLEASE READ THE PRECAUTIONS BELOW BEFORE USING YOUR APPLIANCE.
Always
- Remove all packing from inside the oven and grill compartments before switching on for the first time.
●Understand the controls prior to using the appliance. - Keep children away from the appliance when grilling as the surfaces will get extremely hot during and after use.
● Turn controls off when you have finished cooking and when not in use.
● Stand back when opening an oven door to allow any build up of steam or heat to disperse. - Use dry good quality oven gloves when removing items from the oven/grill.
- Place pans centrally over the hotplate making sure handles are kept away from the edge of the hob and cannot become heated by other hotplate/pans.
●Take care to avoid heat/steam burns when operating the controls.
● Turn off the electricity supply at the wall switch before cleaning and allow the appliance to cool.
●Make sure the shelves are in the correct position before switching on the oven. - Keep the oven and grill doors closed when the appliance is not in use.
● Take care when removing items from the grill when the lower oven is on as the contents will be hot. - Keep the appliance clean, as a build up of grease or fat from cooking can cause a fire.
- Follow the basic principles of food handling and hygiene to prevent the possibility of bacterial growth.
- Keep ventilation slots clear of obstructions.
●Refer servicing to a qualified appliance service engineer.
● Take care to avoid touching heating elements inside the oven, as during use the oven becomes hot.
Safety Information
Never
● Never line the interior of the oven with foil as this may cause the appliance to overheat.
- Never leave children unsupervised where a cooking appliance is installed as all surfaces will be hot during and after its use.
●Never allow anyone to sit or stand on any part of the appliance.
●Never store items above the appliance that children may attempt to reach.
●Never leave anything on the hob surface when unattended and not in use.
●Never remove the oven shelves whilst the oven is hot.
● Never heat up unopened food containers as pressure can build up causing the container to burst.
- Never store chemicals/food stuffs, pressurised container in or on the appliance, or in cabinets immediately above or next to the appliance.
●Never place flammable or plastic items on or near the hob.
●Never fill a deep fat frying pan more than 1/3 full of oil, or use a lid. DO NOT LEAVE UNATTENDED WHILE COOKING.
● Never operate the grill with the grill door closed as this will cause the appliance to overheat.
●Never use the appliance as a room heater.
●Never use the grill to warm plates.
●Never dry any items on either the hob or oven doors.
●Never install the appliance next to curtains or other soft furnishings.
●Never use steam cleaners.
SAFETY ADVICE IN CASE OF A CHIP-PAN FIRE
In the event of a chip pan fire or any other pan fire.
-
TURN OFF THE COOKER APPLIANCE AT THE WALL SWITCH.
-
COVER THE PAN WITH A FIRE BLANKET OR DAMP CLOTH, this will smother the flames and extinguish the fire.
-
LEAVE THE PAN TO COOL FOR AT LEAST 60 MINUTES BEFORE MOVING IT. Injuries are often caused by picking up a hot pan and rushing outside with it.
NEVER USE A FIRE EXTINGUISHER TO PUT OUT A PAN FIRE as the force
of the extinguisher is likely to tip the pan over.
Never use water to extinguish oil or fat fires.
Features
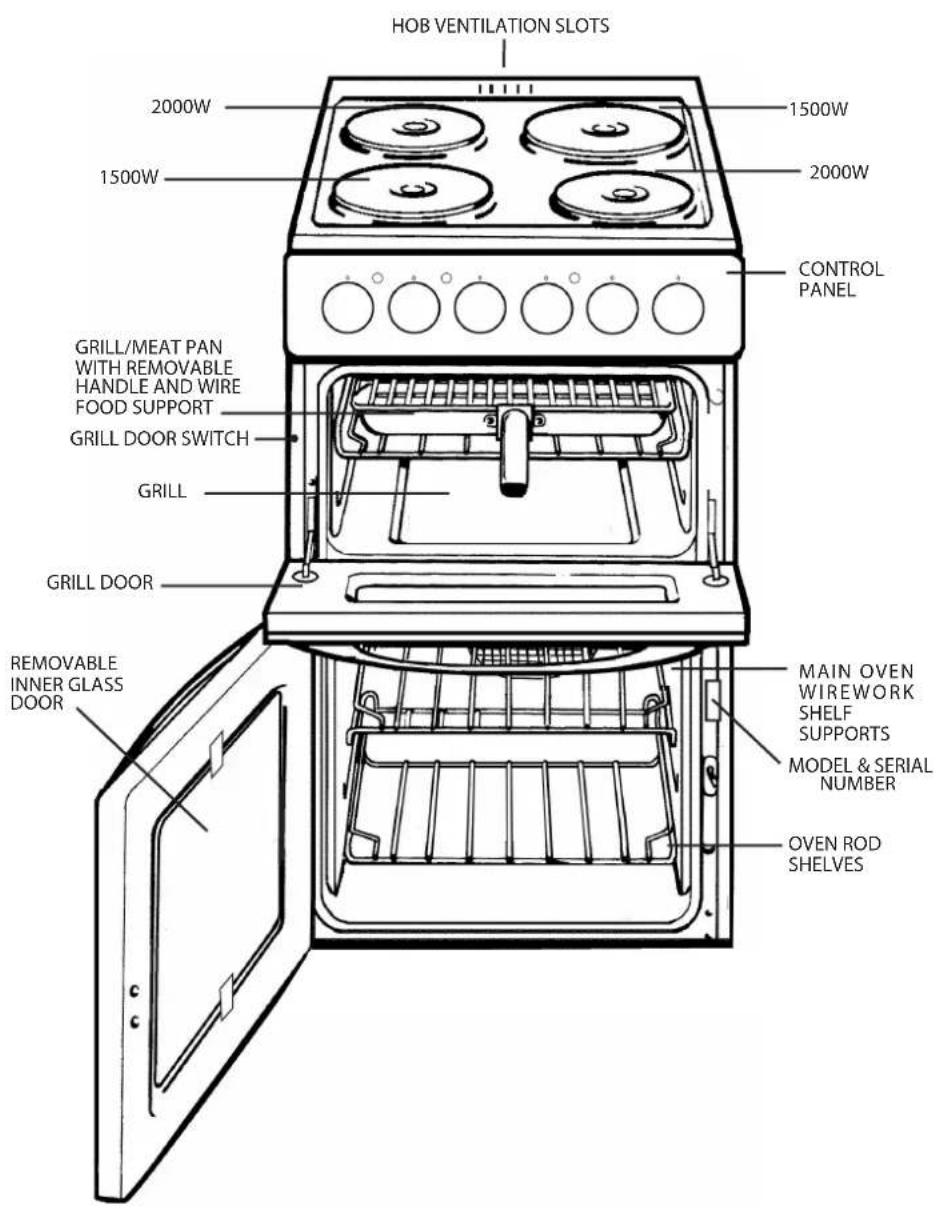
Control Panel

Control Knobs
The knobs for the hotplates can be rotated in either direction to provide variable heat control, the Main Oven knob can only be rotated clockwise from the Off position.
Note: Always ensure that all controls are in the OFF position, when the appliance is not in use.
Operating the control when the grill is in use
In common with all cookers having controls sited above the grill compartment, care must be taken when setting the controls, due to hot air being emitted from the grill compartment.
Slow cooking 'S'
The main oven has a 'S' setting specially designed to reduce energy usage. Full details of this can be found in the Slow cooking section of this book.
Timer *
To use the timer, the buzzer must be wound up by turning the knob one full turn clockwise; then turn it back to the desired time so that the number of minutes on the knob matches the reference mark on the panel.
* (only available on certain models)
Use of Hotplates
Note:
Under no circumstances should the hob be used with aluminium foil in contact with the hob surface.
The controls set the hotplates at six pre-set power levels. Each control can be used to select one of six temperature settings from a minimum at position 1 to a maximum at position 6.
Hotplates General Information Notes
CONTROL SETTINGS GUIDE
This is provided only as a guide – settings also depend on the type of pan used and the quality of food.
| Knob Position | Type of food |
| 1 To melt | butter, chocolate, etc. |
| 1 or 2 To heat | heat food gently.To keep small amounts of water simmering.To heat sauces, containing egg yolks and butter.To simmer: stews, meat, fish, vegetables, fruit. |
| 3 To heat | solid and liquid foods.Keep water boiling.Thaw frozen vegetables.Make 2-3 egg omelettes. |
| 4 or 5 To cook | foods, just above simmering.To maintain 'rolling' boil for preserve making. |
| 5 or 6 To seal | meat and fry fish. |
| 6 Frying | potatoes.Bringing water to the boil.Deep fat frying.Dissolve sugar for preserve making. |
Safety
requirements
for deep fat frying
- Use a deep pan, large enough to completely cover the appropriate heating area.
- Never fill the pan more than one-third full of oil.
- Never leave oil or fat unattended during the heating or cooking period.
- Never try to fry too much food at a time, especially frozen food. This only lowers the temperature of the oil or fat too much, resulting in greasy food.
- Always dry food thoroughly before frying, and lower it slowly into the hot oil or fat. Frozen foods, in particular, will cause frothing and spitting, if added to quickly.
- Never heat fat, or fry, with a lid on the pan.
- Keep the outside of the pan clean and free from streaks of oil or fat.
Hotplates General Information Notes
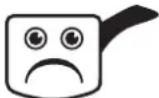
PANS SHOULD
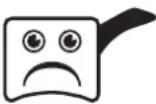
Not be concave (bowed in)
Not be convex (bowed out)

Not be rimmed

Not be deeply ridged

But essentially Flat
| syAwlA | reVeN |
| Use good quality flat-based cookware on all electric heat sources. | Use gauze, metal pan diffusers, asbestos mats and stands e.g. Wok stands - they can use overheating. |
| Always ensure pans have clean, dry bases before use. | Use utensils with skirts or rims e.g. buckets and some kettles. |
| Ensure pans match size of heating area. | Use badly dented or distorted pans. |
| Remember good quality pans retain heat well, so generally only a low or medium heat is necessary. | Leave an element switched on when not cooking. |
| Ensure pan handles are positioned safely and away from heat sources. | Cook food directly on the ceramic glass. |
| Always lift pans, do not drag. Drag or slide utensils, along the hob surface. | |
| Always use pan lids except when frying. | |
| Deal with spillages immediately but with care. |
THE BEST COMBINATIONS
This table is a general guide to the types of pan suitable for different types of hobs and cookers. Remember pans should be good quality, with smooth, flat bases. For any further information refer to manufacturers' instructions.
√ suitable ✗ unsuitable *care should be taken when using any pans on these surfaces not to drag and cause scratching.
| Ceramic* | |
| Aluminium | √ |
| Stainless steel with single layer copper base | ✕ |
| Stainless steel with sandwich bases of aluminium and stainless or aluminium and copper | √ |
| Enamelled steel | √ |
| Enamelled aluminium | √ |
| Enamelled based cast iron | √ With Extra Care |
| Copper | ✕ |
| Toughened glass or ceramic / glass / pottery | Not Recommended |
| Mild steel, Ferro-magnetic or stainless with a magnetic sandwich base | √ |
Hotplates General Information Notes
Do Not
Do not cook directly on the hob surface without a cooking utensil, as this will result in damage to the surface of the hob.
Do not use the hob as a worktop surface as damage may occur to the smooth surface of the hob.
Do not drag or slide utensils on the hob surface, as this will cause scratches in the surface of the hob.
Do not allow a cooking utensil to come into contact with the hob surround.
Do not place anything between the base of the utensil and the ceramic hob, e.g. do not use asbestos mats, aluminium or wok stand.

Do not leave any utensils, food or combustible items on the hob when it is not in use.
Do not place aluminium or plastic foil, or plastic containers on the hob.
Do not leave the hotplates or cooking areas switched On unless they are being used. We recommend not to place large preserving pans or fish kettles across two heating areas.
Do not leave utensils partly covering the heated areas. Always ensure that they are placet centrally over the heated areas and have the same diameter as the heating area used.

We recommend not to use a utensil with a base diameter greater than 25cm (10ins).
Pressure cookers or other large pans should be used on the front cooking areas.
Always ensure that saucepan handles are positioned safely.
Choosing Your Utensils
Do not use utensils with rough bases.
Do not use lightweight utensils with thin, distorted or uneven bases.
Do not use lightweight enamelled steel utensils.
Do not use cast iron utensils.
Do not use utensils with recessed, scrolled or ridged bases.
Do not use a utensil which has a base concavity greater than 1 mm as this will reduce the performance of the hob.
Do not use a utensil with a convex base.
Do not use glass ceramic utensils.
Do not use use lightweight saucepans with plain thin copper bases on ceramic or halogen hot plates.
Note: All copper pans are excellent conductors of heat, and are hard wearing and strong, but need quite a lot of care. They can be very heavy and do not usually have completely flat bases. The interiors are usually lined with a different material such as tin.
A stainless steel pan with a sandwich base of aluminium and stainless steel is an excellent conductor of heat and is suitable for use on ceramic and halogen hobs, providing they are used in accordance with the saucepans manufacturers' recommendations.
Stainless steel pans with a sandwich base of aluminium and copper are excellent conductors of heat. If using stainless steel saucepans with aluminium and copper sandwich bases on ceramic and halogen hobs, the use of these pans must be in accordance with the saucepan manufacturers' recommendations.
Extra care should be taken to ensure the base of the pan and the hob is cleaned, and the hob conditioned, after each and every use, when using this type of saucepan.
If these recommendations are not followed, the result will be a build up of small copper deposits on the surface of your hob which, if not cleaned after each use, will result in permanent marking of your hob.
Always lift the pan from the hob, do not drag or slide across the hob surface as damage may occur.
Grilling
GRILLING MUST BE DONE WITH THE GRILL DOOR OPEN.
CONTROL KNOBS MAY BECOME HOT DURING GRILLING.
CAUTION: ACCESSIBLE PARTS WILL BECOME HOT WHEN THE GRILL IS USED - CHILDREN SHOULD BE KEPT AWAY.
To operate the grill proceed as follows:
- Open the grill door.
● Pre-heat the grill on setting 6 for approximately 5 minutes (see chart on guide to grilling).
Grill Pan Handle
● Fix the grill pan handle securely in position. See below.
- Food which only requires browning should be placed directly on/in the grill pan in the grill pan runner, or on the floor of the grill compartment. (the grill pan grid may be removed.)
- Leave the control on setting 6 for toast, sealing and fast cooking of foods. For thicker foods requiring longer cooking turn the control to a lower setting after the initial sealing, on both sides, on setting 6. The thicker the food the lower the control should be set.
Warning: Take care as the grill will be hot – always wear oven gloves. Always ensure that the grill pan is clean BEFORE use. Excess fat build up in the bottom of the pan could cause a fire hazard. Never line grill pan with foil.
Fixing the Grill Pan Handle
The grill pan handle is detachable from the pan, to facilitate cleaning and storage. Fix the grill pan handle securely in position before use.
The handle fits onto the grill pan edge with the small recess, Fig.1.
Tilt the handle over the recess and slide it towards the centre, Fig.2.
Ensure the handle is fully located. Insert the washer and fixing screw and tighten fully to ensure handle is secured, Fig.3.
Always hold the dripping pan handle in the highlighted zone marked "OK" in figure 4.
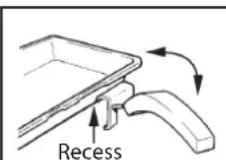
Fig. 1

Fig. 2

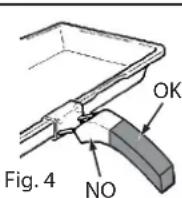
Always fit the screw prior to use.
The food to be cooked should be placed on the grill pan/grill pan food support.
Place the grill pan on the runners and push back to the stop position when the grill pan is correctly positioned beneath the grill element.
Plates and dishes placed on the floor of the grill compartment will be heated when the oven is in use.
Grill Compartment as a 'Hotcupboard'
Do not operate the grill control when using the compartment as a hotcupboard.
Do take care when removing plates, dishes and utensils from the grill compartment when the oven is in use as they may become quite hot.
You may need to use oven gloves when removing warmed items.
Grill Chart
Pre - heat the grill for 5 minutes on maximum control setting before grillino
GRILL CHART
| Food Grill Setting Approximate Cooking time | ||
| Toasting of Bread products | 6 | 3 |
| Small cuts of meat, sausages, bacon, etc. | 5-6 15 - 20 mins. | |
| Chops etc. Gammon steaks Chicken pieces | 5 | 20 - 25 mins. Wire food support used in up turned p osition for c hicken. |
| Fish: fingers Whole Fillets | 5 | 10 - 20 mins. Whole fish and fillets placed in the base of the grill pan. |
| Fish in breadcrumbs | 5 15 - 20 mins. | |
| Pre - Cooked potato products | 5 15 - 20 mins. | |
| Pizzas | 5 | 12 - 15 mins. in the base of the grill pan. |
| Browning of food | 6 | 8 - 10 mins. Dish placed directly on base of the grill pan and pan place d on the base of the grill compartment. |
The settings in the above guide have been developed to cook food successfully without excessive fat spitting and splashing.
Conventional Oven
Oven Control
Heating of the oven is achieved by turning control clockwise to the required oven temperature scale on the control panel, as recommended in the temperature charts. The pilot light will immediately come on and will then automatically go off and on during cooking as the oven thermostat maintains the correct temperature.
The cooking charts provided in this book are a guide only, giving approximate cooking temperatures and times. To suit personal taste and requirements, it may be necessary to increase or decrease temperatures by 10° C.
The oven is fitted with two rod shelves. The oven is heated by two tubular sheathed elements located under the floor of the oven and on the oven roof, inside the cavity. It should be noted that at the end of a cooking period there may be a momentary puff of steam when the oven door is opened. This will disperse in a few seconds and is a perfectly normal characteristic of an oven with a good door seal.
Oven Positions
The correct positioning of food is indicated in the temperature charts.
To prepare meat and poultry for roasting in your conventional oven.
(a) Wipe the joint, dry well with a clean cloth, kitchen tissue etc. and weigh it. Meat which has been stored in a refrigerator should be allowed to come to room temperature for approximately 30 minutes before cooking, and frozen meat or poultry must be completely defrosted before placing in the oven.
(b)The weight of any stuffing used should be added to the oven ready weight of the meat / poultry before calculating the cooking time.
(c) Place the joint in the meat pan supplied with your cooker. Small joints weighing less than 1.75kg (31/2 lbs) should be roasted in a smaller meat pan/tin - or they may be 'pot roasted' - a small joint in a large meat pan causes unnecessary oven splashing and evaporation of meat juices.
(d) Additional fat should not be added, except for veal, very lean meat or poultry which can either be 'larded' with fat bacon or brushed very sparingly with cooking oil or melted fat.
(e) Beef, lamb, mutton and poultry may be dusted lightly with seasoned flour to give a crisp outer surface. The skin of duck and goose should be pricked to release excess fat during cooking, and the rind of pork should be scored, brushed lightly with oil, and rubbed with salt, to give crisp crackling.
(f) Potatoes for roasting only require to be brushed with cooking oil or melted fat.
(g)It is not necessary to baste when roasting in an electric oven and stock or liquid should not be added to the meat pan since this only causes unnecessary soiling, steam and condensation.
For optimum cooking performance, there must be clearance between meat pan and oven sides. The meat pan must be placed lengthways in the oven to allow for air circulation.
Times and Temperatures for Roasting
The secret of succulent, tender meat, is not to roast it too quickly, at too high a temperature. Best results are obtained when roasting is carried out at a low temperature. When a lower temperature is used, the joint loses less weight, is more tender (too high a temperature causes meat to be tough and dry) and the splashing of fat onto the oven interior is reduced to a minimum. When a complete meal is being cooked in the oven, cooking time may need to be increased and temperature may need to be raised for approximately the last 30 minutes of the cooking period (for instance when cooking Yorkshire pudding to serve with roast beef). The suggested times and temperatures should be used as a guide, but may vary according to:-
-
Whether you prefer meat rare, medium or well done.
-
The size and shape of your joint.
(a) A short thick joint requires a longer cooking period than a long thin joint.
(b) A small joint under 1.5kg (3 lbs) takes longer per 450g (1 lb) cook in the time given for 'minutes' per 450g (1 lb) without the 'minutes' over added.
(c) Boned/rolled and stuffed joints take longer to cook through than those with a bone.
N.B.
Remember to switch off the oven control after cooking is finished. If the door of the oven is left open for long periods of time with the control switch ON, then the grill element will become hot. The correct positioning of food is indicated in the temperature charts.
Conventional Oven - Cooking Chart MEAT
Note: Where times are stated, they are approximate only.
| Conventional Oven | ||||
| Meat Pre- | heat | Temperature °C | Time (approx.) Position in Oven | |
| Beef Yes 190/200 | 25-30 mins per 450g (1lb) + 25 mins over. | In meat pan on runner 2 | ||
| Lamb Yes 190/200 | 25-30 mins per 450g (1lb) + 25 mins over. | |||
| Pork Yes 190/200 | 30-35 mins per 450g (1lb) + 30 mins over. | |||
| Veal Yes 190/200 | 25-35 mins per 450g (1lb) + 30 mins over. | |||
| Poultry/Game up to 4kg (8lb) | Yes | 80/190 | 18-20 mins per 450g (1lb) + 20 mins over. | |
| Turkey up to 5.5kg (12lb) | Yes190 | 22 mins per 450g (1lb) eg 5.5 kg (11lb) = 242 mins | Runner 3 from bottom of oven | |
| Turkey over 5.5kg (12lb) | Yes180 | 18 mins per 450g (1lb) eg 10 kg (22lb) = 352 mins | ||
| Casserole Cooking | Yes | 40/160 2-2 1⁄2 hrs | Runner 3 | |
If using aluminium foil, never:
- Allow foil to touch sides of oven.
- Cover oven interior with foil.
- Cover shelves with foil.
The most accurate method of testing the readiness of joints of meat or whole poultry is to insert a meat thermometer into the thickest part of a joint, or the thickest part of poultry thighs, during the cooking period. The meat thermometer will indicate when the required internal temp has been reached.
| Beef: | Rare: | 60°C | Lamb: | 80°C | Poultry: | 90°C |
| Medium: | 70°C | Pork: | 90°C | |||
| Well Done: | 75°C | Veal: | 75°C |
Conventional Oven - Cooking Chart BAKING
| Food | Conventional Oven Cooking | ||
| Pre-heat | Tempe rature and Time | Pos ition in Ove n from bottom | |
| Scones Yes 220/230°C | approx. 10-15 mins. Runners 1 & 4 | ||
| Small Cakes Yes 190/200°C | approx. 20-25 mins. Runners 1 & 4 | ||
| Victoria Sandwich Yes | 180/190°C 6 1/2 "-7" tins approx. 20 mins. 8"-8 1/2 " tins approx. 30 mins. | Runners 1 & 4 | |
| Sponge Sandwich (Fatless) | Yes 190/200°C 7" tins 15-20 mins. Runners 1 & 4 | ||
| Swiss Roll Yes 200/2 | 0°C approx. 10-15 mins. Runner 4 | ||
| Semi-rich Cakes | Yes | 160/170°C 61 1/2 -7" tins 1 1/4 " -1 1/2 " hours 8"-9" tins 2"-2 1/2 " hours | Runner 3 |
| Shortcrust Pastry | Yes | 200/210°C depending on use | Runners 2 & 5 |
| Puff Pastry | Yes | 200/210°C approx. depending on use | Runners 2 & 5 |
| Yorkshire Pudding | Yes | 210/220°C 45-50 mins. | Runner 5 |
| Individual Yorkshire Puddings | Yes 210/220°C approx. 20-25 mins. Runner 5 | ||
| Milk Pudding | Yes | 150/160°C approx. 2"-2 1/2 " hours | Runner 2 |
| Baked Custard | Yes | 150/160°C approx. 45-55 mins. Runner 2 | |
| Bread | Yes | 230°C 50-60 mins reducing to 210/220°C 230°C 45-50 mins after first 10 minutes | Runners 1 & 4 |
| Meringues | Yes | 100/110°C Large3 1/2 "-4 1/2 " hours Small 2 1/2 "-3" hours | Runner 2 |
Note:
If soft margarine is used for cake making, temperatures recommended by the manufacturers should be followed. Temperatures recommended in this chart refer to cakes made with block margarine or butter only.
Using the Main Oven for Other Functions
'S'
SLOW Setting
This is used for slow cooking, keeping food warm and warming plates for short periods. Extra care should be taken when warming bone china, as it may be damaged in a hot oven.
DO NOT place food or plates directly on the oven floor as this could damage both the oven lining and the plates which are being warmed.
Advantages of "SLOW" cooking are:
The oven stays cleaner because there is less splashing.
Timing of food is not as critical, so there is less fear of overcooking.
Inexpensive joints of meat are tenderised.
Fully loading the oven can be economical.
Cooking times can be extended in some cases by up to 2 hours.
Operation:
- Place the prepared food in the main oven and ensure the door is fully closed.
- Select 'S' (Slow Cooking Temperature) by turning the Main Oven Control clockwise ensuring the oven door is fully closed.
Storage and re-heating of food:
- If food is to be frozen or not used immediately, place it in a clean container and cool as soon as possible.
- Always thaw frozen food completely in the refrigerator before re-heating.
- Always reheat food thoroughly and ensure it is piping hot before serving.
- Only re-heat food once.
Points to consider when preparing food for "SLOW" cooking:
- Make sure that the dishes to be used will fit into the oven ensuring enough room for air to circulate.
- All dishes cooked on the slow setting will require a minimum of 6 hours, however, if they are cooked for 1 -2 hours longer then deterioration in their appearance may be noticed.
- Never cook joints of meat over 2.7kg (6 lb) or poultry over 2.0kg (4lb 8oz).
We do not recommend that joints of meat or poultry are stuffed before cooking on the slow setting.
- To seal in the meat juices, always cook meat or poultry at 170° C for 30 minutes before wrapping in foil and placing on a rack over a tin (to allow good air circulation) before turning the control to the slow setting and cooking immediately.
- Always ensure that joints of pork and poultry are thoroughly cooked by checking with a meat thermometer before serving.
- Always thaw frozen foods completely before cooking. We do not recommend placing frozen food in the oven to cook.
- Always bring soups, liquids and casseroles to the boil before placing in the oven.
- Ensure that casserole dishes have a good seal (not airtight) and cover to the top with foil to prevent loss of moisture.
- Ensure that fruit and vegetables are cut into even sized small pieces to cook properly.
- Always adjust seasoning before serving.
- If using dried red kidney beans it is important that the beans are soaked and then boiled for a minimum of 10 minutes before using in any dish to destroy any toxins.
- When cooking fish or egg dishes it may be necessary to check during cooking to avoid overcooking.
Care and Cleaning
| Electric sealed hotplates | The cleaning of sealed hotplates should be done when they are cold, using a soap filled Brillo pad, following the grain of the hotplate. This will ensure that any stubborn, burnt on spillages are removed. Wipe over with a damp clean cloth, making sure that all the cleaner has been removed. Finally, turn on hotplate to warm for a few minutes, then smear with a little cooking oil to provide a protective coating, or the restorative agent Homecare Four Hob, available from our spares department or leading supermarkets. The bezels will mellow with use to a burnished gold colour, a soap filled Brillo pad will help to keep them bright, care should be taken not to damage the vitreous enamel hob surface.Note: We do not recommend the use of decorative covers over the hot hotplates as these can hold condensation and cause corrosion. Accidental operation with a cover in place can cause intense heat. Never place saucepan lids on the hotplates, as this may cause corrosion. |
| Grill | Remove the grill pan and the wire grid food support, it is best to wash these items immediately after use to prevent stains from being burnt on when used again. Wipe out the Grill compartment, use a fine steel wool soap pad to remove stubborn stains from the grill runners and the floor of the compartment. Wipe over the control panel with a damp cloth and polish with a dry cloth. |
| Control Panel | Do not use cream cleaners, oven cleaners or aerosols, scouring pads or abrasive powder for cleaning the plastic knobs as damage will occur. |
| Decorative Trims | It is advisable to clean the decorative trims regularly to prevent any build up of soiling. The recommended method of cleaning is to wipe over the trims with a soft cloth wrung out in warm water or mild non-abrasive cleaner. (If in doubt try the cleaner on a small area of trim which is not noticeable in normal use). Then, after wiping with a cloth wrung out in clear water, dry with a soft clean cloth. |
| Doors | Wipe over the outer door glass panels with a cloth wrung out in warm soapy water, then after wiping with a cloth wrung out in clear water, dry with a soft clean cloth.Ensure that glass doors are not subjected to any sharp mechanical blows.Glass Inner Door Panel (where fitted) – open the door fully and unscrew the two screws securing the glass panel, taking care not to allow the glass to fall. The glass panel may now be washed at the sink. Stubborn stains can be removed by using a fine steel wool soap pad.Ensure the glass panel is not subjected to any sharp mechanical blows. Take particular care not to damage the inner surface which is coated with a heat reflective layer. After cleaning, rinse and dry with a soft cloth. For slight soiling the inner glass panel may be cleaned, while still warm, without removing it from the door.Warning: Oven must not be operated with inner door glass removed.Take care during cleaning not to damage or distort the door seals. Do not lift the door seal from the oven chassis, if necessary remove the seal by carefully unhooking the corner clips.Take care that the rating label edges are not lifted during cleaning, and furthermore that the lettering is not blurred or removed. |
| Ovens | Remove the rod shelves and grill pan. Use a fine steel wool soap pad to remove stubborn stains from the rod shelves, grill pan and the floor of the oven. |
| Oven Shelf Supports | The shelf supports are removable and dishwasher safe.To remove hold the support at the front and pull away from the oven side, this can then be cleaned in a sink or a dishwasher. When removed it allows access to the oven side, which can be cleaned with warm soapy water.To refit the support, insert the longer leg into the rear fixing hole and push in the front leg. |
| Oven Lamp Replacement | Open the oven door and remove the rod shelves. Using a suitable cloth to protect the fingers grip the light glass dome, unscrew anti-clockwise and lift. Reach into the aperture with fingers, and unscrew the lamp anticlockwise. Fit replacement lamp (25W 300°C rated SES), refit dome. |
WARNING: To avoid electric shocks - please ensure that the electricity supply to the appliance is switched off and the appliance is fully cold, before removing the lamp lens.
Cooking Results Not Satisfactory?
| Problem Check | |
| GrillingUneven cooking front to back | Ensure that the grill pan is positioned centrally below the grill element. |
| Fat splattering Ensure that | at the grill is not set to too high a temperature. |
| Oven BakingUneven rising of cake | Ensure that the oven shelves are level by using a spirit level on the rod shelf and adjusting, using suitable packing e.g. wood, under the feet of the appliance. This should be checked both left to right and front to back. Ensure that the food is positioned centrally in the oven. |
| Sinking of cakes The following may cause cakes to sink:1. Cooking at too high a temperature.2. Using normal creaming method with soft margarine. | |
| Over/Under cooking Fast/Slow cooking | Refer to the cooking times and temperatures given in the oven temperature charts, however, it may be necessary to increase or decrease temperatures by 10°C to suit personal taste.Do not use utensils greater than 2 1/4 ins in height. |
| Uneven cooking of cakes | 1. Too large baking sheet used. (See 'Cookery Notes')2. Over loading of oven and always ensure even air gaps around baking tins. |
| Uneven rising of cake Ensure that the shelf is level (see above) and that the food is positioned centrally in the oven. | |
| Food is taking too long to cook | Only cook one item at a time to avoid overloading the oven. |
Something Wrong with your Cooker?
Before contacting your nearest Service Centre/Installer, check the problem guide below; there may be nothing wrong with your cooker.
| Problem | |
| Slight odour or small amount of smoke when using the cooker for the first time. | This is normal and should cease after a short period. |
| Nothing Works Is the main cooker | wall switch turned on?There may be no electricity supply. |
| Oven temperature seems too high or too low. | Check that the temperature has been set in accordance with the temperature charts. It may be necessary to increase or decrease the recommended temperature by up to 10°C to suit your taste. |
| Oven does not cook evenly. Check that the temperature and shelf position are as recommended in the temperature charts.Check that the containers being used in the oven allow sufficient air flow around them.Check that the cooker is level. | |
| Hotplates are slow to boil or will not simmer | Check that your pans conform to the recommendations in these instructions. |
| Marks appearing on hotplates.Can not clean hob / hotplates. | The hob surround can be cleaned with warm soapy water and a cream cleaner, such as Cif. The sealed hotplates should be cleaned regularly, (please refer to the Care and Cleaning section for further information. Please note that replacement hob cleaning kits are available from our parts department, see Key Contacts, back page. |
| Grill not working. The grill door MUST be open. | |
| Grill keeps turning on and off. When the grill control is operated at a setting less than maximum, this is normal regulator operation, not a fault. | |
| Condensation on the wall at the rear of the cooker. | Steam and/or condensation may appear from the vent at the rear of the appliance when using an oven particularly for foods with a high water content e.g. frozen chips, roast chicken etc. This is normal and any excess should be wiped off. |
| Steam / Condensation in the oven after use. | Steam is a by-product of cooking any food with a high water content. To help minimise always:a) Try to avoid leaving food in the oven to cool after being cooked.b) Use a covered container, wherever possible |
Technical Characteristics
Main Oven
Dimensions (HxWxD): 34x39x44 cm
Volume: 58 Litres
Max. Oven Power Absorption: 1950 W
Voltage and Frequency
240V\~50/60Hz
ENERGY LABEL
Directive 2002/40/EC on the label of electric ovens
Norm EN 50304
Declared energy consumption for Natural convection Class
heating mode: Convectional
If It Still Won't Work...
Contact the Service Office (0870 6070805)
If something is still wrong with your appliance after you have been through the 'Something Wrong' list:
- Switch off and unplug the appliance from the mains.
- Call your nearest Service Office or local importer.
When you contact us we will want to know the following:
- Your name, address and postcode.
- Your telephone number.
- Clear and concise details of the fault.
- The Model number and the Serial number of your appliance.
- The date of purchase (please keep the receipt as evidence will be required when an engineer calls) enter the date here:
Please make sure you have all these details ready when you call.
Spare Parts
Please remember your new appliance is a complex piece of equipment.
'DIY' repairs or unqualified and untrained service people may put you in danger, could damage the appliance and might mean you lose cover under the Parts Guarantee.
If you do experience a problem with the appliance don't take risks, call in our Service Engineer. Our Parts are designed exclusively to fit your appliance. Do not use them for any other purpose as you may create a safety hazard.
Disposal of your product
To minimise the risk of injury to children please dispose of your product carefully and safely. Remove all doors and lids. Remove the mains cable (where fitted) by cutting off flush with the appliance and always ensure that no plug is left in a condition where it could be connected to the electricity supply.
To help the environment, Local Authority instructions should be followed for the disposal of your product.
This appliance conforms to the following EEC Directives:
Electromagnetic Compatibility Low Voltage Equipment
89/336/EEC 73/23/EEC
92/31/EEC 93/68/EEC
93/68/EEC


The European Directive 2002/96/EC on Waste Electrical and Electronic Equipment (WEEE), requires that old household electrical appliances must not be disposed of in the normal unsorted municipal waste stream. Old appliances must be collected separately in order to optimise the recovery and recycling of the materials they contain and reduce the impact on human health and the environment. The crossed out “wheeled bin” symbol on the product reminds you of your obligation, that when you dispose of the appliance it must be separately collected.
Consumers should contact their local authority or retailer for information concerning the correct disposal of their old appliance.
Key Contacts
Repair Service and Information Desk
UK: 0870 6070805
(Open 8am to 5.30pm Mon - Fri
9am to 5pm Sat
and 10am to 4pm Sun
Closed Bank Holidays)
Note: Our operators will require the following information:-
Model Number:

Serial Number:

Extended Warranty
To join: UK 0870 442 7661
(Open 8 to 8 Mon-Sun)
Genuine Parts & Accessories Mail Order Hotline
To join: UK 0870 558 5850
(Open 8.30 to 5 Mon-Fri and 8.30 to 12 Sat).
All Services are offered as an extra benefit and do not affect your statutory rights.

indesit
Indesit Company UK Ltd, Morley Way, Peterborough, PE2 9JB

- 50CM FREE STANDING ELECTRIC COOKER
- CONTENTS
- INTRODUCTION
- WHEN THE COOKER IS FIRST USED AN ODOUR MAY BE EMITTED, THIS WILL CEASE AFTER A PERIOD OF USE
- INSTALLATION
- NOTE: THIS APPLIANCE MUST NOT BE FITTED ON A PLATFORM
- SAFETY INFORMATION
- ALWAYS
- NEVER
- SAFETY ADVICE IN CASE OF A CHIP-PAN FIRE
- FEATURES
- CONTROL PANEL
- CONTROL KNOBS
- OPERATING THE CONTROL WHEN THE GRILL IS IN USE
- SLOW COOKING 'S
- TIMER
- USE OF HOTPLATES
- NOTE
- HOTPLATES GENERAL INFORMATION NOTES
- CONTROL SETTINGS GUIDE
- SAFETY
- REQUIREMENTS
- FOR DEEP FAT FRYING
- THE BEST COMBINATIONS
- DO NOT
- CHOOSING YOUR UTENSILS
- GRILLING
- GRILL PAN HANDLE
- FIXING THE GRILL PAN HANDLE
- GRILL COMPARTMENT AS A 'HOTCUPBOARD
- GRILL CHART
- CONVENTIONAL OVEN
- OVEN CONTROL
- OVEN POSITIONS
- TIMES AND TEMPERATURES FOR ROASTING
- N.B
- CONVENTIONAL OVEN - COOKING CHART MEAT
- IF USING ALUMINIUM FOIL, NEVER
- CONVENTIONAL OVEN - COOKING CHART BAKING
- USING THE MAIN OVEN FOR OTHER FUNCTIONS
- S
- ADVANTAGES OF "SLOW" COOKING ARE
- OPERATION
- STORAGE AND RE-HEATING OF FOOD
- POINTS TO CONSIDER WHEN PREPARING FOOD FOR "SLOW" COOKING
- CARE AND CLEANING
- COOKING RESULTS NOT SATISFACTORY
- SOMETHING WRONG WITH YOUR COOKER
- TECHNICAL CHARACTERISTICS
- IF IT STILL WON'T WORK
- CONTACT THE SERVICE OFFICE (0870 6070805)
- SPARE PARTS
- DISPOSAL OF YOUR PRODUCT
- KEY CONTACTS
- REPAIR SERVICE AND INFORMATION DESK
- EXTENDED WARRANTY
- GENUINE PARTS & ACCESSORIES MAIL ORDER HOTLINE
Brand : INDESIT
Model : KD3E1MG
Category : Kitchen