AY11684 - Microscope Barska - Free user manual and instructions
Find the device manual for free AY11684 Barska in PDF.


| Product Type | Monocular Compound Microscope |
| Brand | Barska |
| Model | AY11684 |
| Magnification Range | 40x - 1000x (with oil immersion objective) |
| Eyepiece | WF10x, WF20x |
| Objective Lenses | 4x, 10x, 40x, 100x (oil immersion) |
| Illumination | LED, adjustable brightness |
| Power Source | 3 AA batteries (not included) or USB cable |
| Dimensions | 12.5 x 8 x 5.5 inches (approx.) |
| Weight | 2.8 lbs (approx.) |
| Stage | Double-layer mechanical stage with clips |
| Focusing | Coaxial coarse and fine focus knobs |
| Condenser | Abbe condenser with iris diaphragm |
| Maintenance | Clean lenses with lens paper; store in dry place |
| Safety | Keep away from children under 3; do not point at sun |
| Spare Parts | Replacement bulbs, objective lenses, eyepieces available |
| Warranty | Limited lifetime warranty |
Frequently Asked Questions - AY11684 Barska
User questions about AY11684 Barska
0 question about this device. Answer the ones you know or ask your own.
Ask a new question about this device
Download the instructions for your Microscope in PDF format for free! Find your manual AY11684 - Barska and take your electronic device back in hand. On this page are published all the documents necessary for the use of your device. AY11684 by Barska.
USER MANUAL AY11684 Barska
BARSKA warrants your microscope to be free from defects in materials and workmanship for one (1) year. BARSKA will repair or replace such product or part thereof which, upon inspection by BARSKA, is found to be defective in materials or workmanship. As a condition to the obligation of BARSKA to repair or replace such product, the product must be returned to BARSKA together with proof-of-purchase satisfactory to BARSKA.
The proper Return Merchandise Authorization Number (RMA) must be obtained from BARSKA in advance of return. Please e-mail info@barska.com or call 1.888.666.5769 for Return Merchandise Authorization number (RMA) before any returns. NOTE: All merchandise received without a valid RMA number will be returned to shipper at his/her own expense.
BARSKA products should be sent to the following address for warranty repairs. Products must be packed carefully and sturdily to prevent damage in transit, and returned freight prepaid to:
BARSKA
1721 WRIGHT AVE.
LA VERNE, CA 91750
For additional and updated information
please visit our website at www.barska.com
Please include all of the following when returning BARSKA products for service and/or replacement:
-
Please write your complete details (Name, Address, Telephone#, E-mail address, RMA#, etc.)
-
Purchase receipt or Proof of Purchase. (Original/Copy) 3. A brief explanation of the defect
-
A brief explanation of the defect.
-
A Check/Money Order for \$50.90
-
A CHECK/MONEY Order for \$50.00 to cover inspection, shipping and handling. *Please allow 6-8 weeks for delivery.
The customer shall be responsible for all costs of transportation and insurance, both to and from BARSKA, and shall be required to prepay such costs.
BARSKA shall use reasonable efforts to repair or replace any microscope covered by this warranty within 30 days of receipt. In the event repair or replacement shall require more than 30 days, BARSKA shall notify the customer accordingly. BARSKA reserves the right to replace any product which has been discontinued from its product line with a new product of comparable value and function.
This warranty shall be void and of no force of effect in the event a covered product has been modified in design or function, or subjected to abuse, misuse, mishandling or unauthorized repair. Further, product malfunction or deterioration due to normal wear is not covered by this warranty.
BARKA DISCLAIMS ANY WARRANTIES, EXPRESS OR IMPLIED, WHETHER OF MERCHANTABILITY OF FITNESS FOR A PARTICULAR USE, EXCEPT AS EXPRESSLY SET FORTH HEREIN. THE SOLE OBLIGATION OF BARKA UNDER THIS LIMITED WARRANTY SHALL BE TO REPAIR OR REPLACE THE COVERED PRODUCT. IN ACCORDANCE WITH THE TERMS SET FORTH HEREIN. BARKA EXPRESSLY DISCLAIMS ANY LOST PROFITS, GENERAL SPECIAL INDIRECT OR CONSEQUENTIAL DAMAGES WHICH MAY RESULT FROM BREACH OF ANY WARRANTY, OR ANY ARISING OUT OF THE USE OF THIS INFORMATION. THIS PROPERTY IS SOLD. ANY WARRANTIES WHICH ARE IMPLIED AND WHICH CANNOT BE DISCLAIMED SHALL BE LIMITED IN DURATION TO A TERM OF ONE YEAR FROM THE DATE OF ORIGINAL RETAIL PURCHASE.
Some states do not allow the exclusion or limitation of incidental or consequential damages or limitation on how long an implied warranty lasts, so the above limitations and exclusions may not apply to you.
This warranty gives you specific legal rights, and you may also have other rights which vary from state to state.
BARSKA reserves the right to modify or discontinue, without prior notice to you, any model or style microscope.
If warranty problems arise, or if you need assistance in using your microscope contact:
BARSKA Customer Service Department Tel. 1.888.666.6769 Fax, 909.445.8169 Monday-Friday 8:30AM-5:30PM PST or e-mail: service@barska.com
NOTE: This warranty is valid to U.S.A. customers who have purchased this product from an authorized BARSKA dealer in the U.S.A. This warranty is limited to the original purchaser and is not transferable.
BARSKA® Optics shall not be liable for any consequential, incidental and/or contingent damages whatsoever. We will not pay shipping, insurance or transportation charges from you to us, or any import fees, duties and or taxes. This warranty supersedes all previous BARSKA® Optics warranties.
BC-14
9) 20 | R5R5(3)
www.barska.com

BARSKA®
Digital Microscope Manual
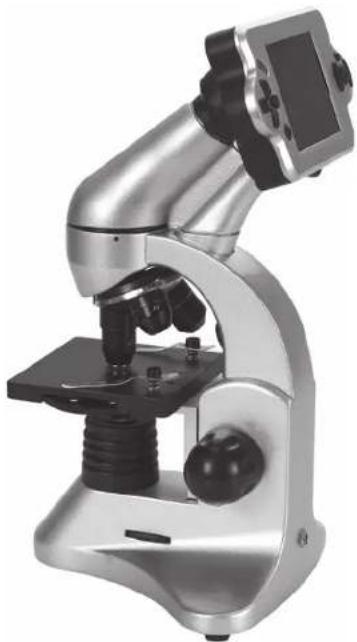
natural_image
Close-up of a metallic laboratory microscope with a mounted screen and tripod (no visible text or symbols)32x, 80x, 320x Magnifi cation with LCD screen 40x, 100x, 400x Magnifi cation with Eye piece
Accessories Included
- LCD Screen
- Eyepiece
- Slide Cutter
-
Hatchery
-
4 Specimen Samples
- 5 Prepared Slides
- 5 Blank Slides
-
Tweezers
-
Mini USB 2.0 Cable
- Plastic Dust Cover
- Carrying Case
BC208
www.barska.com
8/11
BARSKA
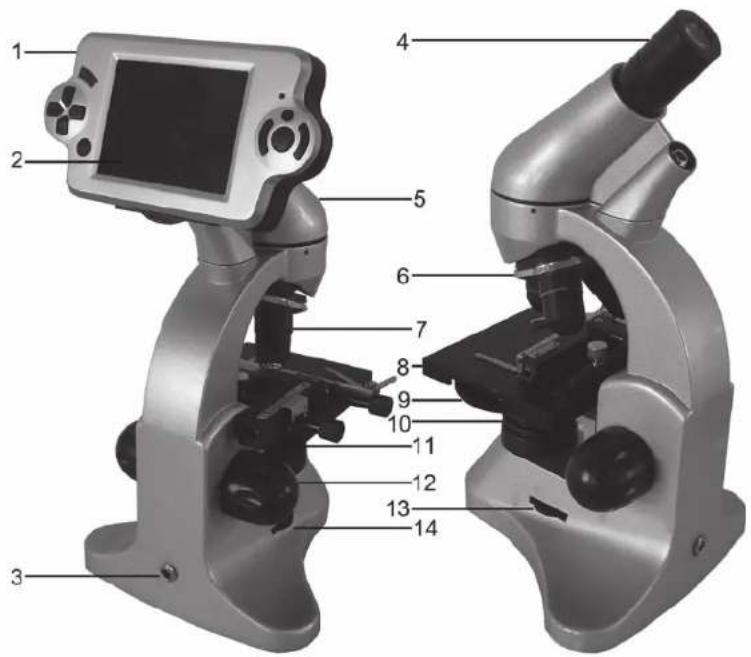
Farts of The Microscope
- Screen module
- LCD monitor
- Power connection
- Eyepiece
- Tube
δ. Lens turret - Objective
-
Microscope table
-
Color filter disc
- LED lighting (transmitted light)
- Stage
- Focusing wheel
- Switch for oblique lighting (top lighting)
- Switch for transmitted lighting (bottom lighting)
BARSKA
Initial Set Up The Microscope
- Carefully remove the microscope and parts from the carrying case and set them on a flat surface
- Remove the dust cover from the microscope.
- Decide if you want to view the specimen with the eyepiece or the LCD screen and carefully attach the appropriate viewing device to the tube of the microscope.
Eyepiece has magnifi cation of 40x,100x, 400: LCD screen has a magnifi cation of 32x, 80x, 320:
- Plug the small cable from the AC adapter into the socket on the back of the base. Power connection (220 V or 110V) is required for observations using the electrical LED lighting and the electronic LCD eyepiece (screen module). Insert the plug end of the AC adapter into the proper power source
Illumination
To get the sharpest and best views, the proper illumination or lighting must be chosen
Oblique Lighting
Or top lighting is normally for solid objects (not on a specimen slide) so light shine down onto the object.
Transmitted Lighting
Or bottom lighting is used for specimen slides where the light shines up through the hole in the stage through the slide.
Having both oblique and transmitted lights on at the same time can provide enough light for semi-transparent specimens.
The lighting switches are located near the base of the microscope on either side of the microscope. Adjust the level of brightness by turning the switch slide.
Using the Microscope with the LCD Screen
Carefully place the LCD screen into the tube of the microscope.
- Begin each observation at the lowest magnification. To adjust the positioning of the specimen move the microscope table, using the focusing wheel completely down and then turn the lens turret until it engages on the lowest magnification (the 4x-objective is vertical)
- Place specimen directly under the objective of the microscope stage and exactly above or below the illumination, if the specimen is on a microscope slide clamp it onto the stage of the microscope. For this, move the lever for the clamping mounting plate to the side, put the slide onto the stage and carefully allow the clamping mounting plate to return onto the prepared slide.
- Then switch on the LCD monitor, by pressing the power switch on the screen module; the red operating light will light up. Look at the LCD screen and adjust lighting and focusing wheel until the image is sharp. With the stage you can now center the object at the desired place on the LCD monitor.
- For higher magnification turn the lens turret to a higher setting (objectives 10x and 40x).
Votes: Before you change the objective setting, first move the microscope table fully downwards. This will avoid possible damage to the objective lens and to the slide.
The higher the magnifi cation, the more light is needed for a good image quality
Depending on the preparation in use, higher magnifi cation in individual cases will not lead to a better picture. The magnifi cation is altered by changing the objective. This alters the sharpness of the image which must be adjusted by the focusing wheel. Proceed here very carefully, if you raise the microscope table too quickly, the objective and the slides can touch each other and be damaged
-
The magnifi cation factor of the LCD eyepiece amounts to 10x. Ir combination with the 4x-objective we obtain a total magnifi cation o 40x, i.e. 1 mm of the object is shown as 40 mm on the LCD monitor. With the 10x objective we have a total magnifi cation of 100x correspondingly, with the 40x objective 400x.
-
To zoom in digitally, press the "up" or "down" arrow keys located on the right of screen. The digital magnification of the image can be zoom with set with a factor from 1 to 8.
Colored Wheel Filter Disc
The color wheel fi Iter disc is located beneath the microscope table helps you when viewing very bright or transparent specimens. For this please select the suitable color depending upon the object being observed. The components of colorless or transparent objects (e.g. grain containing starch, single-celled organisms) will be much easier to recognize. Filter colors are violet, yellow, light green, green and blue.
Icons On the LCD Screen
If you switch on the LCD monitor, you will see the live image of your object as well as three different displays.
- Lower right is the remaining internal storage capacity of the screen module available for image files and showing picture's resolution above it. Quality: Fine (★★★), Standard(★★) and Economy(★)
- At the top right hand corner, is a camera symbol. (photographic mode or video mode)
Taking Photos
To take a photo of the image being viewed press the photo button. A snapshot of the image is taken and saved.
Photograph Management
By pressing "MODE" again you change from video record mode to photo management mode. You can see the photos and videos. By pressing "LEFT" or "RIGHT", you can select a required picture or video. By pressing "MODE" you can return to live image.
By pressing the "MENU" button while displaying the picture (video), a menu bar appears, which you can control using the appropriate arrow keys.
Here you can also change certain settings and bring them into force by pressing the "OK" input key.
BARSKA®
Menu Functions
Delete. By pressing "OK", you can select Single (delete selected image fi le), All (delete all image fi les) or Select (you can delete the on you want to)
Copy to Card
Slide show
Protect (writing and delete protection for image fi le). By pressing "OK" you can select Single (protect selected image fi le), All (protect al image fi les) or Select (the one you want to protect);
Image Capture Settings
By pressing the "MENU" button while displaying the live image a menu bar appears, which you can control using the appropriate arrow keys. Here you can also change settings and bring them into force by pressing the "OK" input key. Overview of the menu
| Picture Resolution or Size | Number of Pixels Width x Height |
| 12M | 4023x3024 |
| 8M | 3264x2448 |
| 5M | 2560x1290 |
| 3M | 2048 x 1536 |
| 2M | 1600 x 1200 |
| 1.3M | 1280 x 1024 |
| VGA | 640 x 480 |
Quality: Fine (★★★), Standard(★★), Economy(★).
EV: you can select EV from -2.0----+2.0
White Balance. Auto for the default
ISO: Auto for the default
Color: Standard, Vivid, Sepia, Monochrome.
Saturation: Normal, High, Low
Sharpness: Normal, Normal, Soft.
BARSKA
Time Stamp: OFF, Date only (can show the date on the picture or video) Date & Time (can show the date and time on the picture or video).
Camera Settings
By pressing the "MENU" button while displaying the live image a menu bar appears, which you can control using the appropriate arrow keys. Then by pressing the "RIGHT" button, you can setup the camera setting.
Format: Execute (warning: all the files will be lost), Cancel
Language: There are 9 kinds of languages. The default is English.
Auto off: 1Min, 3Min, 5Min, ofl
Sys. Reset: Execute (warning: all the setting will be to the default), Cancel.
Light Freq: 60HZ, 50HZ
TV Output: NTSC, PAL
Date Input: Off, Set
USB: PC Cam, Disk Drive, Printer
Recording Video
By pressing button "MODE" in the photographic mode during live image display, a symbol of a movie camera appears on the top left and on the right beneath the volume of free internal storage capacity for photographs. You take the photograph with the "SNAP" photograph button, by renewed pressing of this button you terminate it. During the photograph the movie camera symbol blinks and the current time of the photograph is indicated. You can set sizes of QVGA(320 x 240) or VGA(640 x 480) in the menu, with the "menu" and the "OK" buttons. Furthermore with "EV" the same picture effects can be selected as with photos.
BARSKA®
System Requirements
for USB Connection / Memory Card Use
- Windows operating system (Window XP or Windows Vista)
- USB connection
- Media program
(e.g. Image processing program, program for playing fi lms - Memory card
- Memory card reader
Image Output and Storage
The LCD Screen offers you three possibilities for image output and storage: Directly on the screen, on an SD memory card (NOT included) or through the USB cable.
1. LCD Screen
You can view the image directly on the LCD screen. The screen has an internal storage capacity of 128 MB for your photographs.
2. SD Memory Card (NOT included)
You can store your photographs on an SD memory card (SD, Secure Digital) (NOT included). The memory card slot of the LCD Screen is located on the bottom of the screen beside the USB connection. To use, push the memory card, with the contacts at the front, into the slot, until they engage with a faint click. If the installation is correct, a memory card symbol appears above on the LCD monitor. To remove the SD card press and release the memory card, which after a faint click, can be taken out of the slot. Your photographs are now transportable.
3. USB Cable
If you connect your microscope to the PC using the included USB cable, you can transfer the photographs to the PC through the USB cable. The USB connection of the LCD Screen is located on the bottom of the screen module beside the memory card slot. Insert the smaller plug of the USB cable into the socket on the microscope and the larger plug into a free USB port in your computer. After a successful USB connection, the computer's operating system will recognize new hardware and then two new drive assemblies will be initialized.
These are marked as "removable data carrier e" and "removable data carrier f", the letters vary depending upon the number of drive assemblies in your computer. They are made available on the work station, as well as in Windows Explorer. The fi rst drive assembly
BARSKA
recognized (e:) is the internal memory of the screen module. The second (f:) contains – if a memory card is inserted – the contents of the card.
Caution: When taking a photograph, no USB connection between PC and microscope may exist. Before you interrupt the USB connection or switch the screen module off, you must remove or eject the screen module (removable data carrier e:) in the PC with the help of the hardware assistant and "deactivate" the card drive assembly (removable data carrier f:) ! If the drive assemblies are not deactivated, the PC might "crash" or there may be a loss of data.
Using the Microscope with the Eyepiece
- Remove the LCD eyepiece from the tube and carefully place the eyepiece into the microscope tube.
- Place specimen directly under the objective of the microscope stage and exactly above or below the illumination if the specimen is on a microscope slide clamp it onto the stage of the microscope. For this, move the lever for the clamping mounting plate to the side, put the slide onto the stage and carefully allow the clamping mounting plate to return onto the prepared slide.
- After you have set up the microscope with the corresponding illumination, look through the eyepiece.
- Begin each observation at the lowest magnification. Use the 4> Objective Lens by rotating the Objective Lens Turret so that the 4x Objective Lens is aiming at the center of the Stage (when it is in the proper position it will click into place). The 4x Objective Lens will give a 40x (40 power) view with the 10x Eyepiece. Final Power is calculated by multiplying the Objective Lens Power by the Eyepiece Power (e.g., 4 × 10 = 40 ).
- Focus the microscope by slowly turning the Focusing Knob, until an image forms in the Eyepiece.
- To increase magnification, rotate the Objective Lens Turret to center the 10x Objective Lens over the specimen for 100x, or the 40x Objective Lens for 400x, or change the eyepiece from 10x to 16x. When using higher magnifications focusing becomes more critical and the objective lens will come closer to the specimen in order to reach focus. Don't let the lens touch the slide as you may break the slide and damage the lens.
BARSKA®
Colored Wheel Filter Disc
The color wheel fi Iter disc is located beneath the microscope table helps you when viewing very bright or transparent specimens. For this please select the suitable color depending upon the object being observed. The components of colorless or transparent objects (e.g. grain containing starch, single-celled organisms) will be much easier to recognize. Filter colors are violet, yellow, light green, green and blue.
Care and maintenance
The microscope is a precision optical instrument and should be treated with care at all times. Follow these care and maintenance suggestions and your microscope will need very little maintenance throughout its lifetime.
- Turn off the illuminator switch
- Unplug the power cord
- Carefully remove viewing instrument (screen or eyepiece) from the body of the microscope
- Make sure that dust or moisture do not come into contact with your microscope
- Be very careful if using your microscope in direct sun light to prevent damage to the microscope or your eyes
- When moving your microscope, carry it by the "arm" with one hand and not by the focuser knob, monitor, etc. Then, place put your other hand under the base for support
- Always unplug any cords before cleaning and clean the outside surfaces (metal and plastics) with a moist cloth
- Remove dust with a camel's hair brush or an air blower from optical surfaces
- Never clean optical surfaces with cloth or paper towels as they can scratch optical surfaces easily
BARSKA
- To clean fi ingerprints off of optical surfaces, use a lens cleaning agen and lens tissue available at most retail photo stores and when cleaning do not rub in circles as this may cause sleeks or scratches to occur
- Never disassemble or clean internal optical surfaces. This should be done by qualified technicians at the factory or other authorized repair facilities
- When handling glass specimen slides, use care as the edges may be sharp
- Remove any specimens left on the stage
- After usage, place the dust cover over the microscope and stow the microscope and accessories in their correct place in the carrying case
- Store the microscope in a dry, cool clean place
For more microscopes visit
www.barska.co
- BARSKA®
- Digital Microscope Manual
- Accessories Included
- BARSKA
- Farts of The Microscope
- Initial Set Up The Microscope
- Illumination
- Using the Microscope with the LCD Screen
- Colored Wheel Filter Disc
- Icons On the LCD Screen
- Taking Photos
- Photograph Management
- Menu Functions
- Image Capture Settings
- Camera Settings
- Recording Video
- System Requirements
- Image Output and Storage
- LCD Screen
- SD Memory Card (NOT included)
- USB Cable
- Using the Microscope with the Eyepiece
- Care and maintenance
Brand : Barska
Model : AY11684
Category : Microscope