
NVR-806VRBUC - DJ Equipment NEVIR - Free user manual and instructions
Find the device manual for free NVR-806VRBUC NEVIR in PDF.


| Product Type | DJ Equipment (Turntable with CD, FM Radio, Bluetooth, USB, AUX) |
| Model | NVR-806VRBUC |
| Brand | Nevir |
| Dimensions (W x H x D) | 400 x 223 x 300 mm |
| Net Weight | 5.4 kg |
| Power Supply | AC Adapter 5V, 2000mAh |
| Power Consumption | 10W |
| Audio Output Power | 2 x 5 Watts (Stereo) |
| Radio Frequency Coverage | FM 88 - 108 MHz |
| CD Player Frequency Response | 100 Hz - 16 kHz |
| Bluetooth Version | 2.1 |
| Bluetooth Profiles | A2DP, AVRCP |
| Bluetooth Range | Up to 10 m (line of sight) |
| Turntable Speeds | 33, 45, 78 RPM |
| Turntable Drive | Belt drive (implied by manual) |
| USB Playback | MP3, WMA files |
| USB Recording | From CD, Phono, FM, AUX (not Bluetooth) |
| AUX Input | Yes (RCA jacks on rear) |
| Remote Control Battery | CR2025 3V Lithium Cell (included) |
| Laser Safety Classification | Class 1 Laser Product |
| Ventilation Clearance | Minimum 15 cm (6 inches) around unit |
Frequently Asked Questions - NVR-806VRBUC NEVIR
User questions about NVR-806VRBUC NEVIR
0 question about this device. Answer the ones you know or ask your own.
Ask a new question about this device
Download the instructions for your DJ Equipment in PDF format for free! Find your manual NVR-806VRBUC - NEVIR and take your electronic device back in hand. On this page are published all the documents necessary for the use of your device. NVR-806VRBUC by NEVIR.
USER MANUAL NVR-806VRBUC NEVIR
natural_image
Red portable radio with open lid and speaker grille (no visible text or symbols)

VISTA FRONTAL
natural_image
Hand holding a cable with a pen inserted, showing a directional arrow (no text or symbols)
natural_image
Close-up of a mechanical component with red and black parts, circled in a circle (no visible text or symbols)natural_image
Symbol of a trash bin with crossed lines indicating no waste or discharge, and a solid black rectangle below (no text or labels)natural_image
Red vintage wooden radio with open lid and speaker grille (no visible text or symbols)- OPERATING INSTRUCTIONS –
SAFETY PRECAUTIONS
* This product is designed for use in moderate climates. Do not use or install this unit where it would be exposed to direct sunlight or in extremely hot temperatures, or near a radiator, stove or appliance that produces heat.
* Do not take this unit into the bathroom, or near a swimming pool. Do not use it where it would expose to water, moisture, dripping or splashing.
* No objects filled with liquids, such as vases, should be placed on the product.
* No naked flame sources, such as candles, should be placed on the product.
* If water gets inside the unit. Unplug the power cord from the supply socket and consult your dealer.
* Do not handle the power cord with wet hands. To avoid electric shock, NEVER touch any internal parts. Repairs/Servicing should be left too a qualified service person.
* When connecting or disconnecting from the mains supply, hold the plug, not the cord. Pulling the cord may damage it and could be dangerous.
* Do not drop the unit, spill liquid into it or allow objects to fall in it.
* If the unit fails to operate, disconnect from the mains and consult a qualified service person.
* When plugged in, a very small current will flow. To save electricity and for safety when not using the unit for an extended period of time, it is recommended that the product is completely disconnected at the AC mains socket.
* Do not bend the cord sharply, pull or twist it.
* Do not modify the power cord in any manner.
* Do not insert any metallic object into the unit.
* Unplug the power cord when there is the possibility of lighting.
* In case of malfunction due to electrostatic discharge just reset the
product (reconnect of power source may be required) to resume normal operation.
We certify that the power supply is used as a device for disconnecting the power distribution network, which should stay easily accessible.

The lighting flash and arrow head within the triangle is warning sign alerting you of dangerous voltage inside the product
CAUTION
RISK OF ELECTRIC SHOCK DO NOT OPEN
CAUTION: TO REDUCE THE RISK OF ELECTRIC SHOCK DO NOT REMOVE COVER (OR BACK). NO USER SERVICIABLE PARTS INSIDE. REFER SERVICING TO QUALIFIED SERVICE PERSONNEL.

The exclamation point within the triangle is a warning sign alerting you of important instructions accompanying the product
POSITIONING THE UNIT
* A minimum distance of 6 INCHES “15cm” must be maintained to provide sufficient ventilation.
* Allow adequate ventilation for the unit. Ventilation should not be impeded by covering the ventilation openings with items such as newspapers, table cloths, curtains etc. Do not stand it on a thick pile carpet, or install it in a place with poor air flow.
* Place the unit on a flat even surface.
* Do not use the unit in excessively hot, cold, dusty, damp or humid place.
* Condensation may form inside the CD player if the unit is left anywhere warm and damp, or if you move the unit from somewhere cold (e.g. Your car boot) to a warm room. In this case, let the unit stand for 1-2 hours, or gradually increase the room temperature so the unit is dry before you use it.
* Do not place it where it could be subject to vibration.
* Do not place it where it could be magnetised by a magnet or speaker since there are magnets in the speakers, do not place tapes or magnetic cards on them as recorded data could be erased.
* When this unit is used near a TV, the TV picture could be distorted. If this happens, move the unit away from the TV. If this does not correct the situation, avoid using the unit when the TV is turned on.
* Keep the CD door closed so the lens is not contaminated by dust. Do not touch the lens.
SAFETY MECHANISM
This unit incorporates a safety interlock mechanism which switches the laser beam on and off, so that when the disc holder is open, the laser beam stops automatically.

CLASS I LASER PRODUCT
This set employs an optical laser beam system in the CD mechanism designed with built-in safeguards. Do not attempt to disassemble. Exposure to this invisible laser light beam may be harmful a human eye. This is a Class 1 laser product. Use of controls, adjustments or procedures other than those specified here in may result in hazardous laser light beam exposure. This compact disc player should not be adjusted or repaired by anyone except qualified service personnel. The laser mechanism in the set corresponds to the stylus (needle) of a record player. Although this product uses a laser pick-up lens, it is completely safe when operated according to directions.
LOCATION OF CONTROLS



FRONT VIEW
- Turntable Cover
- FM Radio Knob
- CD Open/Close Button
- Encoding Button
- EQ Button
- Repeat Button
- Mode Knob
(CD/PH/FM/AUX/BT/USB) - LED Display
- CD Door
- Volume Knob; Power ON/OFF
- Next Button
- PREV Button
- Stop Button
- Play/Pause Button
TOP VIEW
- Turntable
- 45 RPM Adaptor
- Control Perch
- Tone Arm
- Speed Control Switch
- Tone Arm Lock
- Turntable pickup
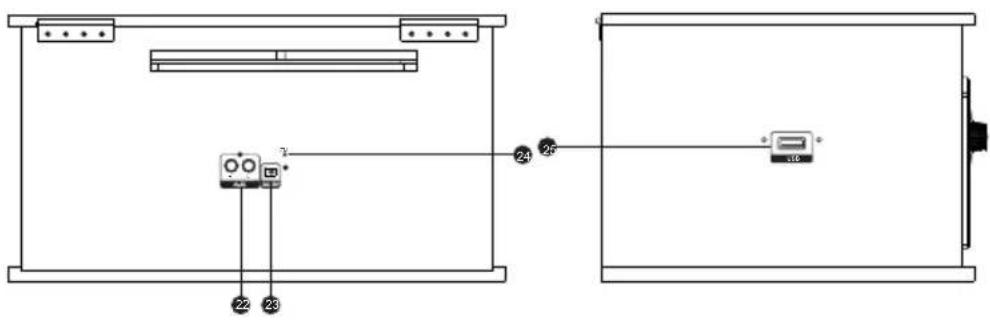
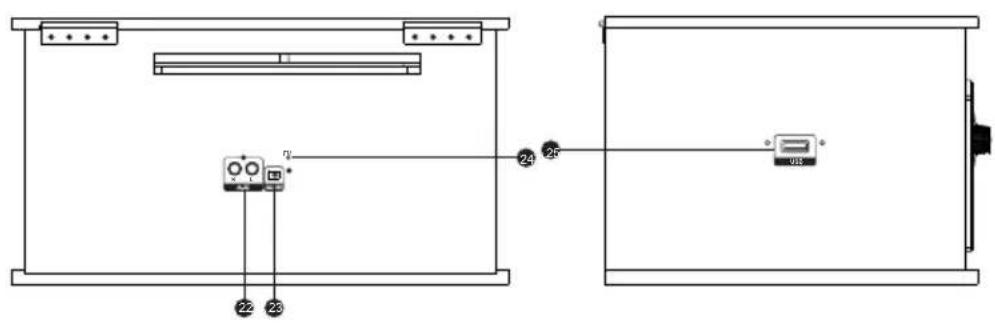
REAR VIEW
- AUX input
- DC IN port
USB SIDE VIEW
- USB play/USB encoding
LED DISPLAY

DESCRIPTION OF THE REMOTE CONTROL
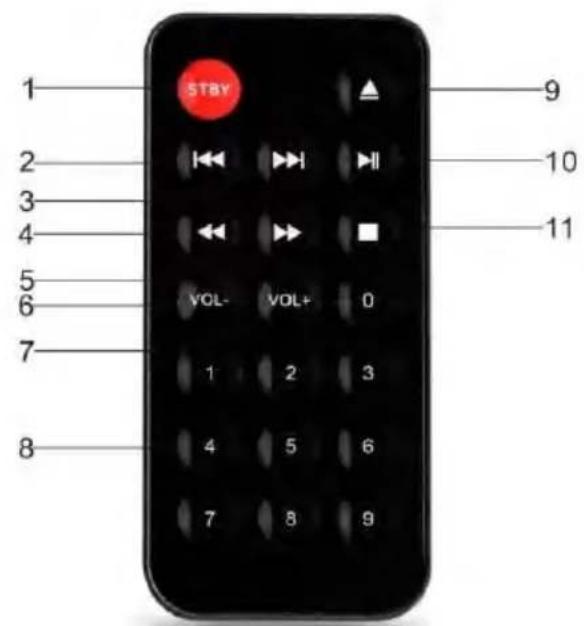
- STBY
- PREV
- NEXT
- PRE
- FWD
- VOL-
- VOL+
- NUMBER KEYS
- OPEN/CLOSE
- PLAY/PAUSE
- STOP
STBY (STANDBY)
- Press this button, the speaker are in stand-by mode.
- Press again to return its power on state.
NUMBER KEYS
- when in CD/USB mode, press the number to choose the number of the songs in the CD/USB device.
PREV
- Press this button, the system will choose previous song.
NEXT
- Press this button, the system will choose next song.
PRE
- Fast reverse playback under CD Mode. The available speed is 2X, 4X, 8X and normal speed.
FWD
- Fast forward playback under CD Mode. The available speed is 2X, 4X, 8X and normal speed.
VOL+/-
- To control volume up or down
PLAY/PAUSE
- Press this button, the system will play or pause.
OPEN/CLOSE
- Press this button to open or close the CD tray when under CD mode.
STOP
- Press this button to stop playing under CD/USB modes.
BATTERY INSTALLATION REMOTE CONTROL
-
Take off the protective paper on battery. Then install battery (1pc 3V Lithium Cell CR2025 included) in battery compartment to respect polarity.
-
For replace new battery, open the battery case when replace the battery. Insert new 1pc 3V Lithium Cell (CR2025).

Note : Keep within 5 meter range, 30 degree angle while aiming at the unit.
PREPARATION FOR USE
Carefully unpack the Main unit from its carton (do not attempt to connect anything at this stage).
You should have the following items:
Packing included
- Manual Book
- Main Unit
- AC adaptor
- RCA cable
- Remote Control
- Warranty Card
If any of these items are missing, consult your dealer. Keep any packaging in case you want to transport the main unit at some later date.
Connections
* Connect the AC Power cord to the AC outlet.
* Unwind the FM antenna.
Adjusting the sound
To adjust the sound, turn the Volume Knob located on the Right side of your system in any mode.
USING THE CD PLAYER
Loading CDs
-Switch ON/OFF button to ON position. Set the Mode Knob to the CD position.
- Press the OPEN/CLOSE button to open the CD door. Do not force open the CD door by hand at any time.
- Place the CD in the compartment with the label side facing upwards.
- Press OPEN/CLOS to Close the CD door.
Notes :
* Do not put anything other than a CD in the compartment. Other objects can damage the mechanism.
* Do not force open/close the CD door by hand at any time.
* Keep the CD door closed when not in use to prevent dirt and dust from getting into the mechanism.
* Never insert more than one CD at a time.
If a disc is deeply scratched or too dirty, it may not play.
Playing CDs
Press PLAY/PAUSE button to play/pause, when pause, LED screen will indicate II.
- Press Stop Button, will stop playing.
- To resume play, press the Play/Pause Button again.
- Press the Play/Pause Button again.
- Press the PREV/NEXT Button to enter into last/next songs.
USING THE TURNTABLE
- Switch ON/OFF button to ON position. Set the Mode Knob to the PH
(phonograph) position..
-Place the record on the turntable.
-Select the speed of record: 33, 45,
78rpm according to vinyl to played.
-Remove the stylus guard and push
the lift lever upward to raise the

natural_image
Hand holding a cable with a tool inserted, showing a directional arrow (no text or symbols)tone arm from the arm park, and then move the cartridge holder over the record gently, now the platter will run automatically .Then put down the lever, the tone arm would drop and touch record surface gently. Now users can enjoy their favorite songs.
-Push the arm lift lever up to raise the arm, now platter will still running but play will pause. To continue the play, user just need to put down the lever
How to replace the stylus
To replace the needle, please refer to the instructions below. Removing the needle form the cartridge
a. Place a screwdriver at the tip of the needle heads hell and push downwards in the direction shown in sketch "A"
b. Remove the needle head shell by pulling it forwards and pushing downwards.
Inserting the needle

natural_image
Close-up of a mechanical component with red and black parts, labeled C and B (no text or symbols on the main subject)Guide Pins (inside)

natural_image
Close-up of a mechanical component with red and black parts, circled in black (no visible text or symbols)c. Hold the tip of the needle head shell and insert it by pressing in the direction illustrated by "B"
d. Push the needle head shell upwards in the direction illustrated by "C" until the needle locks into the tip position.
Cleaning the Lens
A dirty lens will cause sound skipping and, if the lens is very dirty, the CD may not work.
USING THE FM RADIO
-Switch ON/OFF button to ON position.
-Set the Mode Knob to the FM position.
-Turn the FM radio Knob to select the channel you want.
Antenna
For best FM reception, extend the wire antenna located at the back of the unit.
Move it around until you get the best FM reception.
AUX-IN OPERATION
-Switch ON/OFF button to ON position.
-Set the Mode Knob to the AUX position..
-Connect the two ends of the included Audio cable to the LINE IN jack on the back of the speaker(white end into white slot, red end into red slot), and the other end of the cable to the output jack on your computer or mobile phone or tablet etc.
-Open a media player on your computer, mobile phone or tablet, and click on Play to start playing your music.
-Switch ON/OFF button to ON position.
-Set the Mode Knob to the BT (Bluetooth) position.
- The red BLUE will quickly flash in the LED screen.
- Keep the turntable and Bluetooth enable device within 3 feet of each other during the pairing process.
- Set your Bluetooth enable device to search for Bluetooth devices.
- When the Bluetooth enable device finds the turntable, select
NVR-806VRBUC from the list of the found devices.
- If required, enter the password 0000. Select OK or Yes to pair the two units.
- After a successful pairing, the red "BLUE" will solid in the LED screen.
USE USB FUNCTION
-Switch ON/OFF button to ON position.
-Set the Mode Knob to the USB position. Insert your USB flash disk.
Now users can enjoy their favorite songs. Songs could be in MP3, WMA format.
- The user could record the records from CD/PHONO/FM/AUX to USB flash disk. Bluetooth cannot be record.
- Insert USB flash disk under the CD/PH/FM/AUX mode, choose the track you want to record. Then pres ENCODING button, the "REC" will blink on the LED screen, it enter into ENCODE status. Press ENCODING button again to stop the record.
Note: When USB memory is full, the record will not stop automatically. To avoid the record missing, you may use the big memory USB disk. - Set the Mode Knob to the USB position, you could playback the records on USB flash disk.
TECHNICAL SPECIFICATIONS
| Power Supply AC adaptor | 5V 2000mAh |
| Power Consumption | 10W |
| Audio Output Power | 2 x 5 Watts |
| Unit Dimension | 400x223x300mm |
| Net Weight | 5.4kg |
Radio frequency coverage
FM 88 - 108 MHz
CD Player
Frequency Response 100Hz - 16 KHz
Bluetooth 2.1
- Bluetooth profiles: A2DP, AVRCP
- Bluetooth range: Line of sight, 10M or 30FT
Remarks: The manufacturer reserves the right to amend the specification without prior notice.

The symbol opposite indicates that the electric and electronic components are the subject of a selective collection, it represents a dustbin on wheels barred of a cross. The electric and electronic products can contain substances having negative effects on the environment and health. Worn, they should not be thrown with domestic waste but to be imperatively recovered in the selective collections: dump, associations of social economy and interdependent.
The selection of waste decreases the potential effects on the environment and
human health due to the substances dangerous which can compose certain components electric and electronic.
Take an active part: to remove you not from the apparatuses with domestic waste!
- VISTA FRONTAL
- SAFETY PRECAUTIONS
- We certify that the power supply is used as a device for disconnecting the power distribution network, which should stay easily accessible.
- CAUTION
- RISK OF ELECTRIC SHOCK DO NOT OPEN
- POSITIONING THE UNIT
- SAFETY MECHANISM
- CLASS I LASER PRODUCT
- LOCATION OF CONTROLS
- FRONT VIEW
- TOP VIEW
- REAR VIEW
- USB SIDE VIEW
- LED DISPLAY
- DESCRIPTION OF THE REMOTE CONTROL
- STBY (STANDBY)
- NUMBER KEYS
- PREV
- NEXT
- PRE
- FWD
- VOL+/-
- PLAY/PAUSE
- OPEN/CLOSE
- STOP
- BATTERY INSTALLATION REMOTE CONTROL
- PREPARATION FOR USE
- Packing included
- Connections
- Adjusting the sound
- USING THE CD PLAYER
- Loading CDs
- Notes :
- Playing CDs
- USING THE TURNTABLE
- How to replace the stylus
- Cleaning the Lens
- USING THE FM RADIO
- Antenna
- AUX-IN OPERATION
- USE USB FUNCTION
- TECHNICAL SPECIFICATIONS
- Radio frequency coverage
- CD Player
- Bluetooth 2.1
- Remarks: The manufacturer reserves the right to amend the specification without prior notice.
Brand : NEVIR
Model : NVR-806VRBUC
Category : DJ Equipment