
PCMX240I - Audio accessory Pyle - Free user manual and instructions
Find the device manual for free PCMX240I Pyle in PDF.


| Product Type | Dynamic Vocal Microphone |
| Brand | Pyle |
| Model | PCMX240I |
| Color | Black |
| Microphone Type | Dynamic |
| Polar Pattern | Cardioid |
| Frequency Response | 50 Hz - 15 kHz |
| Sensitivity | -54 dB ± 3 dB (1V/Pa at 1 kHz) |
| Impedance | 600 ohms (low impedance) |
| Connector | XLR (3-pin) |
| Cable Type | XLR to 1/4" (6.3mm) TS, 6 ft (1.8 m) |
| Dimensions (L x Diameter) | 6.5 in x 2 in (16.5 cm x 5 cm) |
| Weight | 0.5 lbs (227 g) |
| Power Source | No external power required |
| Features | On/Off switch, rugged metal construction, anti-feedback |
| Accessories Included | Microphone clip, cable, carrying pouch |
| Compatibility | Mixers, amplifiers, PA systems with XLR input |
| Care Instructions | Wipe with a dry cloth; avoid moisture; store in a dry place |
| Safety | Keep away from children; do not disassemble; avoid dropping |
| Spare Parts & Repairability | Contact Pyle customer service for replacement parts |
Frequently Asked Questions - PCMX240I Pyle
User questions about PCMX240I Pyle
0 question about this device. Answer the ones you know or ask your own.
Ask a new question about this device
Download the instructions for your Audio accessory in PDF format for free! Find your manual PCMX240I - Pyle and take your electronic device back in hand. On this page are published all the documents necessary for the use of your device. PCMX240I by Pyle.
USER MANUAL PCMX240I Pyle
Portable PA w/iPod Dock
www.pyleaudio.com

natural_image
Exterior view of a silver industrial testing device with control panel and handle (no visible text or symbols)QUICK SETUP GUIDE (ENGLISH)
- Make sure all items listed on the front of this guide are included in the box.
- READ SAFETY INSTRUCTION BOOKLET BEFORE USING THE PRODUCT.
- MAKE SURE THAT YOU HAVE COMPLETELY CHARGED THE BATTERY PRIOR TO FIRST USE FOR MAXIMUM BATTERY LIFE.
- Study this setup diagram.
- Place product in an appropriate position for operation.
- Make sure all input devices such as microphones, CD players, mp3 players, and linked amplifiers/PAs are turned off and volume settings are set at "zero"
- Connect all devices as shown above.
- Connect the stereo outputs to the power amplifier(s), tape decks, and/or audio sources.
- Switch everything on in the following order.
• audio input sources (i.e. microphones, instruments, CD/MP3 Players)
• last, any amplifiers
- When turning off, always reverse this operation by,
• turning off amplifiers
• last, any input devices

flowchart
graph TD
    A["Charger"] --> B["ON/OFF"]
    B --> C["CHARGE Pod"]
    C --> D["SOUND SYSTEM BATTERY LEVEL"]
    D --> E["LINK OUTPUT"]
    E --> F["Output"]
    G["Speaker"] --> H["Radio Head"]
    H --> I["Amplifier"]
    I --> J["Analog lamp"]
    J --> K["Analog microphone"]
    K --> L["Analog amplifier"]
    L --> M["Analog device with MIC1 Balanced Gain"]
    M --> N["Analog gainer"]
    N --> O["Analog amplifier"]
    O --> P["Analog voltmeter with Pin 2"]
    P --> Q["Analog voltmeter with Pin 3"]
    Q --> R["Analog output"]
    S["Cable sold separately"] --> T["OR"]
    T --> U["Guitar"]
DIAGRAM AND PARTS DESCRIPTION
-
Microphone 1 Balanced Input with Gain Control (1/4" and XLR): This jack can either take a 14 " balanced or a XLR balanced cable. An XLR Cable is included with the microphone.
-
Instrument/Microphone 2 Input with Gain Control (1/4"): This mono input accepts a 14 " input such as a microphone, guitar, or other musical instrument.
-
iPod/Auxiliary input with Gain Control (Stereo RCA): This knob controls the level of the iPod and the RCA input. This stereo


RCA input can be used to connect a CD, MP3, or other audio source. To connect to a portable device with a 1/8" headphone jack, you need a standard (1/8" to RCA) adapter which is NOT included.
- Master Volume Control: This knob controls the master volume.
- Power Adapter (IEC): Insert the included power cable here to charge the unit. Note that it can run off the power adapter while it simultaneously charges the battery. The charge indicator illuminates when the battery is charging.
- Voltage Selector: Set this to the correct voltage for your location standard.
- Power ON/OFF Switch
- iPod Charging Switch
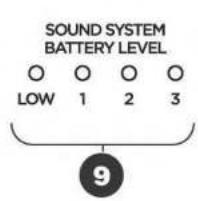
- Battery Level Indicator: While the unit is powered ON, these four lights indicate the power left in the battery. Battery life varies based on volume and usage.
- Link Output: This 14 " jack is a stereo line level output that can be connected to the stereo input of an amplifier or amplified loudspeaker such as another
IMPORTANT NOTES
Use this troubleshooting guide if: The sound is distorted at high volumes.
• Input is clipping: Try lowering the input gain or the volume control on your sound source or music instrument.
• Output is clipping: Lower the main volume level.
- There is too much bass: Try adjusting the tone or EQ control on your sound source to lower the bass level. This will allow you to play the music louder before clipping (distortion) occurs.
• The link cable: is being plugged into the instrument or MIC input instead of the RCA line input.
Important: With all large speakers, an initial "break-in" period is needed to perform at optimal levels. To properly "break-in", play an audio source at medium volume for a few hours.
SPECIFICATIONS
Input Voltage: AC 100-120V/60Hz 220-240V/50Hz
Output Wattage: (Peak) 400W
Output Wattage: (RMS) 15W, 1%THD
Frequency Response: 70Hz\~50kHz +/- 3dB
Bottom pole mount specifications: Standard Pole Mount found at professional audio retailer:
Depth 80mm (3.15")
Diameter 35.5mm (1.40")
Time required to fully charge : under 4 hours
Battery life: Over 12 hours* at full volume when fully charged.
*Note: Battery life may vary based on temperature, age, and volume usage of product.
Brand : Pyle
Model : PCMX240I
Category : Audio accessory