Lizard - Controller Tracer - Free user manual and instructions
Find the device manual for free Lizard Tracer in PDF.


| Product Type | Game Controller |
| Brand | Tracer |
| Model | Lizard |
| Compatible Platforms | PC (Windows XP, Vista, 7, 8, 10), PS3, Android (with OTG) |
| Connection Type | Wired USB (mini USB connector) |
| Operating Modes | D-input (Digital/Analog), X-input |
| Vibration Function | Yes (requires compatible game and driver) |
| LED Indicator | Yes, 2 LEDs for mode indication |
| Driver Installation | Required for PC (driver included) |
| Power Supply | Powered via USB connection (5V DC) |
| Dimensions | Approximately 15 x 10 x 5 cm |
| Weight | Approximately 200 g |
| Care and Cleaning | Wipe with a soft dry cloth; avoid liquids and abrasive cleaners |
| Safety Precautions | Avoid exposure to moisture, extreme temperatures, and impact. Do not disassemble. |
| Spare Parts and Repairability | No user-serviceable parts; contact Tracer support for issues. |
| General Information | Multifunctional controller for gaming on multiple platforms; includes mode switching and vibration support. |
Frequently Asked Questions - Lizard Tracer
For Windows, you may need to install the driver (refer to section 3.1 of the manual).
User questions about Lizard Tracer
0 question about this device. Answer the ones you know or ask your own.
Ask a new question about this device
Download the instructions for your Controller in PDF format for free! Find your manual Lizard - Tracer and take your electronic device back in hand. On this page are published all the documents necessary for the use of your device. Lizard by Tracer.
USER MANUAL Lizard Tracer
natural_image
Black handheld game controller with 'SELECT' and 'START' buttons, no visible text or symbols on the device itself.1. COMPATIBLE PLATFORM AND CONNECTION METHODS
1.1 PC
1 Compatible Version:
Microsoft Windows ^® XP, Vista, 7, 8, 10
2 Connection Method:
Connect Game Controller to PC via original USB cable (mini USB connector for Game Controller, USB for PC), LED indicator light should continue light, connect completed, game controller can be played normally.
1.2 PS3 Game Console
1.1.1 Compatible Version:
PS3 Game Console.
1.1.2 Connection Method:
Connect Game Controller to your PS3 game console via original USB cable (mini USB connector for Game Controller, USB for PS3), LED indicator light should continue light, connect completed.
NOTE: When play with PS3 Game Console, mode of game controller should be change to D-input mode (Mode change method, please refer to Clause 2.1 as shown below).
1.3 Android Device:
1.1.3 Compatible Version:
All Android Versions (Android device must support OTG function).
1.1.4 Connection Method:
Connect Game Controller to your Android device via original OTG cable (mini USB connector for Game Controller, the other one for your Android device), LED indicator light should continue light, connect completed.
NOTE: Android device must support OTG function.
2. MODE MATCHING AND CHANGE METHODS
2.1 D-input Mode
2.1.1 Apply to:
PS3 Game Console, PC games that support game controller (except XBOX360 games for PC).
2.1.2 Modes:
There are two modes under D-input Mode: Digital Mode, Analog Mode.
2.2 X-input Mode
2.2.1 Apply to:
XBOX 360 games for PC, Android devices.
2.3 Mode change
2.3.1 Power On:
Game Controller defaults to your last mode when power on.
2.3.2 Mode Change between D-input/X-input
Keep press "Mode" button 9 seconds for mode change between D-input and X-input. The 1st LED should flash 0.1 second, then keep light when mode change success.
Note: You can easy distinguish D-input Mode/X-input by short press "Mode" button (about 2 seconds): under D-input mode, 2nd LED light can be turn on/off. Under X-input mode, 2nd LED light cannot be turn on/off.
2.3.3 Mode change between Digital/Analog
When game controller is under D-input, short press (about 2 seconds) "Mode" button for Digital/Analog mode change.
Digital Mode: 1st LED keeps light
Analog Mode: 1st LED and 2nd LED keep light
Note: LED indicator light sorted from left-hand to right-hand.

3. DRIVER INSTALL & VIBRATION OF GAME (FOR PC ONLY)
3.1 Driver Install
Uncompress the original driver and install to PC
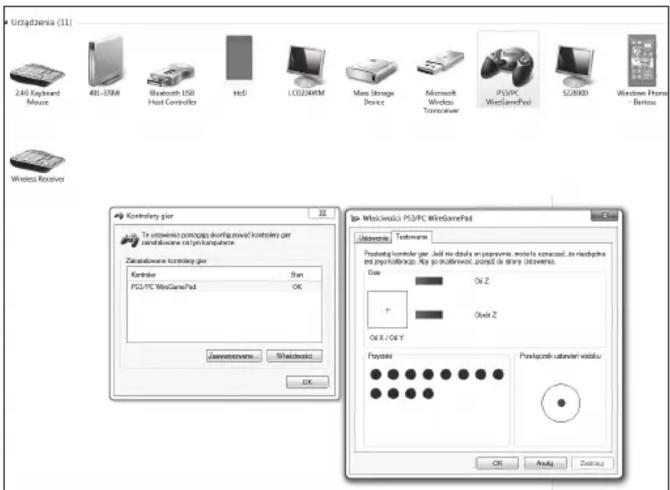
3.2 Driver Test
3.2.1 Test process(Use X-input mode in Win7 system as sample)
A. Enter into "Control panel" of your PC device
B. Enter into "Equipment and Printer"
C. Find the game controller icon, pitch up the icon via right-hand button, press "Game controller setting"
D. Press "Attribute" in the popup dialog, it should popup test dialog. Test can be started(as shown below)
3.3 VIBRATION OF GAME
a) Please confirm driver has been installed successful.
b) Please confirm the game support vibration
c) Please confirm the vibration function in game has been turn on.

(WEEE - ang. Waste Electrical and Electronic Equipment)


Brand : Tracer
Model : Lizard
Category : Controller