RM/481 - Iron Ramtons - Free user manual and instructions
Find the device manual for free RM/481 Ramtons in PDF.


| Product Type | Steam Iron |
| Brand | Ramtons |
| Model | RM/481 |
| Dimensions (approx) | 30 x 15 x 15 cm |
| Weight (approx) | 1.5 kg |
| Power Rating | 1500 W |
| Voltage | 220-240 V |
| Frequency | 50/60 Hz |
| Water Tank Capacity | 250 ml |
| Soleplate Material | Stainless Steel |
| Functions | Dry iron, steam iron, spray mist, self-clean |
| Temperature Control | Adjustable thermostat |
| Auto Shut-off | Yes (when left idle) |
| Anti-drip System | Yes |
| Anti-calc System | Yes |
| Cord Length (approx) | 2 m |
| Water Fill Opening | Large opening for easy filling |
| Accessories Included | Measuring cup |
| Cleaning | Use self-clean function; wipe soleplate with damp cloth |
| Maintenance | Descale regularly using a descaling agent |
Frequently Asked Questions - RM/481 Ramtons
User questions about RM/481 Ramtons
0 question about this device. Answer the ones you know or ask your own.
Ask a new question about this device
Download the instructions for your Iron in PDF format for free! Find your manual RM/481 - Ramtons and take your electronic device back in hand. On this page are published all the documents necessary for the use of your device. RM/481 by Ramtons.
USER MANUAL RM/481 Ramtons
STEAM IRON MODEL NO.: RM/481

natural_image
3D rendering of a white iron with black handle and metal screw, no visible text or symbolsINSTRUCTION MANUAL

IMPORTANT SAFETY INSTRUCTIONS
When using your flatiron, basic safety precautions should always be followed, including the following:
READ ALL INSTRUCTIONS BEFORE USING
- Use iron only for its intended use.
- To protect against a risk of electric shock, do not immerse the iron in water or other liquids.
- The iron should always be turned to "min". Before plugging or unplugging from outlet. Never yank cord to disconnect from outlet; instead, grasp plug and pull to disconnect.
- Do not allow cord to touch hot surfaces. Let iron cool completely before putting away. Loop cord loosely around iron when storing.
- Always disconnect iron from electrical outlet when filling with water or emptying and when not in use.
- Do not operate iron with a damaged cord or if the iron has been dropped or damaged. To avoid the risk of electric shock, do not disassemble the iron. Take it to a qualified serviceman for examination and repair. Incorrect reassembly can cause a risk of electric shock when the iron is used.
- Close supervision is necessary for any appliance being used by or near children. Do not leave iron unattended while connected or on an ironing board.
- Burns can occur from touching hot metal parts, hot water, or steam. Use caution when you turn a steam iron upside down – there may be hot water in the reservoir.
- If the malfunction indicator goes on, the flatiron is not operating normally. Disconnect from the power supply and have the flatiron serviced by qualified service personnel.
- The iron must be used and rested on a stable surface.
- The iron is not to be used if it has been dropped, if there are visible signs of damage or if it is leaking.
SPECIAL INSTRUCTIONS
-
To avoid a circuit overload, do not operate another high wattage appliance on the same circuit.
-
If an extension cord is absolutely necessary, a 10-ampere cord should be used. Cords rated for less amperage may overheat. Care should be taken to arrange the cord so that it cannot be pulled or tripped over.
SAVE THESE INSTRUCTIONS
More specifically:
DO NOT let children or untrained persons use the appliance without supervision.
NEVER immerse the iron, cable or plug in any liquid.
DO NOT leave the hot iron touching fabrics or very inflammable surfaces.
DO NOT leave the appliance unnecessarily plugged in. Disconnect the plug from the mains when the appliance is not being used.
NEVER touch the appliance with wet or damp hands.
DO NOT use the power cord or the appliance in order to pull the plug out of the socket.
DO NOT leave the appliance exposed to the weather (rain, sun, etc.).
DO NOT leave the iron without supervision when it is connected to the power supply.
DO NOT fill the reservoir with water before removing the plug from the socket.
PLEASE NOTE!
Do not use chemical additive, scented substances or decalcifiers. Failure to comply with the above-mentioned regulations leads to the loss of guarantee.
DESCRIPTION OF DEVICE

A. Plate with steam vents
C. Spray organ
E. Steam dial
G. Spray button
I. Top cover
K. Handle
M. Back cover
O. Thermostat knob
B. Plastic Skirt
D. Filler cap
F. Shot-steam button
H. Lampshade
J. Sleeving
L. Water Tank
N. Tank Board
P. Maximum filling level
GENERAL INSTRUCTIONS
When using the iron for the first time, you may notice a slight emission of smoke and hear some sounds made by the expanding plastics. This is quite normal and it
stops after a short time. We also recommend passing the iron over an ordinary cloth before using it for the first time.
PREPARATIONS
Soft the laundry to be ironed according to the international symbols on the garment label, or if this is missing, according to the type of fabric.
| GARMENTLABEL | FABRICTYPE | THERMOSTATREGULATION |
 | synthetic | ●low temperature |
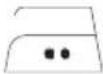 | silk - wool | ●●medium temperature |
 | Cotton - linen | ●●●high temperature |
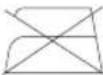 | Fabric not to be ironed | |
Start ironing the garments requiring a low temperature.
This reduces the waiting times (the iron takes less time to heat up than to cool down) and eliminates the risk of scorching the fabric.
220-240V 50/60Hz 2200W
STEAM IRONING
Filling the reservoir
- Check that the plug is disconnected from the socket.
- Move the steam knob E to "o" [Fig. 5].
- Open the cap D.
- Raise the tip of the iron to help the water enter the opening without overflowing [Fig. 1].
- Slowly pour the water into the reservoir using the special measure and taking care not to go over the maximum level (about 170ml) indicated by "MAX" on the reservoir.
- Close the cap D.
Selecting the temperature.
- Put the iron in a vertical position.
- Put the plug in the socket.
- Adjust the temperature knob O according to the international symbol on the garment label [Fig. 3]. The power light indicates that the iron is heating up. Wait until the power light goes off before ironing.
Warning: during ironing, the power light comes on at intervals, indicating that the selected temperature is maintained. If you lower the selected temperature after ironing at a high temperature, do not start ironing until the power light comes on again.
Selecting the steam.
The quantity of steam is regulated by the steam knob E.
- Turn the steam knob to a position between minimum and maximum depending on the quantity of steam required and the temperature selected [Fig. 5].
Warning: the iron gives off steam continuously only if you hold the iron horizontally. You can stop the continuous steam by placing the iron in a vertical position or by moving the steam knob to "o". As indicated on the steam knob E and in the initial table, you can only use steam at the highest temperatures. If the selected temperature is too low, water may drip onto the plate.
Selecting Shot-steam and steam when ironing vertically.
Press the shot-steam button F to generate a powerful burst of steam that can penetrate the fabrics and smooth the most difficult and tough creases. Wait for a few seconds before pressing again [Fig. 4].
By pressing the shot-steam button at intervals you can also iron vertically (curtains, hung garments, etc.) [Fig. 6].
Warning: the shot-steam function can only be used at high temperatures. Stop the emission when the power light comes on, than start ironing again only after the light has gone off.
DRY IRONING
To iron without steam, follow the instructions in section "steam ironing", leaving the steam selector E on position "o".
SPRAY FUNCTION
Make sure that there is water in the reservoir. Press the spray buttonG slowly (for a dense spray) or quickly (for a vaporized spray) [Fig. 2].
Warning: for delicate fabrics, we recommend moistening the fabric beforehand using the spray function, or putting a damp cloth between the iron and the fabric. To avoid staining, do not use the spray on silk or synthetic fabrics.
AUTO STOP (automatic safety shut-off)
If the iron is left motionless for more than 30 seconds, the heating element will be switch off, automatically. To indicate that the iron has shut off, the Auto stop pilot light(green) will start blinking and six sound signals will be audible.
In a horizontal position, this will happen after 30 seconds.
In a vertical position, this will happen after 8 minutes.
--When picking up the iron again, the Auto stop pilot light will go out. The supply pilot light will come on. This indicate that the iron is heating up again.
--Wait for the supply pilot light to go out. Then you can recommence ironing.
HOW TO PUT IT AWAY
- At the end of the using, regulate the steam dial to "o" point.
- When there is no steam, regulate the temperature dialto "min" point. Disconnect the plug of the iron from the socket.
- Empty the reservoir by turning the iron upside down and gently shaking it.
- Leave the iron vertically to cool down completely.
- Roll up the power cord with the rewinder
- Always put the iron away in a vertical position.
ADVICE FOR GOOD IRONING
We recommend using the lowest temperatures with fabrics that have unusual finishes (sequins, embroidery, flush, etc.).
If the fabric is mixed (e.g. 40% cotton 60% synthetics), set the thermostat to the temperature of the fibre requiring the lower temperature.
If you don't know the composition of the fabric, determine the suitable temperature by testing on a hidden corner of the garment. Start with a low temperature and increase it gradually until it reaches the ideal temperature.
Never iron areas with traces of perspiration or other marks: the heat of the plate fixes the stains on the fabric, making them irremovable.
The size is more effective if you use a dry iron at a moderate temperature: excess heat scorches it with the risk of forming a yellow mark.
To avoid marking silk, woolen or synthetic garments shiny, iron them inside out.
To avoid marking velvet garments shiny, iron in one direction (following the fibre) and do not press down on the iron.
The heavier the washing machine is loaded, the more garments come out creased. This also happens when the spin drying revolutions are very high.
Many fabrics are easier to iron if they are not completely dry.
For example, silk should always be ironed damp.

natural_image
Line drawing of a bathroom sink with faucet and toilet (no text or symbols)
natural_image
Line drawing of an iron (£) with a spray gun and exhaust pipe, showing motion and safety (no text or symbols)
natural_image
Line drawing of a steam iron with a dial indicator and a magnified inset showing the dial (no text or symbols)
natural_image
Line drawing of an iron (£) with steam and smoke, no text or symbols present
natural_image
Line drawing of an iron (£) with a dial indicator and arrow, no text or symbols present
natural_image
Line drawing of a steam iron cutting through a pipe with smoke, no text or symbols present

- STEAM IRON MODEL NO.: RM/481
- IMPORTANT SAFETY INSTRUCTIONS
- READ ALL INSTRUCTIONS BEFORE USING
- SPECIAL INSTRUCTIONS
- SAVE THESE INSTRUCTIONS
- More specifically:
- PLEASE NOTE!
- DESCRIPTION OF DEVICE
- GENERAL INSTRUCTIONS
- PREPARATIONS
- STEAM IRONING
- Filling the reservoir
- Selecting the temperature.
- Selecting the steam.
- Selecting Shot-steam and steam when ironing vertically.
- DRY IRONING
- SPRAY FUNCTION
- AUTO STOP (automatic safety shut-off)
- HOW TO PUT IT AWAY
- ADVICE FOR GOOD IRONING
Brand : Ramtons
Model : RM/481
Category : Iron