
FP-D450 - Copier PANASONIC - Free user manual and instructions
Find the device manual for free FP-D450 PANASONIC in PDF.


| Product Type | Copier |
| Brand | Panasonic |
| Model | FP-D450 |
| Dimensions (W x D x H) | approx. 600 x 650 x 500 mm |
| Weight | approx. 50 kg |
| Power Supply | 220-240 V, 50/60 Hz |
| Power Consumption (max) | 1.5 kW |
| Paper Capacity | 500 sheets (standard cassette) |
| Copy Speed | 45 cpm (A4) |
| Copy Resolution | 600 x 600 dpi |
| Zoom Range | 25% - 400% |
| Warm-up Time | approx. 30 seconds |
| First Copy Out Time | approx. 4 seconds |
| Functions | Copy, reduce/enlarge, duplex, sort, staple |
| Maintenance | Clean glass and rollers regularly; replace toner and drum as needed |
| Safety | Do not block vents; use grounded outlet; turn off before cleaning |
| Spare Parts | Toner cartridge, drum unit, fuser unit, paper feed rollers |
| Repairability | Modular design; user-replaceable consumables; service technician for major repairs |
| Intended Use | Office copying |
Frequently Asked Questions - FP-D450 PANASONIC
User questions about FP-D450 PANASONIC
0 question about this device. Answer the ones you know or ask your own.
Ask a new question about this device
Download the instructions for your Copier in PDF format for free! Find your manual FP-D450 - PANASONIC and take your electronic device back in hand. On this page are published all the documents necessary for the use of your device. FP-D450 by PANASONIC.
USER MANUAL FP-D450 PANASONIC
natural_image
Line drawing of a multi-tiered printer with multiple spools and control panel (no text or symbols)Before operating this copier, please read these instructions completely and keep this operating guide for future reference.
The digital copier with options (See P.49)
English
Energy Star

The FP-D250/D350/D450/D600 series copiers comply with Tier 2 of the Environmental Protection Agency's Energy Star Program. This voluntary program specifies certain energy consumption and usage standards for copiers. These copiers will automatically "power down" after a specified period of non-use. The use of these Energy Star compliant copiers will reduce energy consumption and ultimately benefit the environment.
The default functions can be adjusted depending on your office requirements. Please see your authorised Panasonic copier dealer for more details.
Table of Contents
Before Operation
Operation Chart ■ Common features and usage ....4
■ Function Categories ....5
Precautions 6
■ Control Panel 9
■ Touch Panel Display .... 10
Making Copies
Basic Menu ■ Full Size Copying 12
■ Reduction or Enlargement Copying 13
■ Using the Sheet Bypass 14
Duplex/Original 1→2/2→1/2→2 Copy 16
▶ Copy ■ Book → 2 Copy ....17
■ 2 Page Copy ....18
■ N in 1 Copy .... 19
■ 1 to N Copy 20
■ SADF Mode 21
Zoom/Effects ■ Zoom Copying....23
■ Centring/Mirror/Inverse copy....24
■ Edge/Margin/Book Mode 25
■ Page numbering....26
Insertion Job ■ Cover/Page Insertion 28
■ OHP Interleaving/Presentation 29
Other Features ■ Job Memory 30
■ Sky Shot Modes....31
■ Energy Saver/Interrupt....33
■ Combining Function Table 34
User Preset 35
■ General Functions....36
■ Copier Settings 37
■ General Functions for Key Operator 38
■ Copier Settings for Key Operator 42
Options
■ Options 49
■ i-ADF/ADF 50
■ 3 Bin Finisher, Exit Guide Unit .... 52
■ 2 Bin Finisher, Exit Guide Unit .... 55
■ Inverting Shift Tray 60
Maintenance
Handling ■ Adding Paper 61
■ Adding Toner 63
■ Removing a Paper Misfeed 65
Checking ■ Troubleshooting 76
Specifications 78
System Information 82
Operation Chart
Common features and usage
■ Basic Operation

■ Position of the original
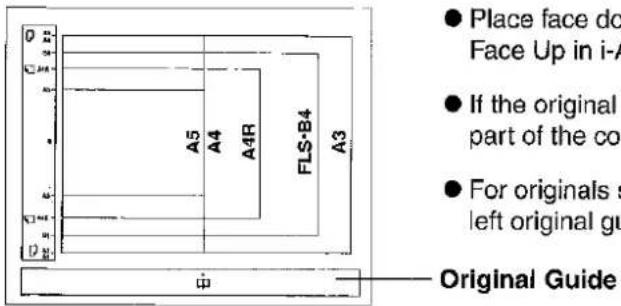
■ Memory capacity:
When the memory becomes full during the original scanning, the message of "Function not available for lack of memory" will be displayed in the message display. In this case, follow the operating instruction in the message display. When the additional memory is required, consult with authorised dealer.
NOTE
* While the copier is warming up, you may position your original on the copier, enter your copy job selections and press the Print key. The wait indicator will flash until the warm up cycle is completed and the copy job automatically start.
- When making 100 copies continuously or intermittently within 20 minutes, the fan motor will start rotation. This is not irregular operation but just to cool off the machine.
Touch Panel Display
■ Function Categories


Basic Menu (See page 12)
① Text, Text/Photo, Photo Mode Key
② Exposure Control Keys
③Auto Exposure Key
④ Cassette Indication
⑤ Cassette Selection Key
⑥Job Status Key

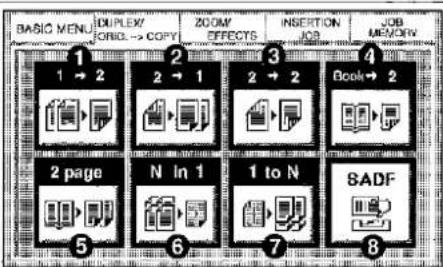
Duplex/Original ▶ Copy (See page 15)
①1→2 Copy Key
②2→1 Copy Key
③2→2 Copy key
④Book→2 Copy Key
⑤2 Page Copy Key
⑥N in 1 Copy Key
⑦1 to N Copy Key
⑧ SADF Key (See NOTE on page 15)


Zoom/Effects (See page 22)
①Zoom Key
②Centring Mode Key
③Page Numbering Mode Key
④Edge Mode Key
⑤Margin Mode Key
⑥Book Mode Key
⑦Mirror Mode Key
⑧ Inverse Mode Key


flowchart
graph TD
    A["BASIC MENU"] --> B["CUPLEX OPTION → COPY"]
    B --> C["ZOOM EFFECTS"]
    C --> D["INSERTION JOB"]
    D --> E["JOB MEMORY"]
    F["Presentation"] --> G["OHP Interleaving"]
    G --> H["Page insertion"]
    H --> I["Cover"]
    I --> J["1"]
    I --> K["2"]
    I --> L["3"]
    I --> M["4"]
Insertion Job (See page 27)
① Cover Mode Key
② Page Insertion Mode Key
③OHP Interleaving Mode Key
④ Presentation Mode Key


Job Memory (See page 30)
①M1, M2, M3, M4, M5 Key
② Memory In Key
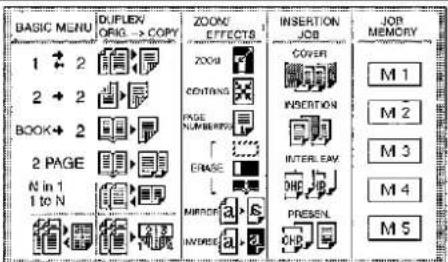
■ Basic Menu Selection
● Displays all functions when touching Basic Menu Key.
● Touch Basic Menu Key again to return to the basic screen.
Precautions
For your safety
■ Laser Safety
Caution
This product utilizes a laser.
Use of controls or adjustments or performance of procedures other than those specified herein may result in hazardous radiation exposure.
■ Caution Labels
DANGER
CAUTION
ATTENTION
VORSICHT
Invisible laser radiation when open. Avoid direct exposure to beam.
Invisible laser radiation when open. Avoid direct exposure to beam.
natural_image
Line drawing of an open industrial machine with internal components and mounting brackets (no text or symbols)
natural_image
Technical line drawing of a mechanical or electronic component with no visible text, numbers, or symbols.LASER KLASSE 1
LASER CLASSE 1
RANGO LASER 1
CLASS 1 LASER PRODUCT
(TO IEC 825)
reptics
CAUTION:
Invisible laser radiation when open
and interlocks defeated
AVOID EXPOSURE TO BEAM.
VORSICHT:
natural_image
Illustration of a person washing a baby's face with a medical device nearby (no text or symbols)■ Do not look directly at exposure lamp when copying.

■ Do not turn the power switch off or open the front panel during copying.
- Do not drop paper clips or other metal objects into the copier.
Toner and Paper

natural_image
Cartoon illustration of a hand holding a small object with a diamond-shaped block, no text or symbols present■ Store toner, developer and paper in cool areas with low humidity.
● High quality paper of 60 – 90 g/m ^2 (55 – 130 g/m ^2 via sheet bypass) may be used.
● For optimum copy quality, it is essential that Panasonic Brand Toner is used in the copier.
Ventilation

natural_image
Illustration of a woman opening a door while another person stands beside it, with steam rising nearby (no text or symbols)■ The copier should be installed in a well-ventilated area to minimize the ozone density in the air.
Precautions
Installation
natural_image
Cartoon illustration of a distressed toaster and a box with a clock, no text or symbols present
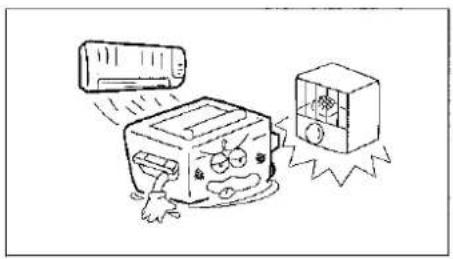
■ The copier should not be installed in areas with the following conditions:
- Extremely high or low temperature and humidity. Ambient Conditions Temperature: 10°C – 30°C Relative humidity: 30% – 80%
● Where temperature and humidity can change rapidly, causing condensation.
● Direct exposure to sunlight.
● Directly in air conditioning flow.
● In areas of high dust concentration.
● In areas of poor ventilation.
● In areas with chemical fume concentration.
● In areas with extreme vibration.
● Unstable or uneven floors.
FOR YOUR SAFETY
This appliance is supplied with a moulded three pin mains plug for your safety and convenience. A 13 amp fuse is fitted in this plug.
Should the fuse need to be replaced please ensure that the replacement fuse has a rating of 13 amps and that it is approved by ASTA or BSI to BS1362
Check for the ASTA mark 📁 or the BSI mark 🌐 on the body of the fuse.
If the plug contains a removable fuse cover you must ensure that it is refitted when the fuse is replaced.
If you lose the fuse cover the plug must not be used until a replacement cover is obtained.
A replacement fuse cover can be purchased from your local Panasonic Dealer.
IF THE FITTED MOULDED PLUG IS UNSUITABLE FOR THE SOCKET OUTLET IN YOUR OFFICE THEN THE FUSE SHOULD BE REMOVED AND THE PLUG CUT OFF AND DISPOSED OF SAFELY.
THERE IS A DANGER OF SEVERE ELECTRICAL SHOCK IF THE CUT OFF PLUG IS INSERTED INTO ANY 13 AMP SOCKET.
If a new plug is to be fitted please observe the wiring code as shown below.
If in any doubt please consult a qualified electrician.
WARNING: THIS APPLIANCE MUST BE EARTHED.
IMPORTANT: The wires in this mains lead are coloured in accordance with the following code: Green and Yellow; Earth
As the colours of the wires in the main lead of this appliance may not correspond with the coloured markings identifying the terminals in your plug, proceed as follows:
The wire which is coloured GREEN-AND-YELLOW must be connected to the terminal in the plug which is marked by letter E or by the safety Earth symbol “ ± ” or coloured GREEN or GREEN-AND-YELLOW.
The wire which is coloured BLUE must be connected to the terminal in the plug which is marked with the letter N or coloured BLACK.
The wire which is coloured BROWN must be connected to the terminal in the plug which is marked with the letter L or coloured RED.
How to replace the fuse.
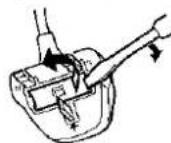
Open the fuse compartment with a screwdriver and replace the fuse.
Caution Note: Disconnect from the mains supply before removing covers.
The mains plug on this equipment must be used to disconnect mains power. Please ensure that the socket outlet is installed near the equipment and shall be easily accessible.
Control Panel

| No | Contents | Refer to |
| 1 | Multi-Size Feed Key● When Multi-sized originals are copied using i-ADF/ADF (Option). | P.51 |
| 2 | Sort/Finish Key● When sorting and stapling with Finisher (Option). | P.52 – 60 |
| 3 | User Preset Key● Changes default modes. | P.35 – 48 |
| 4 | Energy Saver Key● Can save power while the copier is not in use. | P.33 |
| 5 | Manual Key● After pressing this key, the original size can be selected manually. | P.12 |
| 6 | Interrupt Key● Interrupts other copy or print jobs while making copies. | P.33 |
| 7 | Reset Key● Resets all features to the initial power-on state. | — |
| 8 | Clear Key● Clears the copy count in the display. | — |
| 9 | Stop Key● Stops the copy run. | — |
| 10 | Operation Switch (FP-D450/D600 only)● For turning the power On/Off. | — |
NOTE
● Above control panel is only for copier functions. Please refer to the proper operation guide for the Printing and Filing control panel functions.
Control Panel
Touch Panel Display

● Adjusting the touch panel display contrast
Adjust brightness of the display by repeatedly pressing A3 or A5 original size key while pressing and holding the Clear key.
To make the display brighter: A3 size key
To make the display darker : A5 size key
ATTENTION
- Use soft finger pressure only to activate touch Screen panel. DO NOT USE SHARP OBJECTS such as pens, fingernails etc., as this may damage the panel.
■ Touch Panel Display Indications
| No | Contents | Refer to |
| 1 | Warning indications Add Toner Add Paper Replace waste toner bottle. Call service | P.61-64 |
| 2 | SADF/Multi-size Feed Mode indication | P.21, 51 |
| 3 | Original Image indication | — |
| 4 | Rotate Mode indication* | P.60 |
| 5 | Copy paper indication | — |
| 6 | Number of copies | — |
| 7 | Machine/User Error Code indication (E1-01, U13, etc.) | P.75 |
| 8 | Function Categories | P.15-32 |
| 9 | Copy Paper Size indication | — |
| 10 | Finisher Functions indication | P.52, 60 |
| 11 | Selected Paper Tray and Paper status indication2: Tray position Normal Low paper Add Paper | — |
| 12 | Cassette Selection Key | P.13 |
| 13 | Manual Exposure Select keys (Light and Dark) | P.12 |
| 14 | Original Mode Select key (Text/Text/Photo/Photo) | P.12 |
| 15 | Job Status Key | P.12 |
| 16 | Auto Exposure Key | — |
| 17 | Exposure Indicator (7 steps) | — |
| 18 | Copy Ratio indication | — |
| 19 | Original Size indication | — |
NOTE
* When making copies in A4 (☐) if the cassette runs out paper, the copier will automatically select the A4R (☐) cassette and rotate the image to said.
However, the function is not available if any problem occurs by the image rotation function in the middle of copy operation. (Duplex/Original → copy, Insertion job, Sort/Finish mode, etc.)
Full Size Copying
When copying the same size as the original (1:1)
■ Copy size and copy density are automatically selected.

■ Initial Screen
(When placing A4 size originals)

Input the code number, if U0 appears.
① Select the original(s)
● Text: Originals are mainly composed of text.
● Photo: Originals are mainly composed of photo.
● Text/Photo: Combined originals with text and photo.
② Job Status Key
● Each setting jobs will be indicated on the display. See page 15 – 30 for job settings.
■ When manually selecting exposure control or original size:

Select exposure control
● Press the Light or Dark key.
The centre setting is the normal (auto) position.

Select original size.
① Press Manual key.

Lights up (Manual mode)
② Select original size with Original Size key.
NOTE
● Benefits of QUARC (QUALitative Reasoning based adaptive Controller).
The FP-D250/D350/D450/D600 series features exclusive new Panasonic imaging technology which utilises an advanced form of artificial intelligence to ensure optimal copy quality and performance under varying environmental conditions, from a wide range of originals.
Reduction or Enlargement
When copying with preset ratios
There are 5 preset reduction and 5 preset enlargement modes.



Example: Reduction
Original size

flowchart
graph LR
    A3 --> A4
The correct ratio is automatically selected.
Reduction and enlargement ratios. (%)
| Original size | Copy size | |||
| A3 | B4 | A4 | A5 | |
| A3 | 100 | 87 | 71 | 50 |
| B4 | 115 | 100 | 82 | 58 |
| A4 | 141 | 122 | 100 | 71 |
| A5 | 200 | 173 | 141 | 100 |
- When changing the paper size, touch Cassette key.
Paper Tray (CASSETTE) Key
ATTENTION
NOTE
● Part of the image may be deleted if the direction of the original and copy paper do not correspond.
- If the copy size is different from the paper size you can use the sheet bypass. This will save you having to change the setting of the paper trays.
Using the Sheet Bypass
When copying on special paper, etc.
■ To copy on letterhead, mailing labels, transparencies and odd-size paper, etc., or to use the bypass as an additional paper source.
1
Position original.
2

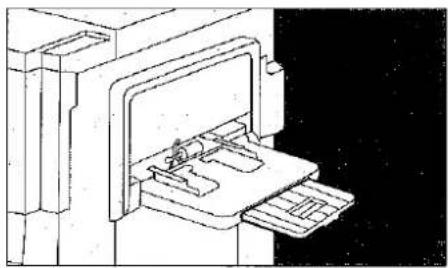
Open the Sheet Bypass.
3
natural_image
Technical line drawing of a mechanical device with internal components (no text or symbols)Pull out the Sheet Bypass tray until it stops.
4

① Place approximately 50 sheets of paper.

Insert the paper until it stops.
②Adjust the side guides. Incorrect adjustment may cause paper to wrinkle, misfeed or skew.
5
Press Print.
NOTE
● The bypass has priority over the paper trays. The copier automatically selects the Sheet Bypass when paper is placed in the empty bypass tray.
- Some types of mailing labels and transparency film may damage your machine. Please contact your service provider for advice regarding non-standard paper types.
- Do not feed curled paper through the bypass to avoid misfeed.
Duplex/Original ▶ Copy
When touching DUPLEX/ORIG. ▶ COPY key
■ Initial Screen

● Touch the desired key to select the function.
| 1 → 2 | From single sided originals to double sided copies. | ⇒ See P.16 |
| 2 → 1 | From double sided originals to single sided copies. | ⇒ See P.16 |
| 2 → 2 | From double sided originals to double sided copies. | ⇒ See P.16 |
| Book → 2 | From book originals to double sided copies | ⇒ See P.17 |
| 2 Page | Copying two facing pages of an A3 size original on two separate A4 size sheets. | ⇒ See P.18 |
| N in 1 | From two (or four) single sided originals onto side by side single sided copies. | ⇒ See P.19 |
| 1 to N | From one 1-sided original to two (or four) 1-sided copies. | ⇒ See P.20 |
| SADF | A special original (like thin paper etc.,) can be fed from the ADF/i-ADF original tray. | ⇒ See P.21 |
NOTE
* Displays when selecting "Yes" with the SADF function. (See P.42)
● To copy double sided originals you can use the i-ADF (FA-A888) or place double sided originals directly onto the original glass.
● ADU (Automatic Document Feeder) is required when making a 2-sided copy.
● To reset Duplex/Original ▶ Copy mode, press Reset key.
Duplex/Original ▶ Copy
1 2/2 1/2 2
■ 1 → 2 Copy
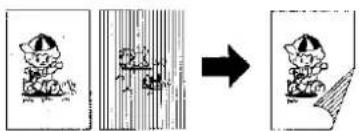
From single sided originals to double sided copies.
From Copier Platen & ADF/i-ADF
2→1 Copy
From double sided originals to single sided copies.
Using i-ADF

■ 2 → 2 Copy
From double sided originals to double sided copies.
Using i-ADF

Procedure
ADF

Face-Down
i-ADF

Face-Up
2
Place originals
3
Count originals (1 → 2 only)


natural_image
Front view of a computer monitor with control panel and keyboard (no visible text or symbols)(4)
Select original size
1
Touch 1 → 2,
2 → 1 or 2 → 2
5
Number of copies (Up to 50)
6
Press Print
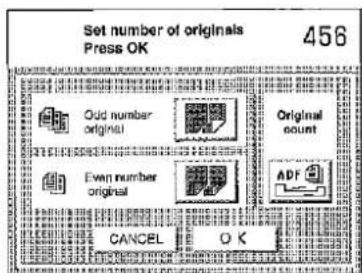
① For odd or even originals, touch the Odd or Even key.
② If number of originals is unknown, touch Original Count key.
③ Touch OK key.
④ Return Originals to the ADF/i-ADF.
NOTE
● To reset a mode selected using the menu, touch Cancel key on the touch panel.
- Press the reset key to feed out last copy existing in the ADU (Automatic Duplex Unit).
Book → 2
■ Book → 2 Copy
From book originals to double sided copies
A3 size originals only.

flowchart
graph LR
    A["Book Format"] --> B["(Facing Pages)"]
    B --> C["(Facing Pages)"]


● Copy last page first in Facing pages and Book Format mode.
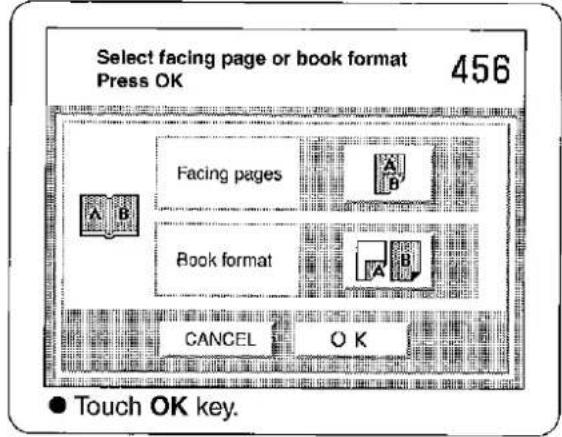
NOTE
● To reset a mode selected using the menu, touch Cancel key on the touch panel.
- Press the reset key to feed out last copy existing in the ADU (Automatic Duplex Unit).
2 Page Copy
■ 2-Page Copy
Copying two facing pages of an A3 size original on two separate A4 size sheets.
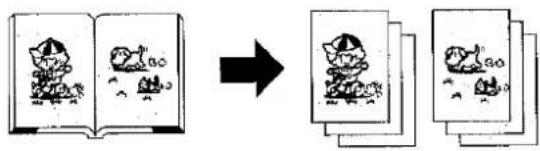
A3 size originals only.
Procedure
2
Place originals


Book on the platen

NOTE
* For reduction or enlargement copy only.
● To reset a mode selected using the menu, touch Cancel key on the touch panel.
N in 1
2 in 1 Copy
From two (or four) single sided originals onto side by side single sided copies.
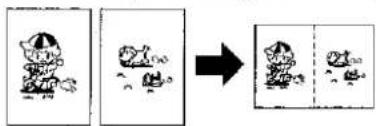
4 in 1 Copy
From four 1-sided originals, side by side, to 1-sided copies.

Booklet
From four 1-sided originals, side by side, to 2-sided copies.
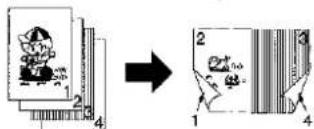
Procedure

2
Place originals
3
Count originals (except Booklet)


Touch N in 1 mode and make selection
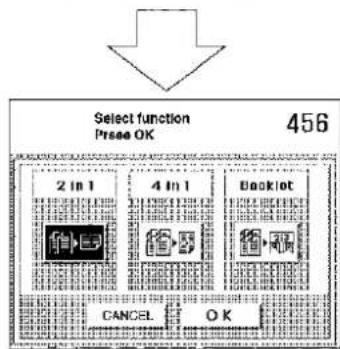
flowchart
graph TD
    A["Select function\nPrase OK"] --> B["2 in 1"]
    A --> C["4 in 1"]
    A --> D["Booklet"]
    B --> E["CANCEL"]
    C --> F["OK"]
    D --> G["OK"]
Number of copies
Press Print
①Touch ADF key.
②After originals are counted, touch the OK key.
③Re-position originals in document feeder.
NOTE
* Copy is automatically reduced.
(ex. A4 to A4 size)
2 in 1: 71%, 4 in 1: 50%
● A4 □ size originals only for Booklet.
● The ADF/i-ADF is required for N in 1 copy.
Duplex/Original ▶ Copy
1 to N
■ 1 to 2 Copy
From one 1-sided original to two 1-sided copies.

■ 1 to 4 Copy
From one 1-sided original to four 1-sided copies.

Procedure

2
Place originals

Touch N in 1
mode and
make selection
Number of Press Print copies
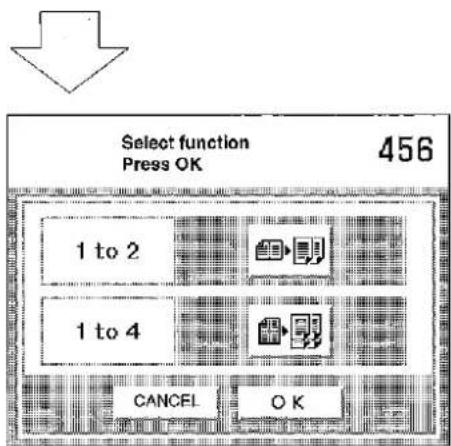
NOTE
● To reset a mode selected using the menu, touch Cancel key on the touch panel.
* Copy is automatically enlarged.
(ex. A4 to A4 size)
1 to 2: 141%, 1 to 4: 200%
SADF MODE
■ SADF (Single Automatic Document Feeder) Function
A special original (like thin paper etc.) can be fed from the ADF/i-ADF original tray and copied continuously with manual operation.
Select SADF setting "Yes" in the user preset mode before using this function. (See page 42)
Procedure


flowchart
graph LR
    A["Ready to Copy 456"] --> B["Select function 456"]
    subgraph Section 1
        C["BASIC MENU"] --> D["DUPLEX/ORIG → COPY"]
        D --> E["ZOOM/EFFECTS"]
        E --> F["INSERTION JOB"]
        F --> G["JOB MEMORY"]
        H["A4"] --> I["LIGHT"]
        I --> J["AUTO"]
        J --> K["DARK"]
        K --> L["2"]
        M["JOB STATUS"] --> N["TEXT"]
        N --> O["EXTPHOTO"]
        O --> P["PHOTO"]
        Q["CASSETTE"] --> R["2"]
    end
    subgraph Section 2
        S["BASIC MENU"] --> T["DUPLEX/ORIG → COPY"]
        T --> U["ZOOM/EFFECTS"]
        U --> V["INSERTION JOB"]
        V --> W["JOB MEMORY"]
        X["1 → 2"] --> Y["2 → 1"]
        Y --> Z["2 → 2"]
        Z --> AA["Book+ 2"]
        AB["2 page"] --> AC["N in 1"]
        AC --> AD["1 to N"]
        AD --> AE["SADF"]
    end
NOTE
- SADF function cannot be combined with 2 1, 2 2 , N in 1 and Finishing function (except Non-sort).
- Set the original from the last page in 1 → 2 copy mode.
● To reset a mode selected using the menu, touch Cancel key on the touch panel.
Zoom/Effects
When touching ZOOM/EFFECTS key
■ Initial Screen

● Touch the desired key to select the function.
| Zoom | Copies with variable zoom ratios from 25% to 400% in 1% increments. | ⇒ See P.23 |
| Centring | Shifts image to centre. | ⇒ See P.24 |
| Page Numbering | Prints a page number on the copies. | ⇒ See P.26 |
| Edge | Creates a blank edge. | ⇒ See P.25 |
| Margin | Shifts image to right or left. | ⇒ See P.25 |
| Book | Eliminates dark inner binding shadows. | ⇒ See P.25 |
| Mirror | Copies a mirror image. | ⇒ See P.24 |
| Inverse | Copies a inverse image.● Negative to Positive● Positive to Negative | ⇒ See P.24 |
NOTE
● To reset Zoom/Effects mode, press Reset key.
● For combining Zoom/Edit functions and other functions, see page 34.
- Press the Clear key and re-enter the correct number if you make a mistake.
Zoom Copying
Zoom
Copies with variable zoom ratios from 25% to 400% in 1% increments.
■ Auto Zoom
Copy ratio can be selected automatically by selecting the paper size.
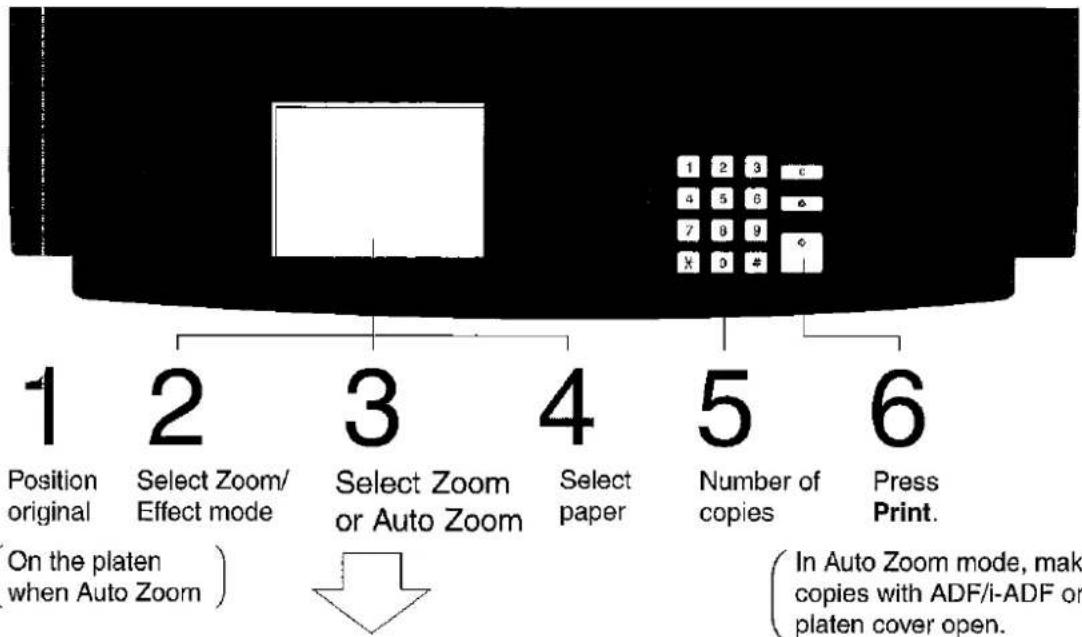

flowchart
graph TD
    A["Select Zoom or Auto Zoom and touch OK"] --> B["Select function Press OK 456"]
    B --> C{Zoom}
    C --> D["25% ~ 400% Zoom"]
    C --> E["Auto Zoom"]
    D --> F["CANCEL OK"]
    E --> G["OK"]
    H["Select paper size and touch OK"] --> I["Select paper tray Press OK"]
    I --> J["A4 A4 A5 A4 B4 A3 A5 OK"]
    J --> K["Auto Zoom"]
    K --> L["When setting X, Y zoom ratio individually, press X, Y key first, then set the zoom ratio by using ▲·▼ key."]
    L --> M["Select mode and touch OK"]
    M --> N["Setting X, Y zoom to same ratio along with the height or width (whichever shorter) of the copy paper."]
    N --> O["Setting X, Y zoom ratio individually along with the height and width of the copy paper."]
ATTENTION
NOTE
- When changing paper size after setting zoom ratio, please use cassette key. If you use copy size key, zoom ratio will be changed.
- Remove the originals from the ADF/i-ADF before selecting the auto zoom mode.
- Incorrect original position detection may occur if any strong light shines onto the platen glass during the auto zoom mode.
● To reset a mode selected using the menu, touch Cancel key on the touch panel.
Zoom/Effects
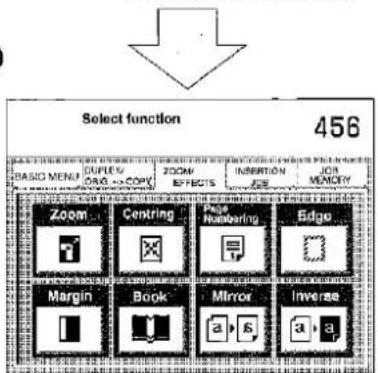
Centring/Mirror/Inverse
Centring
Copy image can be centred automatically on selected paper.

Mirror
A mirror image can automatically be made.

Inverse
Negative/Positive image can be made for interesting effects.

Procedure

Position original
Select Zoom/Effect mode
Select Centring, Mirror or Inverse
Select paper
Number of copies
Press Print
(On the platen when centring*)
NOTE
* In centring mode, make copies with ADF/i-ADF or platen cover open. Remove the originals from the ADF/i-ADF before selecting the centring mode.
- Incorrect original position detection may occur if any strong light shines onto the platen glass during the centring mode.
● To reset a mode selected using the menu, touch Cancel key on the touch panel.
Edge/Margin/Book
Procedure

flowchart
graph TD
    A["1 Position original"] --> B["2 Select Zoom/Effect mode"]
    B --> C["3 Select Edge Margin or Book"]
    C --> D["(4) Select paper"]
    D --> E["5 Number of copies"]
    E --> F["6 Press Print"]
Edge

Margin

Book
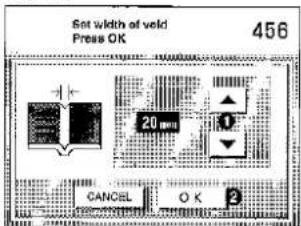
①Select vertical or horizontal edge.
②Adjust each void width by using the ▲·▼ keys.
③ Touch OK key.
④ When the void areas are both the same for vertical and horizontal, adjust the void width by using the ▲·▼ keys, then touch OK key.
* Initial setting (Factory setting): 5 mm
① Select margin area
②Adjust each void width by using the ▲·▼ keys.
③ Touch OK key.
* Initial setting (Factory setting): 10 mm
① Adjust each void width by using the ▲·▼ keys.
② Touch OK key.
* Initial setting (Factory setting): 20 mm
NOTE
* Initial setting (Factory setting) can be changed by the User Mode function. (Please refer to page 37)
- To reset a mode selected using the menu, touch Cancel key on the touch panel.
Zoom/Effects
Page Numbering
Feature
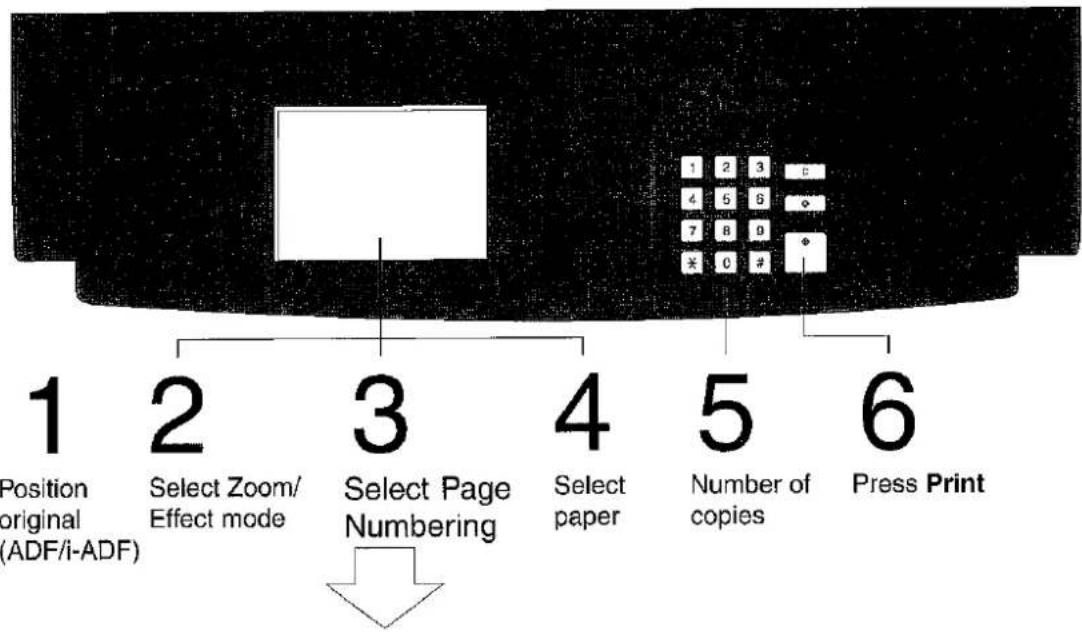
The page number can be automatically printed on each page.
flowchart
graph TD
    A["1 Position original (ADF/i-ADF)"] --> B["2 Select Zoom/Effect mode"]
    B --> C["3 Select Page Numbering"]
    C --> D["4 Select paper"]
    D --> E["5 Number of copies"]
    E --> F["6 Press Print"]

① Select print position for page numbering.
② Select the first page to begin page numbering using 10-key on the control panel. Page 1, 2 or 3 can be selected.
③ Touch OK key.
④ Touch ADF key.
⑤ Touch OK key.
⑥ Position original again.
● Page number is indicated with -n- or n/m form. (Example)


NOTE
● The ADF/i-ADF is required for Numbering.
● The page numbering format can be changed in user preset mode. (See P.36)
● To reset a mode selected using the menu, touch Cancel key on the touch panel.
Insertion Job
When touching INSERTION JOB key
■ Initial Screen
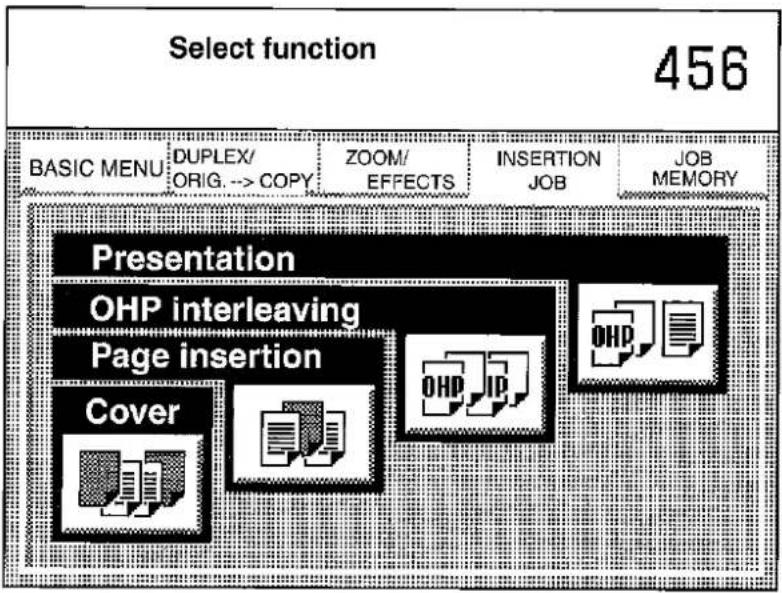
● Touch the desired key to select the function.
| Cover | Adds cover page(s) to the copies. | ⇒ See P.28 |
| Page insertion | Inserts paper between the copies. | ⇒ See P.28 |
| OHP interleaving | Inserts paper between OHP film. | ⇒ See P.29 |
| Presentation | Inserts paper between OHP film and makes copied sets for hand-outs. | ⇒ See P.29 |
NOTE
● The i-ADF/ADF is required for Insertion Job.
● To reset Insertion job, press reset key.
Insertion Job
Cover/Page insertion
Cover
Adds cover page(s) to the copies.
Blank Paper
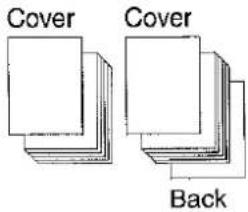
Copied Paper

Page insertion
Inserts paper between the copies.
Blank Paper Copied Paper
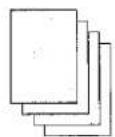

Procedure
ADF
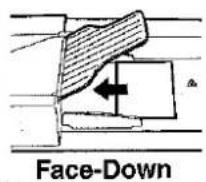
i-ADF
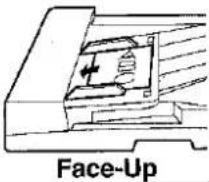
1
Position original (Up to 50)

natural_image
Front view of a computer monitor with keypad and display screen (no visible text or symbols)2
Select Cover or Page Insertion
3
Select cassette
4
Number of copies
5
Press Print
Cover
2 ① Select Cover mode (Front or Front/Back) ② Select Blank or Copy ③ Touch OK key.

3 ① Touch ADF key (Count originals) ② Select cassette and touch OK key.

Page insertion
2 ① Select Blank/Copy mode ② Touch OK key.

3 ① Touch ADF key (Count originals) ③ Input insert position ② Select cassette and touch (Up to 20) OK key. ④ Touch OK key.
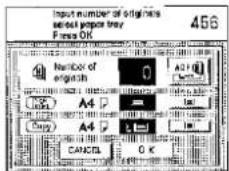
④ Touch OK key.

NOTE
- The number of the originals can be input using the ten key instead of the ADF originals count.
● To reset a mode selected using the menu, touch Cancel key on the touch panel.
OHP interleaving/Presentation
■ OHP interleaving
Inserts paper between OHP film.
Blank Paper

Copied Paper

■ Presentation
Inserts paper between OHP film and makes copied sets for hand-outs.
Blank Paper + Copies

flowchart
graph TD
    A["OHP"] -->|1| B["+"]
    A -->|2| B
    B --> C["(1)"]
    B --> D["(2)"]
Copied Paper + Copies

flowchart
graph TD
    A["OHP"] -->|1| B["+"]
    A -->|2| C["+"]
    D["OHP"] -->|1| E["+"]
    D -->|2| F["+"]
Procedure
ADF

Face-Down
i-ADF

Face-Up
1 2
Place OHP
(Sheet Bypass)
Place
originals
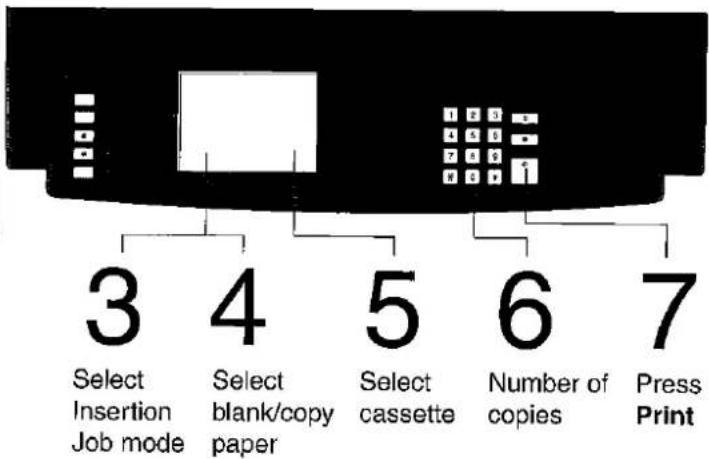
4 OHP interleaving
Select blank/copy and touch OK key

Presentation
Select blank/copy insertion and touch OK key
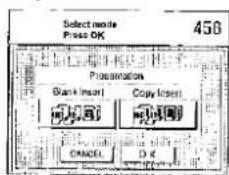
OHP interleaving
Select cassette
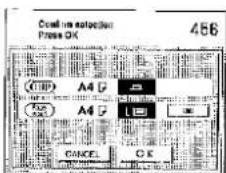
Presentation
Select cassette

NOTE
● To reset a mode selected using the menu, touch Cancel key on the touch panel.
Job Memory
■ Five copy jobs can be programmed in memory (M1 to M5) for recall at a later time.

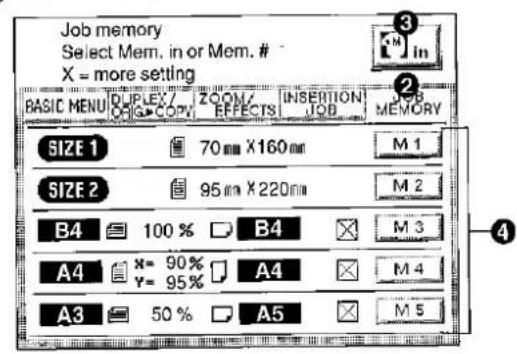
To store a job into a memory
① Set up the copy job to be stored in memory.
②Press Job Memory key
③ Touch Memory In key. (MIN)
④ Touch M1, M2, M3, M4 or M5 key.

☒: Means there are more settings other than what is indicated on the display.
To recall a job from memory mode.
⑤Press Job Memory key
⑥ Touch M1, M2, M3, M4 or M5 key.
⑦ Press Print
NOTE
● Job memory mode will not be deleted even if the Power Switch is turned off.
- When storing a new job, the previously stored job will automatically be deleted and the current job stored in its place.
● To reset Programming job, press reset key.
Skyshot Mode
Manual Skyshot Mode/Digital Skyshot Mode
■ To copy from the platen with the platen cover or ADF/I-ADF open. Two types of skyshot modes can be selected.
Manual Skyshot Mode: Making copies from small originals without dark areas around the image.
Digital Skyshot Mode: Copies can be automatically adjusted although they are not placed in parallel to the original guide. (except A3 and A4)
■ Setting the skyshot mode

Press User Preset
Set the Skyshot Mode


(1) Touch the COPIER SETTINGS key.
(2) Touch the ▶ key to open the 2/2 of Copier settings menu.
(3) Touch the Digital skyshot mode or Manual skyshot setting key.
(4) Select the desired function and touch OK key. Digital Skyshot Mode
None
Free shape: Copy is made with slant.
Parallel: Copy is made to parallel. (within 5 degrees)
Manual Skyshot Mode:
OFF, M1 ON, M2 ON, M1&M2 ON
NOTE
- When changing the M1 or M2 size, please consult the key operator.
- Incorrect erasure may occur if there is a black line at the edge of the original or an image which the copier is detected as a black pattern in the skyshot mode.
- Incorrect original position detection may occur if any strong light shines onto the platen glass during skyshot mode.
Skyshot Mode
Operation
For Manual Skyshot Mode:
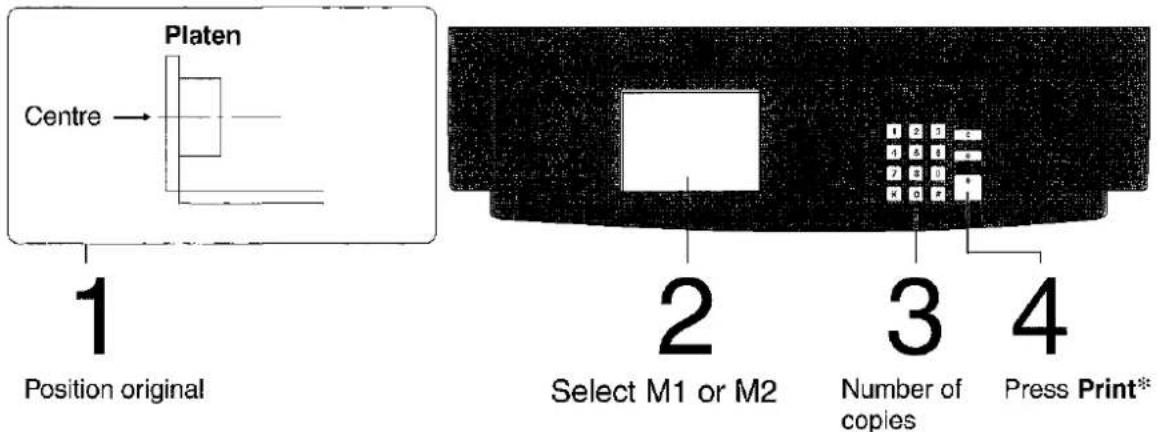

Example M1: i-ADF
M2: Platen

For Digital Skyshot Mode:

flowchart
graph LR
    A["Original"] -->|1 Position original on the Platen (Make copies with ADF/i-ADF or platen cover open.)| B["Process Box"]
    B -->|2 Number of copies| C["Press Print"]
    C --> D["Free shape Copy"]
    C --> E["Parallel Copy"]
NOTE
* In the manual skyshot mode, A4 size paper is selected automatically.
- When using the manual skyshot mode (M1 and M2 are turned ON), the other job memory cannot be used.
● To reset the manual skyshot mode, press Reset key.
● To reset the digital skyshot mode, close the ADF/i-ADF or platen.
Energy Saver/Interrupt
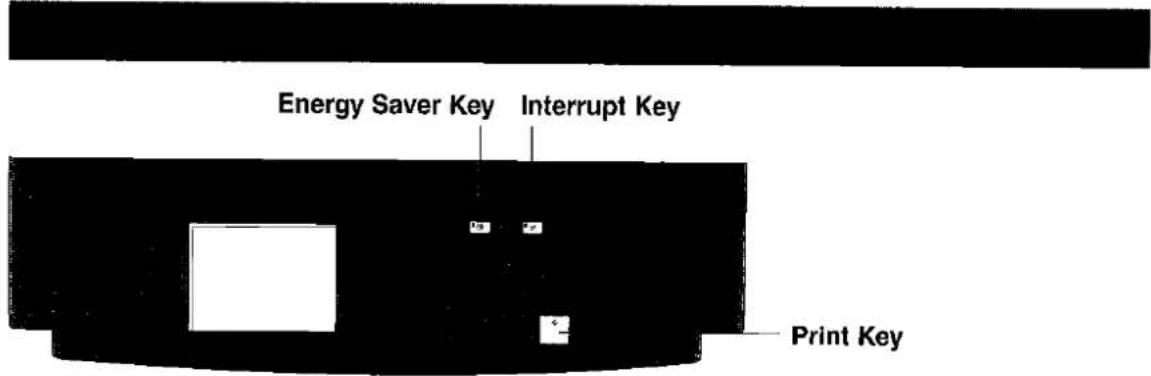

This mode can save power while the copier is not in use.
Energy Saver Mode
① To enter this mode
Press Energy Saver key, the indicator will flash.
② To cancel this mode and make copies Press Energy Saver key again.
Auto Off Mode
① Automatically enters after 60 minutes from the last copy. Copier power will drop and the indicator will light.
② To make copies, press Energy Saver key.
INTERRUPT
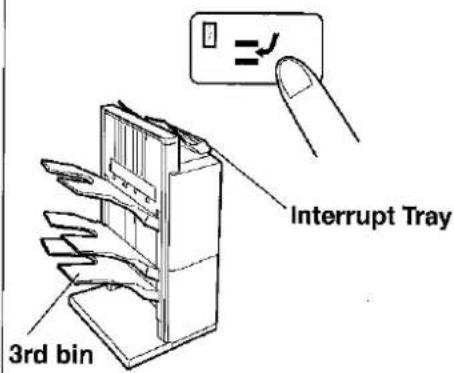
Interrupt Mode
● This mode can interrupt other copy jobs while making copies.
① Press Interrupt key, then indicator will light. When pressing Interrupt key twice, interrupt mode is cancelled.
② Make other copy job. Copies are exited to the interrupt tray when using 3-bin finisher (option), except for the staple sort mode using 3rd bin. (See P.53)
③ Touch Interrupt key again to continue original job.
NOTE
● Energy saver time (15 minutes) and Auto off time (60 minutes) can be changed by key operator. (See P.38)
| Modes | Power Consumption | Warm Up Time | ||
| FP-D250/D350 | FP-D450/D600 | FP-D250/D350 | FP-D450/D600 | |
| Normal Operation | Approx. 200 Wh | Approx. 230 Wh | None | None |
| Power Saving Mode | Approx. 135 Wh | Approx. 190 Wh | 30 sec. | 30 sec. |
| Auto Off Mode | Approx. 15 Wh | Approx. 15 Wh | 75 sec. | 180 sec. |
Combining Function Table
O: Combination use is possible. However it may not accepted when further multiple combinations are selected.
△: Combination use is not accepted on the FA-F320.
- : Combination use is not accepted, or not recommended.
User Preset
■ User Preset modes allow you to change the initial copy mode, if necessary.

flowchart
graph TD
    A["General Functions"] --> B["Input Identification Code"]
    C["Copier Settings"] --> B
    D["File Settings"] --> B
    E["Printer Settings"] --> B
    B --> F["General Functions for Key Operator"]
    B --> G["Copier Settings for Key Operator"]
    B --> H["File Settings for Key Operator"]
    B --> I["Printer Settings for Key Operator"]
    style B fill:#f9f,stroke:#333,stroke-width:2px
Procedure

flowchart
graph TD
    A["User Preset Key"] --> B["Reset Key"]
    B --> C["User preset mode Select function"]
    C --> D["GENERAL FUNCTIONS"]
    C --> E["COPIER SETTINGS"]
    C --> F["FILE SETTINGS"]
    C --> G["PRINTER SETTINGS"]
    style A fill:#000,stroke:#fff,color:#fff
    style B fill:#000,stroke:#fff,color:#fff
    style C fill:#f9f,stroke:#333
    style D fill:#ccf,stroke:#333
    style E fill:#ccf,stroke:#333
    style F fill:#ccf,stroke:#333
    style G fill:#ccf,stroke:#333
    note1["① Press User<br>● Setting m<br>② Select one<br>● File and<br>(Except t<br>③ Select mod<br>● Input ID<br>④ Follow the e"]
● Above screen is an example of multi functions model, FP-D350H.
- Menu locations may be different from above depending on the installed options onto the digital copier.
① Press User Preset Key.
- Setting menu will appear on the display.
② Select one of four functions.
● File and Printer settings are optional. (Except for the FP-D350H)
③ Select mode
● Input ID code for key operator settings.
④ Follow the on screen instructions.
⑤ After setting, touch OK key in Display Panel.
⑥ Press User Preset key or Reset key, then exit User preset mode.
NOTE
- Please refer to each operation guide for file settings and printer settings.
General Functions
■ User Preset modes allow you to change the initial copy mode, if necessary. (See P.44 - 46)


| Screen No. | Modes | Function | Initial setting |
| 1/2 | 00 Finisher mode default | Selects finisher mode.● Non-sort, Sort, Sort/Staple, Group | Non-sort |
| 01 Staple position setting | Selects staple position.● Front, Rear, Booklet | Front | |
| 02 Power on default mode | * Selects mode.● Copy or Filing | Copy | |
| 03 Manual add toner | Allows the addition of toner as determined by operator. Toner is rapidly added after selecting ON and touching OK.● OFF, ON | OFF | |
| 04 User information change | * Allows changing user information as determined by operator. After user ID is entered or card is inserted, the following items can be changed.● User name, Department name, Tel No., Code No. | ||
| 2/2 | 05 Hard disk status | * Hard disk condition will indicate on the screen for 3 seconds. | |
| 06 Departmental counter | Copy usage and copy limit of selected department and total copy usage will appear on the screen for 3 seconds. | ||
| 07 Page numbering style | Selects numbering style● -n- or n/m (ex: -1- or 1/10) | -n- | |
| 08 Hole punch default | Selects hole punch mode● OFF, ON | OFF | |
| 09 Set key operator code | Input key operator ID code. |
NOTE
* Not needed in copying mode, but needed when installing options for advanced functions (see page 82) or using multi functions model (FP-D350H).
Copier Settings
■ User Preset modes allow you to change the initial copy mode, if necessary. (See P.44 - 46)
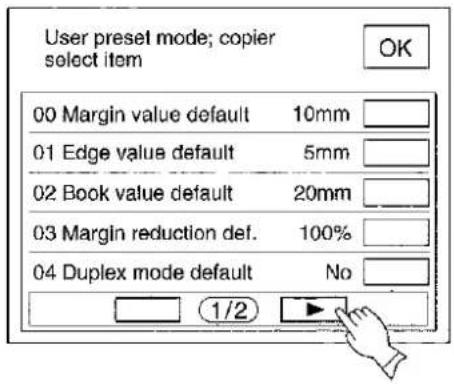
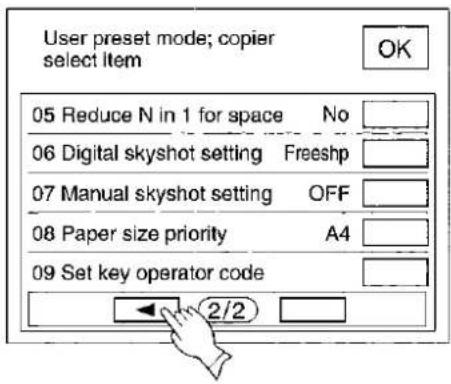
| Screen No. | Modes | Function | Initial setting |
| 1/2 | 00 Margin value default | Selects the margin shift value.● 5mm, 10mm, 15mm or 20mm | 10mm |
| 01 Edge value default | Selects the edge width.● 5mm, 10mm, 15mm or 20mm | 5mm | |
| 02 Book value default | Selects the book void width.● 15mm, 20mm, 25mm or 30mm | 20mm | |
| 03 Margin reduction default | Selects the reduction ratio in margin mode.● 100%, 95%, 93% or 91% | 100% | |
| 04 Duplex mode default | Determines most frequent usage mode● No, 1 to 2, 2 to 2 or Book to 2 | No | |
| 2/2 | 05 Reduce N in 1 for space | Selects whether or not to disable edge deletion● No, Yes | No |
| 06 Digital skyshot setting | Selects whether or not to disable edge deletion*● None, Free shape, Parallel | Free shape | |
| 07 Manual skyshot setting | Enables or disables the use of Manual Skyshot.● OFF, M1 ON, M2 ON, M1&M2 ON | OFF | |
| 08 Paper size priority | Specifies the paper size in manual paper size setting mode.● A4, A4-R, B4-FLS, A3, A5 | A4 | |
| 09 Set key operator code | Input key operator ID code. |
NOTE
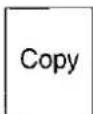
* To copy from the platen with the original cover or i-ADF open. Normally, this makes a copy with a solid (black) area around the original if the original is smaller than the copy paper. This mode eliminates the solid area automatically.
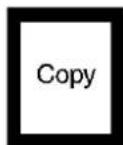
Digital Skyshot Mode (OFF)
Digital Skyshot Mode (ON)
User Preset
General Functions for Key Operator
■ Input key operator ID code to change settings.


| Screen No. | Modes | Function | Initial setting |
| 1/8 | 00 Paper size | Sets the paper size of each paper drawer.●A3, B4, A4, A4-R, B5, B5-R, A5, FLS1, FLS2, Ledger, Legal, Letter, Letter-R, Invoice | Contact your service provider. |
| 01 Auto reset time | Selects the reset time.● None, 45 seconds, 1 minute, 2 minutes | 1 minute | |
| 02 Energy saver time | Selects the energy saver time.● 5/15/30/60 minutes, 1.5/2/3/4 hours | 15 minutes | |
| 03 Auto off time | Selects the Auto off time.● No, 15/30/60 minutes, 1.5/3/4 hours | 60 minutes | |
| 04 Language default | Selects the message language of the display.● Japanese, English or● English, Swedish, Spanish | English | |
| 2/8 | 05 Special paper tray 1 | Sets the paper drawer for special paper (eg: coloured).● None, Copier upper, Copier lower, System Console Upper, Middle Lower, LCC, Bypass | None |
| 06 Special paper tray 2 | Sets another paper drawer for special paper.● Same as above | None | |
| 07 Finisher bin functionC: CopierP: PrinterF: Filing | * Selects stack position for 3 bin finisher (Upper/Middle/Lower)● C/F/P F/P/CP/P/F P/C/FP/C/P | C/F/P | |
| 08 Auto paper out rotate | Copier will automatically rotate image and print when selected paper drawer is empty.● OFF, ON | OFF | |
| 09 (Reserved) |
NOTE
* Not needed in copying mode, but needed when installing options for advanced functions (see page 82) or using multi functions model (FP-D350H).
- It is necessary to input operator ID code before changing items on this page.
General Functions for Key Operator
■ Input key operator ID code to change settings.

| Screen No. | Modes | Function | Initial setting |
| 3/8 | 10 Original set beep sound | — | — |
| 11 Original set beep sound in ADF | — | — | |
| 12 Unknown access rights | * Selects the unknown access rights● Group, Public | Group | |
| 13 (Reserved) | |||
| 14 Departmental counter mode | Monitors copy usage of each department(1) Copy usage of each department(2) Copy limit of each department(3) Copy number of each department | Contact your service provider. | |
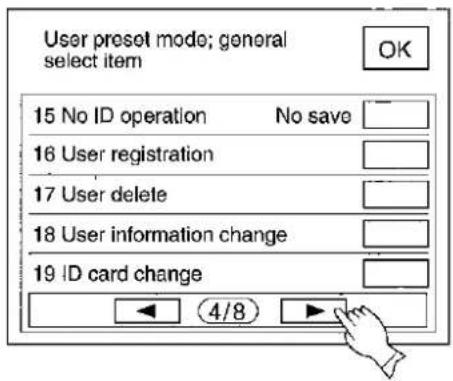
| 4/8 | 15 No ID operation | * Operation for user without access rights● No copy (prohibit all functions)No save (prohibit filing functions)Free (permit filling functions) | No save |
| 16 User registration | * Registers user to the copier● User name, department, Tel No., user ID number, password | ||
| 17 User delete | * Deletes user registration | ||
| 18 User information change | * Changes user information registered | ||
| 19 ID card change | * Changes ID card information registered |
NOTE
* Not needed in copying mode, but needed when installing options for advanced functions (see page 82) or using multi functions model (FP-D350H).
- It is necessary to input operator ID code before changing items on this page.
User Preset
General Functions for Key Operator
■ Input key operator ID code to change settings.


| Screen No. | Modes | Function | Initial setting |
| 5/8 | 20 Date time setting | Sets date time registered● Day, Month, Year, Time | |
| 21 (Reserved) | |||
| 22 TCP/IP address | * Sets user IP address● 3 digit × 4 | ||
| 23 TCP/IP subnet mask | * Sets the subnet mask● 3 digit × 4 | ||
| 24 TCP/IP default gateway | * Sets the gateway address● 3 digit × 4 | ||
| 6/8 | 25 (Reserved) | ||
| 26 (Reserved) | |||
| 27 (Reserved) | |||
| 28 (Reserved) | |||
| 29 DD file server IP add. | * Sets DD file server IP address● 3 digit × 4 |
NOTE
Not needed in copying mode, but needed when installing options for advanced functions (see page 82) or using multi functions model (FP-D350H).
- DD file server: It is a Network server which is able to connect with the Hyper Document System (HDS). DD server software is required when the HDS server function is used.
- It is necessary to input key operator ID code before changing items on this page.
General Functions for Key Operator
■ Input key operator ID code to change settings.
| Screen No. | Modes | Function | Initial setting |
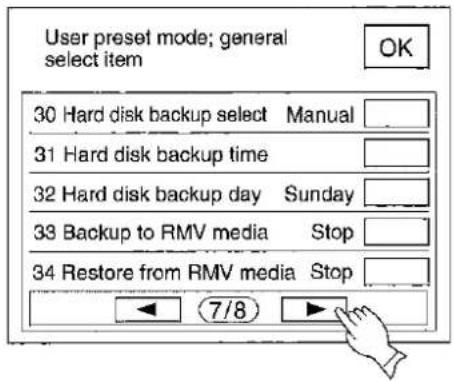
| 7/8 | 30 Hard disk backup select | * Selects the Hard disk backup method● Auto, Manual | Manual |
| 31 Hard disk backup time | * Sets the Hard disk backup time● Hour: minute | ||
| 32 Hard disk backup day | * Selects the Hard disk backup day● Sunday, Monday, Tuesday, Wenes., Thursday, Friday, Saturday, Everyday | Sunday | |
| 33 Backup to RMV media | * Selects the backup to removable media● Stop, Start | Stop | |
| 34 Restore from RMV media | * Selects the restore from removable media● Stop, Start | Stop | |
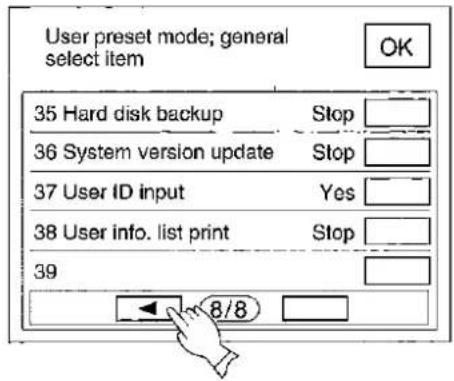
| 8/8 | 35 Hard disk backup | * Selects the hard disk backup manually● Stop, Start | Stop |
| 36 System version update | * Selects the system version update● Stop, Start | Stop | |
| 37 User ID input | * Selects the user ID input to use without ID card● No, Yes | Yes | |
| 38 User info. list print | * Allows printing user information (User name, Department name, Tel No. Code No., Password)● Stop, Start | Stop | |
| 39 (Reserved) |
NOTE
* Not needed in copying mode, but needed when installing options for advanced functions (see page 82) or using multi functions model (FP-D350H).
- It is necessary to input key operator ID code before changing items on this page.
Copier Settings for Key Operator
■ Input key operator ID code to change settings.

| Screen No. | Modes | Function | Initial setting |
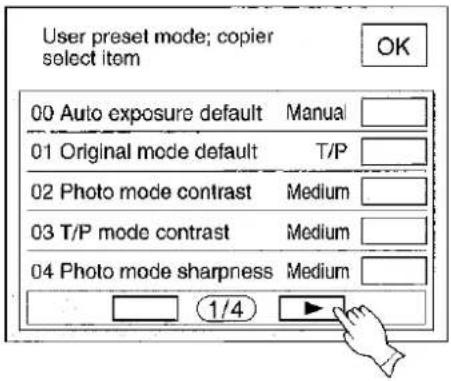
| 1/4 | 00 Auto exposure default | Determines whether to use Auto Exposure mode● No, Auto, Manual | Manual |
| 01 Original mode default | Selects original setting● Text, T/P (Text/Photo), Photo | T/P | |
| 02 Photo mode contrast | Selects contrast for Photo mode● Weak 2, Weak 1, Medium, Strong 1, Strong 2 | Medium | |
| 03 T/P mode contrast (Text/Photo mode) | Selects contrast for Text/Photo mode● Weak, Medium, Strong | Medium | |
| 04 Photo mode sharpness | Selects Sharpness for Photo mode● Weak, Medium, Strong | Medium | |
| 2/4 | 05 T/P mode sharpness (Text/Photo mode) | Selects Sharpness for Text/Photo mode● Weak, Medium, Strong | Medium |
| 06 Interleaving default | Selects OHP interleaving paper● Blank, Copy | Blank | |
| 07 Page insertion default | Selects Page Insertion● Blank, Copy | Blank | |
| 08 Cover mode default | Selects Cover paper● F, Blank (Front cover blank),F, Copy (Front cover copied),FB, Blank (Front & back cover blank),FB, Copy (Front & back cover copied) | F, Blank | |
| 09 SADF default | Enables or disables the use of SADF function.● No, Yes | No |
NOTE
- It is necessary to input key operator ID code before changing items on this page.
Copier Settings for Key Operator
■ Input key operator ID code to change settings.


| Screen No. | Modes | Function | Initial setting |
| 3/4 | 10 Maximum copy setting | Determines whether to limit number of copies (1-99) or not | OFF(No limit) |
| 11 Multi-size rotation | When using the same size paper in Multi-size feeding mode, select the paper direction by rotating or not.● No, Yes | No rotation | |
| 12 M1, size | Input a size in memory 1 for frequent usage size. (X: width, Y: Length) | 70 × 160 mm(X) (Y) | |
| 13 M2, size | Input a size in memory 2 for frequent usage size. (X: width, Y: Length) | 95 × 220 mm(X) (Y) | |
| 14 Text mode sharpness | Selects sharpness for Text mode● Weak, Medium, Strong | Medium | |
| 4/4 | 15 High speed duplex mode | Selects high speed duplex mode● No, Yes | Yes |
| 16 Memory overflow warning | Selects the memory overflow warning● Print, Cancel | ||
| 17 Document save default | * Selects the document save default● No, Yes | No | |
| 18 (Reserved) | |||
| 19 (Reserved) |
NOTE
* Not needed in copying mode, but needed when installing options for advanced functions (see page 82) or using multi functions model (FP-D250H/D350H).
- It is necessary to input key operator ID code before changing items on this page.
User Preset
User Setting
Paper size priority
Specifies the paper size in manual paper size setting mode.
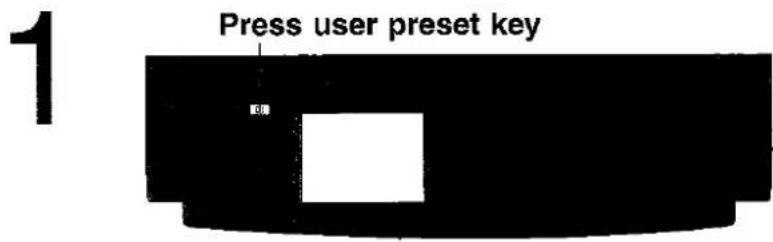
1
Press user preset key

natural_image
Pure electrical circuit lines without any symbols2
Proceed according to screen order
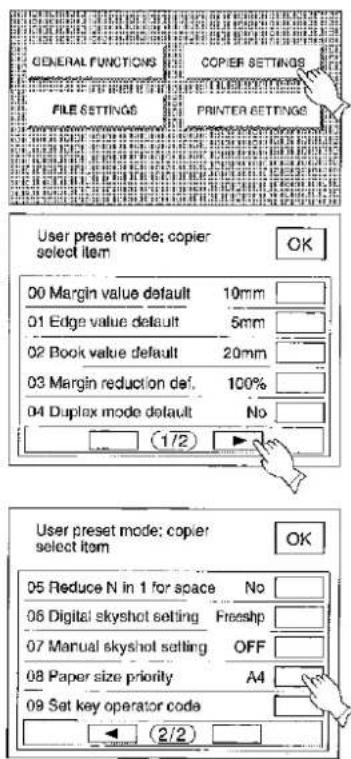
① Touch copier setting.
② Proceed to next page.
③ Touch 08 (Paper size priority).
④ Touch paper size you require and touch OK key.
⑤ Press user preset key then exit user preset.
User setting for key operator
■ Check paper size
The paper trays are designed to accommodate A5, A4, A4R, B4·FLS and A3 size paper. To change the paper size, perform following steps as shown below.
2 Proceed according to screen order ① Touch general functions
① Touch general functions

②Proceed to next page

③ Select key operator key
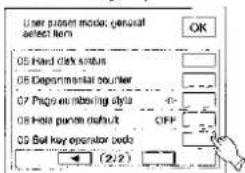
④ Input ID code (3 digit) and touch OK key

⑤ Select 00 (Paper size)
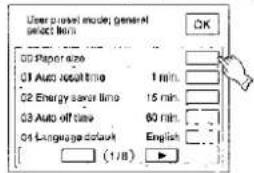
⑥ Touch paper drawer you require and select paper size*
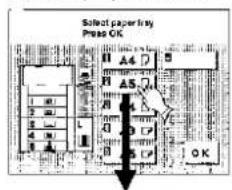
Paper size is changing as follows.

flowchart
graph TD
    A3 --> B4·FLS
    B4·FLS --> A4
    A5 <-- A4R
    A4R <-- A5
⑦ Touch OK key.
⑧ Press user preset key then exit user preset
NOTE
* If the paper tray is not installed or is not inserted completely, the paper size indication will not appear.
3
Change paper guide inside of paper drawer and paper size indicator

natural_image
Line drawing of a file drawer with multiple compartments (no text or symbols)① Pull out paper drawer and remove paper.

② Adjust paper guide ⓐ to the paper length.
③ Adjust paper guide ⑥ to the paper width.
Squeeze the stopper to move the paper guide ⓑ to the desired paper size.

④ Change the paper size indicator.
Take out and re-insert the indicator so the correct paper size is shown. (A5 size is on the rear)
⑤ Place new paper into drawer.
⑥ Close paper drawer.
User Preset modes for Key operator.
■ Departmental counter
Key operator can manage, limit copies, counters and code numbers for each department.
(Maximum department number: 100)
Press user preset key
2 Proceed according to screen order ①Select General function
① Select General function

② Proceed to next page and select 09 key operator key.

③ Input ID code (3 digit) and touch OK key

④ Proceed to screen 3/8 and select 14 Departmental counter mode.

⑤ Select menu of total counter, count number, limited number or password, and touch OK key.

● Input 0 means total counters will be cleared.
NOTE
● To reset the user preset mode, press Reset key.
3
Change Number of Department counter, limit copy and code number.

Number of Department counter
① Select required department using the scroll key.
② Input "0" means clear all counts.
③ Touch OK key.

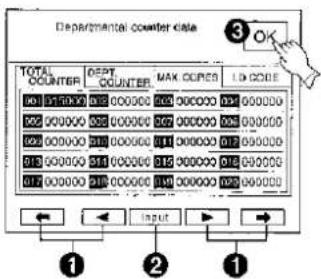
Limit copy for each Department
① Select required department using the scroll key.
② Input limit copy number.
③ Touch OK key.


Code number for each department
① Select required department using the scroll key.
② Input code number.
③ Touch OK key.

4
Exit user preset mode

① Touch OK key.
② Press user preset key on control panel.
NOTE
● To reset the user preset mode, press Reset key.
Options
Systems
2 Bin Finisher
(FA-F320)
- When hole punching copies. (Lower bin functions)
● A4 size only. (Except A4 □)
● Single position stapling. - Offset sets automatically.

natural_image
Technical line drawing of a server rack with multiple components and mounting holes (no text or labels)3 Bin Finisher
(FA-F350/F355)
● Large capacity (Max. 1,550 copies)
● Multi-position stapling.
(50 sheets)
● All 3 bins shift.
Options for 2/3 Bin Finisher
Exit Guide Unit
(FA-FK35)
● When 2/3 Bin Finisher is installed.
■ Other Options
Hard Disk for electronic sort (FA-HD03)
Platen Cover
(FA-UC20)
Platen Cover Mounting Kit (FA-GK35)
Exit Tray
(FA-X350)
ADF, Automatic Document Feeder (FA-A355)
i-ADF, Inverting Automatic Document Feeder
(FA-A888)
● To feed originals automatically.
● Multi-size feeding.
● For N in 1 copying.
● For duplex copying. (FA-A888 only)
Inverting Shift Tray
(FA-TR350)
2 Bin Inverting Shift Tray (FA-TR355)
- Offset sets automatically
● 250 sheets capacity.
Inverting Unit
(FA-RU350)
- Face down.
● Used only with the 3 Bin Finisher.
Optional memory for Image operation\*
● To enhance number of copies for electronic sorting.
ADU, Automatic Duplex Unit\*\* (FA-MADM65)
● For duplex copying. (50 sheets max.)
3000 Sheet Large Capacity Cassette (FA-MA301)
● 3000 sheets
System Console
(FA-DS725/DS825)
● To increase paper feed sources and capacity. (Storage Drawer × 1)
Options for System Console
Paper Drawer (FA-MA0555)
● 550 sheets
NOTE
* Image Processing Memory for factory default setting is 8 MB (24 MB: FP-D350H). Please consult with Authorized Dealer for up-grading memory capacity.
**: On the FP-D350DC/D450/D600 type, the ADU (Automatic Duplex Unit/FA-MADM65) is standardly equipped.
Automatic Document Feeder
ADF (FA-A355)/i-ADF (FA-A888)
1. Features
① Automatic original feeding
- The ADF/i-ADF tray can hold up to 50 originals of 80g / m^2 paper. (30 originals/B4·FLS, A3) It can accommodate originals from A5 to A3 size (50 to 110g / m^2 ).
● Automatic original size detection.
② Duplex Copying (FA-A888)
● The i-ADF allows you to perform two different types of duplexing automatically. (See P.15 – 20)
③ Multi-size feeding
● Different size originals to be copied full size (1:1) or same size. (See P.51)
④2:1 Copy (FA-A888)
● Double sided original to single sided copies. (See P.16)
⑤N in 1 copy (FA-A888)
● To make a 1-sided copy (full size or reduction), from two (or four) 1-sided originals side-by-side. (See P.19)
⑥ SADF (Single Automatic Document Feeder) Function
● A special original (like thin paper etc.,) can be fed from the ADF/i-ADF original tray and copied continuously with manual operation. (See P.21)
2. Components

3. Operation
■ Operation Procedure

Inappropriate originals
● Paper with a smooth surface such as glossy and coated papers
● Transparencies
● Originals with a lead edge that is creased, folded, punched or glued
- Paste-ups
● Pressure sensitive paper or paper with carbon backing
● Paper with excessive curl
● Stapled originals
(2)
Combination of Multi-size feeding
| Originals | Copies | |
| Full Size | Reduction | |
| A3 | A3 | A4R |
| A4 | A4 | A4 |
3 Bin Finisher, Exit Guide Unit
FA-F350/F355/FK35
1. Features
FA-F350/F355 (3 Bin Finisher)


● Staple electronic sort copy
● Up to 50 originals (A4)/30 originals (A3, B4, A4 □)
FA-FK35 (Exit guide unit)
● Feeds paper to 3bin finisher
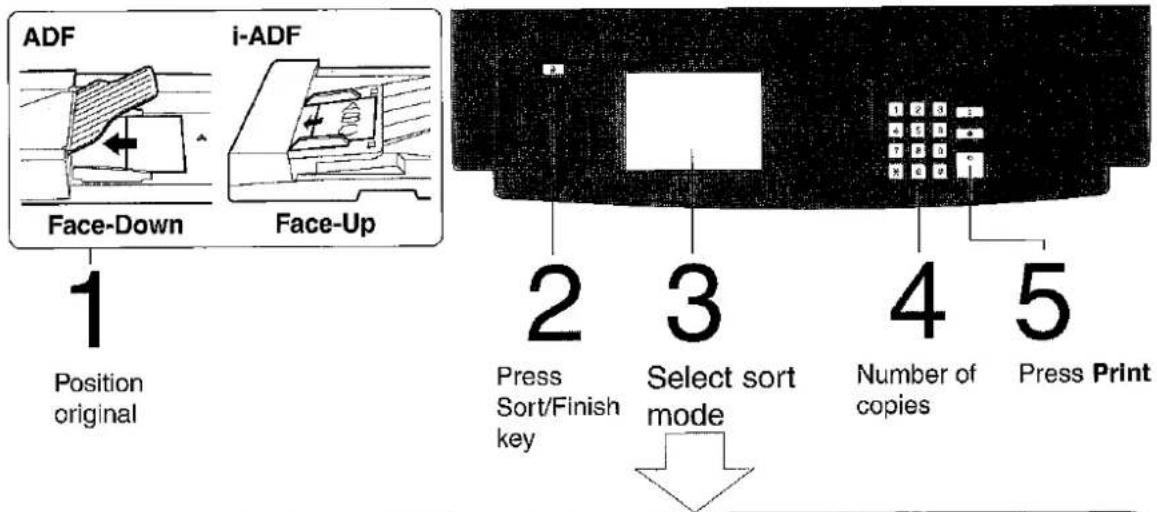
2. How to use
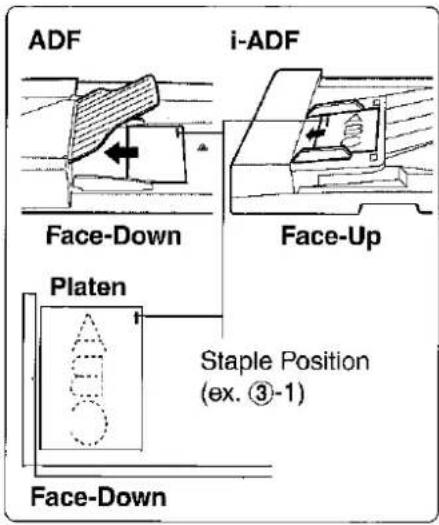

flowchart
graph TD
    A["1 Position original"] --> B["2 Select Sort/Finish key"]
    B --> C["3 Select sort mode"]
    C --> D["4 Number of copies"]
    D --> E["5 Press Print"]

* The Shift-sort is not available in the first set, when the memory is full.
Select the type of copy group mode into inverting unit
①Non-sort
Copy is stored on the tray
② Shift-sort*
Multiple copies are sorted automatically and stacked with shift.
③ Staple-sort
Following functions can be selected by pressing staple-sort key.
③-1: Top left corner (1 position)
③-2: Left (2 positions) (except A4 □)
③-3: Bottom left corner (1 position)
③-4: Bottom left corner (1 position)
④Shift-group
Multiple copies are stored by shifting
FA-F350/F355
3. Operation
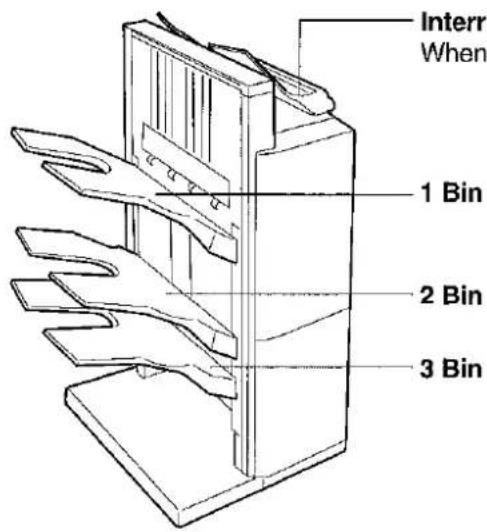
(1) Bin Capacity (sheets)
| Modes | Paper Size | Interrupt Tray | 1 Bin | 2 Bin | 3 Bin |
| Staple-sort | A4 | None | 300 or (30 sets) | 750 | 200 (20 sets) |
| A4 R, B4·FLS, A3 | None | 150 or (30 sets) | 500 | 100 (20 sets) | |
| Non-sort | A4, A5 | 50* | 300 | 1000 | 200 |
| Shift-sort | A4 R, B4·FLS, A3 | 30* | 150 | 500 | 100 |
| Shift-group |
* Non-sort only
(2) Interrupt Copying
From the platen glass only.

3 Bin Finisher
FA-F350/F355
(3) When replacing the staple cartridge
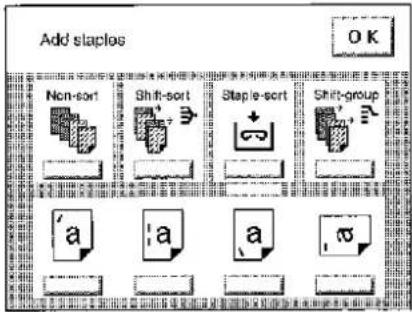
The message shown on the left appears when the staples are out.
1

natural_image
Technical line drawing of a mechanical assembly with no visible text or symbolsOpen the stapler cover.
2

① Turn the lock knob in counter clockwise direction.
② Pull out the staple unit until it stops.
3

① Remove the empty staple cartridge. NOTE: Leave any remaining staples in the stapler unit.
② Install the new cartridge.
③ Push the staple unit back to original position, then turn the lock knob in clockwise direction.
4
Check the operation
Select the staple-sort mode with control panel and print the desired data.
NOTE
- If the unit fails to staple after replacing the staple cartridge follow the instructions below.
① Remove the staple cartridge.
② Pull down the stapler towards you.
③Press the release knob and swing the staple jam lever back and forth.
If the unit still fails to work, contact your service provider.

2 Bin Finisher, Exit Guide Unit
FA-F320/FK35
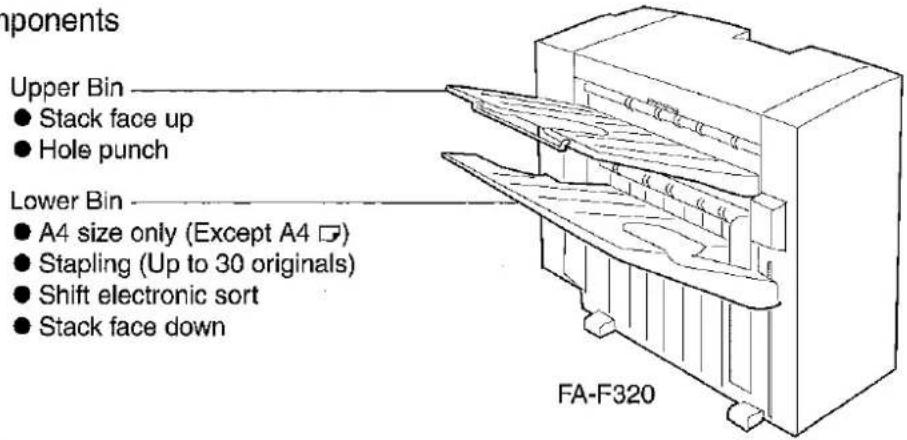
1. Components
2. Features
■ Upper Bin

- Sort by rotating sets

- Stack by punch
■Lower Bin
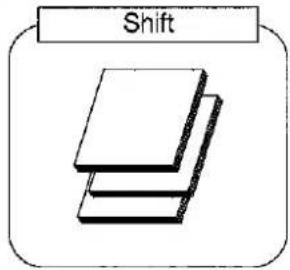
- Offset using electronic sorting

- Offset using punching and electronic sorting

- Sort by stapling sets
■FA-FK35 (Exit Guide Unit)
- Feeds paper to 2 bin finisher. FA-FK35 should be installed when installing FA-F320.
2 Bin Finisher, Exit Guide Unit
FA-F320/FK35
3. How to use


flowchart
graph TD
    A["1 Position original"] --> B["2 Select Sort/Finish key"]
    B --> C["3 Select sort mode"]
    C --> D["4 Number of copies"]
    D --> E["5 Press Print"]
flowchart
graph TD
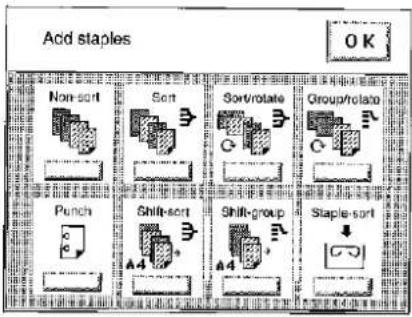
    A["Select finisher mode(s)\nPress OK"] --> B["Non-sort"]
    B --> C["Sort"]
    C --> D["Sort/rotate"]
    D --> E["Group/rotate"]
    E --> F["Punch"]
    F --> G["Shift-sort"]
    G --> H["Shift-group"]
    H --> I["Staple-sort"]
* In the punch mode, A3 size and A4 □ size are available. With other sizes, punch is not enough or lack of the hole(s).
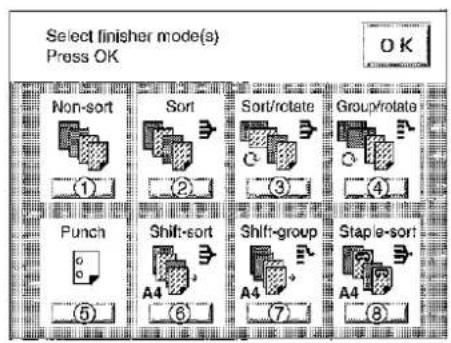
Select the type of copy group mode into 2 bin finisher and press OK.
① Non-sort
Copy is stored on the tray.
②Sort
Multiple copies are sorted automatically and stacked with shift.
③ Sort-rotate (Upper bin only)
Copied sets are separated by rotation and exited onto tray.
④ Group-rotate (Upper bin only)
Grouped copies are rotated and exited onto tray.
⑤Punch*
Sorted copies are punched and exited onto tray.
(Except Sort-rotate and Group-rotate modes)
⑥ Shift-sort (Lower bin only)
Copied sets are offset and exited onto tray.
⑦ Shift-group (Lower bin only)
Grouped copies are offset and exited onto tray.
⑧ Staple-sort (Lower bin only)
Sorted copies are stapled and exited onto tray.
NOTE
- When the image memory capacity of the copier is 8 MB;
Above sort modes may not be possible to use depending on the type of original such as gray originals and overflow indication will be appeared in the message display. In such a case, it is recommended either make copies by separate lots (except staple-sort) or install additional image memory (8 MB or 16 MB).
2 Bin Finisher
FA-F320
4. When replacing the staple
The message shown on the left appears when the staples are out.
1

natural_image
Illustration of a hand pressing down on a mechanical device with a magnified inset showing internal components (no text or symbols)Pull out the finisher.
2

natural_image
Hand inserting a cable into a rack (no text or symbols visible)Open the stapler cover.
3
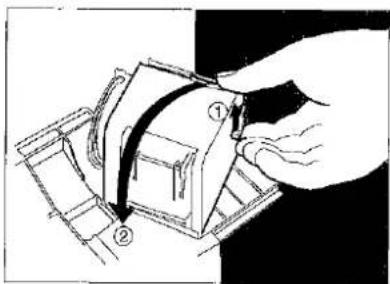
① Lift up the lock lever.
② Raise up the stapler unit.
4

natural_image
Illustration of hands assembling a mechanical component with an upward arrow (no text or symbols)Remove the staple cartridge.
2 Bin Finisher
FA-F320
5
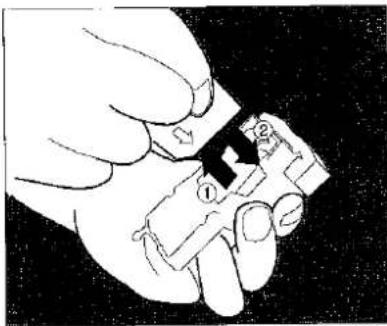
natural_image
Illustration of a hand holding a small electronic component with labeled parts (no text or symbols present)① Remove the empty staple case.
② Install the new staple case.
6

natural_image
Illustration of a hand using a tool to cut or mark a small object on a dark surface (no text or symbols visible)Pull out the tape.
7

natural_image
Illustration of hands assembling or assembling a mechanical component (no text or symbols visible)Insert the staple cartridge.
8
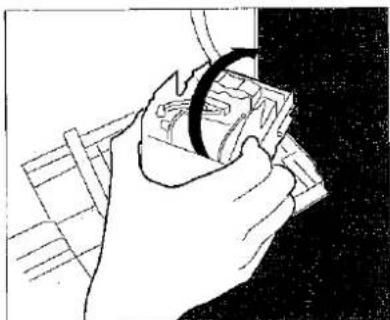
natural_image
Illustration of a hand holding a piece of cash, no text or symbols presentReturn the stapler unit to the original position.
9
10
① Close the stapler cover.
② Return the finisher to the original position.
Check the operation
Select the staple-sort mode with control panel and print the desired data.
FA-F320
- If the unit fails to staple after replacing the staple follow the instruction below.
1
Remove the staple cartridge according to staple replacing procedures steps 1 to 4. (See P.57)
2
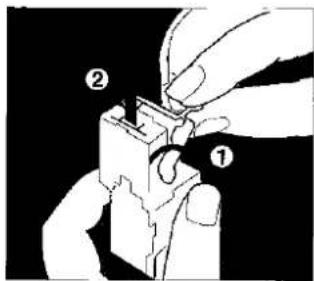
① Open the staple cover.
② Remove the remained staple.
③ Close the staple cover.
3
Reinstall the staple cartridge according to staple replacing procedures steps 7 to 10 and check operation. (See P.58)
- Punch disposal (When replacing the staple)
1
Pull out the finisher.
2

natural_image
Line drawing of a hand inserting a small black object into a file cabinet (no text or symbols)① Pull out the trash box.
② Dispose the punch trash.
3

① Lift up the finisher entry guide.
② Return the trash box.
4
Return the finisher to original position.
Inverting Shift Tray
FA-TR350/TR355
1. Feature
Copies are stacked on the upper bin. (Lower bin is for printer function)
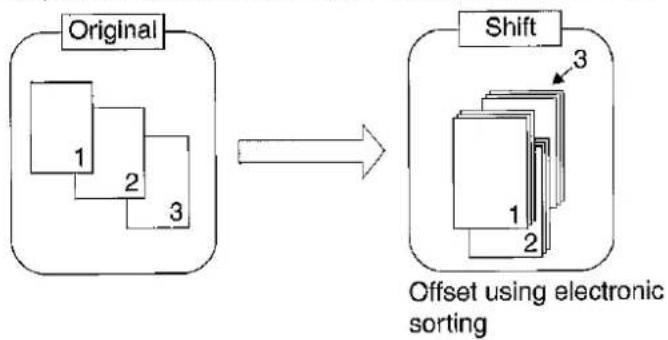
flowchart
graph LR
    A["Original"] --> B["1"]
    A --> C["2"]
    A --> D["3"]
    E["Shift"] --> F["1"]
    E --> G["2"]
    E --> H["3"]
    I["Offset using electronic sorting"] --> B & C & D & F & G & H

2. Operation

flowchart
graph TD
    A["Non-sort"] --> B["Shift-sort"]
    B --> C["Shift-group"]
    C --> D["Sort/rotate"]
    D --> E["Group/rotate"]
Select copy output method
① Non-sort*
Copies are exited onto tray.
② Shift-sort**
Copied sets are offset and exited onto tray.
③ Shift-group
Grouped copies are offset and exited onto tray.
④ Sort/rotate*
Copied sets are separated by rotation and exited onto tray.
⑤ Group/rotate*
Grouped copies are rotated and exited onto tray.
NOTE
* Non-sort, Sort/rotate and Group/rotate are available without the FA-TR350/TR355. Shift-sort and Shift-group require the FA-TR350/TR355.
** The Shift-sort is not available in the first set when the memory is full.
● The ADF/i-ADF is required for Sort/rotate and Group/rotate modes.
- Sort/rotate and Group/rotate functions are not available in the double sided copy, 2 page copy and 1 in N modes.
Adding Paper (↓)
550 Sheet Paper Tray
1

natural_image
Technical line drawing of a mechanical device with internal compartments and mounting brackets (no text or symbols)Pull paper tray out of copier.
Do not load ADU (option) with paper.
2

natural_image
Technical line drawing of a mechanical assembly with an arrow indicating direction (no text or symbols present)Place paper into paper tray.
Special papers, like glossy paper, mailing labels and transparencies cannot be used in the paper tray. Use bypass for special paper.
3

natural_image
Technical line drawing of a mechanical assembly with no visible text or symbolsMake sure paper is not loaded above overfill indicator located in the paper tray.
Overfill Indicator

4
Push paper tray back into copier.
ATTENTION
* When making double sided copies without an automatic duplex unit, place the copies face-up in the paper tray to the double sided overfill indicator.
- When the staple sorter is used:
Some papers may not be suitable for stapling. Please check with your service department if you are unsure about the type of paper you are using.
Adding Paper
3000 Sheet Large Capacity Cassette (LCC)
1
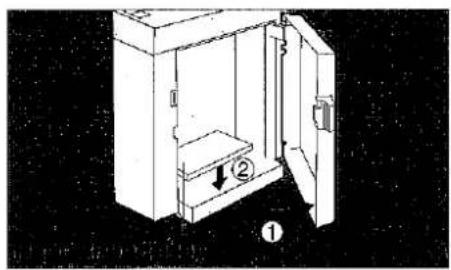
① Open the door.
②The paper feed tray will go down.
Do not touch the tray while it is moving.
2

natural_image
Diagram of a cabinet with an open door and internal structure, showing no text or symbolsADD PAPER
After tray stops, place paper neatly on to tray.
A4 size only (portrait).
3

natural_image
Line drawing of an open industrial cabinet with internal compartments and ventilation slots (no text or symbols)Do not fill above red line.
Up to 3000 sheets, 80 g/m²
4
Close the door.
Add Toner (↓)
When U13 appears
1

Open front panel.
Turn toner hopper assembly.
2
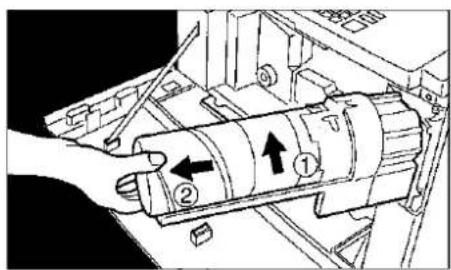
Remove toner bottle
① Turn empty toner bottle until it stops.
② Slide empty toner bottle towards you and remove.
3

natural_image
Technical line drawing of a mechanical component with no visible text or symbolsShake well before using. 10 – 15 times until the toner inside is evenly distributed.
Remove the cap from the bottle.
Do not turn the shutter.
4

① Insert new toner bottle to the hopper assembly.
② Turn the bottle until it stops, and arrows are aligned.

flowchart
graph LR
    A["①"] --> B["→"]
    B --> C["②"]
5
Return the toner hopper assembly to original position. Close front panel.
ATTENTION
- For optimum copy quality use the recommended Panasonic toner. Store toner in a cool dark place. Do not unseal toner before use. Use it as fast as possible after unsealing.
Replacing the Waste Toner Bottle (↓)
When U14 appears
1

Open waste toner bottle cover.
2

natural_image
Illustration of a hand holding a mechanical component with an arrow indicating direction (no text or symbols)Carefully remove the waste toner bottle by pulling it straight out as shown.
Do not squeeze the bottle.
3

Close bottle with cap.
4
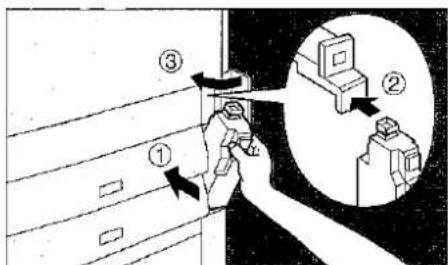
Install new bottle.
Do not insert the bottle from the top.
5
Close waste toner bottle cover.
ATTENTION
NOTE
- Do not use toner in waste toner bottle.
- If you have no replacement waste toner bottle, please contact your service provider.
Removing a Paper Misfeed
If a paper misfeed should occur, the misfeed indicator and misfeed position(s) will be shown on the touch panel display.
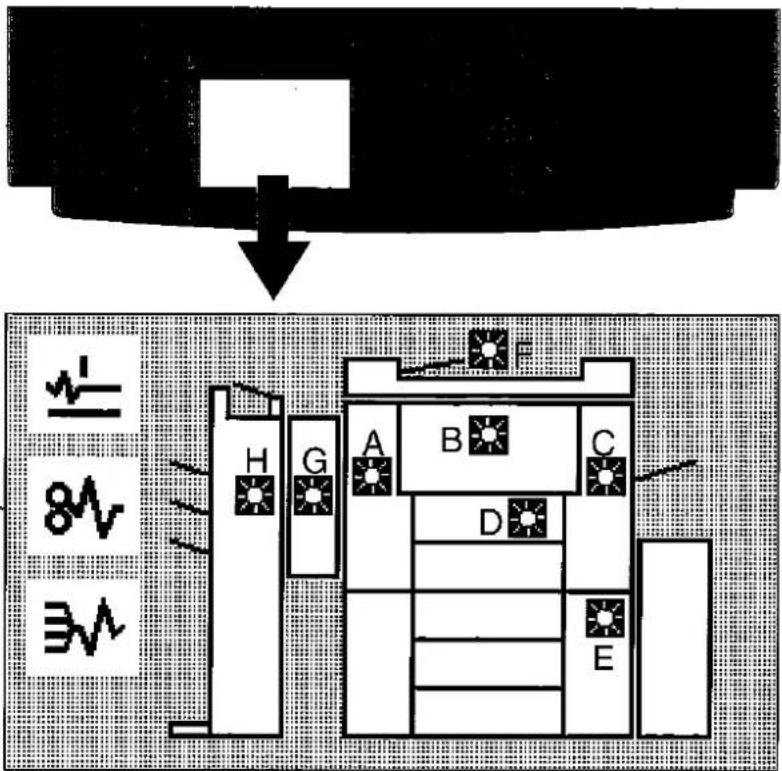
Paper Misfeed Positions
| 8V Copier or System Console | A: The paper exit area: (See P.66)B: Paper transport area (See P.67)C: Paper entry area (See P.67)LCC, Large Capacity Cassette (See P.68)D: Automatic Duplex Unit (ADU) (See P.70)E: System console (See P.68) |
| A/ I-ADF | F: ADF/i-ADF (See P.69, 71) |
| 3V Finisher | G: FA-TR350/TR355 (See P.72 – 73)FA-F320 (See P.75)H: FA-F350/F355 (See P.74) |
ATTENTION
● Make sure that the misfeed indicator goes off after removing a paper misfeed. The misfeed indicator will not go off if the paper is still remaining in the copier. Check again and remove all misfed paper.
Removing a Paper Misfeed
Paper exit area

1

① Open front panel.
② Open exit cover.
Note: If Finisher or Inverting shift tray is installed, move from the machine before above operation.
2

① Turn the left paper clearing knob.
② Remove misfed paper.
Left Paper Clearing Knob
3

Caution: this fuser area may be hot.
① Open the fuser guide.
② Check that no misfed paper is remaining.
③ Close the fuser guide.
① Close exit cover.
② Close front panel.
4
ATTENTION
● The fusing area may be hot, so use caution when removing misfed paper.
● The front panel must be opened prior to opening the exit cover.
● Make sure that the misfeed indicator goes off after removing all misfed paper.
● After removing misfed paper, close front panel as soon as possible.
Paper transport and paper entry areas

1
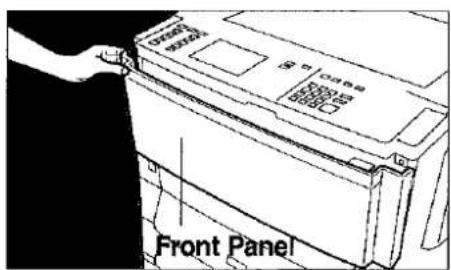
Open front panel.
2
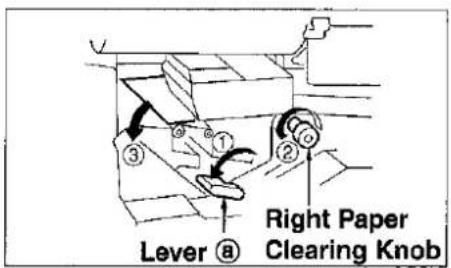
① Lower lever ⓐ.
② If copy paper is fed far into the copier, turn the right paper clearing knob.
③ Remove misfed paper.
④ Raise lever ⓐ to original position.
3

① Open the paper feed cover.
② Remove misfed paper.
③ Close entry cover.
4
Close front panel.
ATTENTION
● Do not touch or scratch the surface of the drum.
● Make sure that the misfeed indicator goes off after removing all misfed paper.
Removing a Paper Misfeed
System console/Large Capacity Cassette

1

System console
① Open the paper feed cover.
② Remove misfed paper.
③ Close the paper feed cover.
2

Large Capacity Cassette
① Hold the latch and slide the large capacity cassette to the right.
② Remove misfed paper.

① Open the door.
② Remove misfed paper.
③ Close the door.
④ Return the large capacity cassette to original position.
ATTENTION
● Make sure that the misfeed indicator goes off after removing all misfed paper.
i-ADF

natural_image
Pure technical diagram of a mechanical or architectural component without any text, numbers, or symbols1

Entry Area
① Open entry cover.
② Remove misfed paper.
③ Close entry cover.
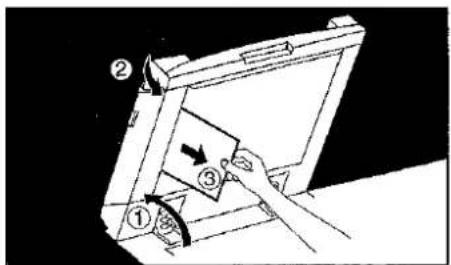
① Open the i-ADF.
② Open entry cover.
③ Remove misfed paper.
④ Close entry cover and the i-ADF.
2

Exit Area
① Open the i-ADF.
② Remove misfed paper.
If paper is remaining on the platen glass, remove it.

If paper can not be removed:
③ Close the i-ADF.
④ Remove misfed paper.
ATTENTION
- Check that the paper misfeed indicator disappears. If not, raise and lower the i-ADF.
Removing a Paper Misfeed
Automatic Duplex Unit (ADU)

1

natural_image
Line drawing of a cabinet with drawers and drawers, showing an arrow pointing to one drawer (no text or symbols present)Pull out automatic duplex unit.
2
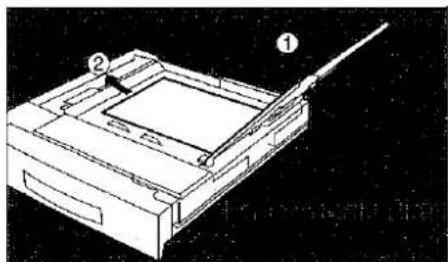
natural_image
Technical line drawing of a mechanical device with labeled components (no text or symbols present)① Open paper guide plate.
② Remove misfed paper.
③ Close paper guide plate.
3

If misfeed is too far into the automatic duplex unit:
① Open paper transport section, until it stops.
②Remove misfed paper.
③ Close paper transport section.
4
Push back automatic duplex unit.
ATTENTION
- When the misfeed indicators light at A, C and D, remove misfed paper from A and C first then remove it in the ADU (D).
● Make sure that the misfeed indicator goes off after removing all misfed paper.
ADF

natural_image
Pure technical diagram of a mechanical assembly without any text, numbers, or symbols1

natural_image
Technical line drawing of a mechanical component with a triangular blade and curved base (no text or symbols)Paper feed unit
① Close exit tray.
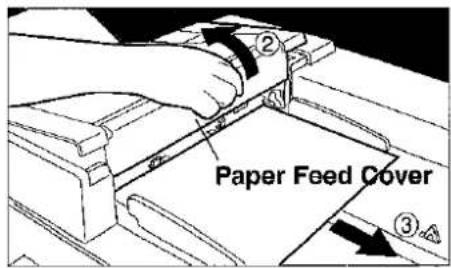
② Open the paper feed cover.
③ Remove misfed paper.
④ Close the paper feed cover.
⑤ Put exit tray back.
2

natural_image
Line drawing of a printer with paper and cover, showing internal structure (no text or symbols)Paper exit
① Open the paper feed cover.
② Remove misfed paper.

natural_image
Line drawing of a hand inserting a card into a notebook (no text or symbols)② Open exit cover.
③ Make sure no paper remains.
④ Close exit cover.
ATTENTION
- Check that the paper misfeed indicator disappears. If not, raise and lower the ADF.
Removing a Paper Misfeed
Inverting Shift Tray (FA-TR350)

1
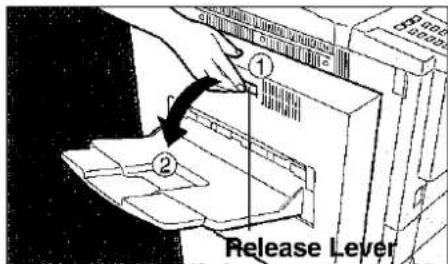
① Hold release lever.
② Open inverting shift tray until it stops.
2

① Open transfer guide.
② Remove misfed paper.
③ Close transfer guide.
3

Close inverse shift tray.
ATTENTION
● Make sure that the misfeed indicator goes off after removing all misfed paper.
2 Bin Inverting Shift Tray (FA-TR355)

1
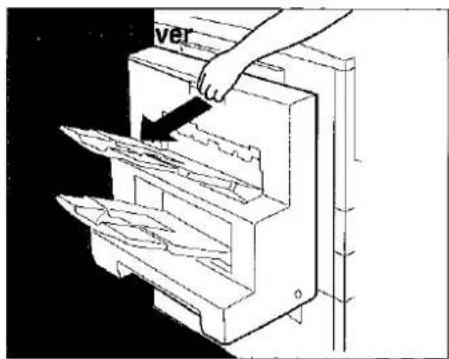
① Hold release lever.
② Open the 2 bin inverting shift tray to the left until it stops.
Pull out gently.
2
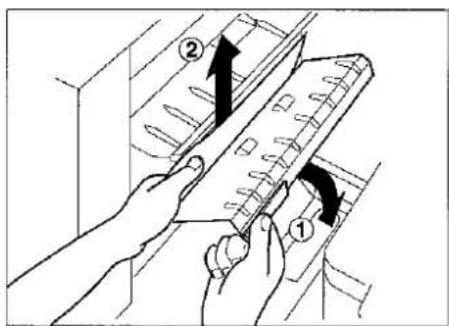
① Open transfer guide.
② Remove misfed paper.
③ Close transfer guide.
3
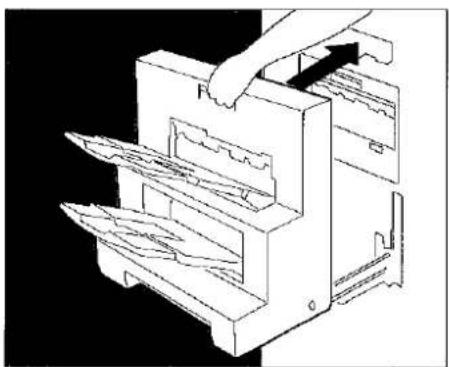
natural_image
Line drawing of a printer or printer with a hand inserting a paper into the cover (no text or symbols present)Return the 2 bin inverting shift tray to the original position.
ATTENTION
● Make sure that the misfeed indicator goes off after removing all misfed paper.
Removing a Paper Misfeed
3 Bin Finisher (FA-F350/F355)

natural_image
Pure technical line drawing of a mechanical assembly without any text, numbers, or symbols1

Press the lock release button and open the finisher to the left.
Pull out gently.
2

Open the interrupt tray
3

① Open the top cover.
② Open the buffer roller cover.
③ Remove misfed paper.
④ Close the buffer roller cover and top cover.
4
Return the finisher to the original position.
ATTENTION
● Make sure that the misfeed indicator goes off after removing all misfed paper.
Removing a Paper Misfeed
2 Bin Finisher (FA-F320)
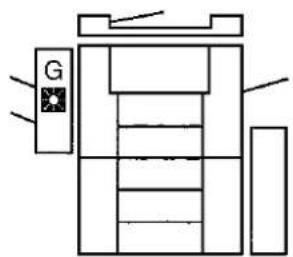
● Make sure that the misfeed indicator goes off after removing all misfed paper.
1

① Lift up the upper cover.
② Remove misfed paper.
2

natural_image
Diagram of a hand pressing down on a mechanical component with internal mesh structure (no text or symbols)① Pull out the finisher.
② Pull out the trash box. (See P.59)
③ Open the stapler cover. (See P.57)
3

① Turn the paper transport knob A.
② Remove misfed paper.

natural_image
Illustration of hands operating a mechanical device with a downward arrow indicating motion (no text or symbols present)When paper cannot be removed:
Lift up the finisher guide and remove misfed paper.
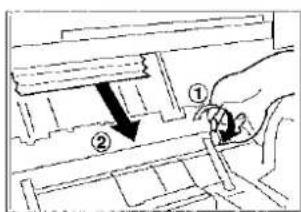
When the misfed paper is not found:
①Turn the paper transport knob B.
② Remove misfed paper.
4
① Close the staple cover and install the trash box.
② Return the finisher to original position.
Troubleshooting
Before you call service
Check
Action
Unit does not operate
Does the display light? (See P.9)
Does the Energy saver key flash (or light) and displays are turned OFF? (See P.33)
Do any of the U## codes and messages appear on display? (U0, U4, U10, U12, U14....etc.)
Does the add staples indicator and message appear on display? (∞) (See P.54)
Does the add paper indicator and message appear on display? (☑) (See P.11)
Does paper misfeed indicator and message appear on display? (8V) (See P.65)
Does any of the E#-## indicator and message appear on display?

Check if the Power Switch is turned on and if the power plug is inserted into the outlet.

Press Energy saver key on control panel.

Perform actions in accordance with each message.

Add staples. (See P.54)

Add paper. (See P.61, 62)

Remove misfed paper. (See P.66 – 75)

Turn copier power switch off, then back on. If error code comes back again, call service.
Before you call service
Check
Action
Copies are light
Does the exposure indicator say "light"?

Touch the "dark" key or touch the "Auto" key to choose the auto mode. (See P.12)
Does the add toner indicator and message appear on displays?

Add toner. (See P.63)
Copies are marked
Is the copier platen glass or platen cover dirty?

Clean the glass or platen cover. (See below)
■ If the measures outlined above do not solve the problem, call for Service.
Cleaning
As a rule, clean once a week.

Platen
Platen/Platen Cover
① Gently wipe marks off with cloth and neutral detergent.
② Gently wipe again with a dry cloth.
Specifications
■ FP-D250/D350/D350DC/D350H/D450/D600
| Type: | Desk Top |
| Copy/Print Process: | Laser/Electrostatic photographic method |
| Process: | Dry, New Mgnefine High Definition Toner |
| Resolution:(Copy mode) | Max. 600 dpi (FP-D250/D350/D350DC/D350H)Max. 400 dpi (FP-D450/D600) |
| Resolution:(Print mode) | Max. 600 × 600 dpiMax. 1,200 × 600 dpi (with smoothing) |
| Image Memory: | 8 MB (24 MB: FP-D350H) (for Electronic Sort/Group) |
| Multi-Copy Speed: | 28 A4 size copies per minute (FP-D250)35 A4 size copies per minute (FP-D350/D350DC/D350H)45 A4 size copies per minute (FP-D450)60 A4 size copies per minute (FP-D600) |
| Maximum Copy Size: | A3 (297 × 420 mm)Void Area: max. 5.0 mm |
| Copy Size: | A3 - A5 via paper drawer/trayA6R - A3 via sheet bypass |
| Reduction Ratios: | Preset: 87%, 82%, 71%, 58%, 50%Variable: from 99% to 25% in 1% increments |
| Enlargement Ratios: | Preset: 115%, 122%, 141%, 173%, 200%Variable: from 101% to 400% in 1% increments |
| Paper Feed: | 550 sheet paper drawer × 2 (× 1: FP-D450/D600) plus 50 sheet BypassAutomatic Switching |
| Paper Selection: | Automatic |
| Paper Weight: | Paper drawer/tray: 60 – 90 g/m2Bypass: 55 – 130 g/m2 |
| Quantity Selector: | 1 – 999, Automatic Repeat, Automatic Reset to 1 |
| Exposure Control: | Automatic, Text/Photo, Text and Photo Mode |
| Toner Supply: | Automatic |
| Dimensions: | 606 (W) × 770 (D) × 624 (H) mm |
| Weight: | 76 kg (FP-D250/D350)80 kg (FP-D350DC)82 kg (FP-D350H)84 kg (FP-D450/D600) |
| Electrical Requirements: | AC 220-240V, 50Hz, 6.5A |
Specifications are subject to change without notice.
■ i-ADF (FA-A888), ADF (FA-A355)
| Original Capacity: | 30 sheets/B4·FLS, A3 50 sheets/A5, A4 |
| Paper Size: | A5, A4, A4 R, B4·FLS, A3 |
| Paper Weight: | 50 - 110 g/m2 |
| Electrical Requirements: | Supplied from copier |
| Dimensions: | 622 (W) × 546 (D) × 117 (H) mm without Tray (FA-A355)600 (W) × 519 (D) × 120 (H) mm without Tray (FA-A888) |
| Weight: | 11 kg (FA-A355)12 kg (FA-A888) |
■ Inverting Shift Tray (FA-TR350)
| Paper Size: | A5, A4, A4 R, B4·FLS, A3 |
| Paper Weight: | 60 - 90 g/m2 |
| Bin Capacity: | Non-sort, Sort/rotate, Group/rotate: 250 sheetsShift-sort, Shift-group : 200 sheets (A4, A5)150 sheets (A3, B4·FLS) |
| Electrical Requirements: | Supplied from copier |
| Dimensions: | 79 (W) × 582 (D) × 419 (H) mm |
| Weight: | 9 kg |
■ 2 Bin Inverting Shift Tray (FA-TR355)
| Paper Size: | A5, A4, B4·FLS, A3 |
| Paper Weight: | 60 - 130 g/m2(Face Down: 60 - 90 g/m2) |
| Number of Bins: | 2 |
| Bin Capacity: | |
| Upper | Non-sort, Sort/rotate, Group/rotate: 300 sheets (A4, A5)200 sheets (A3, B4·FLS)Shift-sort, Shift-group : 200 sheets (A4, A5)150 sheets (A3, B4·FLS) |
| Lower | 300 sheets (For printer function only) |
| Electrical Requirements: | Supplied from copier |
| Dimensions: | 259 (W) × 582 (D) × 522 (H) mm |
| Weight: | 16.2 kg |
Specifications are subject to change without notice.
Specifications
■ 3 Bin Finisher (FA-F350/F355)
| Paper Size: | A5, A4, A4 R, B4·FLS, A3 |
| Paper Weight: | 50 - 128 g/m2 |
| Number of Bins: | 3 + Interrupt Tray |
| Bin Capacity: | |
| Interrupt Tray | 50 sheets |
| 1 Bin | 300 sheets |
| 2 Bin | 1,000 sheets (See page 53 for detailed information) |
| 3 Bin | 200 sheets |
| Electrical Requirements: | Supplied from copier |
| Dimensions: | 669 (W) × 582 (D) × 1,039 (H) mm (FA-F350)669 (W) × 603 (D) × 1,039 (H) mm (FA-F355) |
| Weight: | 34.5 kg (FA-F350)36.0 kg (FA-F355) |
■ 2 Bin Finisher (FA-F320)
| Paper Size: | Upper Bin: A5, A4, B4·FLS, A3Lower Bin: A4 |
| Paper Weight: | 60 – 105 g/m2 (Upper Bin, without punch: 60 – 130 g/m2) |
| Number of Bins: | 2 |
| Bin Capacity: | |
| Upper | 100 sheets |
| Lower | 1,000 sheets (When sorting mode: maximum 30 sets and/or 1,000 sheets) |
| Electrical Requirements: | Supplied from copier |
| Dimensions: | 405 (W) × 520 (D) × 438 (H) mm |
| Weight: | 16.2 kg |
Specifications are subject to change without notice.
■ System Console (FA-DS725/DS825)
| FA-DS725 | FA-DS825 | |
| Combination: | Storage Drawer × 1 | 550 Sheet Paper Drawer × 1Storage Drawer × 1 |
| Paper Size: | A5, A4, A4 R, B4·FLS, A3 | A5, A4, A4 R, B4·FLS, A3 |
| Paper Weight: | 60 - 90 g/m2 | 60 - 90 g/m2 |
| Electrical Requirements: | Supplied from copier | Supplied from copier |
| Dimensions: | 606 (W) × 661 (D) × 416 (H) mm | 606 (W) × 661 (D) × 416 (H) mm |
| Weight: | 22 kg | 27 kg |
| Applicable models: | FP-D250/D350/D350DC/D350H | FP-D450/D600 |
■ Large Capacity Cassette (FA-MA301)/Automatic Document Unit (FA-MADM65)
| FA-MA301 | FA-MADM65 | |
| Paper Size: | A4 | A5R – A3 |
| Paper Weight: | 60 – 90 g/m2 | 60 – 90 g/m2 |
| Paper Capacity: | Maximum 3000 sheets, 80 g/m2 | Maximum 50 sheets, 80 g/m2 |
| Electrical Requirements: | Supplied from system console | Supplied from copier |
| Dimensions: | 290 (W) × 445 (D) × 517 (H) mm | — |
| Weight: | 15 kg | 9 kg |
Specifications are subject to change without notice.
System Information
The FP-D250/D350/D450/D600 series are powerful multi-function digital copiers which can combine copying, printing, electronic filing and network functions all in one unit! Superior output quality is ensured with 600 dpi resolution in both copying and printing modes.
(Note: 400 dpi for FP-D450/D600 in copying mode.)
We hope you find that the wide ranging capabilities of the FP-D250/D350/D350DC/D450/D600 will make your office-place more productive and efficient.
■ Procedure for system upgrades

flowchart
graph LR
    A["Printer"] -->|and/or| B["Filing"]
    A -->|and/or| C["Network"]
    D["FP-D250, FP-D350, FP-D350DC, FP-D450, FP-D600"] -->|Plus| B
    D -->|Plus| C
    B -->|Further more| C
● Before system upgrades
| Part name | Part No. | Remarks |
| Printer Controller/HDD Mounting Kit | FA-PK30 | Control panel for mounting the printer and filing |

For Filing
| Part name | Part No. | Remarks |
| 1. DD Filing Unit(For FP-D250/D350/D350DC) | FA-WA01 | Set up unit for FilingHard Disc (2GB) Card readerRemovable mediaBatteryPersonal cards (10) |
| 2. DD Filing Unit(For FP-D450/D600) | FA-WA02 | |
| 3. DD Browser Software | FA-WB10 | For FA-WA01 |
| 4. Hard Disk Drive for Backup | FA-HD02 | For FA-WA01 |
For Printer
| 1. Printer Unit | FA-PC350 | Printer controller for PCL5e* |
| 2. Multi Page Description Language Controller | FA-MC350 | Printer controller for PS printer and PCL5e |
| 3. Hard Disk Drive for Printer | FA-HD01 | For FA-PC350 or FA-MC350 |
For Network
| Network Adapter Unit | FA-NE35 | Network PCB (Ethernet) for printer and filing |
NOTE
* PCL5e is the Page Description Language of the H.P. Company.
● Information regarding the options for Filing, Printer, Network can be found in each of the options respective operating guides.
For Service Call:
Matsushita Electric Industrial Co., Ltd.
Osaka 542-8588, Japan
FFPTD0921 S0699-0
June 1999
Printed In Japan
- Energy Star
- Table of Contents
- Before Operation
- Making Copies
- Options
- Maintenance
- Operation Chart
- Common features and usage
- ■ Memory capacity:
- NOTE
- Touch Panel Display
- ■ Function Categories
- Basic Menu (See page 12)
- Duplex/Original ▶ Copy (See page 15)
- Zoom/Effects (See page 22)
- Insertion Job (See page 27)
- Job Memory (See page 30)
- ■ Basic Menu Selection
- Precautions
- For your safety
- ■ Laser Safety
- Caution
- ■ Caution Labels
- DANGER
- ATTENTION
- VORSICHT
- CAUTION:
- VORSICHT:
- Toner and Paper
- Ventilation
- Installation
- Control Panel
- ● Adjusting the touch panel display contrast
- Full Size Copying
- ■ Initial Screen
- ■ When manually selecting exposure control or original size:
- Reduction or Enlargement
- Using the Sheet Bypass
- Duplex/Original ▶ Copy
- When touching DUPLEX/ORIG. ▶ COPY key
- → 2/2 → 1/2 → 2
- ■ 1 → 2 Copy
- 2→1 Copy
- ■ 2 → 2 Copy
- Procedure
- Book → 2
- ■ Book → 2 Copy
- Page Copy
- ■ 2-Page Copy
- N in 1
- in 1 Copy
- in 1 Copy
- Booklet
- to N
- ■ 1 to 2 Copy
- ■ 1 to 4 Copy
- SADF MODE
- ■ SADF (Single Automatic Document Feeder) Function
- Zoom/Effects
- When touching ZOOM/EFFECTS key
- Zoom Copying
- Zoom
- ■ Auto Zoom
- Centring/Mirror/Inverse
- Centring
- Mirror
- Inverse
- Edge/Margin/Book
- Page Numbering
- Feature
- Insertion Job
- When touching INSERTION JOB key
- Cover/Page insertion
- Cover
- Page insertion
- OHP interleaving/Presentation
- ■ OHP interleaving
- ■ Presentation
- OHP interleaving
- Presentation
- OHP interleaving
- Job Memory
- To store a job into a memory
- To recall a job from memory mode.
- Skyshot Mode
- Manual Skyshot Mode/Digital Skyshot Mode
- ■ To copy from the platen with the platen cover or ADF/I-ADF open. Two types of skyshot modes can be selected.
- ■ Setting the skyshot mode
- Operation
- Energy Saver/Interrupt
- Energy Saver Mode
- Auto Off Mode
- Interrupt Mode
- Combining Function Table
- User Preset
- General Functions
- ■ User Preset modes allow you to change the initial copy mode, if necessary. (See P.44 - 46)
- Copier Settings
- General Functions for Key Operator
- ■ Input key operator ID code to change settings.
- Copier Settings for Key Operator
- User Setting
- Paper size priority
- 1
- 2
- User setting for key operator
- ■ Check paper size
- Proceed according to screen order ① Touch general functions
- 3
- Change paper guide inside of paper drawer and paper size indicator
- User Preset modes for Key operator.
- ■ Departmental counter
- Press user preset key
- Proceed according to screen order ①Select General function
- Change Number of Department counter, limit copy and code number.
- Number of Department counter
- Limit copy for each Department
- Code number for each department
- 4
- Exit user preset mode
- Systems
- Bin Finisher
- (FA-F320)
- Bin Finisher
- (FA-F350/F355)
- Options for 2/3 Bin Finisher
- Exit Guide Unit
- (FA-FK35)
- ■ Other Options
- ADF, Automatic Document Feeder (FA-A355)
- i-ADF, Inverting Automatic Document Feeder
- (FA-A888)
- Inverting Shift Tray
- (FA-TR350)
- Bin Inverting Shift Tray (FA-TR355)
- Inverting Unit
- (FA-RU350)
- Optional memory for Image operation\*
- ADU, Automatic Duplex Unit\*\* (FA-MADM65)
- Sheet Large Capacity Cassette (FA-MA301)
- System Console
- (FA-DS725/DS825)
- Options for System Console
- Automatic Document Feeder
- ADF (FA-A355)/i-ADF (FA-A888)
- Features
- ① Automatic original feeding
- ② Duplex Copying (FA-A888)
- ③ Multi-size feeding
- ④2:1 Copy (FA-A888)
- ⑤N in 1 copy (FA-A888)
- ⑥ SADF (Single Automatic Document Feeder) Function
- Components
- Operation
- Inappropriate originals
- (2)
- Bin Finisher, Exit Guide Unit
- FA-F350/F355/FK35
- How to use
- FA-F350/F355
- Interrupt Copying
- Bin Finisher, Exit Guide Unit
- FA-F320/FK35
- Components
- Features
- ■FA-FK35 (Exit Guide Unit)
- How to use
- - When the image memory capacity of the copier is 8 MB;
- FA-F320
- When replacing the staple
- 5
- 6
- 7
- 8
- 9
- 10
- FA-TR350/TR355
- Feature
- Operation
- Adding Paper (↓)
- Sheet Paper Tray
- Adding Paper
- Sheet Large Capacity Cassette (LCC)
- ADD PAPER
- Add Toner (↓)
- When U13 appears
- Replacing the Waste Toner Bottle (↓)
- When U14 appears
- Removing a Paper Misfeed
- Paper exit area
- Paper transport and paper entry areas
- System console/Large Capacity Cassette
- Large Capacity Cassette
- i-ADF
- Entry Area
- Exit Area
- Automatic Duplex Unit (ADU)
- ADF
- Inverting Shift Tray (FA-TR350)
- Bin Finisher (FA-F350/F355)
- Bin Finisher (FA-F320)
- Troubleshooting
- Before you call service
- Check
- Action
- Unit does not operate
- Copies are light
- Copies are marked
- Cleaning
- Specifications
- System Information
- ■ Procedure for system upgrades
Brand : PANASONIC
Model : FP-D450
Category : Copier