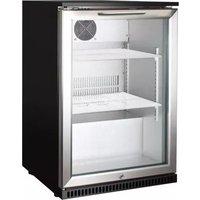
BBF118BI - Refrigerator Bellini - Free user manual and instructions
Find the device manual for free BBF118BI Bellini in PDF.


| Product Type | Built-In Bar Refrigerator |
| Model | BBF118BI |
| Brand | Bellini |
| Dimensions (W x D x H) | 600 mm x 600 mm x 865 mm |
| Adjustable Feet Range | 16 mm to 24 mm |
| Minimum Ventilation Gap | 50 mm |
| Power Supply | 220-240 V ~50 Hz, 10 A fuse |
| Climate Class | 4 (suitable up to +30°C ambient) |
| Recommended Stand Time Before First Use | 24 hours |
| Temperature Display | Electronic digital display |
| Cooling Mode Indicator | Indicator light under cooling symbol |
| Defrost Type | Automatic with manual override |
| Manual Defrost Duration | 20 minutes |
| Replacement Warranty | 2 years |
| Recommended Cleaning Interval for Condenser | Every 3 months |
| Interior Light | Replaceable bulb (switch off power before replacement) |
| Safety Features | Earthed power supply; automatic restart delay of 5 minutes after power interruption |
| Installation Type | Built-in (freestanding possible with proper ventilation) |
Frequently Asked Questions - BBF118BI Bellini
User questions about BBF118BI Bellini
0 question about this device. Answer the ones you know or ask your own.
Ask a new question about this device
Download the instructions for your Refrigerator in PDF format for free! Find your manual BBF118BI - Bellini and take your electronic device back in hand. On this page are published all the documents necessary for the use of your device. BBF118BI by Bellini.
USER MANUAL BBF118BI Bellini
natural_image
Exterior view of a modern stainless steel refrigerator with open storage compartments (no visible text or symbols)Built-In Bar Refrigerator
Model No.
BBF118BI FINELINE: 5104016
V7 Sep20
Thank you for purchasing
Bellini Bar Fridge, the appliance carries a 2 year replacement warranty, be sure to retain this Instruction Manual and receipt.
For Technical, queries please contact
Aust: 1300 373 199
NZ: 0800 764 912
Welcome to your new Bellini Built-In Bar Refrigerator
Thank you for choosing your new Bellini Built-In Bar Refrigerator.
The Bellini brand is built on a foundation of quality combined with affordability.
The operation of this appliance is very simple, but before your use it for the first time, it is important that the appliance is installed correctly and that your read and follow the instructions contained in this booklet.
WARNING: RISK OF ELECTRICAL SHOCK
HAZARD

This appliance must be earthed. If the power cable is damaged, it must be replaced by the manufacturer, its service agent or similarly qualified technician. In order to avoid a hazard ensure that the appliance is properly earthed. If an electric shock is felt when touching the appliance immediately stop using the appliance, switch it off and unplug the power cord at the power source.
DISPOSAL OF OLD APPLIANCES
BE SURE TO MAKE ANY LOCKS UNUSEABLE, REMOVE ANY DOOR(S) AND DISCARD OF THEM SEPARATELY.
WARNING-CHEMICAL HAZARD: DO NOT ALLOW CHILDREN TO PLAY WITH AN OLD APPLIANCE. CONTACT YOUR LOCAL AUTHORITY FOR DISPOSAL PROCEDURES.
Before disposing of an old appliance, please ensure it is switched off and safe. Unplug the appliance and break off or remove any locks in order to avoid children becoming trapped.

Important Notice: The refrigeration system of the appliance contains gas and refrigerants which require specialist waste disposal. The valuable materials in this appliance can be recycled. Contact you local waste disposal depot for proper disposal of an old appliance, your local authority or dealer if you need
any assistance.
Please ensure the pipework of this appliance is not damaged prior to disposal. You can contribute to environmental awareness by insisting on an appropriate non-polluting method of disposal.
Do not allow children to play with the packaging and destroy any plastic bags safely.
The cardboard may be broken or cut into smaller pieces and given to a paper disposal service. The wrapping foil is made polyethylene. The polyethylene pads stuffing contain no fluorochlorohydrocarbons.
All of these valuable materials may be taken to a waste collection depot and used again after adequate recycling. Consult your local authority for the name and address of the waste disposal services nearest to you.
IMPORTANT SAFETY INSTRUCTIONS
Before switching on your appliance for the first time, read the information contained in this user manual carefully. The manual contains important observations relating to the assembly, operation and maintenance of the appliance.
Please keep this booklet in a safe place for future reference. If you ever resell this appliance, hand this manual to the new owner. The manufacturer does not accept responsibility for any damages that may arise due to non-observation of these instructions. The user is liable for any material damage or bodily injury (product liability) caused by using the appliance carelessly or failing to follow the instructions.
- Do not use damaged appliances. If you are in doubt, consult an authorised service agent.
- Connection and installation of the refrigerator is to be carried out in strict compliance with the relative instructions in this manual.
-
Do not damage any parts of the appliance which carry refrigerant by piercing, perforating, crushing, twisting or scraping. If the refrigerant comes into contact with the eyes, it may cause serious eye injury.
-
Always remember to unplug the appliance before cleaning. Never unplug the appliance by pulling on the power cable. Always switch off the appliance at the power socket, grip the plug firmly and pull the plug straight out of the socket. Always check that the plug and cable are undamaged.
- All repairs must be made by the manufacturer, its service agent or similarly qualified service technician. Inadequate repairs may be dangerous. Never try to repair the appliance yourself.
- Should the cover of the interior light fall off or break, immediately switch off the appliance and replace the cover.
- Ensure the location has a flat, level and stable surface. The appliance may be levelled by turning either or both of the adjustable feet in the front corners. Check that the appliance is level using a spirit level. Foot adjustable dimensions minimum 16mm, maximum 24mm. Appliance dimensions 600mmWx600mmDx865mmH
Do not obstruct or cover the ventilation aperture. - Do not position the appliance with its rear panel directly against a wall. Maintain a gap of at least 50mm between the appliance and any adjacent wall.
- Position the appliance away from heat sources, ensure the appliance is well ventilated and protected from moisture or extremes of heat or cold.
- The appliance may not function properly if the temperature rises above +30^OC (standard model).
Do not allow children to play with the appliance, or sit on it or to hang on to the door(s). -
Ensure the power point is properly earthed to ground. Consult a qualified electrician if you are unsure.
-
This appliance is designed to operate on a power supply of 220/240 volts. Connected to a separate power point with a correctly earthed three pin socket. Do not use double adaptors.
- Do not store explosive substances such as aerosol cans with a flammable propellant in this appliance.
- Ensure all vents are clear of obstruction particularly if the appliance is a built-in model.
- Do not use mechanical devices or other means to accelerate the defrosting process, other than those recommended by the manufacturer.
• Do not damage the refrigerant circuit. - Do not use electrical appliances inside the food storage compartments of the appliance, unless they are of the type recommended by the manufacturer.
BEFORE USING FOR THE FIRST TIME
Do not position the appliance with its rear panel directly against a wall.
For good circulation and operating efficiency, the ventilation grilles must never be blocked.
Remove all packaging and place the appliance on a stable, secure flat surface. Position the appliance away from heat sources, where the appliance is well-ventilated and protected from moisture or extremes of heat or cold.
The appliance may not function properly if the temperature rises above +30^OC (standard model). This appliance meets the operating conditions according to the standard EN 411-4 in climate class 4. A 10 amp fuse is fitted. Never replace with a fuse rated higher than 10A.
NEVER USE AN EXTENSION LEAD
Do not use extension cords or double adapter plugs with this appliance.
If the power cord does not reach the nearest power point, either rearrange the layout or consult an electrician to fit a new power point.
If the appliance is unplugged or the power is cut off, wait for at least 5 minutes before plugging in and restarting the appliance to avoid damaging the compressor.
Do not place combustible, explosive or volatile articles, corrosive acid or alkali liquids in glass containers in this appliance. Always exercise caution if adjusting the temperature.

IMPORTANT: Allow the refrigerator to stand upright for 24 hours before plugging in for the first time.
OPERATION
Place the shelves firmly on their supports. Check that the appliance is functioning properly before using it. An optional light switch is inside the appliance.
Never place warm or hot foods directly into the appliance.
ELECTRONIC THERMOSTAT
During normal operation the controller display will show the temperature inside the appliance.
A small indicator light will illuminate under the

flowchart
graph TD
    A["UP"] --> B["Diode 1"]
    C["DOWN"] --> D["Diode 2"]
    B --> E["8"]
    D --> F["8"]
    E --> G["Indicator Lights"]
    F --> G
    G --> H["°C"]
    H --> I["SET"]
    I --> J["SET"]
    J --> K["DEFROST"]
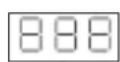
'Cooling' symbol to confirm the appliance is in its normal cooling mode and that the compressor is running.

When the temperature is reached and the compressor is in its 'off' cycle, no indicator light will illuminate in the controller:

Operation of the controller:
To set the desired temperature of the appliance:
- Press the button once. A 'beep' will sound and the display will start to flash.
- Use the buttons to set the desired temperature.
Press again to complete the operation or just leave it for 5-10 seconds and the display will revert back to showing the internal temperature.
Note: The appliance is built to automatically defrost and prevent any ice forming on the Evaporator. When in a 'Defrost' cycle, the indicator light will illuminate under the 'Defrost' symbol:

To manually activate 'Defrost' cycle:
- Press the button and hold it for 6 seconds or until a beep can be heard.
- The indicator light will now illuminate under the 'Defrost' symbol and the fridge is in 'Defrost' cycle.
- 'Defrost' will run for 20 minutes and then automatically revert to normal operation.
To manually change back to normal operating mode from the 'Defrost' mode:
- Press the button again and hold it for 6 seconds or until a beep can be heard.
- Both indicator lights under the ‘Defrost’ symbol and under the ‘Cooling’ symbol will now flash while the appliance is gearing up to switch back to normal operation.
- After 5-20 minutes, only the indicator light will illuminate under the 'Cooling' symbol to indicate that the appliance is now back in normal cooling mode.
IMPORTANT
- The appliance will go through a normal periodical defrosting cycle and a manual defrosting operation is only required in most extreme cases. It is better to avoid if not necessary.
- While in the 'Defrost' mode the appliance cooling power is reduced as the compressor is not working. The automatic cycles ensure the defrosting is done in the most efficient manner and when required. It is not recommended to leave the appliance in the manually set defrost mode prolonged periods of time.

NOTE: It is not recommended to operate the appliance on a setting that runs below 4^0C as such a setting will cause the contents close to the evaporator to freeze and will result in unnecessary strain on the cooling system and undue high energy consumption.
NOTE: In normal operation the controller turns the compressor off at the set temperature and back on again after the temperature has risen to around 5^0C . As such the reading in the electronic controller is almost a few degrees above set-point which is perfectly OK.
CARING FOR THE APPLIANCE
DEFROSTING
Ice may build up on the evaporator if the unit is put to work constantly for a period of time. When ice begins to build up to approximately 4mm thick, defrosting is required. Empty the cabinet of its contents, switch the thermostat to 'OFF' position. The ice will start to melt. When the ice has melted and drained away, dry off any residual moisture with a soft cloth. Switch on the power again via thermostat. Please note it will take around 12 hours for the cabinet to get back down to temperature with the products.
CLEANING
- BEFORE CLEANING turn the appliance off at the power point and unplug the cord to prevent any chance of electrocution and remove all contents.
- Wash the inner compartment with warm soapy water, use a neutral detergent. DO NOT allow the control panel, cables or plug to get wet. DO NOT use metal or sharp objects to remove debris.
- After cleaning dry all surfaces thoroughly.
- to ensure trouble-free operation the condenser should be cleaned every three months where appropriate using a vacuum hose. The condenser is located behind the lower grill of the cabinet. In exceptionally dusty locations the condenser should be cleaned more often.
- Use mild soapy water to clean the gasket and seals.
REPLACING THE LAMP
- Switch off the power at the power point and remove the cord by pulling the plug.
- Unscrew and remove the screws on both ends of the light cover, take down the lamp cover, pull out the wires then remove the bulb.
- Install the new bulb, connect the wires, replace the lamp cover and refit the screws.
- Wait for at least 5 minutes before plugging in and restarting the appliance to avoid damaging the compressor.

WARNING: Never insert your finger into the light bulb socket.
TROUBLSHOOTING
You can solve many common problems easily saving you the cost of a service call. Try the suggestions below to see if you can solve the problem before calling the service centre.
| PROBLEM POSSIBLE CAUSE SOLUTION | ||
| Appliance does not operate. | Appliance is not connected to a power sup-ply.The appliance is turned off.Tripped circuit breaker or a blown fuse. | Connect the appliance to a power supply.Switch on the appliance.Switch on the circuit breaker or replace the fuse. |
| Appliance is not cold enough. | The temperature is not set correctly.The ambient temperature could require a lower temperature setting.The door was opened too often.The door was not closed completely.The door is not hermetically sealed.The condenser is too dirty.The ventilation opening is blocked or too dirty. | Check the set temperature. Set a lower temperature.Do not open the door more often than necessary. Close the door properly.Check the door seal and clean or replace.Clean the condenser when necessary.Clear the obstructions and clean the dust. |
| Appliance turns itself on and off frequently. | The room temperature is higher than aver-age.A large amount of food has been added to the unit.The door is open too often.The door is not closed properly.The door gasket does not seal properly. | Move the appliance to a cooler place.Leave the appliance to work for a while until the set temperature has been reached.Do not open the door more often than necessary.Close the door properly.Check the door seal and clean or replace. |
| The light does not work. | Appliance is not connected to a power sup-ply.Tripped circuit breaker or a blown fuse.The light was switched off on the control panel. | Connect the appliance to a power supply.Switch on the circuit breaker or replace the fuse. Switch the light on at the control panel. |
| Vibrations | The appliance is not properly levelled. | Level the appliance with the adjustable feet. |
| The appliance seems to make too much noise. | The rattling noise may come from the flow of refrigerant, which is normal. As each cycle ends you may hear gargling sounds caused by the flow of refrigerant in the appliance.If temperature fluctuations occur, the concentration and expansion of the inner walls may cause a popping or cracking noise. | |
| The appliance is not properly levelled. | Level the appliance with the adjustable feet. | |
WARRANTY
1.1 In this warranty:
1.1.1 Australian Consumer Law means the law as set out in Schedule 2 of the Competition and Consumer Act 2010;
1.1.2 Company means GSM Sales Pty Ltd ABN 53 007 682 475 of 142-144 Fullarton Road, Rose Park SA 5067. Telephone 1300 373 199. Email admin@gsmsales.com.au;
1.1.3 Consumer means a “consumer” as that term is defined in Section 3 of the Australian Consumer Law as the original purchaser of a Belliniproduct;
1.1.4 Consumer Guarantees means the guarantees under the Australian Consumer Law;
1.1.5 You means the Consumer.
1.2 Nothing in this warranty affects any person's rights under the Australian Consumer Law. The benefits to any Consumer under this warranty are in addition to the rights and remedies available under any Consumer Guarantees.
1.3 Subject to the other clauses of this warranty, the Company warrants to the Consumer that the Bellini product will be free of manufacturing defects and will perform to the Company's specifications.
1.4 The benefit of this warranty extends only to the Consumer as original purchaser of a Bellini product which is installed in a domestic household area.
*The in Home warranty does not apply to Commercial and or industrial usage. * Please See 1.7.7 for additional information
1.5 This warranty commences on the date of purchase of the Bellini product by the Consumer and continues for the benefit only of the Consumer until the expiry of three (3) year (Warranty Period).
1.6 If within the Warranty Period a manufacturing defect is discovered in the Bellini product or it fails to perform to the Company's specifications as a result of some defect in materials, components or workmanship (Defect) then the Company will, at its option, repair the Bellini product or supply a replacement Bellini product free of charge. A replacement Bellini product may differ from the original product purchased by the Consumer.
1.7 This warranty will not apply to any Bellini product:
1.7.1 Installed by any person other than a qualified tradesperson; or
1.7.2 Subjected to misuse, neglect, negligence or accidental damage; or
1.7.3 Operated in any way contrary to any operating or maintenance instructions; or
1.7.4 Improperly handled, installed or maintained; or
1.7.5 Altered or modified prior to or after installation; or
1.7.6 Damaged directly or indirectly by power surges, electrical storm damage or connection to incorrect power supply
1.7.7 Industrial and or Commercial usage is inclusive of staff areas in office/shop environments, hotel/motel or other similar accommodation or rental type properties including Bed and Breakfast establishments.
The Australian Consumer Law requires the inclusion of the following
statement with this warranty:
Our goods come with guaranteed that cannot be excluded under the Australian Consumer Law. You are entitled to a replacement or refund for a major failure and for compensation for any other reasonably foreseeable loss or damage. You are also entitled to have the goods repaired or replaced if the goods fail to be of acceptable quality and the failure does not amount to a major failure.
IN ORDER TO MAKE A CLAIM UNDER THIS WARRANTY THE CONSUMER MUST CALL 1300 373 199 (AUSTRALIA) OR 0800 764 912
(NEW ZEALAND) TO CONNECT TO THE NEAREST AUTHORISED CENTRE
1.8 You must provide proof of your purchase of the Bellini product and the date of purchase in order to obtain the benefit of this warranty.
1.9 If you live outside the service area of the Company or one of its service agents, this warranty does not cover the cost of transport of the Bellini product for service nor the service agent's traveling costs to and from your home.
1.10 If you are required to transport the Bellini product to the Company or its service agent, you must ensure it is safely disconnected by a qualified tradesman and securely packed and insured. The Company does not accept any responsibility for loss or damage of the Bellini product prior to it being received by the Company or its service agent.
1.11 You will be responsible for all costs of returning a Bellini product to the Company and for redelivery of the Bellini product by the Company (whether it is the original or a repaired and/or a replacement Bellini product) and for any other expenses you incur in claiming under this warranty.
1.12 The Company or its service agent will examine any Bellini product and if the Company determines that it is defective through no fault of the Owner and is otherwise undamaged, the Company will repair or replace the Bellini product in accordance with this warranty.
DO NOT SEND IN THIS WARRANTY
Fill out the following details and file with your purchase invoice.
RETAIN & FILE WITH YOUR RECEIPT
Your Purchase Receipt/Invoice is proof of date of purchase. If you are unable to establish the date of purchase, or if the fault is not covered by this warranty, or if the product is found to be in working order, you will be required to bear all service call charges.
GSM Sales Pty Ltd reserves the right to discontinue items, modify designs and change specifications without incurring obligation.
Whilst every effort is made to ensure that descriptions, specifications and other information in this publication is correct, no warranty is given in respect thereof and the company shall not be liable for any errors therein.
Purchased from:
Co. Name:
Address:
Date of Purchase:
Serial number:
NOTE: Consistent with our continuing product development policy, improvements may have been made which render the contents of this packaging slightly different to that shown.
FOR WARRANTY SERVICE CALL 1300 373 199 (AUSTRALIA) OR 0800 764 912 (NEW ZEALAND) TO CONNECT YOU TO THE NEAREST AUTHORISED SERVICE CENTRE




- Thank you for purchasing
- Welcome to your new Bellini Built-In Bar Refrigerator
- WARNING: RISK OF ELECTRICAL SHOCK
- HAZARD
- DISPOSAL OF OLD APPLIANCES
- Do not allow children to play with the packaging and destroy any plastic bags safely.
- IMPORTANT SAFETY INSTRUCTIONS
- BEFORE USING FOR THE FIRST TIME
- NEVER USE AN EXTENSION LEAD
- OPERATION
- ELECTRONIC THERMOSTAT
- Operation of the controller:
- IMPORTANT
- CARING FOR THE APPLIANCE
- DEFROSTING
- CLEANING
- REPLACING THE LAMP
- TROUBLSHOOTING
- WARRANTY
- In this warranty:
- DO NOT SEND IN THIS WARRANTY
- RETAIN & FILE WITH YOUR RECEIPT
- FOR WARRANTY SERVICE CALL 1300 373 199 (AUSTRALIA) OR 0800 764 912 (NEW ZEALAND) TO CONNECT YOU TO THE NEAREST AUTHORISED SERVICE CENTRE
Brand : Bellini
Model : BBF118BI
Category : Refrigerator