
SHB1000 - Headphones PHILIPS - Free user manual and instructions
Find the device manual for free SHB1000 PHILIPS in PDF.


| Product Type | On-ear wireless headphones |
| Model | SHB1000 |
| Brand | Philips |
| Wireless Technology | Bluetooth 4.0 |
| Supported Profiles | HSP, HFP, A2DP, AVRCP |
| Driver Size | 32 mm |
| Frequency Response | 20 Hz - 20 kHz |
| Impedance | 32 Ω |
| Sensitivity | 100 dB |
| Battery Type | Rechargeable lithium-ion |
| Battery Life | Up to 8 hours of music/talk time |
| Charging Time | Approximately 2 hours |
| Charging Port | Micro-USB |
| Weight | 150 g |
| Dimensions (folded) | 16.5 x 14.5 x 4.5 cm |
| Controls | Volume +/-, Play/Pause, Call answer/end |
| Microphone | Built-in, omni-directional |
| Care Instructions | Wipe with a soft, dry cloth. Do not use liquids. |
| Safety Warnings | Use at moderate volume. Avoid prolonged high volume. |
| Spare Parts Availability | Replacement ear cushions and charging cables available via Philips support. |
| Compatibility | Bluetooth-enabled devices (smartphones, tablets, computers) |
Frequently Asked Questions - SHB1000 PHILIPS
User questions about SHB1000 PHILIPS
0 question about this device. Answer the ones you know or ask your own.
Ask a new question about this device
Download the instructions for your Headphones in PDF format for free! Find your manual SHB1000 - PHILIPS and take your electronic device back in hand. On this page are published all the documents necessary for the use of your device. SHB1000 by PHILIPS.
USER MANUAL SHB1000 PHILIPS
Register your product and get support at
www.philips.com/welcome
PhotoFrame
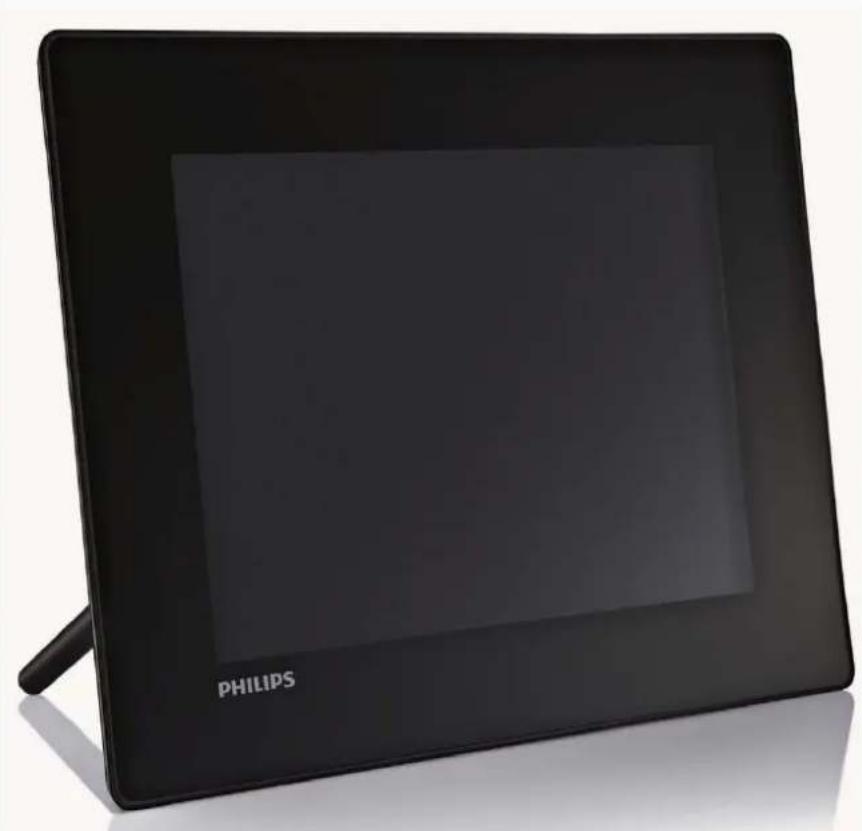
natural_image
Black Philips digital camera with a blank screen, shown on a stand (no text or symbols visible on the device itself)SPF5008
SPF5208
SPF5010
SPF5210
SPF7008
SPF7208
SPF7010
SPF7210
EN
User
manual
1 Important 4
Safety 4
Safety precautions and maintenance 4
Notice 4
CE Declaration of Conformity (SPF5008/SPF5208/SPF5010/SPF5210) 4
CE Declaration of Conformity (SPF7008/SPF7208/SPF7010/ SPF7210) 5
Recycling 5
End of life disposal 5 Recycling Information for Customers 5
Compliance with Electro-Magnetic Field (EMF) 5
North Europe Information (Nordic Countries) 6
Banned Substance Declaration 6
Bluetooth Statement (SPF7008/ SPF7208/SPF7010/SPF7210) 6
Third party software 6
2 Your PhotoFrame 8
Introduction 8
What's in the box 8
Overview of your PhotoFrame (SPF5008/SPF5208) 10
Overview of your PhotoFrame (SPF5010/SPF5210/SPF7008/ SPF7208/SPF7010/SPF7210) 12
3 Get started 14
Install the stand 14
Connect power 14
Turn on/off the PhotoFrame 15
Transfer photos or video/music files 15
Transfer from a storage device 15
Transfer by Philips PhotoFrame Manager (SPF7008/SPF7208/ SPF7010/SPF7210) 17
4 Play 19
Play photos 19
Play video 20
Play background music 21
Display a theme clock (SPF5008/
SPF5208/SPF7008/SPF7208/
SPF7010/SPF7210) 22
5 Browse and manage photos/video or albums
Browse photos/video files in album mode 24
Add a photo/video file to the Favorites album 24
Copy a photo/video file 25
Move a photo/video file 25
Delete a photo/video file 26
Rotate a photo 26
Select a photo effect 27
Group photos by name/date 28
Select several photos at a time 28
Remove photos/video or music files from the Favorites album 29
Manage an album 30
Create an album 30
Rename an album 31
6 Show date/time in slideshow 32
7 Create a reminder 34
Edit a reminder 35
8 Slideshow setting 36
Select a transition effect 36
Select background 36
Select file type for slideshow display 38
Display collage photos 38
9 Other settings 40
Use the quick menu 40
Select an on-screen language 40
Adjust brightness 40
Set time/date 42
Set time/date format 42
Smart Power setting 43
Specify time to auto on/off 43
Specify brightness to auto on/off 44
Hibernate your PhotoFrame 45
Set Auto Orientation 46
Turn on/off button sound 46
Protect/Unprotect content on a storage device 47
Set Demo 48
Bluetooth (SPF7008/SPF7208/
SPF7010/SPF7210) 48
Set up Bluetooth connection 48
Set Bluetooth pin code 49
View information of the PhotoFrame 50
Rename the PhotoFrame 51
Reset all settings to factory default 51
10 Upgrade the PhotoFrame 53
11 Product information 54
12 Frequently asked questions 56
13 Appendix 57
Send photos from your mobile phone with Bluetooth connection 57
14 Glossary 58
Please visit www.philips.com/welcome where you can access a full set of supporting materials such as user manual, the latest software updates and answers to frequently asked questions.
1 Important
Safety
Safety precautions and maintenance
Never touch, push, rub or strike the • screen with hard objects as this may damage the screen permanently.
When the product is not used for long periods, unplug it.
Before you clean the screen, turn off and • unplug the power cord. Only clean the screen with a soft, water-damp cloth.
Never use substances such as alcohol, chemicals or household cleaners to clean the product.
Never place the product near naked • flames or other heat sources, including direct sunlight.
Never expose the product to rain or • water. Never place liquid containers, such as vases, near the product.
Never drop the product. When you drop • the product, it will be damaged.
Keep the stand away from cables.
Ensure that you install and use services or • software only from trustworthy sources free of virus or harmful software.
This product is designed for indoor use • only.
Only use the supplied power adaptor for • the product.

Caution
(For SPF7008/SPF7208/SPF7010/SPF7210) •
Bluetooth connectivity of the PhotoFrame may cause wireless interference. Ensure that you disconnect Bluetooth connection or switch off your PhotoFrame when you use it in a vehicle.
Notice
Warranty
No components are user serviceable. Do not open or remove covers to the inside of the product. Repairs may only be done by Philips Service Centres and official repair shops.
Failure to do so shall void any warranty, stated or implied.
Any operation expressly prohibited in this manual, any adjustments, or assembly procedures not recommended or authorised in this manual shall void the warranty.
CE Declaration of Conformity (SPF5008/SPF5208/SPF5010/SPF5210)
Philips Consumer Lifestyle declares under our responsibility that the product is in conformity with the following standards
EN60950-1:2006 (Safety requirement of Information Technology Equipment)
EN55022:2006 (Radio Disturbance requirement of Information Technology Equipment)
EN55024:1998 (Immunity requirement of Information Technology Equipment)
EN61000-3-2:2006 (Limits for Harmonic Current Emission)
EN61000-3-3:1995 (Limitation of Voltage Fluctuation and Flicker)
following provisions of directives applicable
73/23/EEC (Low Voltage Directive)
2004/108/EC (EMC Directive)
2006/95/EC (Amendment of EMC and Low
Voltage Directive) and is produced by a
manufacturing organization on ISO9000 level.
CE Declaration of Conformity (SPF7008/SPF7208/SPF7010/SPF7210)
Hereby Philips Consumer Lifestyle, P&A, declares that this Digital PhotoFrame SPF7008/SPF7208/SPF7010/SPF7210-/00-/05 is in compliance with the essential requirements and other relevant provisions of Directive 1999/5/EC.
Recycling

Your product is designed and manufactured with high quality materials and components, which can be recycled and reused.
When you see the crossed-out wheel bin symbol attached to a product, it means the product is covered by the European Directive 2002/96/EC:

Never dispose of your product with other household waste. Please inform yourself about the local rules on the separate collection of electrical and electronic products. The correct disposal of your old product helps prevent potentially negative consequences on the environment and human health.
End of life disposal
Your new product contains materials that can be recycled and reused. Specialized companies can recycle your product to increase the amount of reusable materials and to minimize the amount to be disposed of.
Please find out about the local regulations • on how to dispose of your old monitor from your local Philips dealer.
(For customers in Canada and U.S.A.) •
Dispose of in accordance to local-state and federal regulations.
For additional information on recycling contact www.eia.org (Consumer Education Initiative).
Recycling Information for Customers
Philips establishes technically and economically viable objectives to optimize the environmental performance of the organization's product, service and activities. From the planning, design and production stages, Philips emphasizes the importance of making products that can easily be recycled. At Philips, end-of-life management primarily entails participation in national take-back initiatives and recycling programs whenever possible, preferably in cooperation with competitors.
There is currently a system of recycling up and running in the European countries, such as The Netherlands, Belgium, Norway, Sweden and Denmark.
In U.S.A., Philips Consumer Lifestyle North America has contributed funds for the Electronic Industries Alliance (EIA) Electronics Recycling Project and state recycling initiatives for end-of-life electronics products from household sources. In addition, the Northeast Recycling Council (NERC) - a multi-state non-profit organization focused on promoting recycling market development - plans to implement a recycling program.
In Asia Pacific, Taiwan, the products can be taken back by Environment Protection Administration (EPA) to follow the IT product recycling management process, detail can be found in web site www.epa.gov.tw.
Compliance with Electro-Magnetic Field (EMF)
Koninklijke Philips Electronics N.V. manufactures and sells many products targeted at consumers, which, like any electronic apparatus, in general have the ability to emit and receive electromagnetic signals.
One of Philips' leading Business Principles is to take all necessary health and safety measures for our products, to comply with all applicable legal requirements and to stay well within the EMF standards applicable at the time of producing the products.
Philips is committed to develop, produce and market products that cause no adverse health effects. Philips confirms that if its products are handled properly for their intended use, they are safe to use according to scientific evidence available today.
Philips plays an active role in the development of international EMF and safety standards, enabling Philips to anticipate further developments in standardisation for early integration in its products.
North Europe Information (Nordic Countries)
WARNING:
FÖRSÄKRA DIG OM ATT HUVUDBRYTARE OCH UTTAG ÄR LÄTÄTKOMLIGA, NÄR DU STÄLLER DIN UTRUSTNING PÅPLATS. Placering/Ventilation
ADVARSEL:
S∅RG VED PLACERINGEN FOR, AT NETLEDNINGENS STIK OG STIKKONTAKT ER NEMT TILGÆNGELIGE. Paikka/Ilmankierto
VAROITUS:
SIJOITA LAITE SITEN, ETTÄ VERKKOJOHTO VOIDAAN TARVITTAESSA HELPOSTI IRROTTAA PISTORASIASTA. Plassering/Ventilasjon
ADVARSEL:
NÅR DETTE UTSTYRET PLASSERES, MÅ DU PASSE PÅ AT KONTAKTENE FOR ST∅MTILF∅RSEL ER LETTE Å NÅ.
Banned Substance Declaration
This product complies with RoHs and Philips BSD (AR17-G04-5010-010) requirements.
Bluetooth Statement (SPF7008/SPF7208/SPF7010/SPF7210)
Bluetooth®
The Bluetooth ^® word mark and logos are registered trademarks owned by Bluetooth SIG, Inc. and any use of such marks by Philips is under license.
Third party software
This product contains wpa_supplicant software that is licensed subject to the following conditions:
Copyright © 2006, Jouni Malinen jkmaline@cc.hut.fi
All rights reserved.
Redistribution and use in source and binary forms, with or without modification, are permitted provided that the following conditions are met:
Redistributions of source code • must retain the above copyright notice, this list of conditions and the following disclaimer.
Redistributions in binary form must • reproduce the above copyright notice, this list of conditions and the following disclaimer in the documentation and/or other materials provided with the distribution.
Neither the name of the •
THIS SOFTWARE IS PROVIDED BY THE COPYRIGHT HOLDERS AND CONTRIBUTORS "AS IS" AND ANY
EXPRESS OR IMPLIED WARRANTIES, INCLUDING, BUT NOT LIMITED TO, THE IMPLIED WARRANTIES OF MERCHANTABILITY AND FITNESS FOR A PARTICULAR PURPOSE ARE DISCLAIMED. IN NO EVENT SHALL THE COPYRIGHT OWNER OR CONTRIBUTORS BE LIABLE FOR ANY DIRECT, INDIRECT, INCIDENTAL, SPECIAL, EXEMPLARY, OR CONSEQUENTIAL DAMAGES (INCLUDING, BUT NOT LIMITED TO, PROCUREMENT OF SUBSTITUTE GOODS OR SERVICES; LOSS OF USE, DATA, OR PROFITS; OR BUSINESS INTERRUPTION) HOWEVER CAUSED AND ON ANY THEORY OF LIABILITY, WHETHER IN CONTRACT, STRICT LIABILITY, OR TORT (INCLUDING NEGLIGENCE OR OTHERWISE) ARISING IN ANY WAY OUT OF THE USE OF THIS SOFTWARE, EVEN IF ADVISED OF THE POSSIBILITY OF SUCH DAMAGE.
Class II equipment symbol:

This symbol indicates that this product has a double insulation system.

Be responsible Respect copyrights
The making of unauthorized copies of copy-protected material, including computer programs, files, broadcasts and sound recordings, may be an infringement of copyrights and constitute a criminal offence. This equipment should not be used for such purposes.
2 Your PhotoFrame
Congratulations on your purchase, and welcome to Philips! To fully benefit from the support that Philips offers, register your product at www.philips.com/welcome.
Introduction
With your PhotoFrame, you can enjoy:
Digital photo•
Home video•
MP3 music as background•
(SPF5008/SPF5208/SPF7008/SPF7208/•
SPF7010/SPF7210) Theme clock
You can place it on a flat surface or hang it on the wall for a continuous play.
• For SPF5008/SPF5208/SPF5010/SPF5020
After you connect your PhotoFrame to a PC, you can easily drag and drop files from the PC to your PhotoFrame.
• For SPF7008/SPF7208/SPF7010/SPF7210
You can use Philips PhotoFrame Manager; an application software on a PC, to transfer photos or video/music files from a PC to your PhotoFrame easily by drag and drop. You can also use it to manage photos and albums on the PhotoFrame. For details, refer to Philips PhotoFrame Manager in the supplied CD-ROM.
With Bluetooth connectivity available on the PhotoFrame, you can set up wireless connection between your PhotoFrame and a compatible device like a mobile phone.
What's in the box

natural_image
Blank screen layout with no text, symbols, or markings visiblePhilips Digital PhotoFrame•

natural_image
Simple line drawing of a spoon or spoon with a circular base (no text or symbols)Stand•

natural_image
Line drawing of a mechanical device with wires and a connector (no text or symbols)AC-DC power adaptor•

CD-ROM, including•
Digital User Manual•
(SPF7008/SPF7208/SPF7010/•
SPF7210) Philips PhotoFrame
Manager (Software and User Manual)

natural_image
Line drawing of a USB cable with two connectors (no text or symbols)USB cable (not supplied to SPF5010/•
SPF5210)

Quick Start Guide•
Overview of your PhotoFrame (SPF5008/ SPF5208)

①
Turn on/off the PhotoFrame•
②RESET
Restore the system•
③
Slot for a USB flash drive•
④
Slot for a USB cable to PC•
⑤ ▲ CF
Slot for a CF card•
⑥ SD/MMC/xD
Slot for an SD/MMC/xD card•
⑦MMS Pro Duo
Slot for an MS/MS Pro Duo card•
⑧DC
Socket for the AC-DC power • adaptor
⑨ ⏻ Kensington lock
⑩Stand hole
⑪ Wall mounting hole
⑫Speaker
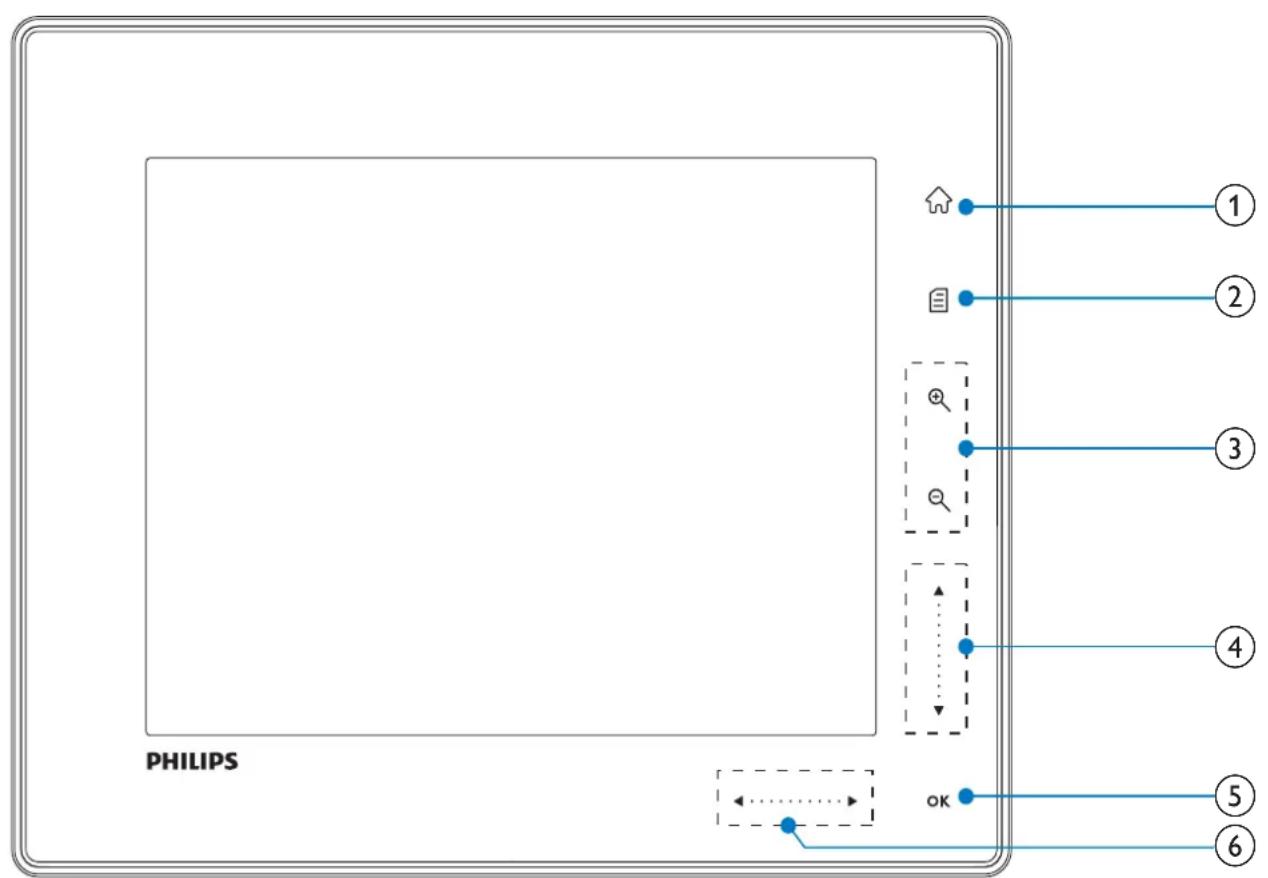
①
Access the home screen•
②
Access the quick menu Access option menu
③Zoom in/out
• +
Zoom in an image Switch modes: Album mode → thumbnail mode → slideshow mode → zoom in 2 times → zoom in 4 times
-
Zoom out an image Switch modes: Album mode ← thumbnail mode ← slideshow mode ← zoom out 2 times ← zoom out 4 times
④Up/down slider
Scroll up/down at high speed
• ▲
Select the upper item Increase the volume
• ▼
Select the item below Decrease the volume
⑤OK
Display slideshow• Play/Pause slideshow/video• Confirm a selection•
⑥Left/right slider
Scroll left/right at high speed
• ◀
Select the left item
• ▶
Select the right item
Overview of your PhotoFrame (SPF5010/ SPF5210/SPF7008/SPF7208/ SPF7010/SPF7210)

① Turn on/off the PhotoFrame•
②RESET Restore the system•
③ ⇔ Slot for a USB flash drive•
④ Slot for a USB cable to PC•
⑤ ▶ SD/MMC/xD/MS/MS Pro Duo
Slot for an SD/MMC/xD/MS/MS Pro •
Duo card
⑥C B Slot for a CF card•
⑦DC Socket for the AC-DC power • adaptor
⑧ ⏻ Kensington lock
⑨Stand hole
⑩Wall mounting hole
⑪Speaker
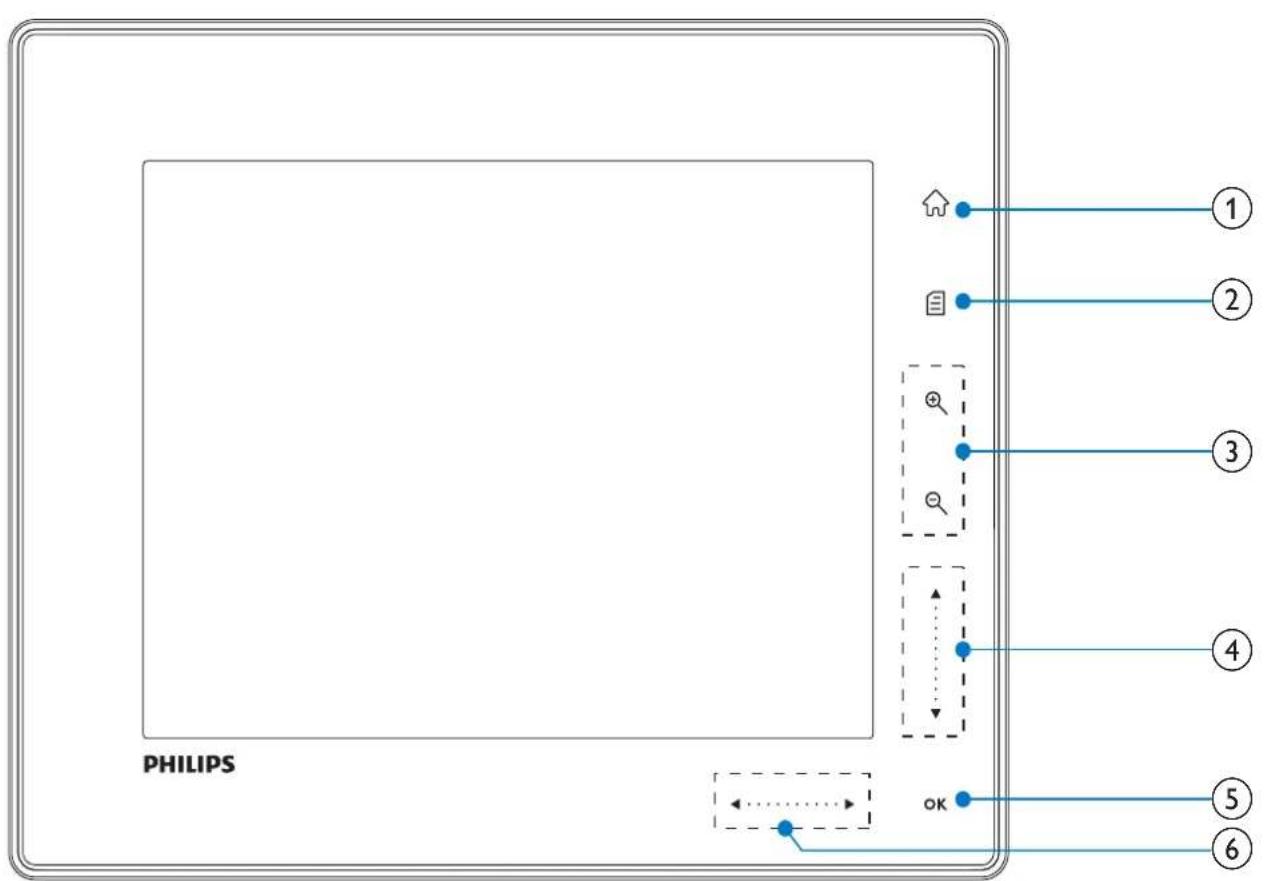
①
Access the home screen•
②
Access the quick menu Access option menu
③Zoom in/out
• +
Zoom in an image Switch modes: Album mode → thumbnail mode → slideshow mode → zoom in 2 times → zoom in 4 times
-
Zoom out an image Switch modes: Album mode ← thumbnail mode ← slideshow mode ← zoom out 2 times ← zoom out 4 times
④Up/down slider
Scroll up/down at high speed
• ▲
Select the upper item Increase the volume
• ▼
Select the item below Decrease the volume
⑤OK
Display slideshow• Play/Pause slideshow/video• Confirm a selection•
⑥Left/right slider
Scroll left/right at high speed
•
Select the left item
• ▶
Select the right item
3 Get started

Caution
Use the controls only as stated in this user • manual.
Always follow the instructions in this chapter in sequence.
If you contact Philips, you will be asked for the model and serial number of this apparatus. The model number and serial number are on the back of the apparatus. Write the numbers here: Model No. ____ Serial No. ____
Install the stand
To place the PhotoFrame on a flat surface, you need install the supplied stand at the back of the PhotoFrame.
1 Insert the stand into the PhotoFrame.
2 Position the indication on the stand to the 🔔 position.
3 (SPF5008/SPF5208) Turn the stand anti-clockwise 45 degrees to the Ⓞ position and lock it to the PhotoFrame firmly.

natural_image
Line drawing of a handheld device with a lever and adjustment knob, no text or symbols present(• SPF5010/SPF5210/SPF7008/SPF7208/SPF7010/SPF7210) Turn the stand clockwise 45 degrees to the □ position and lock it to the PhotoFrame firmly.

natural_image
Line drawing of a device's internal components with a lever and adjustment knob (no text or symbols)Connect power

Note
When you position the PhotoFrame, ensure that the power plug and outlet are easily accessible.
1 Connect the supplied power cord to the DC socket of the PhotoFrame.
- SPF5008/SPF5208

• SPF5010/SPF5210/SPF7008/SPF7208/SPF7010/SPF7210

2 Connect the power cord to a power supply socket.
Turn on/off the PhotoFrame

Note
- You can only turn off the PhotoFrame after all copy and save actions are complete.
For the first time use:
1 Press and hold Ⓧ for more than 1 second. → The language selection menu is displayed.
2 Select a language, and then tap OK to confirm. The home screen is displayed.

For other times when the on screen language is selected:
1 Press and hold ⏻ for more than 1 second.
The home screen is displayed.→ To turn off the PhotoFrame, press and • hold ⏻ for about 2 seconds.
Transfer photos or video/music files
Transfer from a storage device

Caution
Do not remove a storage device from the • PhotoFrame when files are transferring from or to the storage device.
You can play photos or music/video files in one of the following storage device:
Compact Flash type I Secure Digital (SD) Secure Digital (SDHC) Multimedia Card Multimedia+ Card xD card Memory Stick
- Memory Stick Pro - Memory Stick Duo - Memory Stick Pro Duo - USB flash drive However, we do not guarantee the operations for all types of memory card media.

Note
- For SPF5008/SPF5208, Memory Stick/Memory Stick Pro/Memory Stick Duo/Memory Stick Pro Duo should be used with an adaptor.
1 Insert a storage device into the PhotoFrame firmly.
• SPF5008/SPF5208

• SPF5010/SPF5210/SPF7008/SPF7208/SPF7010/SPF7210

A confirmation message is displayed.

An option menu is displayed.
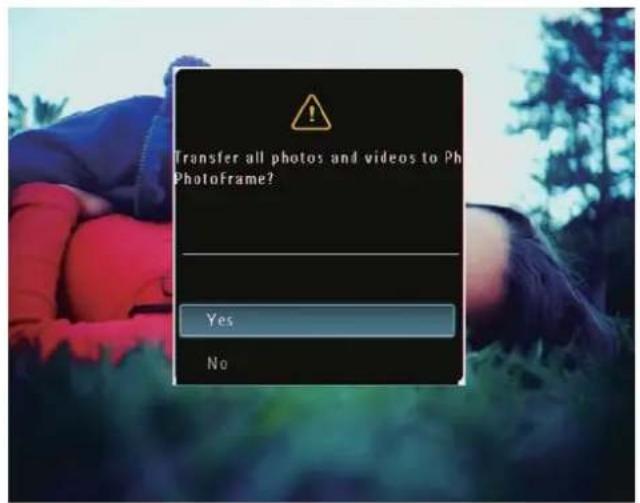
3 To select all photos or video/music files, select [Yes] and then tap OK to confirm. To select some of photos or video/• music files, select [No] and then tap OK to confirm. Tap ▲ / ▼/ ▶ and OK to select photos or video/music files, and then tap 📄 to continue the transfer operation.

2 Select [Transfer], and then tap OK to confirm.
4 Select a destination album on the PhotoFrame, and then tap OK to confirm.
Files are transferred to the ↩ PhotoFrame.
To remove a storage device, pull it out • from the PhotoFrame.
Transfer by Philips PhotoFrame Manager (SPF7008/SPF7208/SPF7010/SPF7210)
Recommended way for SPF7008/SPF7208/SPF7010/SPF7210.

Caution
Do not disconnect the PhotoFrame from the • PC when files are transferring between the PhotoFrame and the PC.

Note
Ensure that Philips PhotoFrame Manager is • installed on your PC.
1 Connect the supplied USB cable to the PhotoFrame and to a PC.

Philips PhotoFrame Manager starts automatically.
2 Select [Transfer Photos] / [Tranfer Music] / [Transfer Video].

3 Under [My frame photos] / [My frame music] / [My frame videos], select a destination album/folder.
![PHILIPS SHB1000 - Under [My frame photos] / [My frame music] / [My frame videos], select a destination album/folder. - 1](/content/2026/05/1073034/images/e0eabdeff8e3a86380fb4836df18c463c35af959b853dc3b70ad94d509a8e3c8.jpg)
4 Under [My computer photos] / [My computer music] / [My computer videos], select photos or video/music files.
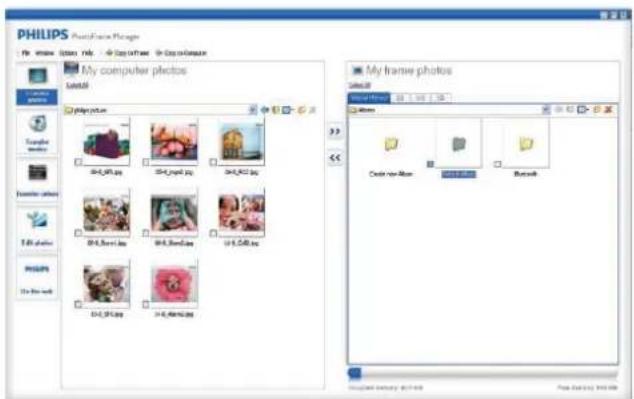
5 Click the icon to start transfer.
6 After all transfer actions are complete, disconnect the USB cable from the PC and the PhotoFrame.

Tip
If Philips PhotoFrame Manager does not start • automatically, you can double click its icon on the desktop of your PC to start it.
- You can also drag and drop photos from the PhotoFrame to a PC.
Transfer from PC (SPF5008/SPF5208/ SPF5010/SPF5210)

Caution
Do not disconnect the PhotoFrame from the PC when files are transferring between the PhotoFrame and the PC.
1 Connect a USB cable to the PhotoFrame and to the PC.

You can drag and drop photos or ↩ video/music files from the PC to an album on the PhotoFrame.
2 After all transfer actions are complete, disconnect the USB cable from the PC and the PhotoFrame.
4 Play
Play photos

Note
- You can play JPEG or progressive JPEG photos on the PhotoFrame.
1 In the home screen, select [Play] and then tap OK to confirm.

→ Photos/video files are displayed in slideshow mode.
If there are music files available, photos are played with background music by default.
In slideshow mode:
• To browse photos/video files in thumbnail mode, tap 🔒.

To view photos/video files in album • mode, tap ☑ twice.
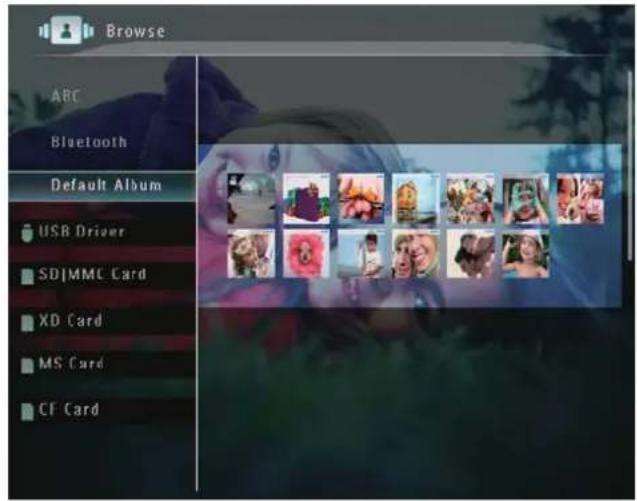
To zoom in an image, tap 🔒. To zoom out an image, tap 🔒. To select the previous/next photo, • tap ◀ / ▶ To pause, tap • OK. To resume, tap • OK again. To view photos in filmstrip mode, • fast swipe the right/left slider to the right.

In filmstrip mode:
• To resume slideshow mode, tap OK.

Tip
- In filmstrip mode: About fifteen seconds later without user operation, filmstrip disappears and the selected photo is displayed in full screen.
In slideshow mode, you can also manage the photo displayed.
1 In slideshow mode, tap. An option menu is displayed.

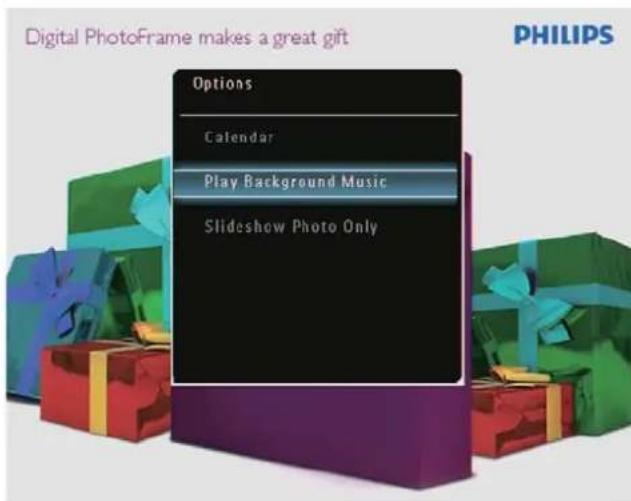
2 Select an option, and then tap OK to confirm.

Tip
- If [Slideshow Photo Only] is enabled, video files are not played in slideshow mode.
Play video

Note
The PhotoFrame plays most video clips of a digital still camera in M-JPEG (*.avi/*.mov), MPEG-1 (*.mpg), MPEG-4 (*.avi/*.mov/*.mp4), H.263 (*.avi/*.mov) format. Some video clips might have compatibility issues when played on your PhotoFrame. Before playing, ensure that these video clips are compatible with your PhotoFrame.
- Some video clips in a format which is not compatible well with your PhotoFrame, like *.3gp/*.3g2 and some others, may be played with no audio output. When a video clip is played with no audio output, the icon 📀 is displayed on the screen. - In album/tholumnail/filmstrip mode, a video file is displayed with the 🔔 icon on the left top corner.
1 In the home screen, select [Play] and then tap OK to confirm.
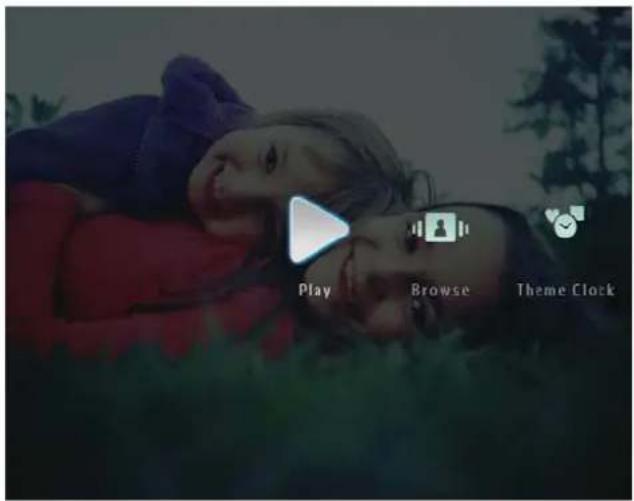
2 Fast swipe the right-left slider to the right. Photos/video files are displayed in filmstrip mode.

natural_image
Wedding couple in wedding attire with ornate golden headdress, surrounded by photo frames (no visible text or symbols)3 Select a video file, and then tap OK to confirm.

natural_image
Interior view of a snowy ski resort with skiers and illuminated architecture (no visible text or signage)During video play:
To view the album in which the • slideshow video is saved, tap 🔒 twice. To adjust volume, tap ▲ / ▼
• To pause/resume play, tap OK.
• To play the previous/next file, tap ◀ / ▶
• For fast forward, fast swipe the right-left slider to the right.

1 time: 2X fast forward
2 times: 4X fast forward
3 times: normal speed
• During fast forward, tap OK to resume normal play.
During play, you can also manage the video file.
1 During play, tap . 📄 An option menu is displayed.

2 Select an option, and then tap OK to confirm.
• [Repeat] ([Play Loop]: Play in a loop; [Play Once]: Play once)
• [Viewing Format] ([Full Screen]: Play in full screen; [Original]: Play in original format)
Play background music

Note
Only MP3 (MPEG Audio Layer III) music files • can be played on the PhotoFrame.
1 During photo display, tap . 📋 An option menu is displayed.
2 Tap ▼ repeatedly to select [Play Background Music], and then tap OK to confirm.

3 Select [Set Music], and then tap OK to confirm.
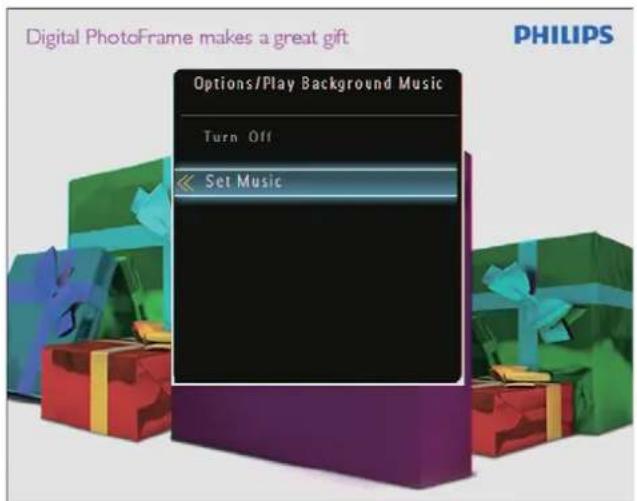
4 Select a folder.
5 To play all music files in the folder, tap OK to confirm.
• To play a single music file, tap ▶ to access the folder, select a music file, and then tap OK to confirm.
If you have set music before:
- In [Play Background Music]menu, select[Turn On]and then tapOKto confirm.

Selected music files are played.
To stop music play:
- In [Play Background Music] menu, select [Turn Off] and then tap OK to confirm.

Tip
After a music file is selected, you can tap • to access the option menu to copy/delete it.
Display a theme clock (SPF5008/SPF5208/SPF7008/SPF7208/SPF7010/SPF7210)

Note
Ensure that you have installed a theme clock in your PhotoFrame.
- You can also download latest theme clocks from www.philips.com/support, in the coming future.
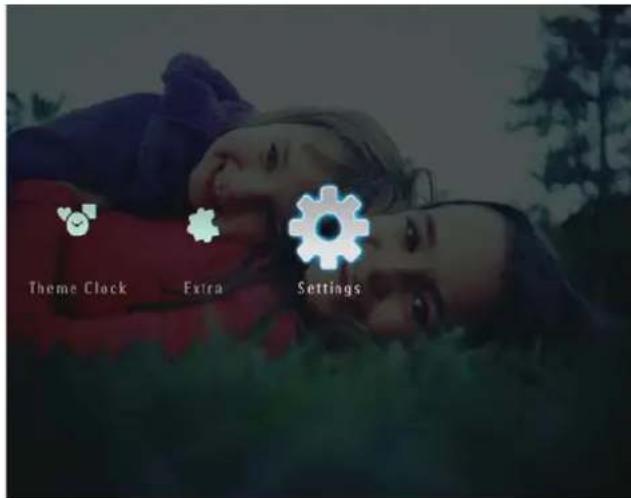
1 In the home screen, select [Theme Clock] and then tap OK to confirm.

2 Select [Show Current], and then tap OK to confirm.

To select and install another theme clock:
1 Download a theme clock and save it in an SD card before you install it.
2 Insert the SD card into the PhotoFrame.
3 In [Theme Clock] menu, select [Select Other] and then tap OK to confirm.

4 Select a theme clock, and then tap OK to confirm. After the theme clock is installed, it is ↩ displayed automatically.
5 Browse and manage photos/video or albums
You can browse and manage photos/video files or album in album ode. You can also browse and manage photos in thumbnail mode.
Browse photos/video files in album mode
1 In the home screen, select [Browse] and then tap OK to confirm.
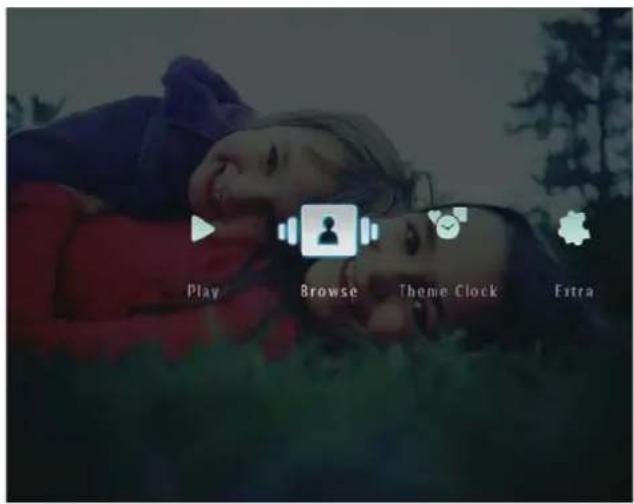
Photos/video files are displayed in album mode.
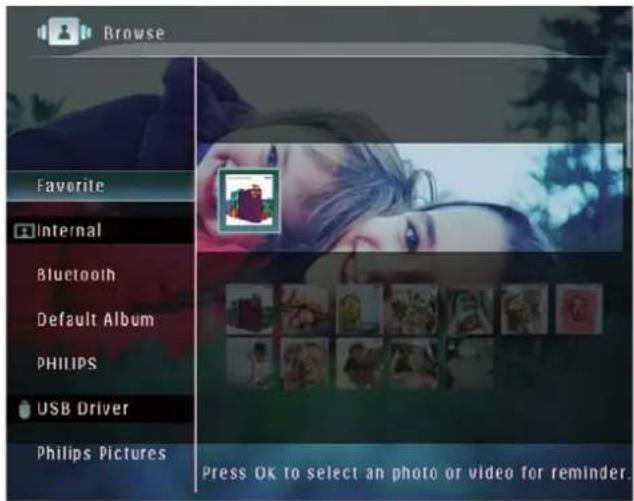
2 Select an album, and then tap to access the album.
3 Tap ▲/▼/◄/► to browse photos/video files in the album.

Tip
- If you select an album and then tap OK, photos/video files in the selected album are displayed in slideshow.
Add a photo/video file to the Favorites album
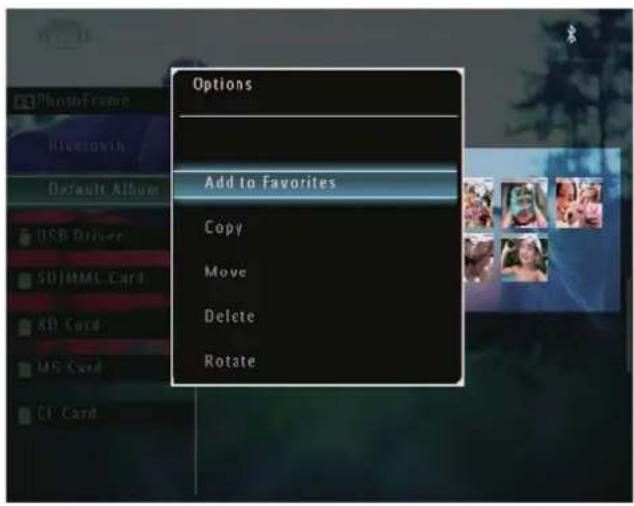
1 In album mode, select a photo and then tap 📄.
An option menu is displayed.
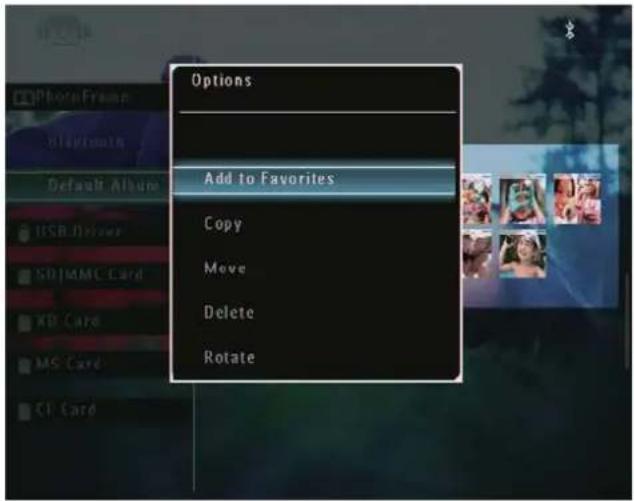
2 Select [Add to Favorites], and then tap OK to confirm.

The photo is added to the →[Favorites] album.
Copy a photo/video file
1 In album mode, select a photo and then tap 📄.
An option menu is displayed.
2 Select [Copy], and then tap OK to confirm.

3 Select a storage device and a destination album, and then tap OK to confirm.
Move a photo/video file
1 In album mode, select a photo and then tap 📄.
An option menu is displayed.

2 Select [Move], and then tap OK to confirm.
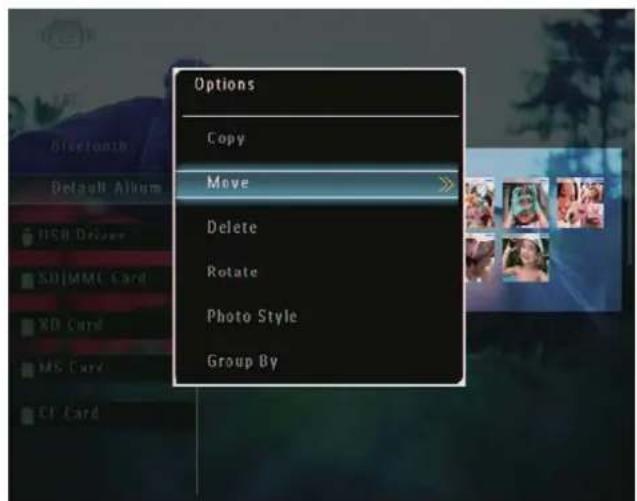
3 Select a destination album, and then tap OK to confirm.
Delete a photo/video file
1 In album mode, select a photo and then tap 📄.
An option menu is displayed.

2 Select [Delete], and then tap OK to confirm.
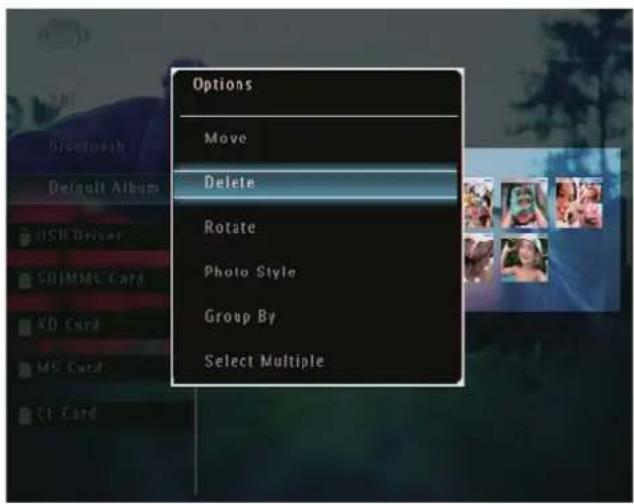
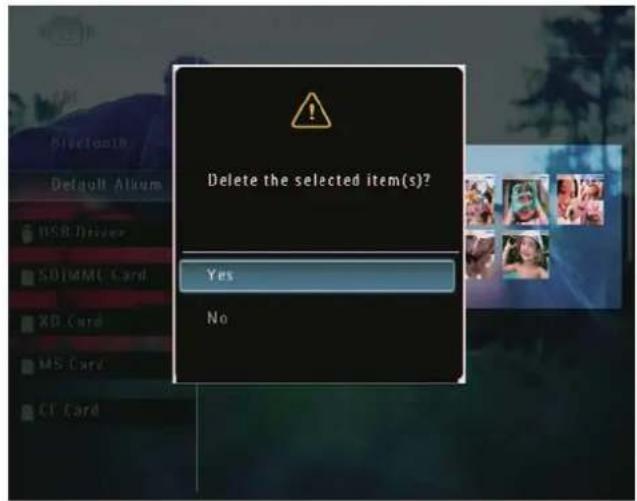
A confirmation message is displayed.

3 Select [Yes], and then tap OK to confirm.
Rotate a photo
1 In album mode, select a photo and then tap 📄.
An option menu is displayed.

2 Select [Rotate], and then tap OK to confirm.

3 Select an option, and then tap OK to confirm.
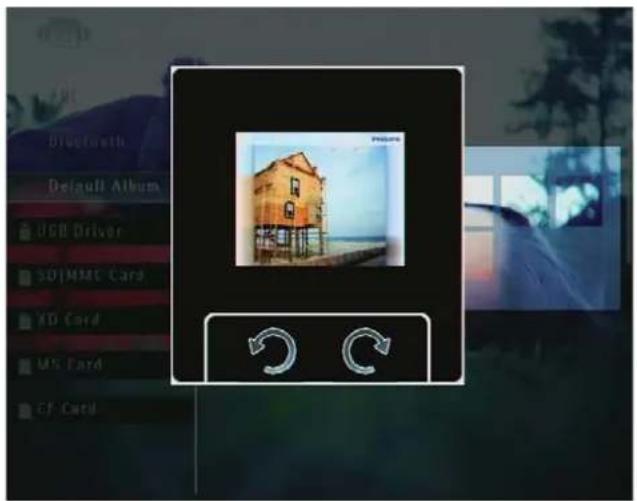
Select a photo effect
1 In album mode, select a photo and then tap 📄.
An option menu is displayed.

2 Select [Photo Style], and then tap OK to confirm.

3 Select an effect, and then tap OK to confirm.
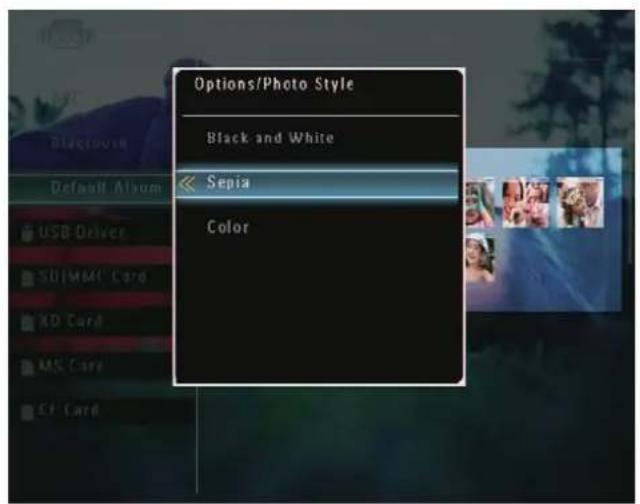
Group photos by name/date
1 In album mode, select a photo and then tap 📄.
An option menu is displayed.

2 Select [Group By], and then tap OK to confirm.

3 Select [Name] / [Date], and then tap OK to confirm.

If you group photos by name, photos → are displayed alphabetically in an ascending order from top left to bottom right (1, 2, ... a, b, ... z).
If you group photos by time, photos → are displayed chronologically in a descending order from top left to bottom right (from the recent to the previous).
Select several photos at a time
1 In album mode, select a photo and then tap 📄.
An option menu is displayed.

2 Select [Select Multiple], and then tap OK to confirm.

3 Tap ▲/▼/◄/► and OK to select photos.
4 Tap to access the option menu.
Remove photos/video or music files from the Favorites album
1 In the album mode, select the [Favorites] album and them tap ▶ to confirm.
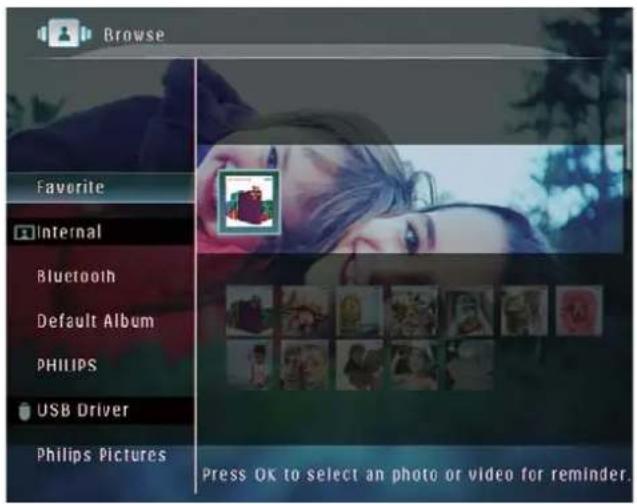
2 Select photos/files to be removed, and then tap 📄.
An option menu is displayed.
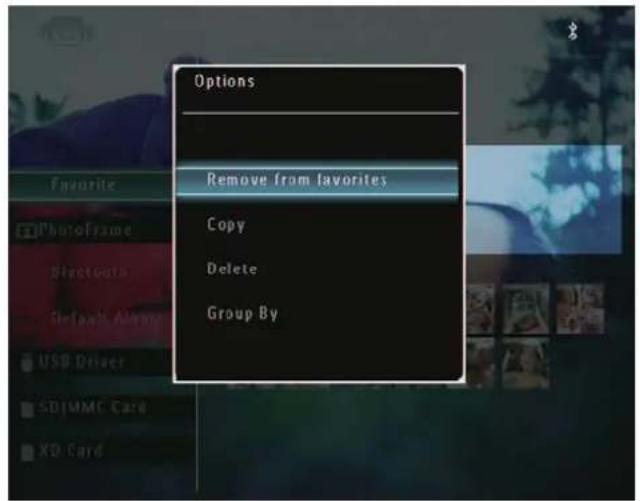
3 In the option menu, select [Remove from favorites] and then tap OK to confirm. A confirmation message is displayed.

4 Select [Yes], and then tap OK to confirm.
Manage an album
1 In the home screen, select [Browse] and then tap OK to confirm. Photos are displayed in album mode.

2 Select an album, and then tap. An option menu is displayed.
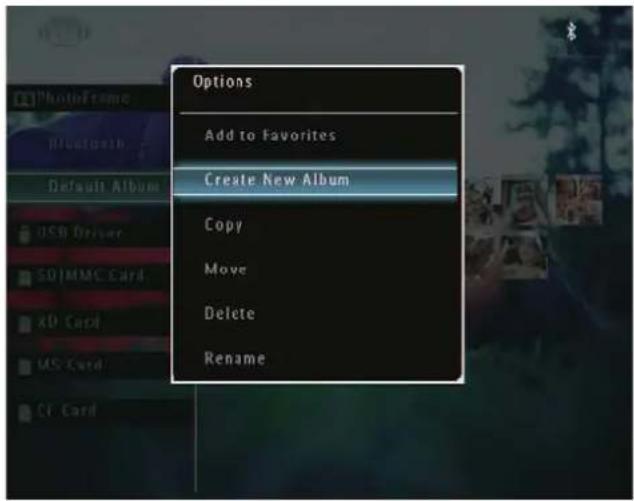
If the [Favorites] album is selected, a different option menu is displayed.

3 Select an option, and then tap OK to confirm.

Tip
For albums on sources other than the • PhotoFrame, [Create New Folder] is displayed instead of [Create New Album]. • You can manage an album in the similar way as you manage a photo.
Create an album
1 In the option menu, select [Create New Album] and then tap OK to confirm.

A keypad is displayed.
2 To enter the name (up to 24 characters), select an alphabet/number and then tap OK to confirm.
To switch between uppercase • and lowercase, select [a/A] on the displayed keypad and then tap OK to confirm.
3 When the name is complete, select [Enter] and then tap OK to confirm.

Rename an album

Note
Ensure that albums are grouped by name.
1 In the option menu, select [Rename] and then tap OK to confirm.

A keypad is displayed.
2 To enter the name (up to 24 characters), select an alphabet/number and then tap OK to confirm.
To switch between uppercase • and lowercase, select [a/A] on the displayed keypad and then tap OK to confirm.
3 When the name is complete, select [Enter] and then tap OK to confirm.

Tip
If albums are grouped by date, the album cannot be renamed.
6 Show date/time in slideshow
1 In the home screen, select [Extra] and then tap OK to confirm.

2 Select [Calendar], and then tap OK to confirm.

3 Select [Month] / [Week] / [Clock], and then tap OK to confirm.
• [Month]

• [Week]

• [Clock]

natural_image
Penguins gathering in a large open field, captured mid-jump with no visible text or symbolsTo play slideshow without date/time shown, select [Off] and then tap OK to confirm.
- In calendar mode: You can tap 📄 to access the option menu to manage the photo displayed.
7 Create a reminder

Note
- Ensure that you set time and date correctly on the PhotoFrame.
1 In the home screen, select [Extra] and then tap OK to confirm.

2 Select [Reminder], and then tap OK to confirm.

3 Select [

4 Tap /▲/ ▼ to set the date and month of the reminder, and then tap OK to confirm. A key pad is displayed.
5 To enter the name (up to 24 characters), select an alphabet/number and then tap OK to confirm. To switch between uppercase • and lowercase, select [a/A] on the displayed keypad and then tap OK to confirm.
6 When the name is complete, select [Enter] and then tap OK to confirm. A preview message is displayed!

7 Tap OK to confirm. Photos/video files are displayed in ↩ thumbnail mode.
8 Select a photo or video file, and then tap OK to confirm.
A preview message is displayed.

To select background music for the → reminder photo, tap ▼ to select the music icon and then tap OK to confirm.
Select a music file, and then tap OK to confirm.
9 Select [Finish], and then tap OK to confirm.
Edit a reminder
1 In the home screen, select [Extra] and then tap OK to confirm.

2 Select [Reminder], and then tap OK to confirm.

3 Select a reminder, and then tap. An option menu is displayed.

8 Slideshow setting
Select a transition effect
1 In the home screen, select [Settings] and then tap OK to confirm.

2 Select [Slideshow], and then tap OK to confirm.

3 Select [Transition Effect], and then tap OK to confirm.

4 Select a slideshow effect, and then tap OK to confirm.
Select background
You can select a background border color for photos that are smaller than the PhotoFrame display.
1 In the home screen, select [Settings] and then tap OK to confirm.
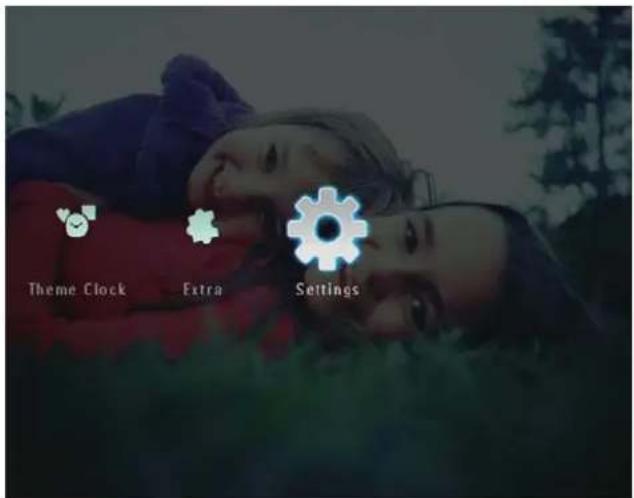
2 Select [Slideshow], and then tap OK to confirm.

3 Select [Background Color], and then tap OK to confirm.
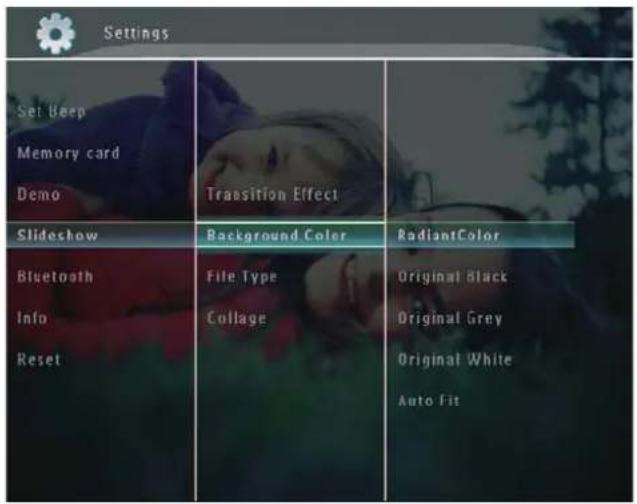
4 Select [RadiantColor] / a background colour/ [Auto Fit], and then tap OK to confirm.
If you select →[RadiantColor], the PhotoFrame extends the color on the edges of a photo that is smaller than the full screen to fill the screen without black bars or aspect ratio distortion.

natural_image
Exterior view of a two-story residential house with a red-tiled roof and white walls, surrounded by greenery and a lawn under a clear blue sky (no signage or text visible)If you select a background color, the ↩ PhotoFrame displays a photo with a background color.
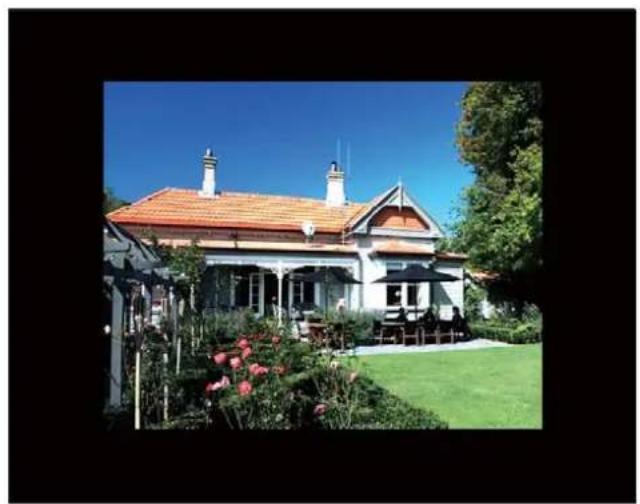
natural_image
Exterior view of a two-story residential house with a red-tiled roof and white walls, surrounded by greenery and a lawn under a clear blue sky (no signage or text visible)If you select ↩[Auto Fit], the PhotoFrame extends a photo to fill the screen with picture distortion.

natural_image
Exterior view of a modern single-story house with orange-tiled roof and white walls, surrounded by garden and lawn (no signage or text visible)Select file type for slideshow display
You can select type of file to be displayed in slideshow mode.
1 In the home screen, select [Settings] and then tap OK to confirm.
2 Select [Slideshow], and then tap OK to confirm.
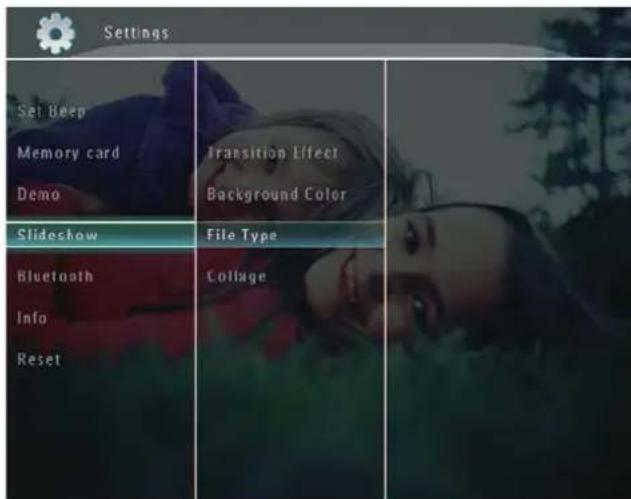
3 Select [File Type], and then tap OK to confirm.
4 To display photos and videos in slideshow mode, select [Photo + Video] and then tap OK to confirm.
| Set Beep Memory Card Demo | Transition Effect Background Color | |
| Slideshow | File Type | Photo + Video |
| Bluetooth Info Reset | Collage | Photo Only |
To display only photos in slideshow • mode, select [Photo Only] and then tap OK to confirm.
Display collage photos
1 In the home screen, select [Settings] and then tap OK to confirm.

2 Select [Slideshow], and then tap OK to confirm.

3 Select [Collage], and then tap OK to confirm.

4 Select a collage format, and then tap OK to confirm.
To stop collage display, select • [Settings] > [Slideshow] > [Collage] > [Single] and then tap OK to confirm.
9 Other settings
Use the quick menu
In the quick menu, you can access directly to some most-frequently used settings.
1 In the home screen, press. The quick menu is displayed!
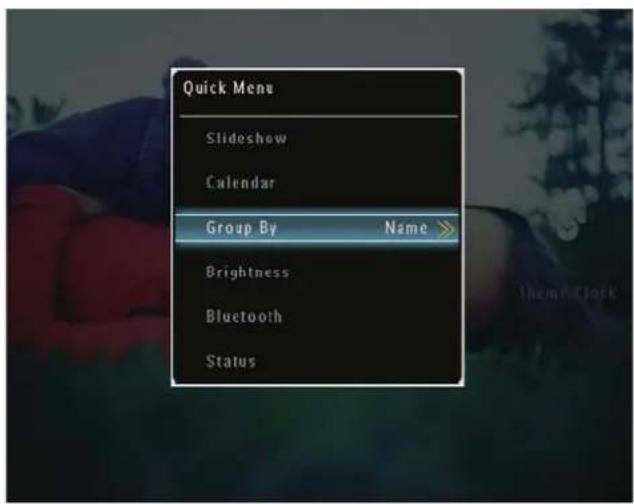
2 Select an option, and then tap OK to confirm.
Select an on-screen language
1 In the home screen, select [Settings] and then tap OK to confirm.

2 Select [Language], and then tap OK to confirm.

3 Select a language, and then tap OK to confirm.
Adjust brightness
You can adjust the brightness of the PhotoFrame to achieve the best view.
1 In the home screen, select [Settings] and then tap OK to confirm.

2 Select [Brightness], and then tap OK to confirm.

3 To adjust the brightness automatically, select [Smart Brightness] and then tap OK to confirm.
4 Select [On], and then tap OK to confirm.

The brightness of display is adjusted automatically to fit the ambient light.
To adjust the brightness manually:
1 In the [Brightness] menu, select [Manual Adjust] and then tap OK to confirm.

2 Tap ▲/▼ to adjust brightness, and then tap OK to confirm.

natural_image
A smiling woman and child lying on grass outdoors, no visible text or symbols.Set time/date
1 In the home screen, select [Settings] and then tap OK to confirm.

2 Select [Time and Date], and then tap OK to confirm.

3 Select [Set Time] / [Set Date], and then tap OK to confirm.
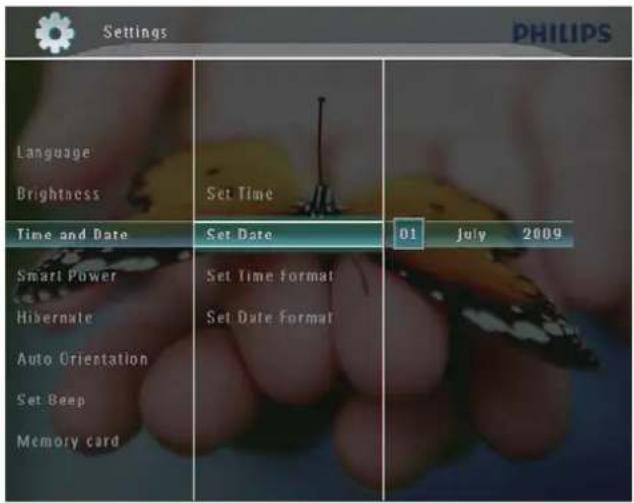
4 Tap ▲/▼/◄/► to adjust minute/hour/day/month/year, and then tap OK to confirm.
Set time/date format
1 In the home screen, select [Settings] and then tap OK to confirm.

2 Select [Time and Date], and then tap OK to confirm.
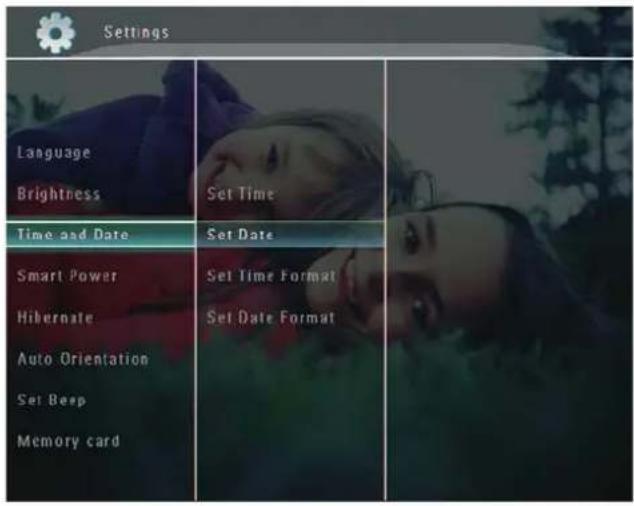
3 Select [Set Time Format] / [Set Date Format], and then tap ▶.

4 Select a format, and then tap OK to confirm.
Smart Power setting
With Smart Power function on the PhotoFrame, you can configure the time for the PhotoFrame to turn on or off the display automatically. Or you can also adjust the light sensor for the PhotoFrame to turn on or off the display according to the ambient brightness. When the display automatically turns off, your PhotoFrame goes to standby (sleep) mode.

Note
You can enable only one Smart Power function • at a time, either by timer or by light sensor. • Ensure that your PhotoFrame is turned on.
Specify time to auto on/off

Note
Ensure that the current time of the • PhotoFrame is set correctly.
1 In the home screen, select [Settings] and then tap OK to confirm.

2 Select [Smart Power], and then tap OK to confirm.
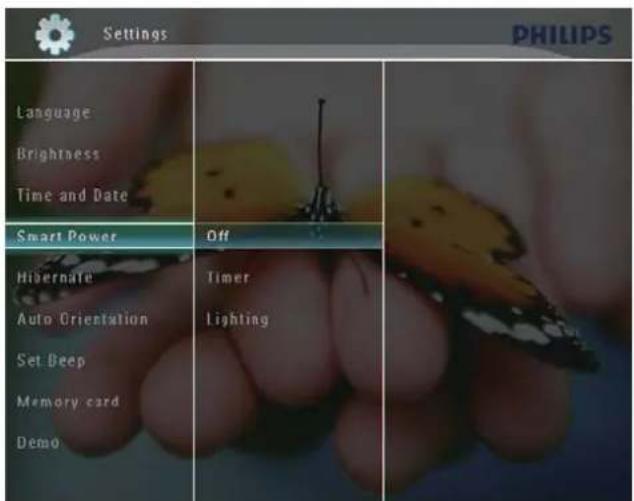
3 Select [Timer], and then tap ▶.
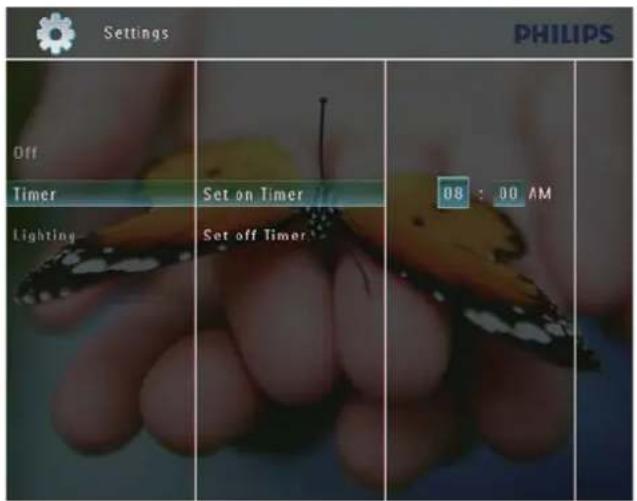
4 Select [Set on Timer] / [Set off Timer], and then tap OK to confirm.

5 Tap ▲/▼/◄/► to set time, and then tap OK to confirm.
Specify brightness to auto on/off
1 In the home screen, select [Settings] and then tap OK to confirm.

2 Select [Smart Power], and then tap OK to confirm.
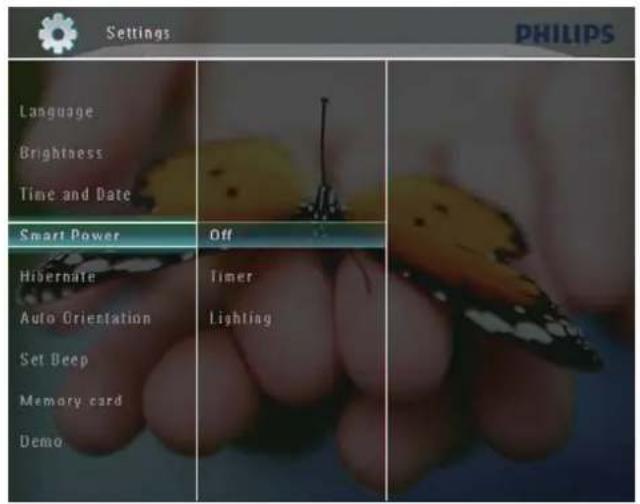
3 Select [Lighting], and then tap ▶.

4 To specify the brightness to auto on, select [On] and then tap OK to confirm.
To specify the brightness to auto • off, select [Off] and then tap OK to confirm.
5 Tap ▲/▼ to adjust brightness sensor, and then tap OK to confirm.
To switch off Smart Power function:
• In the [Smart Power] menu, select [Off] and then tap OK to confirm.


Tip
When the ambient light reaches the set auto • on/off level and lasts about 10 seconds, the Smart Power (Lighting) function takes effect.
- The auto on level must be set higher than that of the auto off level.
- When the PhotoFrame is in standby (sleep) mode, you can press to wake up the PhotoFrame.
Hibernate your PhotoFrame
1 In the home screen, select [Settings] and then tap OK to confirm.
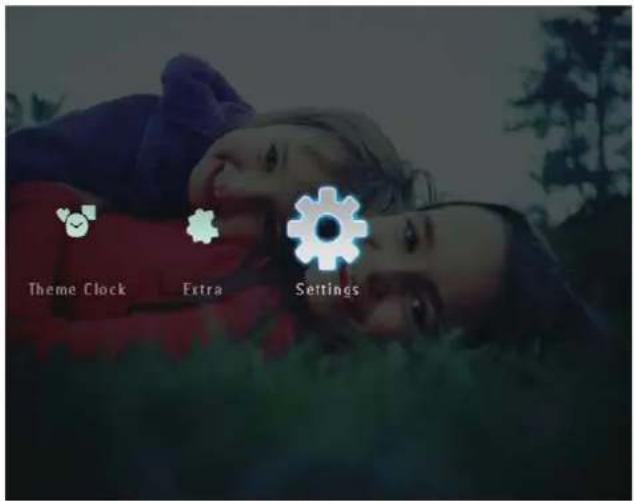
2 Select [Hibernate], and then tap OK to confirm.

3 Select an option, and then tap OK to confirm.
To disable hibernate function, • select [Never] and then tap OK to confirm.

After the selected period, your • PhotoFrame hibernates.
To get your PhotoFrame out of • hibernation, press 🔒.
Set Auto Orientation
You can play photos in the correct orientation depending the horizontal/vertical orientation of the PhotoFrame.
1 In the home screen, select [Settings] and then tap OK to confirm.

2 Select [Auto Orientation], and then tap OK to confirm.

3 Select [On], and then tap OK to confirm.

Turn on/off button sound
1 In the home screen, select [Settings] and then tap OK to confirm.

2 Select [Set Beep], and then tap OK to confirm.

3 Select [On] / [Off], and then tap OK to confirm.
Protect/Unprotect content on a storage device
You can enable the delete function on a storage device available on the PhotoFrame. To protect files on a storage device from accidental deletes, you can disable the delete function on a storage device.
1 In the home screen, select [Settings] and then tap OK to confirm.

2 Select [Memory card], and then tap OK to confirm.

3 Select [Delete Enable] / [Delete Disable], and then tap OK to confirm.

Set Demo

Note
The demo function is only effective during • photo slideshow.
1 In the home screen, select [Settings] and then tap OK to confirm.

2 Select [Demo], and then tap OK to confirm.
3 Select [On], and then tap OK to confirm.
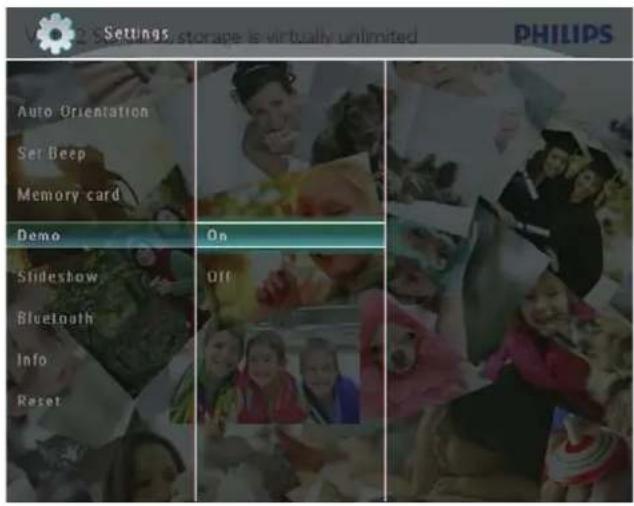
The demo function is activated.
Bluetooth (SPF7008/SPF7208/SPF7010/SPF7210)

Note
Bluetooth connectivity is available only on • SPF7008/SPF7208/SPF7010/SPF7210.
Set up Bluetooth connection
With the PhotoFrame, you can set up Bluetooth connection with a device like a mobile phone. Once a device is recognized, it is automatically accepted when it tries to connect with the PhotoFrame.
1 In the home screen, select [Settings] and then tap OK to confirm.

2 Select [Bluetooth], and then tap OK to confirm.

3 Select [Setup], and then tap OK to confirm.
4 Select [Bluetooth On], and then tap OK to confirm.

To set off • Bluetooth connection, select [Bluetooth Off] and then tap OK to confirm.

Tip
- If Bluetooth connection on your PhotoFrame is enabled, the Bluetooth icon * is displayed on the top-right corner of the screen.
- Bluetooth in correlation are saved in the Bluetooth album. You can access or manage the Bluetooth album the same way you access or manage other albums on the PhotoFrame.
Set Bluetooth pin code
To keep security, you can set a pin code (from 1 to 16 digits) on the PhotoFrame. The default pin code is 0000.
1 In the home screen, select [Settings] and then tap OK to confirm.

2 Select [Bluetooth], and then tap OK to confirm.
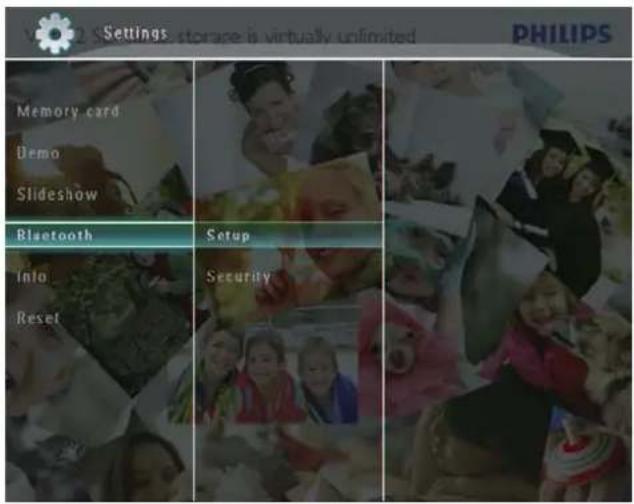
3 Select [Security], and then tap OK to confirm.
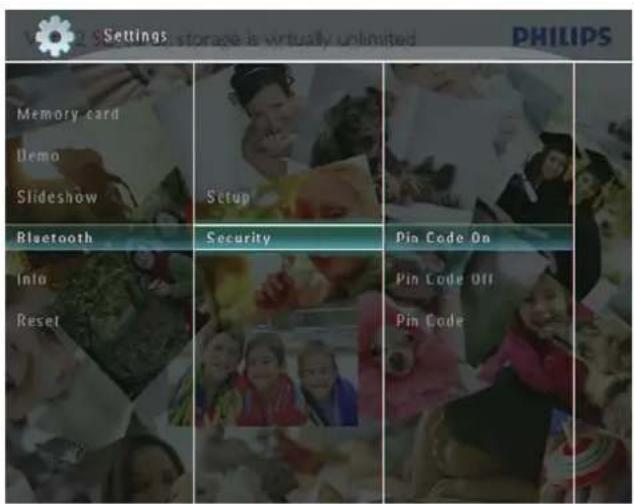
4 Select [Pin Code], and then tap OK to confirm.
A key pad is displayed.
5 Select a number, and then tap OK to confirm.
6 Repeat Step 5 until the pin code is complete.
7 Select [Enter], and then tap OK to confirm.

8 To set the pin code on, select [Pin Code On] and then tap OK to confirm. To set the pin code off, select • [Pin Code Off] and then tap OK to confirm.
View information of the PhotoFrame
You can find the friendly name, the memory status, and the firmware version of the PhotoFrame.
1 In the home screen, select [Settings] and then tap OK to confirm.

2 Select [Info], and then tap OK to confirm.
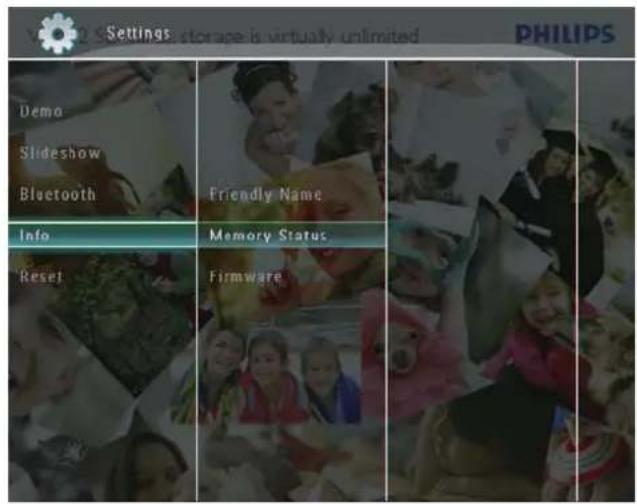
3 Select [Friendly Name] / [Memory Status] / [Firmware] to view related information.

Rename the PhotoFrame
1 In the home screen, select [Settings] and then tap OK to confirm.

2 Select [Info], and then tap OK to confirm.
3 Select [Friendly Name], and then tap OK to confirm.
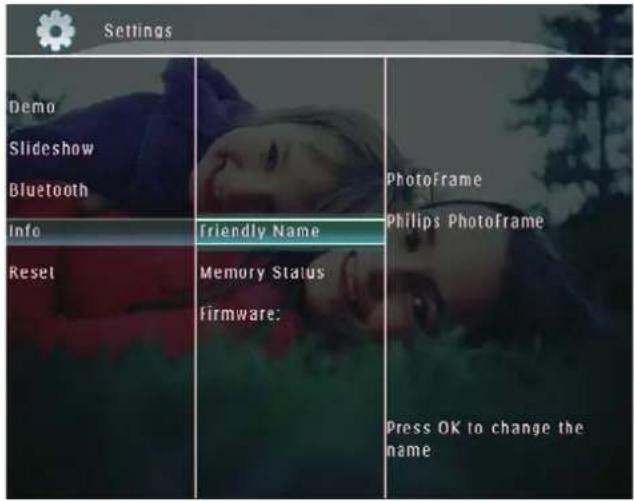
A key pad is displayed.
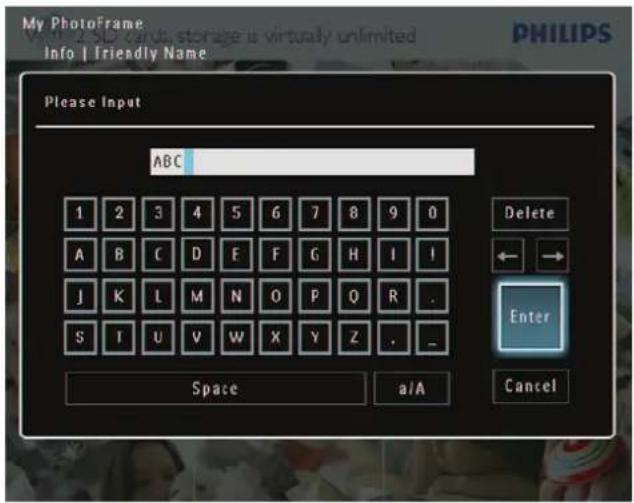
4 To enter the name (up to 24 characters), select an alphabet/number and then tap OK to confirm.
To switch between uppercase • and lowercase, select [a/A] on the displayed keypad and then tap OK to confirm.
5 When the name is complete, select [Enter] and then tap OK to confirm.
Reset all settings to factory default
1 In the home screen, select [Settings] and then tap OK to confirm.

2 Select [Reset], and then tap OK to confirm.

3 Select [Yes], and then tap OK to confirm.
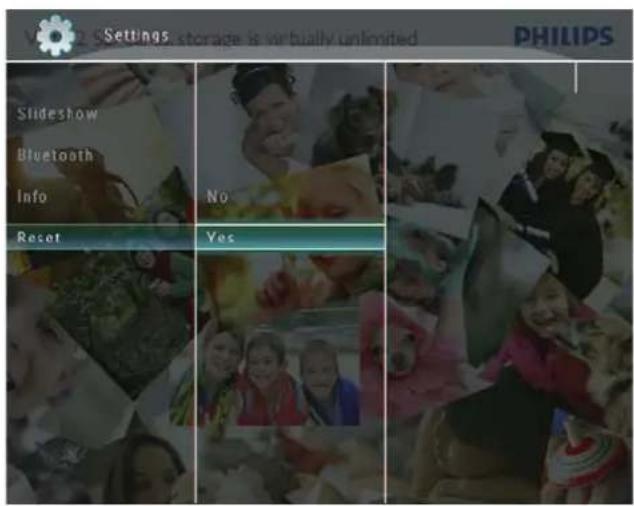
A confirmation message is displayed.

4 Select [Yes], and then tap OK to confirm. All settings on the PhotoFrame are set → to factory default.
10 Upgrade the PhotoFrame

Caution
Do not power off the PhotoFrame during • upgrade.
If there is a software update, you can download the latest software from www.philips.com/support to upgrade your PhotoFrame. The earlier software is unavailable online.
1 Visit www.philips.com/support.
2 Search for your PhotoFrame and go to the software section.
3 Download the latest software onto the root directory of an SD card.
4 Insert the SD card into the PhotoFrame.
5 Turn on the PhotoFrame
A confirmation message is displayed.
6 Select [Yes], and then tap OK to confirm. When the update is complete, the → PhotoFrame reboots.
11 Product information

Note
• Product information is subject to change without prior notice.
Picture/Display
• Viewing angle: @ C/R > 10, 130° (H)/110° (V)
• Lifetime, to 50% brightness: 20000 hr
- Aspect ratio: 4:3
• Panel resolution: 800 × 600
• Brightness (typical): 220 cd/m²
• Contrast ratio (typical): 300:1
• Photo format support:
- JPEG photo (maximum: 8000 × 6000 pixel resolution)
• Progressive JPEG photo (maximum: 1024 × 768 pixel resolution)
Video feature
• Video supported format: M-JPEG (*.avi/*.mov), MPEG-1 (*.mpg), MPEG-4 (*.avi/*.mov/*.mp4), H.263 (*.avi/*.mov)
- Video size:
• For M-JPEG: ≤ 640 × 480
• For MPEG-1, MPEG-4, H.263: ≤720 × 576
• Frame rate: ≤ 30 fps
Audio feature
• Audio supported format: MP3 (MPEG Audio Layer III)
Bit rate: 16 \~ 320 Kbps•
• Sample rate: 8 \~ 48 kHz
• Speaker output power (RMS): 0.83 W
Storage Media
• Memory Card Types:
- Compact Flash type I
- Secure Digital (SD)
- Secure Digital (SDHC)
- Multimedia Card
- xD card
- Memory Stick
Memory Stick Pro•
Memory Stick Duo•
Memory Stick Pro Duo•
USB: USB flash drive•
Built-in memory capacity: •
SPF5008/SPF5208/SPF5010/SPF5210: •
512 MB, for up to 500 High
Definition photos
SPF7008/SPF7208/SPF7010/•
SPF7210: 1 GB, for up to 1,000 High
Definition photos
Connectivity
USB: USB 2.0 Host, USB 2.0 Slave • Bluetooth® (SPF7008/SPF7208/SPF7010/• SPF7210): Bluetooth V2.0 + EDR, Class 2, Receiver only
Dimensions
- Set dimensions with stand (W × H × D): SPF5008/SPF5208/SPF7008/• SPF7208: 224.9 × 184.3 × 113.8 mm SPF5010/SPF5210/SPF7010/SPF7210: • 275.8 × 226 × 121 mm
- Set dimensions without stand
(W × H × D):
SPF5008/SPF5208/SPF7008/•
SPF7208: 224.9 × 184.3 × 33.2 mm
SPF5010/SPF5210/SPF7010/SPF7210: •
275.8 × 226 × 34.8 mm
• Weight (Main unit): SPF5008/SPF5208/SPF7008/ SPF7208: 0.60 kg
• SPF5010/SPF5210: 0.84 kg
• SPF7010/SPF7210: 0.87 kg
• Temperature range (operation): 0 °C - 40 °C/32 °F - 104 °F
• Temperature range (storage): -10 °C - 60 °C/14 °F - 140 °F
Power
• Power mode supported: AC powered
- Input: SPF5008/SPF5208: 100 - 240 V \~ • 50/60 Hz 0.3 A - SPF5010/SPF5210/SPF7008/ SPF7208/SPF7010/SPF7210: 100 - 240 V \~ 50/60 Hz 0.6 A
• Output: • SPF5008/SPF5208: 9 V = 1 A
SPF5010/SPF5210/SPF7008/• SPF7208/SPF7010/SPF7210: 9 V == 2.0 A
Efficiency level: IV•
Maximum consumption:•
SPF5008/SPF5208 (system on with • slideshow + MP3): 6.5 W
• SPF7008/SPF7208 (system on with slideshow + MP3): 5.1 W
- SPF5010/SPF5210 (system on with slideshow + MP3): 7.0 W
• SPF7010/SPF7210 (system on with slideshow + MP3): 7.1 W
Accessories
- AC-DC adaptor
• USB cable (not supplied to SPF5010/SPF5210)
- Stand
- Quick start guide
• CD-ROM, including
- User Manual
- (SPF7008/SPF7208/SPF7010/SPF7210) Philips PhotoFrame Manager
Convenience
• Card Reader: Built-in
• Photo format supported:
- JPEG photo (maximum: 8000 × 6000 pixel resolution) Progressive JPEG photo (1024 × 768 • pixel resolution only)
- Placement supported: Photo auto orientation, Landscape, Portrait
- Buttons and controls: Touch boarder control, power button
- Playback mode: Full screen browse, Slideshow, Thumbnail browse
• Album management: Create, Delete, Edit, Rename, Group, Add to Favorites
• Photo edit: Copy, Delete, Rotate
• Photo effects: Black and White, Sepia
- Slideshow setting: Transition Effect, Background Color, File Type, Collage (multiple pictures)
• Screen background: Black, White, Gray, Auto-fit, Radiant color
Setup function: Brightness adjustment, Language, Status, Event reminder, Beep on/off, Set time and date, Clock display enable/disable, Auto on/off, Slideshow System status: Firmware version, Remaining memory
Plug & Play Compatibility: Windows Vista, • Windows XP or later, Mac OS X 10.4 or later
Regulatory Approvals: C-Tick, CCC, CE, GOST, PSB, Switzerland
Other convenience: Kensington lock • compatible
On-Screen Display languages: English, • French, German, Spanish, Italian, Danish, Dutch, Portuguese, Russian, Simplified Chinese
12 Frequently asked questions
Is the LCD screen touch-enabled?
The LCD screen is not touch-enabled. After you turn on the PhotoFrame, you can use the touch boarder on the front panel to control the PhotoFrame.
Can I use the PhotoFrame to delete photos on a memory card?
Yes, it supports operations to delete photos on external devices such as a memory card. Ensure that you enable the delete function on a memory card available on the PhotoFrame.
Can I use the PhotoFrame during its display auto-off periods?
Yes.
When the PhotoFrame is in standby (sleep) mode, you can press ⏻ to wake up the PhotoFrame.
Why does my PhotoFrame not show some of my photos?
The PhotoFrame plays only JPEG photos • (maximum: 8000 × 6000 pixel resolution) and progressive JPEG photos (maximum: 1024 × 768 pixel resolution). Ensure that these photos are not • damaged.
Why does my PhotoFrame not show some of my video files?
The PhotoFrame plays most video clips of a digital still camera in M-JPEG (*.avi/*.mov), MPEG-1 (*.mpg), MPEG-4 (*.avi/*.mov/*.mp4), H.263 (*.avi/*.mov) format. Some video clips might have compatibility issues when played on your PhotoFrame. Before playing, ensure that these video clips are compatible with your PhotoFrame.
Ensure that the size of the video files • are applicable to your PhotoFrame (For details, see “Product information” in the User Manual).
Ensure that the video files are not • damaged.
Why cannot my PhotoFrame show video files even I could see them in [Browse] mode, and I played them before?
Ensure that [Slideshow Photo Only] is not enabled.
To play video in slideshow mode:
- In slideshow mode, tap 📄.
- In the displayed option menu, select
[Slideshow Photo Only].
- In the displayed message, select [No] and then tap OK to confirm.
Now you can play these video files in slideshow.
Why does my PhotoFrame not show some of my music files?
The PhotoFrame only supports MP3 (MPEG Audio Layer III) music files. Ensure that these MP3 (MPEG Audio Layer III) music files are not damaged.
Why does the PhotoFrame not go into auto-off status after I set it?
Ensure that you set the current time, • auto-off time, and auto-on time correctly.
The PhotoFrame automatically turns off its display exactly at the auto-off time. If the time has already passed for the day, it starts to enter auto-off status at the specified time from the next day.
Ensure that you adjust brightness sensor • correctly. If the auto-on level is too close to the auto-off level, this function cannot take effect.
Does the PhotoFrame support CF II?
No. The PhotoFrame does not support CF II.
Can I increase the memory size to store more pictures on the PhotoFrame?
No. The internal memory of the PhotoFrame is fixed and cannot be expanded. However, you could switch between different photos by using different storage devices on the PhotoFrame.
The PhotoFrame is ON but the PhotoFrame does not respond anymore. What can I do?
Ensure that the PhotoFrame is turned on.
Then, use a pin to trigger the RESET button located on the back to restore the system.
13 Appendix
Send photos from your mobile phone with Bluetooth connection

Note
Bluetooth connectivity is available only on • SPF7008/SPF7208/SPF7010/SPF7210.
- EBluedbab connection on your mobile phone is enabled.
- EBluetooth connection on your PhotoFrame is enabled.
• Detailed operation procedures depend on the type of mobile phones.
Consult the user manual of your mobile phone to proceed:
1 On your mobile phone, select photos to be sent to the PhotoFrame.
2 Activate Bluetooth feature on your mobile phone.
3 Pair your mobile with the PhotoFrame.
Your Philips PhotoFrame is searched!
4 If a pin code is required, enter the pin code (0000 by default) of the PhotoFrame.
5 Send photos from your mobile to the PhotoFrame.
The PhotoFrame saves photos in the Bluetooth album.
14 Glossary
A
Aspect ratio
Aspect ratio refers to the length to height ratio of TV screens. The ratio of a standard TV is 4:3, while the ratio of a high-definition or wide TV is 16:9. The letter box allows you to enjoy a picture with a wider perspective on a standard 4:3 screen.
B
Bluetooth®
Bluetooth® is a short-range wireless protocol that is meant to allow mobile devices to share information and applications without the worry of cables or interface incompatibilities. The name refers to a Viking King who unified Denmark. Operates at 2.4 GHz. For more information, see bluetooth.com.
C
CF Card
CompactFlash card. A memory card that uses flash memory to store data on a small card. A CompactFlash card makes data easy to add to a wide variety of computing devices, including digital cameras and music players, desktop computers, personal digital assistants (PDAs), digital audio recorders, and photo printers.
J
JPEG
A very common digital still picture format. A still-picture data compression system proposed by the Joint Photographic Expert Group, which features small decrease in image quality in spite of its high compression ratio. Files are recognized by their file extension '.jpg' or '.jpeg.'
K
Kbps
Kilobits per second. A digital-data-rate measurement system which is often used with highly compressed formats such as AAC, DAB, MP3 etc. The higher the amount, the better the quality generally is.
Kensington lock
A Kensington Security Slot (also called a K-Slot or Kensington lock). Part of an anti-theft system. It is a small, metal-reinforced hole found on almost all small or portable computer and electronics equipment, particularly on expensive and/or relatively light ones, such as laptops, computer monitors, desktop computers, gaming consoles, and video projectors. It is used for attaching a lock-and-cable apparatus, in particular those from Kensington.
M
Memory Stick
Memory Stick. A flash memory card for digital storage on cameras, camcorders and other handheld devices.
MMC Card
MultiMedia Card. A flash memory card that provides storage for cellphones, PDAs and other handheld devices. The card uses flash memory for read/write applications or ROM chips (ROM-MMC) for static information, the latter widely used for adding applications to a Palm PDA.
Motion JPEG
Motion JPEG (M-JPEG) is an informal name for multimedia formats where each video frame or interlaced field of a digital video sequence is separately compressed as a JPEG image. It is often used in mobile appliances such as digital cameras.
MP3
A file format with a sound data compression system. MP3 is the abbreviation of Motion
Picture Experts Group 1 (or MPEG-1) Audio Layer 3. With the MP3 format, one CD-R or CD-RW can contain about 10 times more data than a regular CD.
MPEG
Motion Picture Experts Group. A collection of compression systems for digital audio and video.
S
SD Card
Secure Digital Memory Card. A flash memory card that provides storage for digital cameras, cellphones and PDAs. SD Cards use the same 32 x 24mm form factor as the MultiMediaCard (MMC), but are slightly thicker (2.1mm vs. 1.4mm), and SD Card readers accept both formats. Cards up to 4GB are available.
T
Thumbnail
A thumbnail is reduced-size versions of a picture that is used to make it easier to recognize an them. Thumbnails serve the same role for images as a normal text index does for words.
X
xD Card
EXtreme Digital Picture Card. A flash memory card used in digital cameras.

- PhotoFrame
- Important 4
- Your PhotoFrame 8
- Get started 14
- Play 19
- Browse and manage photos/video or albums
- Show date/time in slideshow 32
- Create a reminder 34
- Slideshow setting 36
- Other settings 40
- Important
- Safety
- Safety precautions and maintenance
- Caution
- Notice
- Warranty
- CE Declaration of Conformity (SPF5008/SPF5208/SPF5010/SPF5210)
- CE Declaration of Conformity (SPF7008/SPF7208/SPF7010/SPF7210)
- Recycling
- End of life disposal
- Recycling Information for Customers
- Compliance with Electro-Magnetic Field (EMF)
- North Europe Information (Nordic Countries)
- WARNING:
- ADVARSEL:
- VAROITUS:
- Banned Substance Declaration
- Bluetooth Statement (SPF7008/SPF7208/SPF7010/SPF7210)
- Bluetooth®
- Third party software
- Be responsible Respect copyrights
- Your PhotoFrame
- Introduction
- What's in the box
- Overview of your PhotoFrame (SPF5008/ SPF5208)
- Overview of your PhotoFrame (SPF5010/ SPF5210/SPF7008/SPF7208/ SPF7010/SPF7210)
- Get started
- Install the stand
- Connect power
- Note
- Turn on/off the PhotoFrame
- For the first time use:
- Transfer photos or video/music files
- Transfer from a storage device
- Transfer by Philips PhotoFrame Manager (SPF7008/SPF7208/SPF7010/SPF7210)
- Connect the supplied USB cable to the PhotoFrame and to a PC.
- Select [Transfer Photos] / [Tranfer Music] / [Transfer Video].
- Under [My frame photos] / [My frame music] / [My frame videos], select a destination album/folder.
- Under [My computer photos] / [My computer music] / [My computer videos], select photos or video/music files.
- Click the icon to start transfer.
- After all transfer actions are complete, disconnect the USB cable from the PC and the PhotoFrame.
- Tip
- Transfer from PC (SPF5008/SPF5208/ SPF5010/SPF5210)
- Connect a USB cable to the PhotoFrame and to the PC.
- After all transfer actions are complete, disconnect the USB cable from the PC and the PhotoFrame.
- Play
- Play photos
- In slideshow mode:
- In filmstrip mode:
- Play video
- During video play:
- Play background music
- Display a theme clock (SPF5008/SPF5208/SPF7008/SPF7208/SPF7010/SPF7210)
- Browse photos/video files in album mode
- Add a photo/video file to the Favorites album
- Copy a photo/video file
- Move a photo/video file
- Delete a photo/video file
- Rotate a photo
- Select a photo effect
- Group photos by name/date
- Select several photos at a time
- Remove photos/video or music files from the Favorites album
- Manage an album
- Create an album
- Rename an album
- Show date/time in slideshow
- Create a reminder
- Edit a reminder
- Slideshow setting
- Select a transition effect
- Select background
- Select file type for slideshow display
- Display collage photos
- Other settings
- Use the quick menu
- Select an on-screen language
- Adjust brightness
- Set time/date
- Set time/date format
- Smart Power setting
- Specify time to auto on/off
- Specify brightness to auto on/off
- Hibernate your PhotoFrame
- Set Auto Orientation
- Turn on/off button sound
- Protect/Unprotect content on a storage device
- Set Demo
- Bluetooth (SPF7008/SPF7208/SPF7010/SPF7210)
- Set up Bluetooth connection
- Set Bluetooth pin code
- View information of the PhotoFrame
- Rename the PhotoFrame
- Reset all settings to factory default
- Upgrade the PhotoFrame
- Product information
- Picture/Display
- Video feature
- Audio feature
- Storage Media
- Connectivity
- Dimensions
- Power
- Accessories
- Convenience
- Frequently asked questions
- Is the LCD screen touch-enabled?
- Can I use the PhotoFrame to delete photos on a memory card?
- Can I use the PhotoFrame during its display auto-off periods?
- Why does my PhotoFrame not show some of my photos?
- Why does my PhotoFrame not show some of my video files?
- [Slideshow Photo Only].
- Why does my PhotoFrame not show some of my music files?
- Why does the PhotoFrame not go into auto-off status after I set it?
- Does the PhotoFrame support CF II?
- Can I increase the memory size to store more pictures on the PhotoFrame?
- The PhotoFrame is ON but the PhotoFrame does not respond anymore. What can I do?
- Appendix
- Send photos from your mobile phone with Bluetooth connection
- Glossary
- A
- Aspect ratio
- B
- C
- CF Card
- J
- JPEG
- K
- Kbps
- Kensington lock
- M
- Memory Stick
- MMC Card
- Motion JPEG
- MP3
- MPEG
- S
- SD Card
- T
- Thumbnail
- X
- xD Card
Brand : PHILIPS
Model : SHB1000
Category : Headphones