
Avance Collection HD2089 - Soy milk machine PHILIPS - Free user manual and instructions
Find the device manual for free Avance Collection HD2089 PHILIPS in PDF.


| Product Type | Soy Milk Machine |
| Brand | Philips |
| Model | Avance Collection HD2089 |
| Power Consumption | 145 W |
| Rated Voltage | 220-240 V |
| Capacity (Max Water Level) | 1.2 L (upper mark) |
| Capacity (Min Water Level) | 0.6 L (lower mark) |
| Weight (Approx.) | 2.0 kg |
| Dimensions (Approx.) | 25 x 20 x 30 cm |
| Functions | Soy Milk, Rice Paste, Fruit/Veggie Drink, Chunky Soup, Pureed Soup, Keep Warm |
| Keep Warm Duration | 20 hours (except Fruit/Veggie Drink) |
| Overflow Sensor | Yes |
| Automatic Shut-off | Yes |
| Cleaning Method | Self-cleaning cycle or manual cleaning |
| Material | Stainless steel pot, plastic top unit |
| Accessories | Measuring cup, cleaning brush |
| Safety Features | Overheat protection, anti-dry boil protection |
| Warranty | 2 years (standard) |
Frequently Asked Questions - Avance Collection HD2089 PHILIPS
User questions about Avance Collection HD2089 PHILIPS
0 question about this device. Answer the ones you know or ask your own.
Ask a new question about this device
Download the instructions for your Soy milk machine in PDF format for free! Find your manual Avance Collection HD2089 - PHILIPS and take your electronic device back in hand. On this page are published all the documents necessary for the use of your device. Avance Collection HD2089 by PHILIPS.
USER MANUAL Avance Collection HD2089 PHILIPS
1 Your soymilk maker
Congratulations on your purchase, and welcome to Philips!
To fully benefit from the support that Philips offers, register your product at www.philips.com/welcome.
2 Important
Read this user manual carefully before you use the appliance, and save the
user manual for future reference
2017 processing
- Before you connect the appliance to the power, make sure that the voltage indicated on the appliance corresponds to the local power voltage.
• This appliance can only be used with a grounded plug. Make sure that the
plug is firmly inserted into the power outlet.
• I take sure up power outlet.
- Make sure surface of both the upper and lower coupler is free from liquid an easy conductivity medium before putting the lid onto the sun.
• Make sure the surface of both the upper plug connector and the power.
cord connector is free from liquid or any conductive medium before
putting the top unit into the pot.
POTEL CONTACTS AND APPLIANE TO A OTHER OFFICE, TO BREAD A RED OUT situation.
- Before you insert the plug into appSense is assembled, respectively
- Make sure that you clean the appliance before use (see the “Cleaning
before first use" section).
- Do not use this appliance to heat up soy - Never use the appliance for dry heating.
- Never add contents (including water) above MAX (the maximum level
indication) or below MIN (the minimum level indication).
- If the power cord is damaged, you must have it replaced by Philips, a service center authorized by Philips or similarly qualified persons to avoid a hazard.
- Do not replace parts of the appliance yourself.
• This appliance is not intended for use by persons (including children) with reduced physical, sensory or mental capabilities, or lack of experience.
and knowledge, unless they have been given supervision or instructions
concerning use of the appliance by a person responsible for their safety.
- For their safety, do not allow children to play with the appliance. Keep the appliance and its power cord out of the reach of children.
- Make sure that the water you add into the soymilk maker is warm in
ambient temperature.
- This appliance is
• Do not use this appliance on an unstable or uneven surface.
- Keep the appliance and its power cord out of the reach of children.
- Do not touch the steam vent and the metal parts of the appliance to avoid burns or scalding.
- Do not disconnect the power cord or remove the top unit before
processing is complete.
- If you have to stop processing, disconnect the power cord before you
■ If there is a power outage
immediately restart the soymilk maker. Empty the contents, and then put in
new ingredients before restarting. Otherwise, the contents will stick to the
pot or overflow, o
After processing:
- Disconnect the power before you continue other operations. - To prevent steam scalding, keep a certain distance from the s
before you turn and lift the top uni
- Be careful of the trapezoidal blade mill on the top unit, do not cut yourself
or others with IL
1

2

3


- Before cleaning or disassembling the appliance, disconnect the power cord from the power outlet.
• To prevent a short circuit or an electric shock, do not use water to rinse
the outside of the pot unit or top unit (including the top unit handle,
control panel, upper plug upper plug connector, and the power cor connector) and keep them away from drip or splash.
• To prevent a short circuit or an electric shock, do not immerse the base of
the pot unit in water as there is a heat vent at the bottom, otherwise water
- I use a microwave oven to heat up cold soymilk. Do not use this appliance.
to heat it, as the contents will stick to the inner side of the pot.
- Some foods may discolor the overflow sensor. This is perfectly normal.
- store the power cord in cool and dry p not use the power cord to support other
Electromagnetic Fields (EMF)
This Philips appliance complies with all applicable standards and regulations
regarding exposure to electromagnetic fields.
3 Overview
Product overview (fig. 1)
| 1 | Handle of the top unit | 8 | Upper plug | |
| 1 | Control Panel | 9 | Lower part of the top unit | |
| 3 | Top unit seal (removable) | 10 | Pot unit | |
| 4 | Overflow sensor - Monitor soymilk and prevent overflowing | 11 | Base | |
| 5 | Trapezoidal blade mill | 12 | Upper plug connector | |
| 6 | Steam vent cap (Removable) | Steam vent upper cap | 13 | Pot handle |
| Steam vent lower cap | ||||
| Steam vent seal | ||||
| 7 | Steam vent | 14 | Power cord connector | |
Controls overview

| 1 | Functional indicators | Soymilk | 2 | Program selection button |
| Rice paste | 3 | Start button | ||
| Fruit/veggie drink | 4 | Easy clean button | ||
| Chunky soup | 5 | Timer display | ||
| Pureed soup |
4 Cleaning before first use (fig. 2)
Method 1
Pour boiling water into the pot, put the too unit into it, then soak for
10 minutes. (fig ① to ⑥)
Clean the appliance (see the "Cleaning" section).
(No text)
Method 2
Follow the soymilk making instructions.
I out the soymilk away when it is done appliance (see the "Cleaning" section).
5 Using the appliance (fig. 3)
Warning
- If you wish to cancel a function after it has started, do not turn and lift the top unit to prevent the facial scalding. You can unplug the power cord, re-plug it, and then selected another function. If the appliance has processed more than 3 minutes, make sure to empty and replace the ingredients and water before restarting the new function.
Measure ingredients as instructed in the recipe. You can adjust the quantity to fit your personal taste. Do not adjust the quantity sharply.
For 2-4 servings.
1 Clean the supplied measuring cup and stand by.
To extend the lifetime of the trapezoidal blade mill, soak the
soybeans (2 hours in summer and 4 hours in winter), and wasn them
-
Turn the top unit anticlockwise and lift it up (fig ① to ②)
-
Put the soybeans evenly at the bottom of the pot. (fig. 3).
-
Pour water into the pot. Make sure the water level is between 上水位
e maximum level indication) and 下水位 minimum level
indication). (fig. ④)
5 Put the top unit into the pot, and turn it clockwise to tightly close the
to unit. Make sure that the upper plug is correctly inserted into the
connector: (Fig. ⑤ to ⑥)
6 Insert the power cord and connect the power. (ng ⑨)
The selected function indicator lights up and the appliance sounds
once.
- Press the start button to start processing. (fig. ⑧)
→ For Soymilk, you will hear 6 beeps after about 30 minutes, and the
process is complete. (fig. 9)
→ For Rice paste, you will he
process is complete. (fig. 9)
For Fruit/veggie drink, you will hear 6 beeps after about 4 minutes,
and the process is complete. (16, 2)
For Chunky soup, you will hear 6 beeps after about 40 minutes, and
the process is complete. (Fig. ①)
the process is complete (fig. 9).
Note
- All functions, except Fruit/Veggie Drink, will be in keep warm mode for an hour after they are complete. The function indicator flashes in keep warm mode, and 00 displays on the screen. After the warm keeping is finished, the appliance beeps 5 times, the screen goes off, and the function indicator remains on. - For Soymilk, Rice paste and Pureed Soup, the appliance constantly stirs the ingredients in keep warm mode. The process is completed and you can unplug the appliance at any time. The food is ready to serve.
9 After processing, disconnect the power. Hold the handle of the pot tightly with one hand, then turn it anticlockwise and lift the top unit with the other hand. (fig. 10 to 12).
10 Stir the content well. (fig. 13) Then, pour it out directly to the drinking glass, and it is ready to serve. (fig. 14) No filtering is needed. You can add some sugar and stir before serving.
Ti
• After processing, serve at once to avoid oxidization.
- to keep the appliance more durable, wait about 20 minutes or above until the
appliance looks down before next use.
6 Cleaning (fig. 4)
三
• Disconnect the power and remove the power cord before cleaning or
disassembling this appliance.
• Do not immerse the top unit in water.
- to prevent scalding, do not touch the top unit, steam vent cap, inner side of the
- Be careful of the trapezoidal blade mill during cleaning to avoid cutting yourself.
and others
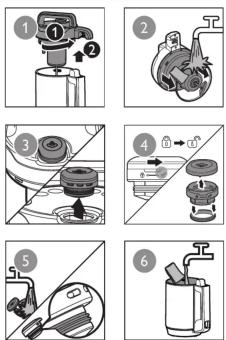
1 Turn the top unit anticlockwise and lift it up. (fig. ①)
2 Rinse the lower part of the top unit, the overflow sensor, the trapezoidal blade mill, and the inner side of the pot with water. Use a cleaning pad to remove the residues. (fig. ②)
3 Remove and clean the top unit seal. (fig. ②)
4. Remove and clean the steam vent upper cap, the lower cap, and the seal
with water. (fig. ③ to ⑤)
5 Use a cleaning pad and water to clean the inner side of the pot. (fig. 6)
6 Use a dry cloth to clean the top unit handle, control panel, and power
cord connector. The outside of the pot can be cleaned with a damp
cloth,
Tir
- Clean the appliance immediately after use
- Make sure to properly assemble the top unit seal and the steam vent seal back to the top unit and the steam vent respectively after cleaning. Sealing edge must point outward (fig. 5 and 7)
- If the steam vent cap, the steam vent seal, or the top unit seal is damaged or lost, contact the Philips Consumer Care Center in your country to purchase the new parts.
Easy cleaning
- Promptly clean the residue on the appliance; otherwise, the residue will dry up and stick on the appliance, and become difficult to remove. When this happens, you can use the easy clean function to heat and soak the
inner side of the pot and clean the appliance easier.
• To prevent the re
1 Pour water into the pot. Make sure the water level is between 上水位
(the maximum level indication) and h(4) minimum level
indication).
2 Put the top unit into the pot. Make sure that the upper plug is correctly
- Insert the power cord and connect the power
- Press Easy Clean (fig 8)
→ After about 8 minutes, you will hear 6 beeps, indicating that the easy
clean function is complete.
5 Clean the appliance as instructed in the "Cleaning" section.
4


7 Recipes
For more recipes you can visit Philips MyKitchen website www.philips.com/kitchen.
| Recipe | Ingredients | Cooking method |
| Soymilk | 70g of soybeans (a full cup) | Wash and soak the soybeans thoroughly. Place them into the pot. Add water up to the middle of 上水位 (MAX) and 下水位 (MIN). After connecting to the power, select 浓醇豆浆 (Soymilk). Once done, the appliance will sound. Pour the red beans and millet milk to the glass. Then, mix well to taste. |
| Black bean milk | 80g of black beans ( a full cup ) | |
| Mung bean milk | 85g of mung beans (a full cup ) |
Rice paste
| Recipe | Ingredients | Cooking method |
| Complete nutritious rice paste | 35g of rice (around 1/2 cup); 15g of milk (around 1/5 cup); 10g of black sesame seeds; 10 peanuts (with shrew removed); 5 walnut flesh; 5 chinese dates (with stones removed) | Wash rice, millet, and peanuts. Crush the walnut flesh and break the chinese dates into small pieces. Place them all to the pot. Add water with the middle of the MNX and下水位(MIN). After connecting to the power, select营养米糊(Rice Paste). Once done, the appliance will sound. Pour the complete nutritious rice paste to the glass. Finally, add some crystal sugar to taste. |
| Almond paste | 70g of almonds; 30g of rice; some milk and sugar | Brown the almonds and make sure they are around 1cm in size. Put them into the pot. Add water up to the middle of上水位(MIN) and下水位(MIN). After connecting to the power, select营养米糊(Rice Paste). One done, the appliance will sound. Pour almond paste to the bowl. Finally, add some milk and sugar to taste. |
| Cashew paste | 130g of cashews; some milk and sugar | Brown the cashews and make sure they are around 1cm in size. Put them into the pot. Add water up to the middle of上水位(MIN) and下水位(MIN). After connecting to the power, select营养米糊(Air) Paste. Once done, the appliance will sound. Pour cashew paste to the bowl. Finally, add some milk and sugar to taste. |
| Sesame paste | 120g of black sesame seeds; 30g of white sesame seeds; 35g of rice; some milk and sugar | Brown the black sesame seeds and the white sesame seeds. Wash rice. Put both the black and white sesame seeds into the pot first, then put the clean rice. Add water up to the middle of上水位(MIN) and下水位(MIN). After connecting to the power, select营养米糊(Rice Paste). One done, the appliance will sound. Pour sesame paste to the bowl. Finally, add some milk and sugar to taste. |
Fruit/veggie drink
| Recipe Ingredients Cooking method | ||
| Banana milkshake | 400g of banana; 300ml of milk | Remove the skin of the bananas and cut them into 1cm cubes. Place them evenly in the pot. Then, add water up to the middle of 上水位 (MAX) and 70 kilol. Connect to power; and select 果蔬纤饮 (Fruit/Veggie Drink). Once the processing is complete, the appliance sounds. Pour the milkshake out and it is ready to serve. |
| Cucumber juice | One cucumber (around 200g) | Cut the cucumber into 1cm cubes, and place evenly in the pot. Then add water till 下水位 (MIN), Connect to power; and select 果蔬纤饮 (Fruit/Veggie Drink). Once the processing is complete, the appliance sounds. Pour the juice out and it is ready to serve. |
Chunky soup
| Recipe Ingredients Cooking method | ||
| Dried shrimp daikon soup | Daikon (about a half), small dried shrimp, chopped green onion | Wash and peel the daikon, cut it into small pieces. Wash the dried shrimp thoroughly. Put the daikon and dried shrimp into the pot, add water up to the middle of 上水位 (MAX) and 下水位 (MIN), and press 中式滚汤 (chunky soup). Once done, the machine will beep. Add some chopped green onion and salt to taste. |
Pureed soup
| Recipe Ingredients Cooking method | ||
| Pumpkin soup with cream | Pumpkin (about a half), cream | Wash and peel the pumpkin, cut it into small pieces. Put all the ingredients into the pot, add water up to the middle of 上水位 (MAX) and 下水位, and press 西式浓汤 (pureed soup). Once done, the machine will beep. Add some salt to taste. |
8 Troubleshooting
This chapter summarizes the most common problems you could encounter with the appliance. If you are unable to solve the problem with the information below, contact the Philips Consumer Care Center in your country.
| Problem Possible cause Solution | ||
| The indicators or the screen do not light up | The upper plug is not connected correctly. | Make sure the top unit is put into the pot correctly. |
| There is water in the top unit or the indicators and screen are broken. | Contact the Philips Consumer Care Center. | |
| The indicators light up but the appliance does not work. | The appliance malfunctions. | Contact the Philips Consumer Care Center. |
| Processing will not stop. | The appliance malfunctions. | Contact the Philips Consumer Care Center. |
| The buttons do not respond nor work. | The appliance malfunctions. | Contact the Philips Consumer Care Center. |
| The beans or rice do not ground well. | The voltage is too low. | Use a household power regulator. |
| Too many beans are added. | Put in proper amount of soybeans and other ingredients as instructed in the "Using the appliance" section. | |
| Insufficient water is added. | Make sure the water level is between 上水位 (the maximum level indication) and 下水位 (the minimum level indication) | |
| The appliance has been used continuously. | Wait about 20 minutes or above before next use. | |
| The appliance malfunctions. | Contact the Philips Consumer Care Center. | |
| The appliance overflows, or it sounds while all the indicators flash. | You have selected a wrong function. | Select the correct function. |
| You have added to too many ingredients. | Put in proper amount of soybeans and other ingredients as instructed in the receipt. | |
| The water added in the pot is below 下水位 (the minimum level indication), or above 上水位 maximum level indication). | Make sure the water level is between 上水位 (maximum level indication) and 下水位 (the minimum level indication). | |
| The appliance malfunctions. | Contact the Philips Consumer Care Center. | |
| The overflow sensor is dirty. | Clean the overflow sensor. | |
| The water temperature is too high. | Add warm water in ambient temperature. | |
| The steam vent is blocked. | Clean the steam vent. | |
| You are trying to reheat soymilk or other liquid foods. | Use the appliance correctly. | |
| The voltage is too high. | Use a household power regulator. | |
| The top unit seal is not assembled properly. | Correctly assemble the top unit seal. | |
| The processing time for soymilk is longer than instructed. Other functions work normal. | The voltage is too low. | Use a household power regulator. |
| The water temperature is too low. | Add warm water in ambient temperature. | |
| Food is burnt. | You have selected a wrong function. | Select the correct function. |
| The inner side of the pot is not cleaned. | Clean the inner side of the pot. | |
| Insufficient water is added. | Make sure the water level is between 上水位 (the maximum level indication) and 下水位 (the minimum level indication) | |
| You have added in too many ingredients. | Put in proper amount of soybeans and other ingredients as instructed in the recipe. | |
| The soymilk is not fully boiled. | You have added in too much water or ingredient. | Put in proper amount of soybeans and other ingredients as instructed in the recipe. |
| Make sure the water level is between 上水位 (the maximum level indication) and 下水位 (the minimum level indication) | ||
| The appliance malfunctions. | Contact the Philips Consumer Care Center. | |
| The sea level of your region is too high. | This appliance can only be used in regions no more than 2000m above sea level. | |
9 Product information
Motor power: 145 W
Heating power: 850 W
Dimensions (L × W × H)
• Soymilk make
Weight:
Net weight:
Gross weight
-
2.6 kg
[Non-Text]
3.1 kg
For rated voltage and frequency information, refer to the typeplate on the
product.
-
-
-
-
-
-
-
-
-
-
-
-
-
-
-
-
-
-
-
-
-
-
-
-
-
-
-
-
-
-
-
-
-
-
-
-
-
-
-
-
-
-
-
-
-
-
-
-
-
-
-
-
-
-
-
-
-
-
-
-
-
-
-
-
-
-
-
-
-
-
-
-
-
-
-
-
-
-
-
-
-
-
-
-
-
-
-
-
-
-
-
-
-
-
-
-
-
- 99.
-
-
-
-
-
-
-
-
-
-
-
-
-
-
-
-
-
-
-
-
-
-
-
-
-
-
-
-
-
-
-
-
-
-
-
-
-
-
-
-
-
-
-
-
-
-
-
-
-
-
-
-
-
-
-
-
-
-
-
-
-
-
-
-
-
-
-
-
-
-
-
-
-
-
-
-
-
-
-
-
-
-
-
-
-
-
-
-
-
-
-
-
-
-
-
-
Product information is subjected to change without prior notice.
10 Recycling
Do not throw away the appliance with normal household waste at the end of its life, but hand it in at an official collection point for recycling. By doing this, you help to preserve the environment.
11 Guarantee and service
If you have a problem, need service, or need information, see www.philips.
com/support or contact the Philips Consumer Care Center in your country
简体中文
1 您的豆浆机
- Your soymilk maker
- Important
- processing
- - This appliance is
- pot or overflow, o
- After processing:
- 1
- 2
- 3
- Electromagnetic Fields (EMF)
- Overview
- Cleaning before first use (fig. 2)
- Method 1
- (No text)
- Method 2
- Using the appliance (fig. 3)
- Warning
- Note
- Ti
- Cleaning (fig. 4)
- 三
- Tir
- Easy cleaning
- 4
- Recipes
- Troubleshooting
- Product information
- Recycling
- Guarantee and service
- 简体中文
- 您的豆浆机
Brand : PHILIPS
Model : Avance Collection HD2089
Category : Soy milk machine