
FCU150 - Waste press VIKING - Free user manual and instructions
Find the device manual for free FCU150 VIKING in PDF.


| Product Type | Trash Compactor |
| Brand | Viking |
| Model | FCU150 |
| Overall Width | 14-7/8" (37.6 cm) |
| Overall Height (min/max) | 24-1/8" to 25-1/8" (61.3 to 63.8 cm) |
| Overall Depth (excluding door panel) | 21-1/8" (53.7 cm) |
| Cutout Width Required | 15" (38.1 cm) |
| Cutout Height Required | 34-1/2" (87.6 cm) |
| Cutout Depth Required | 22" (55.9 cm) |
| Electrical Rating | 5.0 A, 120 VAC, 60 Hz |
| Recommended Circuit | 15 A, time-delay fuse or circuit breaker, dedicated circuit |
| Power Cord Length | 6 ft (1.82 m) |
| Power Cord Plug | Three-prong grounded plug |
| Approximate Shipping Weight | 110 lbs (50 kg) |
| Compression Ratio | Up to 6:1 (reduces volume to 1/6) |
| Key Lock Switch | ON/OFF/LOCK positions, removable key |
| Odor Control System | Automatic rotating disk, lasts 6 months, model ODFCU |
| Clock/Auto Delay | Programmable delay start (up to 2 hours hold time) |
| Battery Backup | 9V battery (not included) for clock retention |
| Trash Bucket Capacity | Approximately 1/3 to full bucket for effective compaction |
| Removable Bucket and Compaction Plate | Yes, compaction plate dishwasher safe |
| Door Panels | Accessory panels PTDP15 (15") and PTDP18 (18") or custom up to 15 lbs |
| Leveling | Two rear rollers and two front leveling legs |
| Safety Interlock | Door interlock switch stops operation if door is open |
| Cleaning | Mild detergent, avoid abrasives; removable bucket and plate for thorough cleaning |
Frequently Asked Questions - FCU150 VIKING
User questions about FCU150 VIKING
0 question about this device. Answer the ones you know or ask your own.
Ask a new question about this device
Download the instructions for your Waste press in PDF format for free! Find your manual FCU150 - VIKING and take your electronic device back in hand. On this page are published all the documents necessary for the use of your device. FCU150 by VIKING.
USER MANUAL FCU150 VIKING
Viking Installation Guide & Use & Care Manual

Viking Range Corporation
111 Front Street
Greenwood, Mississippi 38930 USA
(662) 455-1200
For product information,
call 1-888-VIKING1 (845-4641)
or visit the Viking Web site at
vikingrange.com
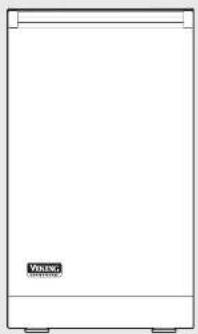
Trash Compactor
Table of Contents
Warnings & Important Information 3
Dimensions 5
Specifications 6
Cutout Dimensions ____ 7
Electrical Requirements 8
General Information 9
Installation 10
Panel Installation and Dimensions 11
Accessory Door Panel (PTDP15) 11
Accessory Door Panel (PDTP18) 12
Custom Door Panel 13
How the Compactor Works 14
Operation 15
Key Lock Switch 15
Clock/Auto Delay 15
Battery Backup 15
Preparing Odor Control Disk 16
Installing Odor Control Disk 16
Installing Bag 17
Compacting 17
Compacting Tips 17
Bag Removal 18
Cleaning 19
Troubleshooting ____ 20
Service & Registration 21
Warranty 22
IMPORTANT-Please Read and Follow!
■ Before beginning-please read these
Instructions completely and carefully.
- DO NOT remove permanently affixed labels, warnings, or rating plates from the trash compactor. This may void warranty or create an unsafe product.
- Please observe all national and local codes.
- Please ensure that this product is properly grounded.
- The installer should leave these instructions with the consumer who should retain for local inspector's use and for future reference.
Site Preparation It is recommended that a thorough site inspection be conducted PRIOR to unpacking and moving this appliance.
CAUTION
The odor control disk contains material that may cause moderate eye irritation. Avoid contact with eyes. Harmful if swallowed. Wash skin or clothing thoroughly with soap and water after handling. DO NOT reuse empty foil pouch.
WARNING
DO NOT compact aerosol cans or any other containers still holding or which held toxic chemicals, insecticides, or combustible contents. Fumes may be reaccessed that are hazardous to health or may result in fire or explosion.
CAUTION
Glass fragments and other sharp trash pieces may be on or around the surfaces to be cleaned. Carefully remove these objects before wiping down any surfaces.
WARNING
Make sure that incoming voltage is the same as unit rating. An electric rating plate specifying voltage, hertz, and amps is attached to the product. Wiring the compactor with more voltage than it is rated for may cause severe damage. To reduce the risk of fire, electric shock, or injury to persons, installation work and electrical wiring must be done by qualified technician in accordance with all applicable codes and standards, including fire-rated conditions.
WARNING
DO NOT put paint, oily rega, lighter fluid cans, paint thinner cans, etc., in your compactor. Doing so could result in spontaneous combustion causing a fire and/or explosion.
CAUTION
NEVER push trash into the bucket with hands or foot. Trash might contain broken glass, sharp pieces of metal, etc., which could cause injury.
IMPORTANT-Please Read and Follow!
READ ALL INSTRUCTIONS CAREFULLY BEFORE OPERATING COMPACTOR.
Basic precautions should always be taken when using an electrical appliance - including the following:
- Close supervision is necessary when any appliance is operated near children. DO NOT allow the appliance to be used as a toy, or to run unattended at any time. Turn key to "OFF" and remove it to lock the compactor. Store the key out of reach to prevent children or others from operating or tampering with the compactor.
- DO NOT push trash into compactor drawer with hands or lopt. Trash might contain broken glass, sharp pieces of metal, etc., which would cause injury.
- DO NOT compact volatile material. Paint, oily rags, lighter fluid cans, and paint thinner cans could combust spontaneously and cause an explosion and/or fire.
- DO NOT compact aerosol cans or any other containers still holding toxic chemicals, insecticides, or combustible contents. Fumes may be released which are hazardous to health.
- DO NOT compact lighted cigarettes, cigars, or other hat or burning items.
-
DO NOT overload the compactor.
-
Be careful when removing and carrying bag. Broken glass or other sharp objects may pierce bag. DO NOT overload trash bag with heavy material such as glass.
- DO NOT operate this unit with an extension card.
- Use only Viking approved accessories.
• DO NOT touch moving parts. - DO NOT take this appliance apart. Incorrect reassembly can cause electrical shock when operated.
• DO NOT operate with a damaged power cord, plug, motor, or after damage of any kind. Have the compactor examined, and all repairs made, by an authorized serviceman. - This compactor is FOR HOUSEHOLD USE ONLY. Use it only as described in this manual.
- Unplug the appliance from outlet before servicing.
Dimensions

*NOTE: Not including handle.
Specifications
| DescriptionFCU150 | |
| Overall width 14-7/8" (37.6 cm)Overall height from floor 24-1/8" min. to 25 1/8" max. | |
| Overall depth from rear 21-1/8" (53.7 cm) Does not include necessary door panelCutout width 15" (38.1 cm) | |
| Cutout height 24-1/2" (87.6 cm max.)Cutout depth 22" (55.9 cm) | |
| Electrical requirements 5.0 amps, 120VAC/60 Hz6" (1.82 ml electrical cord & prong plug supplied with unit | |
| Approximate shipping weight | 10lbs./kg |
Cutout Dimensions
The compactor requires a minimum under-counter cutout opening 15" wide, 34½" high, and 22" deep.
Plan to provide an electrical outlet in the opening that meets all applicable electrical codes and requirements. See "Electrical Requirements" section on Page 8 for specific information.

Electrical Requirements
GROUNDING INSTRUCTIONS

Important: TO REDUCE THE RISK OF ELECTRIC SHOCK - Please read carefully.
FOR PERSONAL SAFETY, THIS APPLIANCE MUST BE PROPERLY GROUNDED. The power cord on this appliance is equipped with a three-prong (grounding) plug which mates with a standard three-prong (grounded) receptacle as illustrated above.
If there is a two-prong outlet located where you will install the compactor, it is your responsibility to have it replaced with a properly grounded three-prong wall receptacle. No adapter shall be used with this product.
DO NOT, UNDER ANY CIRCUMSTANCES, CUT OR REMOVE THE THIRD (GROUND) PRONG FROM THE POWER CORD PLUG.
The GREEN (or GREEN & YELLOW) conductor in the cord is the grounding wire. Never connect the GREEN (or GREEN & YELLOW) wire to a live terminal.
A 120 volt, 60 Hz, A.C., 15 amp fused and grounded electrical supply is required (time-delay fuse or circuit breaker is recommended). It is recommended that a SEPARATE CIRCUIT serving only this appliance be provided.
DO NOT USE AN EXTENSION CORD WITH THIS APPLIANCE.
General Information
UNPACKING THE COMPACTOR
The trash compactor is shipped from the factory with packing material in the trash bucket and the ram in the down position. The ram will return to the up position once the cord is plugged into an electrical outlet. Open the trash bucket and remove the packing material.
The compactor is only configured for built-in installations.
Your compactor has four adjustable levelers, (2) rollers in the rear and (2) legs in the front. They allow you to adjust for uneven floors and also trim the unit up to fit an under-counter installation.
Installation
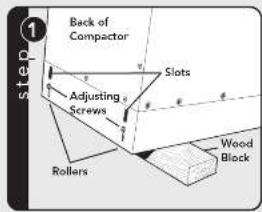
Tip the back of compactor up and once a wood block. Lesson the adjusting screws only for enough to move the rollers to a higher or lower slot. Belighten the adjusting screws and remove the wood block.
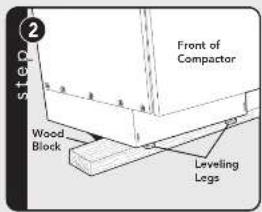
Tip the iron of compactor up and onto a wood block. Turn the leveling eggs in or out to the desired position. Remove the wood block.
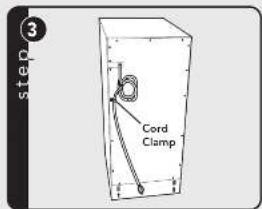
Use the card clamp to prevent excess power card from being pinched beneath the cabinet during installation or service.

Faster the stunted end of the steps to the compactor using the holes in the top of the compactor cabinet as shown. NOTE: When installing compactor under grants or solid surface counterships, bend the mounting steps so they can be secured to the adjacent cabinery.
Panel Installation and Dimensions
ACCESSORY DOOR PANEL (PTDP15)
The following installation parts are supplied with PTDP15 door panels:
- Accessory door panel with foam insert
finish designates color; Foam jeron
- Foam insert - 5 - #8 sheet metal screws
Accessory Door Panel Installation (PTDP15) The PTDP15 panel will be held on by five screws (supplied in door panel packaging) and two screws with locator pins pre-attached (supplied on panels).
- Remove all plastic covering on the stainless steel panel.
- Place the panel onto the outside of the door, aligning it with the pro-drilled holes on the trash compactor door facing.
- Insert the panel into the door by inserting the pre-attached locator pins into the middle screw hole (second hole from top on left and right-hand sides).
- Install the five screws provided with packaging into their designated locations (two on loft, two on right, and one at the top).

Panel Installation and Dimensions
ACCESSORY DOOR PANEL (PTDP18)
The following installation parts are supplied
with PTDPT8 door panels:
■ Accessories door panel with foam insert
- Accessory door panel with room insert (finish designates color)
• 2 - Accessory side trim pieces
- 13 - #8 Sheet metal screws
Accessory Door Panel Installation (PTDP18)
The PTDP18 panel will be held on by five
screws (supplied in door panel packaging)
and two screws with locator p attached (supplied on panels).
-
Remove all plastic covering on the stainless steel panel.
-
Place the panel onto the outside of the door, aligning it with the pre-drilled holes on the trash compactor door facing.
- Insert the panel into the door by inserting the pre-attached locator pins into the middle screw hole (second hole from top on left and right-hand sides).
- Install the five screws provided with packaging into their designated locations (two on left, two on right, and one at the top).
- Before installing the trash compactor into its cutout, the side trim pieces must be attached to the unit on each side. Please refer to the template included in your packaging and insert four screws in the designated locations on the left and right sides of the unit. You will be drilling directly into the unit to attach the trim pieces.
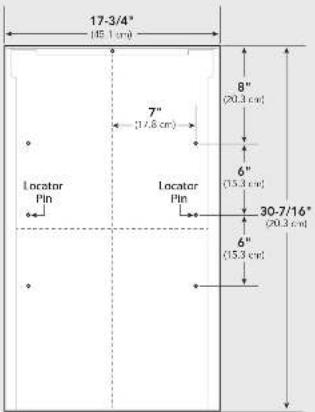
Panel Installation and Dimensions
CUSTOM DOOR PANEL
A custom panel of wood or other material not exceeding 15 lbs. can be attached to the door.
To create and attach a custom panel:
- Panel width: 15"W. = 14-7/8" (37.9 cm);
18"W. = 17-778" (45.4 cm) - Panel height: 30-5/16" (77.0 cm)
- Panel thickness: 2/4" (1.0 cm)
- Pane thickness: 3/4 11.9 cm
- Purchase an accessory handle kit to match your cabinet hardware and install per handle instructions. Or you may purchase a Viking handle kit: For a 15"W, panel use Viking PHK145S and for an 18"W, panel use PHK175S. Drill pilot holes for wood screws. Use drill stop to prevent drilling through the panel.
- Mount panel to door by using wood
screws or supplied panel mounting
screws. - Make sure the door opens and closes smoothly with the actuator entering and exiting the door interlock switch on the compactor.
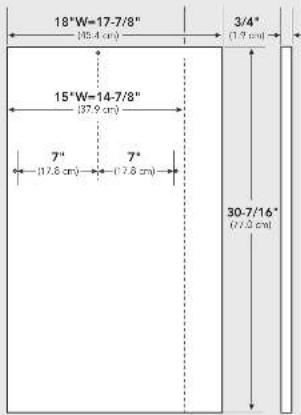
How the Compactor Works
The Viking compactor compresses household trash up to 1/6 of its original volume. It will compact normal household trash including milk cartons, glass and plastic bottles, containers and jars, tin cans, wrappings, boxes, food wastes, etc.
When you start the compactor, an electrically powered ram moves down into the trash
bucket, compresses the trash and then returns to the UP position and shots off automatically.
Note: The ram travels about 2/3 of the way down into the trash bucket. Because of this, the trash bucket must be at least 1/3 full before you will notice any compression.

- Door interlock
- Key lock
- Electronic control panel
- Bag storage area
- Ram
- Sliding trash bucket
- Leveling rollers
-
Leveling legs
-
Battery back-up
- Interlock actuator
- Odor disk tray
- Compaction plate release tab
- Compaction plate
- Decorative door panel with handle (order separately)
- Door release (for trash bag removal)
Operation
Key Lock Switch
The key lock switch on your compactor is provided for your protection as a safety measure.
When the key lock switch is the "OFF" and "LOCK" positions, the compactor will not operate. Remove the key to keep children from operating the unit or to prevent anyone from tampering with it.


When the key lock switch is in the "ON" position, the compactor is ready for operation. The key cannot be removed when in the "ON" position.
Clock/Auto Delay
The compactor is equipped with a delay start /clock feature that allows you to compact and hold your trash at a time of your choice (such as every evening).

- To set clock time:
Press and hold "Clock" button until display fashes. Use the "Up Arrow" and "Down Arrow" buttons to set current time. -
To set Auto Delay start time:
Press and hold "Auto Delay" Set button until clock display flashes. Use "Up Arrow" and "Down Arrow" buttons to set delay time. Press "Auto Delay" Set button again, until clock display shows current time. -
To activate "Auto Delay" Start:
Press "Auto Delay" Start button. LED above button will light and clock display will show delay start time. Once clock reaches delay start time, ram will compact and hold trash for 2 hours, then return to previous position.
Battery Backup
The compactor is equipped with a battery backup, to maintain clock settings in the event of loss of power to the unit

Remove the battery cover and install a 9-volt battery (not included).
NOTE: The battery backup will not provide power to operate ram.
Operation
Preparing Odor Control Disk
Your compactor is equipped with an odor control disk that will last up to six months when installed in the trash compactor. The odor disk comes packaged in a foil pouch and is activated once the pouch is opened. The compactor has an electronic control the automatically advances the odor disk every 30 days until six months have expired.
It is recommended you complete the following steps to determine when the disk is scheduled for replacement.
CAUTION
The door control disk contains material that may cause moderate eye irritation. Avoid contact with eyes. Harmful if swallowed. Wash skin or clothing thoroughly with soap and water after handling. DONOTreuse empty foil pouch.
- Open the pouch and remove the odor control disk and month indicator labels. Write the "Activation Date" on top of disk in space provided.
- Starting one month from activation date, write 5 consecutive dates on the green labels, each 1 month apart. On the red label write the date that is 6 months from the activation date.
- Orient the odor control disk so the instruction label faces up. Apply the five green and one red month indicator labels to
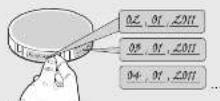
the disk as shown.
In this example, 01/01/2011 is the disk activation date and the first label is dated 02/01/2011.
Installing Odor Control Disk
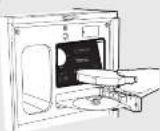
- Swing open the odor disk tray located on the control panel. Install the disk face down on the tray so the month one label faces the tray door. Close the odor disk tray.
- Press the odor control "Reset" button on the control panel to start the 6 mo
timer. The odor status LED will be GREEN. - The disk will automatically advance every 30 days or it can be manually advanced by pressing the odor control "Advance" button on the control panel. Once the disk advances, the next 30 day period begins.
- At the conclusion of the 5th month the odor status LED will FLASH GREEN to signal the disk is on its last month.
- At the conclusion of the 6th month the odor status LED will turn RED to signal the disk must be replaced.
- Descard the used disk in the trash, insert a new disk and press "Reset". Odor disk, Model ODFCU, is available from your Viking Distributor.

Operation
Installing Bag
With the door open and the trash bucket extended to the furthest position, place a bag into the bucket. Fold the bag over the top rim of the bucket, on all sides.
Press the bag into all corners of the bucket and smooth the bottom.
Smooth and shape the bag carefully. This will prevent the bag from being torn by the ram during compaction.
Secure the bag in place over the two buttons on each side of the bucket. The bag has prepunched slots for this purpose.
The compactor is now ready to use.


Compacting
FOR BEST RESULTS, ALWAYS FILL EACH NEW BAG COMPLETELY BEFORE OPERATING THE COMPACTOR. DOING SO WILL MINIMIZE BAG PULL-UP AND TEARING.
-
Tum Key Lock Switch to "ON" position.
-
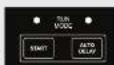
Press "Start" button close door - ram will travel downward into trash bucket and compact trash. At bottom of ram stroke ram automatically

Compacting Tips
- Although it is not necessary to compact until the bucket is full or nearly so, it is suggested that for maximum compaction, you start the compactor each time a significant amount of trash is added.
- At full stroke, the ram does not travel all the way to the bottom of the trash bucket. Trash in the bottom 1/3 of the bucket will be crushed during subsequent compacting.
- Glass bottles can make a loud noise when they break during compaction. This is normal. Bottles do not always break during the first cycle. Breaking glass and associated noise may occur several cycles later
depending on type and volume of trash. - Bottles and large cans compact best when laid flat near the center of the trash bucket.
Operation
Compacting Tips (cont.)
- Place a couple of folded sheets of newspaper, or a large paper grocery bag on top of the load to be compacted when
o Compacting large or several glass bottles or jars (or any items that might shatter). This will help prevent glass fragments and particles from flying out of bucket into mechanism.
o Compacting unwrapped messy food waste. This will help keep the power sum class. - Compacting extreme uneven loads may cause the trash bucket to shift forward which may cause the door to open and interrupt the compaction cycle. Gently push and hold door closed to activate the ram until it returns to the up position. Open the trash bucket and reposition any objects that may be causing the uneven load. Re-activate the compaction cycle by prassing the "START" button and closing the door.
- There are certain types of trash that create exceptionally strong odors such as raw meat, fish, grapefruit rinds, personal hygiene items, and disposable diapers. You may wish to not put such items into your compactor.
- If the compactor will not be used for an extended period of time, such as during vacation, remove the bag to prevent a build-up of undesirable colors.
WARNING
DONOTcompact aerosol cans or any other containers still holding or which held toxic chemicals, insecticides, or combustible contents. Fumes may be released that are hazardous to health or may result in fire or explosion.
WARNING
DONOT put paint, oily rags, lighter fluid cans, paint thinner cans, etc., in your compactor. Doing so could result in spontaneous combustion causing a fire and/or explosion.
CAUTION
NEVERpush trash into the bucket with hands or feet. Trash might contain broken glass, sharp pieces of metal, etc., which could cause injury.
Bag Removal
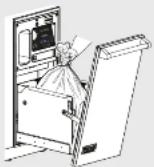
- Slide out trash bucket.
- Unbutton bag from bucket and close by twisting bag top. Faston with twist-tie provided.
- Lift door up and pull forward to unlatch trash bucket.
- Lift bag from bucket.
- Lift door and push toward compactor. Once door is vertical, lower it into position to latch door.
Cleaning
EXCEPT FOR CLEANING DESCRIBED IN THE FOLLOWING SECTION, ALL SERVICE SHALL BE PERFORMED BY AN AUTHORIZED SERVICE REPRESENTATIVE.
Your compactor has been designed with easy access for cleaning when required. The interior and exterior of the cabinet are finished with a durable baked-on enamel finish. DO NOT use harsh or gritty cleanser or scouring pads which may mar the finish of the compactor. Use a mild detergent solution on these surfaces.
CAUTION
Glass fragments and other sharp teeth pieces may be on or around the surfaces to be cleaned. Carefully remove these objects before wiping down any surfaces.
Removing Trash Bucket and Cleaning Interior
- Pull out trash bucket until it stops.
- Remove (1) screw from each of the bucket slides.
- Press down on left and right bucket slide release tabs while pulling the bucket out of the unit.
- Vacuum and clean cabinet base, track channels, and bucket, particularly in corners.
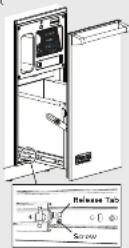
- Press the compaction plate release tab on the front of the ram to disengage the plate. The plate can be removed by pulling down and away from the ram.

- Once removed the compactor plate can be washed in a mild detergent solution or placed in a dishwasher.
- Re-install the compactor plate by inserting the tab (on the rear of the plate) into the slot (at in the rear of the ram). Press up on the front of the plate until it securely latches in place.
- Wash the cabinet interior with a mild detergent solution.
- When finished cleaning the cabinet, install the trash bucket by reversing steps 2 and 3.
Troubleshooting
Before you call for service, check these handy hints which may save you the cost of a service call:
- Is electric cord plugged in securely?
- Has a house fuse blown or a circuit breaker tripped?
- Is the door pushed firmly shut?
- Is the key switch in the "ON" position?
- Did you press the "START" button long enough to start the compaction cycle?
- If trash bucket is difficult to close, check to see if any trash has fallen behind the bucket, preventing it from closing completely.
- The motor has an automatic thermal cutout. If you have compacted repeatedly, this protector may have opened the circuit. Wait a few minutes and the cutout will reset automatically.
- The trash bucket must be at least 1/2 full of trash before any appreciable amount of compacting will be apparent, as the ram does not travel all the way to the bottom of the bucket. Trash in the bottom 1/3 of the bucket will be crushed during subsequent compacting.
-
In the unlikely event that the interlock actuator (on the inside of the door) breaks off, the compactor will not operate. DO NOT ATTEMPT TO OPERATE COMPACTOR IN ANY OTHER MANNER. A replacement actuator can be ordered from your Viking Distributor.
-
To obtain service, provide the unit model number, serial number and nature of any defect in the product or part. The model number, serial number and all other data is shown on the model plate, which is located on the wall of the bag storage compartment. When requesting warranty service, evidence of the original purchase date must be presented. To obtain the name of the warranty service center serving your location, contact your Viking Distributor.
Service & Registration
Only authorized replacement parts may be used in performing service on the appliance. Do not repair or replace any part of the appliance unless specifically recommended in the manual. All servicing should be referred to a qualified technician.
Contact Viking Range Corporation, 1-888-VIKING1 (845-4641), for the nearest service parts distributor in your area or write to:
VIKING RANGE CORPORATION
PREFERRED SERVICE
1803 Hwy 82W
Greenwood, Mississippi 38930 USA
The serial number and model number for your compactor are located on the identification plate mounted on the bottom left side of the compactor door opening.
Record the following information indicated below. You will need it if service is ever required.
Modal number
Serial number
Date of purchase
Date installed
Dealer's name
Address
These installation instructions should remain with the unit for future reference.
Warranty
TIASH COMPACTORS WARRANTY
(1) The company and all of their component parts, except as detailed below, we connected to be true from derivative methods or and neither in normal. In particular, or a position of the 30 years from its date of original material produce or decrease for more conductors who have put them a longer living range. Exercice, women, against work or replace, at the option, are not which risks or trade to be derived during the every period.
FULL TENNETY 100 DAY COSMETIC PRAWAY! Product is being rated to the first from customer details in various or worldwide sales. Such as sometimes on one end steel, paintbrushes, batteries, and other parts of a red, 200-way from the date of long retail purchase or closing. The following products are not rated a longer. Despite some expected to be trading out with different price points (e.g., \$50, down to above of traded retail purchases). Using Range Corp's own e-commerce, sell revenue and networks will also be sold on or linked. However, your color sale may be not listed because of the interest differences in parted parts and those parts as well as if between in kitchen lighting, product, accessories, and other items. Therefore, this warranty does not apply to color pricing applicable to sum factors
FULL NETNIFY 100% DAY WARRANTY IN "RESIDENTIAL PLUS" APPLICATIONS. This will mean to apply to applications of all, one of the products, likely beyond normal, exceptional use, but the warranty period for products is well as top salaries are a 150 Day. Examples of application on which you can be done, and this way is not one and his/her, the status in place of clients, customers, services, etc. Under this "the brand." Five awards were: "Product, its components and accessories are contrasted to be free from defective markets or oversampling for a period of in teny. All crops from the date of original retail prices. This warranty excludes use of the product in all or minimal locations such as restaurants, food service locations and birth's home, store stores."
TERMS AND CONDITIONS
the company which is to the original purchase of the product returned herein and to which within some of the products during the term of the entity and/or its previous document issued in the United States. Products must be issued in the country where it was or requested. The product or now of its current service is a brief replacement, during its warranty mentioned as an accurate number of changes by the numerator to remedy the collection of landings. Its own is called for sale and to replacement of the breed, etc. to incorporate part or sale. The product has been sold at the time of sale, including the limited amount of cash, under the conditions of the above buy price being performed by a history authorized Wlng Bouge. Equivalent service again for replacement. Service will be limited during periods but less than 100 days, and later period at sections or pasture shall not be served by a moment.
Our call will be prepared for proper trial at starting yesterday and meeting the session, giving a great of purchase upon request, and making the top since recently, according to this. The return of the One. A grant on Card is not to do so early coverage. You should now say that the Darver registration Card so that the right home Corporation can contact you and do any occasion of safety and which is all where you.
This warranty gives you specific legal charges, and you may also have other rights on any way from jurisdiction to jurisdiction.
WHAT IS NOT COVERED BY THIS WARRANTY. The warranty of the not apply to damage, relating, from other, shall be paid for any resale and necessary due diligence, and direct, delivery, pricing, natural classification of electrical service to the construction for any reason, abnormal, posterior use, improper marketable improvement operation or enterprise use of the product by anyone who then act in Thailand's Hong Kong Corporation on service offering or redistribution. This warranty does not apply to commercial uses.
LIMITATION OF REMEDIES AND DURATION OF IMPIED WARRANTY
OWNER'S SOLE AND EXCLUSIVE REMOY FOR A CLAIM OF ANY KIND WITH RESPECT TO THIS PRODUCT SHALL BE THE REMEDIES SET FORTH ABOVE/WHOLE IS NOT RESPONSIBLE FOR CONSECURITARY OR INCIDENTAL DAMAGE, INCLUDING BUT NOT LIMITED TO FOOD OF MEDICINE LOSS, DUE TO PRODUCT FAILURE, WHETHER ABINS OUT OF BREACH OF WARRANTY, BREACH OF CONTRACT OR OTHERWISE. Some yard pairs do not show the risk of an IR burst or a target or target of certain stressors, so on the claim required by the owner's way to apply to you. ANY IMPERED WARRANTIES OF MERCHANTABILITY ON FITNESS FOR A PARTICULAR PURPOSE APPLICABLE TO THIS PRODUCT ARE LIMITED IN QURATION TO THE EXPRESS UNIT. This EXPRESS SET FORTH ABOVE (see Table 4) shall be allowed if you have, or if you have, please notify you, as the Order Limited will now be easy to you.
HAPPARTER
In certain warranty service, contract as submitted Using Range Corporation service agent, or Using Range Corporation, 11-2 and Street, Commonwealth Markets 39510, 5861, 845, 4541. Provide material and material transfer and value of original purchase or sale rights for nonaccrualization. For the current year owner referenced Using Range Corporation service agency, call Using Range Corporation.
IMPORTANT: Using one's actual purchase to be sold in company paper.
Specifications subject to choice without notice.
Notes
- TABLE OF CONTENTS
- IMPORTANT-PLEASE READ AND FOLLOW
- CAUTION
- WARNING
- READ ALL INSTRUCTIONS CAREFULLY BEFORE OPERATING COMPACTOR
- DIMENSIONS
- SPECIFICATIONS
- CUTOUT DIMENSIONS
- ELECTRICAL REQUIREMENTS
- GENERAL INFORMATION
- INSTALLATION
- PANEL INSTALLATION AND DIMENSIONS
- ACCESSORY DOOR PANEL (PTDP15)
- ACCESSORY DOOR PANEL (PTDP18)
- ACCESSORY DOOR PANEL INSTALLATION (PTDP18)
- CUSTOM DOOR PANEL
- TO CREATE AND ATTACH A CUSTOM PANEL
- HOW THE COMPACTOR WORKS
- OPERATION
- KEY LOCK SWITCH
- CLOCK/AUTO DELAY
- BATTERY BACKUP
- PREPARING ODOR CONTROL DISK
- INSTALLING ODOR CONTROL DISK
- INSTALLING BAG
- COMPACTING
- COMPACTING TIPS
- COMPACTING TIPS (CONT.)
- BAG REMOVAL
- CLEANING
- REMOVING TRASH BUCKET AND CLEANING INTERIOR
- TROUBLESHOOTING
- SERVICE & REGISTRATION
- VIKING RANGE CORPORATION
- PREFERRED SERVICE
- 1803 HWY 82W
- GREENWOOD, MISSISSIPPI 38930 USA
- WARRANTY
- TIASH COMPACTORS WARRANTY
- TERMS AND CONDITIONS
- LIMITATION OF REMEDIES AND DURATION OF IMPIED WARRANTY
- HAPPARTER
- NOTES
Brand : VIKING
Model : FCU150
Category : Waste press