
480KS - Knife sharpener Chef's Choice - Free user manual and instructions
Find the device manual for free 480KS Chef's Choice in PDF.


| Product Type | Knife and Scissors Sharpener |
| Brand | Chef'sChoice |
| Model | 480KS |
| Purpose | Sharpens knives and scissors |
| Sharpening Stages | 2 (Stage 1: medium diamond, Stage 2: fine diamond) |
| Abrasive Type | Diamond-coated pads (coarse and fine) |
| Included Accessories | 2 diamond abrasive pads, 3 scissor angle guides (Red, Gray, White) |
| Knife Sharpening Angle | Precisely controlled by roller guides |
| Scissor Compatibility | Most scissors except hair styling, pinking, manicure, serrated, tin snips, and over 10\" |
| Power Source | Manual (no electricity required) |
| Storage Compartment | Handle compartment for pads and small accessories |
| Dimensions (Approx.) | 8 x 4 x 2 inches |
| Weight (Approx.) | 0.5 lbs |
| Material | Plastic housing, diamond abrasives |
| Maintenance | Wipe clean with damp cloth; remove metal filings by shaking or blowing |
| Safety Feature | Guard rib to protect fingers during sharpening |
| Warranty | 1 year limited warranty against defects |
| Country of Origin | Designed and assembled in USA |
| Specialty Pads Usage | Coarse pad for pre-sharpening dull knives and tools; fine pad with groove for fishhooks |
Frequently Asked Questions - 480KS Chef's Choice
User questions about 480KS Chef's Choice
0 question about this device. Answer the ones you know or ask your own.
Ask a new question about this device
Download the instructions for your Knife sharpener in PDF format for free! Find your manual 480KS - Chef's Choice and take your electronic device back in hand. On this page are published all the documents necessary for the use of your device. 480KS by Chef's Choice.
USER MANUAL 480KS Chef's Choice
Read these instructions before use. It is essential that you follow these instructions to achieve optimum results.
natural_image
Close-up of a Choris Choice knife with a magnified inset showing the tool (no text or symbols on the knife itself)iNSTRUcTiONS
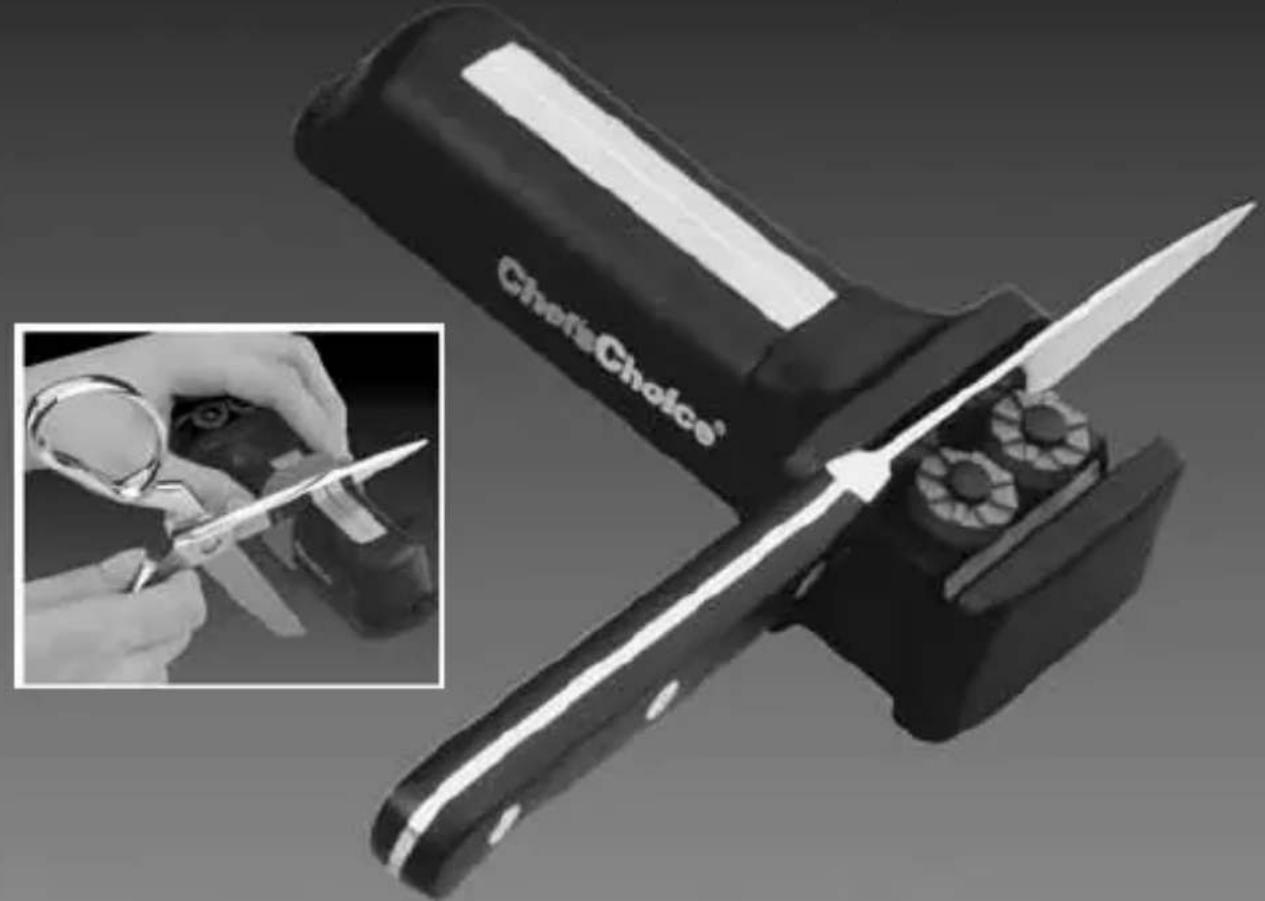
Congratulations! You have selected the world's first professional compact knife and scissors sharpener, invented and made in the U.S.A. by EdgeCraft: the world's leading manufacturer of sharpeners. The EdgeCraft 480KS includes an assortment of accessories to meet a wide range of sharpening needs. To get the most from your new compact sharpener please follow these instructions.
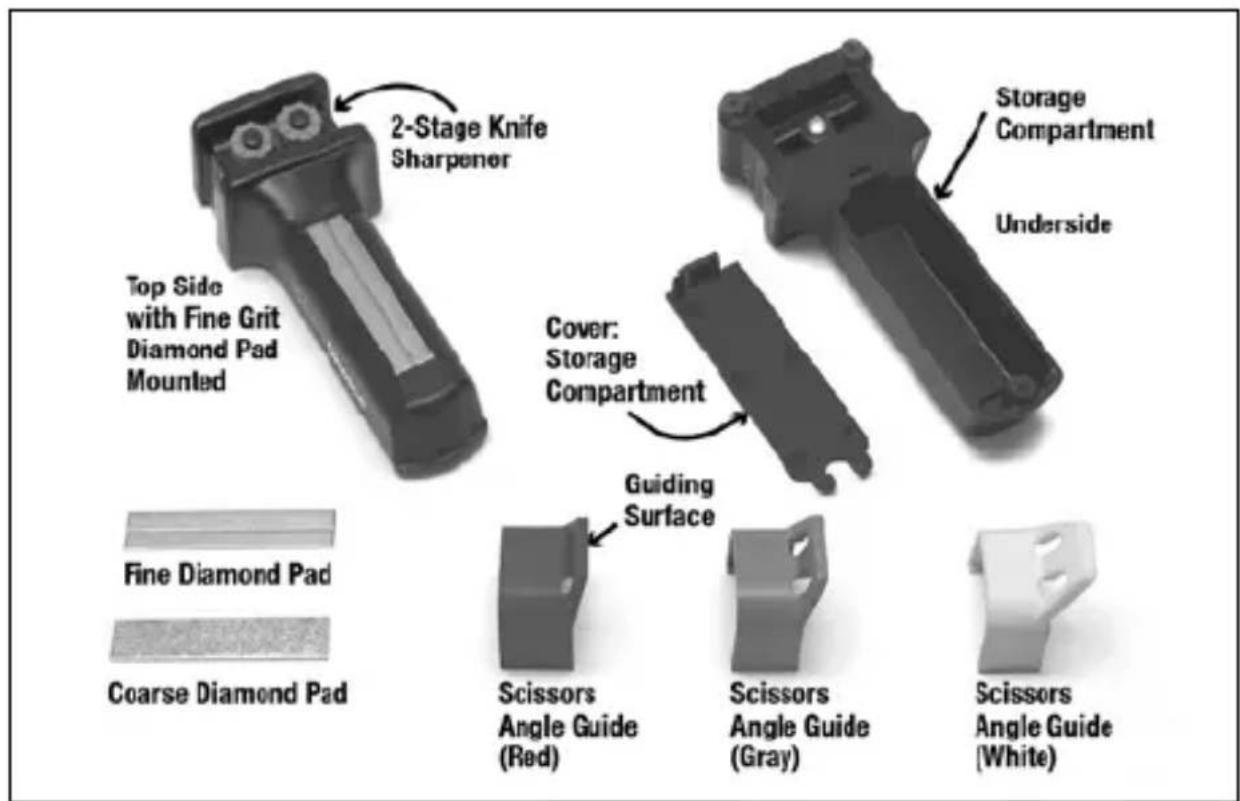
The Model 480KS, See Figure 1, consists of the 2-Stage Knife Sharpener, two (2) diamond coated abrasive pads, and three (3) Scissors Angle Guides.
The sharpener is shown at upper left – Figure 1 with the Fine grit diamond pad in place on top of the sharpener. That abrasive pad, held in place by a magnetic strip (not shown) recessed under the pad, can be removed and stored in the compartment under the sharpener.
The sharpener shown in the upper right is turned over to show the open storage compartment on its underside with the compartment cover removed.
There are two (2) different diamond coated pads, Coarse and Fine. The Fine grit pad has a ruled groove along its length on the diamond coated side in order that it can be readily identified. The Coarse grit pad is ungrooved. The abrasive pads held in place on top of the sharpener by the built-in magnet can be removed from the magnet with a finger nail or by inverting the sharpener and tapping it lightly on the table.
There are three (3) differently colored Scissors Sharpener Angle Guides.
Follow the Detailed Instructions carefully to insure perfect results.
flowchart
graph TD
    A["Top Side with Fine Grit Diamond Pad Mounted"] --> B["2-Stage Knife Sharpener"]
    B --> C["Storage Compartment"]
    C --> D["Underside"]
    E["Fine Diamond Pad"] --> F["Coarse Diamond Pad"]
    G["Scissors Angle Guide (Red)"] --> H["Guiding Surface"]
    I["Scissors Angle Guide (Gray)"] --> H
    J["Scissors Angle Guide (White)"] --> H
Figure 1: Model 480KS Knife and Scissors Sharpener and its components.
KNife ShARPeNiNG
The Chef'sChoice® 480 KS Knife and Scissors Sharpener is equipped with a 2-stage knife sharpening section with built-in angle guides that take the guess-work out of sharpening and 100% diamond abrasives that sharpen quickly and efficiently! Knives are sharpened first with medium diamond abrasives in Stage 1 then with fine diamond abrasives in Stage 2. The sharpening angle in both stages is precisely controlled by roller angle guides (Fig. 2).
First, familiarize yourself with the parts of the sharpener (Fig. 2). Always start with a clean knife. Place the sharpener on a flat surface, near the edge of a table or other secure work surface. Hold the sharpener with fingers safely behind the Guard Rib and place the blade in Stage 1: the slot nearest to the Guard Rib (Fig. 3). Make sure the blade leans firmly against the roller guides. Without any downward pressure, move the blade back and forth in the Stage 1 slot until the blade is sharp. Keep your eyes on the roller guides; one or both should turn as you pull the knife back and forth to ensure the knife is at the correct angle. Both sides of the edge will be sharpened at the same time.
Next, place the knife in the Stage 2 slot, (Figure 4) making sure the blade leans firmly against the roller guides and repeat the back and forth movement to refine and further sharpen the edge. Usually, only 25 back-and-forth strokes are needed in Stage 1 and about 5 back-and forth strokes in Stage 2. It is important to keep the blade in contact with the knife roller guides at all times and apply little to no downward pressure on the blade. If the knife is not sharp enough, repeat the steps described above for both Stages 1 and 2.
SUGGESTIONS: If you're right-handed, hold the handle in the left hand and the knife in the right. If left-handed, reverse hands. Just remember to start sharpening in the slot nearest the handle (Stage 1). You won't need any sharpening oils, lubricants, water or other liquids. Stage
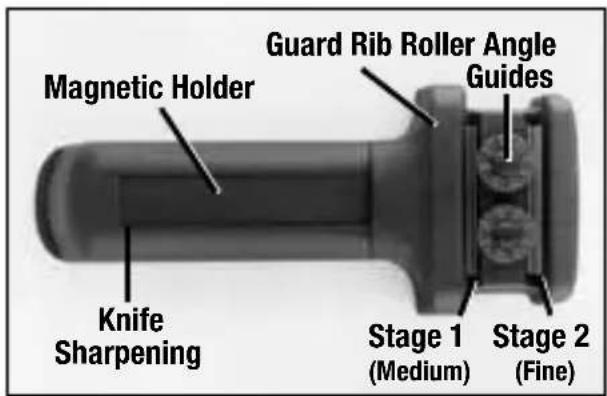
Figure 2: Knife sharpener parts.

natural_image
Close-up of a black handheld tool with a knife inserted, showing mechanical components and a screw base (no visible text or symbols)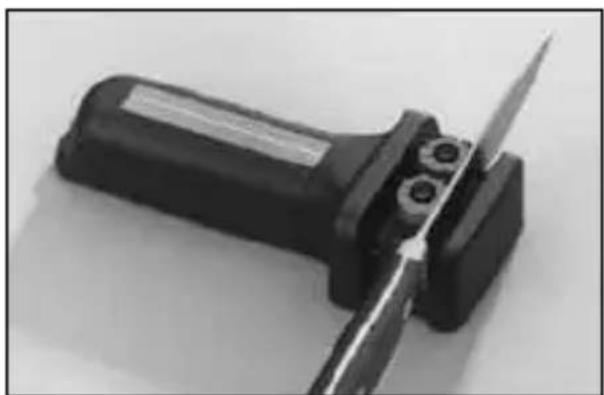
natural_image
Close-up of a black electronic device with a metallic tool inserted, showing no visible text or symbols.Figure 4: Sharpening in Stage 2. Figure 3: Shar
1 and Stage 2 are designed for only sharpening knives, not for sharpening scissors or other tools.
CAUTION! Always keep fingers behind the guard rib. Handle the sharpened knives with care - - they can be extremely sharp!
h0w TO USe SPeciALTY DiAMOND ShARPeNiNG PADS
The Chef'sChoice® Diamond Hone® 480KS come with auxiliary diamond sharpening or honing pads that provide additional sharpening capabilities. It also features a magnetic holder on the handle (See Figure 2) so sharpening pads can be easily interchanged. Their use is described below.
DIAMOND ABRASiVe ShARPeNiNG PADS
The Chef's Choice® 480KS with the coarse diamond abrasive pad (mounted on top of the handle) can be used as a sharpening stone to presharpen extremely dull knives, before sharpening them in the two-stage sharpening section. Put the sharpener on a secure work surface. Hold by the two-stage sharpening section (not the handle!) with fingers safely behind the guard rib.
Position the knife blade at about a 20^ angle to the pad (See Figure 6). Pull the blade in a smooth motion away from the edge. Use only light pressure. Alternate sides, sharpening one side of the edge then the other. Continue until the edge is reasonably sharp. Then use the two-stage sharpening section to produce a razor-sharp edge. Diamonds can-sharpen any material, including stainless steel alloys and tool steel. The coarse diamond abrasive pad mounted on the model 480KS can also be used like a file to sharpen hatchets and other cutting tools (Fig. 7).

natural_image
Black Chefs Choice brand device with two buttons and a flat blade (no visible text or symbols on body)Figure 5: Auxiliary coarse pad (on handle) and fine diamond pad.
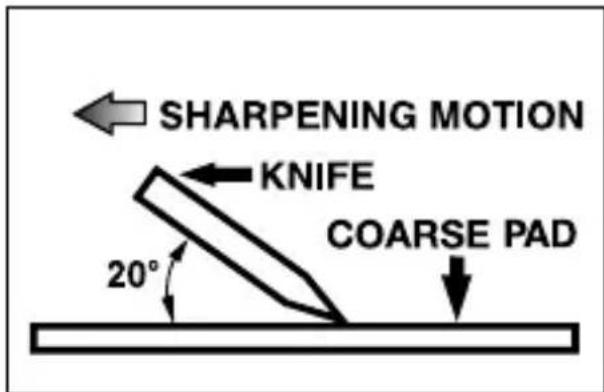
Figure 6: Pre-sharpening a knife with coarse pad: correct angle and motion.

natural_image
Close-up of hands holding a black mechanical device with a handle, no visible text or symbolsFigure 7: Sharpening an axe with the coarse pad.
fiNe DiAMOND PAD/fiShhOOK ShARPeNeR
This pad has a long groove in the center to sharpen fishhooks. Push the point of the hook along the bottom of the groove moving away from the point (Fig. 8). This fine grit pad can also presharpen knives before sharpening in the two-stage sharpening section.
STORAGE cCOMPARTMeNT
The Chef'sChoice® 480KS feature a handle storage compartment to hold sharpening pads, personal accessories, fishhooks, line cutters and even small pocket knives!

natural_image
Close-up of a hand holding a black cylindrical object with a small circular component, possibly a flashlight or connector (no visible text or symbols)Figure 8: Using the fishhook sharpening pad: correct motion.

natural_image
Close-up of hands holding an open battery pack with internal components (no visible text or symbols)Figure 9: Storage Compartment.
SciSSORS ShARPeNiNG
The Chef'sChoice® Model 480KS is designed to also sharpen scissors to professional standards, simply and easily. It can put an exceptionally sharp edge on your kitchen, household, sewing, and arts and crafts scissors. There are several distinctly different types of scissors, consequently, it is important to completely read these instructions to optimize your sharpening results.
The Chef'sChoice® Model 480KS Manual Knife and Scissor Sharpener owes much of its uniqueness to its precision Scissors Angle Guides, designed to position the scissor blade securely at a precise angle against the diamond abrasive pad. Before sharpening your first scissors it is important to read the following instructions carefully.
iIMPORTANT iNFORMATION
- WARNING: EVEN THOUGH ALL SCISSORS MAY APPEAR TO BE SIMILAR, THERE ARE MAJOR DIFFERENCES AMONG THEM THAT MUST BE UNDERSTOOD BEFORE YOU USE THIS SHARPENER. THE MODEL 480KS WILL SHARPEN MOST, BUT NOT ALL, TYPES OF SCISSORS. DO NOT ATTEMPT TO SHARPEN HAIR STYLING SCISSORS, PINKING SHEARS, MANICURE SCISSORS, SERRATED BLADES, TIN SNIPS, OR SCISSORS MORE THAN 10" IN LENGTH.
The Chef'sChoice ^® Model 480KS will sharpen most other scissor blades, including knife-edge scissors, as described below. It is essential, however that you follow the instructions to optimize your results.
- It is not entirely obvious that the two blades on some scissors can be different. When you cut with scissors, one blade the anvil blade, is designed to be below the material and the other blade called, the cutter blade, is above the material. See Figures 10 and 11. Commonly the blade on top of the material, the cutter blade, does most of the cutting. Referring to the Figures 10 and 11, note that the cutter blade usually has the oblong finger-hold and a more rounded tip. The anvil blade has a more pointed tip and a round finger hold.
- It is very important to be able to identify the special knife-edge type scissors. They have a cutter blade that is factory sharpened at a very small angle to form a knife-like edge that is extremely sharp. THE KNIFE-EDGE CUTTER BLADE MUST BE SHARPENED ONLY WITH THE WHITE COLORED KNIFE-EDGE ANGLE GUIDE SUPPLIED WITH EACH SHARPENER. With this type scissor, the knife-edge cutter blade does virtually all the cutting. Commonly only the cutter blade of this type scissor has the knife edge. When that is the case and you can properly identify and sharpen that blade, sharpening the other (anvil) blade is optional. Only the knife-edge scissor blade should be sharpened by the special procedure on page 10. If you elect to sharpen the anvil blade, use the sharpening procedure for standard scissors described on page 8. Do not confuse these blades. If you have any doubt about whether you have this type of scissors, ask your nearest fabric or sewing center to help you identify these special blades before you sharpen them. (Most lower cost and general purpose scissors are not knife edge scissors).
- During the sharpening process you will need to know how to feel for a burr on the scissor blade in order to know when sharpening is complete. Feeling for a burr involves running your finger carefully across (NOT ALONG) the back of the blade as shown in Figure 12. A burr is a microscopic bending of the tip of the edge produced during the sharpening process which can be felt but is not

Figure 10: Typical Right-handed Scissors.

Figure 11: Typical position of the Cutter Blade and Anvil Blade on Right-handed Scissors.
always visible. It will feel rough and jagged compared to the smooth finish on the back of the blade.
- The Model 480KS will sharpen either right hand or left hand scissors without the need to disassemble them. If you are left handed you probably have purchased left handed scissors*. To sharpen right hand scissors, hold the wider, knife sharpener portion of the sharpener in your left hand. With left hand scissors hold the sharpener in your right hand (See Figures 13 and 14). However, the orientation of the angle guide on the sharpener will remain the same with either right or left handed scissors.
- Before sharpening identify the type of scissor you have*. Unless you have scissors designed for specialized applications, you will have either; (a) standard right handed scissors; (b) standard left handed scissors; or (c) knife edge scissors (which can be either right or left handed). By far the most popular scissor is standard right handed. Follow the appropriate instructions below depending on the type of scissors you have.
* You can determine whether your scissors are right or left handed as follows: Open the scissors and lay them on a table. If the cutting edge of the top blade faces to your right, the scissors are right handed. If the cutting edge of the top blade faces to your left, the scissors are left handed.
ShARPeNiNG PROceDUReS - GeNeRAL
Regardless of the type of scissors, either of the two blades can be sharpened first. Position the sharpener adjacent to the edge of a tabletop as shown in Figures 13 and 14. Put the appropriate grit diamond pad on the sharpener and slide on the correct Angle Guide as described in the following sections. You will want to securely hold the handle of the scissor blade being sharpened in your free hand (right hand if you are sharpening right handed scissors) and press the inside mating flat face of that scissor blade securely against the guiding surface of the angle-guide as shown. Before you start sharpening, the flat face of the blade should be in perfect contact with the guide surface and the cutting edge of that blade must be in good sliding contact with the diamond coated abrasive pad. The free blade should hang freely below the table as illustrated.
With the correct Angle Guide (see subsequent sections) set onto the sharpener and the flat face of the scissor blade positioned in good contact with the guide surface move the blade back and forth smoothly with its edge in sliding contact with the abrasive pad

natural_image
Close-up of hands using scissors to cut a thin sheet of paper, with a black arrow indicating the cutting edge (no text or symbols visible)Figure 12: Carefully feel for a burr along the entire back of the blade. Note arrow for direction of finger movement when in contact with blade.
while maintaining perfect contact between the guiding surface and the face of the blade being sharpened. This cutting or sawing-like motion becomes natural with just a little practice. Apply only light downward pressure, sufficient to maintain solid contact between the edge being sharpened and the diamond sharpening pad. Continue the back and forth sawing-like motion until a burr is created along the entire length of the scissor edge as outlined below.
A. ShARPeNiNG STANDARD, RiGhT-hANDeD SciSSORS
NOTE: NOT FOR KNIFE-EDGE SCISSOR BLADES.
To sharpen Standard Right Handed Scissors, proceed as follows:
- Hold the knife sharpener end as a handle with your left hand (Figure 13) with sharpening surface facing up.
- Make certain the Fine grit diamond pad is placed in the recess on top of magnetic holder, abrasive side up. (Identify the Fine grit pad by the groove ruled down the length of that pad).
- Slide the Red Angle Guide onto the smaller end of sharpener and position it as shown (in Figure 13) over the diamond pad. The flat angle guiding surface of the Red Guide must lean to your right – away from the sharpener handle. The Angle Guide can be positioned anywhere over the diamond pad as long as the blade edge rests on the diamond pad.
- Place the sharpener adjacent to the edge of the table as shown.
- Hold one scissor blade by its handle firmly in your right hand as shown in Figure 13 and align the inside mating flat face of the blade against and in intimate contact with the guiding surface as shown. The other blade should hang vertically below the table surface as illustrated (Figure 13). With the blade so positioned the cutting edge of the blade will be in contact with the surface of the diamond coated pad. (The other blade should be on the left side of the blade being sharpened).
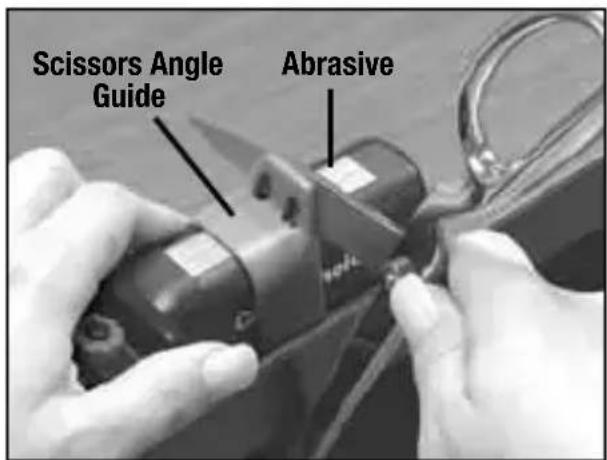
Figure 13: Suggested hold for right hand scissors.
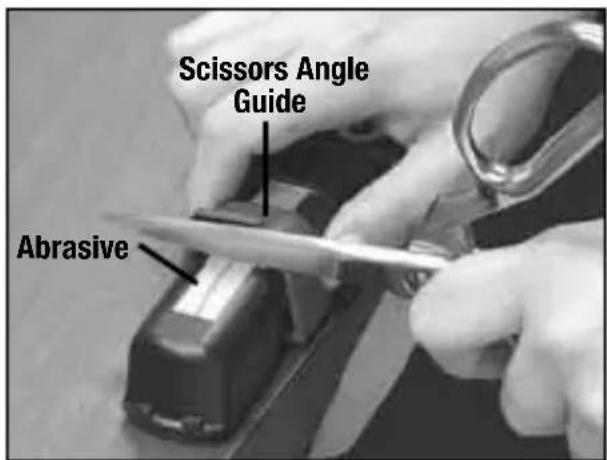
Figure 14: Suggested hold for left hand scissors.
NOTE: Sharpening left-handed scissors using the procedur designed for right-handed scissors, or vice versa, will severely damage the scissor edge!
- Holding the inside flat face of the blade constantly in intimate contact with the guiding surface while maintaining the edge in solid contact with the diamond abrasive pad, move the scissor blade forward and backward in a cutting or sawing-like motion 4 or 5 times. Stop and check to determine if a burr has formed on the flat face along the entire length of the edge (Figure 12). You may find it convenient to hold the blade guide with your left thumb and/or forefinger as shown in Figure 13.
- If a burr is detected along the entire edge, proceed to Step 8. If no burr has developed continue to sharpen the edge with the back and forth motion until a burr is present and then proceed to Step 8.
- When a burr has been created along the entire length of the first blade, remove the scissor and open and close the blades fully five (5) or more times to cut off the burr.
- Then repeat Steps 5 thru 8 with the second scissor blade.
- Finish by opening and closing the scissors 5 to 10 times rapidly to cut off any residual burrs along both blades. Wipe the blades off carefully with a soft cloth.
- Test the blades for sharpness using a thin sheet of paper. If you need to further improve sharpness, repeat the Steps 5 thru 11. Your scissors should cut paper very easily when properly sharpened. If your scissors have an adjustment screw make certain it is tightened until blade faces contact well when opened and closed.
After many resharpenings if the above procedure fails to give a good edge, it may be necessary to REANGLE THE EDGE as described below:
A.1 ReANGLiNG The eDGe Of STANDARD RiGhT-hANDeD SciSSORS
This should be necessary only infrequently, when the procedure of Section A does not sharpen well. When this is needed, proceed as follows for RIGHT-HANDED scissors:
- Hold the knife sharpener end as a handle (Figure 13) with your left hand with the sharpening surface upward.
- Insert the Coarse grit diamond pad in the recess directly on top of the magnetic holder, abrasive side up. (First remove the Fine grit pad, which can be stored in underside compartment).
- Slide on the Gray Angle Guide over the Coarse diamond pad. The flat angle guiding surface of the Gray Guide must be to your right leaning away from the knife sharpener end.
-
Follow Step 4 thru 10 of Section A above. Because more metal must be removed from the edge facet during the reangling, many strokes will be needed to create the burr.
-
Once a burr is developed along the entire edge, remove the Gray Angle Guide and the Coarse grit pad. Install the Fine grit diamond pad on the sharpener along with the Red Angle Guide and repeat Steps 2 thru 11 of Section A.
B. DeTAiLeD PROceDURe fOR ShARPeNiNG STANDARD LefT-hANDeD SciSSORS
The procedure for LEFT-HANDED Scissors is the same as for standard right handed scissors, (see Section A) except:
Step 1. Hold the knife sharpener end as a handle with your right hand (Figure 14).
Step 2. No change to Step 2 – Section A.
Step 3. The guiding surface of the Red Guide will lean to your left – still away from the knife sharpener end.
Step 5. Hold the scissor blade firmly in your left hand and in good contact with the guiding surface.
Steps 6 thru 11. Follow these steps of Section A.
B.1 ReANGLiNG The eDGe Of STANDARD LefT-hANDeD SciSSORS
Follow procedure of Section A-1 with the following exceptions:
Step 1. Hold the knife sharpener end as a handle with your right hand, and scissors in your left hand.
Step 2. Follow Step 2 of Section A-1.
Step 3. The flat angle guiding surface of the Gray Angle Guide must lean to your left – away from the sharpener handle.
Steps 4 thru 10: Follow steps 4 thru 10 of Section A. Hold blade handle in your left hand. Then reinstall the Fine abrasive diamond pad and the Red Angle Guide on the sharpener and repeat Steps of Section B above to complete sharpening.
fOR KNife eDGe SciSSORS
IMPORTANT: Knife-edge scissors, designed particularly for cutting heavy or multiple fabric layers, have one or both blades capable of cutting more like a knife.
NOTE: If you plan to sharpen your scissors and are uncertain whether the scissor blade is a knife edge type, it is safe to assume it is knife edge and to proceed as described below. If the blade is not knife edge type you will find that you cannot develop a burr in a reasonable time. In that event you probably have a pair of standard scissors. Then sharpen according to the instructions for standard scissors on page 8. See note 3 on page 6 for further information.
To sharpen KNIFE EDGE SCISSORS:
-
Use ONLY the Fine grit diamond pad (with ruled groove) and the White Angle Guide. Never use either of the other angle guides or the coarse diamond pads for Knife Edge scissors. Take time to identify each blade carefully.
-
Otherwise follow Step 4 and the subsequent steps of Section A or Section B depending on whether you have Right Handed or Left Handed knife-edge scissors. Most knife-edge scissors are Right Handed.
-
Only the knife-edge scissor blade is sharpened by this special procedure. Commonly only the cutter blade of this type scissor has the knife edge. Sharpening the other blade (anvil blade) if it is a conventional blade is optional. If you elect to sharpen the anvil blade, use the sharpening procedure for standard blades of Section A or B described above depending upon whether you have a right or left handed anvil blade.
-
Do not attempt to Reangle Knife Edge Scissors.
SciSSORS ShARPeNiNG SUGGeSTIONS
Your Chef'sChoice® Model 480KS is designed to produce scissor edges that are like new, quickly and easily. To insure that you get the very best scissor edges every time, take time to correctly identify the type of scissors to be sharpened, and:
- Always make certain that the flat face of the scissor blade is in intimate contact and alignment with the guiding surface of the correct Angle Guide (Figure 13 and 14).
- Sharpen using a smooth back and forth stroke keeping the scissor blade edge in solid sliding contact with the correct diamond pad during the entire stroke.
- Do not attempt to sharpen pinking shears, serrated blades or knives, with the scissor sharpener.
- Make certain that the scissor blades are clean before sharpening.
- It is essential to learn how to feel for the burr. This is the best indication that sharpening in a given stage is complete. Make certain the burr has formed along the entire blade... from pivot to tip (Figure 12).
- With curved poultry shears you need sharpen only the smooth convex blade. The other blade, concave (usually serrated) blade will not need sharpening and cannot be sharpened on this sharpener.
- Do not attempt to sharpen serrated blades. However, where only one blade is serrated, the other blade if it is a standard convex or straight edge blade can be sharpened using the procedure for standard scissors. Look carefully for serrations. They can sometimes be very small and difficult to see.
-
Scissor Adjustment: All “professional” scissors and many other quality scissors have a screw tensioner at the pivot. The performance of your scissors and your scissor life may be improved by adjusting this pivot to establish and maintain a smooth edge contact when you close the scissors. Proper adjustment is determined by opening scissors to 50% of blade length, then tightening until blade looseness is just barely removed. It is important that the pivot not be over tightened.
-
Do not use honing oils, water or any other lubricant on the Sharpener or sharpening pads.
- To clean sharpener, shake off or blow off any loose metal filings. Wipe parts with a damp cloth and store diamond pads in the storage compartment.
LIMITED WARRANTY
Used with normal care, the Chef's Choice® Model 480KS Knife and Scissors Sharpener is guaranteed against defective material and workmanship for a period of one (1) year from the date of original purchase (“Warranty Period”). We will repair or replace, at our option, any product or part that is defective in material or workmanship without charge if the product is returned to us postage prepaid, with dated proof of purchase, within the Warranty Period. This warranty does not apply to commercial use or any product abuse.
ALL IMPLIED WARRANTIES, INCLUDING IMPLIED WARRANTIES OF MERCHANTABILITY AND FITNESS FOR A PARTICULAR PURPOSE, ARE LIMITED TO THE WARRANTY PERIOD. EDGECRAFT CORPORATION SHALL NOT BE LIABLE FOR ANY INCIDENTAL OR CONSEQUENTIAL DAMAGES. Some States do not allow limitations on how long an implied warranty lasts and some states do not allow the exclusion or limitation of incidental or consequential damages, so the above limitations or exclusions may not apply to you. This Limited Warranty gives you specific legal rights and you may also have other rights which vary from state to state. Send inquiries and product requiring service directly to our Service Center. Describe defect and include your address and telephone number.
SERVICE
In the event post-warranty service is needed, return your sharpener to the EdgeCraft factory where the cost of repair can be estimated before the repair is undertaken.
Please include your return address, daytime telephone number, and a brief description of the problem or damage to the sharpener on a separate sheet inside the box. Retain a shipping receipt as protection against loss in shipment.
Send your sharpener (insured and postage pre-paid) to:
EdgeCraft®
World Leader in Cutting Edge Technology
EdgeCraft Corporation
825 Southwood Road, Avondale, PA 19311 U.S.A. Customer Service (800) 342-3255 or 610-268-0500
Engineered and assembled in the U.S.A. www.chefschoice.com


- iNSTRUcTiONS
- KNife ShARPeNiNG
- CAUTION! Always keep fingers behind the guard rib. Handle the sharpened knives with care - - they can be extremely sharp!
- h0w TO USe SPeciALTY DiAMOND ShARPeNiNG PADS
- DIAMOND ABRASiVe ShARPeNiNG PADS
- fiNe DiAMOND PAD/fiShhOOK ShARPeNeR
- STORAGE cCOMPARTMeNT
- SciSSORS ShARPeNiNG
- iIMPORTANT iNFORMATION
- ShARPeNiNG PROceDUReS - GeNeRAL
- ShARPeNiNG STANDARD, RiGhT-hANDeD SciSSORS
- A.1 ReANGLiNG The eDGe Of STANDARD RiGhT-hANDeD SciSSORS
- DeTAiLeD PROceDURe fOR ShARPeNiNG STANDARD LefT-hANDeD SciSSORS
- B.1 ReANGLiNG The eDGe Of STANDARD LefT-hANDeD SciSSORS
- fOR KNife eDGe SciSSORS
- SciSSORS ShARPeNiNG SUGGeSTIONS
- LIMITED WARRANTY
- SERVICE
Brand : Chef's Choice
Model : 480KS
Category : Knife sharpener