WD-9K2 - Vacuum Cleaner Koblenz - Free user manual and instructions
Find the device manual for free WD-9K2 Koblenz in PDF.


| Product Type | Wet/Dry Vacuum |
| Brand | Koblenz |
| Model | WD-9K2 |
| Capacity | 9 gallons (34 liters) |
| Motor Power | 120 V, 60 Hz, 5.5 A |
| Dimensions (L x W x H) | 18 x 18 x 22 inches |
| Weight | 18.5 lbs |
| Hose Length | 6 feet |
| Filter Type | Reusable cloth filter |
| Functions | Dry pick-up, wet pick-up, blower function |
| Blower Port | Yes |
| Drain Hose | Included for liquid emptying |
| Power Cord Length | 10 feet |
| Construction Material | High-density polyethylene tank |
| Safety Features | Thermal overload protection, GFCI recommended |
| Maintenance | Empty tank, clean filter after each use |
| Spare Parts Available | Filters, hoses, nozzles, and caster wheels |
| Warranty | 1 year limited warranty |
| Certifications | ETL listed |
Frequently Asked Questions - WD-9K2 Koblenz
User questions about WD-9K2 Koblenz
0 question about this device. Answer the ones you know or ask your own.
Ask a new question about this device
Download the instructions for your Vacuum Cleaner in PDF format for free! Find your manual WD-9K2 - Koblenz and take your electronic device back in hand. On this page are published all the documents necessary for the use of your device. WD-9K2 by Koblenz.
USER MANUAL WD-9K2 Koblenz
This warranty gives you specific legal rights, and you may also have other rights that vary from state to state.
This product is warranted against malfunctions and defects in material and workmanship for a period of one year for domestic use and ninety days for commercial use.
THIS WARRANTY SHALL NOT APPLY to any products or parts there of which have been damaged by tampering, misuse or abuse or which have been altered or repaired by an unauthorized person or service center.
THIS WARRANTY SHALL NOT APPLY to brushes or accessories since their life depends upon the amount of use.
FOR REPAIR the inoperative machine must be delivered with shipping and delivery charges prepaid together with satisfactory evidence of the purchase date to an authorized service center or Thorne Electric Company at the address that appears below. Koblenz will either repair or replace, at its election, all defective machines during the warranty period.
Some states do not allow the exclusion or limitation of incidental or consequential damages, so the above limitation or exclusion may not apply to you.
Thorne Electric, Co.
Canada Call:
610 Lanark Suite 205
San Antonio, TX
78218-0363 U.S.A
Tel: 1(888) 647-1433
MADE IN MEXICO
Tel: (210) 590 1226

Koblenz®
Visit our website www.koblenz-electric.com
19-0972-00-0

natural_image
Line drawing of a vacuum cleaner with no visible text or symbolsFor models / Para modelos:
IMPORTANT SAFETY INSTRUCTIONS
When using an electric vacuum cleaner, basic precautions should be followed:
Read all instructions before using this vacuum cleaner.
This vacuum cleaner is for domestic use only; it may be used for vacuuming wet or dry materials and as a blower.
SAVE THESE INSTRUCTIONS FOR FUTURE REFERENCE.
WARNING
To reduce risk of fire, electric shock or injury:
- Do not use to pick up flammable or combustible liquids, such as gasoline or use in areas where such items may be present.
- Use products only as described in this manual, use only manufacturer's recommended attachments.
- Do not pick up anything that is burning or smoking; such as cigarettes, matches or hot ashes.
- Do not leave vacuum plugged in. Unplug from outlet when not in use and before servicing.
- Turn unit off before unplugging.
- Do not put any object into openings. Do not use with any opening blocked. Keep free of dust, lint, hair and anything that may reduce airflow.
- Do not use without filter in place.
- Do not allow vacuum to be used as a toy, or to run unattended at any time. If used by children or near them, close supervision is necessary.
- Do not store outdoors.
- Do not use with a damaged cord or plug. If vacuum is not working as it should, or if it has been dropped, damaged, or submerged into water, return it to an authorized service center.
- Do not pull or carry by cord, use cord as a handle, close a door on a cord or pull cord around sharp edges or corners, do not run vacuum over cord. Keep away from heated surfaces.
- Do not unplug by pulling on cord. To unplug, grasp the plug, not the cord.
- Do not unplug or vacuum with wet hands. Use extra care when cleaning stairs.
- Keep hair, loose clothing, fingers and all parts of body away from openings and moving parts.
- Never use vacuum cleaner as a pump.
- If the line cord is damaged it must be replaced by the manufacturer or an authorized service center.
- Connect to a properly grounded outlet only. See grounding instructions.
GARANTÍA
natural_image
Technical line drawing of a mechanical component with a tool, showing a threaded shaft and a curved base (no text or symbols)natural_image
Line drawing of a mechanical device with a top component and a base, showing motion arrows (no text or symbols)- Assemble, motor head and the vacuum cleaner is ready to use.
SI TIENE PROBLEMAS
PROBLEMA POSIBLE CAUSA
Use polarized instructions for models WD-9K2 and WD-6K2
This appliance is for use on a 120 V\~ circuit, and has a polarized plug as shown in figure a. A temporary adapter may be used to connect this plug to Non-polarizedoulet.
The temporary adapter should be used only until a properly polarized outlet can be installed by a qualified electrician.

NOTE:
In Canada, the use of a temporary adapter is not permitted by the Canadian Electrical Code.
Grounded Outlet
Use grounded instructions for models WD-9K2 US and WD-6K2 US
This appliance must be grounded. If it should malfunction or breakdown, grounding provides a path of least resistance for electric current to reduce the risk of electric shock. This appliance is equipped with a cord having an equipment-grounding conductor and grounding plug. The plug must be inserted into an appropriate outlet that is properly installed and grounded in accordance with all local codes and ordinances.
Warning
Improper connection of the equipment grounding conductor can result in a risk of electric shock. Check with a qualified electrician or service person if you are in doubt as to whether the outlet is properly grounded. Do not modify the plug provided with the appliance if it does not fit the outlet, have a proper outlet installed by a qualified electrician.
This appliance is for use on a 120V\~ circuit, and has a grounded plug that looks like the plug illustrated in figure A. A temporary adapter may be used to connect this plug to a non-grounded outlet if a properly grounded outlet is not available. The temporary adapter should be used only until a properly grounded outlet can be installed by a qualified electrician.
The green colored rigid ear, lug or the like extending from the adapter must be connected to a permanent ground such as a properly grounded outlet box cover. Whenever the adapter is used, it must be held in place by a metal screw. (fig. B).
NOTE: In Canada, the use of a temporary adapter is not permitted by the Canadian Electrical Code.

-3-
PRODUCT DESCRIPTION

CASTER/CASTER FOOT ASSEMBLY
To assemble the casters on the unit:
- Turn the dust drum upside down on the floor.
- Insert the plastic caster foot into the bottom of drum
- Push until it is flush, with bottom of the dust drum.
- Turn the drum upright.

-4-
natural_image
Line drawing of a portable air purifier with top and bottom views (no text or symbols)- Quite la cabeza

natural_image
Technical line drawing of a mechanical component with threaded shaft and curved base (no text or symbols)natural_image
Line drawing of a mechanical device with a top component and two bottom components, showing directional arrows (no text or symbols)natural_image
Line drawing of a hand holding a curved object with an arrow indicating rotation (no text or symbols)-13-
natural_image
Line drawing of a mechanical component with a handle and arrow indicator (no text or symbols)Ensamble manguera
natural_image
Line drawing of a portable air conditioner unit with upward arrows indicating airflow or movement (no text or symbols)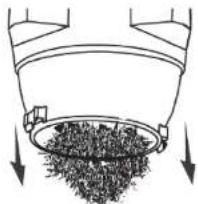
natural_image
Diagram of a container with granular material inside, showing downward arrows indicating flow or movement (no text or symbols)Importante:
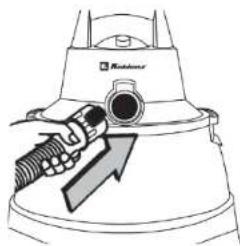
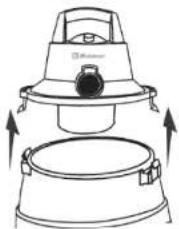
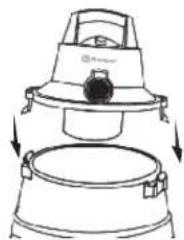
- Line up the motor head with the tank. Pull the side latches out and lower the head. Snap the latches into place.
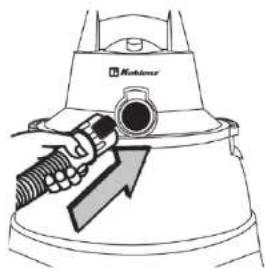
- To connect the hose press the tab on the hose while inserting Then release it should click in place.
- To release the hose, press tab on hose and pull out.
- Plug power cord.
- To turn unit on use switch on motor head.
- Familiarize yourself with the control and features of your vacuum cleaner.

natural_image
Line drawing of a hairdryer with a hand holding a tool, no text or symbols presentHose assembly
Insert hose connector into suction port until you hear a click.
DEBRIS REMOVAL
- Unplug power cord.
- Remove the hose.
- Unlock the side latches.
- Place cover upside down on a clean surface.
- Dump tank contents into a waste container.
natural_image
Line drawing of a portable air conditioner unit with upward arrows indicating airflow or movement (no text or symbols)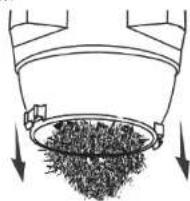
Warning:
To avoid back injury or falls, do not lift a vac heavy with liquid or debris. Scoop or drain enough contents out ti make the vac light enough to lift comfortably.
BLOWING FEATURES
This Koblenz vacuum cleaner also function as an air blower. It has the capability to blow sawdust and other debris. It is excellent to use to blow dust and debris out of garages or off patios and driveways.
Warning:
To avoid injury to bystanders, keep them clear of blowing debris. The operation of any utility vac can result in foreign objects being blown into the eyes, which can result in severe eye damage. Always wear safety goggles.
To use your Koblenz vacuum as a blower:
- Locate the blowing port of your vac.
- Insert the flexible end of the hose into the blowing port.
- Turn vac "ON" and you are ready to use your vac as a blower
TO VACUUM LIQUIDS

natural_image
Diagram of a portable air purifier with top and bottom views showing airflow direction (no text or symbols)- Remove motor head

natural_image
Technical line drawing of a mechanical component with an arrow indicating direction (no text or symbols)- Remove pleated paper filter
natural_image
Line drawing of a portable air conditioner unit with cooling fan and side panel (no text or symbols)- Assemble motor head
Never pick up liquids with pleated paper filter in place.
STORAGE
Before storing your vac, the dust tank should be emptied and cleaned.
Accessories may be stored on the tool caddy.
The vac should be stored indoors.

-6-
To avoid injury from accidental starting, unplug power cord before changing or cleaning the filter.
Cleaning
Your filter should be changed often to maintain peak vac performance.
NOTE: This filter is made of high quality materials designed to stop very small particles of dust. Handle the filter carefully when removing to clean or installing it.
To use vacuum cleaner with pleated paper filter:

natural_image
Technical line drawing of a mechanical component with threaded shaft and curved base (no text or symbols)- Slide over cage until the filter stops against the lid.

natural_image
Line drawing of a portable air conditioner unit with cooling fan and lid (no text or symbols)- Assemble, motor head and the vacuum cleaner is ready to use.
Always use the unit with the filter when vacuuming dry debris and dust.
Important
After cleaning the paper filter, check for holes. If any holes are found replace the filter immediately. Even small holes will permit dust to come out of the vac.
GENERAL MAINTENANCE
To keep your wet / dry vac looking its best, clean the outside with a cloth dampened with water and mild soap.
To clean the drum: 1. Dump out debris.
- Wash drum thoroughly.
- Wipe out with dry cloth.
WARNING:
To assure product SAFETY AND RELIABILITY, repairs and adjustments should be performed by a Koblenz Service Center, always using Koblenz replacement parts.
TROUBLESHOOTING
PROBLEM
Vacuum does not start Low suction
POSSIBLE CAUSE
Not firmly plugged in. Tank full . Filter is dirty.
POSSIBLE SOLUTION
Plug in firmly. Empty tank. Shake dust out of filter See "Filter Maintenance Section".
Obstruction in hose.
Motor head not installed correctly.
Connect the hose to the blowing port until hose is clear. Be sure that the cover seats properly on the tank.
= MANUAL DE USUARIO =
- IMPORTANT SAFETY INSTRUCTIONS
- SAVE THESE INSTRUCTIONS FOR FUTURE REFERENCE.
- WARNING
- GARANTÍA
- SI TIENE PROBLEMAS
- PROBLEMA POSIBLE CAUSA
- Use polarized instructions for models WD-9K2 and WD-6K2
- NOTE:
- Grounded Outlet
- Use grounded instructions for models WD-9K2 US and WD-6K2 US
- PRODUCT DESCRIPTION
- CASTER/CASTER FOOT ASSEMBLY
- To assemble the casters on the unit:
- Importante:
- DEBRIS REMOVAL
- Warning:
- BLOWING FEATURES
- TO VACUUM LIQUIDS
- STORAGE
- Cleaning
- To use vacuum cleaner with pleated paper filter:
- Important
- GENERAL MAINTENANCE
- TROUBLESHOOTING
- PROBLEM
- POSSIBLE CAUSE
- POSSIBLE SOLUTION
- Obstruction in hose.
- = MANUAL DE USUARIO =
Brand : Koblenz
Model : WD-9K2
Category : Vacuum Cleaner