
LTE 4400 - Tumble dryer CORBERO - Free user manual and instructions
Find the device manual for free LTE 4400 CORBERO in PDF.


| Product Type | Tumble Dryer |
| Brand | Corbero |
| Model | LTE 4400 |
| Installation Type | Freestanding |
| Drying System | Condenser |
| Drum Capacity | 4 kg |
| Energy Class | C |
| Annual Energy Consumption | 560 kWh |
| Noise Level | 65 dB(A) |
| Dimensions (H x W x D) | 85 x 60 x 60 cm |
| Weight | 35 kg |
| Power Supply | 220-240 V / 50 Hz |
| Number of Drying Programs | 5 |
| Drying Programs | Cotton, Synthetics, Delicates, Mix, Iron Dry |
| Delay Start | Yes, up to 24 hours |
| Anti-crease Function | Yes |
| Child Lock | Yes |
| Filter Indicator | Yes |
| Water Tank Capacity | 3.5 L |
| Condenser Cleaning Indicator | Yes |
| Spare Parts Availability | 7 years |
| Repair Index | 8.5/10 |
Frequently Asked Questions - LTE 4400 CORBERO
User questions about LTE 4400 CORBERO
0 question about this device. Answer the ones you know or ask your own.
Ask a new question about this device
Download the instructions for your Tumble dryer in PDF format for free! Find your manual LTE 4400 - CORBERO and take your electronic device back in hand. On this page are published all the documents necessary for the use of your device. LTE 4400 by CORBERO.
USER MANUAL LTE 4400 CORBERO
Warnings ......Page 3
Description of the appliance......Page 4
Installation......Page 5
■ Positioning......Page 5
■ Fitting the vent hose......Page 5-6
■ Door reversal......Page 7
■ Electrical connection ......Page 7
■ Stacking kit......Page 7
Use......Page 8
■ Control panel......Page 8
■ Electronic Controlled Programmes......Page 9
■ Time Controlled Programmes ......Page 9
■ Drying programmes......Page 10
■ Drying sequence ......Page 11
■ Useful hints ......Page 11
Maintenance Page 12
■ External cleaning......Page 12
■Cleaning the door......Page 12
■Cleaning the filter ......Page 12
Something not working? ......Page 13
TECHNICAL SPECIFICATIONS
| DIMENSIONS | Height | 85 cm |
| Width | 60 cm | |
| Depth | 57 cm | |
| ELECTRICAL CONNECTION | Voltage/Frequency | 220-230 V/50 Hz |
| Max. power absorbed | 2200 W (10A) | |
| DRYING CAPACITY | Cotton, linen | 5 kg |
| Synthetics | 2.5 kg |
CE This appliance complies with the following E.E.C. Directives:
- 73/23 EEC of 19.2.73 (Low Voltage Directive) and subsequent modifications;
- 89/336 EEC of 3.5.89 (Electromagnetic Compatibility Directive) and subsequent modifications.
It is most important that this instruction book should be retained with the appliance for future reference. Should the appliance be sold or transferred to another owner, or should you move house and leave the appliance, always ensure that the book is supplied with the appliance in order that the new owner can get to know the functioning of the appliance and the relevant warnings.
■ These warnings have been provided in the interest of safety. You MUST read them carefully before installing or using the appliance.
INSTALLATION
■ Any electrical work required to install this appliance should be carried out by a qualified electrician or competent person.
■ Make sure that the appliance does not stand on its electrical supply cable.
■ If the machine is situated on a carpeted floor, please adjust the feet in order to allow air to circulate freely.
■ This tumble dryer is designed to be vented through to the open air. It should have its own ventilation system which should not be joined with any other ventilation system connected to any other appliance.
USE
■ Always unplug the appliance after use.
■ Clothes which are dripping wet should not be placed in the dryer. Always load well spun laundry. The higher the spin speed, the lower the electricity consumption and the shorter the drying times.
■ Never tumble dry items that have been in contact with chemicals such as dry cleaning fluid. These are of a volatile nature and could cause an explosion.
■ As some bulky items such as duvets and eiderdowns should be dried in large commercial machines because of their bulk, check with the manufacturer of the item if it is suitable for drying in a domestic machine, even if the dry weight of the item is within the limit advised.
■ Always check that no cigarette lighters have been left in pockets.
■ Leave the porthole door slightly ajar when not in use to preserve the door seal.
■ The fluff filter must be cleaned after every use.
■ Do not operate the appliance with a damaged filter as this may cause a fire.
■ Do not overload the appliance.
■ Do not allow fluff to accumulate around the dryer.
SERVICE/REPAIR
■ Under no circumstances should you attempt to repair the machine yourself. Repairs carried out by inexperienced persons may cause injury or serious malfunctioning. Refer to your local Zanussi Service Centre. Always insist on genuine Zanussi spare parts.
GENERAL SAFETY
■ It is dangerous to modify or try to modify the specifications of this appliance in any way.
■ This appliance is designed to be used by adults. Children should not be allowed to touch the controls or play with the product.
■Pets and small children may climb into tumble dryers. Check your appliance each time before use.

ENVIRONMENT PROTECTION
■The materials used on this appliance marked with the symbol are recyclable. This means that they can be recycled by disposing of them properly in appropriate collection containers.
■ If you take your appliance to a refuse disposal site, cut off the power cable flush with the appliance to avoid the danger of the appliance being re-used, and disable the door catch to prevent children becoming trapped inside.
DESCRIPTION OF THE APPLIANCE
1 Worktop
2 Programme chart
3 Low Temperature Button
4 Buzzer OFF button
5 Start button
6 Control lights
7 Mains-On Light
8 Programme Selector Dial
9 Rating Plate
10 Door Handle
11 Fluff filter
12 Adjustable feet

13 Side vent outlets
14 Ring nut
15 Rear vent outlet

INSTALLATION
Positioning
It is recommended that, for your convenience, the machine is positioned close to your washing machine.
Whilst drying, the tumble dryer will expel a certain amount of warm, very moist air, and this should be removed from the room as quickly as possible to prevent condensation. In an extremely well ventilated room or close to an open window, this may occur naturally.
However, in general, it is better to carry the dryer's exhaust outside via a 100 mm diameter flexible hose available through your dealer; ending either temporarily at an open window, or permanently at a fixed ventilation grille, fitted to an exterior wall or window.
The tumble dryer must be installed in a clean place, where dirt does not build up.
Make sure there are no obstructing items or material near the air-intake louvres provided at the back (e.g. paper, rags etc.).
To keep vibration and noise to a minimum when the dryer is in use, it should be placed on a firm, level surface.
Once in its permanent operating position, check that the dryer is absolutely level with the aid of a spirit level. If it is not, raise or lower the two adjustable feet at the front of the machine until it is.
The feet must never be removed.
Do not restrict the floor clearance through deep-pile carpets, strips of wood or similar. This might cause heat build-up which would interfere with the operation of the appliance.
Important
When operating the tumble dryer, the room temperature must not exceed 35^ C, as it may affect the performance of the appliance.
Fitting the vent hose
To simplify the installation, there is a choice of vent outlets: one at the back, the others in the left and right-hand side.
Connect the hose to whichever is the more convenient by pulling the ring nut (A) from the vent outlet at the back, screwing it on to the hose and pushing it firmly back into place.
The unused vents should now be sealed with the special snap covers provided.

natural_image
Technical diagram of a bolt installation with circular arrows indicating rotation (no text or symbols)
natural_image
Technical line drawing of a computer case with ventilation grilles and a labeled component (no text or symbols beyond label)
Advice: If the hose is long and the room temperature low, the moisture might condense to water inside the hose. This is an unavoidable natural phenomenon. To prevent this water from lying in the hose or flowing back into the tumble dryer, it is advisable to drill a small hole (dia. 3 mm) in the lowest point of the hose and to place a small container below it.(See picture, point A).
Once connected to the dryer, run the vent hose to the desired outlet point, ensuring that the run's overall length is less than 2 m, and that it contains no more than two bends. As to the outlet itself, if you have decided on a fixed wall/window grille, a good local builder's merchant should be able to supply you with the necessary fittings and installation advice.

It is important not to connect the vent hose to, for example, a cooker hood, or a chimney or flue pipe designed to carry the exhaust from a fuel burning appliance.
Note that to avoid condensation problems, it is essential that the dryer be fitted with the flexible hose to carry its “exhaust” at least beyond the kitchen units; preferable outside the kitchen.
In order to prevent the appliance from overheating, it is important that the steam exhaust is unobstructed.
Therefore, in case of a permanent hose fitted to an exterior wall or ceiling, it must be ensured an exhaust capacity of at least 150 m^3/h .
If the dryer is fitted next to kitchen units, make sure that the vent hose is not squashed. If the hose is partially squashed, drying efficiency will be reduced, resulting in longer drying times and higher energy consumption.
If the hose is completely squashed, the safety cut-outs with which the machine is fitted may operate.

natural_image
Technical line drawing of a washing machine with labeled component A (no text or symbols beyond label)
natural_image
Diagram showing a washing machine and a refrigerator with crossed-out pipes (no text or symbols)Door reversal
To make it easier to load or unload the laundry the door can be reversed.
This operation must be carried out by qualified personnel.
Operate as follows:
- Remove the door by unscrewing the two screws (1) fastening the hinge to the cabinet (Fig. A).
- Remove the safety catch (2) and the plug (3) by bending the two fastening tags (Fig. A).
- Refit the safety catch (2) and plug (3) on the door by reversing their positions (Fig. B).
- Remove the plastic plate (4) by unscrewing the two fastening screws (Fig. A).
- Refit the plastic plate (4) on the opposite side (Fig. B).
- Refit the door by screwing in the two screws (1) which fasten the door to the cabinet (Fig. B).


Electrical connection
This machine is designed to operate on a 220-230 V, single-phase, 50 Hz supply.
Check that your domestic electrical installation can take the maximum load required (2.2 kW), also taking into account any other appliances in use.
Connect the machine to an earthed socket, in accordance with current wiring regulations.

The manufacturer declines any responsibility for damage or injury through failure to comply with the above safety precaution.
Stacking kit
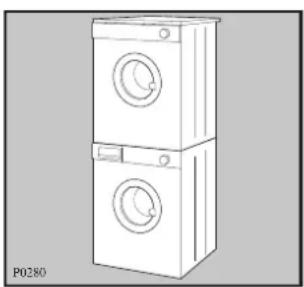
A special stacking kit is available through your dealer, to enable the mounting of the dryer on top of your washing machine.
natural_image
Line drawing of two stacked washing machines with circular windows (no text or symbols)USE
Control panel

1 Programme Chart
This will help you to select the correct programme for drying.
2 Low Temperature Button ↓
Press this button to reduce the temperature when drying particularly delicate items.
To be used only when drying synthetics with the time controlled programme.
3 Buzzer Off Button
Press this button if you do not wish the buzzer to ring during the «anti-crease» phase.
4 Start Button ◆
Press this button for a few seconds to start the selected drying programme.
If the door is opened during drying, this button has to be depressed after closing the door to allow the programme to continue.
5 Drying Light 🙏
This light (green) indicates that the machine is performing the drying programme.
6 Cooling phase Light ✿
This light (green) will illuminate when the cooling phase is in operation. This starts 9 minutes before the end of drying to prevent any creasing or crumpling of fabrics.
7 End of Programme Light ↗
This light (red) comes on at the end of the drying programme and remains alight until the door is opened.
This light will also remind you that the filter should be cleaned at the end of each drying cycle.
8 Open Door Light
This light (red) flashes when the door is opened or not well closed.
9 Mains-On Light
This lights up by selecting the programme or time and goes out when the programme selector dial is turned to «0».
10 Programme Selector Dial
To set the machine to the selected programme or time, turn the dial until the letter or the time you want coincides exactly with the pointer.
Electronic Controlled Programmes
These operate by means of dampness sensors.
All you have to do is to set the selector dial for the programme required A, B, C or D and the laundry will be dried to the selected degree of dryness.
The following are the degrees of final drying which can be obtained with electronic control:
■ Extra Dry
Ideal for bathrobes, bath towels etc.
■ Store Dry
Suitable for items which you want to put away without ironing, for example towels and non-iron fabrics.
■ Iron Dry
Suitable for items which need ironing.
■ Synthetics (store dry)
Suitable for delicate articles which do not need ironing.
Time Controlled Programmes
You can select a time up to 90 mins. to finish off drying, if necessary, or to use your tumble dryer independently of the electronic control system.
When selecting a short drying time, remember that during the last 9 mins. of operation, the heat is cut off in order to carry out a cooling phase.
If you dry synthetics, switch on the LOW TEMP. button ↓
Drying programmes
Electronic Controlled Programmes
| Type of laundry Degree of drying required | Quantity | Selector setting | |
| Extra dry | A | ||
| Cotton & linen | Store dry | 5 kg B (*) | |
| Iron dry | C (*) | ||
| Synthetics | Store dry | 2.5 kg D (*) | |
(*) According to CEI 1121 standards.
Time Controlled Programmes - Cotton and Linen
| Degree of drying required Degree of spin given | Quantity Selector dial setting mins | |
| Store dry | 800-900 rpm | 5 kg 75-90 |
| 2 kg 60-75 | ||
| 1000-1200 rpm | 5 kg 60-75 | |
| 2 kg 45-60 | ||
| Iron dry | 800-900 rpm | 5 kg 60-75 |
| 2 kg 45-60 | ||
| 1000-1200 rpm | 5 kg 45-60 | |
| 2 kg 30-45 | ||
Time Controlled Programmes - Synthetics: switch on pushbutton ↓
| Degree of drying required Degree of spin given | Quantity Selector dial setting mins | |
| Store dry | Short spin at 650 rpm | 2.5 kg 45-60 |
| 1 kg 30-45 | ||
| 0.5 kg 20 | ||
Never overfill the drum (do not load large quilts, for example).
The laundry must be suitably spun in your washing machine before being placed in the tumble dryer (500rpm minimum).
Drying times vary according to:
- The type of laundry
- The size of the load
- The degree of spinning prior to drying
i Drying sequence
Before starting up for the first time it is advisable to load a few moist cloths into the dryer and to let it run for about 20 minutes. This ensures that no dust and dirt is left in the drum.
1. Load the laundry
Open the door by pulling the catch forwards.
Load the items one at a time, shaking them out loosely and close the door.
Please check the laundry does not get caught between the door and filter.
2. Select the drying time or the drying programme
Turn the selector dial to the desired programme or time, the mains-on light illuminates.
3. Select the required option and start the machine
Depress Buzzer Off and/or Low Temp. Button, if you have to dry synthetics with a time controlled programme.
Depress START button, the machine starts operating and the drying light illuminates.
To change a programme already in progress, turn the selector dial to «0», select the new programme and then depress START button.
4. When drying is completed
The machine stops automatically.
Release the button(s).
Turn the selector dial to «0», the mains-on light goes out.
Clean the filter after every drying programme. A clean filter ensures correct functioning of the appliance.

natural_image
Illustration of hands cleaning a circular object with a cloth, no text or symbols present
natural_image
Illustration of a hand holding a circular object with a pointer labeled 'B' (no text or symbols on the object itself)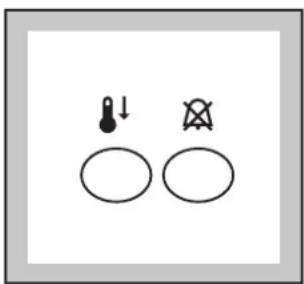
natural_image
Simple diagram with two circles and a thermometer symbol (no text or labels)
natural_image
Simple line drawing of a finger pressing a button with a diamond above it (no text or symbols)Anticrease phase
If you do not remove the laundry at the end of the programme, after the cooling phase, the machine will carry out automatically the «anticrease» phase which lasts approx 30 mins. During this period the drum will rotate at regular intervals to avoid creasing and the buzzer will sound for 1 second every 10 seconds, unless you have depressed the BUZZER OFF button.
To remove the laundry during this phase it is necessary to switch the machine off by turning the selector dial to «0».

Useful hints
■ Try to load to the maximum capacity of the machine as small loads are uneconomical. For information, here is a list of the average weights of some common laundry items.
Sheet 700 - 1000 g
Tablecloth 400 - 500 g
Kitchen towel 70 - 120 g
Table napkin 50 - 100 g
Towelling hand towel 150 - 250 g
Bathrobe 1000 - 1500 g
Man's shirt 200 - 300 g
Pillowcase 100 - 200 g
Man's pyjamas 400 - 500 g
Ladies' nightdress 200 - 250 g
■ Never tumble dry the following: Particularly delicate items such as net curtains, woollen, silk, fabrics with metal trim, nylon tights, bulky materials such as anoraks, blankets, eiderdowns, sleeping bags, feather quilts and any items containing rubber foam or materials similar to rubber foam.
■ Always follow the instructions on garment labels.

normal drying (high temperature)

delicate drying (low temperature)

do not tumble dry
■ Close pillowcases and covers with fasteners to prevent small laundry items getting tangled inside them. Close press studs, zips and hooks and tie belts and apron strings.
■ Sort laundry according to type and degree of drying required.
■ Do not over-dry laundry, this avoids creasing and saves energy.
■ Avoid drying dark clothes with light coloured fluffy items such as towels as they could attract the fluff.
■ The laundry must be thoroughly spun before tumble drying.
■ Easy-care items, too, e.g. shirts, should be briefly pre-spun before drying (depending on crease resistance approx. 30 seconds or using the special brief spin programme of your washing machine).
■ Knitted textiles (knitted underwear) may shrink a little during drying. Please do not overdry items of this type. It is advisable to allow for shrinkage when choosing the size of new purchases.
■ You can also put starched items into your dryer. However, to achieve the desired starched effect, choose the programme “iron dry”. To remove any starch residues, wipe out the internal drum after drying with a moist cloth and then rub it dry.
■ To avoid a static charge when drying is completed, use either a fabric softener when you are washing the laundry or a fabric conditioner specifically for tumble dryers.
■ Remove the laundry when the dryer has finished drying.
■ If individual items are still damp after drying, set a brief post-drying time, but at least 20 minutes. This will be necessary particularly for multilayered items (e.g. collars, pockets, etc.).
MAINTENANCE
You must disconnect the appliance from the electricity supply, before you can carry out any cleaning or maintenance work.
External cleaning
Use only soap and water and then dry thoroughly.
From time to time, apply a little wax furniture cream with a soft cloth.
Important: do not use methylated spirit, diluents or similar products.
Cleaning the door
Clean periodically the interior part of the door to remove any fluff.
Accurate cleaning ensures correct drying.

natural_image
Diagram showing a hand pressing down on a circular component with concentric rings (no text or symbols)Cleaning the filter
Your dryer will only function well if the filter is clean.
The filter collects all the «fluff» which accumulates during drying and it must therefore be cleaned at the end of each programme with a damp cloth.
The filter cannot be removed.
Do not be alarmed by the amount of fluff. It is not due to excessive wear caused by the dryer. All fabric loses fluff when drying but it goes unnoticed in the air. In a tumble dryer it simply collects in the filter.

natural_image
Illustration of a hand cleaning a circular mechanical component with a tool (no text or symbols)SOMETHING NOT WORKING?
Problems which you can resolve yourself:
| PROBLEM POSSIBLE CAUSE | |
| ■ The dryer does not start up | ■ The door is open.■ There is a power failure.■ The fuse is damaged.■ The start button has not been depressed.■ The drying programme or time has not been selected. |
| ■ The dryer does not dry properly | ■ The filter is clogged.■ An insufficient drying time has been selected.■ The selected programme is not suitable for the laundry.■ Excessive laundry load.■ The dryer is not correctly installed. |
If, after the above checks, there is still a fault, call your local Zanussi Service Centre.
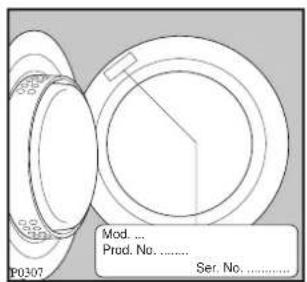
Please make sure you give the model and serial number of the appliance.
This information can be found on the rating plate (see picture) or on the guarantee card.


- INSTALLATION
- USE
- SERVICE/REPAIR
- GENERAL SAFETY
- ENVIRONMENT PROTECTION
- DESCRIPTION OF THE APPLIANCE
- Positioning
- Important
- Fitting the vent hose
- Door reversal
- Electrical connection
- Stacking kit
- Control panel
- Programme Chart
- Low Temperature Button ↓
- Buzzer Off Button
- Start Button ◆
- Drying Light 🙏
- Cooling phase Light ✿
- End of Programme Light ↗
- Open Door Light
- Mains-On Light
- Programme Selector Dial
- Electronic Controlled Programmes
- ■ Extra Dry
- ■ Store Dry
- ■ Iron Dry
- ■ Synthetics (store dry)
- Time Controlled Programmes
- Drying programmes
- i Drying sequence
- Load the laundry
- Select the drying time or the drying programme
- Select the required option and start the machine
- When drying is completed
- Anticrease phase
- Useful hints
- MAINTENANCE
- External cleaning
- Cleaning the door
- Cleaning the filter
- The filter cannot be removed.
- SOMETHING NOT WORKING?
Brand : CORBERO
Model : LTE 4400
Category : Tumble dryer