STS2406 - Iron Stirling - Free user manual and instructions
Find the device manual for free STS2406 Stirling in PDF.


| Product type | Steam iron |
| Brand | Stirling |
| Model | STS2406 |
| Dimensions (L x W x H) | Approx. 280 x 120 x 150 mm |
| Weight | Approx. 1.2 kg |
| Power consumption | 2400 W |
| Voltage | 220-240 V ~ 50/60 Hz |
| Water tank capacity | 250 ml |
| Soleplate material | Ceramic |
| Steam output (continuous) | Up to 40 g/min |
| Steam boost | 120 g/min |
| Anti-drip system | Yes |
| Self-cleaning function | Yes |
| Vertical steam | Yes |
| Spray function | Yes |
| Cord length | 2 m |
| Auto shut-off | Yes, after 8 minutes idle |
| Thermal fuse protection | Yes |
| Cleaning | Wipe soleplate with soft cloth; descale periodically |
| Spare parts availability | Online and authorized service centers |
Frequently Asked Questions - STS2406 Stirling
User questions about STS2406 Stirling
0 question about this device. Answer the ones you know or ask your own.
Ask a new question about this device
Download the instructions for your Iron in PDF format for free! Find your manual STS2406 - Stirling and take your electronic device back in hand. On this page are published all the documents necessary for the use of your device. STS2406 by Stirling.
USER MANUAL STS2406 Stirling
Steam Station Iron
Model Number STS2406
INSTRUCTION MANUAL
Important
Getting the most out of your Steam Station:

Read the manual carefully
It will help you get set up with ease

Visit www.winplus.com.au
We've got support materials online

Call After Sales Support - 1300 663 907
Available Monday - Friday, 8:30am - 6:00pm AEST

il customercare@winplus.com.au
Warranty Note
If you experience any issues with this product, or its performance is not what you had expected, please contact us at Winplus before returning the item to the store.
It is likely that we can resolve any problems for you via phone or email.
We can be reached on:
Phone: 1300 663 907 (Mon - Fri; 8:30am - 6:00pm EST)
Email: customercare@winplus.com.au
Web: www.winplus.com.au
Welcome
Congratulations on choosing to buy a Stirling® product.
All products brought to you by Stirling® are manufactured to the highest standards of performance and safety, and, as part of our philosophy of customer service and satisfaction, are backed by our comprehensive 3 Year Warranty.
We hope that you will enjoy using your purchase for many years to come.
Contents
01 Welcome
03 Warranty Page
04 General Information and Safety Instructions
06 Features / Technical Specifications
07 Assembly and Parts List
10 Getting Started
12 Instructions
16 Cleaning and Maintenance
20 FAQ
21 Index
22 Repair & Refurbished Goods or Parts Notice

STIRLING®
Steam Station Iron
Warranty Details
The product is guaranteed to be free from defects in workmanship and parts for a period of 36 months from the date of purchase. Defects that occur within this warranty period, under normal use and care, will be repaired, replaced or refunded at our discretion.
The benefits conferred by this warranty are in addition to all rights and remedies in respect of the product that the consumer has under the Competition and Consumer Act 2010 and similar state and territory laws.
Our goods come with guarantees that cannot be excluded under the Australian Consumer Law. You are entitled to a replacement or refund for a major failure and for compensation for any other reasonably foreseeable loss or damage. You are also entitled to have the goods repaired or replaced if the goods fail to be of acceptable quality and the failure does not amount to a major failure.
General Information and Safety Instructions
IMPORTANT SAFETY INSTRUCTIONS READ CAREFULLY BEFORE USE
- Do not use in dusty conditions
- Do not drop the Steam Station Iron. Dropping or rough use of the unit will cause damage
- Do not place near strong magnets or strong electric currents
- If the Steam Station Iron is not in use, turn off and unplug from any power source
- Do not attempt to repair, open or alter any components of the Steam Station Iron. In the case of improper usage or if you have opened, altered and repaired the product yourself, all guarantees are void
- The supplier does not accept responsibility for additional or consequential damage other than covered by legal product responsibility
- The supplier is not responsible for the end use of this product including any improper use or when used for purposes that are not specified
KEEP FOR FUTURE REFERENCE
This product complies with AS/NZS60335.1, AS/NZS60335.2.3 and AS/NZS CISPR 14.1
Version No: 1.0
Issue Date: 4 Apr 2016
Warnings
- Read all instructions before operating the Steam Station Iron for the first time.
- This product is intended for indoor domestic use and is not intended for commercial, trade or industrial applications.
- Do not use the appliance for other than intended or specified purposes.
- Only use the Steam Station Iron with Australian Standard 220-240V AC 50Hz 10A rated power supply.
- To avoid electrical shock, do not place the cord, plug or Steam Station Iron in water or other liquids.
- Do not operate appliance with wet hands or operate in a wet working environment.
- Keep the Steam Station Iron and power cable away from heat sources and hot surfaces.
- Always protect the power cable from undue flexing and wearing – do not allow the cable to hang off edge of the counter or table.
- If the supply cord is damaged, do not use the product. Contact customer service for repair or replacement to avoid a hazard.
- This appliance is not intended for use by persons (including children) with reduced physical, sensory or mental capabilities, or lack of experience and knowledge, unless they have been given supervision or instruction concerning use of the appliance by a person responsible for their safety.
- Do not leave your Steam Station Iron unattended when power is connected.
- Do not use this appliance with an external timer or separate remote-control system of any kind.
- Do not fill the container above its maximum indicated level.
- Take caution of hot surfaces when product is in use.
- Do not direct steam from the iron towards any persons, animals, or combustible items.
- Do not leave hot iron soleplate in contact with any material whilst unattended.
- The plug must be removed from the power point before the water tank is filled with water.
- The iron must be used and rested on a flat, stable surface.
- When placing the iron on its stand, ensure that the surface on which the stand is placed is stable.
- The iron is not to be used if it has been dropped, if there are visible signs of damage or if it is leaking.
- Children should be supervised to ensure that they do not play with the appliance.
Features
- 6 Bar Steam Pressure
• 3 Steam Settings
• 1.7L Removable Water Tank - Boil Dry Protection
• Automatic Shut Off -
Cord Storage
-
Iron Locking Mechanism
- Ceramic Soleplate
• Water Level Sensor - Fast Heat Up Time
- Descale Function
• 120g/min Max Steam rate
Technical Specifications
Model Specification: STS2406
Input: 220-240V AC 50Hz
Power: 2000-2400W
(Iron Power: 1000W;
Boiler Power: 1400W)
Tank Capacity: 1.7L
Maximum Continuous Steam Rate:
120g/min
Weight: 4.82kg
Warranty: 3 Years
Dimensions: 39cm x 22cm x 31cm
Assembly and Parts List

- Removable Water Tank
- Tank Handle
- Tank Lid
- Iron Release Button
- Iron
- Steam Button
-
Iron Temperature Dial
-
Iron Rest
- Steam Hose
- Iron Thermostat Light
- Main Housing
- Control Panel
- Cord Tidy
Control Panel
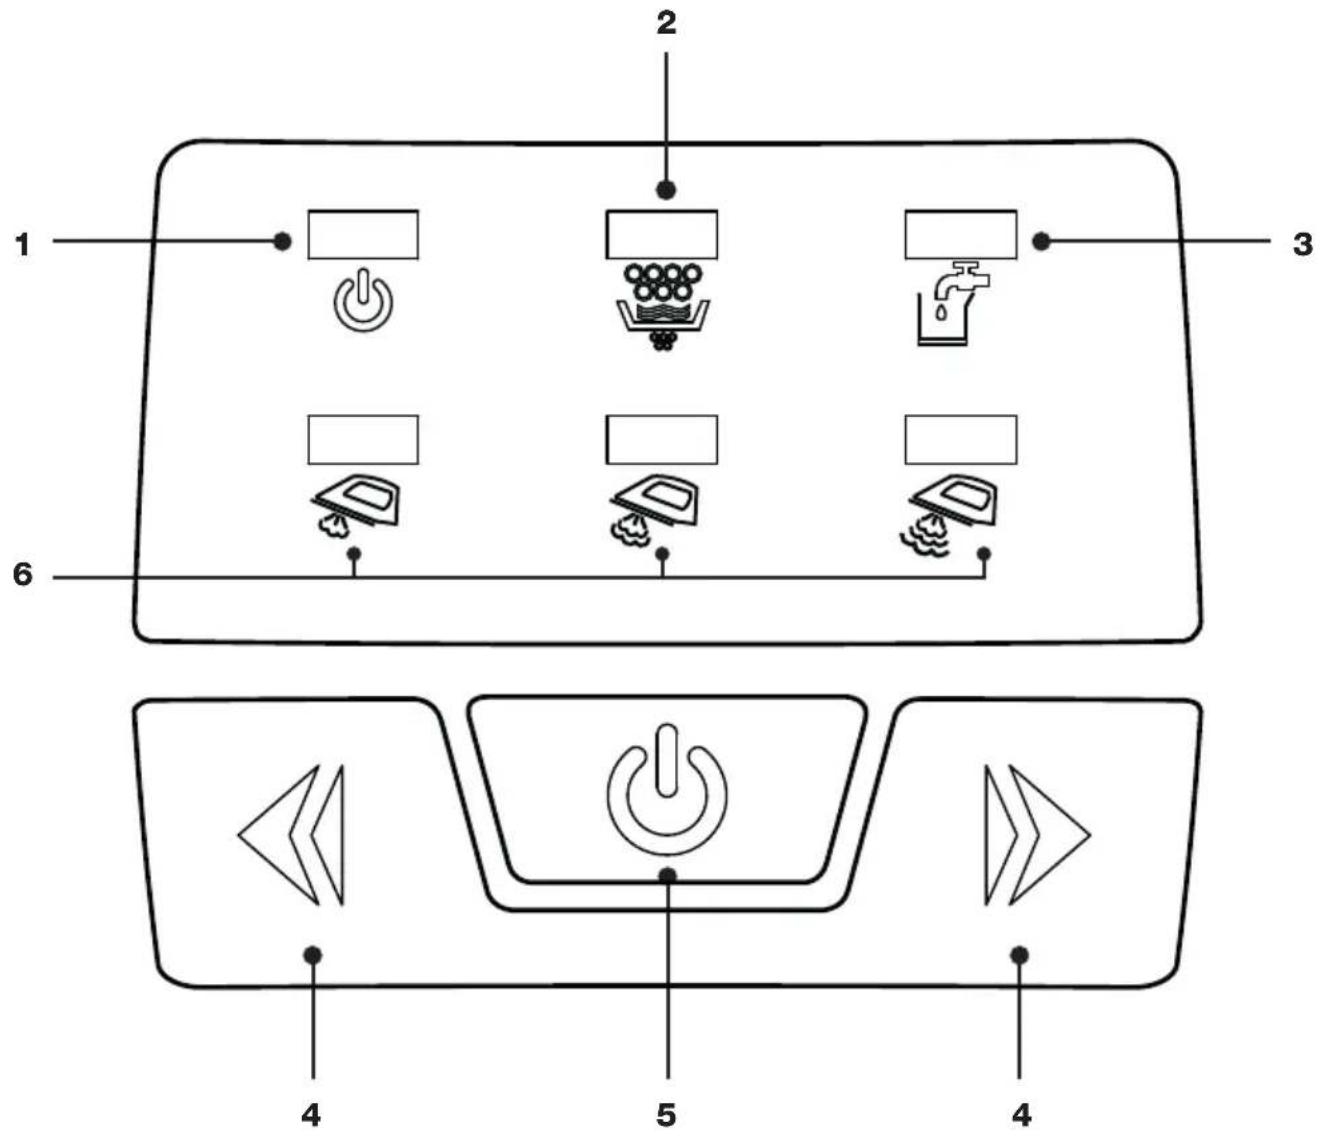
- ON Indicator
- Descale Indicator
- Low Water Level Indicator
- Steam Setting Buttons
- ON/OFF Button
- LOW-MEDIUM-HIGH Steam Setting Indicators

-
Max Setting (For Linen)
-
Medium Setting (For Wool)
-
High Setting (For Cotton)
-
Low Setting (Fibres/Silk)
Soleplate Temperature Settings
The following table should be used as a guide only, always refer to garment manufacturer guidelines for each individual garment.
| Setting Fabric Steam Temperature* | |||
| ● | Synthetic fibers/silk NO 70°C - 120°C | ||
| ●● | Wool YES 100°C - 160°C | ||
| ●●● | Cotton YES 140°C - 210°C | ||
| MAX Linen YES 170°C - 225°C | |||
*NOTE: These temperatures are approximate, and for your reference only.
Getting Started
Before First Use
Remove any packaging material and promotional labels before using your Steam Station Iron for the first time. You may notice an odour from the unit for the first use. This is normal and will cease after a short while.
Water Use
The Steam Station Iron is designed to be used with normal tap water only. In hard water areas it is recommended to use distilled water as minerals or other elements may cause wear to the appliance and staining to clothes.
WARNING: Do not use the following in the water tank: rain water, bottled water, detergents, descaling agents or any other chemicals.
Iron Locking Mechanism
The Steam Station Iron has a locking mechanism for the iron which keeps the iron safely in place and allows easy transport. To release, press the iron release button and rotate the iron clockwise off the iron rest.

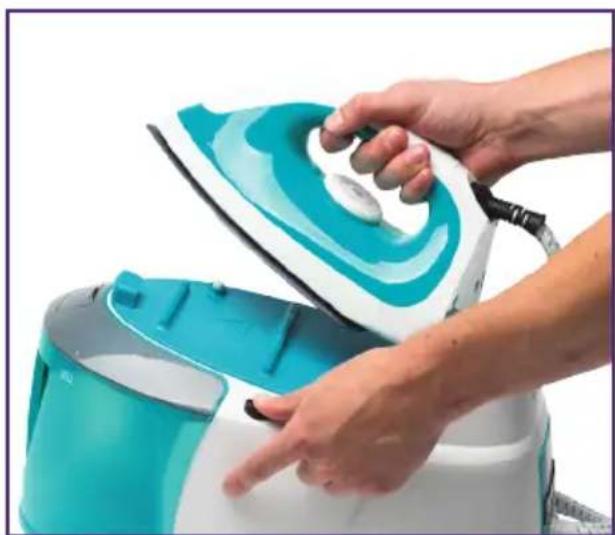
WARNING: Take care of the hot soleplate when releasing the iron, this poses risk of burns.
NOTE: Before releasing the iron, ensure the base is on a flat, stable surface.
Water Level
If the water is low, the low water level indicator light will illuminate. At this point the iron can generate little to no steam. To refill the tank during use, detach the water tank (the unit will beep) and refill with water. Slide the tank back into position and wait for the boiler to reheat.


WARNING: Do not fill the water tank above the MAX line.
Auto-Off Function
The Steam Station Iron has a safety auto-off function which turns the unit off automatically after 10 minutes of non-use. If you need to turn the unit back on, simply press the ON/OFF button and follow instructions as per page 13.
Descale Indicator
The Steam Station Iron has a descale notification function to assist in notifying when the boiler should be flushed. Mineral deposits can build up in the appliance potentially blocking steam holes and affecting overall performance. When the descale indicator light illuminates it means the boiler should be cleaned. Follow cleaning instructions listed on page 17.
Boil Dry Protection
Your Steam Station Iron is equipped with boil dry protection, meaning if there is no water in the water tank or no water running through the boiler, the unit will beep and shut off.
Instructions
Position the Steam Station Iron on a firm level table, bench or ironing board.
Filling the Water Tank


Remove the water tank by pressing the button on the handle and pulling the tank out.
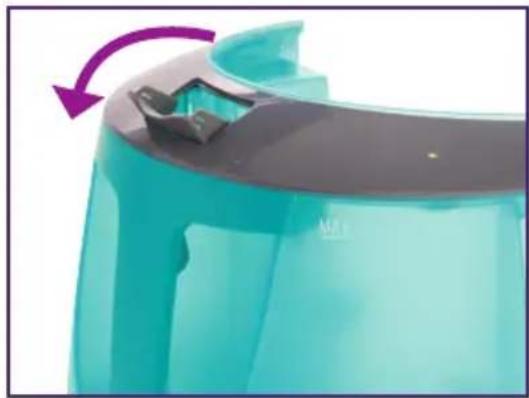

Lift the lid and fill the tank with water under a tap or using a jug, ensuring you do not exceed the MAX fill line.
NOTE: Dry any excess water from around the outside of the water tank.
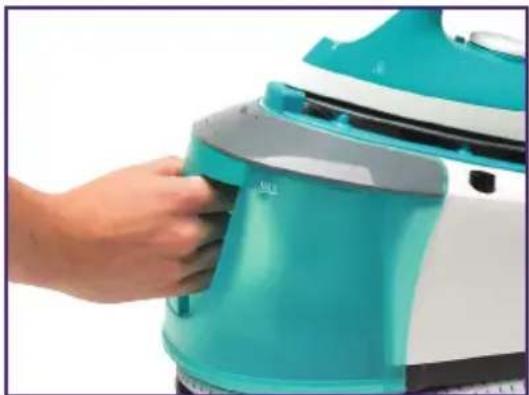

Slide the tank back into position. Gently pull the handle to ensure the tank is correctly in place.
Steam Station Iron Operation


Plug the unit into a household power point and turn power point on.


Press the ON/OFF button, the unit will beep once.


The ON/OFF light will illuminate and the (steam setting 1) icon will begin flashing as default, indicating the boiler is heating. The iron thermostat light will also turn on.


Select the desired steam setting by pressing either the right or left arrows. The corresponding light will flash to indicate the boiler is heating to the selected setting.
NOTE: The unit may make a pumping noise for a few seconds, this is normal.
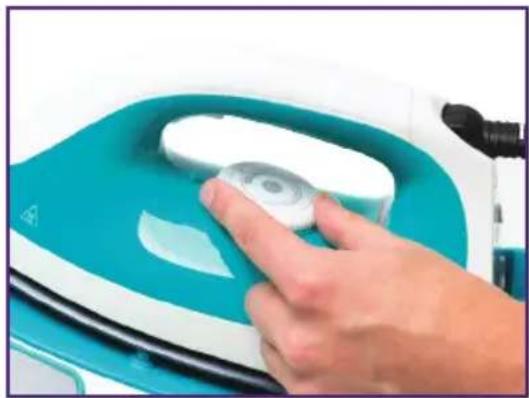

Select the desired soleplate heat setting by rotating the iron temperature dial.


Once the selected steam setting light has stopped flashing and the iron thermostat light is off, the unit is ready for use.
NOTE: Always refer to garment manufacturer recommendations for the correct temperature setting.
NOTE: During heating the iron may emit a small amount of steam for a few seconds, this is normal. The thermostat light and steam setting light may illuminate or flash at times during use.
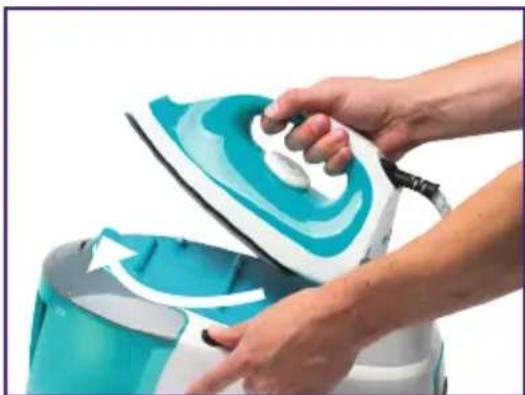

Press the iron release button and rotate the iron clockwise to release from the locking mechanism.


Direct a short burst of steam in the air to release any condensation.
WARNING: Take care not to touch the hot soleplate when releasing the iron, contact could result in burns.
NOTE: Particles may come out of the soleplate when you use the iron for the first time. This is normal; the particles are harmless and stop coming out of the iron after a short while.
WARNING: Do not direct steam from the iron towards any persons, animals or combustable items.


To iron with steam, press the steam button and release as desired.

To iron without steam do not press the steam button.
TIP: You can provide a quick shot of steam at any time during ironing by pressing and releasing the steam button as desired.
WARNING: Never leave iron face down on any surface. Always place iron back on the main unit or stand the iron vertically in between ironing strokes.

Once you have finished ironing, turn the unit off by pressing and holding the ON/OFF button and removing the plug from the power point.
WARNING: Before storing, ensure the Steam Station Iron has completely cooled down. This may take up to 2 hours.
Cleaning and Maintenance
Cleaning and Storage
Before cleaning the Steam Station Iron, ensure the unit is turned off and unplugged from the power point. If recently used, allow time for the iron to cool down completely. This may take up to 2 hours.
Clean the base, iron and soleplate by wiping with a moist cloth.
NOTE: Do not use abrasive cleaning materials or chemicals as this can damage the appliance and soleplate.
WARNING: DO NOT immerse the main unit or iron in water or any other liquid.
When storing the Steam Station Iron, ensure the following steps are taken.
- Turn off the appliance and unplug from the power point.
- Empty the water tank.
- Allow the iron to cool completely before storing. Wrap the cord and steam hose around the base to store neatly
Disposal
At the end of its working life, do not throw this product out with your household rubbish. Electrical and electronic products contain substances that can have a detrimental effect on the environment and human health if
disposed of inappropriately. Observe any local regulations regarding the disposal of electrical consumer goods and dispose of it appropriately for recycling. Contact your local authorities for advice on recycling facilities in your area.
Please keep the original packaging carton and materials in a safe place. It will help to prevent any damage if the product needs to be transported in the future. In the event it is to be disposed of, please recycle all packaging material where possible.
If you require another copy of this instruction manual, please contact customercare@winplus.com.au to obtain an electronic copy.
Descaling the Steam Station Iron
When the descale indicator is illuminated, the boiler needs to be flushed out to maintain optimum performance of the appliance. Before proceeding, ensure you have unplugged the appliance from the power point and removed the water tank.
Descaling or decalcifying solutions can be readily purchased to perform cleaning. If using these solutions, follow manufacturer instructions carefully as any misuse may cause damage to the appliance. Always ensure the solution is specifically designed for the purpose of descaling irons or Steam Station Irons.
WARNING: Do not use any other solutions in the water tank as this may cause damage to the appliance.
How to Clean
- Turn off unit and unplug from power point. Allow unit to cool completely.
WARNING: If Steam Station Iron has been recently used, ensure the appliance has cooled completely before proceeding with descaling process to reduce risk of burns.
-
Position the unit on a sink edge or similar waterproof surface.
-
Tilt the unit on its side to expose the base.
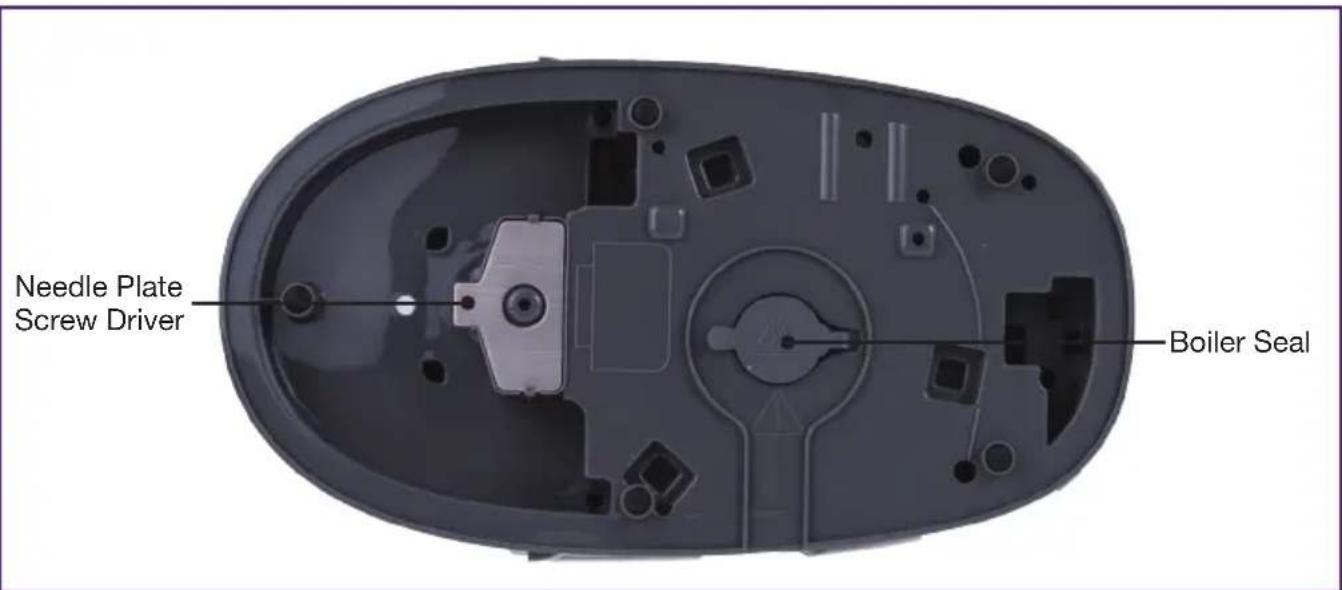
NOTE: For convenience it is recommended to detach the water tank and iron.
-
Locate the Needle Plate Screw Driver on the base of the Steam Station.
-
Flip back the boiler seal and using the Needle Plate Screw Driver attached, release the boiler cap.
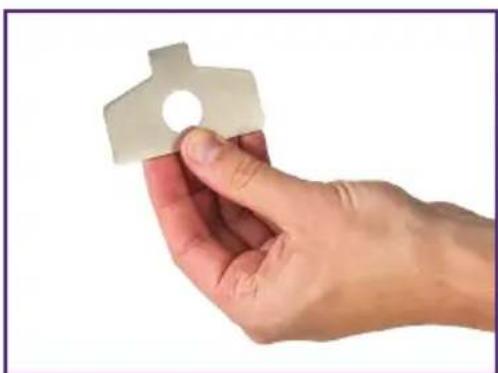

NOTE: The boiler cap may be tight due to prolonged steam exposure, if problems persist in removing, please contact customer service.
-
Tilt the unit over the sink to flush out any liquid inside.
-
Rinse out boiler with 1 cup of water. Drain and repeat.
-
Ensure once complete the boiler cap and seal are in place.
Vinegar Solution
An alternative method to descale the Steam Station Iron is to use a vinegar solution to flush out the appliance.
- Follow instructions under 'How to Clean' up to step 5.
- Mix 125mL of water with 125mL of distilled white vinegar.
- Tilt the unit upwards and pour the 1 cup solution into the boiler.
-
Replace the boiler cap.
-
Place the unit in an upright position again and leave to stand for 2 minutes.
-
Shake the unit to mix the solution around then leave to stand for another 5-10 minutes.
-
Tilt the unit back onto its side and unscrew the boiler cap once more.
-
Empty the boiler of the solution.
-
Rinse with one cup of water, shake around and empty. Repeat 2-3 times for a complete flush.
-
Ensure once complete the boiler cap and seal are in place.
Hints and Tips
- Always check for a label attached to the fabric with ironing instructions. Follow these ironing instructions to avoid damage to the fabric.
- It is recommended to iron fabrics that require a lower heat first as the iron takes longer to cool down from higher settings.
- If the fabric consists of various kinds of fibers, it is highly recommended to select the lowest ironing temperature to suit the composition of those fibres.
- Silk should be ironed on the inner (non-shiny) side. Velvet and other textures should be ironed in one direction with light pressure applied. Always keep the iron moving whilst ironing to prevent burns to delicate fabrics.
- Pure wool fabrics (100% wool) may be ironed. It is recommended to iron the inside of the fabric.
- If ironing a t-shirt or garment with printed graphics ensure you turn it inside out and iron the reverse side.
- Never iron over zips or metal buttons in the cloth, as this may damage the non-stick coating on the soleplate.
- Vertical steaming is an alternative way to smooth out creases in garments or curtains. The high steam pressure of the Steam Station Iron can provide bursts of steam while holding the iron vertically. For best results, utilise on delicate or light fabrics. To produce the maximum amount of steam, set the steam setting to HIGH. Only direct steam at hanging garments or curtains in a safe area and ensure you always refer to garment manufacturer recommendations.
WARNING: Do not direct steam from the iron towards any persons, animals, or combustible items, serious burns could occur if you do.
FAQ
| Problem Solution | |
| My Steam Station Iron doesn’t turn on | · Ensure the unit is plugged correctly into a power point that is turned on. · Ensure you have pressed the ON/OFF button. · If there has been no water in the water tank or boiler the boil dry protection may have engaged. Refer to page 11. |
| The iron is dripping water | · Ensure you allow the boiler and iron to fully heat. · The Iron can drip water when you try and use the steam function on the lowest heat setting. It is recommended to use the steam function on higher heat settings. |
| The descale light is on • The appliance requires descaling, follow instructions for cleaning on page 17. | |
| The iron isn’t hot • Ensure the unit is plugged correctly into a power point that is turned on. · Ensure you have pressed the ON/OFF button. · If there has been no water in the water tank or boiler the boil dry protection may have engaged. Refer to page 11. · Check the iron temperature dial is correctly set to desired heat. | |
| There is no steam • Ensure the low water icon is not illuminated. When the water level is low, steam may not be produced. · Ensure you are pressing the steam button on the iron. | |
| The low water level icon is on | · The water needs to be refilled, follow instructions on page 12. |
| There is a pumping noise | · The pump will engage at times to ensure sufficient steam is generated, this is normal. |
Index
Assembly and Parts List 7
Boil Dry Protection 6, 11, 20
Boiler Seal 17, 18
Control Panel 7,8
Descale 6, 8, 11, 17, 18, 20
Fabric 9, 16, 19
FAQ 20
Features 6
Getting Started 10
Iron Temperature Dial 7, 14, 20
Iron Thermostat Light 7, 13, 14
Locking Mechanism 6, 10, 14
Soleplate 5, 6, 9, 10, 14, 16, 19
Steam Hose 7,16
Steam Station Iron 4, 5, 10, 11, 12, 13, 15, 16, 17, 18, 20, 24
Technical Specification 6
Vertical Steaming 16
Warnings 5
Warranty Page 2
Water Level 6, 8, 11, 20
Water Tank 6,7,10,11,12,16,17,20
Welcome 3

STIRLING®
Steam Station Iron
Repair and Refurbished Goods or Parts Notice
Unfortunately, from time to time, faulty products are manufactured which need to be returned to the Supplier for repair.
Please be aware that if your product is capable of retaining user-generated data (such as files stored on a computer hard drive, telephone numbers stored on a mobile telephone, songs stored on a portable media player, games saved on a games console or files stored on a USB memory stick) during the process of repair, some or all of your stored data may be lost.
We recommend you save this data elsewhere prior to sending the product for repair.
You should also be aware that rather than repairing goods, we may replace them with refurbished goods of the same type or use refurbished parts in the repair process.
Please be assured though, refurbished parts or replacements are only used where they meet ALDI's stringent quality specifications.
If at any time you feel your repair is being handled unsatisfactorily, you may escalate your complaint. Please telephone us on 1300 663 907 or write to us at:
Winplus Australasia
PO BOX 537
Bayswater Business Centre
Bayswater, VIC 3153
Winplus Help Desk 1300 663 907
(Operating Hours: Mon-Fri 08:30AM to 6:00PM)
customercare@winplus.com.au
www.winplus.com.au
STIRLING®
- Steam station iron
- Important
- Warranty note
- Welcome
- Contents
- Stirling®
- Warranty details
- General information and safety instructions
- Important safety instructions read carefully before use
- Keep for future reference
- Warnings
- Features
- Technical specifications
- Assembly and parts list
- Soleplate temperature settings
- Getting started
- Before first use
- Water use
- Iron locking mechanism
- Water level
- Auto-off function
- Descale indicator
- Boil dry protection
- Instructions
- Filling the water tank
- Steam station iron operation
- Cleaning and maintenance
- Cleaning and storage
- Warning: do not immerse the main unit or iron in water or any other liquid
- Disposal
- Descaling the steam station iron
- How to clean
- Vinegar solution
- Hints and tips
- Faq
- Index
- Repair and refurbished goods or parts notice
Brand : Stirling
Model : STS2406
Category : Iron