SE324FB - Television Seiki - Free user manual and instructions
Find the device manual for free SE324FB Seiki in PDF.


| Product Type | LED Television |
| Screen Size | 32 inches (81 cm) |
| Resolution | 1366 x 768 (HD) |
| Dimensions (without stand) | 730 x 435 x 80 mm (W x H x D) |
| Weight (without stand) | 4.5 kg |
| Power Supply | AC 100-240V, 50/60Hz |
| Power Consumption (typical) | 50 W |
| Standby Power Consumption | < 0.5 W |
| Inputs | HDMI x2, USB x1, VGA x1, Composite AV x1, Antenna x1 |
| Audio Output | 3.5mm headphone jack, Optical audio out |
| Built-in Tuner | ATSC (digital), NTSC (analog) |
| Remote Control | IR remote included |
| VESA Mount Pattern | 100 x 100 mm |
| Operating Temperature | 0°C to 40°C |
| Maintenance | Clean with a soft, dry cloth. Do not use abrasive cleaners. |
| Safety Warning | Do not block ventilation openings. Avoid exposing to rain or moisture. |
| Spare Parts & Repairability | Contact Seiki support for authorized service centers. |
| Warranty | 1 year limited warranty |
| General Information | For full details, refer to the user manual included with the product. |
Frequently Asked Questions - SE324FB Seiki
User questions about SE324FB Seiki
0 question about this device. Answer the ones you know or ask your own.
Ask a new question about this device
Download the instructions for your Television in PDF format for free! Find your manual SE324FB - Seiki and take your electronic device back in hand. On this page are published all the documents necessary for the use of your device. SE324FB by Seiki.
USER MANUAL SE324FB Seiki
The lightning flash with arrowhead symbol, within an equilateral triangle, is intended to alert the user to the presence of un-insulated dangerous voltage within the products enclosure that may be of sufficient magnitude to constitute a risk of electric to persons.

The exclamation point within an equilateral triangle is interded to alter the user to the presence of important operating and maintenance (servicing) instruction the literature accompanying the appliance.
CAUTION: USE OF ANY CONTROLS, ADJUSTMENTS, OR PROCEDURES OTHER THAN THOSE SPECIFIED HEREIN MAY RESULT IN HAZARDOUS RADIATION EXPOSURE.
CAUTION: These servicing instructions are for use by qualified service personnel only. To reduce the risk of electric shock, do not perform any servicing other than that contained in the operating instructions unless you are qualified to do so.
Refer to service manual for servicing instructions.

Please note that changes or modifications not expressly approved by the party responsible for compliance could void the user's authority to operate the equipment.
This device complies with Part 15 of the FCC Rules. Operation is subject to the following two conditions: (1) this device may not cause harmful interference, and (2) this device must accept any interference received, including interference that may cause undesired operation.
"Warning: Changes or modifications to this unit not expressly approved by the party responsible for compliance could void the user's authority to operate the equipment."
"NOTE: This equipment has been tested and found to comply with the limits for a Class B digital device, pursuant to Part 15 of the FCC Rules. These limits are designed to provide reasonable protection against harmful interference in a residential installation. This equipment generates, uses and can radiate radio frequency energy and, if not install LCD and used in accordance with the instructions, may cause harmful interference to radio communications.
However, there is no guarantee that interference will not occur in a particular installation. If this equipment does cause harmful interference to radio or television reception, which can be determined by turning the equipment off and on, the user is encouraged to try to correct the interference by one or more of the following measures:
■ Reorient or relocate the receiving antenna.
■ Increase the separation between the equipment and receiver.
■ Connect the equipment into an outlet on a circuit different from that to which the receiver is connected.
- Consult the dealer or an experienced radio/TV technician for help."
Important Safety Instructions
Note:
- Read these instructions.
- Keep these instructions.
- Heed all warnings.
- Follow all instructions.
- Do not use near water.
- Clean only with dry cloth.
- Do not block any ventilation openings. Install in accordance with the manufacturer's instructions.
- Do not install near any heat sources such as radiators, heat registers, stoves, or other apparatus (including amplifiers) that produce heat.
- Do not defeat the safety purpose of the polarized or grounding-type plug. A polarized plug has two blades with one wider than the other. A grounding type plug has two blades and a third grounding prong. The wide blade or the third prong are provided for your safety. If the provided plug does not fit into your outlet, consult an electrician for replacement of the obsolete outlet.
- Protect the power cord from being walked on or pinched particularly at plugs, convenience receptacles, and the point where they exit from the apparatus.
- Only use attachments / accessories specified by the manufacturer.
- Use only with the cart, stand, tripod, bracket, or table specified by the manufacturer, or sold with the apparatus. When a cart is used, use caution when moving the cart / apparatus combination to avoid injury from tip-over.

natural_image
Silhouette of a person lifting a ladder inside a circle with a diagonal line (no text or symbols)- Unplug this apparatus during lightning storms or when unused for long periods of time.
- Refer all servicing to qualified service personnel. Servicing is required when the apparatus has been damaged in any way, such as power-supply cord or plug is damaged, liquid has been spillLCD or objects have fallen into the apparatus, the apparatus has been exposed to rain or moisture, does not operate normally, or has been dropped.
- Apparatus shall not be exposed to dripping or splashing and that no objects fill LCD with liquids, such as vases, shall be placed on the apparatus.
- WARNING: To reduce the risk of fire or electric shock, do not expose this apparatus to rain or moisture.
- Mains plug or appliance coupler is used as the disconnect device, shall be readily operable.
WARNING: The battery (battery or batteries or battery pack) shall not be exposed to excessive heat such as sunshine, fire or the like.

This equipment is a Class II or double insulated electrical appliance. It has been designed in such a way that it does not require a safety connection to electrical earth.
2. PREFACE
Thank you for buying this Please read this manual thoroughly before operating the TV. Make sure the TV was not damaged in transit. Should the TV be damaged, do not install it and contact your dealer. Check that you have all the accessories according to the model.
3. SAFETY PRECAUTIONS

Put the TV on a stable surface.

natural_image
Simple line drawing of a computer monitor with a crossed X marks above it (no text or symbols)Do not place any material on the TV.

Do not use the TV with fixtures other than those provided or suggested by the manufacturer.

Do not block or cover the ventilation openings on the TV. If you have a wall mount, check that it is steady.

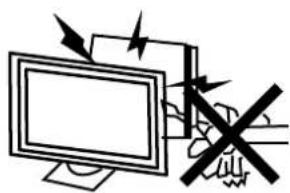
Power cord and cables must be properly placed and protected to prevent people from stepping on them and causing the TV to fall.
natural_image
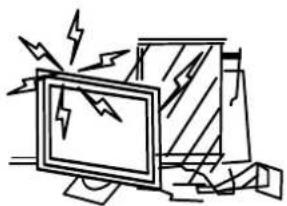
Cartoon illustration of a computer monitor with broken screen and lightning bolts (no text or symbols)Keep the TV dry and away from humidity.
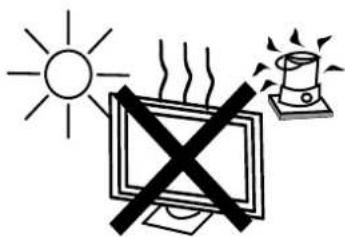
Keep the TV away from heat sources.
natural_image
Illustration of a computer monitor with arrows indicating motion and a crossed hand symbol (no text or labels)Unplug the TV before cleaning it. Do not use solvent or liquid to clean the TV.
Only clean the TV with a soft and dry cloth.
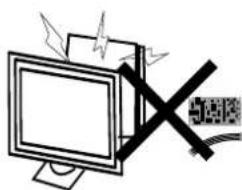
In case of troubleshooting, do not use spare parts other than those suggested by the manufacturer. Using inadequate spare parts can lead to electric shocks, short-circuits, fire or other incidents.

Unplug the TV during lightning storms or when unused for long periods of time.
4. IN THE CARTON
natural_image
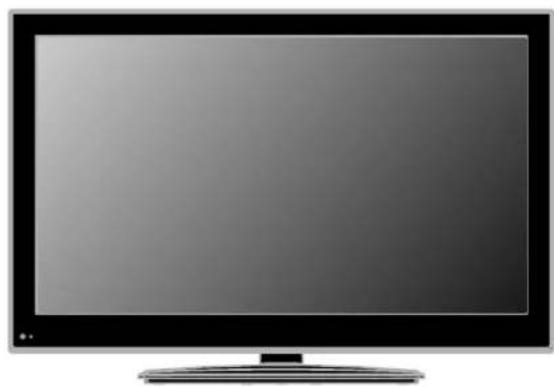
Front view of a flat-screen television displaying (no visible text or symbols)LCD TV SET
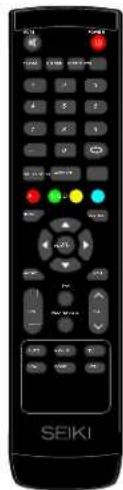
Remote Control

AAA Batteries

Warranty Card
USER'S MANUAL

Quick Connect Guide
5. FRONT/BACK CONNECTIONS OF LCD TV
Front View

natural_image
Front view of a modern flat-screen monitor with a small up arrow icon at the bottom left (no text or symbols on screen)
- Press "INPUT" to select the input source.
- Press “MENU” to bring up the main menu on the screen.
- Press “CH^” or “CHv” to scan through channels.
- Press “VOL+” or “VOL-” to increase or decrease the volume.
- Press "POWER" button to turn the TV on or off.
- REMOTE SENSOR: infrared sensor for the remote control.
- POWER INDICATOR: Shows red in standby mode. Shows when your TV is turned on.
ON/OFF LED — 7 ●
IR — 6 ●
Back View and Control Connections

natural_image
Interior layout diagram of a computer monitor showing front, top, and side panels with no visible text or symbols- Digital Audio Out (Coaxial): Connects to the coaxial audio input of your digital stereo equipment.
- Cable/Antenna: RF input that connects to your cable or VHF/UHF antenna.
- VGA(PC): Connects to a personal computer's video output connector.
- PC AUDIO: Connects to a personal computer's audio output connector.
- HDMI1/HDMI2/HDMI3: HDMI (High-Definition Multimedia Interface) provides an uncompressed, all-digital audio/video interface between this TV and any HDMI-equipped A/V equipment. HDMI supports enhanced, or high-definition video, plus digital audio.
- USB SERVICE: This USB port is for service only. Output power 5V --- 0.5A.
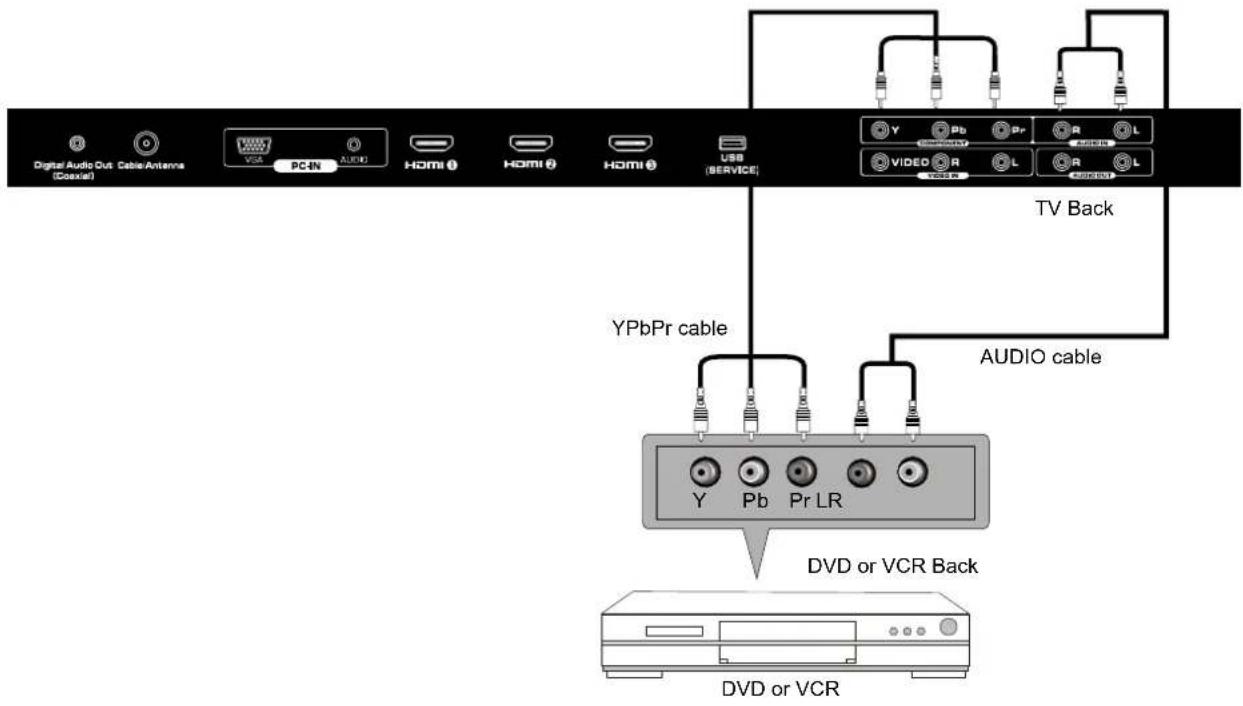
- YPbPr/AUDIO(L/R): Connect the YPbPr /Audio output jack of DVD or VCR.
- VIDEO/AUDIO(L/R): Connect the Video/Audio output jack of DVD or VCR.
- L-OUT/R-OUT: Connect to Audio Amplifier device.

6. ATV INSTALL TION DRAWINGS
Power Cord Connection
- Connect the power cord correctly as shown. - Press the Power of your LCD TV to turn on the LCD TV. The power indicator on the front panel lights up in blue.

natural_image
Technical line drawing of a computer monitor with an external power outlet cable (no text or symbols)Antenna Connection
To ensure good picture and sound, TV antenna system needs to be installLCD. The antenna system as shown can be sourced from TV equipment shops, which will provide service for correct installation and connection. After installation, insert the 75-ohm antenna plug into the antenna jack as shown.

flowchart
graph TD
    A["VHF ANTENNA UHF ANTENNA"] --> B["OUTDOOR ANTENNA AMPLIFIER"]
    A --> C["INDOOR ANTENNA AMPLIFIER"]
    B --> D["Power Plug OF ANTENNA AMPLIFIER"]
    C --> D
    D --> E["75 OHM ANTENNA PLUG"]
    style A fill:#f9f,stroke:#333
    style E fill:#ccf,stroke:#333
AV Connection
Connect the VIDEO and AUDIO output jack of the DVD or VCR to the VIDEO jacks on the set using the RCA cable. Match the jack colors: Video is yellow, Audio left is white, and Audio right is red. Select the AV input source using the SOURCE button on the remote control.

YPbPr(Component) Connection
Connect the YPbPr output of the DVD or VCR to the YPbPr input on the set. The picture quality is improved; compared to connecting a regular VCR to the video input. Connect the Audio output of the DVD or VCR to the Audio input jacks on the set using the RCA cable.
Match the jacks colors :Y is green, Pb is blue, Pr is red, Audio left is white and Audio right is red. Select component input source using the SOURCE button on the remote control.
VGA(PC) Connection
Connect the RGB output of the PC to the VGA(PC) jack on the set. Connect the AUDIO output of the PC to the PC AUDIO jack on the set. Select the RGB input source with using the SOURCE button on the remote control.

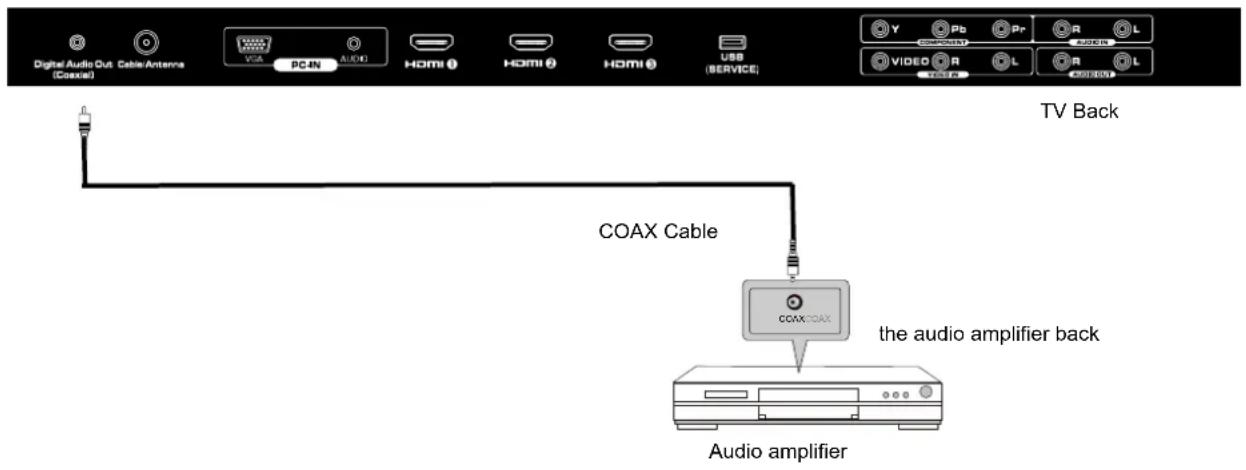
Connect to Audio Amplifier device to the Coaxial output jack on the TV.
HDMI Connection
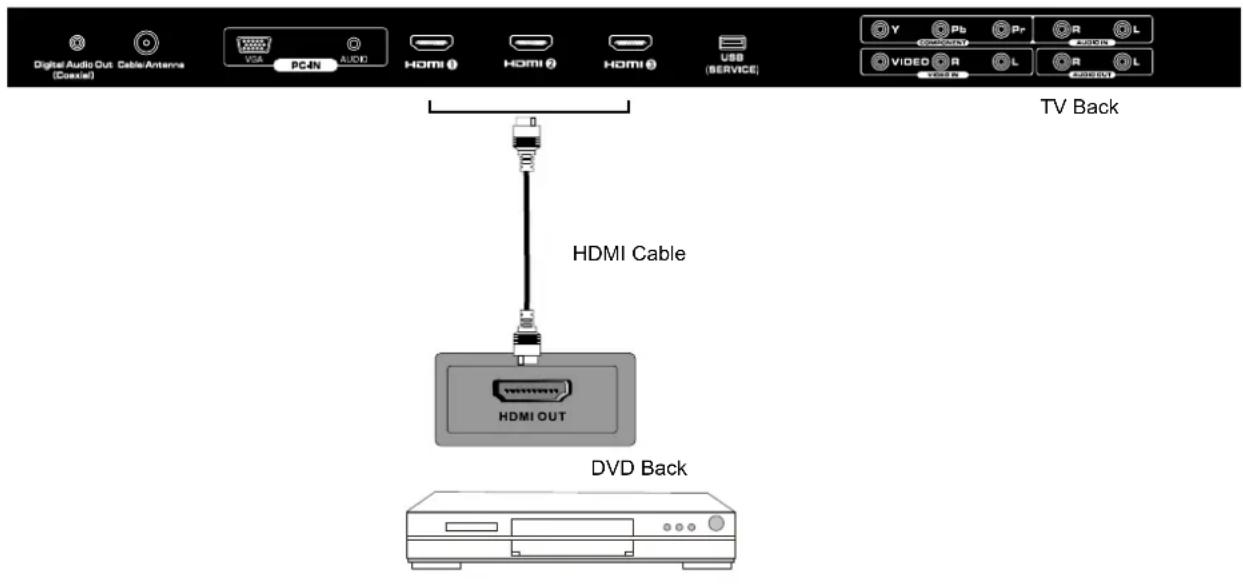
HDMI plug which replaces the HDMI connection allows transfer of all audio/video/control signals through one cable only. These signals are transferred in digital.
Service Port Function
Service port: (For factory uses only.)

Wall Mounting
The TV is provided with mounting holes for a VESA approved wall mounting bracket (NOT SUPPLIED). Remove the screws holding the base to the base bracket and lift the base away (do not remove the base mounting brackets). Mount the VESA bracket using 4 x M5x12 isometric threaded screws (not supplied). Do not use screws longer than 20mm; damage will occur to the internal parts.
Caution: Your new TV is heavy; please consult with a professional wallmount installer to perform this installation.
7 REMOTE CONTROL.
Remote control instructions in TV mode

MUTE
Press to mute the sound. Press again or press Vol+ to un-mute the TV.
POWER
Turn the TV ON or OFF.
P.MODE
Press repeatedly to cycle through the available video picture modes.
S.MODE
Press to cycle through the different sound settings.
SLEEP
Lets you select amount of time before your TV turn itself off automatically.
MTS
Choose Mono, stereo or sap for analog TV input.
Choose English, French or Spanish for DTV input.
NUMBER BUTTONS
Press 0-9 to directly change the TV channel.

Press this button to enter a program number for multiple program channel such as 2-1, etc.

Return to the previous channel viewed.
LIST
Press to display the TV program list.
ASPECT
Press to select Aspect Ratio.
(As follow Standard, Wide, Wide Zoom, Zoom, etc.)
CC
Press to display the closed caption.
MENU
Displays the main TV menu.
SOURCE
Press SOURCE to display the OSD input source, press ▲▼ to select an input source and then press OK to confirm.
THUMBSTICK( ▲/ ▼/◀ / ▶/ OK )
Allows you to navigate the on-screen menus and adjust the system settings to your preference.
DISPLAY
Press to display the source and channel's information.
EXIT
Exit the main TV menu.
Remote control instructions in TV mode

FAV.CHA
Single push>switch to FAV channel A; Push and hold>store current channel in A.
FAV.CH B
Single push>switch to FAV channel B; Push and hold>store current channel in B.
FAV.CH C
Single push>switch to FAV channel C; Push and hold>store current channel in C.
FAV.CH D
Single push>switch to FAV channel D; Push and hold>store current channel in D.
VOL+/VOL-
Press to increase / decrease the sound level.
CH+/CH-
Press to scan through channels.
FAV
Press to display the favorite list in TV mode.
ADD/ERASE
Add or Erase favorite channels.
cc
Press to display the closed caption.
V-CHIP
Press to enter the V-CHIP menu.
AUTO
Automatically adjust the Horizontal/Vertical position in PC(VGA) mode.
HDMI
Switch to HDMI source.
COMP
Switch to YPbPr source.
VGA
Switch to VGA source.
TV
Switch to TV source.
-If you deviate the television remote sensors. the remote control may fail or work abnormally.
-If not using the remote for a long period of time, please remove the batteries.
-The picture of remote controller is only for reference and is subject to the real one.
Remote control setup
- Open the cover.
- Uses two AAA size batteries. When inserting the batteries, make sure correct polarities "+" and "-" marks on the batteries line up correctly with compartment markings.
- Replace the battery cover.
To prevent battery leakage which may result in bodily injury or damage to the remote:
- Install all batteries correctly, and as marked on the remote control.
- Do not mix alkaline, standard (carbon-zinc) or rechargeable (ni-cad, ni-mh, etc.) Batteries. Remove batteries when the remote is not used for a long period of time.

natural_image
Illustration of two remote control devices with battery and charging port symbols, plus a separate battery case (no text or labels)8. MENU OPERATION
SETUP WIZARD
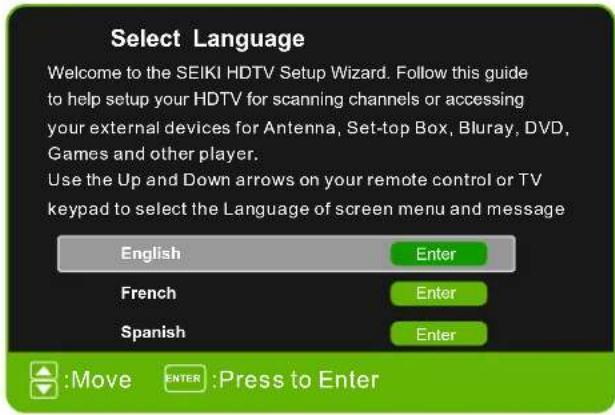
Select Language
Select the language you want.
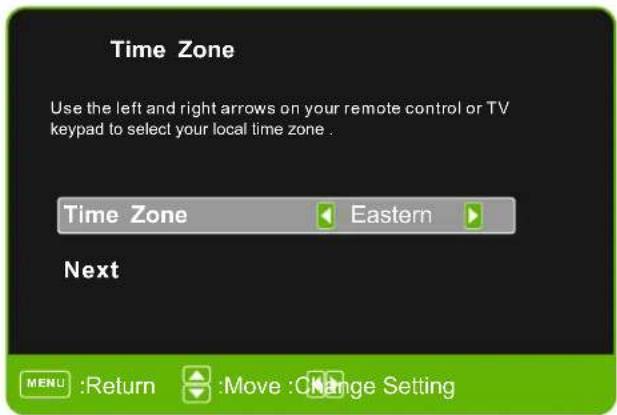
Select Time Zone
Power On Mode

Select Input Source

Select the Game, Blu-Ray, DVD, or other player.

Select the TV (or the Antenna or cable input).



SELECT INPUT SOURCE

- Press SOURCE button to display the input source list.
- Press ▼/▲ button to select the input source you want to watch.
- Press ENTER button to enter the selected source.
BASIC OPERATION
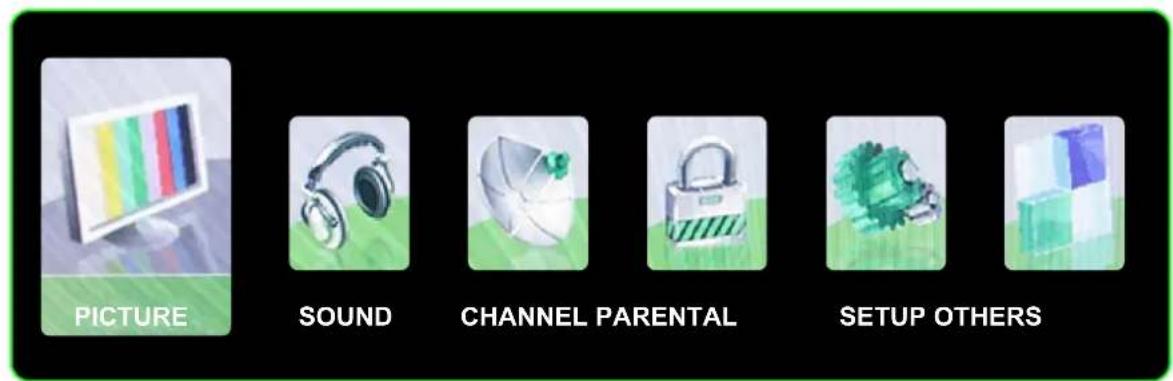
- Press MENU button to display the MAIN MENU.
- Press ◀/▶ button to select the MENU you would like to choose.
- Press ENTER button to enter the sub menu.
- Press ▼/▲ button to select the option and then press ENTER to adjust the value in the sub menu.
- You can press MENU button to go back to the main menu or EXIT button to close the MENU.
PICTURE MENU

Picture Settings
- Press ENTER when the Picture Settings item is highlighted. Then you will go to the sub-menu as following.
- Press ▼/▲ to select the desired menu item. Press ENTER to proceed if necessary.
- Press ◀/▶ to the desired level.
- When you have changed the settings, you can exit from the menu by pressing MENU/EXIT.

Picture Mode
Press ▼/▲ buttons to select Picture Mode, then press ◀/▶ buttons to adjust. Only in the User mode, the detail options as following can be adjusted. Available picture mode: Dynamic, Standard, Movie, User.
Brightness
Press ▼/▲ button to select Brightness, then press ◀/▶ button to adjust.

Contrast
Press ▼/▲ button to select Contrast, then press ◀/▶ button to adjust.
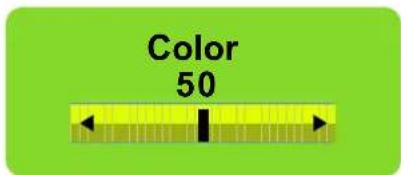
Color
Press ▼/▲ button to select Color, then press ◀/▶ button to adjust.
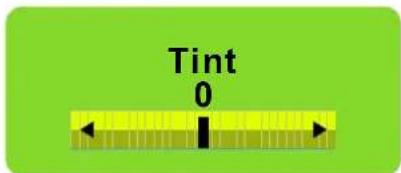
Tint
Press ▼/▲ button to select Tint, then press ◀/▶ button to adjust.
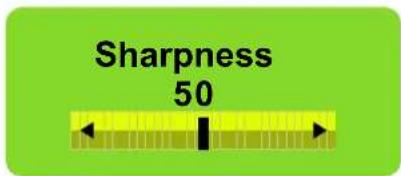
Sharpness
Press ▼/▲ button to select Sharpness, then press ◀/▶ button to adjust.
Screen Size
Screen Size
Press ▼/▲ button to select Screen Size, then press ◀/▶ button to adjust. Available Screen Size: Standard, Wide, Wide Zoom, Zoom.
Color Temperature
Color Temperature
Press ENTER when the Color Temperature item is highlighted. Then press ◀/▶ button to adjust. Available color temperature: Normal, Warm, Cool.
Color Temperature Warm
Advanced Picture Settings

Dynamic Contrast
Press button to select the item Dynamic Contrast Mode then press button to adjust.
This option can adjust the contrast corresponding to the input signal in order to improve the picture quality that is displayed. Available Mode: On/Off.
Film Mode
Press ▼/▲ button to select the item Film Mode, then press ◀/▶ button to adjust. This option handles 3:2 pull down and 2:2 pull down. Available Film Mode: On/Off.
Noise Reduction
Press ▼/▲ button to select the item Noise Reduction, then press ◀/▶ button to adjust. Available Noise Reduction: Off, Low, Medium, High.
MPEG Noise Reduction
Press ▼/▲ button to select the item MPEG Noise Reduction, then press ◀/▶ button to adjust. Reduces the mosaic effect in MPEG-compressed video. Useful for DVDs, Blu-ray, and Digital TV channels.
Dynamic Contrast Off
Film Mode Off
Noise Reduction Off
MPEG Noise Reduction Off
SOUND MENU

Sound Settings
- Press ENTER when the Sound Settings item is highlighted. Then you will go to the sub-menu as following.
- Press ▼/▲ to select the desired menu item. Press ENTER to proceed if necessary.
- Press ◀/▶ to the desired level.
- When you have changed the settings, you can exit from the menu by pressing MENU/EXIT.

Sound Mode
Press ▼/▲button to select the item Sound Mode, then press ◀/▶ button to adjust. Options can only be adjusted manually in the USER mode. Available Sound Modes: User, Music, Standard, Movie.
Bass
Press ▼/▲ button to select the item Bass, then press ◀/▶ button to adjust.
Treble
Press ▼/▲ button to select the item Treble, then press ◀/▶ button to adjust.
Balance
Press ▼/▲ button to select the item Balance, then press ◀/▶ button to adjust.

flowchart
graph TD
    A["Bass\n0"] --> B["Treble\n0"]
    B --> C["Balance\n0"]
Surround Mode
Press ▼/▲ button to select the item Surround Mode, then press ENTER button to adjust. Provides a virtual surround sound experience made possible using just two front speakers.
Surround Mode

AVL
Press ▼/▲ button to select the item AVL, then press ENTER button to select Enable/Disable. AVL Level can stabilize the volume across all programs and commercials.
Analog Sound
Press ▼/▲ button to select the item Preferred Analog Sound, then press ◀/▶ button to select the prefer audio when switching to an analog channel. Available Analog Sound: Stereo, Mono,SAP.
Digital Sound
Press ▼/▲ button to select the item Preferred Digital Sound, then press ◀/▶ button to select the prefer audio when switching to a digital channel. Available Digital Sound: English, French, Spanish.
Digital Audio Output
Press ▼/▲ button to select the item Digital Audio Output, then press ◀/▶ button to select the desired digital audio output. Available digital audio output: PCM, Raw, Off.
Equalizer Settings

Equalizer Settings
Press ▼/▲ button to select the item Mode, then press ◀/▶ button to select the desired mode. Available Equalizer Mode: Off, Rock, Pop, Jazz, User.
CHANNEL MENU
Note: This menu is only shown when the input source is TV.

Channel List
Press ▼/▲ button to select Channel List, then press ENTER button to scan the Channel List. If you select the option "Channel List" On, the channel label will display in the list.

Favorite List
Press ▼/▲ button to select Favorite List, then press ENTER button to scan the Favorite Channel List.

Channel Settings
Press ▼/▲ button to select Manual Channel Settings, then press ENTER button to set the value in the sub menu.

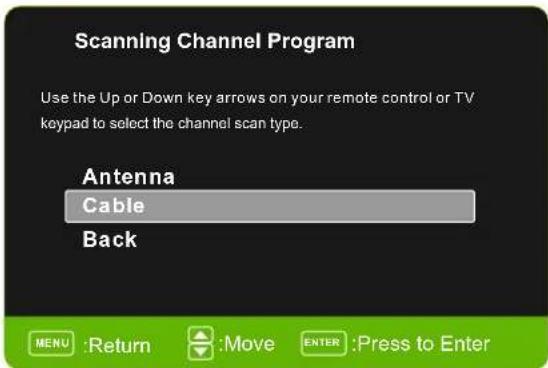
Signal Type
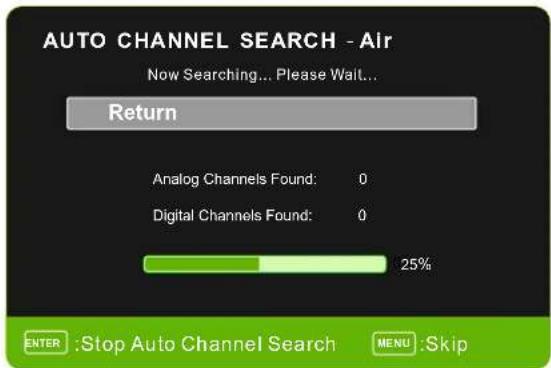
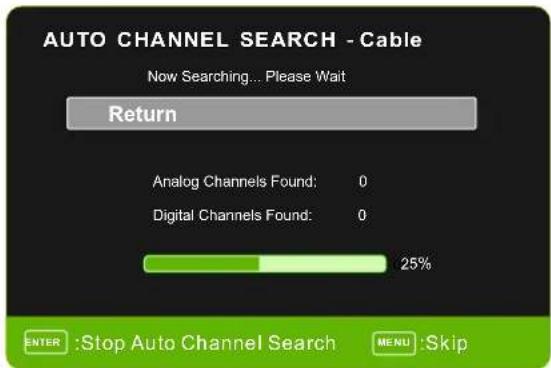
Press ▼/▲ button to select Signal Type, then press ◀/▶ button to select the type you want to set. There are two selections: Air and Cable.
Auto Channel Search
Press ▼/▲ button to select Auto Channel Search, then press ENTER button to search channel. A Channel Search Menu will appear as below.

PARENTAL MENU
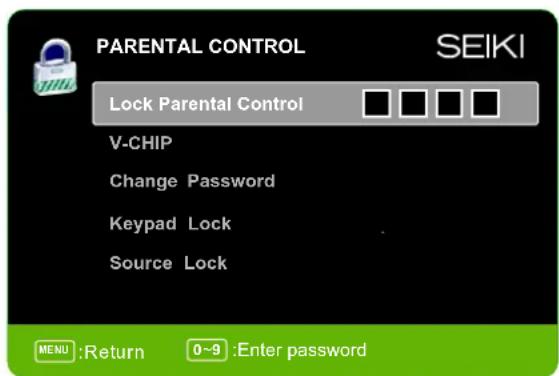


Input password to enter, default password is "0000".
V-CHIP
Press ▼/▲ button to select V-CHIP, then press ENTER button to adjust. A sub menu will appear as below.

US V-CHIP
Press ▼/▲ button to select US V-CHIP, then press ENTER button to adjust. A sub menu will appear as below.

Movie Rating
Press ▼/▲ button to select Movie Rating, then press ENTER button to adjust. A sub menu will appear as below.

Press ▼/▲ button to select Rating, then press ENTER button to lock.
TV Rating
Press ▼/▲ button to select TV Rating, then press ENTER button to adjust. A sub menu will appear as below.

Press ▼/▲/◄/► button to select Rating, then press ENTER button to lock.
CANADA V-CHIP
Press ▼/▲ button to select CANADA V-CHIP, then press ENTER button to adjust. A sub menu will appear as below.


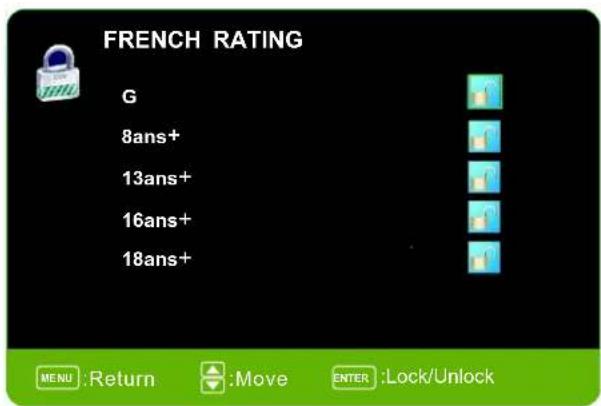
The operation of CANADA V-CHIP is the same as the operation of US V-CHIP.
Information
Motion Picture Association of America (MPAA) Rating System
| Grade | Meaning | |
| G | General Audiences | Content not offensive to most viewers |
| PG | Parental Guidance Suggested | Content is such that parents may not want their children to view the program |
| PG-13 | Parental Guidance Cautioned | Program is inappropriate for preteens, with a greater degree of offensive material suggested than a PG rated program |
| R | Restricted viewing | Not for children under 17, Strong element of sex and/or violence |
| NC-17 | No Children Under age 17 | Not for children under 17 under any circumstances. Strong sexual content |
| X | Hard Core Films | Same as NC-17 rating |
| No Rating | No Rating | MPAA Not Rated |
TV Parental Guideline Rating System
| Grade | Meaning | |
| TV-Y | Young Children | Content not offensive to most viewers |
| TV-Y7 | Children 7 and over | Considered suitable for children over 7, may contain Fantasy Violence Scenes |
| TV-G | Parental Audience | Considered suitable for all audiences; children may watch unattended |
| TV-PG | Parental Guidance | Suggested Unsuitable for younger children, may contain; Suggestive Dialogue, Bad Language, Sex, and Violence Scenes |
| TV-14 | Parents Strongly Cautioned | Unsuitable for children under 14, may contain: Strong Dialogue, Bad Language, Sex, and Violence Scenes |
| TV-MA | Mature Audience Only | Adults only, may contain Strong Dialogue, Bad Language, Sex, and Violent Scenes |
Canadian Rating: Canadian English is used throughout all English-speaking Canada (C, C8+, G, PG, 14+, 18+).
Canadian French is used in Quebec (G, 8 ans+, 13 ans+, 16 ans+, 18 ans+)
Note: The V-Chip will automatically block certain categories that are "more restrictive". If you block TV-Y category, then TV-Y7 will be automatically blocked. Similarly, if you block TV-G category, then all the categories in the "young adult" will be blocked (TV-G, TV-PG, TV-14, and TV-MA).
Block UnRated Show
Press ◀/▶ button to select Block UnRated Show, then press OK button to set the rating locked.
Downloadable Rating
Press ▼/▲ button to select Downloadable Rating, then press OK button to set the rating.
If the DTV program doesn't have this rating information, this option will be in gray.
Clear Downloadable Data
Press ▼/▲ button to select Clear Downloadable Data, then press OK button to set the rating.
Note: The above two operation only valid when playing the downloadable data stream.
The operations are the same as US V-CHIP.
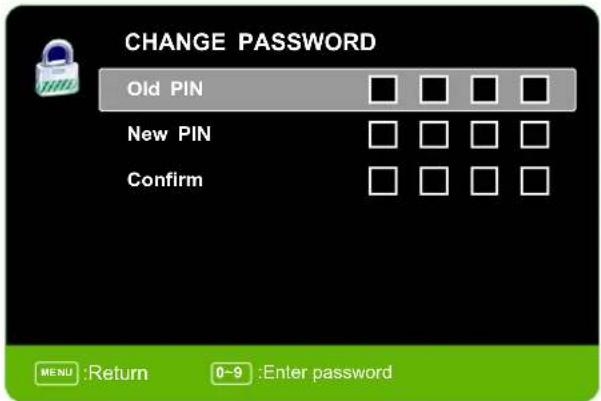
CHANGE PASSWORD
Press ▼/▲ button to select Change Password, then press ENTER button to adjust the value. A Sub Menu Will appear as below. If the password is changed, all of the passwords in the menu will be changed at the same time.
Keypad Lock
Press ▼/▲ button to select Keypad Lock, then press ENTER button to select On/Off.
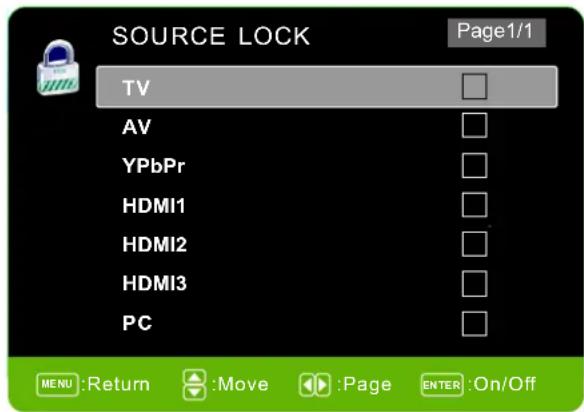
Source Lock
Press ▼/▲ button to select Source Lock, then press ENTER button to enter the sub menu. Press ▼/▲ button to select Source, then press ENTER button to set the Source Lock. You can't enter the locked source if you set the Source lock.
SETUP MENU

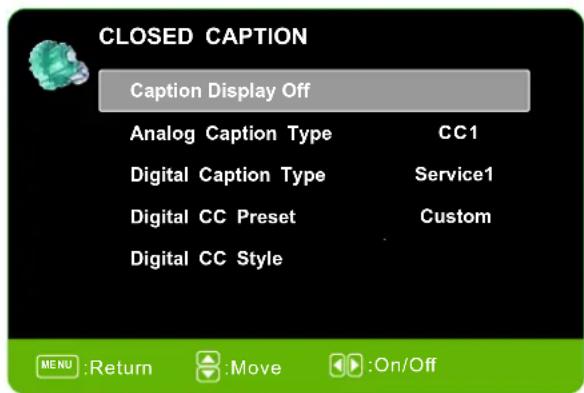
Closed Caption
Press ▼/▲ button to select the item Closed Caption, then press ENTER button to adjust.
Caption Display
Press ▼/▲ button to select Caption Display, then press ◀/▶ button to select ON or OFF.
Analog Caption Type
Press ▼/▲ button to select Analog Caption Type, then press ◀/▶ button to select the type.
Available type: CC1, CC2, CC3, CC4, TEXT1, TEXT2, TEXT3, TEXT4.
Digital Caption Type
Press ▼/▲ button to select Digital Caption Type, then press ◀/▶ button to select the type. Available type: Service1\~6.
Digital CC Preset
Press ▼/▲ button to select Digital CC Preset, then press ◀/▶ button to select Default or Custom.
Digital CC Style
This menu is only shown when the Digital CC Preset is selected Custom.

CC Size
Press ▼/▲ button to select CC Size, then press ◀/▶ button to set. Available Size: Default, Small, Standard, Large.
CC Font
Press ▼/▲ button to select, then press ◀/▶ button to select the Font. Available type: Default, Style0\~7.
CC Opacity
Press ▼/▲ button to select CC Opacity, then press ◀/▶ button to select the Opacity.
Available Opacity: Default, Solid, Flashing, Translucent, Transparent.
Text Color
Press ▼/▲ button to select Text Color, then press ◀/▶ button to select the color.
Available Color: Default, Black, White, Red, Green, Blue, Yellow, Magenta, Cyan.
CC Background Opacity
Press ▼/▲ button to select CC Background Opacity, then press ◀/▶ button to select the Opacity. Available Opacity: Default, Solid, Flashing, Translucent, Transparent.
CC Background Color
Press ▼/▲ button to select CC Background Color, then press ◀/▶ button to select the Color. Available Color: Default, Black, White, Red, Green, Blue, Yellow, Magenta, Cyan.
Menu Language
Press ▼/▲ button to select the item Menu Language, then press ◀/▶ button to adjust.
Available Language: English, French, Spanish.
Clock
Press ▼/▲ button to select the Clock, then press ENTER to edit.

Time Zone
Press ▼/▲ button to select Timer Zone, then press ◀/▶ button to set. Available Size: Central, Mountain, Pacific, Alaska, Hawaii, Samoa, Newfoundland, Atlantic, Eastern.
Auto Clock
Press ▼/▲ button to select Auto Clock, then press ENTER button to set it Enable/Disable. If you set it on Enable, it will adjust the time corresponding the DTV time automatically.
Setup Time
Press ▼/▲ button to select Setup Time, then press ◀/▶ button to adjust the time and use the OK button to go to the next option.
Day Of Week
This option displays the Day Of Week corresponding to the setup time.
Daylight Saving Time
Press ▼/▲ button to select Daylight Saving Time, then press ENTER button to set.
OSD Timer
Press ▼/▲ button to select the item OSD Timer, then press ◀/▶ button to select the time of the menu display. Available Times: 5s, 10s, 20s, 30s, 40s, 60s.
OTHERS MENU
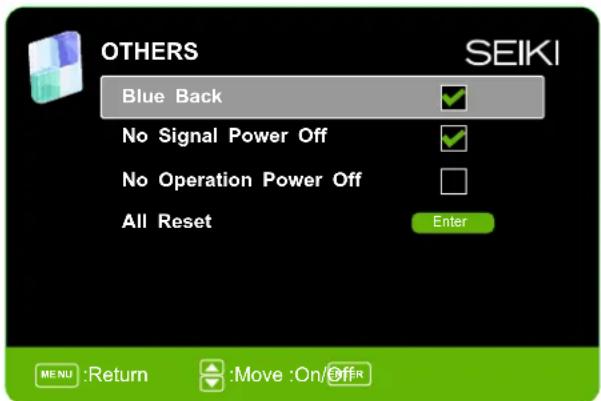
Blue Screen
Press ▼/▲ button to select Blue Background, then press ENTER button to select when there is no signal, whether set the background in blue or not.
No Signal Power Off
Press▼/▲ button to select No Signal Power Off, then press ENTER button to select it On or Off. When On and there is no signal input for 10 minutes, it will turn off the TV.
No Operation Power Off
Press ▼/▲ button to select No Operation Power Off, then press ENTER button to select it On or Off. When On and there is no operation input for 3 hours, it will turn off the TV.
All Reset
Press ▼/▲ button to select All Reset, then press ENTER button to execute reset. When you select All Reset item, a dialogue box will appear as following:
Attention! If [ All Reset ] was executed TV system is reset.
AV/YPbPr/HDMI1/HDMI2/HDMI3
- PICTURE menu and description are the same as that for TV source.
2.SOUND menu and description are the same as that for TV.
But the settings for Analog Sound and Digital Sound are invalid in these sources.
-
LOCK menu and description are the same as that for TV V source.
-
SETUP menu and description are the same as that for TV source. But the setting for Closed Caption is invalid in source HDMI.
-
OTHER menu and description are the same as that for TV source.
6.CHANNEL menu and description are invalid in these sources.
PICTURE MENU IN PC SOURCE
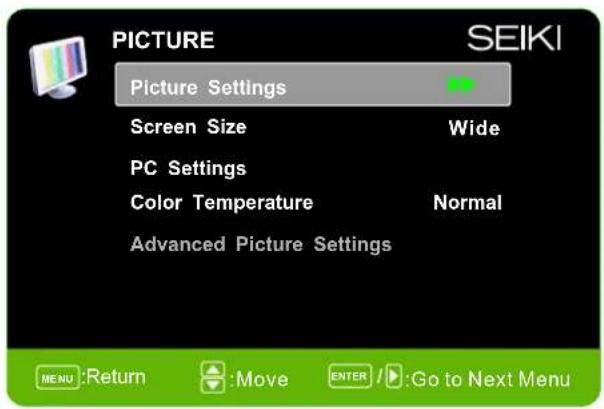
Picture Settings
- Press ENTER when the Picture Settings item is highlighted. Then you will go to the sub-menu as following.
- Press ▼/▲ to select the desired menu item. Press ENTER to proceed if necessary.
- Press ◀/▶ to adjust the item to the desired level.
- When you have changed the settings, you can exit from the menu by pressing MENU/EXIT.

Picture Mode
Press ▼/▲ button to select Picture Mode, then press◀/▶ button to adjust. Available picture mode: Dynamic, Standard, Movie, User.
Brightness
Press ▼/▲ button to select Brightness, then press ◀/▶ button to adjust.

Contrast
Press ▼/▲ button to select Contrast, then press ◀/▶ button to adjust.

Color
Press ▼/▲ button to select Color, then press ◀/▶ button to adjust.

Sharpness
Press ▼/▲ button to select Sharpness, then press ◀/▶ button to adjust.

Screen Size
- Press OK when the Screen Size item is highlighted. Then you will go to the sub-menu as following.
- Press ▼/▲ to select the desired menu item. Press ENTER to proceed if necessary.
- Press ◀/▶ to adjust the item to the desired level.
- When you have changed the size, you can exit from the menu by pressing MENU/EXIT.

Screen Size
Press ▼/▲ button to select Screen Size, then press ◀/▶ button to adjust. Available Screen Size: Standard, Wide, Dot By Dot.
PC Settings
- Press ENTER when the PC Settings item is highlighted. Then you will go the sub-menu as following.
- Press ▼/▲to select the desired menu item. Press ENTER to proceed if necessary.
- Press ◀/▶ to adjust the item to the desired level.
- When you have changed the settings, you can exit from the menu by pressing MENU/EXIT.
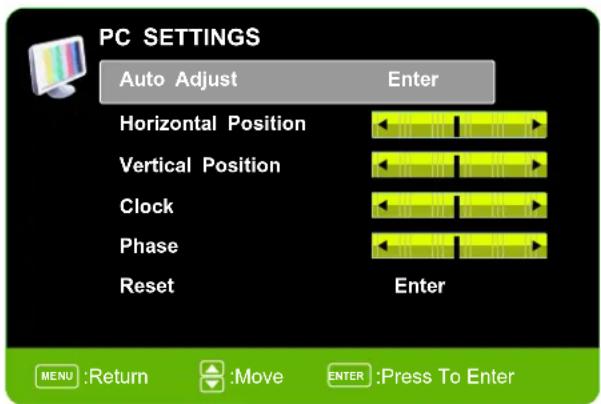
Auto Adjust
Press ▼/▲ button to select Auto Adjust, then press ENTER button to start auto adjusting.
Horizontal Position
Press ▼/▲ button to select Horizontal Position, then press ◀/▶ button to adjust.
Vertical Position
Press ▼/▲ button to select Vertical Position, then press ◀/▶ button toadjust.
Clock
Press ▼/▲ button to select Clock, then press ◀/▶ button to adjust.
Phase
Press ▼/▲ button to select Phase, then press ◀/▶ button to adjust.
Reset
Press ▼/▲ button to select Reset, then press OK button to reset the options above.


- SOUND menu and description are the same as that for TV. but the settings for Analog Sound and Digital Sound are invalid in PC source.
- LOCK menu and descriptions are the same as that for TV source.
- SETUP menu and description are the same as that for TV source. But the setting for Closed Caption is invalid in PC source.
- OTHER menu and description are the same as that for TV source.
5.CHANNEL menu and description are invalid in PC source.
Note: The operation and description of the hot key is programmable on your remote control.
9. Troubleshooting
If your television does not operate normally or does not turn on, please check the following troubleshooting questions. Remember to also check the other connected electronic devices, such as DVDs or Blu-ray players to pinpoint any problem. If the television still fails to operate normally, please contact technical support (refer to Warranty page).
| SYMPTOM | POSSIBLE CAUSE | REMEDY |
| Dead. No LED lit | No power to the TV. | Check all connections to the TV's AC socket. |
| Dead. No LED lit red | Set in standby mode. | Press either the Power button or the Standby button on the remote control. |
| Blue screen | No signal. | Press SOURCE button to select the correct source |
| Incorrect source selected. | ||
| Noisy, snowy, ghosting picture (TV) | Poor antenna signal. | If using an indoor antenna, try adjusting the antenna position. Check antenna connections |
| No sound | Sound “Mute”. | Turn sound “Mute” OFF. |
| Volume set too low. | Check volume settings. | |
| External leads not connected “if used”. | Check that all external leads are connected properly. |
Before contacting the service technician, perform the following simple checks. If any problem still persists, unplug the LCD TV and call for assistance.
| PROBLEM | POSSIBLE SOLUTION |
| No sound and picture | - Check that the main plug has been connected to a wall outlet- Check that you have pressed the POWER button on the front of the TV set- Check the picture contrast and the brightness setting |
| Red LED indicator light | Set in standby mode. Press either the POWER button or the Standby button on the remote control |
| Normal picture but no sound | - Check the volume- Sound muted? Press the MUTE button- Try another channel, the problem may be with the broadcast- Are the audio cables installed properly? |
| The remote control does not work | - Check to see if there are any objects between the TV and remote control causing obstruction- Are batteries installed with correct polarity (+ / -)- Correct remote operating mode set: TV, VCR, etc?- Install new batteries |
| Power suddenly turns off | - Is the sleep timer set?- Check the power control settings. Power may be interrupted- No broadcast on the station tuned |
| Picture appears slowly after switching on | - This is normal, the image is muted during the product start up process. Please contact a service provider if the picture has not appeared after 5 minutes |
| Poor Color or picture | - Adjust the color in Menu option- Keep a sufficient distance between the product and the VCR- Try another channel, the problem may be with the broadcast- Are the VIDEO cables installed properly?- Activate any function to restore the brightness of the picture |
| Horizontal/vertical bars or picture shaking | - Check for local interference, such as an electrical appliance or power tool |
| Blue Screen | - Press SOURCE button to select correct source |
| Poor reception on some channels | - Station or cable experiencing problems. Tune to another station- Station signal is weak, reorient antenna to receive better reception- Check for sources of possible interference |
| Lines or streaks in pictures | - Check the antenna (change the direction of the antenna) |
| No output from one of the speakers | - Adjust balance in the Menu option |
NOTE: When there is a problem in VGA mode (only when VGA mode is applied)
| PROBLEM | POSSIBLE SOLUTION |
| The signal is out of range | - Adjust resolution, horizontal frequency, or vertical frequency- Check whether the signal cable is connected or loose- Check the input source |
| Vertical bar or stripe on background, horizontal noise and incorrect position | Set the auto configure or adjust clock, phase or H/V position |
| Screen Color is unstable or is a single Color | - Check the signal cable- Re-install the PC video card |
Maintenance
Early malfunctions can be prevented. Careful and regular cleaning can extend the amount of time you will have with your new TV. Be sure to turn the power off and unplug the power cord before you begin any cleaning.
Cleaning the screen
- A great tip to dust off your screen. Wet a soft cloth in a mixture of lukewarm water and a little fabric softener or dish washing detergent. Wring the cloth until it's almost dry, and then use to wipe the screen.
- Make sure the excess water is off the screen, then let air-dry before you turn on the TV.
Cleaning the Cabinet
To remove dirt or dust, wipe the cabinet with a soft, dry, lint-free cloth. Please be sure not to use a wet cloth.
Extended Absence

If you expect to leave your TV dormant for a long time (such as a vacation), it is a good idea to unplug the power cord to protect against possible damages from lightning or power surges.
10. SPECIFICATIONS
This manual is only for your reference, any change to the design and specification will not be advised.
| Screen Size | 31.5 Inch | |
| Display Type | TFT LCD | |
| Resolution(Pixel) | 1366 X 768 | |
| Aspect Ratio | 16:9 | |
| Input Power | AC 110-120V~, 60Hz | |
| Power Consumption | 95W | |
| TV System | ATSC/NTSC | |
| Video Input Format | PAL/NTSC | |
| Audio Output Power | L / R 2X8W | |
| SUPPORT | ANTENNA | YES |
| AV-IN | YES | |
| YPbPr - IN | YES | |
| HDMI - IN | YES | |
| VGA(PC) - IN | YES | |
| VGA(PC) AUDIO - IN | YES | |
| SCART - IN | -- | |
| SCART - OUT | -- | |
| AUDIO - OUT | YES | |
| S-VIDEO - IN | -- | |
| COAXIAL - OUT | YES | |
| COMMON INTERFACE | -- | |
| USB | Service Port Only | |
| IPOD | -- | |
| DVD | Disc Physical Format | -- |
| DVD Video Output Format | -- | |
| Dimensions | W/Stand(LxWxH-inches) | 30.8*9.4*21.2 inches |
| W/O Stand(LxWxH-inches) | 30.8*4.1*20.0 inches | |
| Wall-mount | 7.87*7.87 VESA(inches) | |
| Wall-mount Screw size | M5*12 | |
| Weight ( )W/Stand | Net (lbs.) | 19.0 |
| Gross (lbs.) | 23.4 | |
www.seikiworld.com
- Important Safety Instructions
- Note:
- PREFACE
- SAFETY PRECAUTIONS
- IN THE CARTON
- FRONT/BACK CONNECTIONS OF LCD TV
- Back View and Control Connections
- ATV INSTALL TION DRAWINGS
- Power Cord Connection
- Antenna Connection
- AV Connection
- YPbPr(Component) Connection
- VGA(PC) Connection
- HDMI Connection
- Service Port Function
- Wall Mounting
- REMOTE CONTROL.
- Remote control instructions in TV mode
- MUTE
- POWER
- P.MODE
- S.MODE
- SLEEP
- MTS
- NUMBER BUTTONS
- LIST
- ASPECT
- CC
- MENU
- SOURCE
- THUMBSTICK( ▲/ ▼/◀ / ▶/ OK )
- DISPLAY
- EXIT
- FAV.CHA
- FAV.CH B
- FAV.CH C
- FAV.CH D
- VOL+/VOL-
- CH+/CH-
- FAV
- ADD/ERASE
- V-CHIP
- AUTO
- HDMI
- COMP
- VGA
- TV
- Remote control setup
- To prevent battery leakage which may result in bodily injury or damage to the remote:
- MENU OPERATION
- SETUP WIZARD
- Select Language
- Select Time Zone
- Power On Mode
- Select Input Source
- BASIC OPERATION
- PICTURE MENU
- Picture Settings
- Picture Mode
- Brightness
- Contrast
- Color
- Tint
- Sharpness
- Screen Size
- Color Temperature
- Advanced Picture Settings
- Dynamic Contrast
- Film Mode
- Noise Reduction
- MPEG Noise Reduction
- SOUND MENU
- Sound Settings
- Sound Mode
- Bass
- Treble
- Balance
- Surround Mode
- AVL
- Analog Sound
- Digital Sound
- Digital Audio Output
- Equalizer Settings
- CHANNEL MENU
- Channel List
- Favorite List
- Channel Settings
- Signal Type
- Auto Channel Search
- PARENTAL MENU
- US V-CHIP
- Movie Rating
- TV Rating
- CANADA V-CHIP
- Information
- Block UnRated Show
- Downloadable Rating
- Clear Downloadable Data
- CHANGE PASSWORD
- Keypad Lock
- Source Lock
- Closed Caption
- Caption Display
- Analog Caption Type
- Digital Caption Type
- Digital CC Preset
- Digital CC Style
- CC Size
- CC Font
- CC Opacity
- Text Color
- CC Background Opacity
- CC Background Color
- Menu Language
- Clock
- Time Zone
- Auto Clock
- Setup Time
- Day Of Week
- Daylight Saving Time
- OSD Timer
- OTHERS MENU
- Blue Screen
- No Signal Power Off
- No Operation Power Off
- All Reset
- AV/YPbPr/HDMI1/HDMI2/HDMI3
- PICTURE MENU IN PC SOURCE
- PC Settings
- Auto Adjust
- Horizontal Position
- Vertical Position
- Phase
- Reset
- Troubleshooting
- Maintenance
- Cleaning the screen
- Cleaning the Cabinet
- Extended Absence
- SPECIFICATIONS
Brand : Seiki
Model : SE324FB
Category : Television