
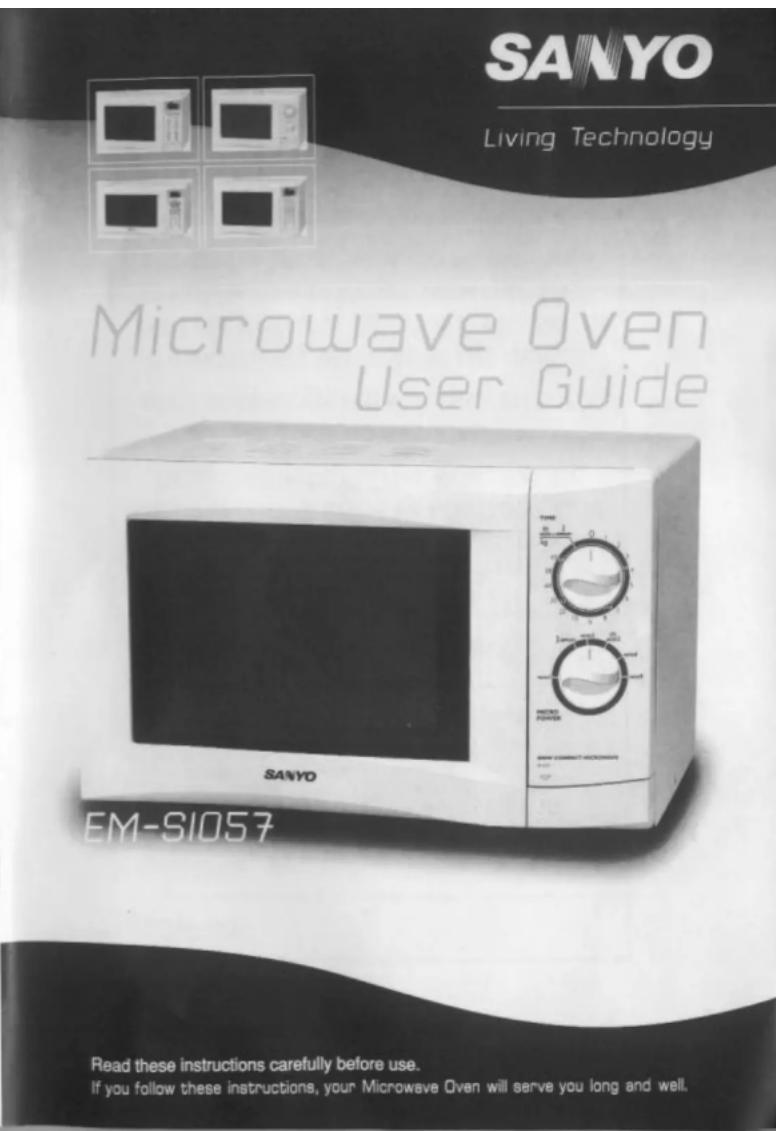
EM-S1057 - Microwave SANYO - Free user manual and instructions
Find the device manual for free EM-S1057 SANYO in PDF.


| Brand | Sanyo |
| Model | EM-S1057 |
| Product Type | Solo Microwave Oven |
| Power Levels | 6 levels (80W, 300W, 400W, 500W, 650W, 800W) |
| Defrost Function | Yes, weight-based defrost |
| Timer | Mechanical timer, up to 35 minutes |
| Turntable | Yes, glass tray with roller rest |
| Door Release | Push-button |
| Interior Light | Yes |
| Safety Interlocks | Yes, to prevent operation when door open |
| Earthing | Required, 3-prong plug |
| Power Cord | Detachable, 1.5m approx |
| Interior Material | Stainless steel |
| Capacity | 20 liters (estimated) |
| Dimensions (W x D x H) | Approx. 45 x 35 x 26 cm |
| Weight | Approx. 10 kg |
| Cleaning Instructions | Wipe interior after each use; clean turntable and roller rest with warm soapy water |
| Repairability | Contact Sanyo Service Centre; do not attempt self-repair |
| Accessories Included | Glass turntable, roller rest, instruction manual |
| Warranty | Check with retailer or Sanyo |
Frequently Asked Questions - EM-S1057 SANYO
User questions about EM-S1057 SANYO
0 question about this device. Answer the ones you know or ask your own.
Ask a new question about this device
Download the instructions for your Microwave in PDF format for free! Find your manual EM-S1057 - SANYO and take your electronic device back in hand. On this page are published all the documents necessary for the use of your device. EM-S1057 by SANYO.
USER MANUAL EM-S1057 SANYO
ATTENTION!
THE OVEN CAVITY SHOULD BE CLEANED AND WIPED DRY AFTER EACH USE. THE OVEN SHOULD NOT BE USED IF ANY WATER OR MOISTURE REMAINS IN THE CAVITY.
ROLLER REST AND GLASS TRAY SHOULD NOT STAND IN WATER.
DUE TO HIGH MOISTURE CONTENT OF CERTAIN FOODS SUCH AS POTATOES, IT IS IMPORTANT THAT THE OVEN IS WIPED CLEAN AFTER EACH USE.
1) Read these instructions carefully before installing and operating the oven. Keep them for further reference.
2) Record in the space below the SERIAL No. found on the oven and retain this information for future reference.
SERIAL NO.
Contents
Oven Specification 4 How To Use Your Oven Safely 4
Safety Instructions
| Other Important Safety Instructions | 5 |
Setting Up & Getting To Know Your Oven
| Installation | 6 |
| Oven Parts and Accessories | 7 |
| Oven Control Panel | 8 |
| Oven Utensils | 9 |
Operating Instructions and Cooking Charts
| Cook and Defrost Guide | 10 |
| Operating Instructions | 11 |
| Reheating Tips | 12 |
| Reheating Table | 12 |
| Defrosting Tips | 13 |
| Defrosting Table | 14-15 |
| Meat / Poultry Cooking Table | 16 |
| Fish Cooking Table | 17 |
| Vegetable Cooking Table | 17-18 |
| Pasta and Rice Cooking Table | 18 |
| Useful Microwave Tips | 19 |
Care Of Your Microwave Oven
| Questions and Answers | 20 |
| Care and Cleaning | 21 |
| Before Calling For Service | 21 |
*According to IEC 705 test procedures
HOW TO USE YOUR OVEN SAFELY
- When boiling water or other liquids, be sure to use a wide mouthed container, this will allow air bubbles to escape freely and prevent boiling over. Overheating the liquid beyond boiling point can occur without the evidence of bubbling. This could result in a sudden boil over of the hot liquid.
- Do not attempt to operate the oven while empty as this will cause damage.
- Do not deep fry in the microwave oven as the temperature of the oil cannot be controlled and it may overheat.
- Never completely seal containers in the microwave oven. Coverings are necessary but containers must not be airtight.
-
Small quantities of food with low moisture content or high fat or sugar content can burn, dry out or catch fire if cooked or re-heated too long. Please note that the heating/cooking period required is extremely short: for example it only takes approximately 15 seconds to heat one mince pie or similar.
-
Always pierce food which has a skin or membrane, for example, potatoes, tomatoes, apples, sausages etc. If you don't pierce them steam will build up inside and they may explode.
7 When disposable containers of plastic, paper or other combustible materials are used to reheat food, it is advisable to check from time to time during the cooking cycle.
NOTE:
It is quite normal for steam to be emitted around the door, for misting to occur on the door, or even for water droplets to appear below the door during the cooking cycle. This is merely condensation from the heat of the food and does not affect the safety of your oven. The door is not intended to seal the oven cavity completely but its special SANYO design contributes to the complete safety of the appliance.
ALTHOUGH YOUR OVEN IS PROVIDED WITH SAFETY FEATURES, IT IS IMPORTANT TO OBSERVE THE FOLLOWING:
a. Do not tamper with safety interlocks.
b. Do not place any object between the oven and the door or allow any food residue to accumulate on sealing surfaces. Wipe the door sealing area frequently with a mild detergent, rinse and wipe dry. Never use abrasive powders or pads.
c. When opened, the door must not be subjected to strain, for example, a child
hanging on an opened door may cause the oven to fall forward resulting in injury.
d. If any damage is apparent, do not operate the oven. Contact your nearest SANYO SERVICE CENTRE.
e. Children may use the appliance only without supervision as long as instructions had been given which enables the child for safe operation and makes the child aware of the dangers of false operation.
OTHER IMPORTANT SAFETY INSTRUCTIONS
The following safety precautions should be followed when using this appliance:
-
Read all instructions before first use.
-
As with most cooking appliances, close supervision is necessary to reduce the risk of a fire in the oven cavity.
If a fire should start:
- Keep the oven door closed
- Turn the oven off.
- Disconnect the power cord or shut off the power at the mains.
Other important safety points to remember are:
1 Do not use wire ties in the oven. Be sure to inspect purchased items for wire ties and remove before placing food in the oven.
2. It is important to keep the oven interior clean. Food particles left on the oven walls reduce the efficiency of the microwaves.
3. Do not heat foods or liquids in bottles or jars with lids on. Air must be allowed to escape from the container.
4. Milk or food for babies should be heated on "MED". It should then be stirred thoroughly and tested to ensure that it is at the correct temperature before giving it to the baby.
5. Care must be taken when removing cups of hot liquid from the turntable. Cups should be lifted not slid to the edge of the turntable to prevent tipping. Cups should be placed in the centre of glass tray.
WARNING
(a) Do not adjust or repair the microwave oven yourself. Do not operate the oven if it is damaged, until it has been repaired by a service engineer trained by the manufacturer.
(b) It is dangerous for anyone other than a properly qualified engineer trained by the manufacturer to carry out adjustments or repairs.
(c) If the power supply cord is damaged, it must be replaced by the manufacturer or its service agent or a similarly qualified person in order to avoid a hazard.
(d) On no account remove or interfere with any parts or screws. THIS COULD PROVE VERY DANGEROUS.
(e) This appliance is not intended for use by young children or infirm persons without supervision.
(f) Young children should be supervised to ensure that they do not play with the appliance.
(G) Please be advised that these Sanyo Microwave Ovens are not to be installed or used within an enclosed cabinet.
PLEASE SAVE THESE INSTRUCTIONS
INSTALLATION
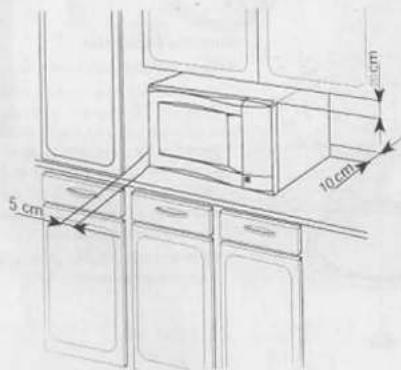
OVEN POSITIONING
- Install the oven on a flat, level surface strong enough to safely bear the weight of the oven.
- Do not locate the oven near areas where heat and moisture are generated as this may lower oven efficiency.
- Covering the air vents may lead to malfunctioning, therefore a minimum clearance of 20cm is required above the oven, 10cm at the back and 5cm to each side of the oven.
- Some interference may occur if it is placed too close to a radio or TV, so keep them as far apart as possible.
WARNING
THIS APPLIANCE MUST BE EARTHED
IMPORTANT: The wires in this mains lead are coloured in accordance with the following code
Green-and-yellow: Earth
Blue: Neutral.
Brown: Live
As the colours of the wires in the mains lead of this appliance may not correspond with the coloured markings identifying the terminals in your plug, proceed as follows:
The wire which is coloured green-and-yellow must be connected to the terminal in the plug which is marked with the letter E or by the earth symbol or coloured green or green-and-yellow. The wire which is coloured blue must be connected to the terminal which is marked with the letter N or coloured black.
The wire which is coloured brown must be connected to the terminal which is marked with the letter L or coloured red.
OVEN PARTS AND ACCESSORIES
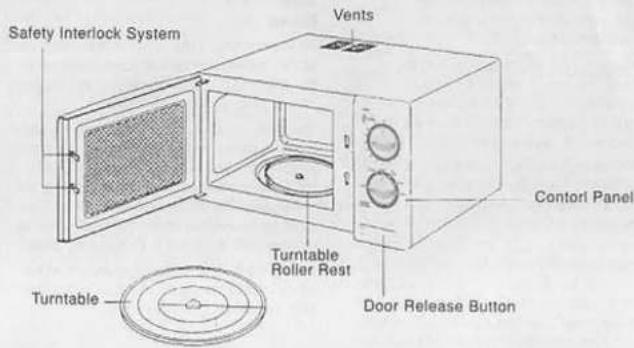
Your oven is supplied with the following accessories:
Turntable 1 Turntable roller rest 1 Instruction manual 1
Turntable Installation
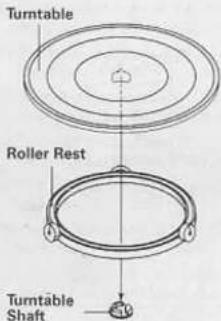
- Place the roller rest on the cavity bottom.
- Place the turntable on top of the roller rest as shown in the diagram. Make sure the turntable hub is securely locked in the turntable shaft. Never place the turntable upside down.
- Both turntable and roller rest must always be used during cooking
- All food and containers of food are always placed on this turntable for cooking.
- This turntable rotates clockwise and anticlockwise; this is normal.
OVEN CONTROL PANEL
natural_image
Close-up of a perforated metal panel with no visible text or symbols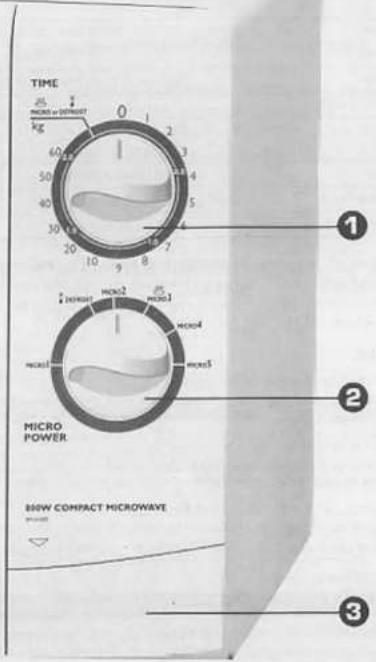
EM-S1057
- Timer.
- Variable Power Control.
- Door Release Button.
OVEN UTENSILS
| MATERIAL | UTENSILS | USE |
| Ceramic & Glass | Corning Ware | YES |
| Heat Resistant Glassware | YES | |
| Glass Ware with Metal Decoration | NO | |
| Lead Glass | NO | |
| China | Without metal decoration | YES |
| Pottery | YES | |
| Plastic | Regular Oven Heat-Proof Ware | YES |
| Plastic Wrap | YES | |
| Metal | Baking Pan | NO |
| Aluminium Foil | YES | |
| Paper | Cups, Plates,Towels | YES |
| Waxed Paper | YES | |
| Wood | NO |
A variety of utensils and materials may be used for cooking in your microwave oven. For your safety and to prevent damaging utensils and your oven, choose appropriate utensils and materials for each cooking method. This list is a general guide to help you to select appropriate utensils and materials.
NOTES:
- Aluminium foil should be used for shielding purposes only. Over use may cause arcing.
- Arcing is denoted by a "snapping" or "cracking" noise and may be accompanied by bright flashes.
- Do not use metal ties on any paper or plastic bags; the ties become hot and could cause a fire.
- When using cling film:
- Make sure the film is not fitted skin tight.
- Pierce film to allow steam to escape.
- Never allow film to touch food as it may melt when food becomes hot.
COOK AND DEFROST GUIDE
Your Cook and Defrost guide is designed to make cooking and defrosting of the following foods easier.
Defrosting: Chicken Portions, Chops, Minced Meat and Sausages.
Cooking: Canned Food, Fish (whole or fillets) and Fruit.
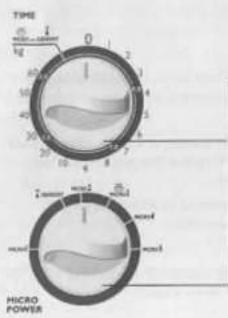
- Open the door, place the food on the turntable, close the door.
- Set the VARIABLE POWER SELECTOR to "Defrost" to defrost foods or selected power settings depending on cooking requirements to cook foods.
- Set the TIMER to the weight of the food. The oven begins cooking.
- Place fish in flan dish. Cover with pierced cling film. Place on turntable.
- Turn VARIABLE POWER SELECTOR to selected power settings depending on cooking requirements.
- Turn TIMER selector to 0.5kg. The oven begins cooking.
Example: To Cook 0.5kg Fish:
| COOKING GUIDE | Weight Range 0.25 - 1.25 kg |
| Canned Food | Transfer the food to a microwave proof dish and cover with lid or pierced cling film.Stir 3-4 times during cooking and afterwards. |
| Fish | Place fish in a flan dish. Overlap thin ends to avoid over cooking. Cover dish with pierced cling film. |
| Fruit | Prepare fruit and place in a microwave proof dish. Cover with lid or pierced cling film. Stir 3-4 times during cooking and afterwards. |
| DEFROST GUIDE | Weight Range 0.25 - 1.25 kg |
| Chicken Portions | Place on a microwave proof plate. Arrange ends of the food towards the centre.Shield thin areas with smooth foil. Turnover 3-4 times during defrosting. |
| Chops | Place on a microwave proof plate. Separate as soon as possible. Rearrange half way through defrost. |
| Minced Meat | Place on a microwave proof plate. Break apart as soon as possible. Turn 3-4 times during defrosting. Remove any thawed parts immediately. |
| Sausages | Place on a microwave proof plate. Separate as soon as possible. Rearrange half way through defrost. |
OPERATING INSTRUCTIONS
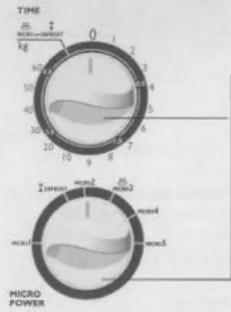
- Open the door, place the food on the turntable, close the door.
- Set the VARIABLE POWER SELECTOR to the desired power level.
- Set the TIMER to the desired time. The oven begins cooking.
NOTE:
- When cooking for less than 2 minutes, turn the TIMER for a longer period and then return to the desired time.
• To turn off the oven during cooking, simply turn the TIMER to 0; otherwise the microwave will continue to operate.
• If the microwave oven is used when empty, serious damage may occur.
CAUTION:
• After use, be sure to return the TIMER to 0 or the oven will continue to operate.
Your SANYO microwave oven offers 6 variable microwave power levels which allows you to select the speed of your microwave cooking. The chart below suggests uses for each setting
| POWER SETTING | POWER | SUGGESTED USE |
| MICRO1 | 80W | Softening cream cheese. |
| DEFROST | 300W | Keeping foods warm, defrosting. |
| MICRO2 | 400W | Completing the cooking cycle of some casserole and stews. |
| MICRO3 | 500W | Completing the cooking cycle of pot roasts.Completing the cooking cycle of some casseroles and stews.Baked custards and cheese cakes. |
| MICRO4 | 650W | Roasting meats. |
| 650W-750W | Baking cakes. | |
| MICRO5 | 800W | Reheating precooked foods.Boiling liquids.Baking fish, vegetables. |
REHEATING TIPS
- Foods with plenty of liquid such as casseroile or soups can safely be reheated on HIGH power. More delicate foods such as vegetables, puddings, and pies are best reheated more gently on MED. Power.
- Take care when reheating pies or pasties with meat or fruit filling as the filling can become very hot very quickly.
- Stir foods wherever possible to ensure even reheating.
- To retain moisture always cover food where possible.
- The food manufacturers cooking time should be used as a guide only. If when the stated cooking time has expired, the food isn't piping hot, return it to the oven and cook it until it is, in much the same manner as you would when cooking with a conventional oven.
REHEATING TABLE
The details below are just guidelines, as the reheating time will depend on the start temperature of the food, the quantity and the dish used. Always ensure that reheated food is piping hot.
| FOOD | QUANTITY | COOKING TIMEON HIGH POWER | COMMENTS |
| Soup | 400g | 3-4 minutes | |
| Baked Beans | 420g | 3-4 minutes | |
| Vegetables | 300g | 1-2 minutes | |
| Minced Beef /Chilli Con Carne | 400g | 3-4 minutes | |
| Irish Stew | 400g | 3-4 minutes | |
| Rice Pudding | 400g | 1min 30s - 2min 30s | |
| Sponge Pudding | 300g | 1-2 minutes |
Fresh Foods
| Individual Pie / Pasty | 1 pie / pasty approx. 200g | 30-40secs | Remove any wrappers. Place on plate |
| Sausage Rolls | 2 rolls | 15-30 secs approx.150g | Remove any wrappers. Place on plate |
| Quiche Slice | 1 slice approx. 100g | 15-30 secs | Remove any wrappers. Place on plate |
| Milk | 1 mug approx. 200mls | 2 minutes | Place on edge of turntable. Stir after heating. |
Note:
For chilled or frozen convenience foods follow manufacturers instructions. Always ensure that reheated food is piping hot.
DEFROSTING TIPS
- It is better to underestimate defrosting times if you are unsure. Food will continue to defrost during the standing time.
- Separate food as soon as possible.
- Turn large items, e.g. joints, over halfway through the defrosting time.
- Remove any thawed food as soon as possible.
-
Remove or open any packaging before defrosting.
-
Place food in a larger container than that which it was frozen in, this will allow for easy stirring.
- Begin thawing poultry, breast side down and turn over halfway through defrosting time. Delicate areas such as wing tips can be shielded with small pieces of smooth foil.
- Standing time is very important, particularly for large, dense foods which cannot be stirred to ensure that the centre is completely defrosted before cooking.
DEFROSTING TABLE
Remove food from packaging and place on plastic defrosting rack or microwave proof plate. Turn all food halfway through defrosting time. Use "DEFROST" setting
| FOOD | DEFROST TIME | STANDING TIME | GENERAL GUIDELINES |
| MEAT | |||
| Joint(pork,beef,lamb)900g | 25-30 min. | 30-40 min. | Shield thin areas and outer edges with smooth pieces of foil, remove these halfway through defrosting time. Turnover several times. |
| Cubed Meat450g | 10-12 min. | 10-15 min. | Separate as soon as possible.Stir halfway through defrosting time, remove any thawed portions immediately. |
| Minced Meat450g | 10-12 min. | 10-15 min. | Break apart as soon as possible.Remove any thawed portions immediately. |
| Steak450g | 8-10 min. | 15-20 min. | Shield thin outer edges with smooth pieces of foil, remove halfway through defrosting time. Turnover halfway through defrosting time. Shield any warm parts. |
| Chops450g | 10-12 min. | 10-15 min. | Separate as soon as possible.Arrange chops so thinner areas are towards the centre. Turnover halfway through defrosting time. |
| Sausages450g | 10-13 min. | 10-15 min. | Separate as soon as possible.Rearrange halfway through defrosting time.Remove any thawed sausages. |
| Bacon225g | 6-8 min. | 15-20 min. | Shield thin ends with smooth pieces of foil.Separate slices as soon as possible and arrange in a single layer. Remove any thawed slices. |
| POULTRY | |||
| Chicken, whole 1350g | 30-40 min. | 40-60 min. | Begin defrosting, chicken breast side down,turnover halfway through. Shield legs, wingsor any warm parts with smooth pieces of foil.Rearrange halfway through defrosting time. |
| Chicken portions 450g | 10-13 min. | 10-15 min. | Arrange with thinner areas to centre. Shieldlegs and wings with smooth pieces of foil. |
| Whole fish 450g | 10-12 min. | 10-15 min. | If more than one fish, arrange head to tail.Shield thin ends with smooth pieces of foil.Rearrange halfway through defrosting time.Take care foil does not touch sides of oven. |
| FISH | |||
| Fish Fillets450g | 10-12 min. | 10-15 min. | Arrange in an even layer. Separate as soon as possible. Rearrange halfway through defrosting time. |
| Prawns450g | 8-10 min. | 10-15 min. | Place in a microwave proof dish. Stir halfway through defrosting time and remove any thawed prawns. |
DEFROSTING Cont.
DEFROSTING GUIDE FOR BREAD AND CAKES
Use defrosting rack or kitchen paper
| FOOD | DEFROST TIME | STANDING TIME | GENERAL GUIDELINES |
| BREAD | |||
| Small Loaf | 5-7 min. | 10-15 min | Remove from wrapper. Turnover halfway through defrosting time. |
| Sliced Large | 8-9 min. | 10-15 min. | Remove from wrapper. Turnover halfway through Loaf defrosting time. Separate slices as soon as possible. Remove outer slices when defrosted. |
| 2 Slices | 1m - 1m 30s. | 5 min. | |
| 1 Bread Roll | 1m - 1m 30s. | 5 min. | |
| 2 Bread Rolls | 1m 30s - 2 min. | 5 min. | |
CAKES & PASTRY
| Gateau (small)340g | 7-9 min. | 15-30 min. | Remove from packaging and place onmicrowave proof plate. |
| Cheesecake450g | 6-8 min. | 15-30 min. | Remove from packaging and place onmicrowave proof plate. |
| Fruit Pie (cooked)450g | 8-9 min. | 15-30 min. | Remove from packaging and place onmicrowave proof plate. |
| Pastry450g | 6-7 min. | 15-30 min. | Remove from packaging and place onmicrowave proof plate. |
BUTTER
| 250g(1 Packet) | 4-5 min. | 5-10 min. | Remove from wrapper and place on plate. |
PLATED MEAL
| 400g | 7-9 min. | 5-10 min. | Cover with a plate or microwave cling film. |
| 1 Plated Meal | Reheat on MAX. power. |
FRUIT & VEGETABLES
| 225gSoft Berry Fruits. | 4-5 min. | 5-10 min. | Place in a single layer in a shallow dish.Stir halfway through defrosting. |
| 450gSoft Berry Fruits. | 7-9 min. | 5-10 min. | Place in a single layer in a shallow dish.Stir halfway through defrosting. |
| VEGETABLES | It is not necessary to defrost vegetables before cooking. All vegetables can be defrosted and cooked on MAX. power. |
MEAT / POULTRY COOKING TABLE
General Guidelines
- Roasting joints / whole poultry;
Place joint / poultry on a microwave roasting rack on a large plate. (This allows the juices to drain away). A split roasting bag may be placed loosely over the joint / poultry to retain moisture and assist browning. Turnover halfway through cooking. After cooking allow joints / poultry to stand for at least 15 minutes.
- Cooking smaller cuts of meat; Prime, tender cuts are recommended for best results. Less tender cuts should be marinated or tenderised first and cooked on a lower power setting for a longer time. Chops or steaks can be cooked in a browning dish or on a microwave roasting rack on a plate. Serve with an interesting sauce such as barbecue or sweet and sour to add colour.
- Seasoning can be used to improve the appearance of meat cooked by microwave.
| MEAT | QUANTITY | POWER LEVEL COOKING TIME | COMMENTS |
| Roast Joint | 900g | "MED. HIGH"16 -18 mins | Place on a microwave roasting rack or on an upturned saucer on a plate.Cover loosely with a roasting bag.Turnover halfway, drain off any excess juices and recover with roasting bag.After cooking cover loosely with foil and stand 10-15 minutes before carving. |
| Chops 2, | 300g | "MED. HIGH"8 -10 mins | Brush with seasoning.Arrange thinner ends towards centre of dish.Use browning dish if preferred. |
| Lamb Chops 4, | 450g | "MED. HIGH"8-10 mins | Brush with melted butter.Sprinkle with herbs.Turnover halfway. |
| Bacon | 4 slices | "HIGH"2 12 - 3 12 mins | Cover with kitchen paper. |
| Whole Chicken(Not Stuffed) | 1.3kg | "MED. HIGH"26-30 mins | Brush with melted butter and seasoning.Place chicken on a microwave roasting rack or on an upturned saucer on a plate.Cover loosely with a roasting bag.Begin cooking breast side down.Turnover halfway, drain any excess juices and remove roasting bag.After cooking stand in foil for 15-20 mins.before carving. |
| Chicken Pieces 2, | 450g | "MED. HIGH"9 - 11 mins | Arrange thin ends towards centre of dish. |
FISH COOKING TABLE
General Guidelines
- Fish which would usually be poached, baked-or steamed is particularly good when cooked by microwave. The full flavour is retained and cooking smells are reduced.
- Fish may be poached in wine, stock or milk which can then be used to make a sauce.
- All types of fresh fish (except battered or breadcrumbd fish) can be microwaved whether whole, fillets or steaks.
• Always cook fish covered to retain moisture
- Fish cooks quickly by microwave, so take care not to overcook.
- Add a little lemon juice, white wine or butter to fish to enhance flavour.
- Fish should stand for 2-3 minutes after cooking. Fish is cooked when it becomes opaque and flakes easily.
| FRESH FISH | QUANTITY | COOKING TIME ON "HIGH" POWER | COMMENTS |
| Fillets | 450g | 5-7 mins | Overlap thin ends to avoid overcooking. Poach in liquid in a covered dish. |
| Steaks | 450g | 6-8 mins | Poach in liquid in a covered dish. |
| Whole | 450g | 6-8 mins | Brush skin with melted butter or add 2 tblaps of liquid. Shield delicate head and tail areas with foil. |
VEGETABLE COOKING TABLE
General Guidelines
- Place the prepared vegetables in a microwave proof dish with 5-6 tblps of water. Frozen vegetables may be cooked without any added water if preferred.
• Always cover the dish
- For best results cut vegetables into similar sized pieces.
- All fresh or frozen vegetables should be cooked on "HIGH" power.
- Halfway through cooking stir or rearrange the vegetables.
• After cooking allow vegetables to stand, covered for 2-3 minutes before serving.
| FRESH VEGETABLES | QUANTITY | COOKING TIME ON "HIGH" POWER | COMMENTS |
| AsparagusSpeers | 450g | 7-9 mins | Wash, trim and leave whole. Arrange with tips towards centre of dish. |
| Broccoli Florets | 450g | 8-9 mins | Arrange with florets towards centre. |
| Brussel Spouts | 450g | 8-10 mins | Wash and trim. |
| Calbage /Spinach /Spring Greens | 450g | 8-10 mins | Wash and shred. |
| Carrots | 450g | 8-10 mins | Peel and slice. |
| Corn on the Cob | 2 x 200g | 6-8 mins | Wash and trim. Replace water with a knob of butter. Turnover halfway. |
| Potatoes - Baked | 1 x 200g | 4-6 mins | Wash and prick with a fork. Arrange around outer edge of turntable. Turnover halfway. |
| 2 x 200g | 7-9 mins | ||
| 3 x 200g | 9-11 mins | ||
| 4 x 200g | 12-15 mins |
VEGETABLE COOKING TABLE Cont.
| FRESH VEGETABLES | QUANTITY | COOKING TIME ON "HIGH" POWER | COMMENTS |
| Potatoes - Boiled | 450g | 7-9 mins | Peel and cut into evenly sized pieces. |
| Potatoes - New | 450g | 8-10 mins | Wash thoroughly. Cut into evenly sized pieces. |
| Swede / Turnip | 450g | 8-10 mins | Peel and cut into evenly sized pieces. |
| FROZEN VEGETABLES | |||
| Mixed Diced Veg | 450g | 6-7 mins | Stir after cooking. |
| 200g | 3-4 mins | ||
| Peas / Sweetcorn | 450g | 6-7 mins | Stir after cooking. |
| 200g | 3-4 mins | ||
| Beans - Broad, Green or Runner | 450g | 8-9 mins | Stir after cooking. |
| Cauliflower / Broccoli Florets | 450g | 9-10 mins | Arrange with florets towards centre. |
PASTA & RICE COOKING TABLE
General Guidelines
- Use a large microwave proof bowl e.g. a large pyrex mixing bowl.
-
Add 3-4 tsps of vegetable oil to the pasta to prevent sticking.
• Using boiling water to minimise cooking times
• Always ensure that the pasta or rice is covered by the water. -
Stir pasta twice during cooking to prevent sticking. It is not necessary to stir nice.
- Stand 3-5 minutes after cooking. Drain and serve. Rice may be rinsed with boiling water if preferred.
- Remember that brown rice requires a longer cooking time than white rice
| PASTA | QUANTITY OF DRIED PASTA 200G SERVES 3-4 | QUANTITY OF BOILING WATER | COOKING TIME ON "HIGH" POWER |
| Twists | 200g | 1 litre / 1^2/_2 pint | 8-10 mins. |
| Macaroni | 200g | 1 litre / 1^2/_2 pint | 9-11 mins. |
| Shells | 200g | 1 litre / 1^2/_2 pint | 8-10 mins. |
| Spaghetti | 200g | 1 litre / 1^2/_2 pint | 7-8 mins. |
| RICE | QUANTITY OF | QUANTITY OFBOILING WATER | COOKING TIMEON "HIGH" POWER |
| Easy Cook LongGrain Rice | 100g(Serves 2) | 375mls / 34 pint | 11-13 mins. |
| Easy Cook LongGrain Rice | 200g(Serves 4) | 600mls / 1 pint | 11-13 mins. |
| Easy CookBrown Rice | 200g(Serves 4) | 600mls / 1 pint | 17-20 mins. |
USEFUL MICROWAVE TIPS
1. Soften Honey
If you have a jar of honey which has crystallised, remove lid, and place the jar in the oven, microwave on LOW power for 2 minutes.
2. Soften or Melt Butter.
Melting takes a few seconds on HIGH power. Softening is better done more gently on min. power.
3. Freshen or Warm Bread
Use LOW power for a few seconds.
4. Easy Peeling Garlic.
Heat 3 or 4 cloves of garlic on HIGH power for 15-20 seconds. Squeeze at one end until the clove pops out.
5. More Juice From Oranges or Lemons.
Citrus fruits will yield more juice if they are heated on HIGH power for 15-20 seconds before squeezing.
6. Cook Porridge.
Porridge is easily cooked in the serving dish leaving no sticky pan to wash.
7 To recrisp biscuits or crackers
(without filling)
Place them in a dish lined with absorbent kitchen paper, microwave on HIGH for 15-30 seconds.
8. To remove Oven Odours.
Add the juice of half a lemon to a pint of water in large bowl. Heat on HIGH for 4-5 minutes then wipe out the oven.
QUESTIONS & ANSWERS
OPERATION
0. What is wrong when the oven light does not function?
A. Either:
• The door is not firmly closed.
or:
• The light bulb has burned out.
Q. Why does steam come out of the air exhaust vent?
A. Steam is normally produced during cooking. The microwave oven has been designed to allow this steam to escape.
Q. Can the microwave oven be damaged if it is operated empty?
A. Yes. Never operate the oven while empty or without the turntable positioned correctly on the roller rest.
0. Why does noise sometimes come from the turntable when the oven is turned on?
A. This noise occurs when the turntable roller rest and cavity bottom are dirty. Frequent cleaning of these parts should eliminate or reduce the noise.
Q. Instructions for aluminium foil use are confusing. When should foil be used?
A. It should be used to shield portions of food from becoming overcooked or overdefrosted. Use small flat pieces of foil for shielding.
Q. Why is standing time recommended after the cooking operation has been completed?
A. Standing time is very important. With microwave cooking, the heat is in the food, not in the oven. Many foods build-up enough internal heat to allow the cooking process to continue, even after the food is removed from the oven. Standing time for joints of meat, large vegetables and cakes is to allow the inside to cook completely, without overcooking the outside.
Q. Why do sparks and crackling (arcing) occur in the oven?
A. There may be several reasons why sparks and crackling within cavity (arcing) occur.
- A dish with metal parts or trim is being used (silver or gold).
• A metal utensil has been left in the oven.
• Too much metal foil is being used.
• A metal twist-tie is present in the oven.
Q. Why does condensation appear in the oven?
A. This is normal and occurs because the food is cooking faster than the moisture can be removed from the oven.
FOODS
Q. Why do eggs sometimes pop?
A. The egg yolk may pop because of a build-up of steam inside the membrane. To prevent this, pierce the membrane before cooking it. CAUTION: Eggs in their shell and whole hard boiled eggs should not be heated in microwave ovens since they may explode even after microwave heating has ended.
Q. Why are scrambled eggs sometimes a little dry after cooking?
A. Eggs dry out if they are overcooked. You may need to vary the cooking time for one of the following reasons:
- Eggs vary in size.
- The initial temperature of the egg may vary depending on where it is stored.
- The shape of cooking utensils vary, which makes it necessary to vary cooking time.
- Eggs continue cooking during standing time.
Q. Why do baked apples sometimes burst during cooking?
A. The peel has not been removed from the top half of each apple to allow for expansion of the interior of the apple during cooking. As in regular cooking methods, the interior of the apple expands during the cooking process.
Q. How are liquids prevented from boiling over?
A. Use a larger utensil than usual for cooking. If you open the oven door or turn TIMER to '0', the food will stop boiling.
Q. Why does the dish become hot when I microwave food in it?
A. As the food becomes hot it will conduct the heat into the dish. Use oven gloves to remove food after cooking.
Q. Does the density of a food affect its cooking time in the microwave?
A. Yes: A dense food such as meat will take longer to cook, reheat or porous, light and airy food such as bread, puddings and cakes. This is because microwaves cannot penetrate as deeply into denser, heavier foods.
CARE AND CLEANING
It is important that no liquid food or grease particles are left in the oven as this ensures the correct performance of your oven and reduces the risk of corrosion. After use always wipe out your oven and dry thoroughly.
INTERIOR OF THE OVEN
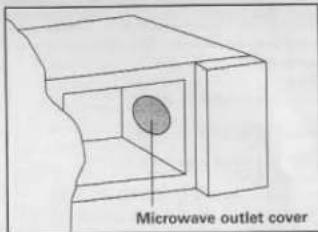
It is essential to keep your oven clean at all times. The oven cavity should be cleaned and wiped dry after each use. Wipe out with a mild detergent solution, paying particular attention to the microwave outlet cover (see illustration opposite) and the door seal area. Take particular care not to allow water to seep through the small holes in the oven walls. Wipe dry with a soft cloth. Never use abrasive cleaning materials as these can damage the oven cavity.
Do not use any type of oven cleaner on your microwave oven as this can cause severe damage.
REMOVABLE PARTS
The glass turntable and roller rest can be removed for easy cleaning. Wash in warm soapy water and dry.
EXTERIOR OF OVEN
Wipe with a damp cloth. Do not allow water to seep into vents. Never use abrasive cleaning materials as these can damage your oven.
BEFORE CALLING SERVICE
You can often correct operating problems yourself. If your microwave oven fails to work properly, locate the operating problem in the chart below and try the solutions marked for
each problem. If the microwave oven still does not work properly, contact your nearest SANYO SERVICE CENTRE.
PROBLEMS
Oven will not start
Arcing or sparking
Unevenly cooked foods
Overcooked foods
Undercooked foods
Improper defrosting
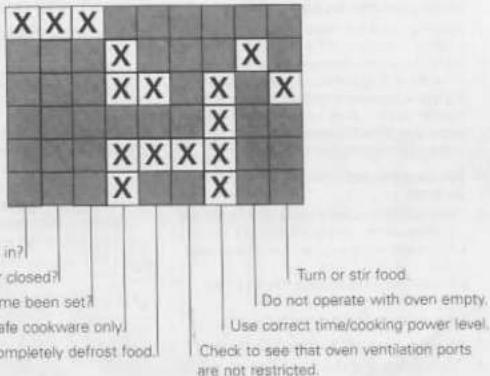
POSSIBLE CAUSES
Is power cord plugged in?
Is door closed?
Has the cooking time been set?
Use microwave-safe cookware only
Completely defrost food.
Check to see that oven ventilation ports are not restricted.
- ATTENTION!
- Contents
- HOW TO USE YOUR OVEN SAFELY
- NOTE:
- ALTHOUGH YOUR OVEN IS PROVIDED WITH SAFETY FEATURES, IT IS IMPORTANT TO OBSERVE THE FOLLOWING:
- OTHER IMPORTANT SAFETY INSTRUCTIONS
- The following safety precautions should be followed when using this appliance:
- Other important safety points to remember are:
- WARNING
- PLEASE SAVE THESE INSTRUCTIONS
- INSTALLATION
- OVEN POSITIONING
- THIS APPLIANCE MUST BE EARTHED
- Green-and-yellow: Earth
- Blue: Neutral.
- OVEN PARTS AND ACCESSORIES
- Turntable Installation
- EM-S1057
- NOTES:
- COOK AND DEFROST GUIDE
- Example: To Cook 0.5kg Fish:
- OPERATING INSTRUCTIONS
- CAUTION:
- REHEATING TIPS
- REHEATING TABLE
- DEFROSTING TIPS
- DEFROSTING Cont.
- MEAT / POULTRY COOKING TABLE
- General Guidelines
- - Roasting joints / whole poultry;
- FISH COOKING TABLE
- VEGETABLE COOKING TABLE
- PASTA & RICE COOKING TABLE
- USEFUL MICROWAVE TIPS
- Soften Honey
- Soften or Melt Butter.
- Freshen or Warm Bread
- Easy Peeling Garlic.
- More Juice From Oranges or Lemons.
- Cook Porridge.
- To recrisp biscuits or crackers
- (without filling)
- To remove Oven Odours.
- QUESTIONS & ANSWERS
- OPERATION
- What is wrong when the oven light does not function?
- Either:
- Why does steam come out of the air exhaust vent?
- Can the microwave oven be damaged if it is operated empty?
- Why does noise sometimes come from the turntable when the oven is turned on?
- Instructions for aluminium foil use are confusing. When should foil be used?
- Why is standing time recommended after the cooking operation has been completed?
- Why do sparks and crackling (arcing) occur in the oven?
- Why does condensation appear in the oven?
- FOODS
- Why do eggs sometimes pop?
- Why are scrambled eggs sometimes a little dry after cooking?
- Why do baked apples sometimes burst during cooking?
- How are liquids prevented from boiling over?
- Why does the dish become hot when I microwave food in it?
- Does the density of a food affect its cooking time in the microwave?
- CARE AND CLEANING
- INTERIOR OF THE OVEN
- REMOVABLE PARTS
- EXTERIOR OF OVEN
- BEFORE CALLING SERVICE
- PROBLEMS
- POSSIBLE CAUSES
Brand : SANYO
Model : EM-S1057
Category : Microwave