
EM-X491 - Microwave SANYO - Free user manual and instructions
Find the device manual for free EM-X491 SANYO in PDF.


| Product Type | Microwave Oven |
| Brand | Sanyo |
| Model | EM-X491 |
| Capacity | 0.9 cu ft (25.5 L) |
| Power Output | 900 W |
| Dimensions (W x H x D) | 19.2 x 11.3 x 15.8 in (48.8 x 28.7 x 40.1 cm) |
| Weight | 27.5 lb (12.5 kg) |
| Power Supply | 120 V, 60 Hz |
| Power Consumption | 1450 W |
| Turntable | Yes, 12.4 in (31.5 cm) glass |
| Control Type | Digital with LED display |
| Defrost Function | Auto defrost by weight or time |
| Cooking Presets | Multiple auto cook menus |
| Timer | Up to 99 min 99 sec |
| Child Lock | Yes |
| Door Type | Push-button release |
| Interior Light | Yes |
| Material | Stainless steel exterior, easy-clean interior |
| Cleaning | Wipe with damp cloth, avoid abrasives |
| Parts Included | Turntable, roller ring, instruction manual |
| Repairability | Service centers available; see manual for details |
| Safety | FCC compliant, safety interlock system |
Frequently Asked Questions - EM-X491 SANYO
User questions about EM-X491 SANYO
0 question about this device. Answer the ones you know or ask your own.
Ask a new question about this device
Download the instructions for your Microwave in PDF format for free! Find your manual EM-X491 - SANYO and take your electronic device back in hand. On this page are published all the documents necessary for the use of your device. EM-X491 by SANYO.
USER MANUAL EM-X491 SANYO
natural_image
Line drawing of a microwave oven with lid and side panel (no text or symbols)Read these instructions carefully before using your microwave oven. If you follow the instructions, your oven will provide you with many years of good service.
SAVE THESE INSTRUCTIONS
PRECAUTIONS TO AVOID POSSIBLE EXPOSURE TO EXCESSIVE MICROWAVE ENERGY
(a) Never interfere or tamper with safety interlocks.
(b) Do not place any object between the oven front face and the door or allow soil or cleaner residue to accumulate on sealing surfaces. Wipe the door sealing area frequently with a mild detergent, rise and wipe dry. Never use abrasive powders or pads.
(c) When open, the door must not be subjected to strain; for example, a child hanging on the opened door or any load on it could cause the oven to fall forward, and the weight could also damage the door.
(d) Do not operate the oven if it is damaged. It is particularly important that the oven door close properly and that there is no damage to the:
(1) DOOR (bent)
(2) HINGES AND LATCHES (broken or loosened)
(3) DOOR SEALS AND SEALING SURFACES
SPECIFICATIONS
| Model: | EM-X491 | EM-X691 |
| Power Consumption: | 1500W | 1500W |
| Maximum Output: | 1000W* | 1000W* |
| Oven Capacity: | 28L | 37 L |
| Turntable Diameter: | 275 mm | 320 mm |
| Dimensions: (w x h x d) | 525 x 289 x 425 mm | 550 x 317 x 457 mm |
| Weight: Approx. | 17 kg | 18.5 kg |
Specifications subject to change without notice.
*According to IEC-705 test procedures. The IEC-705 test procedure is an internationally recognized method of rating microwave wattage output.
Please record your product's information
When you call to request service, you need to know your complete model number and serial number. Please fill in the information below. Please also record purchase date, price and where purchased.
| Model Number: | (Located on the front of the oven) |
| Serial Number: | (Located on the front of the oven) |
| Date of Purchase: | |
| Purchase Price: | |
| Where Purchased: |
SAFETY
■ Proper and Safe Use of Your Oven....4
■ Important Safety Instructions .... 5
■ Earthing Instructions .... 6
■ Utensils....6
SET UP
■ Names of Oven Parts and Accessories....8
■ Turntable Installation....8
■ Installation 9
OPERATION
■ Control Panel and Features .... 10
■ Setting Clock.... 12
■ Child Lock-Out 12
■ Kitchen Timer 13
■ Add 30 Seconds ..... 13
■ Time Cooking .... 14
■ Auto Sensor Microwaving.... 15
■ Billboard 19
■ Optional Settings 19
■ Automatic Defrost By Weight ..... 20
■ Quick Reheating .... 22
■ Custom Programs....23
■ Menu Match 24
COOKING GUIDE
■ Sensor Cooking Recipes 25
MAINTENANCE
■ Troubleshooting 28
■ Questions and Answers.... 29
■ Cleaning 30
PROPER AND SAFE USE OF YOUR OVEN
• The oven must be level.
- The turntable and turntable roller rest must be in the oven during cooking.
- Place the cookware gently on the turntable and handle it carefully to avoid possible breakage.
- The oven has several built-in safety switches to ensure that the power remains off when the door is open. Do not tamper with these switches.
- Do not operate the microwave oven when empty.
- Do not overcook food. A small quantity of food with low moisture content or high fat or sugar content can burn.
- Do not cook bacon directly on the turntable. Excessive local heating of the turntable may cause it to break.
- When heating food in plastic or paper containers, check the oven frequently due to the possibility of cause fires in the oven.
- Do not place liquids or other foods with sealed containers in the microwave oven, it may explode.
- Avoid heating baby bottles or baby food jars. Transfer the food into a suitable container for the microwave oven. The food temperature should be tested before giving it to the baby.
- Do not heat narrow-necked containers, such as syrup bottles.
- Do not attempt to deep-fry in your microwave oven as the temperature of oil cannot be controlled.
- Do not heat cans. Transfer the contents into a microwave-safe dish before heating.
- Do not use this microwave oven for commercial purposes. This microwave oven is made for household use only.
NOTE
It is quite normal for steam to be emitted around the door, for misting to occur on the door, or even for water droplets to appear below the door during the cooking cycle. This is merely condensation from the heat of the food.
WARNING -
(a) Do not adjust or repair microwave oven yourself. Do not operate the oven if it is damaged, until it has been repaired by a service engineer trained by the manufacturer.
(b) It is dangerous for anyone other than a properly qualified engineer trained by the manufacturer to carry out adjustments or repairs.
(c) If the power cord is damaged, it must be replaced by a special prepared cord available from the Manufacturer or its Service Agent.
(d) On no account remove or interfere with any parts or screws. THIS COULD PROVE VERY DANGEROUS.
(e) Before use, the user should check that utensils are suitable for use in microwave ovens.
IMPORTANT SAFETY INSTRUCTIONS
When using electrical appliances, basic safety precautions should be followed, including the following:
WARNING -
To reduce the risk of burns, electric shock, fire, injury to persons or exposure to excessive microwave energy:
-
Read all instructions before using.
-
As with most cooking appliances, close supervision is necessary to reduce the risk of a fire in the oven cavity.
If a fire should start or smoke is observed:
- Keep the oven door closed
• Turn the oven off, and - Disconnect the power cord or shut off power at the fuse or circuit breaker panel.
Keep in mind the following rules at all times:
a. Do not overcook food. Overcooked food can cause fires in the oven. Carefully attend to the oven's activities, especially if paper, plastic, or other combustibles are inside.
b. Do not store combustible items such as bread, cookies, paper products, etc. inside the oven. They may catch fire if turned on accidentally.
c. Do not use wire twist-ties in the oven. Be sure to inspect purchased items for wire twist-ties and remove before placing food in the oven.
-
Some products such as eggs in the shell, water with oil or fat, sealed containers and closed glass jars may explode and therefore should not be heated in this oven.
-
Use this oven only for its intended uses as described in the manual. It is not designed for industrial or laboratory use. Never use corrosive chemicals or vapours in this oven.
-
As with any appliance, children should use the oven only under adult supervision.
-
Do not store or use this appliance outdoors.
-
Keep the oven away from heat and water sources. Exposure to heat and water can lower efficiency and lead to malfunctioning.
-
When heating water or other liquids, use a wide necked container to allow air bubbles to escape freely. Using narrow-necked containers may cause the liquid to boil over. This may happen even after the cooking has stopped.
-
It is important to keep the door and the oven interior clean. (See Cleaning instructions on page 30.)
-
To prevent delayed eruptive boiling of hot liquids and beverages or scalding, stir liquid before placing the container in the oven and again halfway through cooking time. Let stand in the oven for a short time and stir again before removing the container.
SAVE THESE INSTRUCTIONS
This appliance must be earthed. If there is an electrical short circuit, earthing reduces the risk of electric shock by providing an escape wire for the electric current. This appliance is equipped with a cord that has a earthing wire with a earthing plug. The plug must be plugged into an outlet that is properly installed and earthed.
The electrical power cord must be kept dry and must not be pinched or crushed in any way.
WARNING - Improper use of the grounding plug can result in electric shock.
UTENSILS

CAUTION
Personal Injury Hazard
- Tightly-closed utensils could explode. Closed containers are opened and plastic pouches pierced before cooking.
See next page for further instructions "Materials you can use in microwave oven or to be avoided in microwave oven."
There may be certain non-metallic utensils that are not safe to use for microwaving. If in doubt, you can test the utensil in question following the procedure below.
Utensil Test:
- Fill a microwave-safe container with 1 cup of cold water (250 mL) along with the utensil in question.
- Cook on maximum power (P100) for 1 minute.
- Carefully feel the utensil.
If the empty utensil is warm, do not use it for microwave cooking.
Do not exceed 1 minute testing time.
Materials you can use in microwave oven
| Utensils | Remarks |
| Aluminum foil | Shielding only. Small smooth pieces can be used to cover thin parts of meat or poultry to prevent overcooking. Arcing can occur if foil is too close to oven walls. The foil should be at least 2.5 cm away from oven walls. |
| Browning dish | Follow manufacturer's instructions. The bottom of browning dish must be at least 5 mm above the turntable. Incorrect usage may cause the turntable to break. |
| Dinnerware | Microwave-safe only. Follow manufacturer's instructions. Do not use cracked or chipped dishes. |
| Glass jars | Always remove lid. Use only to heat food until just warm. Most glass jars are not heat resistant and may break. |
| Glassware | Heat-resistant oven glassware only. Make sure there is no metallic trim. Do not use cracked or chipped dishes. |
| Oven cooking bags | Follow manufacturer's instructions. Do not close with metal tie. Make slits to allow steam to escape. |
| Paper plates and cups | Use for short-term cooking/warming only. Do not leave oven unattended while cooking. |
| Paper towels | Use to cover food for reheating and absorbing fat. Use with supervision for a short-term cooking only. |
| Parchment paper | Use as a cover to prevent spattering or a wrap for steaming. |
| Plastic | Microwave-safe only. Follow the manufacturer's instructions. Should be labeled "Microwave Safe." Some plastic containers soften as the food inside gets hot. "Boiling bags" and tightly closed plastic bags should be slit, pierced or vented as directed by package. |
| Plastic wrap | Microwave-safe only. Use to cover food during cooking to retain moisture. Do not allow plastic wrap to touch food. |
| Thermometers | Microwave-safe only (meat and candy thermometers). |
| Wax paper | Use as a cover to prevent splattering and to retain moisture. |
Materials to be avoided in microwave oven
| Utensils | Remarks |
| Aluminum tray | May cause arcing. Transfer food into microwave-safe dish. |
| Food carton with metal handle | May cause arcing. Transfer food into microwave-safe dish. |
| Metal or metal-trimmed utensils | Metal shields the food from microwave energy. Metal trim may cause arcing. |
| Metal twist ties | May cause arcing and could cause a fire in the oven. |
| Paper bags | May cause a fire in the oven. |
| Plastic foam cups | Plastic foam may melt or contaminate the liquid inside when exposed to high temperature. |
| Wood | Wood will dry out when used in the microwave oven and may split or crack. |
NAMES OF OVEN PARTS AND ACCESSORIES
Remove the oven and all materials from the carton.
Your oven comes with the following accessories:
| Turntable | 1 |
| Turntable roller rest | 1 |
| Instruction Manual | 1 |
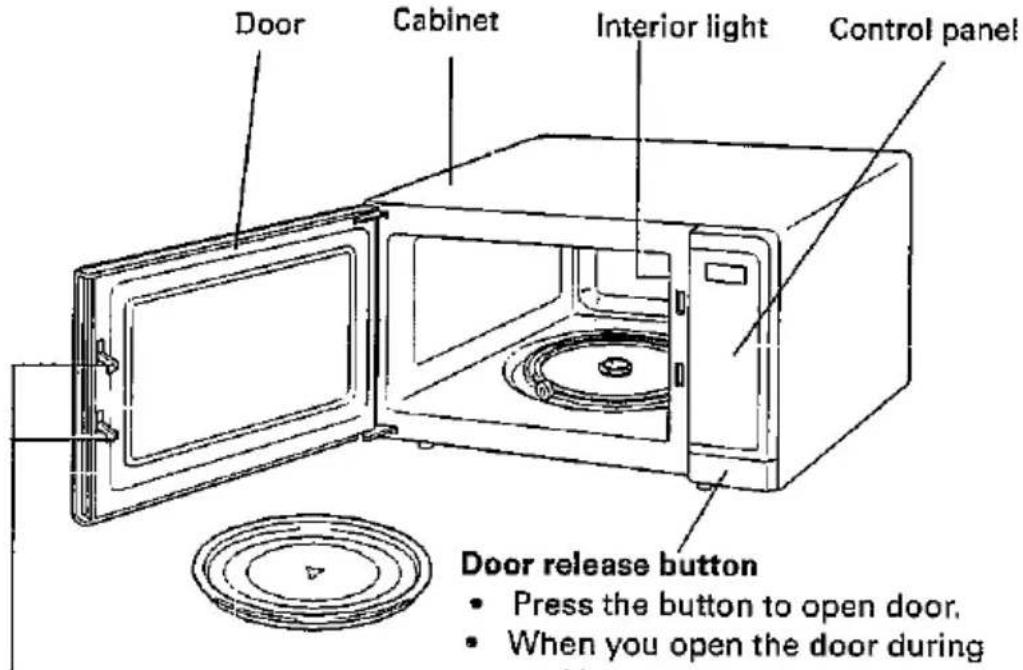
Safety interlock system
Shuts off oven power if door is opened during operation.
Door release button
- Press the button to open door.
- When you open the door during cooking process, the cooking stops without cancelling the program.
Press START to resume cooking.
TURNTABLE INSTALLATION
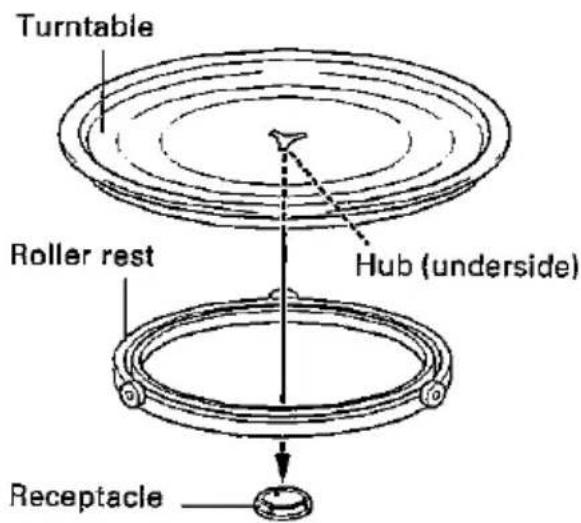
- Place the roller rest on the cavity bottom.
-
Place the turntable on top of the roller rest as shown in the diagram. Make sure the turntable hub is securely locked in the receptacle.
-
Never place the turntable upside down. The turntable should never be restricted.
- Both turntable and roller rest must always be used during cooking.
- All food and containers of food are always placed on the turntable for cooking.
- The turntable returns to its original starting position when cooking is finished. The light and fan will remain on but microwave power is turned off.
- The turntable rotates clockwise and counterclockwise; this is normal.
- If turntable or roller rest cracks or breaks, contact your nearest authorized service centre.
Remove all packing material and accessories.
Examine the oven for any damage such as dents or a broken door.
Do not install if oven is damaged.
-
Select a level surface that provides enough open space for the inlet and/or outlet vents.
-
Leave a minimum clearance of 7.5 cm above the oven.
- Do not remove the legs from the bottom of the oven to ensure proper air flow.
- Blocking the inlet and/or outlet opening can damage the oven.
- Do not install oven over a range, cooktop or other heat-producing appliance.
- Place the oven as far away from radios and TV's as possible. Operation of microwave oven may cause interference to your radio, TV. Plug the microwave oven into a different outlet.
-
When the cabinet is covered with a protective film, remove the film to fully show the intended colour and finish.
-
Plug your oven into a standard household outlet.
When installing in a Built-in situation, you must allow a minimum of 7.5 cm on each side and the top and at the back of the microwave oven for ventilation. Failing to do so might cause damage to the microwave oven.
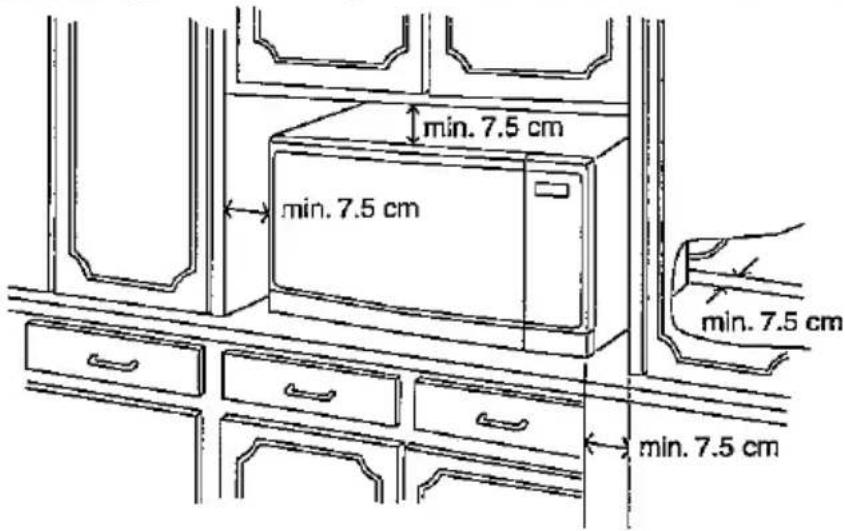
A minimum clearance of 7.5 cm is required between the oven and any adjacent walls including the back wall.
CAUTION: Use with care when handling oven. The control panel side of oven is heavy inside.
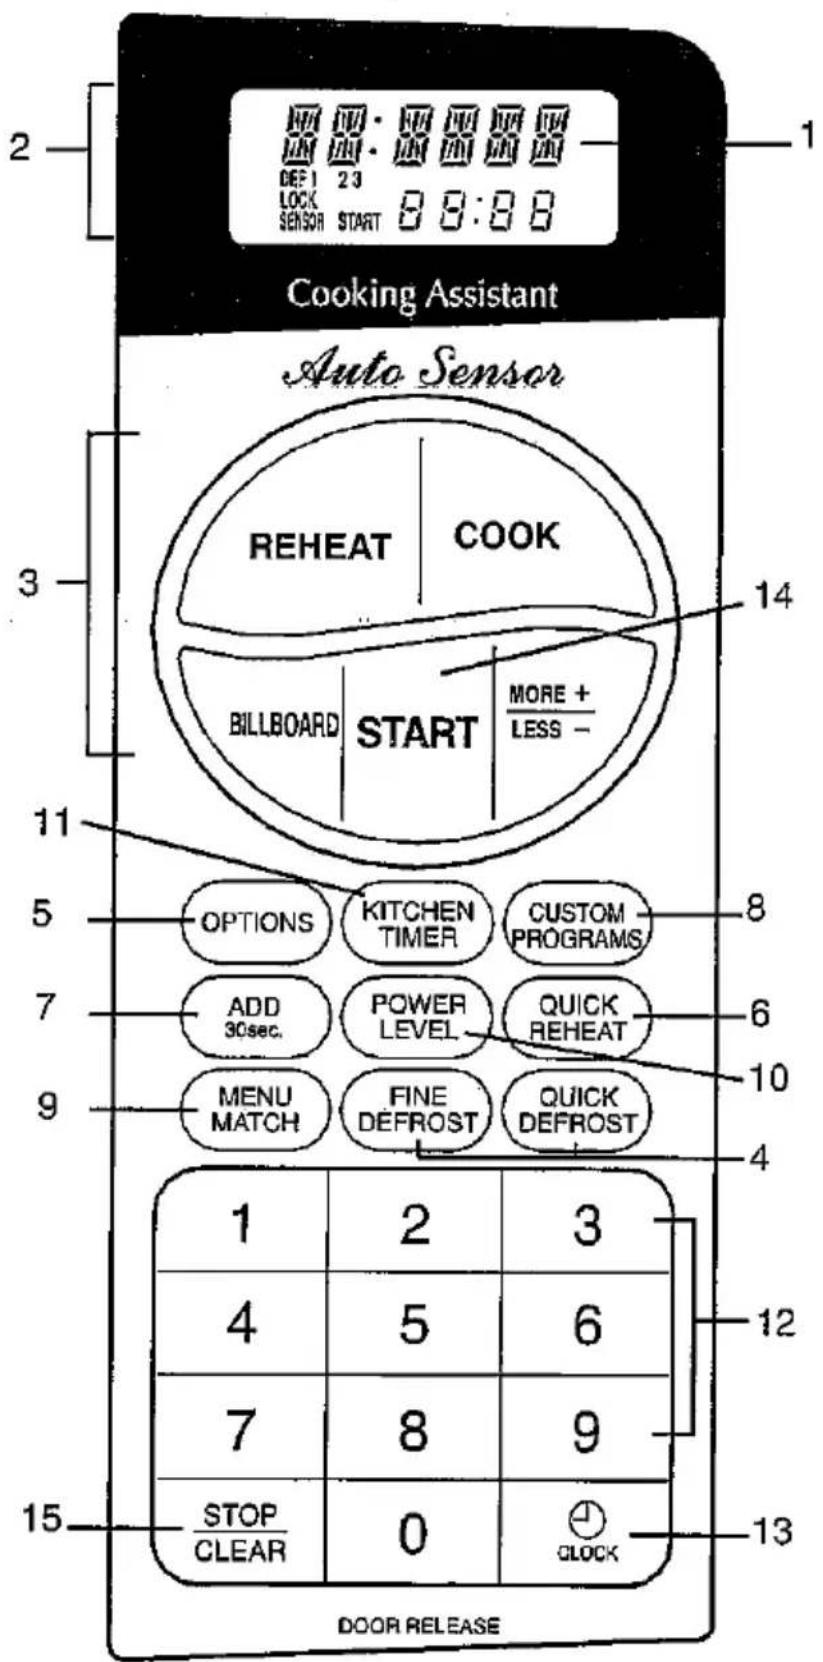
(1) Display Window
Upper line: Counts down cooking time in seconds. Shows clock time when oven is not in use. The Word prompt scrolls to guide you when setting the clock and at every operation stage.
Lower line: Shows power level when using Time Cooking. Shows Kitchen Timer time.
(2) Indicators
Indicators light or flash in the display window.
1/2/3: Lights to indicate current cooking stage.
DEF: Lights during Auto Defrost.
LOCK: Lights to indicate the child lock feature is set.
SENSOR: Flashes during Auto Sensor Microwaving.
START: Flashes to prompt you to press START.
(3) Auto Sensor keypads (page 15) REHEAT COOK
These 2 keys are used to select the desired food category for Auto Sensor Microwaving.
MORE +/LESS -
Used to adjust cooking time for Auto Sensor Microwaving.
BILLBOARD (page 19)
The display provides an alternative shortcut food category selection for Auto Sensor Microwaving.
(4) Auto Defrost by Weight (page 20) This feature provides two options:
FINE DEFROST: Provides thorough defrosting results.
QUICK DEFROST: Provides faster defrosting when complete thawing is less crucial. This option is excellent for thawing items such as ground meat for use in spaghetti sauce or for tacos.
(5) OPTIONS (page 19)
Allows you to customize the following oven feature settings: Word Prompt on/off, Billboard reset, Clock on/off, Beep on/off and Language selection.
(6) QUICK REHEAT (page 22)
Used with a number key, this feature allows immediate start for one of 10 preset times from 30 seconds to 9 minutes.
(7) ADD 30 sec. (page 13)
(8) CUSTOM PROGRAMS (page 23)
(9) MENU MATCH (page 24)
(10) POWER LEVEL (page 14)
(11) KITCHEN TIMER (page 13)
(12) Number keys
(13) CLOCK (page 12)
(14) START
• To start cooking.
• To set and cancel child lock-out.
(15) STOP/CLEAR
- Clears all previous settings if pressed before cooking starts.
- Press once to stop oven during cooking.
- Press twice to stop and clear all entries after cooking has started.
Beep Sound
A beep sounds to confirm your key entry when a keypad is pressed.
To set the time of day, follow the steps below.
Example: To set 3:15:
| 1 | Press CLOCK. |  |
| 2 | Press 3, 1 and 5 to enter time of day. |  |
| 3 | Press CLOCK.The clock starts counting. |  |
Note: • If the clock (or display) shows any abnormality, unplug the oven from the AC outlet. Plug it in again and then reset the clock.
- When your oven is plugged in for the first time or when power resumes after a power interruption, reset the clock.
• This is a 12-hour clock.
• You can use the oven without setting clock.
- The clock display can be turned off. See page 19 (Optional Settings) for more details.
CHILD LOCK-OUT
The oven has a safety feature which prevents use by children. The feature locks the operation of the oven until cancelled.
To set:
| 1 | Press START and hold for 4 seconds. LOCK appears in the display. | START |
To cancel:
| 1 | Press START and hold for 4 seconds. LOCK disappears from the display. | START |
You can use the Kitchen Timer function independently, even while a cooking program is going on in the oven. The Kitchen Timer will be displayed on the lower line of the display.
Example: To set timer for 3 minutes:
| 1 | Press KITCHEN TIMER. |  |
| 2 | Press 3, 0 and 0 to set 3 minutes.(up to 99 minutes 99 seconds can be set.) |  |
| 3 | Press START.The timer starts counting and beeps for 7 seconds at the end. |  |
Note: • To clear a Kitchen Timer setting, press STOP/CLEAR. If you are using both Kitchen Timer and cooking, press KITCHEN TIMER. Kitchen Timer on the lower line of the display flashes for 5 seconds. Press STOP/CLEAR while Kitchen Timer on the lower line of display flashes. The Kitchen Timer will stop but the oven continues cooking to the end.
• To stop beeps of Kitchen Timer, touch KITCHEN TIMER.
- Kitchen Timer will not beep if the oven beeps at the same time to indicate another oven operation (the end of a cooking, for example).
- If you do not enter a timer time for 10 seconds after step 1, the setting is cleared with a beep.
- If a cooking completes while you are setting the Kitchen Timer, all settings are cleared. Restart from step 1.
- If no key is touched for 5 seconds after the last key entry at step 2 above, the timer automatically starts.
ADD 30 SECONDS
This feature provides 2 functions:
- Allows you to cook for only 30 seconds on P100 (maximum power).
- Allows you to extend a cooking time by 30 seconds during Time Cooking without pressing START. You can repeat this option up to 3 times.
Example: To set 30-second cooking:
| 1 | Press ADD 30 SEC. once. |  |
| 2 | Press START.The display shows time countdown. |  |
Note: This feature cannot be used during Auto Sensor Microwaving or Auto Defrost by Weight.
This basic microwave cooking method allows you to cook food for a desired time. The oven can be programmed to cook for up to 99 minutes 99 seconds. In addition to the maximum power level (P100), you can select different microwave power from 10 levels, P 0 to P90 (0-90% of total power level).
Example: To cook at power level P80 for 40 seconds:
| 1 | Enter 40 seconds by pressing 4 and 0.(up to 99 minutes 99 seconds can be set.) |  |
| 2 | Press POWER LEVEL until P80 appears in the display. |  |
| 3 | Press START. |  |
Note: • If no power level is entered, the power level will always be P100 (100%).
- Foods with high moisture content should be cooked on P100 power.
- To check the power level while Kitchen Timer is operating, press POWER LEVEL.
• To change power level during cooking, press POWER LEVEL. Power level on the lower line of the display flashes for 3 seconds. During this time, Press POWER LEVEL repeatedly until your desired power appears.
POWER LEVEL SETTING GUIDE
| P100 • Cooking poultry, vegetables, and most casseroles. Boiling water.• Preheating a browning dish. | P50 Medium• Cooking custards and pasta.• Cooking rump roast, ham, veal, lamb. |
| P90 • Reheating rice and pasta. | P40 • Cooking less tender cuts of meat in liquid or slow-cooking dishes.• Completing the cooking cycle of less tender roasts. |
| P80 • Reheating precooked or prepared food quickly.• Cooking fish. | P30 Med. Low• Completing the cooking cycle of casseroles, stews, sauces.• Time defrosting. |
| P70 Med. High• Cooking cheese dishes. | P20 • Softening chocolate.• Clarifying butter.• Heating breads, rolls, pancakes, tacos, tortillas, French toast. |
| P60 • Cooking scrambled eggs.• Baking cakes. | P10 • Softening cream cheese, butter.• Keeping casseroles warm. |
Time Defrosting:
Use power level P30 (Medium Low). For most frozen foods, allow approximately 5 minutes per 500 g. To speed up the defrosting of dense foods over 500 g, you may start on P100 for 2 minutes. Then reduce to the power level P30 and enter remaining time.
Multistage Cooking:
You can program oven for 3 cooking stages. Each stage can be programmed with a different power level and time. To program 2-stage or 3-stage cooking, repeat the Time Cooking steps 1 and 2 and press START. The oven will automatically proceed to the end of cooking stages.
Delay Start Cooking:
You can delay the time when you want cooking to start. Cooking can be delayed up to 99 minutes and 99 seconds. To delay cooking, follow procedure for multistage cooking, but for stage1 use power level P 0.
The Auto Sensor feature uses a built-in humidity sensor that measures the amount of steam/humidity in the oven to accurately determine correct cooking time and power level for the food placed in the oven. A variety of popular food categories have been preprogrammed to use this feature for cooking and reheating.
Press REHEAT or COOK keypad to call up preprogrammed food category prompt. Then enter the number of your desired food type. The REHEAT keypad lets you select from 3 different food categories, and the COOK keypad from 8 categories.
Soup/Beverage selections require entry of number of servings.
| REHEAT Food Categories | Press | COOK Food Categories | Press |
| FROZEN REHEAT | REHEAT→1 | CASSEROLE | COOK→1 |
| REHEAT | REHEAT→2 | FISH FILLET | COOK→2 |
| SOUP/BEVERAGE | REHEAT→3 →Number of servings | MEAT BEEF | COOK→3 |
| - | - | MEAT CHICKEN | COOK→4 |
| - | - | MEAT LAMB | COOK→5 |
| - | - | MEAT PORK | COOK→6 |
| - | - | POTATO | COOK→7 |
| - | - | VEGETABLE | COOK→8 |
Example - To reheat 2 servings of soup:
| 1 | Press REHEAT. Food category numbers and names will scroll across the display. |  | ||
| 2 | Press 3 to select SOUP/BEVERAGE. |  | ||
| 3 | Press 2 to enter 2 servings. |  | ||
| 4 | Press START. |  |
Note: • Do not open the oven door until time countdown starts in the display (after you pressed START).
Meat Cooking Techniques:
- The oven stops about halfway through cooking process to allow for checking, turning or rearranging the food. Open the door and rearrange the food. The oven restarts after 5 minutes to the end if you do not open the door.
Pause Reminder
About halfway through the Auto Sensor cooking process, 5 beeps sound to remind you to rearrange (turn or separate) the food. If you do not open the door at the reminder, the oven continues to complete cooking. The Pause prompt scrolls across the display.
MORE/LESS ADJUSTMENT
The MORE +/LESS — keypad allows fine adjustments in Auto Sensor Microwaving by either increasing or decreasing the preprogrammed cooking time.
To increase the time, press MORE/LESS once, and press START.
To decrease the time, press MORE/LESS twice, and press START.
If an Error Message appears...
ERROR 1: The door is opened before time countdown starts. Press STOP/CLEAR, and use Time cooking to finish. (Partially-cooked foods are no longer suitable for Auto Sensor Microwaving.)
ERROR 2: Auto Sensor Microwaving was attempted within 5 minutes after plugging in the oven. Press STOP/CLEAR, wait for 5 minutes and retry.
AUTO SENSOR MICROWAVING TIPS
General Sensor Cooking/Reheating:
- For foods not listed in the Sensor Reheating/Cooking guide, use Time cooking.
- After START is pressed, do not open the door while the words SENSOR COOKING scrolls across the display. During this time, the oven is measuring the amount of steam generated from the food. The oven then determines the heating or cooking time for the food.
- Room temperature should be below 35°C (95°F).
- Keep the inside of oven, the turntable and the outside of cooking containers dry. Wipe off all spillovers. Excessive humidity in the oven may result in an incorrect cooking time.
- Always cover food completely (but not too tightly) with wax paper, plastic wrap or casserole lids. Loose-fitting covers may cause the oven to miscalculate time. Never use tightly sealed plastic containers such as those with plastic snap closing lids.
REHEAT, FROZEN REHEAT
• Auto Sensor Reheat is best used for 1 - 2 servings.
- Very dense foods (e.g. frozen lasagna) should be allowed to stand covered after reheating.
- The following foods are not recommended: Boil-in-the-bag entrees or vegetables, raw or uncooked food, food that must be reheated uncovered, foods needing a dry look or crisp surface after reheating, frozen cheesecake, dried foods, bread or pastry, beverages.
- Do not reheat in foil containers.
- When reheating 1 cup (250 mL) of delicate sauces/dips that contain sour cream, eggs or cream cheese, use Time Cooking on power level P30 for 4 - 5 minutes and stir halfway through cooking time.
MEAT (CHICKEN, BEEF, LAMB, PORK)
- Doneness varies with meat of different shape and weight.
- Aluminium foil can be used to cover thin parts of meat or chicken wings and legs to prevent overcooking. Foil should be applied after cooking time appears in the display window.
- While chicken or meat is standing, cover with foil to keep in the heat.
- Use heat resistant microwave-safe wrap only.
SOUP/BEVERAGE
- When reheating canned soups, remove from can. Add milk or water as directed on can. Place in a microwave-safe bowl! or cup.
- Liquid must be room or refrigeration temperature.
See page 17 - 18 for Auto Sensor Microwaving guides and pages 25 - 27 for sample recipes.
Reheating Guide/ Cooking Guide
| Item/Amount | Food Selection | Special Notes |
| Casserole/ Entree Lasagna Macaroni and cheese 115 - 560 g | FROZEN REHEAT (115 - 560g) REHEAT (115 - 560g) | Cover with plastic wrap or casserole lid. Stir after reheating. Foods that cannot be stirred (ex. lasagna) should be allowed to stand covered for a few minutes after reheating. |
| Plate of food Pasta in sauce Meatloaf dinner Turkey dinner 115 - 560 g | Arrange less dense foods in centre of plate. Cover with plastic wrap. Allow to stand, covered for a few minutes after reheating. When reheating frozen plate of food, use LESS time adjustment for best results. | |
| Fried chicken 2 - 4 pieces | Cover with wax paper. | |
| Soup, Coffee, Tea 1-3 servings 230 - 690 mL | SOUP/ BEVERAGE (1-3 servings) | Cover soups before heating. Stir beverages after heating. Enter number of servings using a number key. |
| Ham & Potato Scallop Casserole Italiano Onion-Beef Soup Hearty Beef Vegetable Stew Bacon Vegetable Soup | CASSEROLE | Follow cooking recipes on pages 25 - 26. Place the ingredients in a microwave-safe casserole dish. Cover with casserole lid. Stir once at pause prompt. |
| Fish fillet Fish steaks | FISH FILLET (170 - 900 g) | Use microwave-safe shallow dish or pie plate. Arrange in a single layer. Cover lightly with plastic wrap. Turn or rearrange fish after cooking time appears in the display window, if necessary. |
| Whole Chicken, Chicken pieces | MEAT CHICKEN (0.5 - 2.5 kg) | Chicken, whole: Remove the giblets, rinse in cold water and pat dry. Tie legs together with string. Place breast side down on a roasting rack set in a dish. Cover with plastic wrap completely. Turn over at pause prompt. Let stand 10 - 20 minutes. Chicken, pieces: Arrange pieces skin side down. Cover with plastic wrap completely. Turn and rearrange at pause prompt. Let stand 5 - 10 minutes. Use LESS time adjustment for best results. |
| Lamb, Beef, Pork | MEAT BEEF MEAT LAMB MEAT PORK (0.5 - 2.5 kg) | Tie meat with string. Place meat fat side down on a roasting rack set in a dish. Cover with plastic wrap completely. Turn over at pause prompt. Let stand 10 - 20 minutes. |
Reheating Guide/ Cooking Guide
| White potatoesBaking potatoesSweet potatoesWhole:1 - 6- potatoes170 - 230 g each. | POTATO | Wash, scrub and pierce several places with fork. Place on paper towels.Arrange potatoes in circle and avoid placing potatoes in the centre of the turntable.Turn potatoes over after cooking time appears in the display window, if necessary.Allow 5 - 10 minutes standing time. |
| Quartered or sliced230 - 900 g | The best container for cooking quartered or sliced potatoes is a 12 to 2 quart ( 12 to 2 litre) microwave-safe casserole dish.Peel and quarter or slice. Add 14 cup (50 mL) water. Cover with plastic wrap or casserole lid.Stir after cooking time appears in the display window. | |
| Red potatoes, boilingNew potatoes, small230 - 450 g | Wash and/or peel. Pierce with a fork.Add 14 cup (50 mL) water.Cover with plastic wrap or lid.Stir once after cooking time appears in the display window. | |
| Artichokes, Beans, Broccoli, Brussels sprouts, Cabbage, Carrots, Corn, Cauliflower, Eggplant, Mushrooms, Onion, Okra, Peas, Spinach, Squash, Zucchini, or a mixture of these. | VEGETABLE(115 - 900 g) | Wash. Prepare and cut into slices, cubes, wedges, or julienne strips for fresh vegetables.The best container for cooking vegetables is a 12 to 2 litre microwave-safe microwave-safe casserole.Add 1 - 4 tbs. (15-60 mL) water and cover with plastic wrap or casserole lid.Stir vegetables once after pause prompt scroll across the display.Let stand for 3 - 5 minutes before serving.When cooking frozen vegetables, use LESS time adjustment for best results. |
This key provides quick access to your favorite food categories available in the Auto Sensor REHEAT/COOK keys. The BILLBOARD feature has a unique learning ability and remembers which categories you select most frequently. As you press the BILLBOARD key, the categories that you use most often will appear first.
Example: To cook a package of frozen vegetables:
| 1 | Press BILLBOARD repeatedly until VEGETABLE appears. | BILLBOARD |
| 2 | Press START. | START |
Note: You may reset the food categories to appear in their alphabetical order by using OPTIONS key. See below.
OPTIONAL SETTINGS
The OPTIONS key allows you to customize the following five oven feature settings as shown below.
Optional Features:
| Features | Press keypad | Press number |
| Word Prompt on/offThe Word Prompt may be turned on or off*. | once | 1-ON2-OFF*Prompt words may be shortened. |
| Billboard resetAllows you to reset the food categories to appear in alphabetical order. | twice | 1-YES (Food categories will appear in alphabetical order.)2-NO (Food categories used most often will appear first.) |
| Clock on/offThe clock display can be turned off and back on. | 3 times | 1-ON2-OFF |
| Beep on/offThe beep sound may be turned off and back on. | 4 times | 1-ON2-OFF |
| Language selectionYou can select from English or Spanish for display. | 5 times | 1-ENGLISH2-ESPAÑOL |
Example - To select Spanish for Word Prompt display:
| 1 | Press the OPTIONS key 5 times until language choice prompt appears:1-ENGLISH2-ESPAÑOL | OPTIONS |
| 2 | Press 2 to select Spanish. | 2 |
Note: When first plugged in, the oven will automatically display English in the Word Prompt display.
Automatic Defrost allows you to easily defrost food. Power levels and times are automatically determined when the food weight is entered.
FINE DEFROST: Use for thorough defrosting of larger, dense frozen foods, when it is important to have the centre section defrosted as well as the outside. Ideal for items such as roasts, whole chicken and steak.
QUICK DEFROST: Use to assist separation of frozen pieces of chicken or fish that need preparation prior to cooking. Excellent for defrosting ground meat for use in spaghetti sauce or taco meat.
Example: To thoroughly defrost a 2.5 kg whole chicken:
| 1 | Press FINE DEFROST. |  |
| 2 | Enter the weight of food in kilogram. | 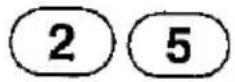 |
| 3 | Press START.Total defrost time appears in the display. |  |
Defrosting Techniques:
- Remove freezer paper, plastic wrap or foil wrap. Place food in a microwave-safe dish.
• To prevent thin parts and edges from becoming too warm and cooking before centre of food is defrosted, shield with small pieces of aluminium foil. - Because some foods will still be icy in the centre, it is necessary to have a standing time after defrosting the food in the oven. Food should be taken out of the oven to complete defrosting. A longer standing time might be required for denser foods such as roasts.
• To defrost items not listed in defrosting chart, use Time defrosting (see page 14).
• The FINE DEFROST includes preset standing time.
Note: • Maximum weight for defrosting is 2.9 kg.
• The oven selects 1 kg if a weight is not entered.
- Beep tone sounds 5 times during the defrosting cycle to signal that food should be rearranged to improve defrosting performance. Open the door and rearrange the food. The oven continues the defrosting cycle to the end if you do not open the door.
- Food can be defrosted in a styrofoam package.
- If weight of food is stated in pounds and ounces, it must be converted to kilograms.
Conversion Table
| lbs - oz. | kg | lbs - oz. | kg |
| 4 oz. | 0.1 | 3 lb-9 oz. | 1.6 |
| 7 oz. | 0.2 | 3 lb-12 oz. | 1.7 |
| 10 oz. | 0.3 | 4 lb | 1.8 |
| 14 oz. | 0.4 | 4 lb-3 oz. | 1.9 |
| 1 lb-2 oz. | 0.5 | 4 lb-7 oz. | 2.0 |
| 1 lb-5 oz. | 0.6 | 4 lb-10 oz. | 2.1 |
| 1 lb-9 oz. | 0.7 | 4 lb-14 oz. | 2.2 |
| 1 lb-12 oz. | 0.8 | 5 lb-1 oz. | 2.3 |
| 2 lb | 0.9 | 5 lb-5 oz. | 2.4 |
| 2 lb-4 oz. | 1.0 | 5 lb-8 oz. | 2.5 |
| 2 lb-7 oz. | 1.1 | 5 lb-12 oz. | 2.6 |
| 2 lb-11 oz. | 1.2 | 5 lb-15 oz. | 2.7 |
| 2 lb-14 oz. | 1.3 | 6 lb-3 oz. | 2.8 |
| 3 lb-2 oz. | 1.4 | 6 lb-6 oz. | 2.9 |
| 3 lb-5 oz. | 1.5 |
DEFROSTING CHART
| Item | During Defrosting |
| Beef | |
| Ground beef | Turn over. Remove defrosted portion. |
| Liver | Drain liquid. Separate pieces. |
| Roasts | Turn over. Cover ends with foil. |
| Sirloin steak | Turn over. |
| Rib or T-bone | Turn over. |
| Flank steak | Turn over. |
| Stewing meat | Break apart. |
| Pork | |
| Ground pork | Turn over. Remove defrosted portion. |
| Bacon | Defrost in original wrapper. Turn over. |
| Chops | Separate and turn over. |
| Ribs | Turn over. |
| Roasts | Turn over. Cover ends with foil. |
| Lamb | |
| Ground lamb | Turn over. Remove defrosted portion. |
| Chops | Separate. Turn over. |
| Ribs | Turn over. |
| Roasts | Turn over. Cover ends with foil. |
| Poultry | |
| Chicken, whole | Turn over. Cover ends with foil. Rinse under cold water after defrosting. |
| Pieces | Separate. Turn over. |
| Cornish hens | Turn over. Cover ends with foil. Rinse under cold water after defrosting. |
| Fish and Seafood | |
| Crabmeat, Shrimp | Break apart. |
| Fish fillets | Turn over. Rearrange. Rinse under cold water to separate after defrosting. |
| Fish whole | Turn over. Cover head and tail with foil. |
| Steaks | Turn over. |
| Scallops | Break apart. Remove defrosted seafood. |
A time-saving feature, this simplified control lets you quickly set and start microwave cooking without pressing START.
Example: To set Quick Reheating for 2 minutes:
| 1 | Press QUICK REHEAT. | |
| 2 | Press 2.The display shows time counting down. |
Note: • To cook for 30 seconds, press 0. To cook for 1 to 9 minutes, press the corresponding number key (1 - 9).
• This feature only cooks at highest power level (P100).
QUICK REHEATING AND COOKING CHART
| Reheating | Amount | Time | Special Notes |
| MeatChili, stews | 2 cups | 3 - 4 min. | Place in microwave-safe dish.Cover. Stir halfway through cooking time. |
| Hamburgers, meat loaf slices | 1 serving2 servings | 12 - 1 min.1 - 2 min. | Place on microwave-safe plate.Cover with paper towel.Turn over once. |
| PoultryChicken pieces | 24 | 1 - 2 min.2 - 3 min. | Heat on microwave-safe plate.Cover with wax paper. If fried, cover with paper towel. |
| Chicken, turkey, sliced | 85 - 140 g | 1 - 2 min. | Heat on microwave-safe plate.Cover with wax paper. |
| Cooked rice, pasta | 1 cup (250 mL)2 cups (500 mL) | 1 - 2 min.2 - 3 min. | Heat in microwave-safe casserole, covered with plastic wrap. |
| Canned vegetable | 230 g425 g | 1 - 2 min2 - 3 min. | Use microwave-safe casserole, covered. Stir once. |
| Cooking | Amount | Time | Special Notes |
| Mashed potatoes instant | 4 servings | 3 - 5 min. | Follow package directions.Reduce liquid by 1 tbsp (15 mL). |
| Pudding and pie filling mix | 90 g | 4 - 6 min. | Follow package directions.Stir once. |
| CerealsCream of wheat (regular) | 14 cup (50 mL) | 1 - 2 min. | Add 34 cup (175 mL) of water.Cook uncovered. Stir once. Let stand for 1 minute. |
For food/recipes prepared most often, you can easily custom program your own sequences or cooking stages (power levels/cooking times). You can set 3 different custom programs (No.1, No.2 and No.3). Each program may have 1 - 3 cooking stages.
For example, you frequently cook 1 cup long-grain rice. For Stage 1 you use 100% power for 5 minutes to bring water to a boil. You then add rice, salt and butter and for Stage 2 you use 30% power for 20 minutes to cook rice. To set these 2 cooking sequences in the first Custom Program (No.1):
Stage 1 for 5 minutes at P100 (100% power)
Stage 2 for 20 minutes at P30 (30% power)
| 1 | Press CUSTOM PROGRAMS once.No.1 appears in the display. | CUSTOMPROGRAMS |
| 2 | Press 5,0 and 0 to enter 5 minutes. | 500 |
| 3 | Press POWER LEVEL once to selectP100. | POWERLEVEL |
| 4 | Press 2,0,0 and 0 to enter 20 minutes. | 2000 |
| 5 | Press POWER LEVEL repeatedly untilP30 appears in display. | POWERLEVEL |
| 6 | Press CUSTOM PROGRAMS once.The Custom Program No.1 is nowprogrammed into the microwavememory. | CUSTOMPROGRAMS |
To use a Custom Program:
| 1 | Once programming is completed, you can call up any of your Custom Programs (No.1, No.2 or No.3) by pressing the CUSTOM PROGRAMS keypad once, twice or 3 times. | CUSTOM PROGRAMS |
| 2 | Press START. | START |
To delete a Custom Program:
| 1 | Call up the Custom Programs (No.1, No.2 or No.3) you want to delete by pressing CUSTOM PROGRAMS. | CUSTOMPROGRAMS |
| 2 | Press 0 and then CUSTOM PROGRAMS. | 0 CUSTOMPROGRAMS |
Note: • For custom programming, only Time Cooking can be used.
• For more details, see page 14 for multi-stage cooking.
This feature allows you to prepare packaged foods perfectly with no guess work. For instance, frozen food instructions may specify to reheat the item on MED, LOW, or in a 700W microwave oven. To compensate for the higher wattage of this microwave oven, the cooking time and power levels will be automatically adjusted when Menu Match is used. Example: To cook a frozen entree that requires 3-minutes cooking in a 700W oven:
| Step | Procedure | Keypad | |
| 1 | Press MENU MATCH five times to enter the manufacturer's recommended power level, 700W. | ||
| Press | Power Level | ||
| once twice3 times4 times5 times6 times | HIGH MEDIUM LOW800W700W600W | ||
| 2 | Press 3, 0 and 0 to enter the manufacturer's recommended defrosting time. | 3 0 0 | |
| 3 | Press START.ADJUST appears and a beep sounds.The cook time display changes to the actual time adjusted by the oven and counts down in the display. | START | |
Note: • For a range of time (such as 5 - 7 minutes), use 6 minutes.
• If the instructions do not specify a power level, use HIGH.
- Closely watch the cooking/defrosting progress when preparing an item for the first time.
- When MED-HIGH power is called for, use MEDIUM level. Add more time to the suggested cooking time on the package, if necessary.
- Two stages of food preparation can be programmed at one time using Menu Match feature. Repeat steps 1 - 2, and then press START.
SENSOR COOKING RECIPES
CASSEROLE RECIPES
| Ham and Potato Scallop | Cooking Time: About 20 - 30 minutes |
| 1 cup (250 mL) white sauce, seasoned as desired | Place potatoes in 1 12 litre microwave-safe casserole. |
| 3 medium potatoes, peeled and thinly sliced (about 450 g) | Add ham and onion. |
| 5 oz. (140 g) diced cooked ham | Pour white sauce over ham and potatoes mixture, stir to combine. |
| 1 tsp. (5 mL) instant minced onion | Cover with casserole lid. |
| ^1/_4 cup (30 g) shredded cheddar cheese | Cook on CASSEROLE. |
| 4 servings | Stir once at pause prompt. After cooking, sprinkle with cheese. Cover and let stand for 10 minutes or until cheese is melted. |
| Casserole Italiano | Cooking Time: About 30 - 40 minutes | |
| ^1/_2 | lb (225 g) lean ground beef | Crumble beef into 2 litre microwave-safe casserole. |
| ^3/_4 | cup (175 mL) spaghetti sauce | |
| ^1/_2 | can (115 g) tomato sauce | Cook on P100, 2 to 3 minutes. |
| ^3/_4 | cup (175 mL) water | Stir to break up beef. Drain. |
| ^1/_2 | can (230 g) green beans, drained | Add remaining ingredients except cheese to beef. Blend well. |
| 3 | cups (115 g) uncooked medium-width egg noodles | Cover with casserole lid. |
| 1 | tbsp. (15 mL) onion flakes | Cook on CASSEROLE. |
| 1 | clove garlic, minced | Stir once at pause prompt. |
| 1 | tbsp. (15 mL) sugar | After cooking, sprinkle with cheese. |
| 1 | tsp. (5 mL) Italian herb seasoning | Stir and let stand before serving. |
| ^1/_4 | tsp. (1 mL) salt | |
| Pepper to taste | ||
| 1 | cup (115 g) shredded mozzarella cheese | |
| 6 - 8 servings | ||
| Onion-Beef Soup | Cooking Time: About 55 - 65 minutes | |
| 3 | medium onions, thinly sliced | Combine onions and butter in 3 litre microwave-safe casserole. |
| 1/4 | cup (50 mL) butter or margarine | |
| 4 | cups (1000mL) beef broth | Cover with casserole lid. |
| 1/4 | cup (50 mL) white wine | Cook on P100, 4 to 6 minutes. |
| 1 | tsp. (5 mL) Worcestershire sauce | Add remaining ingredients, except cheese. Blend well. Cover. |
| 1 | tsp. (5 mL) salt | Cook on CASSEROLE. |
| 1 | tsp. (5 mL) soy sauce | Stir once at pause prompt. Serve in bowls with cheese sprinkled on top. |
| 1/2 | tsp. (2 mL) paprika | |
| Grated Parmesan cheese | ||
| 4 - 6 servings | ||
CASSEROLE/ FISH FILLET RECIPES
| Hearty Beef Vegetable Stew | Cooking Time: About 60 - 75 minutes |
| 2^1/_4 cups (550 mL) water2 beef bouillon cubes450 g round steak, cut into 1 cm cubes3 tbsp. (45 mL) cornstarch2 large potatoes, peeled and cubed ^3/_4 cup (175 mL) thinly sliced carrots ^1/_2 cup (125 mL) thinly sliced celery1 medium onion, diced ^1/_2 tsp. (2 mL) salt ^1/_4 tsp. (1 mL) freshly ground pepper ^1/_4 tsp. (1 mL) thyme1 bay leaf, crushed | Place all ingredients in 3 litre microwave-safe casserole, and stir.Cover with casserole lid.Cook on CASSEROLE. Stir once at pause prompt. |
| 4 - 6 servings |
| Bacon Vegetable Soup | Cooking Time: About 70 - 80 minutes |
| 115 g sliced bacon, diced | Combine all ingredients in 3 litre microwave-safe casserole. |
| 1 medium tomato, peeled and chopped | Cover with casserole lid. |
| 1 carrot, sliced | Cook on CASSEROLE. |
| 1 stalk celery, sliced | Stir once at pause prompt. |
| 1 medium red potato, cubed | |
| 1 small zucchini, sliced | |
| 1 medium onion, chopped | |
| 2 bay leaves | |
| 1 tsp. (5 mL) basil | |
| 1 tsp. (5 mL) Italian herb seasoning,season as desired | |
| 3 cups (750 mL) beef broth | |
| 4 - 6 servings |
| Fish Fillets with Mushrooms | Cooking Time: About 10 - 15 minutes |
| 450 g fish fillets2 tbsp. (30 mL) butter or margarine2 tbsp. (30 mL) dry white wine ^1/_2 tsp. (2 mL) lemon juice ^1/_2 cup (115 g) sliced fresh mushrooms2 green onions, finely chopped1 tomato, peeled and diced ^1/_2 tsp. (2 mL) salt6 servings | Arrange fish fillets so that thick portions are toward the outer edges of 20 cm microwave-safe baking dish.Dot with butter.Combine wine and lemon juice, and pour over fish.Sprinkle with mushrooms, green onions, and tomato.Cover with plastic wrap.Cook on FISH FILLET.Remove from oven and let stand covered, 2 minutes. |
VEGETABLE RECIPES
| Carrot and Basil Bake | Cooking Time: About 7 - 10 minutes |
| 450 g carrots, peeled and shredded | Combine all ingredients in 2 litre microwave-safe casserole. |
| 1 small onion, minced | |
| 2 tbsp. (30 mL) butter or margarine | Cover with casserole lid. |
| 2 tbsp. (30 mL) water | Cook on VEGETABLE. |
| 1 tsp. (5 mL) parsley flakes | Stir once at pause prompt. |
| 12 tsp. (2 mL) basil | Let stand 3 minutes before serving. |
| 12 tsp. (2 mL) salt | |
| 6 servings |
| Asparagus with Mustard Sauce | Cooking Time: About 6 - 9 minutes |
| 450g asparagus, cleaned and cut into pieces ^1/_4 cup (50 mL) water ^1/_3 cup (75 mL) mayonnaise1 tbsp. (15 mL), minced fresh parsley1 tsp. ((5 mL) prepared dijon-style mustard ^1/_2 tsp (2 mL) onion salt White pepper to taste6 servings | Combine asparagus and water in 1^1/_2 litre microwave-safe casserole.Cover with casserole lid.Cook on VEGETABLE.Stir once at pause prompt. Drain.Set aside. Combine remaining ingredients in small bowl.Pour over asparagus and toss lightly to coat asparagus.Cook on P100, 1 to 1^1/_2 minutes or until heated through. |
| Creamy Cabbage | Cooking Time: About 10 - 14 minutes |
| 450 g cabbage, shredded 14 cup (50 mL) water1 package (85 g) cream cheese, cut into cubes2 tbsp. (30 mL) milk 12 tsp. (2 mL) celery seed 12 tsp. (2 mL) saltDash pepperChopped parsley | Place cabbage and water in 2 litre microwave-safe casserole.Cover with casserole lid.Cook on VEGETABLE.Stir once at pause prompt.Add remaining ingredients except parsley. Stir. Cover.Cook on P100, 4 to 5 minutes.Let stand 2 minutes. Stir and sprinkle with parsley before serving. |
| 4 - 6 servings |
TROUBLESHOOTING
Check your problem by using the chart below and try the solutions for each problem. If the microwave oven still does not work properly, contact the nearest authorized service center.
| TROUBLE | POSSIBLE CAUSE | POSSIBLE REMEDY |
| Oven will not start. | Electrical cord for oven is not plugged in.Door is open.Wrong operation is set. | Plug into the outlet.Close the door and try again.Check instructions, (pages 12-24) |
| Arcing or sparking. | Materials to be avoided in microwave oven are used.The oven is operated when empty.Spilled food remains in the cavity. | Use microwave-safe cookware only. (page 7)Do not operate with oven empty.Clean cavity with wet towel. |
| Unevenly cooked foods. | Materials to be avoided in microwave oven are used.Food is not defrosted completely.Cooking time, power level is not suitable.Food is not turned or stirred. | Use microwave-safe cookware only. (page 7)Completely defrost food.Use correct cooking time, power level.Turn or stir food. |
| Overcooked foods. | Cooking time, power level is not suitable. | Use correct cooking time, power level. |
| Undercooked foods. | Materials to be avoided in microwave oven are used.Food is not defrosted completely.Oven ventilation ports are restricted.Cooking time, power level is not suitable. | Use microwave-safe cookware only. (page 7)Completely defrost food.Check to see that oven ventilation ports are not restricted.Use correct cooking time, power level. |
| Improper defrosting. | Materials to be avoided in microwave oven are used.Cooking time, power level is not suitable.Food is not turned or stirred. | Use microwave-safe cookware only. (page 7)Use correct cooking time, power level.Turn or stir food. |
| ERROR message (ERROR 1 or ERROR 2) appears in the display window. | ERROR 1 lights if door is opened before time countdown appears in the display.ERROR 2 lights if the oven has not been plugged into a power supply cord for more than 5 minutes when you start a Sensor Cooking. | Touch STOP/CLEAR and restart using Time Cooking on page 14.Touch STOP/CLEAR and wait for 5 minutes to restart from step 1 of Auto Sensor Microwaving on page 15. |
| Poor cooking results using Auto Sensor Microwaving. | The food was not covered properly.STOP/CLEARwas pressed or the door was opened while the sensor was programming the right cooking time and power level.The food being cooked was not suitable for Auto Sensor Microwaving.There may have been too much or not enough food to ensure proper results from Auto Sensor Microwaving. | See pages 16 for instructions on how to prepare food.Do not open the door or press STOP/CLEAR while display shows SENSOR COOKING.Use Time Cooking (see page 14).When cooking food not listed in Sensor Reheating/ Cooking guide (page 17-18), use Time Cooking on page 14. |
QUESTIONS AND ANSWERS
Q. When the oven is plugged into a wall outlet for the first time, it does not work properly. What is wrong?
A. The microcomputer used in the oven control may temporarily become scrambled and fail to function as programmed. Unplug the oven from the wall outlet and then plug it back in. The microcomputer will then reset for proper functioning.
Q. Why is there noise coming from the turntable when the oven is turned on?
A. This noise occurs when the turntable roller rest and cavity bottom are dirty. Clean the turntable roller rest cavity bottom. Frequent cleaning of these parts should eliminate or reduce the noise.
Q. Why is there noise coming from the oven when using a lower power level?
A. When cooking with power other than P100, the oven automatically turns on and off to obtain lower power output. The clicking noise can be heard when the oven switches on and off. This is normal.
Q. Why is there steam coming out of the air exhaust vent?
A. Steam is produced during cooking. The microwave oven has been made to vent this steam.
Q. What is wrong when the oven light will not glow?
A. There may be several reasons why the oven light will not glow. The light bulb has burned out or START has not been pressed.
Q. Why do eggs sometimes pop?
A. The egg yolk may pop because of steam build-up inside the membrane. Pierce the membrane with a toothpick before cooking it. Never microwave eggs in the shell since they may explode.
Q. How are boil-overs avoided?
A. Use a larger utensil than usual for cooking. If you open the oven door or touch STOP/CLEAR, the food will stop boiling.
Wipe the oven inside and outside with a soft cloth and a mild detergent solution. Then rinse and wipe dry. This should be done on a weekly basis, more often if needed. Never use cleaning powders or rough pads. Excessive oil splatters on the inside top will be difficult to remove if left for many days. Wipe splatters with a wet paper towel, especially after cooking chicken or bacon.
REMOVABLE PARTS
The following parts may be removed as described. They should be washed in warm (not hot) water with a mild detergent and a soft cloth. Once they are clean, rinse them well and dry with a soft cloth. Never use cleaning powders, steel wool or rough pads.
- The turntable may be cleaned at the sink. Be careful not to chip or scratch the edges as this may cause the turntable to break during use.
- The turntable roller rest should be cleaned regularly.
SPECIAL CARE
For best performance and safety, the inner door panel and the oven front frame should be free of food or grease buildup. Wipe them often with a mild detergent. Then rinse and wipe dry. Never use cleaning powders or rough pads.
After cleaning the control panel, press STOP/CLEAR to clear any entries that might have been entered accidentally while cleaning the panel.
SENSOR COOKING
- Press REHEAT or COOK.
- Enter the number of your food category selection.
- If desired, press MORE/LESS once or twice to increase or decrease cooking time.
- Press START.
REHEAT
- Frozen Reheat
- Reheat
- Soup/Beverage
COOK
- Casserole
- Fish fillet
- Meat beef
- Meat chicken
- Meat lamb
- Meat pork
- Potato
- Vegetable
BILLBOARD: Provides quick access to favorite food categories. The oven automatically changes list in order of frequency of use.
NOTE: The oven stops about halfway through cooking for meat menus. The oven restarts after 5 minutes to the end if you do not open the door.
CHILD LOCK-OUT
To set:
- Press and hold START for 4 seconds. Indicator LOCK lights.
To cancel:
- Press and hold START for 4 seconds. Indicator LOCK disappears.
QUICK REHEATING (HI-power only)
- Press QUICK REHEAT.
- Press a number (0-9) for cooking time.
NOTE: To set Quick Reheating for 30 seconds, press QUICK REHEAT and 0.
TIME COOKING
- Press numbers for cooking time (in minutes and seconds).
- Press POWER LEVEL until desired power level (P100 - P 0) appears in the display.
- Press START.
ADD 30 SECONDS
- Press ADD 30 sec.
- Press START.
NOTE: If you use ADD 30 sec. while cooking, you do not need to press START. The oven allows you to use ADD 30 sec. up to 3 times while oven is in operation
CUSTOM PROGRAMS
To set your custom program:
- Press CUSTOM PROGRAMS 1 - 3 times to select program.
- Press numbers for cooking time (in minutes and seconds).
- Press POWER LEVEL until desired power level (P100 - P 0) appears in the display. To program 2 or 3 stage cooking, repeat steps 2 and 3.
- Press CUSTOM PROGRAMS.
NOTE: Only Time cooking can be used.
To use your program:
-
Press CUSTOM PROGRAMS 1 - 3 times to select your desired program.
-
Press START.
To delete program:
-
Press CUSTOM PROGRAMS 1 - 3 times to select program you want to delete.
-
Press 0.
-
Press CUSTOM PROGRAMS.
OPTIONAL SETTINGS
Allows you to customize five oven features.
- Press OPTIONS to select:
once Word Prompt on/off
twice Billboard Reset
3 times Clock on/off
4 times Beep on/off
5 times Language
- Press a number (1 - 3) to select your desired setting.
MENU MATCH
-
Press MENU MATCH 1 - 6 times until the power level shown on the food package appears: HIGH MEDIUM LOW 800W 700W 600W
-
Enter the required cook time shown on the package.
-
Press START.
CLOCK
- Press CLOCK.
- Press numbers to set time.
- Press CLOCK.
KITCHEN TIMER
- Press KITCHEN TIMER.
- Press numbers for desired time.
- Press START.
- SAVE THESE INSTRUCTIONS
- PRECAUTIONS TO AVOID POSSIBLE EXPOSURE TO EXCESSIVE MICROWAVE ENERGY
- Please record your product's information
- SAFETY
- SET UP
- OPERATION
- COOKING GUIDE
- MAINTENANCE
- PROPER AND SAFE USE OF YOUR OVEN
- NOTE
- WARNING -
- IMPORTANT SAFETY INSTRUCTIONS
- If a fire should start or smoke is observed:
- Keep in mind the following rules at all times:
- UTENSILS
- CAUTION
- Personal Injury Hazard
- Utensil Test:
- NAMES OF OVEN PARTS AND ACCESSORIES
- Door release button
- TURNTABLE INSTALLATION
- CHILD LOCK-OUT
- ADD 30 SECONDS
- Time Defrosting:
- Multistage Cooking:
- Delay Start Cooking:
- Meat Cooking Techniques:
- Pause Reminder
- MORE/LESS ADJUSTMENT
- AUTO SENSOR MICROWAVING TIPS
- General Sensor Cooking/Reheating:
- REHEAT, FROZEN REHEAT
- MEAT (CHICKEN, BEEF, LAMB, PORK)
- SOUP/BEVERAGE
- OPTIONAL SETTINGS
- Defrosting Techniques:
- SENSOR COOKING RECIPES
- TROUBLESHOOTING
- QUESTIONS AND ANSWERS
- REMOVABLE PARTS
- SPECIAL CARE
- SENSOR COOKING
- REHEAT
- COOK
- QUICK REHEATING (HI-power only)
- TIME COOKING
- CUSTOM PROGRAMS
- MENU MATCH
- CLOCK
- KITCHEN TIMER
Brand : SANYO
Model : EM-X491
Category : Microwave