
ARX-03 - Hi-Fi System ROLAND - Free user manual and instructions
Find the device manual for free ARX-03 ROLAND in PDF.


| Product Type | Hi-Fi System |
| Brand | Roland |
| Model | ARX-03 |
| Dimensions (W x H x D) | 430 x 90 x 300 mm |
| Weight | 5.0 kg |
| Power Supply | AC 230V, 50 Hz |
| Power Consumption | 50 W |
| Audio Output Power | 2 x 20 W RMS |
| Frequency Response | 20 Hz - 20 kHz |
| Signal-to-Noise Ratio | > 90 dB |
| Supported Media | CD, CD-R/RW, MP3 (via USB) |
| Tuner | AM/FM with 30 presets |
| Inputs | AUX (RCA), USB, Microphone (6.3mm) |
| Outputs | Headphone (3.5mm), Speaker terminals |
| Speaker Configuration | 2-way bookshelf speakers (included) |
| Remote Control | Included (IR) |
| Maintenance | Clean with soft dry cloth; avoid solvents |
| Safety Instructions | Do not expose to moisture; unplug during storms |
| Spare Parts Availability | Contact Roland authorized service centers |
| Repairability | Repairable by qualified technicians only |
| Country of Origin | Japan |
Frequently Asked Questions - ARX-03 ROLAND
User questions about ARX-03 ROLAND
0 question about this device. Answer the ones you know or ask your own.
Ask a new question about this device
Download the instructions for your Hi-Fi System in PDF format for free! Find your manual ARX-03 - ROLAND and take your electronic device back in hand. On this page are published all the documents necessary for the use of your device. ARX-03 by ROLAND.
USER MANUAL ARX-03 ROLAND
SuperNATURAL Expansion Board
ARX-03 BRASS
Owner's Manual
Before using this product, carefully read the sections entitled: "USING THE UNIT SAFELY" and "IMPORTANT NOTES" (p. 4; p. 6). These sections provide important information concerning the proper operation of the product. Additionally, in order to feel assured that you have gained a good grasp of every feature provided by your new product, Owner's manual should be read in its entirety. The manual should be saved and kept on hand as a convenient reference.
Copyright © 2009 ROLAND CORPORATION All rights reserved. No part of this publication may be reproduced in any form without the written permission of ROLAND CORPORATION.
USING THE UNIT SAFELY
INSTRUCTIONS FOR THE PREVENTION OF FIRE, ELECTRIC SHOCK, OR INJURY TO PERSONS
About ⚠️ WARNING and ⚠️ CAUTION Notices
| ⚠ WARNING | Used for instructions intended to alert the user to the risk of death or severe injury should the unit be used improperly. |
| ⚠ CAUTION | Used for instructions intended to alert the user to the risk of injury or material damage should the unit be used improperly.* Material damage refers to damage or other adverse effects caused with respect to the home and all its furnishings, as well to domestic animals or pets. |
About the Symbols
| The △ symbol alerts the user to important instructions or warnings. The specific meaning of the symbol is determined by the design contained within the triangle. In the case of the symbol at left, it is used for general cautions, warnings, or alerts to danger. | |
| The ⊗ symbol alerts the user to items that must never be carried out (are forbidden). The specific thing that must not be done is indicated by the design contained within the circle. In the case of the symbol at left, it means that the unit must never be disassembled. | |
| The ● symbol alerts the user to things that must be carried out. The specific thing that must be done is indicated by the design contained within the circle. In the case of the symbol at left, it means that the power-cord plug must be unplugged from the outlet. |
ALWAYS OBSERVE THE FOLLOWING
WARNING
- Do not open or perform any internal modifications on the product.

WARNING
- Do not open or perform any internal modifications on the product. (The only exception would be where this manual provides specific instructions which should be followed in order to put in place user-installable options; see p. 8.)

WARNING
- Do not attempt to repair the product, or replace parts within it (except when this manual provides specific instructions directing you to do so). Refer all servicing to your retailer, the nearest Roland Service Center, or an authorized Roland distributor, as listed on the "Information" page.

- Never install the product in any of the following locations. - Subject to temperature extremes (e.g., direct sunlight in an enclosed vehicle, near a heating duct, on top of heat-generating equipment); or are - Damp (e.g., baths, washrooms, on wet floors); or are - Exposed to steam or smoke; or are - Subject to salt exposure; or are - Humid; or are - Exposed to rain; or are - Dusty or sandy; or are - Subject to high levels of vibration and shakiness.

- In households with small children, an adult should provide supervision until the child is capable of following all the rules essential for the safe operation of the product.


WARNING
- Protect the product from strong impact. (Do not drop it!)

- Before installing the ARX-03, you must first always turn off the (Fantom-G6/G7/G8, Cakewalk VS-700R) and unplug its power cord.

CAUTION
• Install the circuit board only into the specified product (Fantom-G6/G7/G8, Cakewalk VS-700R). Remove only the specified screws during the installation.


IMPORTANT NOTES
When you purchase the ARX-03 SuperNATURAL Expansion Board from an authorized Roland dealer, the included sounds and samples are licensed, not sold, to you by Roland Corporation, for commercial use in music production, public performance, broadcast, etc.
You may use any of the included phrases and/or samples in a commercial or non-commercial recording without paying any additional license fees. However, you must strictly adhere to the following crediting guidelines on any music recording that utilize material from ARX-03.
Reproduction or duplication of this collection or any of the sound recording contained in the ARX-03, either as they exist on this expansion board or by any means of reformatting, mixing, filtering, re-synthesizing, processing or otherwise editing for use in another product or for re-sale, is strictly prohibited without the express written consent of Roland. All unauthorized giving, trading, lending, renting, re-issue, redistribution or re-sale of the sounds included in the ARX-03 are expressly prohibited.
In Plain English: Be creative in your application of the ARX-03 sounds, and keep this library for your use only. DO NOT COPY IT.
Roland constantly monitors other Soundware releases to check for copyright infringements, and will prosecute all piracy and copyright violations to the fullest extent of the law.
THIS LIBRARY IS GUARANTEED TO BE 100% COPYRIGHT CLEAN.
Placement
- This device may interfere with radio and television reception. Do not use this device in the vicinity of such receivers.
Additional Precautions
- To avoid disturbing your neighbors, try to keep the product's volume at reasonable levels (especially when it is late at night).
- When you need to transport the product, package it in the box (including padding) that it came in, if possible. Otherwise, you will need to use equivalent packaging materials.
- MMP (Moore Microprocessor Portfolio) refers to a patent portfolio concerned with microprocessor architecture, which was developed by Technology Properties Limited (TPL). Roland has licensed this technology from the TPL Group.


Contents
USING THE UNIT SAFELY.... 4
IMPORTANT NOTES 6
Installing the Expansion Board in Your Product 8
Installation in Your Product....9
Confirmation after Installation ....11
To Remove the Board from the Product 12
ARX Series SuperNATURAL Expansion Boards 17
Roland SuperNATURAL Technology 17
ARX-03 Brass 18
The Structure of ARX-03 Brass....19
Different Ways to Play the ARX-03 20
Playing a Solo.... 20
Playing a Section....20
Creating a Patch 23
Main Screen 23
Patch Selection and Indicator 23
Player Select setting 24
Player Settings (Player Edit) 25
Selecting an instrument
(Inst/Level screen).... 25
Feeling settings (Feeling screen).... 26
Breath settings (Breath screen).... 27
Equalizer settings (EQ screen) 28
Section Settings (Section) 29
Playing settings (Section Style screen) 29
Pitch settings (Tune/Key Shift screen) 30
Vibrato settings (Vibrato screen)....31
Volume Balance Settings (MIXER)....31
Volume and pan settings (Level/Pan screen) 31
Equalizer settings (EQ screen)....32
Effect Settings (Effects) 33
Applying effects (Routing screen)....33
Multi-effect settings (MFX screen) 34
Multi-effect control
(MFX Control Screen)....35
Reverb settings (Reverb screen) 36
Controller Assignments (CONTROL)....38
Bender settings (Bend/Hold screen)....38
Controller assignments for each patch
(Control Assign 1 screen) 39
Controller assignments for individual instruments
(Control Assign 2 screen) 40
Initializing a Patch (Utility Screen) 41
Saving a Patch (on the Fantom-G)....41
Multi-Effects List....42
Multi-Effects Types....42
Multi-Effects Parameters 42
About Note....53
Specifications ....54
Index......55
Installing the Expansion Board in Your Product
Cautions when installing
- Before you install this expansion board (hereafter referred to as "the board"), you should carefully read the procedure for installing expansion boards given in the owner's manual of the product in which you're installing it.
-
To avoid the risk of damage to internal components that can be caused by static electricity, please carefully observe the following whenever you handle the board.
-
Before you touch the board, always first grasp a metal object, so you are sure that any static electricity you might have been carrying has been discharged.
- When handling the board, grasp it only by its edges. Avoid touching any of the electronic components or connectors.
-
Save the bag in which the board was originally shipped, and put the board back into it whenever you need to store or transport it.
-
Do not touch any of the printed circuit pathways or connection terminals.
- Never use excessive force when installing a circuit board. If it doesn't fit properly on the first attempt, remove the board and try again.
- When circuit board installation is complete, double-check your work.
Installation in Your Product
- As described in your product's owner's manual, expose the slot in which the expansion board is to be installed.
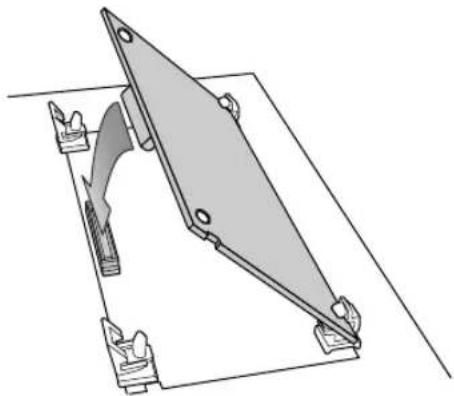
- Orient the board with the slot of your product as shown in the illustration.
Slot of the product
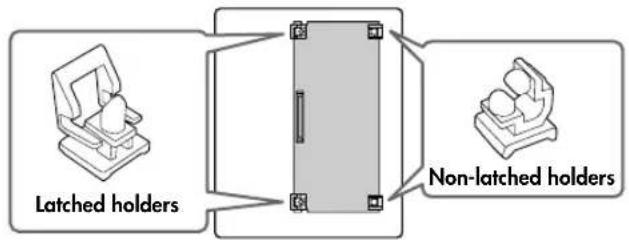
flowchart
graph LR
    A["Latched holders"] --> C["Central Device"]
    B["Non-latched holders"] --> C
    C --> D["Device with control points"]
Board
(expansion board)
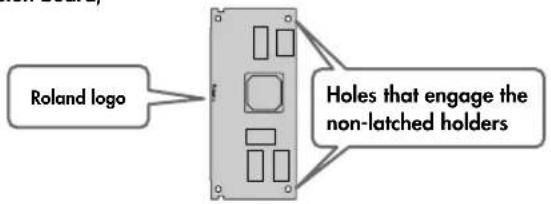
- Insert the board into the product's non-latched board holders until you hear a click.
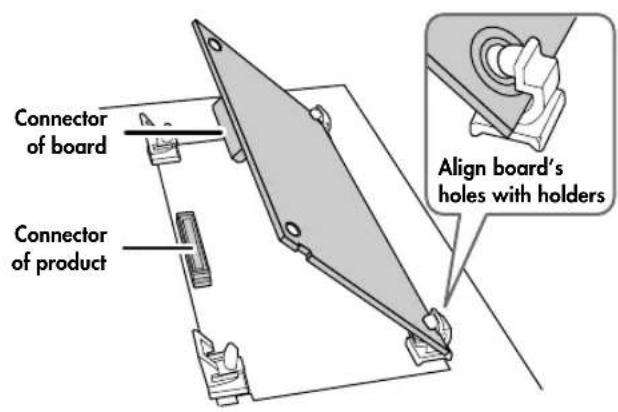
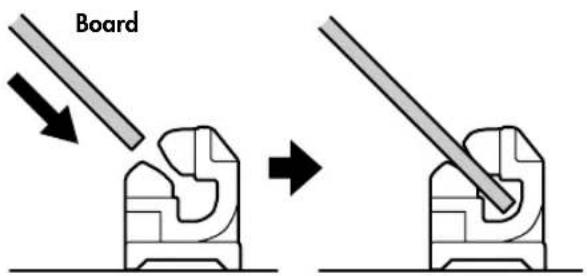
Non-latched holders
- Gently lower the board into place.
natural_image
Technical line drawing of a mechanical component with mounting brackets and a triangular support (no text or symbols)- From above, press down on the board at the three locations indicated in the illustration until the latched board holders lock into place.
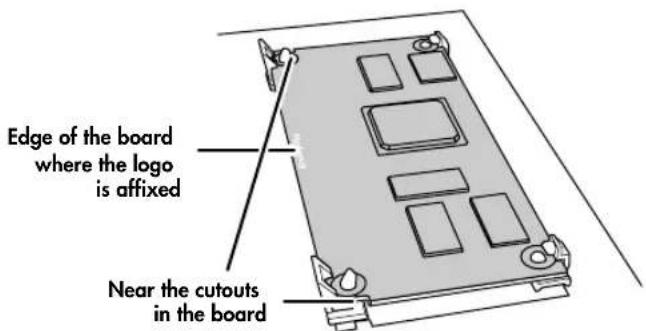
- Verify that the latched board holders are locked.
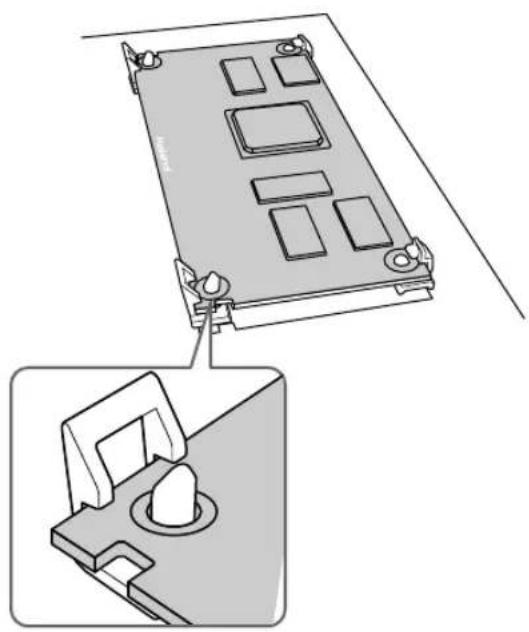
natural_image
Technical illustration of a device with a base panel and a close-up view showing a mechanical component (no text or symbols)- Return the expansion board installation slot to its original state.
Confirmation after Installation
After you've finished installing the expansion board, you will need to perform the following procedure to confirm the installation. This installation procedure needs to be performed only the first time you power up your device after installing the expansion board.
- Power up your device as described in its owner's manual.
- If the expansion board was installed correctly, an installation confirmation screen will appear. Press the [F8] (Execute) button to begin installation.
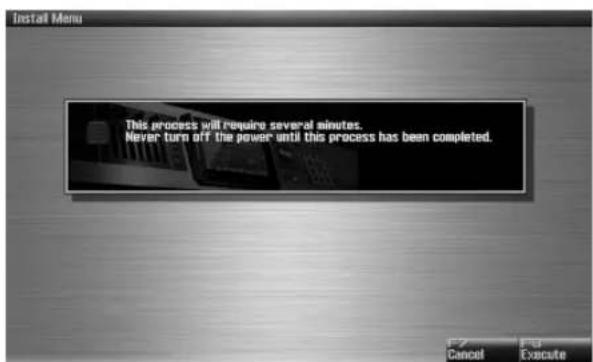
* The screen shown here is for when the board is installed in the Fantom-G.

If the installation confirmation screen does not appear the first time you power up after installing the expansion board, it is likely that the board was not installed correctly. Check once again to make sure that the board is correctly installed.

It may take one to five minutes before installation is finished. Never turn off the power during this installation process.
- When you see the Power Off screen indicating that installation is finished, switch your device's "Please Power Off!", then on again as described in its owner's manual.
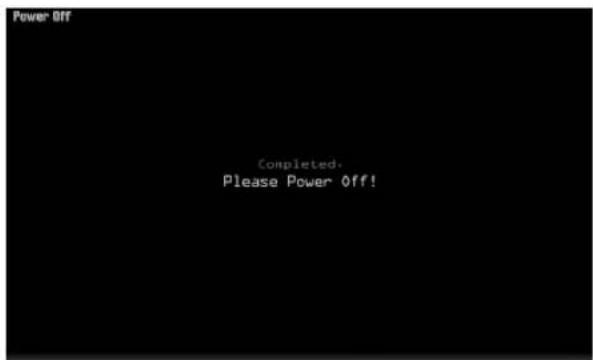
This completes the expansion board installation process.
To Remove the Board from the Product
- As described in your product's owner's manual, expose the slot in which the expansion board was installed.
- Unlatch the latched board holders.
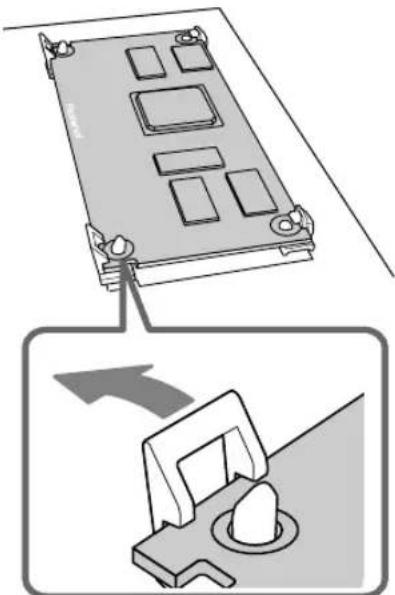
natural_image
Diagram showing a device with labeled components and an arrow indicating direction (no text or symbols present)- Verify that the two latched board holders are unlocked, then gently pull up the board and disconnect the connector.
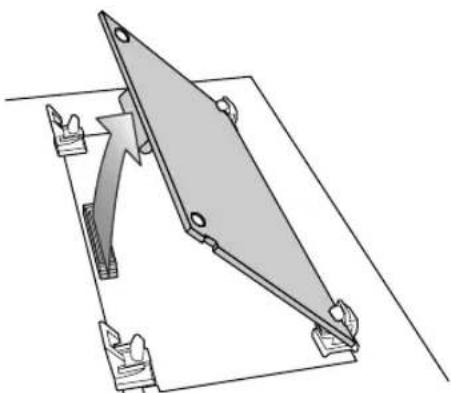
natural_image
Pure mechanical diagram of a triangular frame with mounting holes and a diagonal support (no text or symbols)- Disengage the board from the non-latched board holders, and remove the board.
for Canadian Safety Standard
natural_image
Technical line drawing of a mechanical assembly with mounting brackets and a triangular component (no text or symbols)natural_image
Technical illustration of a device with mounting holes and a close-up view showing internal components (no text or symbols)natural_image
Diagram showing a device with labeled components and an arrow indicating motion (no text or symbols present)natural_image
Pure mechanical diagram of a triangular frame with mounting holes and base plates, no text or symbols presentARX Series SuperNATURAL Expansion Boards
The ARX series SuperNATURAL expansion boards represent a further evolution for Roland's line of expansion solutions, which began with the SR-JV80 series and SRX series—they are a completely new type of expansion board. SuperNATURAL technology delivers natural, richly expressive sounds and effects along with a dedicated graphic user interface, all adding up to a comprehensive application environment that allows an unprecedented degree of expressive playability and customization.
Roland SuperNATURAL Technology
SuperNATURAL
Proprietary Roland sound generation technology that realistically reproduces the tonal changes and performance techniques distinctive of an acoustic instrument, allowing you to perform music that is natural and richly expressive.
ARX-03 Brass
High-quality brass sounds using SuperNATURAL technology
The ARX-03 Brass Expansion board uses SuperNATURAL technology to bring you high-quality brass sounds and new, more intuitive editing features.
Various performance expressions distinctive to brass instruments that were difficult to play from a keyboard can now be reproduced without special operations, and expressively played with realistic tone
Create brass sections with as many as six players with the new "Section" feature
In addition to playing each instrument solo, you can use the Section feature to create and play brass sections consisting of up to six "players." With this function, the performance of each player in the section will take advantage of the distinctive characteristics of the instrument being used; you are free to specify not only the type and volume balance of each instrument, but also make settings for the personality of each player, such as the accuracy and personality of the performance.
This is fundamentally different than the conventional method of "selecting a sound"; it is a new type of editing that allows you to produce high-quality brass sounds by creating your very own brass section.
Stereo reverb taken from the Fantom-G
Built into the ARX-03 are eight types of reverb taken from the Fantom-G. This beautiful reverberation will further enhance the amazing brass sounds.
Multi-effects that meet the needs of diverse musical styles
The ARX-03 contains fifteen multi-effects optimized for brass, including a Lo-Fi effect that delivers the "oldies" sound of the sixties, a comp-limiter used in rock styles to enhance the sonic power, and multiple delays that are particularly effective in solo performance.
The Structure of ARX-03 Brass
Basic structure
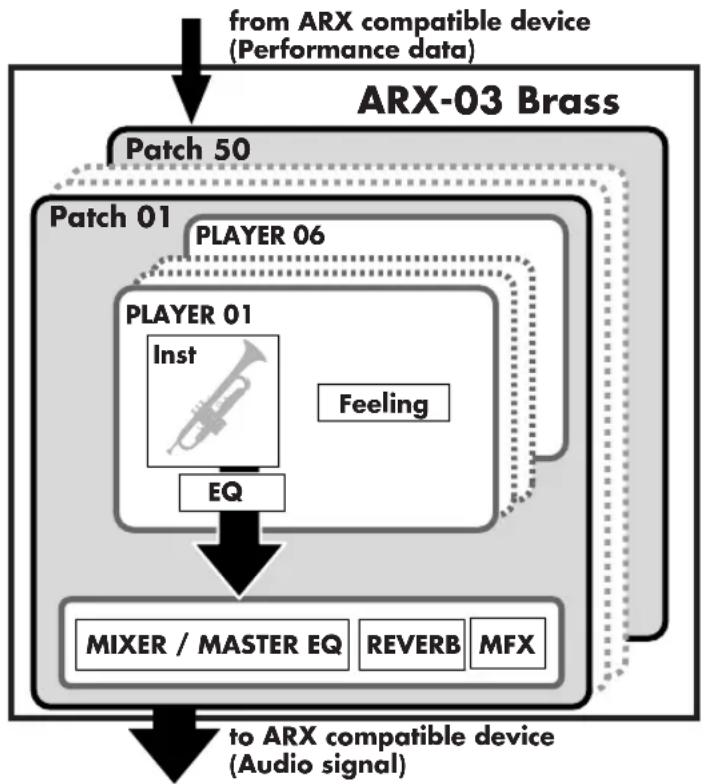
The ARX series of SuperNATURAL expansion boards receives performance data and control from a device that supports the ARX series, produces sound in response to this data, and transmits it as a stereo audio signal to the supporting device.
* The ARX series supports up to sixteen parts, but ARX-03 Brass product is designed with only one part.
Player
The "player" is the smallest unit of sound on the ARX-03 Brass.
For each player, you can select an instrument of eight types, such as trumpet, trombone, or sax.
The ARX-03 Brass can simultaneously use up to six players.
Patch
Settings for six players, MFX (multi-effect) settings, and reverb settings can be collectively saved as a "patch."
The ARX-03 Brass contains fifty such patches.
* If the ARX-03 is installed in a Fantom-G, the patch data is saved in the Fantom-G project.
* If you've installed the ARX-03 in a Fantom-G6/G7/G8, executing a Factory Reset for the Fantom-G6/G7/G8 will reset the expansion boards to their factory-set condition.
flowchart
graph TD
    A["from ARX compatible device (Performance data)"] --> B["ARX-03 Brass"]
    B --> C["Patch 50"]
    C --> D["Player 01"]
    D --> E["PLAYER 06"]
    E --> F["Player 01 Inst"]
    F --> G["EQ"]
    G --> H["MIXER / MASTER EQ"]
    H --> I["REVERB"]
    I --> J["AFX"]
    J --> K["to ARX compatible device (Audio signal)"]
Different Ways to Play the ARX-03
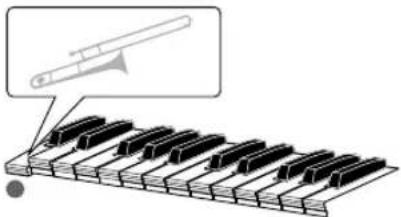
Playing a Solo
By setting the Player Select parameter (p. 24) to a specific player from 1 through 6, you can play a solo for the specified player. Playing solo allows you to perform while conveying a sense of the breathing that's distinctive to wind instruments.
Playing a Section
By setting the Player Select parameter (p. 24) to "ALL," you can play a section performance consisting of up to six players. The ARX-03 will automatically assign the notes among the six players according to your playing on the keyboard, allowing you to play the brass section by yourself.
When playing a section you can choose one of the two following performance modes.
* For details on switching between performance modes, refer to "Player Settings (Player Edit)" (p. 25).
- Unison mode (p. 21)
- Stack mode (p. 22)
Unison Mode
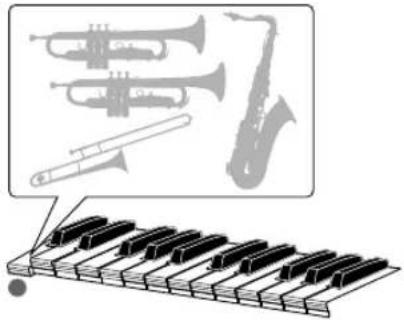
When you play a single key or multiple keys simultaneously with a four-player ensemble setting, the various instruments will be assigned as follows.
When you play single notes
All assigned instruments will sound at the same pitch. Each instrument will sound in an octave that's appropriate for it.
natural_image
Illustration of piano keys and two brass instruments (no text or symbols)When you play multiple notes simultaneously
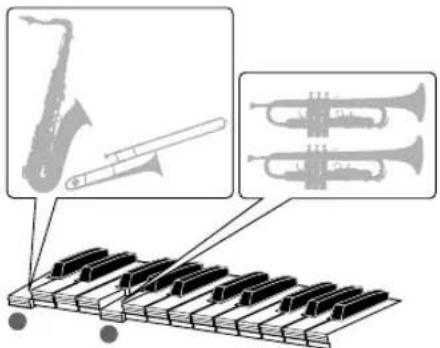
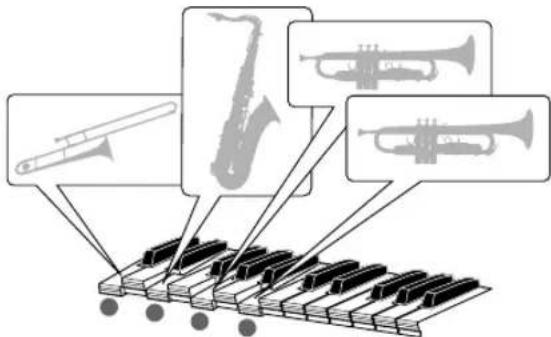
Each instrument will automatically be assigned to a note you play. Units of instruments automatically assigned to a note you play are called a group.
Example: If you play two notes
Example: If you play four notes
Stack Mode
This allows you to successively layer each instrument in the order you've specified "Playing settings (Section Style screen)" (p. 29). Using this mode allows you to simulate the bell tones played by a brass ensemble.
When you play single notes
Only the first instrument will sound.
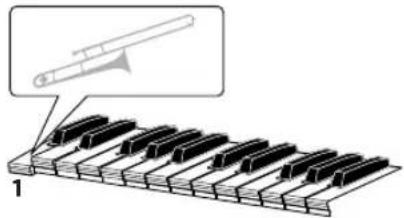
natural_image
Illustration of a piano keyboard with a musical instrument above it (no text or symbols)When you play a second note as well...
The first instrument will continue sounding, and the second instrument will be added.
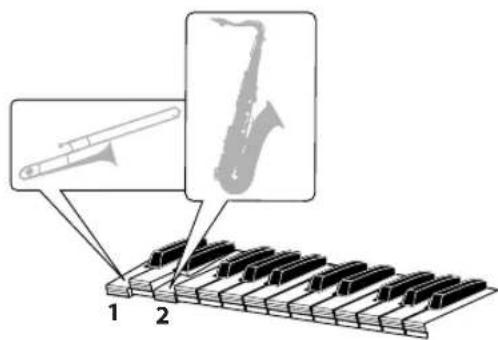
When you additionally play a third and fourth note...
The sounds of the third and fourth instrument will be successively layered.
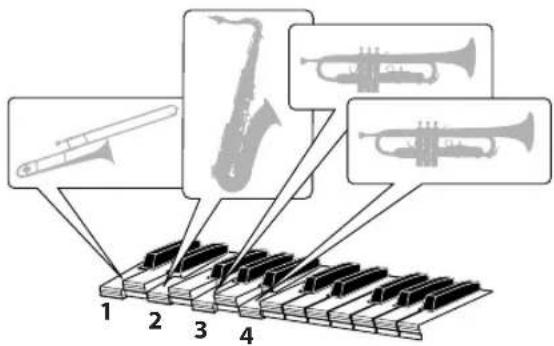
Creating a Patch
About this manual
- The screen images used in this manual are taken from a Fantom-G with the ARX-03 installed. The various procedures described also assume that you are using the ARX-03 installed in a Fantom-G.
- For details on how to move the cursor or edit a value, refer to the owner's manual for the device in which you've actually installed the ARX-03.
Main Screen
This screen is used mainly to select patches.
By changing the Player Select setting you can switch between
playing the section (ALL) or playing a solo (1-6).
Patch Selection and Indicator
Move the cursor to PATCH Number/Name and change the value to select a patch (001–050).
PATCH Number/Name
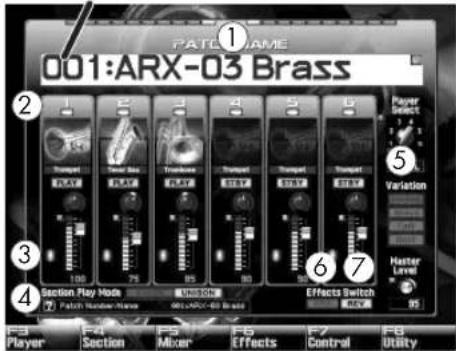
The indicators show the following information.
| No. | Indicator Description | |
| 1 | L/R Level Indicator Left/right levels of the sound | |
| 2 | Player Indicator The players that are currently playing will be lit | |
| 3 | Section Group Indicator | The indicators will be lit at the same height for players in the same group |
| 4 | Section Play Mode Indicator | Play mode status *1 |
| 5 | Variation Indicator Performance | variation status *1 |
| 6 | MFX Switch Turns the multi-effect on/off *2 | |
| 7 | Reverb Switch Turns the reverb | on/off *2 |
*1 This setting cannot changed in the main screen. You can adjust this in "Playing settings (Section Style screen)" (p. 29) These Parameters can be controlled using a specified controller (p. 39).
*2 This setting cannot changed in the main screen. You can adjust this in "Applying effects (Routing screen)" (p. 33)
Player Select setting
When playing the section (Player Srect = ALL)
You can play a section performance consisting of up to six players. You can change the mute setting and instrument level setting for each player.
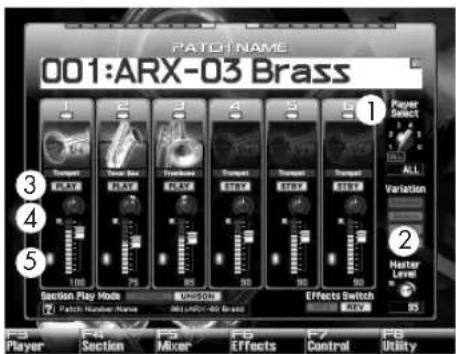
| No. | Parameter | Value Description | |
| 1 | Player Select | All,Solo1-Solo6 | Selects the PlayerAll: Section performanceSolo1-Solo6: Solo performance |
| 2 | Master Level 0-1 | 27 Adjusts the volume of the entire patch | |
| 3 Play/Standby | PLAY,STANDBY | Turns the sound of each player on/off | |
| 4 Inst | Pan L64-63R Adjusts the pan of each instrument | ||
| 5 Inst | Level 0-127 Adjusts the volume of each instrument | ||
When playing a solo (1–6)
You can play a solo for the specified player. You can adjust the instrument level of the selected player.
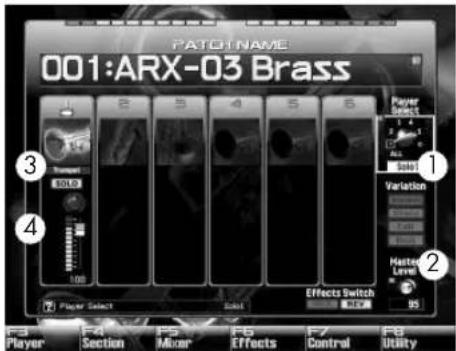
| No. | Parameter | Value Description | |
| 1 | Player Select | All, Solo1-Solo6 | Selects the Player• All: Section performance• Solo1-Solo6: Solo performance |
| 2 | Master Level | 0-127 | Adjusts the volume of the entire patch |
| 3 Inst | Pan L64-63R Adjusts | the pan of each instrument | |
| 4 Inst | Level 0-127 | Adjusts the volume of each instrument | |
Player Settings (Player Edit)
In the Player Edit screens you can create a patch by choosing an instrument for the player, and specifying the accuracy (Stability) and personality (Personality) of the performer, just as though you were a producer giving instructions to a wind musician or a brass ensemble.
Selecting an instrument (Inst/Level screen)
In this screen you can choose from eight instrument types and variations.
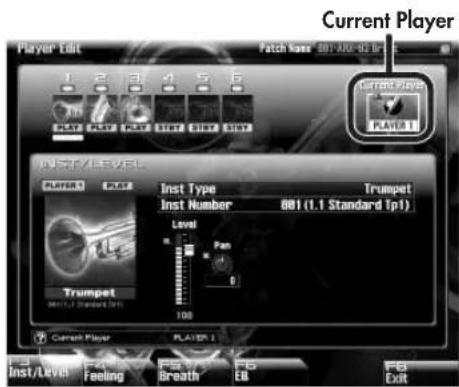
On the Fantom-G From Main Screen F3>F3
Current Player (PLAYER 1-PLAYER 6)
Indicates the number of the currently selected player * This is not shown for solo performances.
| Parameter | Value Description | |
| Inst Type | Trumpet, Mute Trumpet, Flugel Horn, Trombone, Soprano Sax, Alto Sax, Tenor Sax, Baritone Sax | Selects one of eight instrument types |
| Inst Number | Available values will differ depending on the selected Inst. Type | Selects a variation of the instrument selected by Inst Type |
| Play/Standby PLAY, | STANDBY | Turns the sound of each player on/off *1 |
| Inst Level 0–127 | Adjusts the volume of each instrument | |
| Inst Pan L64–63R | Adjusts the pan of each instrument | |
*1 This is not shown for solo performances.
Feeling settings (Feeling screen)
Here you can adjust the tone by making settings that control aspects of the performer's personality, such as the accuracy of the performance (Stability) and the prominence of their playing (Personality).
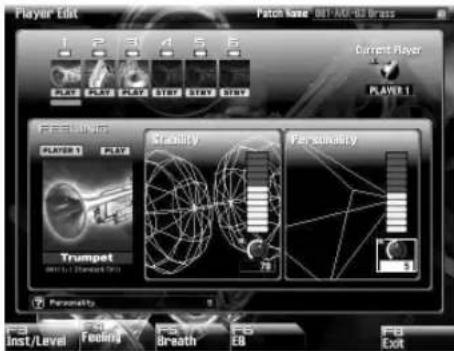
From Main Screen F3>F4 (on the Fantom-G)
| Parameter Value | Description | |
| Stability | 0–127 Adjusts the accuracy of the player | |
| Personality 0–10 Adjusts the prominence of the player | ||
Stability
(Accuracy of the performance)
This adjusts the accuracy of the performance relative to your keyboard playing.
With a value of 0
The initial pitch at the beginning of each note will be unstable. There will also be a greater spread between the timing of each player's notes.
With the maximum value
The pitch at the beginning of each note and the timing of the notes will both be accurate.
* With a Player Select setting of 1–6, this parameter will not affect the spread of the note timing.
Personality
This adjusts the volume and the timing of the end of each note relative to your keyboard performance, making the specified player more prominent in the ensemble.
With a value of 0
The volume and timing will be according to your keyboard playing.
With the maximum value
The volume will be somewhat louder than your keyboard playing. Additionally, the end of the note will be somewhat later, causing that instrument to be more prominent in the ensemble.
* With a Player Select setting of 1–6, this parameter will not affect the volume; only the timing of the end of the notes will be affected.
Breath settings (Breath screen)
Here you can adjust the tone by making settings that are distinctive to wind instruments such as "Growl" (when a Sax instrument is selected), "Turbid" (when Trumpet, Mute Trumpet, Flugel Horn, or Trombone are selected), and "Noise."
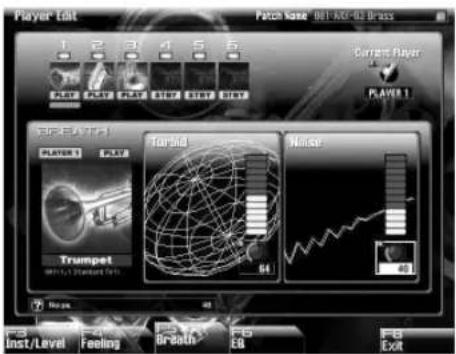
From Main Screen F3>F5 (on the Fantom-G)
| Parameter | Value Description | |
| Growl | 0–127 | Adjusts the amount of growl for strongly played notes of each instrument (Valid for Soprano Sax, Alto Sax, Tenor Sax, and Baritone Sax) |
| Turbid 0–127 | Adjusts the turbidity for softly played notes of each instrument(Valid for Trumpet, Mute Trumpet, Flugel Horn, and Trombone) | |
| Noise 0–127 | Adjusts the amount of breath noise for each instrument | |
Growl (Growl sensitivity)
This adjusts the volume of the distinctive nuance (growl) that occurs when a sax is blown strongly.
With a value of 0
The amount of growl at the beginning of each note will be minimal.
With the maximum value
The beginning of each note will have the maximum amount of growl. The more strongly you play the keyboard, the stronger this effect will be.
Turbid (Turbidity)
This adjusts the volume of the distinctive nuance (turbidity or muddiness) that occurs when a trumpet or trombone is blown softly.
With a value of 0
The amount of turbidity at the beginning of each note will be minimal.
With the maximum value
The beginning of each note will have the maximum amount of turbidity. The more softly you play the keyboard, the greater this effect will be.
Noise (Amount of breath noise)
This adjusts the amount of breath noise for each instrument.
With a value of 0
The amount of breath noise will be minimal.
With the maximum value
The maximum amount of breath noise will be heard.
Equalizer settings (EQ screen)
Here you can adjust the equalizer settings for each instrument.
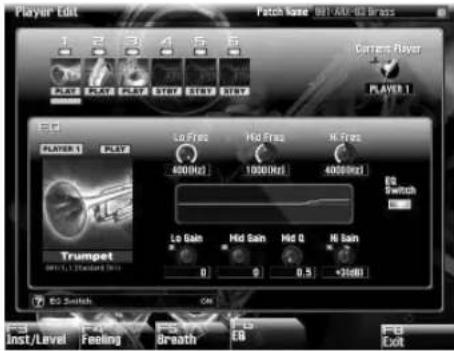
From Main Screen F3>F6 (on the Fantom-G)
Settings for each patch
| Parameter Value Description | ||
| Play/Standby | PLAY, STANDBY | Turns the sound of each player on/off. |
| Low Freq 200, | 400 Hz | Center frequency of the low range |
| Mid Freq | 200, 250, 315, 400, 500, 630, 800, 1000, 1250, 1600, 2000, 2500, 3150, 4000, 5000, 6300, 8000 Hz | Center frequency of the midrange |
| High Freq 2000, | 4000, 8000 Hz | Center frequency of the high range |
| Low Gain -15—+15 dB | Amount of boost/cut for the low range | |
| Mid Gain -15—+15 dB | Amount of boost/cut for the midrange | |
| Mid Q 0.5, 1.0, | 2.0, 4.0, 8.0 | Width of the midrangeHigher values will make the width narrower. |
| High Gain -15—+15 dB | Amount of boost/cut for the high range | |
| EQ Switch BYPASS, ON Turns the EQ on/off | ||
Section Settings (Section)
Playing settings (Section Style screen)
Here you can make basic settings for playing a Section.
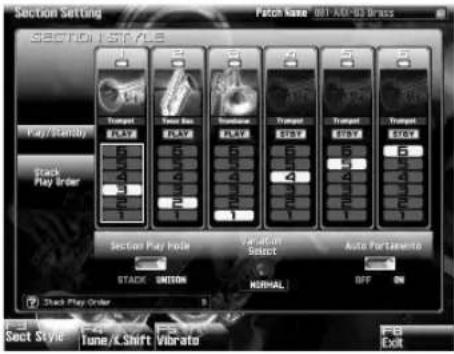
From Main Screen F4>F3 (on the Fantom-G)
| Parameter | Value Description | |
| Play/Standby | PLAY, STANDBY | Turns the sound of each player on/off. |
| Stack Play Order 1-6 | Specifies the order in which each instrument will play when you perform using Stack modeRefer to “Stack Mode” (p. 22). *1 | |
| Section Play Mode | UNISON, STACK | Switches between Unison mode and Stack mode *1 *2 |
| Auto Portamento Switch | OFF, ON | Automatically adds a smooth pitch change when you play a quick phrase as a legato. |
| Parameter | Value Description | |
| Variation Select | NORMAL, STACCATO, FALL, DOIT | Selects the performance variation• NORMAL• Staccato• Fall• Doit |
* If the Stack Play Order settings are identical, the instruments will sound in the order of their player number.
* Staccato, Fall, and Doit cannot be used simultaneously. The last-specified one will take priority.
*1 This setting is valid only for Section playing.
*2 If a multiple number of keys are played simultaneously while in Unison mode, the instruments will be assigned in order, according to the Player number, starting from the upper range.
MEMO
"Section Play Mode" and "Variation Select" parameters can be controlled using a specified controller (p. 39).
Pitch settings (Tune/Key Shift screen)
Here you can make settings for the pitch (tuning and key).
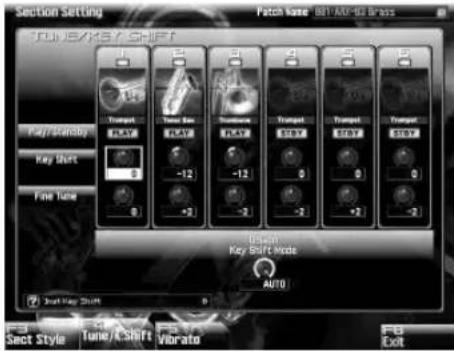
From Main Screen F4>F4 (on the Fantom-G)
Settings for each instrument
| Parameter Value Description | ||
| Play/Standby | PLAY, STANDBY | Turns the sound of each player on/off |
| Inst Key Shift -48-48 | Adjusts the pitch of the soundThis setting is in semitone steps. | |
| Inst Fine Tune -50-50 | Adjusts the pitch of the soundThis setting is in one-cent steps.* 1 cent = 1/100th of a semitone | |
Settings for each patch
| Parameter | Value Description | |
| Unison Key Shift Mode | NONE, FIXED, AUTO | Specifies the "Inst Key Shift" setting.NONE:The "Inst Key Shift" will be ignored.FIXED:The "Inst Key Shift" setting will be applied.AUTO:The "Inst. Key Shift" setting will be applied only when you're playing single notes in Unison mode. The "Inst Key Shift" setting will be ignored if you play chords in Unison mode, or if you're in Stack mode. |
* The "Unison Key Shift Mode" setting is valid only for Section playing.
* The "Inst Key Shift" setting applies to Solo playing regardless of the "Unison Key Shift Mode" setting.
Here you can make settings for the vibrato.
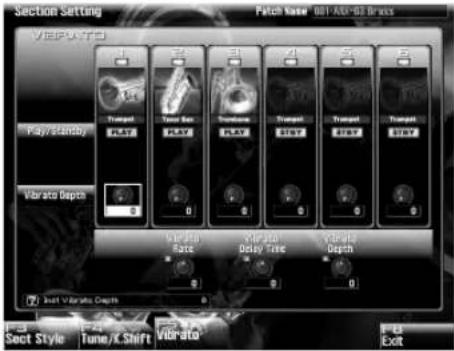
From Main Screen F4>F5 (on the Fantom-G)
Settings for each instrument
| Parameter | Value Description | |
| Play/Standby | PLAY, STANDBY | Turns the sound of each player on/off |
| Inst Vibrato Depth 0-127 | Adjusts the vibrato depth | |
Settings for each patch
| Parameter | Value Description | |
| Vibrato Rate -64-+63 | Adjusts the vibrato speed | |
| Vibrato Delay Time -64-+63 | Adjusts the delay time until vibrato begins to be applied | |
| Vibrato Depth -64-+63 | Adjusts the vibrato depth | |
Volume Balance Settings (MIXER)
Volume and pan settings (Level/Pan screen)
Here you can adjust the volume and pan settings for each instrument.
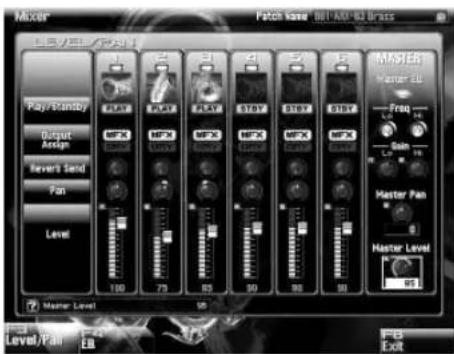
From Main Screen F5>F3 (on the Fantom-G)
Settings for each instrument
| Parameter Value | Description | |
| Play/Standby | PLAY, STANDBY | Turns the sound of each player on/off |
| Output Assign DRY | MFX | Selects whether the original signal will be output without further processing or output via MFX.DRY:Output without further processingMFX:Output via multi-effect |
| Reverb Send Level | 0–127 | Specifies the level of the signal sent to the reverb effect |
| Inst Pan L64–63R | Adjusts the pan of each instrument | |
| Inst Level 0–127 | Adjusts the volume of each instrument | |
Equalizer settings (EQ screen)
Here you can adjust the equalizer settings for each instrument.
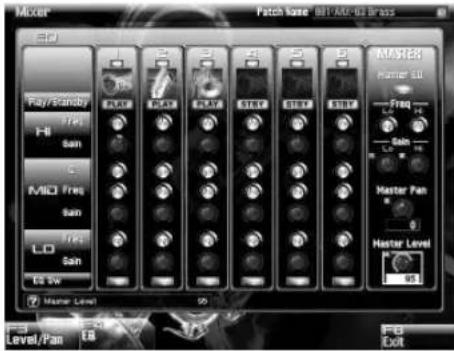
On the Fantom-G From Main Screen F5>F4
Settings for each instrument
| Parameter | Value Description | |
| Play/Standby P | PLAY, STANDBY | Turns the sound of each player on/off |
| High Freq 2000, 4000, 8000 Hz | Center frequency of the high range | |
| High Gain -15—+15 dB | Amount of boost/cut for the high range | |
| Mid Q 0.5, 1.0, 2.0, 4.0, 8.0 | Width of the midrangeHigher values will make the width narrower | |
| Mid Freq | 200, 250, 315, 400, 500, 630, 800, 1000, 1250, 1600, 2000, 2500, 3150, 4000, 5000, 6300, 8000 Hz | Center frequency of the midrange |
| Mid Gain -15—+15 dB | Amount of boost/cut for the midrange | |
| Parameter | Value Description | |
| Low Freq | 200, 400 Hz | Center frequency of the low range |
| Low Gain -15 | +15 dB | Amount of boost/cut for the low range |
| EQ Switch BYPASS, ON Turns the EQ on/off | ||
MASTER (Settings for each patch)
| Parameter | Value Description | |
| MASTER EQ Switch | BYPASS, ON Turns the EQ on/off | |
| MASTER Low Freq 200, 400 Hz | Center frequency of the low range | |
| MASTER High Freq 2000, 4000, 8000 Hz | Center frequency of the high range | |
| MASTER Low Gain -15-+15 dB | Amount of boost/cut for the low range | |
| MASTER High Gain -15-+15 dB | Amount of boost/cut for the high range | |
| Master Level | 0-127 | Adjusts the volume of the entire patch |
| MASTER Pan L64-63R | Adjusts the pan of the entire patch | |
Effect Settings (Effects)
Applying effects (Routing screen)
Here you can make multi-effect (MFX) and reverb settings.
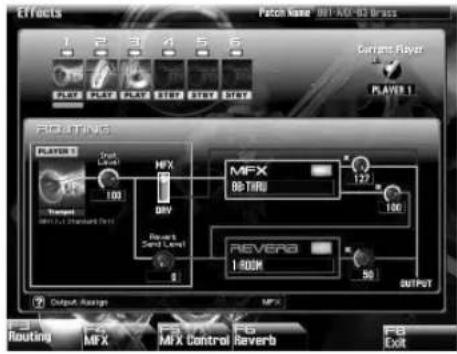
On the Fantom-G From Main Screen F6>F3
Signal Flow
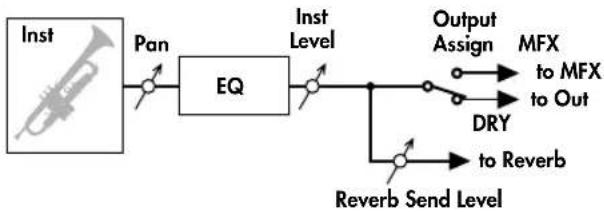
flowchart
graph LR
    A["Inst"] --> B["Pan"]
    B --> C["EQ"]
    C --> D["Inst Level"]
    D --> E["Output Assign"]
    E --> F["MFX to MFX to Out"]
    E --> G["DRY"]
    G --> H["to Reverb"]
    D --> I["Reverb Send Level"]
| Parameter | Value Description |
| Inst Level | 0–127 Adjusts the volume of each instrument |
| Parameter Value Description | ||
| Output Assign | DRY, MFX | Selects whether the original signal will be output without further processing or output via MFX.DRY:Output without further processingMFX :Output via multi-effect |
| Reverb Send Level | 0-127 | Specifies the level of the signal sent to the reverb effect |
| MFX Switch OFF, ON Turns the multi-effect on/off | ||
| MFX Type | 00 (THRU),01-15 | Selects the multi-effect type.For details on each type, refer to "Multi-Effects List" (p. 42) |
| MFX Output Level | 0-127 | Specifies the volume of the sound that has passed through the multi-effect. |
| MFX Reverb Send Level | 0-127 | Specifies the amount of reverb that will be applied to the sound that has passed through the multi-effect.Set this to 0 if you don't want to apply reverb. |
| Reverb Switch OFF | ON Turns the reverb on/off | |
| Reverb Type | 0 (OFF),1 (ROOM),2 (HALL),3 (PLATE),4 (STUDIO),5 (CHURCH),6 (SRV ROOM),7 (SRV HALL),8 (SRV PLATE) | Selects the type of reverbFor details on each type, refer to "Reverb settings (Reverb screen)" (p. 36). |
| Reverb Level | 0-127 | Specifies the volume of the sound with reverb applied. |
Multi-effect settings (MFX screen)
The Effects/MFX screen lets you edit the multi-effect parameters.
In this screen you can make detailed settings for the multi-effect selected by "MFX Type" (p. 34). For more about the parameters that you can edit, refer to "Multi-effect list" (p. 42).
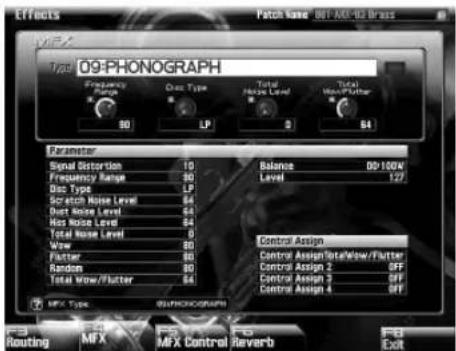
From Main Screen
F6>F4
(on the Fantom-G)
| Parameter Value Description | ||
| MFX Type | 00 (THRU), 01–15 | Selects the type of multi-effect. For details on each type, refer to “Multi-Effects List” (p. 42). |
| MFX Switch OFF, ON Turns the multi-effect on/off | ||
| Control Assign 1–4 | Depends on the MFX Type | Multi-effect control allows you to use MIDI messages to control the parameters of the multi-effect. |
MEMO
For details on Control Assign 1–4, refer to "Multi-effect control (MFX Control Screen)" (p. 35).
Multi-effect control (MFX Control Screen)
If you want to use an external MIDI device to control multi-effect parameters such as the volume or delay time of the effect, you would normally need to transmit device-specific types of MIDI messages called "system exclusive" messages. However, system exclusive messages involve complex settings, and require a larger amount of data to be transmitted.
For this reason, the ARX-03 expansion board lets you use conventional MIDI messages, such as control change messages, to control some of the important multi-effect parameters. For example, you could use the pitch bend lever to change the amount of distortion, or use keyboard touch to change the delay time. The parameters that can be controlled in this way are pre-specified for each multi-effect type. For each multi-effect type, such parameters are indicated by a “#” symbol in the “Multi-effect parameters” list (p. 42).
Multi-effect control refers to this capability of using MIDI messages to control multi-effect parameters in real time. The ARX-03 expansion board lets you use four multi-effect control settings simultaneously.
To use multi-effect control, you need to specify which MIDI source (Source 1–4) will be controlled by which parameter (Control Assign 1–4), and to what extent (Sens 1–4).
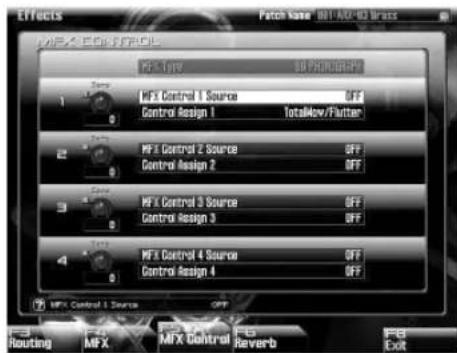
From Main Screen F6>F5 (on the Fantom-G)
MFX Control Sens 1-4
| Value | Description |
| -63→+63 | Specifies the depth of multi-effect control.Select a positive (+) value if you want to modify the parameter in the positive direction (higher value, toward the right, faster, etc.) relative to its current setting. Select a negative (-) value if you want to modify the parameter in the negative direction (lower value, toward the left, slower, etc.) relative to its current setting. For either "+" or "-" settings, larger values will allow a greater range of control. Select "0" if you don't want to modify the parameter. |
MFX Control Source 1-4
| Value | Description |
| OFF | Multi-effect control will not be used. |
| CC 01-CC95 Control change | |
| PITCH BEND Pitch bend | |
| AFTERTOUCH After touch | |
| AUDIO Level of the signal being input to MFX | |
Reverb settings (Reverb screen)
In the Effects/Reverb screen you can specify the type of reverb and how it will sound.
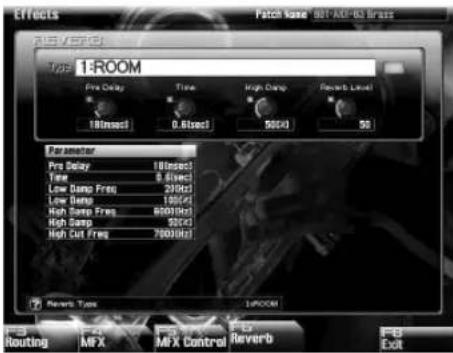
From Main Screen F6>F6 (on the Fantom-G)
| Parameter Value | Description | |
| Reverb Type | 00 (OFF),01 (ROOM),02 (HALL),03 (PLATE),04 (STUDIO),05 (CHURCH),06 (SRV ROOM),07 (SRV HALL),08 (SRV PLATE) | Reverb type |
| Reverb Switch OFF, ON Turns the reverb on/off | ||
| Type: 1 (ROOM)/ 4 (STUDIO) | ||
| Pre Delay 0–100 ms | Delay time from the original sound until the reverb is heard | |
| Time 0.1–3.0 sec. | Time over which the reverb sound decays | |
| Low Damp Freq 20–1000 Hz | Frequency below which the low range of the reverb sound will be dampened | |
| Low Damp 1–100% | Amount of attenuation for LF damp(100%: no effect) | |
| High Damp Freq 1000–10000 Hz | Frequency above which the high range of the reverb sound will be dampened | |
| High Damp 1–100% | Amount of attenuation for HF damp(100%: no effect) | |
| High Cut Freq 1000–10000 Hz | Frequency above which the high range of the final output sound will be cut | |
| Type: 2 (HALL)/ 3 (PLATE)/5 (CHURCH) | ||
| Pre Delay 0–100 ms | Delay time from the original sound until the reverb is heard | |
| Parameter Value Description | ||
| Time 0.1–6.0 sec. | Time over which the reverb sound decays | |
| Low Damp Freq 20–1000 Hz | Frequency below which the low range of the reverb sound will be dampened | |
| Low Damp 1–100% | Amount of attenuation for LF damp(100%: no effect) | |
| High Damp Freq 1000–10000 Hz | Frequency above which the high range of the reverb sound will be dampened | |
| High Damp 1–100 % | Amount of attenuation for HF damp(100%: no effect) | |
| High Cut Freq 1000–10000 Hz | Frequency above which the high range of the final output sound will be cut | |
| Type: 6 (SRV ROOM)/ 7 (SRV HALL)/ 8 (SRV PLATE) | ||
| Pre Delay 0.0–100 ms | Delay time from the original sound until the reverb is heard | |
| Time 0–127 | Time over which the reverb sound decays | |
| Size 1–8 Size of the room or hall | ||
| High Cut Freq | 160 Hz–12500 Hz, BYPASS | Frequency above which the high range of the final output sound will be cut(BYPASS: no cut) |
| Density 0–127 Density of the reverberation | ||
| Diffusion 0–127 | Change in reverb density over timeWith higher values, the sound will become denser over time.This is particularly noticeable with longer reverb times. | |
| Parameter Value Description | ||
| LF Damp Freq | 50–4000 Hz | Frequency below which the low range of the reverb sound will be dampened |
| LF Damp Gain -36-0 dB | Amount of attenuation for LF damp(0: no effect) | |
| HF Damp Freq | 4000 Hz–12500 Hz | Frequency above which the high range of the reverb sound will be dampened |
| HF Damp Gain -36-0 dB | Amount of attenuation for HF damp(0: no effect) | |
Controller Assignments (CONTROL)
Here you can assign controllers to switch between Unison mode and Stack mode, or to switch between performance variations. For example, you could use a pedal to switch between Unison mode and Stack mode.
Bender settings (Bend/Hold screen)
Here you can specify bender range for each instrument.
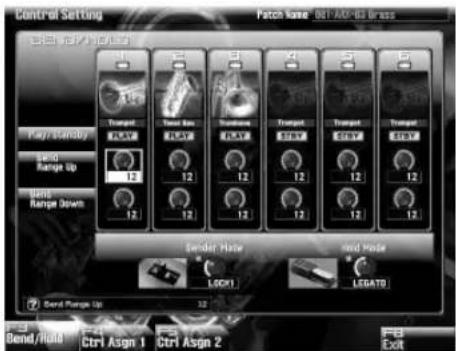
From Main Screen F7>F3 (on the Fantom-G)
Settings for each instrument
| Parameter | Value Description | |
| Play/Standby | PLAY, STANDBY | Turns the sound of each player on/off. |
| Bend Range Up 0-12 | Specifies the amount of pitch change for BendUpThis setting is in semitone steps (valid when Bender Mode is "NORMAL," "LOCK1" or "LOCK2"). | |
| Parameter Value | Description | |
| Bend Range Down | 0–12 | Specifies the amount of pitch change for BendDownThis setting is in semitone steps (valid when Bender Mode is "NORMAL," "LOCK1" or "LOCK2"). |
* For the SuperNATURAL brass (BRASS) sounds, setting the bend range (RANGE) to 3 or higher will simulate the discontinuous pitch change that is typical of brass instruments, instead of the normal smooth pitch change. When you apply a downward bend, the sound will behave in the manner distinctive of brass instruments, meaning that the volume will also decrease.
Settings for each patch
| Parameter | Value Description | |
| Bender Mode | NORMAL, LOCK1, LOCK2, COMBI | Specifies what happens when you operate the benderNORMAL: Normal operationLOCK1:Bend will apply only to the first-played key.LOCK2:No change will be produced by returning the bender.COMBI:This mode allows you to express the subtle pitch changes that are distinctive of a brass instrument. The proportion of breath noise will increase when you operate the bender in the Down direction.This lets you freely control the breathiness at the beginning or end of a note. |
| Hold Mode | NORMAL, LEGATO, ACCOMP | Switches the mode in which the damper pedal will operateNORMAL:Operates as a conventional damper pedal.LEGATO:Sustains the currently sounding note until the next key is played.ACCOMP:Produces a sostenuto-like effect. |
Controller assignments for each patch (Control Assign 1 screen)
Here you can assign performance controllers for individual patch.
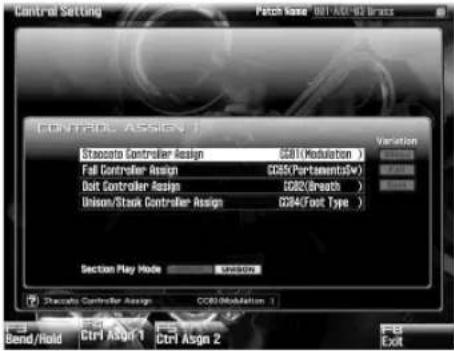
From Main Screen F7>F4 (on the Fantom-G)
| Parameter Value | Description | |
| Staccato Controller Assign | OFF, CC1-CC95, PITCH BEND, AFTERTOUCH | Specifies the number of the controller that will turn “Staccato” on |
| Fall Controller Assign | OFF, CC1-CC95, PITCH BEND, AFTERTOUCH | Specifies the number of the controller that will turn “Fall” on |
| Doit Controller Assign | OFF, CC1-CC95, PITCH BEND, AFTERTOUCH | Specifies the number of the controller that will turn “Doit” on |
| Unison/Stack Controller Assign | OFF, CC1-CC95, PITCH BEND, AFTERTOUCH | Specifies the number of the controller that will switch between Unison mode and Stack mode |
Controller assignments for individual instruments (Control Assign 2 screen)
Here you can assign performance controllers for individual instruments.
In this screen you can assign volume and tone, vibrato, and pitch to the desired control change messages.
This allows you to produce smooth change by using continuous controllers such as an expression pedal or modulation lever.
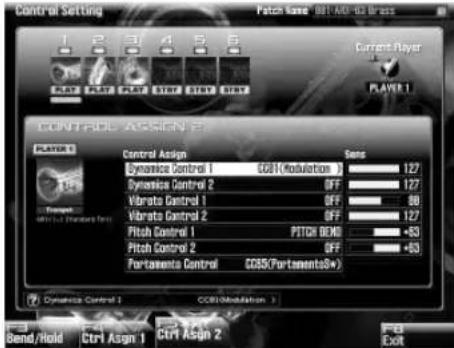
From Main Screen F7>F5 (on the Fantom-G)
| Parameter Value Description | ||
| Dynamics Control 1 | OFF, CCI-CC95, PITCH BEND, AFTERTOUCH | Specifies the number of the controller 1 that will affect dynamics (volume/tone) |
| Dynamics Control 2 | OFF, CCI-CC95, PITCH BEND, AFTERTOUCH | Specifies the number of the controller 2 that will affect dynamics (volume/tone) |
| Parameter Value Description | ||
| Vibrato Control 1 | OFF, CC1-CC95, PITCH BEND, AFTERTOUCH | Specifies the number of the controller 1 that will affect vibrato depth |
| Vibrato Control 2 | OFF, CC1-CC95, PITCH BEND, AFTERTOUCH | Specifies the number of the controller 2 that will affect vibrato depth |
| Pitch Control 1 | OFF, CC1-CC95, PITCH BEND, AFTERTOUCH | Specifies the number of the controller 1 that will affect pitch |
| Pitch Control 2 | OFF, CC1-CC95, PITCH BEND, AFTERTOUCH | Specifies the number of the controller 2 that will affect pitch |
| Portamento Control | OFF, CC1-CC95, PITCH BEND, AFTERTOUCH | Specifies the number of the controller that will turn portamento on/off |
| Dynamics Control 1Sens | 0-127 | Specifies the extent to which controller number 1 will change the dynamics (volume/tone) |
| Dynamics Control 2Sens | 0-127 | Specifies the extent to which controller number 2 will change the dynamics (volume/tone) |
| Vibrato Control 1Sens | 0-127 | Specifies the extent to which controller number 1 will change the vibrato depth |
| Vibrato Control 2Sens | 0-127 | Specifies the extent to which controller number 2 will change the vibrato depth |
| Pitch Control 1Sens | -64-63 | Specifies the extent and direction in which controller 1 will change the pitch |
| Pitch Control 2Sens | -64-63 | Specifies the extent and direction in which controller 2 will change the pitch |
Initializing a Patch (Utility Screen)
In the Utility screen you can initialize patch.
This operation lets you return the settings of the current patch to their default values.
Patch Init will initialize the settings of the current patch.
- Select the patch that you want to initialize.
- In the Utility screen, choose Patch Init.
- When the confirmation screen appears, press the [F7] (OK) button.
If you decide to cancel, press the[F8] (EXIT) button.
Saving a Patch (on the Fantom-G)
A patch you've created is temporary; it will be lost if you select a different patch. If you want to save the patch you've edited, proceed as follows.
- Press the [WRITE] on the Fantom-G.
- Assign a name to the patch.
For details on how to assign a name, refer to the Fantom-G owner's manual.
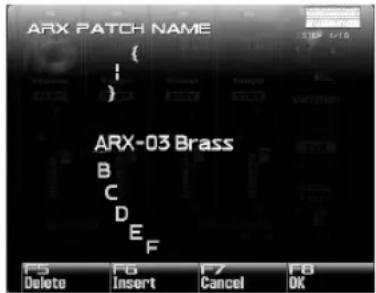
-
When you've finished assigning the name, press the [F8] (OK) button.
-
Select a patch number, and press the [F8] (WRITE) button.
-
When the confirmation screen appears, press the [F7] (OK) button to save the patch.
* If you've installed the ARX-03 in a Fantom-G6/G7/G8, executing a Factory Reset for the Fantom-G6/G7/G8 will reset the expansion boards to their factory-set condition.
Multi-Effects List
Multi-Effects Types
There are 15 types of multi-effect. Each multi-effect has "Control Assign" parameters. These indicate the
| FILTER (3 types) | ||
| 01 STEREO EQ p. 43 | ||
| 02 ENHANCER p. 43 | ||
| 03 AUTO WAH p. 44 | ||
| CHORUS (1 types) | ||
| 04 HEXA-CHORUS p. 44 | ||
| DYNAMICS (2 types) | ||
| 05 COMPRESSOR p. 45 | ||
| 06 LIMITER p. 45 | ||
| LOFI (4 types) | ||
| 07 LOFI | COMPRESS p. 46 | |
| 08 TELEPHONE p. 46 | ||
| 09 PHONOGRAPH p. 47 | ||
| 10 TAPE | ECHO p. 48 | |
| REVERB (1 type) | ||
| 11 GATED REVERB p. 49 | ||
| DELAY (4 types) | ||
| 12 STEREO DELAY p. 50 | ||
| 13 MODULATION DELAY p. 51 | ||
| 14 TRIPLE TAP DELAY p. 52 | ||
| 15 REVERSE DELAY p. 52 | ||
Multi-Effects Parameters
parameters that can be controlled via "Multi-effect control (MFX Control Screen)" (p. 35).
MEMO
For details on the "note" that can be selected for some parameter, refer to "About Note" (p. 53)
MEMO
Parameters marked with a sharp “#” can be controlled using a specified controller (p.35).
01: STEREO EQ (Stereo Equalizer)
This is a four-band stereo equalizer (low, mid x 2, high).
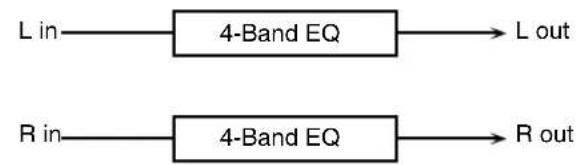
flowchart
graph LR
    A["L in"] --> B["4-Band EQ"] --> C["L out"]
    D["R in"] --> E["4-Band EQ"] --> F["R out"]
| Parameter | Value Description | |
| Low Freq | 200, 400 Hz Frequency of the low range | |
| Low Gain # -15-+1 | 5 dB Gain of the low frequency range | |
| High Freq | 2000, 4000,8000 Hz | Frequency of the high range |
| High Gain # -15-+ | 15 dB Gain of the high frequency range | |
| Mid1 Freq 200-8000 Hz Frequency of Middle Range 1 | ||
| Mid1 Q | 0.5, 1.0, 2.0,4.0, 8.0 | Width of Middle Range 1Select a higher Q value to narrow Mid-dle Range 1. |
| Mid1 Gain -15-+15 | dB Gain of Middle Range 1 | |
| Mid2 Freq 200-8000 Hz Frequency of Middle Range 2 | ||
| Mid2 Q | 0.5, 1.0, 2.0, 4.0,8.0 | Width of Middle Range 2Select a higher Q value to narrow Mid-dle Range 2. |
| Mid2 Gain -15- +1 | 5 dB Gain of Middle Range 2 | |
| Level # 0-127 Output level | ||
02: ENHANCER
Controls the overtone structure of the high frequencies, adding sparkle and brightness to the sound.
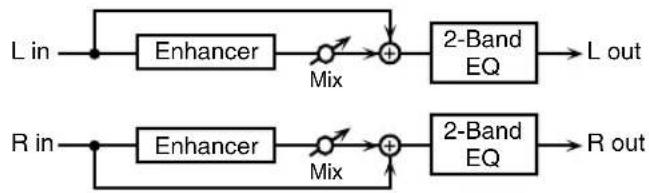
flowchart
graph LR
    A["L in"] --> B["Enhancer"]
    B --> C["Mix"]
    C --> D["+"]
    D --> E["2-Band EQ"]
    E --> F["L out"]
    G["R in"] --> H["Enhancer"]
    H --> I["Mix"]
    I --> J["+"]
    J --> K["2-Band EQ"]
    K --> L["R out"]
| Parameter | Value Description | |
| Sens # | 0–127 Sensitivity of the enhancer | |
| Mix # 0–127 | Level of the overtones generated by the enhancer | |
| Low Gain -15– +15 dB | Gain of the low frequency range of frequencies | |
| High Gain -15– +15 dB | Gain of the high frequency range of frequencies | |
| Level 0–127 Output level | ||
03: AUTO WAH
A filter that turns on and off to create a cyclical change in timbre.
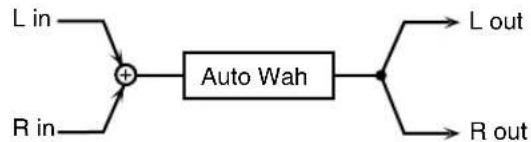
flowchart
graph LR
    A["L in"] --> C["+"]
    B["R in"] --> C
    C --> D["Auto Wah"]
    D --> E["L out"]
    D --> F["R out"]
| Parameter | Value Description | |
| Filter Type | LPF, BPF | Type of filterLPF:The wah effect is applied over a wide frequency range.BPF:The wah effect is applied over a narrow frequency range |
| Rate # | 0.05–10.00 Hz, note | Frequency of modulation |
| Depth # 0–127 Depth of modulation | ||
| Sens 0–127 | Adjusts the sensitivity with which the filter is controlled. | |
| Manual # 0–127 | Adjusts the center frequency at which the wah effect is applied. | |
| Peak 0–127 | Adjusts the amount of the wah effect that occurs in the range of the center frequency.Set a higher value for Q to narrow the range to be affected. | |
| Level 0–127 Output level | ||
04: HEXA-CHORUS
Uses a six-phase chorus (six layers of chorused sound) to give richness and spaciousness to the sound.
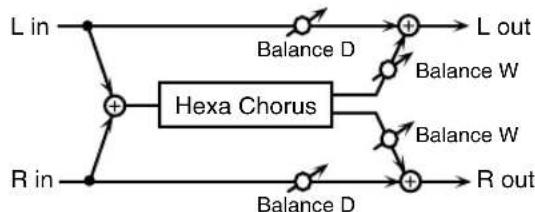
flowchart
graph LR
    L_in --> A["+"]
    R_in --> A
    A --> B["Hexa Chorus"]
    B --> C["+"]
    L_out --> C
    R_out --> C
    C --> D1["Balance D"]
    C --> D2["Balance W"]
    C --> D3["Balance W"]
    C --> D4["Balance D"]
    D1 --> E1["L in"]
    D2 --> E2["L out"]
    D3 --> E3["R out"]
    D4 --> E4["R out"]
| Parameter | Value Description | |
| Pre Delay 0.0-100.0 ms | Adjusts the delay time from the direct sound until the chorus sound is heard. | |
| Rate # | 0.05-10.00 Hz, note | Frequency of modulation |
| Depth 0-127 Depth of modulation | ||
| Pre Delay Deviation | 0-20 | Adjusts the differences in Pre Delay between each chorus sound. |
| Depth Deviation | -20-+20 | Adjusts the difference in modulation depth between each chorus sound. |
| Pan Deviation | 0-20 | Adjusts the difference in stereo location between each chorus sound.0:All chorus layers are in the center.20:The chorus layers are spaced at 60-degree intervals relative to the center. |
| Balance # | D100:0W-D0:100W | Volume balance between the direct sound (D) and the chorus sound (W) |
| Level 0-127 Output level | ||
05: COMPRESSOR
Flattens out high levels and boosts low levels, smoothing out fluctuations in volume.


| Parameter | Value Description | |
| Attack # | 0–127 | Time from when the volume goes up the Threshold level until the compressor effect applies |
| Threshold # 0–127 | Adjusts the volume at which compression begins | |
| Post Gain 0–18 dB | Adjusts the output gain. | |
| Low Gain -15–+15 dB Gain of the low frequency range | ||
| High Gain -15–+15 dB Gain of the high frequency range | ||
| Level # 0–127 Output level | ||
06: LIMITER
Compresses signals that exceed a specified volume level, preventing distortion from occurring.


| Parameter | Value Description | |
| Release # | 0-127 | Adjusts the time after the signal volume falls below the Threshold Level until compression is no longer applied. |
| Threshold # 0-127 | Adjusts the volume at which compression begins | |
| Ratio | 1.5:1, 2:1, 4:1, 100:1 | Compression ratio |
| Post Gain 0-18 dB | Adjusts the output gain. | |
| Low Gain -15- +15 dB Gain of the low frequency range | ||
| High Gain -15- +15 dB Gain of the high frequency range | ||
| Level # 0-127 Output level | ||
07: LOFI COMPRESS (Lo-Fi Compress)
This is an effect that intentionally degrades the sound quality for creative purposes.
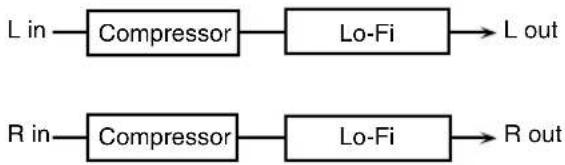
flowchart
graph LR
    A["L in"] --> B["Compressor"]
    B --> C["Lo-Fi"]
    C --> D["L out"]
    E["R in"] --> F["Compressor"]
    F --> G["Lo-Fi"]
    G --> H["R out"]
| Parameter | Value Description | |
| Pre Filter Type | 1-6 | Selects the type of filter applied to the sound before it passes through the Lo-Fi effect. |
| LoFi Typ 1-9 | Degrades the sound quality. The sound quality grows poorer as this value is increased. | |
| Post Filter Type | OFF, LPF, HPF | Selects the type of filter applied to the sound after it passes through the Lo-Fi effect.OFF:no filter is usedLPF:cuts the frequency range above the CutoffHPF:cuts the frequency range below the Cutoff |
| Post Filter Cutoff 200-8000 Hz Basic frequency of the Post Filter | ||
| Balance # | D100:0W-D0:100W | Volume balance between the direct sound (D) and the effect sound (W) |
| Level # 0-127 Output level | ||
08: TELEPHONE
Produces a muffled sound, similar to what it would sound like if heard over the phone.
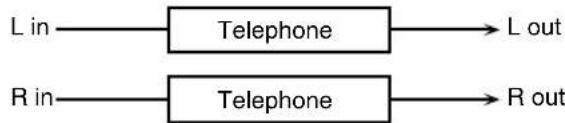
flowchart
graph LR
    A["L in"] --> B["Telephone"]
    C["R in"] --> D["Telephone"]
    B --> E["L out"]
    D --> F["R out"]
| Parameter | Value Description | |
| Voice Quality # | 0-15 Audio quality of the telephone voice | |
| Treble -15- +15 dB | Bandwidth of the telephone voice | |
| Balance # | D100:0-D0:100W | Volume balance between the direct sound (D) and the effect sound (W) |
| Level 0-127 Output | level | |
09: PHONOGRAPH
Simulates a sound recorded on an analog record and played back on a record player. This effect also simulates the various types of noise that are typical of a record, and even the rotational irregularities of an old turntable.
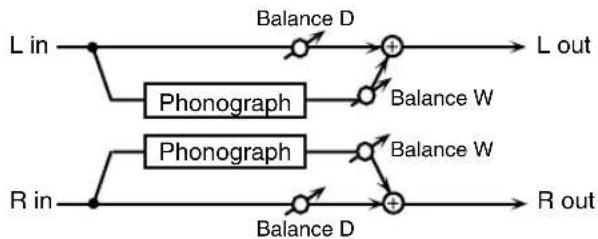
flowchart
graph LR
    L_in --> A["Balance D"]
    A --> B["L out"]
    A --> C["Phonograph"]
    C --> D["Balance W"]
    D --> B
    R_in --> E["Balance D"]
    E --> F["R out"]
    E --> G["Phonograph"]
    G --> H["Balance W"]
    H --> I["Balance D"]
    I --> J["+"]
    J --> B
| Parameter | Value Description | |
| Signal Distortion | 0-127 Depth of distortion | |
| Frequency Range 0- | 127 | Frequency response of the playback systemDecreasing this value will produce the impression of an old system with a poor frequency response. |
| Disc Type LP, EP, SP | Rotational speed of the turntableThis will affect the frequency of the scratch noise. | |
| Scratch Noise Level | 0-127 | Amount of noise due to scratches on the record |
| Dust Noise Level 0- | 27 Volume of noise due to dust on the record | |
| Hiss Noise Level 0- | 27 Volume of continuous "hiss" | |
| Total Noise Level # | 0-127 Volume of overall noise | |
| Wow 0-127 Depth of long-cycle rotational irregularity | ||
| Flutter 0-127 Depth of short-cycle rotational irregularity | ||
| Random 0-127 | Depth of indefinite-cycle rotational irregularity | |
| Total Wow/Flutter # | 0-127 Depth of overall rotational irregularity | |
| Balance # | D100:0W-D0:100W | Volume balance between the direct sound (D) and the effect sound (W) |
| Level 0-127 Output level | ||
10: TAPE ECHO
A virtual tape echo that produces a realistic tape delay sound. This simulates the tape echo section of a Roland RE-201 Space Echo.
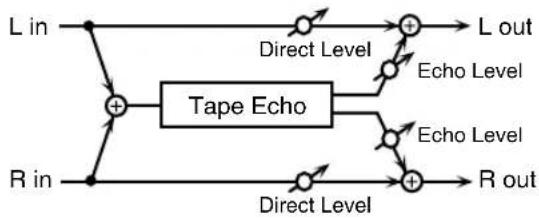
flowchart
graph LR
    L_in --> A["+"]
    R_in --> A
    A --> B["Tape Echo"]
    B --> C["+"]
    D["R out"] --> E["+"]
    F["L out"] --> G["+"]
    H["Echo Level"] --> I["+"]
    J["Echo Level"] --> K["+"]
    L_out --> G
    M["Direct Level"] --> G
    N["Direct Level"] --> E
| Parameter | Value Description | |
| Mode | S, M, L, S+M,S+L, M+L,S+M+L | Combination of playback heads to useSelect from three different heads withdifferent delay times.S: shortM: middleL: long |
| Repeat Rate # 0-127 | Tape speedIncreasing this value will shorten thespacing of the delayed sounds. | |
| Intensity # 0-127 Amount of delay repeats | ||
| Bass -15- +15 | Boost/cut for the lower range of the echo sound | |
| Treble -15- +15 | Boost/cut for the upper range of the echo sound | |
| Head S Pan | L64-63R | Independent panning for the short,middle, and long playback heads |
| Head M Pan | ||
| Head L Pan | ||
| Tape Distortion 0-5 | Amount of tape-dependent distortion tobe addedThis simulates the slight tonal changesthat can be detected by signal-analysisequipment. Increasing this value willincrease the distortion. | |
| Wow/Flutter Rate 0-127 | Speed of wow/flutter (complex variationin pitch caused by tape wear androtational irregularity) | |
| Wow/Flutter Depth | 0-127 Depth of wow/flutter | |
| Echo Level # 0-127 | Volume of the echo sound | |
| Direct Level # 0-127 | Volume of the original sound | |
| Level 0-127 Output level | ||
11: GATED REVERB
This is a special type of reverb in which the reverberant sound is cut off before its natural length.
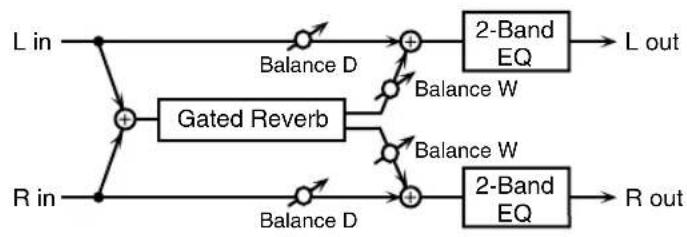
flowchart
graph LR
    L_in --> A["+"]
    R_in --> B["+"]
    A --> C["Balance D"]
    B --> D["Balance D"]
    C --> E["+"]
    D --> F["+"]
    E --> G["Balance W"]
    F --> H["Balance W"]
    G --> I["2-Band EQ"]
    H --> J["2-Band EQ"]
    I --> K["L out"]
    J --> L["R out"]
| Parameter Value | Description | |
| Type | NORMAL, REVERSE | Type of reverbNORMAL:conventional gated reverbREVERSE:backwards reverb |
| Pre Delay 0.0–100.0 ms | Adjusts the delay time from the direct sound until the reverb sound is heard. | |
| Time 5–500 ms | Adjusts the time from when the reverb is first heard until it disappears. | |
| Pan # L64–63R Stereo location of Pitch Shift | ||
| Low Gain -15–+15 dB Gain of the low frequency range | ||
| High Gain -15–+15 dB Gain of the high frequency range | ||
| Balance # | D100:0W–D0:100W | Volume balance between the direct sound (D) and the reverb sound (W) |
| Level # 0–127 Output level | ||
12: STEREO DELAY
This is a stereo delay.
When Feedback Mode is NORMAL:
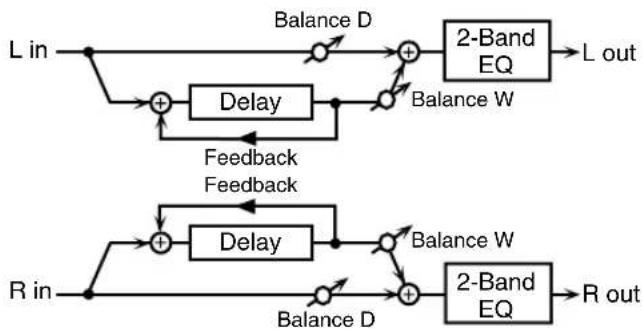
flowchart
graph TD
    A["L in"] --> B["+"]
    B --> C["Delay"]
    C --> D["+"]
    D --> E["2-Band EQ"]
    E --> F["L out"]
    G["R in"] --> H["+"]
    H --> I["Delay"]
    I --> J["+"]
    J --> K["2-Band EQ"]
    K --> L["R out"]
    M["Balance D"] --> D
    N["Balance W"] --> D
    O["Feedback Feedback"] --> B
    P["Balance D"] --> H
    Q["Balance W"] --> I
When Feedback Mode is CROSS:
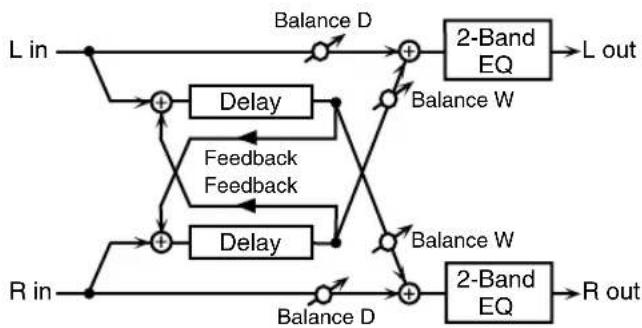
flowchart
graph TD
    A["L in"] --> B["+"]
    C["R in"] --> D["+"]
    B --> E["Delay"]
    D --> F["Delay"]
    E --> G["+"]
    F --> H["+"]
    G --> I["Balance D"]
    H --> J["Balance W"]
    I --> K["2-Band EQ"]
    J --> L["2-Band EQ"]
    K --> M["L out"]
    L --> N["R out"]
    style A fill:#f9f,stroke:#333
    style C fill:#f9f,stroke:#333
    style B fill:#ccf,stroke:#333
    style D fill:#ccf,stroke:#333
    style E fill:#cfc,stroke:#333
    style F fill:#cfc,stroke:#333
    style G fill:#fcc,stroke:#333
    style H fill:#fcc,stroke:#333
    style I fill:#fcc,stroke:#333
    style J fill:#fcc,stroke:#333
    style K fill:#fcc,stroke:#333
    style L fill:#fcc,stroke:#333
| Parameter | Value Description | |
| Feedback Mode | NORMAL, CROSS | Selects the way in which delay sound is fed back into the effect. (See the figures of algorithm.) |
| Delay Left | 0–2000 ms, note | Adjusts the time until the delay sound is heard. |
| Delay Right | ||
| Phase Left | NORMAL, INVERT | Phase of the delay sound |
| Phase Right | ||
| Feedback # -98- +98 % | Adjusts the amount of the delay sound that's fed back into the effect.Negative (-) settings invert the phase. | |
| HF Damp | 200–8000 Hz, BYPASS | Adjusts the frequency above which sound fed back to the effect is filtered out. If you don't want to filter out any high frequencies, set this parameter to BYPASS. |
| Low Gain -15- +15 dB Gain of the low frequency range | ||
| High Gain -15- +15 dB Gain of the high frequency range | ||
| Balance # | D100:0W-D0:100W | Volume balance between the direct sound (D) and the delay sound (W) |
| Level 0–127 Output level | ||
13: MODULATION DELAY
Adds modulation to the delayed sound.
When Feedback Mode is NORMAL:
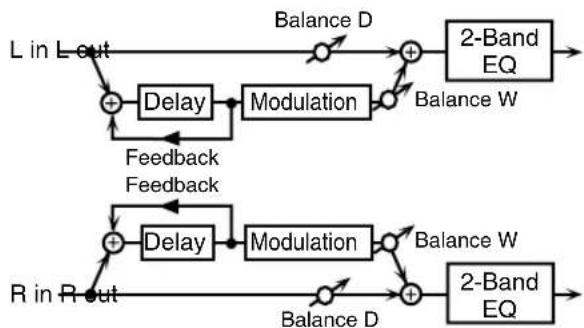
flowchart
graph TD
    A["L in L out"] --> B["+"]
    B --> C["Delay"]
    C --> D["Modulation"]
    D --> E["+"]
    E --> F["2-Band EQ"]
    F --> G["Balance W"]
    H["R in R out"] --> I["+"]
    I --> J["Delay"]
    J --> K["Modulation"]
    K --> L["+"]
    L --> M["2-Band EQ"]
    M --> N["Balance D"]
    O["Feedback Feedback"] --> B
    P["Balance D"] --> E
    Q["Balance W"] --> F
When Feedback Mode is CROSS:
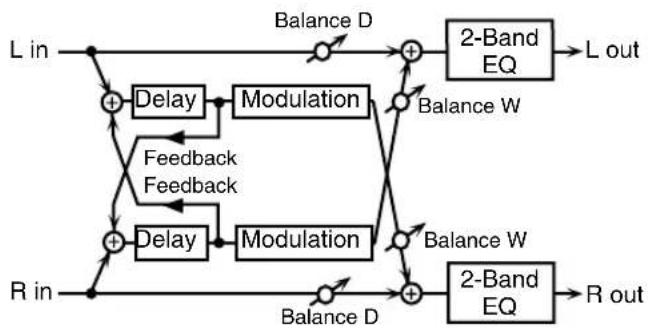
flowchart
graph TD
    L_in --> Delay1["Delay"]
    R_in --> Delay2["Delay"]
    Delay1 --> Modulation1["Modulation"]
    Delay2 --> Modulation2["Modulation"]
    L_in --> BalanceD["Balance D"]
    R_in --> BalanceD["Balance D"]
    Delay1 --> Feedback1["Feedback"]
    Delay2 --> Feedback2["Feedback"]
    BalanceD --> 2BandEQ["2-Band EQ"]
    2BandEQ --> Lout["L out"]
    2BandEQ --> 2BandEQ["2-Band EQ"]
    2BandEQ --> Rout["R out"]
    2BandEQ --> BalanceW["Balance W"]
    2BandEQ --> BalanceWb["Balance W"]
    2BandEQ --> BalanceWc["Balance W"]
    2BandEQ --> BalanceWd["Balance W"]
    2BandEQ --> BalanceWe["Balance W"]
    2BandEQ --> BalanceWf["Balance W"]
    2BandEQ --> BalanceWg["Balance W"]
    2BandEQ --> BalanceWh["Balance W"]
    2BandEQ --> BalanceWi["Balance W"]
    2BandEQ --> BalanceWj["Balance W"]
    2BandEQ --> BalanceWk["Balance W"]
    2BandEQ --> BalanceWl["Balance W"]
    2BandEQ --> BalanceWg
    2BandEQ --> BalanceWh
    2BandEQ --> BalanceWi
    2BandEQ --> BalanceWg
    2BandEQ --> BalanceWl
    2BandEQ --> BalanceWg
    2BandEQ --> BalanceWh
    2BandEQ --> BalanceWi
    2BandEQ --> BalanceWg
    2BandEQ --> BalanceWh
    2BandEQ --> BalanceWg
    2BandEQ --> BalanceWl
    2BandEQ --> BalanceWg
    2BandEQ --> BalanceWh
    2BandEQ --> BalanceWg
    2BandEQ --> BalanceWl
    2BandEQ --> BalanceWg
    2BandEQ --> BalanceWh
    2BandEQ --> BalanceWg
    2BandEQ --> BalanceWl
    2BandEQ --> BalanceWg
    2BandEQ --> BalanceWl
    2BandEQ --> BalanceWg
    2BandEQ --> BalanceWl
| Parameter | Value Description | |
| Feedback Mode | NORMAL, CROSS | Selects the way in which delay sound is fed back into the effect (See the figures of algorithm.) |
| Delay Left | 0–2000 ms, note | Adjusts the time until the delay sound is heard. |
| Delay Right | ||
| Feedback # -98- +98% | Adjusts the amount of the delay sound that's fed back into the effect. Negative (-) settings invert the phase. | |
| HF Damp | 200–8000 Hz, BYPASS | Adjusts the frequency above which sound fed back to the effect is filtered out. If you don't want to filter out any high frequencies, set this parameter to BYPASS. |
| Rate # | 0.05–10.00Hz, note | Frequency of modulation |
| Depth 0–127 Depth of modulation | ||
| Phase 0-180 deg Spatial spread of the sound | ||
| Low Gain -15- +15 dB Gain of the low frequency range | ||
| High Gain -15- +15 dB Gain of the high frequency range | ||
| Balance # | D100:0W- D0:100W | Volume balance between the direct sound (D) and the delay sound (W) |
| Level 0–127 Output level | ||
14: TRIPLE TAP DELAY
Produces three delay sounds; center, left and right.
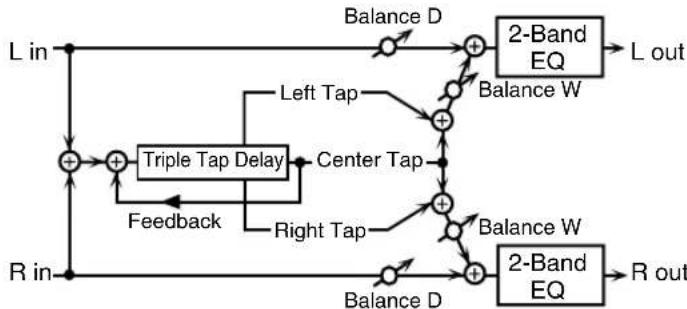
flowchart
graph TD
    L_in --> +1["+"]
    R_in --> +1
    +1 --> +2["+"]
    +2 --> Balance_D["Balance D"]
    Balance_D --> +3["+"]
    +3 --> 2_BandEQ1["2-Band EQ"]
    2_BandEQ1 --> L_out["L out"]
    2_BandEQ1 --> R_out["R out"]
    +3 --> Balance_W1["Balance W"]
    Balance_W1 --> +3
    +3 --> Left_Tap["Left Tap"]
    +3 --> Center_Tap["Center Tap"]
    Center_Tap --> +3
    +3 --> Right_Tap["Right Tap"]
    +3 --> Feedback["Feedback"]
    +3 --> Triple_Tap_Delay["Triple Tap Delay"]
    Triple_Tap_Delay --> +3
| Parameter | Value Description | |
| Delay Left Delay Center Delay Right | 0-4000 ms, note | Adjusts the time until the center, left and right delay sound is heard. |
| Feedback # -98- +98 % | Adjusts the amount of the delay sound that's fed back into the effect. Negative (-) settings invert the phase. | |
| HF Damp | 200-8000 Hz, BYPASS | Adjusts the frequency above which sound fed back to the effect is filtered out. If you do not want to filter out any high frequencies, set this parameter to BYPASS. |
| Left Level Right Level Center Level | 0-127 | Volume of each delay |
| Low Gain -15- +15 dB Gain of the low frequency range | ||
| High Gain -15- +15 dB Gain of the high frequency range | ||
| Balance # | D100:0W- D0:100W | Volume balance between the direct sound (D) and the delay sound (W) |
| Level 0-127 Output level | ||
15: REVERSE DELAY
Adds the reverse of the input sound as a delay.
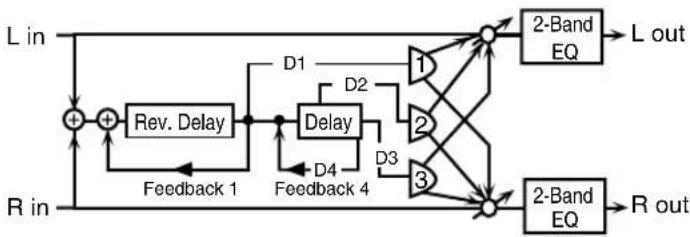
flowchart
graph TD
    A["L in"] --> B["+"]
    B --> C["Rev. Delay"]
    C --> D["Delay"]
    D --> E["D1"]
    D --> F["D2"]
    D --> G["D3"]
    E --> H["1"]
    E --> I["2"]
    E --> J["3"]
    F --> K["2-Band EQ"]
    G --> L["2-Band EQ"]
    H --> M["L out"]
    I --> N["R out"]
    J --> O["R out"]
    P["Feedback 1"] --> C
    Q["Feedback 4"] --> D
    R["R in"] --> B
| Parameter | Value Description | |
| Threshold | 0-127 | Volume level at which the reverse delay begins |
| Delay 1-4 | 0-2000 ms, note | Adjusts the time until Delays 1-4 are heard. |
| Feedback 1 # | -98- +98 % | Adjusts the amount of the delay sound that's fed back into the effect. Negative (-) settings invert the phase. |
| Feedback 4 # | ||
| HF Damp 1 | 200-8000 Hz, BYPASS | Adjusts the frequency above which sound fed back to the effect is filtered out. If you do not want to filter out any high frequencies, set this parameter to BYPASS. |
| HF Damp 4 | ||
| Pan 1-3 L64-63R Stereo location of Delays 1-3 sound | ||
| Level 1-3 0-127 Output level of Delays 1-3 sound | ||
| Balance # | D100:0W-D0:100W | Volume balance between the direct sound (D) and the effect sound (W) |
| Low Gain -15- +15 dB Gain of the low frequency range | ||
| High Gain -15- +15 dB Gain of the high frequency range | ||
| Level 0-127 Output level | ||
About Note
Some parameters (such as Rate or Delay Time) can be set in terms of a note value instead of a time value.
Such parameters provide a Sync SW(Sync switch) that allows you to switch between setting the parameter as a note value or as a numerical value.
If you want to set it as a note value, set the Sync SW to ON.
* If a parameter that's chosen in Control Assign for multi-effect control has its Sync SW to ON, you won't be able to use multi-effect control to control that parameter.
| Value | Description |
| 1/64T ( 3 ) | Sixty-fourth-note triplet |
| 1/64 ( ) | Sixty-fourth note |
| 1/32T ( 3 ) | Thirty-second-note triplet |
| 1/32 ( ) | Thirty-second note |
| 1/16T ( 3 ) | Sixteenth-note triplet |
| 1/32. ( ) | Dotted thirty-second note |
| 1/16 ( ) | Sixteenth note |
| 1/8T ( 3 ) | Eighth-note triplet |
| 1/16. ( ) | Dotted sixteenth note |
| 1/8 ( ) | Eighth note |
| 1/4T ( 3 ) | Quarter-note triplet |
| 1/8. ( ) | Dotted eighth note |
| 1/4 ( ) | Quarter note |
| 1/2T ( 3 ) | Half-note triplet |
| 1/4. ( ) | Dotted quarter note |
| 1/2 ( ) | Half note |
| 1/1T ( 3 ) | Whole-note triplet |
| 1/2. ( ) | Dotted half note |
| 1/1 ( ) | Whole note |
| 2/1T ( 3 ) | Double-note triplet |
| 1/1. ( ) | Dotted whole note |
| 2/1 ( ) | Double note |
Specifications
ARX-03 BRASS
Maximum Polyphony
14 voices (varies according to the sound generator load)
Parts
1 part
User Memory
Patch: 50 (including pre-loaded data)
(CC#0 = 66, CC#32 = 0, PC = 1-50)
Effects
Reverb: 1 system, 8 types ROOM, HALL, PLATE, STUDIO, CHURCH, SRV ROOM, SRV HALL, SRV PLATE
Customize Functions
Stability, Personality, Growl/Turbid, Noise, Control Assign
Miscellaneous
6-channel Mixer Screen
Accessories
Owner's manual
Screwdriver
* In the interest of product improvement, the specifications and/or appearance of this product are subject to change without prior notice.
Index
B
Bend/Hold screen 38
Breath screen 27
C
CONTROL 38
Control Assign 1 screen 39
Control Assign 2 screen 40
E
Effects 33
EQ screen 28,32
F
Feeling screen 26
G
Growl 27
|
Inst/Level screen 25
instrument 19,25
L
Level/Pan screen 31
M
MFX
AUTO WAH 44
COMPRESSOR 45
ENHANCER 43
GATED REVERB 49
HEXA-CHORUS 44
LIMITER 45
LOFI COMPRESS 46
MODULATION DELAY 51
PHONOGRAPH 47
REVERSE DELAY 52
STEREO DELAY 50
STEREO EQ 43
TAPE ECHO 48
TELEPHONE 46
TRIPLE TAP DELAY 52
MFX Control Screen 35
MFX Control Sens 1-4 35
MFX Control Source 1-4 35
MFX screen 34
MIXER 31
Multi-Effects 42
N
Noise 27
P
Patch 19
Save 41
Patch Init 41
Patch Selection 23
Personality 26
Player 19
Player Edit 25
Player Select 24
R
Reverb screen 36
Routing screen 33
S
Section 20, 29
Section Style screen 29
Selecting an instrument 25
Solo 20
Stability 26
Stack Mode 22
SuperNATURAL 17
T
Tune/Key Shift screen 30
Turbid 27
U
Unison Mode 21
Utility Screen 41
V
Vibrato screen 31
For the USA
FEDERAL COMMUNICATIONS COMMISSION RADIO FREQUENCY INTERFERENCE STATEMENT
This equipment has been tested and found to comply with the limits for a Class B digital device, pursuant to Part 15 of the FCC Rules. These limits are designed to provide reasonable protection against harmful interference in a residential installation. This equipment generates, uses, and can radiate radio frequency energy and, if not installed and used in accordance with the instructions, may cause harmful interference to radio communications. However, there is no guarantee that interference will not occur in a particular installation. If this equipment does cause harmful interference to radio or television reception, which can be determined by turning the equipment off and on, the user is encouraged to try to correct the interference by one or more of the following measures:
- Reorient or relocate the receiving antenna.
- Increase the separation between the equipment and receiver.
- Connect the equipment into an outlet on a circuit different from that to which the receiver is connected.
- Consult the dealer or an experienced radio/TV technician for help.
This device complies with Part 15 of the FCC Rules. Operation is subject to the following two conditions:
(1) this device may not cause harmful interference, and
(2) this device must accept any interference received, including interference that may cause undesired operation.
Unauthorized changes or modification to this system can void the users authority to operate this equipment.
This equipment requires shielded interface cables in order to meet FCC class B Limit.
For Canada
NOTICE
This Class B digital apparatus meets all requirements of the Canadian Interference-Causing Equipment Regulations.
AVIS
DECLARATION OF CONFORMITY Compliance Information Statement
Model Name: ARX-03
Type of Equipment: Expansion Board
Responsible Party : Roland Corporation U.S.
Address: 5100 S. Eastern Avenue, Los Angeles, CA 90040-2938
Telephone : (323) 890 3700
For C.A. US (Proposition 65)
WARNING
This product contains chemicals known to cause cancer, birth defects and other reproductive harm, including lead.
For EU Countries

This product complies with the requirements of EMC Directive 2004/108/EC.
For EU Countries

This symbol indicates that in EU countries, this product must be collected separately from household waste, as defined in each region. Products bearing this symbol must not be discarded together with household waste.
When you need repair service, call your nearest Roland Service Center or authorized Roland distributor in your country as shown below.
AFRICA
EGYPT
Al Fanny Trading Office
- EBN Hagar Al Askalany
Street,
ARID E1 Golf, Heliopolis,
Cairo 11341, EGYPI
TEL: (022)-418-5531
REUNION
Royal Cape Park, Unit 24
Londonderry Road, Ottery 7800
Cape Town, SOUTH AFRICA
TEL: (021) 799 4900
ASIA
CHINA
Roland Shanghai Electronics
Co., Ltd.
5F. No.1500 Pingliang Road
Shanghai 200090, CHINA
TEL: (021) 5580-0800
Roland Shanghai Electronics
Co., Ltd.
(BEIJING OFFICE)
10F. No.18 3 Section Anhuaxili
Chaoyang District Beijing
100011 CHINA
TEL: (010) 6426-5050
HONG KONG
Tom Lee Music Co., Ltd.
Service Division
22-32 Pun Shan Street, Tsuen
Wan, New Territories,
HONG KONG
TEL: 2415 0911
Parsons Music Ltd.
8th Floor, Railway Plaza, 39
Chatham Road South, T.S.T.
Kowloon, HONG KONG
TEL: 2333 1863
INDIA
Rivera Digitec (India) Pvt. Ltd.
411, Nirman Kendra
Mahalaxmi Flats Compound
Off. Dr. Edwin Moses Road,
Mumbai-10011, INDIA TEL: (022) 2462 0951
TEL: (022) 2493 9051
INDONESIA
PT Citra IntiRama
Suoi Nhac Company, Ltd
370 Cach Mang Thang Tam St.
Dist.3. Ho Chi Minh City.
VIET NAM
TEL: 9316540
PHILIPPINES
G.A. Yupangco & Co. Inc.
339 Gil J. Puyat Avenue
Makati, Metro Manila 1200,
PHILIPPINES
TEL: (02) 899 9801
SINGAPORE
SWEE LEE MUSIC
COMPANY PTE. LTD.
150 Sims Drive,
SINGAPORE 387381
TAIWAN
ROLAND TAIWAN
ENTERPRISE CO., LTD.
Room 5, 9fl. No. 112 Chung
Shan N.Road Sec.2, Taipei,
TAIWAN, R.O.C.
TEL: (02) 2561 3339
THAILAND
Theera Music Co., Ltd.
100-108 Soi Vermig
Nakornkasem, New
Road, Sumpantawongse,
Bangkok 10100 THAILAND
TEL: (02) 224-8821
AUSTRALIA/ NEW ZEALAND
AUSTRALIA/
NEW ZEALAND
Roland Corporation
Australia Pty., Ltd.
38 Campbell Avenue
Dee Why West, NSW 2099
AUSTRÀLIA
For Australia
Tel: (02) 9982 8266
For New Zealand
Tel: (09) 3098 715
CENTRAL/LATIN AMERICA
ARGENTINA
Instrumentos Musicales S.A.
Av.Santa Fe 2055
(1123) Buenos Aires
ARGENTINA
TEL:(011)4508-2700
BARBADOS
A&B Music Supplies LTD
12 Webster Industrial Park
Wildey, St. Michael, Barbados TEL: (216) 430-1100
TEL: (246)430-1100
BRAZIL
Roland Brasil Ltda.
Rua San Jose, 780 Sala B
Parque Industrial San Jose
Cotia - Sao Paulo - SP, BRAZIL
TEL: (011) 4615 566
CHILE
Comercial Fancy II S.A.
Rut.: 96.919.420-7
Nataniel Cox #739, 4th Floor
Santiago - Centro, C
TEL:(02)688-9540
COLOMBIA
Centro Musical Ltda.
Cra 43 B No 25 A 41 Bododega 9
Medellin, Colombia
TEL: (574)381252
COSTA RICA
JUAN Bansbach Instrumentos
Musicales
Boulevard Andrews, Albrook,
Panama City, REP. DE
PANAMA
TEL: 315-0101
PARAGUAY
Distribuidora De
Instrumentos Musicales
J.E. Olear y ESQ. Manduvira
Asuncion PARAGUAY
TEL:(595)21492147
PERU
Audionet
155, New National Road
Patras 26442. GREECE
TEL: 2610 435400
HUNGARY
Roland East Europe Ltd.
Warehouse Area 'DEPO' PI.83
H-2016 Torokbalint,
HUNGARY
TEL:(23)511011
IRELAND
Roland Ireland
G2 Calmount Park, Calmount
Avenue, Dublin 12
Republic of IRELAND
TEL:(01)4294444
ITALY
Roland Italy S. p. A.
Danvik Center 28, 2 tr.
S-131 30 Nacka SWEDEN
TEL : (0)8 702 00 20
SWITZERLAND
Roland (Switzerland) AG
Atlantic Close, Swansea
Enterprise Park, SWANSEA
SA7 9HJ
UNITED KINGDOM
TEL:(01792)702701
MIDDLE EAST
BAHRAIN
Moon Stores
No.1231&1249 Rumaytha
Building Road 3931, Manama
339 DAHRAIN
TEL: 17 813 942
IRAN
MOCO INC.
Nu.41 Nike St., Dr.Shariyati Ave.,
Roberoye Cerahe Mirdamad
Tehran, IRAN
TEL: (021)-2285-4169
ISRAEL
Halilit P. Greenspoon & Sons
Ltd.
8 Retzif Ha alia
Tel-Ayiv-Yafo ISRAFI
TEL:(03)6823666
JORDAN
Al-Yousifi Service Center
P.O.Box 126 (Safat) 13002
KUWAIT
TEL: 00 965 802929
LEBANON
Chahine S.A.L.
George Zeidan St., Chahine
Bldg., Achrafieh, P.O.Box: 16-
5657
Beirut, LEBANON
TEL:(01)20-1441
OMAN
TALENTZ CENTRE L.L.C.
Malatan House No.1
Al Noor Street, Ruwi
SULTANATE OF OMAN
TEL: 2478 3443
QATAR
Al Emadi Co. (Badie Studio &
Stores)
P.O. Box 62, Doha, QATAR
TEL:4423-554
SAUDI ARABIA
aDawliah Universal
Electronics API
Behind Pizza Int
Prince Turkey Street
aDawliah Building.
PO BOX 2154
Alkhobar 31952
SAUDI ARABIA
TEL: (03) 8643601
SYRIA
Technical Light & Sound
Centex
Rawda, Abdul Qader Jazairi St
Bldg. No. 21, P.O.BOX 13520,
Damascus, SYRIA
TEL:(011)223-5384
TURKEY
ZUHAL DIS TICARET A.S.
Galip Dede Cad. No.37
Beyoglu - Istanbul / TURKEY
TEL: (0212) 249 85 10
U.A.E.
Zak Electronics & Musical
Instruments Co. L.L.C.
Zabeel Road, Al Sheroux Bldg.,
No. 14, Ground Floor, Dubai,
U.A.F.
TEL:(04)3360715
NORTH AMERICA
CANADA
Roland Canada Ltd.
(Head Office)
5480 Parkwood Way
Richmond B. C., V6V 2M4
CANADA
TEL: (604) 270 6626
n
Korland Canada Ltd.
(Toronto Office) 170 Admiral Kow
Misciscuca On L5T 2N6
CANADA
TEL: (905) 362 9707
U.S.A.
Roland Corporation U.S.
5100 S. Eastern Avenue
Los Angeles, CA 90040-2938.
U.S.A.
TEL:(323)8903700
Roland Corporation
- ARX-03 BRASS
- Owner's Manual
- USING THE UNIT SAFELY
- INSTRUCTIONS FOR THE PREVENTION OF FIRE, ELECTRIC SHOCK, OR INJURY TO PERSONS
- ALWAYS OBSERVE THE FOLLOWING
- WARNING
- CAUTION
- IMPORTANT NOTES
- Placement
- Additional Precautions
- Contents
- Installing the Expansion Board in Your Product
- Cautions when installing
- Installation in Your Product
- Confirmation after Installation
- To Remove the Board from the Product
- ARX Series SuperNATURAL Expansion Boards
- Roland SuperNATURAL Technology
- SuperNATURAL
- High-quality brass sounds using SuperNATURAL technology
- Create brass sections with as many as six players with the new "Section" feature
- Stereo reverb taken from the Fantom-G
- Multi-effects that meet the needs of diverse musical styles
- The Structure of ARX-03 Brass
- Basic structure
- Player
- Patch
- Different Ways to Play the ARX-03
- Playing a Solo
- Playing a Section
- Unison Mode
- When you play single notes
- When you play multiple notes simultaneously
- Stack Mode
- When you play a second note as well...
- When you additionally play a third and fourth note...
- Creating a Patch
- About this manual
- Main Screen
- Patch Selection and Indicator
- Player Select setting
- When playing a solo (1–6)
- Player Settings (Player Edit)
- Selecting an instrument (Inst/Level screen)
- Current Player (PLAYER 1-PLAYER 6)
- Feeling settings (Feeling screen)
- Stability
- (Accuracy of the performance)
- With a value of 0
- With the maximum value
- Personality
- Breath settings (Breath screen)
- Growl (Growl sensitivity)
- Turbid (Turbidity)
- Noise (Amount of breath noise)
- Equalizer settings (EQ screen)
- Section Settings (Section)
- Playing settings (Section Style screen)
- MEMO
- Pitch settings (Tune/Key Shift screen)
- Volume Balance Settings (MIXER)
- Volume and pan settings (Level/Pan screen)
- Effect Settings (Effects)
- Applying effects (Routing screen)
- Multi-effect settings (MFX screen)
- Multi-effect control (MFX Control Screen)
- Reverb settings (Reverb screen)
- Controller Assignments (CONTROL)
- Bender settings (Bend/Hold screen)
- Controller assignments for each patch (Control Assign 1 screen)
- Controller assignments for individual instruments (Control Assign 2 screen)
- Initializing a Patch (Utility Screen)
- Saving a Patch (on the Fantom-G)
- Multi-Effects List
- Multi-Effects Parameters
- 01: STEREO EQ (Stereo Equalizer)
- 02: ENHANCER
- 03: AUTO WAH
- 04: HEXA-CHORUS
- 05: COMPRESSOR
- 06: LIMITER
- 07: LOFI COMPRESS (Lo-Fi Compress)
- 08: TELEPHONE
- 09: PHONOGRAPH
- 10: TAPE ECHO
- 11: GATED REVERB
- 12: STEREO DELAY
- 13: MODULATION DELAY
- 14: TRIPLE TAP DELAY
- 15: REVERSE DELAY
- About Note
- Specifications
- Maximum Polyphony
- Parts
- User Memory
- Effects
- Customize Functions
- Miscellaneous
- Accessories
- Index
- B
- C
- E
- F
- G
- |
- L
- M
- N
- P
- R
- S
- T
- U
- V
- FEDERAL COMMUNICATIONS COMMISSION RADIO FREQUENCY INTERFERENCE STATEMENT
- NOTICE
- AVIS
- DECLARATION OF CONFORMITY Compliance Information Statement
- For EU Countries
- AFRICA
- EGYPT
- REUNION
- ASIA
- CHINA
- HONG KONG
- INDIA
- INDONESIA
- PHILIPPINES
- SINGAPORE
- TAIWAN
- THAILAND
- AUSTRALIA/ NEW ZEALAND
- AUSTRALIA/
- NEW ZEALAND
- CENTRAL/LATIN AMERICA
- ARGENTINA
- BARBADOS
- BRAZIL
- CHILE
- COLOMBIA
- COSTA RICA
- PARAGUAY
- PERU
- HUNGARY
- IRELAND
- ITALY
- SWITZERLAND
- MIDDLE EAST
- BAHRAIN
- IRAN
- ISRAEL
- JORDAN
- LEBANON
- OMAN
- QATAR
- SAUDI ARABIA
- SYRIA
- TURKEY
- U.A.E.
- NORTH AMERICA
- CANADA
- U.S.A.
- Roland Corporation
Brand : ROLAND
Model : ARX-03
Category : Hi-Fi System