Gibraltar - Loudspeaker REL Acoustics - Free user manual and instructions
Find the device manual for free Gibraltar REL Acoustics in PDF.


| Product Type | Powered Subwoofer |
| Driver Size | 12 inches (300 mm) |
| Amplifier Power | 300W RMS (600W peak) |
| Frequency Response | 22 Hz – 120 Hz ±3 dB |
| Dimensions (H x W x D) | 430 x 400 x 470 mm |
| Weight | 28 kg |
| Enclosure Type | Sealed (acoustic suspension) |
| Inputs | High-level Neutrik Speakon, Low-level RCA (LFE), .1/LFE RCA |
| Outputs | High-level Neutrik Speakon (loop) |
| Crossover Frequency | Adjustable 30 Hz – 120 Hz, 12 dB/octave |
| Phase Control | 0° or 180° switchable |
| Power Supply | AC 100-240V, 50/60 Hz (internal, auto-switching) |
| Standby Power Consumption | <0.5 W |
| Maximum SPL | 116 dB at 1m |
| Driver Type | Long-throw, cast aluminum frame |
| Cabinet Material | MDF with internal bracing |
| Finish | Black textured vinyl or High-Gloss White |
| Protection | Auto-on/off signal sensing, thermal protection |
| Maintenance | Wipe with dry cloth; do not use liquids or chemicals |
| Safety | Place on stable surface; do not block ventilation; keep away from moisture |
| Spare Parts / Repairability | Contact authorized service center for amplifier module and driver replacement |
Frequently Asked Questions - Gibraltar REL Acoustics
User questions about Gibraltar REL Acoustics
0 question about this device. Answer the ones you know or ask your own.
Ask a new question about this device
Download the instructions for your Loudspeaker in PDF format for free! Find your manual Gibraltar - REL Acoustics and take your electronic device back in hand. On this page are published all the documents necessary for the use of your device. Gibraltar by REL Acoustics.
USER MANUAL Gibraltar REL Acoustics
natural_image
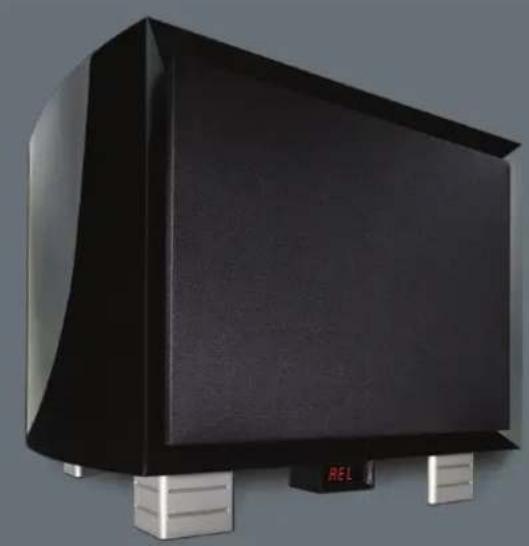
Exterior view of a black and silver electronic device with a digital display (no visible text or symbols)REL
REL
Acoustics Ltd.
natural_image
Exterior view of a black and silver electronic device with a digital display showing 'REL' (no visible text or symbols on the device itself)Opera1ng Instruc1ons for the
Gibraltar Sub-Bass Systems

Important Safeguards
1 Read all of these instructions.
2 Save these instructions for future use.
3 Unplug from the wall socket before cleaning.
4 Do not use near water.
5 Do not place on a stand or table; it may fall causing injury to a child or adult, and damage
6 The unit should only be operated from the power source indicated on the panel of the amplifier
7 Only use the power cord supplied.
8 Do not allow anything to rest on the power cord. Position the power cord such that it can no
9 For added protection during a lightning storm, or when not in use for long periods of time, ur from the wall socket.
10 Never spill any kind of liquid on the unit.
11 Do not attempt to service the unit yourself, as removing the amplifier may expose you to dan voltages. Refer all servicing to your dealer.
12 Unplug the unit from the wall socket and refer servicing to your dealer under the following co-a When the power cord or plug is damaged.
b If liquid has been spilled onto the unit.
c If the unit does not operate properly by following the operating instructions.
d If the unit has been dropped and damaged.
e When the unit exhibits a drastic change in performance.
Warning
This item is heavy. To avoid risk of injury, take care when handling.
Design Safety
This apparatus is supplied with a detachable mains cord. For 230V operation a 5A fuse is fitted in for 115V operation a 10A fuse is fitted. Should the fuse need to be replaced use a similar rated to ASTA or BSI 362. Do not use without the fuse cover in place. Replacement fuse covers are av your distributor.
Welcome to the REL Family
Thank you for buying a REL Gibraltar Sub-Bass System. Gibraltar is carefully hand-built using the fin materials available and is designed for maximum performance. This manual contains important safety information as well as helpful advice and should be carefully studied before connecting the unit.
Many or most loudspeakers emphasize the mid-bass. This is the range from 50Hz to 90Hz. We at this is an incomplete approach and that loudspeakers need to be supplemented in the lower frequency true full range reproduction. All of our designs are true Sub-Bass Systems, meaning they are designed to reproduce very low frequencies (below 30Hz) that are felt rather than heard. This is because we have music is full-range, as are sound effects on movies, and we intend for our products to reproduce sounds, not just a narrow band.
Gibraltar is equipped to allow you to take full advantage of AC3, Dolby Digital, DTS, MPEG 2 and other digital sound format that includes a dedicated Low Frequency Effects (LFE) channel. The dedicated LFE input meets the specification for digital 3/2.1 channels, usually known as 5.1. The output is not flat from 35Hz – 90Hz. It has a dedicated input level control, which enables users to set the LFE independently of the processor. This is important because not all processors offer control over this parameter. The LFE channel frequently outputs at levels 10dB higher than the other channels.
Gibraltar also has high-level speaker level inputs with independent level control. In high-level mode, signal is derived at the end of the amplification chain, producing the most natural and full express voice of the main system and allowing the REL to blend seamlessly with the main speakers. The I inputs feature REL-D™ circuitry which allows connection to class-D amplifiers without worry of ground problems. Uniquely, both the high-level and the LFE input can be used simultaneously. This means it up for an audiophile sound with your CDs or other stereo signals and instantly revert to using System as the dedicated LFE component when watching movies. This is a feature of real benefit if to play music in stereo mode, in the purist audiophile way, and in full 5.1 digital mode. True fle
Introduction to the Design of the REL Gibraltar Sub-Bass Systems
Any design process is a journey. Please follow along as we share lessons gleaned from our three-y journey culminating in the birth of a new ultra high performance range for REL Acoustics, Gibraltar' REL design team's goals for Gibraltar were to replicate the extraordinary performance of the much REL Studio III while reducing size and upgrading appearance. Additionally, the aim was to balance the virtues of Gibraltar toward speed and power so that multiple units can be coupled together to exc Studio's performance.
The Heart of the Matter
Before beginning to refine the cabinet design or assign engineering resources to amplifier layout, it necessary to design and build the ideal driver for this application. In its final iteration, we selected tightly wound true carbon fiber material that is extremely strong and lightweight. Reducing moving r produces superlative impulse response—a key design goal for Gibraltar. This particular driver also need a long stroke (about 1-3/4") in order to generate the volume required to underpin today's high pe main speakers.
A Rare Occasion Wherein Bigger is Not Better
Reducing size while maintaining extremely high levels of output, low distortion and lightning fast train speed influenced the decision to utilize a sealed cabinet. Though Studio III successfully employs an variation of a vented enclosure, performance in a limited enclosure size is superior with a sealed or Sealing naturally places increasing resistance that acts to progressively limit driver excursion. Sometimes referred to as an “airspring,” it is a gentle mechanical aid to the necessary limiting action required to damage to the driver.
Gibraltar's cabinet form is inspired by the design studies of a longtime mentor, Franco Serblin, four Sonus faber. The amount of refinement necessary in order to deal with the extreme pressure levels by the backwave of our Gibraltar driver was an unanticipated challenge. Extremely small variations in basic shape of the cabinet resulted in evident changes in bass performance.
Numerous versions of the cabinet were constructed and evaluated using test instruments and, in part the human ear. Extensive bracing runs the full internal height of each side panel, across the entire crucial top panel, and includes a single fore-and-aft integrating brace much like the spars on a ship results in an exceptionally quiet cabinet. Spacing of these spars is based on Fibonacci multiples, ens that resonance cancellation is spread across a multitude of frequencies. The resulting performance de exceptionally low bass, replete with weight and authority, along with tremendous transient speed. The performance of Gibraltar is only realized through precise cabinet form and precise assembly technique
Divide (Very Rapidly) and Conquer!
The input filter topology (crossover) used in Gibraltar is new and, to the best of our knowledge, the analog filter ever devised for a sub-bass system at about 4 milliseconds rise time. We utilize a second Bessel function for preservation of impulse response that crosses over as low as 20 Hz. Additionally, have a second filter placed at approximately 250 Hz that gently removes midrange and high frequency from the mix, but allows for maximum speed of the main filter within its operating range. Crossover tunable in 1 Hz increments.
Gain is adjustable for REL Reference High-Level connection (preferred) or standard low level input from main preamplifier. In high-level mode, input signal is derived at the end of the amplification chain, the most natural and full expression of the voice of the main system. This allows the REL to be with the main speakers. Conventional low-level connection is also supported through rear panel RCA
Power Corrupts
Or so the saying goes. Actually, a lack of power is frequently what corrupts or limits the pure pi performance of a sub. REL employs an expensive, but in our experience, ultimate circuit topology for Gibraltar. A linear, Class AB power amplifier using 6 MOSFETs for the G-1 and four for the G-2 k state of the art power supply and a power transformer with vast over-specification. Expensive? Yes, unabashedly so. However, it is both the finest and most reliable design approach we know of for virtually military specification amplifiers. Execution is absolutely first cabin including subtle touches such as use of telecommunications grade printed circuit boards, high current output devices and tight voltage regulation.
REL Reference Theater Connection
Gibraltar's filter, operating completely independently of the primary crossover, provides for dedicated inputs and crossover function. The pure Dolby® Labs .1 protocol is observed featuring a dedicated filter fixed at 120Hz. Connection is via either XLR or RCA sockets for the .1 input. Gain is adjustable independently of the high-level connection.
When both the high and .1 input are employed it is possible to obtain the ultimate performance from soundtracks, as the main speakers are permitted to run full range producing the most natural from high quality speakers. The REL high-level connection extends and supports the main speakers, t them into truly full-range devices while the dedicated .1 channel information encoded in the soundtr fed to its own REL channel and gain can be perfectly set to extract maximum dynamics from a 1 best of all worlds.
A Tower of Gibraltar
Gibraltar is designed to allow multiple units to be used in conjunction either as vertically stacked into stereo pairs, or the ultimate set: vertical tower stacks of stereo subs. Stacked towers extend and use the performance. To render connectivity simple, Gibraltar provides both inputs and outputs for all co-Thus, a stack of Gibraltar can be connected using only one cable from the main amplifier. In a . configuration each channel will require a .1 cable as well, but additional units in a tower may be chained to minimize clutter. Stacked Gibraltar subs have the ability to effortlessly energize even the of salons with huge wavefronts of air, from the most delicate cello pizzicato to the most crushing organs played at triple forte, Gibraltar possesses the ability to convey the musical event or film so spectacularly and with ease.
In summation, Gibraltar delivers performance close to our internal reference unit—Studio III—at less than half the cost when used singly. When used in multiples, especially when deployed in vertical towers stereo sub bass systems, Gibraltar's performance is capable of outperforming this standard and, in more relevant terms, any other commercially available sub system we know of at the time of this writing
REL G-1 Rear Panel Connection Legend
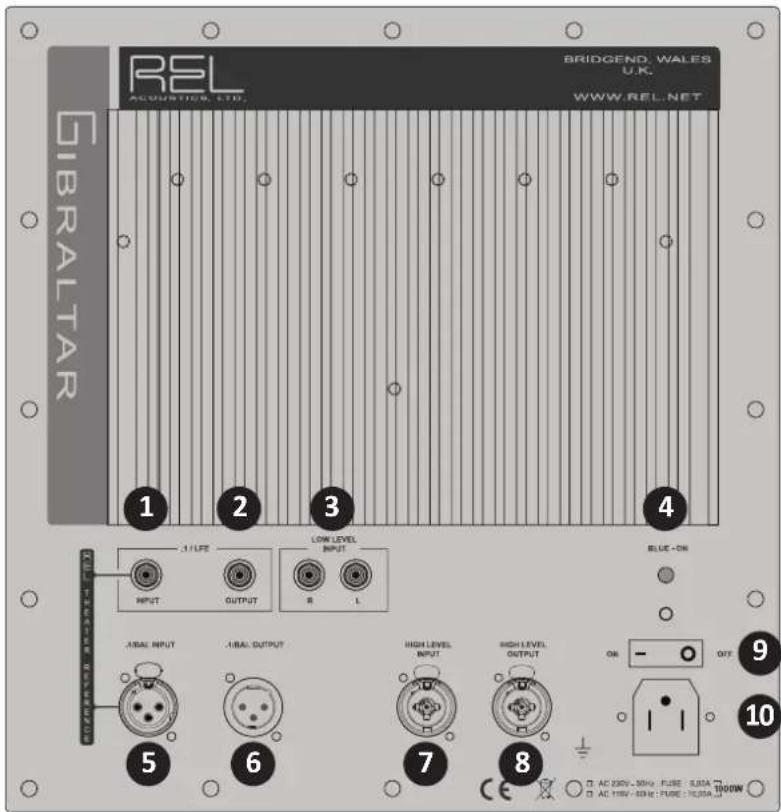
1 .1/LFE Phono Input: Used to connect to the .1/LFE output of a surround-sound processor.
2 .1/LFE Phono Output: Used to connect or "daisy chain" another REL G-Series in tandem.
3 Left & Right Channel Low-Level Phono Input: Used to connect low-level signals to the sub-bass s the output of a preamplifier, integrated amplifier or receiver. (For home cinema use, use .1/LFE
4 Power Pilot Light: Power On/Off indicator.
5 .1/LFE Balanced Input: Balanced (XLR connector) version of .1/LFE Input. For use only with fully balanced cables.
6 .1/LFE Balanced Output: Balanced (XLR connector) version of .1/LFE Output. For use only with full balanced cables.
7 High Level Input (Neutrik Speakon): Used to connect to the main front amplifier speaker terminal
8 High Level Output (Neutrik Speakon): Used to connect or "daisy chain" another REL G-Series in t
9 Power On/Off Switch: Use to turn unit on or off.
10 IEC Mains Socket: Fused mains (AC) input socket that accepts detachable power cord.
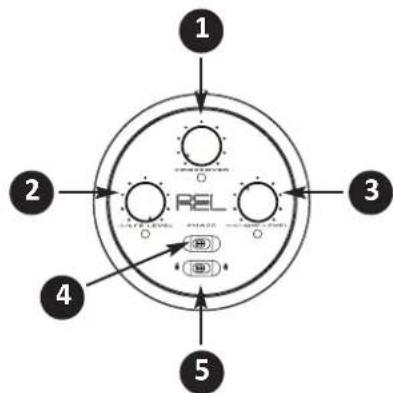
Remote Control
1 Crossover: Used to adjust crossover frequency. Variable between 20-90Hz.
2 .1/LFE Level: Used to adjust output level when using .1/LFE input from a surround-sound process
3 Hi/Lo Level: Volume control for HI/LO input. Use to adjust output when using either HI Level or input. Do not use both simultaneously.
4 Phase: Used to set phase 0-180 degrees.
5 Security: Used to lock remote settings. To extend battery life of the remote, always leave the switch in the locked position when not in use.
Connectivity and Functionality
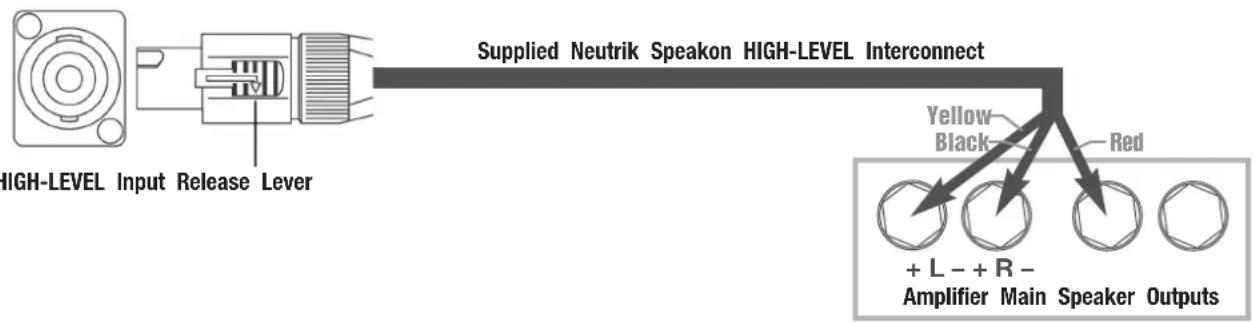
High-Level Input: Connections should be made to the same binding post on main amplifier as the main
speakers. Red to amplifier main right speaker red terminal, yellow to amplifier main left speaker red and black to amplifier main speaker black terminal, right or left but not both. Plug the Neutrik Sp into the HIGH-LEVEL Speakon socket.
.1 Input: This requires a phono-to-phono cable and is a dedicated true .1 channel. This circuit therefore
eliminates the normal Natural RollOff™ Crossover and passes the .1 low-level signal through with only required 120Hz fourth-order crossover. Single-ended or balanced inputs are available.
Low-Level Input: This stereo phono input allows for conventional connection to a preamplifier and should
be used in the rare event that a high-level connection proves incompatible. Plug one end into the output of the amplifier/processor and the other end into the stereo low-level inputs on the G-1.
Phase Switch
Used to set phase. Phase Switch on remote control is momentary. Refer to display for 0 or 180 Phase selection affects both high-and low-level inputs.
LEDDisplay
An LED display is located on the lower front of Gibraltar. All functions that are user-adjustable via control can be seen here. The display reverts to off a few seconds after adjustment.
RemoteControlBatteryInstallation
Gibraltar's remote control unit requires two AAA batteries. These are not installed but are supplied. install or replace batteries in the remote control unit, first remove the bottom aluminum cover by supplied 2.5mm allen key to loosen the two visible screws. With the bottom cover removed, you battery holder which will accept two AAA batteries. Follow the images on the holder for proper or of the batteries. After installing the batteries, test the unit by setting the SECURITY switch to UNLC turning one of the knobs. If the batteries are installed properly, you will see one of the red LED remote control's front panel illuminate. Replace the bottom cover and tighten the two screws using supplied allen key. Battery life can be extended if the SECURITY toggle switch is left in the LOCK when the remote control is not in use.
Remote Control Address Selection
The remote control unit provides an address selection function to allow multiple sub-bass systems to used in an audio system with a separate remote control for each. Additionally, if the remote control Gibraltar interacts with any other piece of equipment in your system or if other remotes interact with Gibraltar, the address can be changed to avoid unwanted interaction.
Connecting Up
Always switch off your system before disconnecting any wires. To increase the versatility of connecti Gibraltar has two separate stereo inputs: A Neutrik Speakon socket and two phono sockets. This is use with various system configurations.
The high-level, unbalanced, dual-channel (stereo) input uses a Neutrik Speakon connector which is co- to the power amplifier's left and right channel speaker terminals. This has the advantage of ensuring REL receives exactly the same signal as the main speakers. This means that the character of the I the main system is carried forward into the sub-bass. This is a very important point and together Active Bass Controller (ABC), ensures far superior system integration of the sub-bass with the main
There are two RCA sockets for low-level connection to the output of a stereo preamplifier or receive single RCA socket connects to the .1/LFE output of a home cinema amplifier or processor.
HIGH-LEVEL and .1/LFE inputs can be used simultaneously. The benefits are two-fold when used with home cinema system. The low-level input reproduces the .1 Sub/LFE channel and the high-level conr underpins the main front speakers. The main front speakers should be set to the 'large' option on processor. See the section "REL Theater Reference™ Home Cinema Applications" (P. 19) for more inf
Connecting to the Power Amplifier Using the Speakon High-Level Input
To engage the Neutrik Speakon plug, insert fully into socket and rotate clockwise until locked. To Neutrik Speakon plug, grip body of plug, place thumb on chrome lever, move lever backwards, rotate anti-clockwise quarter turn and withdraw.
Standard Connection
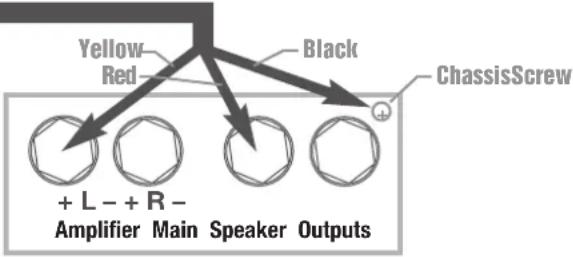
- The standard high-level hookup procedure is: attach the red wire to the amplifier's right positive output terminal; attach the yellow wire to the amplifier's left positive speaker output terminal; att black wire to whichever of the amplifier's ground output terminals is convenient; plug the Speaker into the Sub-Bass System's high-level input.
Differential or Class-D Amplifier Connection
- For different1al (i.e. fully balanced) amplifiers using one REL, simply use the standard connec1ng s with the exception of connec1ng the black wire to chassis ground (i.e. a metal bolt or screw, not painted or anodized, on the chassis of the power amp or receiver), not to a negative speak and then connec1ng into the HIGH-LEVEL INPUT on the REL. Please contact your dealer should the any questions concerning this or any other hookup procedure.
Supplied Neutrik Speakon HIGH-LEVEL Interconnect
Stereo Sub Connection
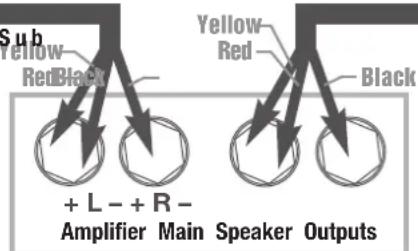
- If connec1ng two RELs in a stereo configura1on, connect the black wire of each REL to the new speaker terminal of the corresponding amplifier channel; twist together the red and yellow wires separately and connect each pair to the positive speaker terminal of the corresponding amplifier c
Supplied Neutrik Speakon HIGH-LEVEL Interconnect
Supplied Neutrik Speakon HIGH-LEVEL Interconnect
LeftSub RightSub
Dedicated Center Channel Sub Connection
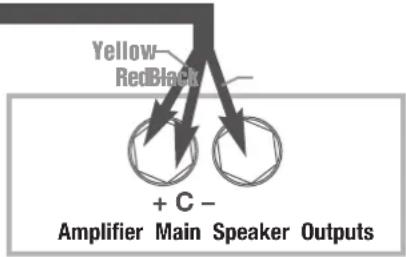
- If connecting a single REL as a dedicated center channel sub, connect the black wire of the RE negative center channel speaker terminal; twist together the red and yellow wires and connect this to the positive center channel speaker terminal.
Supplied Neutrik Speakon HIGH-LEVEL Interconnect
Dedicated Rear Sub Connection
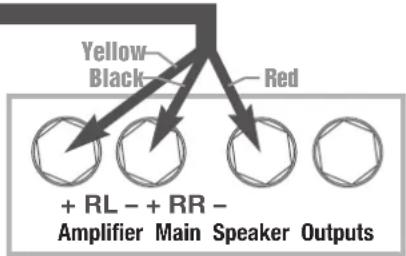
- If connecting a REL as a dedicated rear channel sub, connect the black wire of the REL to eit rear or right rear negative speaker terminal; connect the yellow wire to the left rear positive spe terminal; connect the red wire to the right rear positive speaker terminal.
Supplied Neutrik Speakon HIGH-LEVEL Interconnect
Low-level connection (via phono connectors) is always an option if high-level connection is not possible. When connecting to the low-level inputs in a system in which high-level connection is not possible, if using internally-amplified speakers, connect one end of a stereo phono cable to the LOW-LEVEL I jacks on the REL and connect the other end to the outputs of your preamplifier.
When connecting to a home cinema system where there is a .1/LFE channel output, connect a sin cable between the sub output of the processor/receiver and the .1/LFE input jack on the REL.
Connecting Gibraltar Towers
For higher levels of low-frequency output, you may want to use multiple sub-bass systems. To facilitate the Gibraltar uses a rear panel high-level connector to “daisy chain” units when stacked vertically on next to each other.
This connectivity allows for the same amplifier output signal to easily feed multiple sub-bass systems use the optional cable (Speakon-to-Speakon) to connect from the “HIGH-LEVEL OUTPUT” of the first system to the “HIGH-LEVEL INPUT” of the second unit.
When “daisy chained” each sub-bass system retains its autonomy and each will need to have its level, crossover point, phase, etc adjusted individually. This arrangement provides unrestricted flexibility in-room integration and fine-tuning of all audio parameters.
For multi-channel home cinema systems, the same procedure is followed except a phono-to-phono ca also used to connect the first sub-bass system ".1/LFE OUTPUT" to the ".1/LFE INPUT" of the seco is typical for REL, both high-level and .1/LFE inputs can be used together and adjusted independent the ability to blend both signals to your taste.
To protect Gibraltar's fine furniture grade cabinetry when stacking, optional rails with felt coverings replace the metal feet are available. The kit contains all hardware necessary to attach the rails, as a Speakon-to-Speakon cable for daisy-chaining.
Using the Remote Control to Address Multiple Sub-Bass Systems
The address selection is accessed on the remote control unit by removing the bottom aluminum co the same way as outlined in the section "Battery Installation". Removing the cover will reveal a sn switch labeled "ADDRESS" next to the battery holder. Factory setting is position "0". With the remo unit powered off (locked mode), this switch can be rotated using a small slotted screwdriver to set sixteen possible address positions, "0" through "F". Once a selection has been made, replace the ba and turn the remote control unit on (unlocked mode). At this point the remote control will not o subwoofer. In order to pair the remote control unit with the sub-bass system, point the remote co unit's emitter at the LED display and hold the PHASE switch for 5 seconds. The LED under the C control will flash once and the display on the sub-bass system will read "- - - " followed by a cc noting the selected address. The sub-bass system is now paired with the specific remote control un will not function with a different remote. In a system with multiple sub-bass systems, change each one unit at a time with the sub-bass systems not being changed switched-off to avoid inadvertently the addresses of multiple units.
REL Set-Up Made Simple
REL products are not traditional subwoofers, but true Sub-Bass Systems. A REL is designed to augm performance of “full range” speaker systems in order to provide, in certain cases, linear response d below 12 Hz. Therefore, for the moment, set aside everything you’ve been taught about subwoofers how they are integrated into a stereo or home cinema system. Set-up and positioning of REL Sub-differs from conventional subwoofers. A REL will take advantage of physics and room acoustics to p deep pressurization as no traditional subwoofer can. It is important that you bring to the set-up p willingness to do things a little differently in order to obtain these superior results. The end result labors will be an utterly seamless integration of true deep bass to a sound system, regardless of speakers’ low bass capability.
Basic set-up should take no more than ten to fifteen minutes to accomplish once connected.
Before You Begin
- It is helpful to know that you will almost always connect the REL to the input on the rear p "HIGH-LEVEL INPUT." This connection is made using the supplied 34' 10" (10 meters) cable, the b of which connect to the speaker output terminals of the power amplifier. The easy and foolproof at the REL is done with a Neutrik Speakon connector. The purpose of connecting to the speaker terminals is one of the unique secrets of REL's success. By connecting to the high-level input on from the amplifier, you build forward the sonic signature of your main system, including the tona and timing cues of the entire electronics chain. In this way, the REL is fed the exact signal tha main speakers.
- When possible, the REL should be placed in one of the corners behind the speakers. Remember, dealing with true LOW bass pressurization with RELs. Low bass pressurization below 40Hz is best from corner placement, where the most linear and efficient low bass can be produced.
High-level connection, using the enclosed cable with the Neutrik Speakon connector, is always the choice compared with low-level connection. This connection can be made without affecting the per of the amplifier because the REL's amplifier input impedance is 150,000 ohms, in effect not produced additional demand whatsoever on the rest of your system. When connecting to a home cinema s where a .1/LFE channel output is present, connect a single phono cable between the sub output processor/receiver and the .1/LFE input jack on the REL.
Setting Up
1 Positioning: The optimal position for a REL is in one of the corners behind the main speakers. This position provides 9 dB of mechanical amplification and allows for the most linear true low bass wave lao owing to the ability to tune the REL to the longest distance in the room in order to produce therefore lowest, bass waves.
2 The Process: To begin the set-up process, choose a piece of music that has a repetitive bass line that is very low in frequency. We recommend track 4 from the soundtrack to Sneakers (Columbia CK 53146).
This has a repetitive bass drum throughout that gives you plenty of time to move the woofer but more importantly, the venue was quite large for this recording and therefore it has a very large-scale bass signature. This type of track is perfect for the set-up process and should be pla highest reasonable level expected for system playback.
Working with a partner, one in the listening position and one at the REL manipulating the cont the most effective and efficient way to set up the REL. If working alone, the initial steps in the be very effectively carried out from the location of the REL. Trying to ignore all other music in listen for the bass drum and its effect on the listening room.
3 Phase Orientation: Once in the corner we need to adjust for phase. This may be the single most critical
step and, because it really is quite simple, it is often over-thought. Keep in mind; the right ph whichever position is the loudest or fullest. While playing music with true low bass, adjust the to a point where the REL and the speaker are sure to share frequencies (about halfway up or higher for smaller speakers). At this point turn the HI/LOW level control up so that both the F speaker are roughly equal in volume and then switch, using the phase switch, from "0" to "180" positions. Again, whichever position is loudest or fullest is the correct position. That is, when the is working in harmony with your main speakers, reinforcing bass, and not cancelling it.
4 Placement: The next step is to determine precisely how far out from the corner the sub should be placed
to achieve the most efficient output, as well as the lowest frequency extension. With the REL f the corner, and pointing straight out along the diagonal coming out of the corner, continuing to music, slowly pull the REL from the corner on the diagonal, equidistant from both side and rea certain point (sometimes a matter of only a few inches, in rare cases a foot or more) the RE go lower, play louder and, if it truly locks-on to the room and is fully pressurizing it, the air REL will seem to be energized. Stop right there! This is the correct position from the corner fo
5 Orientation: Once the position from the corner has been established, the orientation of the woofer must
be determined by rotating the REL from an imagined center point at the rear of the REL. As moved from one side to the other, listen for the greatest level of output and bass linearity. The should be left in the position where it is playing the loudest and lowest.
6 Crossover and Level Settings: To determine the crossover point, take the volume of the REL (using the
HI/LOW Level control) all the way down, and put the crossover to 25 Hz. At this point, bring volume back up slowly to the point where you have achieved a subtle balance, i.e. the point: you can hear the REL even with the main speakers playing. Now, bring the crossover point up is obviously too high; at this point bring it down to the appropriate lower setting. For all interpurposes, this is the correct crossover point. Once this stage has been reached, subtle changes
and crossover can be made to provide the last bit of complete and seamless integration. With set-up is complete.
Hint: There may be a tendency to set the crossover point too high and the volume of the Sub-Bass System toottilowttiwhenttifirstttilearningttihowttitottiintegratettiattiRELttiwithttithettisystem,ttithettifearttibeingttionettiofttiove mainttispeakersttiwithttibass.ttiButttiinttidoingttiso,ttithettiresultingttiset-upttiwillttibettilackingttiintttibassttidepthttiand propertticrossoverttipointttiandttivolumettisettingttiwillttiincreasettiooverallttidynamics,ttiallowttiforttiextendedttibassttfi andttiimprovettisoundstagettiproperties.ttiNote,ttivolumettimustttibettiadjustedttiintticonjunctionttiwithtticrossoverttich Inttigeneral,ttiwhenttiselectingttiattilowertticrossoverttipoint,ttimorettivolumettimayttineedttitottibettiapplied.
An Alternative Method to Setting up Gibraltar
Whereas lesser REL designs make virtually exclusive use of corner positioning, Gibraltar may be set-up two different ways:
1 Traditional corner loading—this method continues to work well, especially in smaller and medium-si
2 For large rooms and especially when used in large rooms with state of the art main speakers, with coupling the Gibraltar(s) in close proximity to the mains, yet slightly behind and to the out the mains can result in perfect integration with ones' main speakers.
If method 2 is selected, the listening cues involve using the same type of repetitive, bass transient customarily used for all REL set-up work (Sneakers). First, experiment with corner placement, if for any reason
this position seems problematic proceed as follows. Carefully draw Gibraltar out from the corner brick closer and closer to the main speaker, listen carefully for anchor points—those points of room bound reinforcement that inform you that the REL is working efficiently with the room. An optimal location approximately 18"-36" of the location of the main speaker should result in perfect, seamless coupling
Essentially, Gibraltar is so powerful that room boundary reinforcement becomes less of a concern at listener/optimizer is free to focus virtually exclusively on speed, integration and air with Gibraltar take care of all the slam and output necessary to obtain the desired REL effect.
REL Theater Reference™ Home Cinema Applications
For Dolby® Digital AC-3 or other 5.1 theater systems, once the standard set-up for two-channel out above is complete, the LFE output from the processor or receiver should be connected to the .1/L and appropriate volume adjustments made using the .1/LFE level control. For this configuration, you set the processor to the “large” or “full range” setting for the left and right speakers in order for receive the bass signal via the high-level cable. In this configuration, the REL provides support for left and right speakers for two-channel listening and support for the LFE when movies are playing. processors will allow you to defeat the subwoofer output when listening in the two-channel mode. effect of this set-up is one of greatly increased dynamics in the mid-bass range, no bass bloat and degree of space and timing from the special audio effects.
REL Theater Reference 3D Bass™
While slightly more complicated than the basic REL Theater Reference scheme, use of three RELs pin number of noteworthy benefits and proves the most cost-effective method of achieving professional I 5.1 standard bass performance. REL Theater Reference 3D Bass™ produces true full range performance from the three primary zones of reproduction in theater sound resulting in a far more natural and sive experience than any single sub can produce.
1 The main left and right speakers should be connected to the primary REL using REL Theater Re connection. This unit forms the foundation of your theater system's performance and so should be perfectly matched to one's main speakers.
2 In the rear corner (ideally that which is opposite the primary sub), connect a second REL to the speakers using REL Theater Reference connectivity. The purpose of the rear channel REL is to en proper front-to-rear balance and weight; too often virtually all the power and weight in a theatre from the front and it produces unnatural weighting as well as hot spots. By placing a rear REL opposite, bass transects the room on a tangent and has the effect of greatly smoothing overall response of your RELs. This unit need not be a duplicate of your primary REL; instead it should well with your surround speakers.
3 Connect a third REL to the center channel using only the HIGH-LEVEL connection. This may be accomplished by connecting directly to the connection terminals on the rear of the center channel speaker. To do so, first twist the red and yellow leads together and connect to the positive test
connect the remaining black lead to the negative (black) terminal on the rear of the speaker. The of the third “center” REL is to ensure the center channel can keep up with the scale, weight the main system now has. Location should be anywhere from the opposite corner of the front somewhere in the middle of the front wall, listen for best integration with the center channel. Some people prefer to use the REL as an actual pediment or stand for their center channel sp choice is yours. Again, this unit need not be an exact duplicate of the primary REL but should for its acoustic ability to mate seamlessly with your center channel.
First, carefully set-up and dial-in the primary REL, then move to the rear REL and balance this main REL. Care must be taken to ensure phase is identical on both RELs as accidentally reversing one relative to the other will result in a dramatic reduction in bass output. Finally, carefully dial performance of the center channel sub. Hint: to make this easier, once the primary REL has been, unplug it from the system using the Speakon connection and dial-in the rear, followed by the channel REL.
Genuine sticklers for perfection find it easiest to tune in sections. For example, connect only the right mains and the primary REL. Next, tune only the rear surrounds and the rear REL. Finally, and tune only the center channel with the center REL.
When you have accomplished this task, plug all three units in and re-check your gain settings as cumulative effect of hooking all three up will usually result in temporarily excessive output. Work and methodically to reduce the settings on primary, then rear, and finally center channel RELs an minutes balance should be restored. However, the net result of all your tuning will be a sound immerses the theater owner in a rich natural wash of bass that suffuses the room effortlessly, what is often experienced as too loud a bass balance pushing uncomfortably at the listener.
Running In
Care taken over running in will be rewarded by many years of pleasurable use. Both the electronic drive unit will benefit from an initial period of carefully controlled use. Possible damage may be su by running in the unit at too high a volume setting over an extended period. On the other hand little care over this initial period, about 24 hours of actual use, a longer life with a higher potent performance is assured.
Care and Polishing
The cabinets are best maintained by using a light automotive spray-on wax and a microfiber cloth. spray-on made by a company called Griot's Garage™. While this may not be available in all markets use a similar product. Take care not to spray the aluminum badges. Do not place objects, such as top of your REL. Never use a dry cloth on this finish.
Technical
Gibraltar employs an advanced filter circuit which provides exceptional performance when coupled to rest of the signal chain of the Sub-Bass System. A second-order variable low-pass filter approximating Bessel function was chosen for its linear phase response, which equates to flat group delay. This n that, unlike other filter functions, the amount of delay the signal is subjected to during processing through the entire pass-band, which improves the frequency response and allows for better integratic the sub with the main speakers. An additional fixed second-order Bessel filter follows the variable f removing unwanted midrange signals that, if left unfiltered, cause the midrange of the main speaker become muddy or congested. All filtering is performed in the analog domain using high-quality comp with tight tolerances to ensure the highest possible performance and consistency.
The amplifier is fully DC coupled to avoid phase shifts and compromises in its low end performance inherently stable and will retain its characteristics over very long periods of time – important in a designed for an exceptionally long working life. These amplifiers are designed to withstand reasonable abuse and overloads. If in doubt, please contact your dealer.
We believe that the importance of the electronics, cabinet and drivers being designed to work in I is paramount. This belief allows Gibraltar to achieve the highest possible level of fidelity.
Overload Protection
All REL Sub-Bass Systems are designed as true sub bass speakers. They are designed to reproduce exceptionally deep notes that are felt rather than heard. This it will attempt to do at whatever you set. If set too high no damage should result because the built-in electronics will limit the core. This electronic control is called Set-Safe™. It constantly and instantaneously monitors the output from power amplifier and is totally transparent in operation until required. This means it has absolutely on the sound quality of your REL until an overload is detected.
Ordinarily an overload would cause the power amplifier to go into clipping with resultant loss of c over the drive unit. This can cause drive unit damage, and always sounds nasty. Set-Safe detects t of incipient clipping and gently soft clips the waveform of the signal to ensure actual clipping does occur. This is a necessarily simplified description of what actually happens, but in effect, Set-Safe cc the amplifier and ensures there is minimal risk of amplifier or driver damage caused by over-driving Although everything possible has been done to minimize risk of thermal overload failure, there can no defense against deliberate abuse the device. Such damage is NOT covered by warranty. Please r your REL is there to supplement your main system, not overwhelm it!
Power Saving Efficiency
All REL Sub-Bass Systems are designed for maximum power efficiency, both when passing a signal to its resultant output sound into the room and also when silent.
REL circuitry is designed for “power starvation” operation under no signal conditions. This means that immediately when there is a gap in the signal the REL is instantly at maximum power saving efficiency remains at maximum readiness to respond immediately to a sudden transient signal, such as an exp in a movie, even after a long quiet period and regardless of level.
This compares to some “auto power on/off systems” which remain powered up for a set period of condition (up to 10-15 minutes) and which need to power-up on receipt of a sudden transient, then to catch the start of that transient. There is also the possibility of the unit remaining inoperative listening sessions where the overall volume is low.
It is not necessary to switch off between listening sessions – it will not significantly shorten its lif leaving it switched on. On the other hand, it will not harm sound quality if it is always switched power consumption in the quiescent (no signal) state is negligible.
It is perfectly safe under all normal domestic circumstances as it is fully protected by internal fuse external mains fuse in the fuse holder of the mains input socket, with a spare inside this holder.
Specifications
G-1
Type: Closed box, front firing woofer
Drive Unit: 12 in., 300mm long throw, carbon fiber cone
Lower Frequency Response
in Room: -6dB at 15Hz
Input Connectors: High-Level Neutrik Speakon, Low-Level stereo phono, LFE phono, LFE XLR
Output Connectors: High-Level Neutrik Speakon, LFE phono, LFE XLR
Gain Control Range: 80 dB
Power Output: 600 Watts (RMS) Ultra High-Current Power Supply
Phase Switch: Yes, 0 or 180 degrees
Amplifier Type: Class AB
Protection System
Fully Electronic with SET-SAFE: Yes
DC Fault: Yes
Output Short: Yes
Mains Input Voltage: 220-240 volts, 110-120 volts for certain markets
Mains Fuse: 5 Amp semi delay 230 volts operation
10 Amp semi delay 115 volts operation
Dimensions
W x H x D, Including Feet: 22.5 x 18.2 x 26.8 in., (571.5 x 462 x 680.3 mm)
Net Weight: 108 lbs. (49 kg)
Supplied Accessories
Mains Lead: Yes
Neutrik Speakon Interconnect
10 Meters Nominal: Yes
Users Manual: Yes
Remote Control: Yes
Batteries (AAA x 2): Yes
Spikes (x 4): Yes
Allen Key (2.5mm): Yes
G-2
Type: Closed box, front firing woofer
Drive Unit: 10 in., 250mm long throw, carbon fiber cone
Lower Frequency Response
in Room: -6dB at 18Hz
Input Connectors: High-Level Neutrik Speakon, Low-Level stereo phono, LFE phono, LFE XLR
Output Connectors: High-Level Neutrik Speakon, LFE phono, LFE XLR
Gain Control Range: 80 dB
Power Output: 450 Watts (RMS) Ultra High-Current Power Supply
Phase Switch: Yes, 0 or 180 degrees
Amplifier Type: Class AB
Protection System
Fully Electronic with SET-SAFE: Yes
DC Fault: Yes
Output Short: Yes
Mains Input Voltage: 220-240 volts, 110-120 volts for certain markets
Mains Fuse: 5 Amp semi delay 230 volts operation
10 Amp semi delay 115 volts operation
Dimensions
W x H x D, Including Feet: 20 x 16.4 x 24 in., (508.8 x 417.3 x 610.4 mm)
Net Weight: 84lbs. (38.1kg)
Supplied Accessories
Mains Lead: Yes
Neutrik Speakon Interconnect
10 Meters Nominal: Yes
Users Manual: Yes
Remote Control: Yes
Batteries (AAA x 2): Yes
Spikes (x 4): Yes
Allen Key (2.5mm): Yes
In the interest of product development, REL Acoustics Limited reserve the right to vary these specifications without notice.
REL Acoustics Limited
North Road, Bridgend industrial Estate . Bridgend, CF31 3TP . United Kingdom
Telephone: +44 (0)1 656 768 777 . Fax: +44 (0) 1 656 766 093
Web: www.rel.net
- REL
- Gibraltar Sub-Bass Systems
- Important Safeguards
- Warning
- Design Safety
- Welcome to the REL Family
- Introduction to the Design of the REL Gibraltar Sub-Bass Systems
- The Heart of the Matter
- A Rare Occasion Wherein Bigger is Not Better
- Divide (Very Rapidly) and Conquer!
- Power Corrupts
- REL Reference Theater Connection
- A Tower of Gibraltar
- Remote Control
- Connectivity and Functionality
- Phase Switch
- LEDDisplay
- RemoteControlBatteryInstallation
- Remote Control Address Selection
- Connecting Up
- Connecting to the Power Amplifier Using the Speakon High-Level Input
- Standard Connection
- Differential or Class-D Amplifier Connection
- Stereo Sub Connection
- Dedicated Center Channel Sub Connection
- Dedicated Rear Sub Connection
- Connecting Gibraltar Towers
- Using the Remote Control to Address Multiple Sub-Bass Systems
- REL Set-Up Made Simple
- Before You Begin
- Setting Up
- An Alternative Method to Setting up Gibraltar
- REL Theater Reference™ Home Cinema Applications
- REL Theater Reference 3D Bass™
- Running In
- Care and Polishing
- Technical
- Overload Protection
- Power Saving Efficiency
- Specifications
- G-1
- Dimensions
- Supplied Accessories
- G-2
Brand : REL Acoustics
Model : Gibraltar
Category : Loudspeaker