
46MF401B - Television MAGNAVOX - Free user manual and instructions
Find the device manual for free 46MF401B MAGNAVOX in PDF.


| Product Type | Television (LCD 46 inch Full HD) |
| Model | 46MF401B |
| Brand | Magnavox |
| Display | 46 inch LCD, Full HD (1920x1080) |
| Dimensions (with stand) | 44.3 x 30.4 x 11.7 inches (1125.0 x 770.5 x 295.0 mm) |
| Dimensions (without stand) | 44.3 x 28.4 x 4.4 inches (1125.0 x 719.0 x 109.5 mm) |
| Weight (with stand) | 53.58 lbs (24.30 kg) |
| Weight (without stand) | 48.15 lbs (21.84 kg) |
| Power Requirements | AC 120V ~ ±10%, 60 Hz ±0.5% |
| Power Consumption (max) | 228W |
| Audio Output | 10W + 10W (8Ω) |
| Tuner | ATSC (digital) / NTSC (analog) / CATV |
| Inputs | HDMI x3, Component Video x1, S-Video x2, Composite Video x2, PC (HDMI-DVI), USB x1, Antenna (RF), Audio L/R x4 |
| Outputs | Digital Audio (coaxial) x1, Analog Audio L/R x2 |
| Special Features | Autoprogram, Child Lock, Closed Caption, Fun-Link (HDMI link), Energy Saving Mode, Sleep Timer, Freeze Mode, MTS/SAP, PLL tuning |
| USB Playback | MP3 (music), JPEG (pictures) |
| On-Screen Languages | English, Spanish, French |
| Standby Power | <1W (estimated) |
| Safety | Polarized plug, anti-tip, ventilation requirements, mercury warning (lamp contains mercury) |
| Cleaning | Use soft dry cloth; no solvents; disconnect power before cleaning panel |
| Warranty | 90 days labor / 1 year parts (limited) |
Frequently Asked Questions - 46MF401B MAGNAVOX
User questions about 46MF401B MAGNAVOX
0 question about this device. Answer the ones you know or ask your own.
Ask a new question about this device
Download the instructions for your Television in PDF format for free! Find your manual 46MF401B - MAGNAVOX and take your electronic device back in hand. On this page are published all the documents necessary for the use of your device. 46MF401B by MAGNAVOX.
USER MANUAL 46MF401B MAGNAVOX
Thank you for choosing Magnavox.
Need help fast?
Read your Owner's Manual first for quick tips that make using your Magnavox product more enjoyable. If you have read your instructions and still need assistance, you may access our online help at www.magnavox.com/support or call 1-866-341-3738 while with your product (and Model / Serial number)
Return your Product Registration Card or register online at www.magnavox.com/support today to get the very most from your purchase.
Registering your model with MAGNAVOX makes you eligible for all of the valuable benefits listed below, so don't miss out. Complete and return your Product Registration Card at once, or register online at www.magnavox.com/support to ensure:
\*Proof of Purchase \* Product Safety
Returning the enclosed card guarantees that your date of purchase will be on file, so no additional paperwork will be required from you to obtain warranty service.
Notification
By registering your product, you'll receive notification directly from the manufacturer - in the rare case of a product recall or safety defect.
\*Additional Benefits
Registering your product guarantees that you'll receive all of the privileges to which you're entitled, including special money-saving offers.
MAGNAVOX
Congratulations on your purchase, and welcome to the "family!"
Dear MAGNAVOX product owner:
Thank you for your confidence in MAGNAVOX. You've selected one of the best-built, best-backed products available today. We'll do everything in our power to keep you happy with your purchase for many years to come.
As a member of the MAGNAVOX “family,” you’re entitled to protection by one of the most comprehensive warranties and outstanding service networks in the industry. What’s more, your purchase guarantees you’ll receive all the information and special offers for which you qualify, plus easy access to accessories from our convenient home shopping network.
Most importantly, you can count on our uncompromising commitment to your total satisfaction.
All of this is our way of saying welcome - and thanks for investing in a MAGNAVOX product.
P.S. To get the most from your MAGNAVOX purchase, be sure to complete and return your Product Registration Card at once or register online at:
www.magnavox.com/support
Know these safety symbols

CAUTION
RISK OF ELECTRIC SHOCK DO NOT OPEN

CAUTION: TO REDUCE THE RISK OF ELECTRIC SHOCK, DO NOT REMOVE COVER (OR BACK). NO USER-SERVICEABLE PARTS INSIDE. REFER SERVICING TO QUALIFIED SERVICE PERSONNEL.

This “bolt of lightning” indicates uninsulated material within your unit by cause an electrical shock. For the safety everyone in your household, please do not move product covering.

The “exclamation point” calls attention to features for which you should read the closed literature closely to prevent operating and maintenance problems.
WARNING : To reduce the risk of fire or electric shock, this apparatus should not be exposed to rain or moisture and objects filled with liquids, such as vases, should not be placed on this apparatus.
CAUTION : To prevent electric shock, match wide blade of plug to wide slot, fully insert.
Enter below the Serial No. which is located on the rear of the cabinet. Retain this information for future reference.
Model No. ____
Serial No. ____
MAGNAVOX Visit our World Wide Web Site at www.magnavox.com/support
IMPORTANT SAFETY INSTRUCTIONS
Read before operating equipment
- Read these instructions.
- Keep these instructions.
- Heed all warnings.
- Follow all instructions.
- Do not use this apparatus near water.
-
Clean only with a dry cloth.
-
Do not block any of the ventilation openings. Install in accordance with the manufacturer's instructions.
-
Do not install near any heat sources such as radiators, heat registers, stoves, or other apparatus (including amplifiers) that produce heat.
-
Do not defeat the safety purpose of the polarized or grounding-type plug. A polarized plug has two blades with one wider than the other. A grounding type plug has two blades and third grounding prong. The wide blade or third prong are provided for your safety. When the provided plug does not fit into your outlet, consult an electrician for replacement of the obsolete outlet.
-
Protect the power cord from being walked on or pinched particularly at plugs, convenience receptacles, and the point where they exit from the apparatus.
-
Only use attachments/accessories specified by the manufacturer.
-
Use only with a cart, stand, tripod, bracket, or table specified by the manufacturer, or sold with the apparatus. When a cart is used, use caution when moving the cart/apparatus combination to avoid injury from tip-over.
-
Unplug this apparatus during lightning storms or when unused for long periods of time.
-
Refer all servicing to qualified service personnel. Servicing is required when the apparatus has been damaged in any way, such as power-supply cord or plug is damaged, liquid has been spilled or objects have fallen into apparatus, the apparatus has been exposed to rain or moisture, does not operate normally, or has been dropped.
-
Damage Requiring Service - The appliance should be serviced by qualified service personnel when:
A. The power supply cord or the plug has been damaged; B. Objects have fallen, or liquid has been spilled into the appliance;
C. The appliance has been exposed to rain D. The appliance does not appear to operate normally or exhibits a marked change in performance;
E. The appliance has been dropped, or the enclosure damaged.
- Tilt/Stability - All televisions must comply with recommended international global safety standards for tilt and stability properties of its cabinet design.
- Do not compromise these design standards by applying excessive pull force to the front, or top, of the cabinet which could ultimately overturn the product. - Also, do not endanger yourself, or children, by placing electronic equipment/toys on the top of the cabinet. Such items could unsuspectingly fall from the top of the set and cause product damage and/or personal injury.
-
Wall or Ceiling Mounting - The appliance should be mounted to a wall or ceiling only as recommended by the manufacturer.
-
Power Lines - An outdoor antenna should be located away from power lines.
-
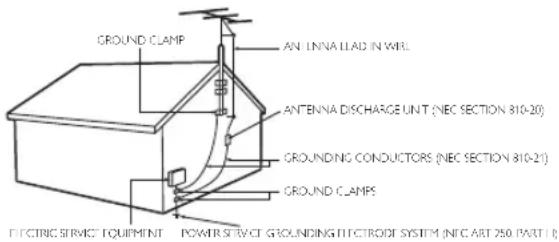
Outdoor Antenna Grounding - If an outside antenna is connected to the receiver, be sure the antenna system is grounded so as to provide some protection against voltage surges and built up static charges. Section 810 of the National Electric Code, ANSI/NFPA No. 70-1984, provides information with respect to proper grounding of the mast and supporting structure, grounding of the lead-in wire to an antenna discharge unit, size of grounding connectors, location of antenna-discharge unit, connection to grounding electrodes, and requirements for the grounding electrode. See Figure below.
-
Object and Liquid Entry - Care should be taken so that objects do not fall and liquids are not spilled into the enclosure through openings.
-
Battery Usage CAUTION - To prevent battery leakage that may result in bodily injury, property damage, or damage to the unit:
- Install all batteries correctly, with + and - aligned as marked on the unit.
- Do not mix batteries (old and new or carbon and alkaline, etc.).
- Remove batteries when the unit is not used for a long time.
Note to the CATV system installer: This reminder is provided to call the CATV system installer's attention to Article 820-40 of the NEC that provides guidelines for proper grounding and, in particular, specifies that the cable ground shall be connected to the grounding system of the building, as close to the point of cable entry as practical.
Example of Antenna Grounding as per NEC - National Electric Code
FCC WARNING
This apparatus may generate or use radio frequency energy. Changes or modifications to this apparatus may cause harmful interference unless the modifications are expressly approved in the manual. The user could lose the authority to operate this apparatus if an unauthorized change or modification is made.
RADIO-TV INTERFERENCE
This apparatus has been tested and found to comply with the limits for a Class B digital device, pursuant to Part 15 of the FCC Rules. These limits are designed to provide reasonable protection against harmful interference in a residential installation. This apparatus generates, uses, and can radiate radio frequency energy and, if not installed and used in accordance with the instructions, may cause harmful interference to radio communications. However, there is no guarantee that interference will not occur in a particular installation. If this apparatus does cause harmful interference to radio or television reception, which can be determined by turning the apparatus off and on, the user is encouraged to try to correct the interference by one or more of the following measures:
1) Reorient or relocate the receiving antenna.
2) Increase the separation between the apparatus and receiver.
3) Connect the apparatus into an outlet on a circuit different from that to which the receiver is connected.
4) Consult the dealer or an experienced radio/TV technician for help.
DECLARATION OF CONFORMITY
Trade Name: MAGNAVOX Responsible Party: FUNAI CORPORATION, Inc.
Model: 46MF401B
Address: 19900 Van Ness Avenue, Torrance, CA 90501 U.S.A.
Telephone Number: 1-866-341-3738
This Class B digital apparatus complies with Canadian ICES-003. Standard Television Receiving Apparatus, Canada BETS-7/NTMR-7
CAUTION: Danger of explosion if battery is incorrectly replaced. Replace only with the same or equivalent type.
WARNING: Batteries (battery pack or battery installed) shall not be exposed to excessive heat such as sunshine, fire or the like.
Disconnect the mains plug to shut off when find trouble or not in use. The mains plug shall remain readily operable.
This apparatus should not be placed in a built-in installation such as a bookcase or rack unless proper ventilation is provided. Make sure to leave a space of 4 inches (10cm) or more around this apparatus.
WARNING: To prevent injury, this apparatus must be securely attached to the wall in accordance with the instructions.

Like all LCD products, this set contains a lamp with Mercury, please dispose of according to all Local, State and Federal laws. For the disposal or recycling information, contact:
www.mygreenelectronics.com or www.eiae.org
Do not place the unit on the furniture that is capable of being tilted by a child and an adult leaning, pulling, standing or climbing on it. A falling unit can cause serious injury or even death.
NOTE ABOUT RECYCLING
- This unit's packaging materials are recyclable and can be reused. Please dispose of any materials in accordance with your local recycling regulations.
- Batteries should never be thrown away or incinerated but disposed of in accordance with your local regulations concerning chemical wastes.

WHEN CARRYING THIS UNIT
- At least 2 people are required when carrying this unit.
- Make sure to hold the upper and bottom frames of the unit firmly as illustrated.

natural_image
Two silhouettes of two people holding a large rectangular object (no text or symbols visible)TO AVOID THE HAZARDS OF ELECTRICAL SHOCK AND FIRE
• Do not handle the AC power cord with wet hands.
- Do not pull on the AC power cord when disconnecting it from an AC outlet. Grasp it by the plug.
• Do not put your fingers or objects into the unit.
LOCATION AND HANDLING
- Do not install the unit in direct sunlight or in a place subject to dust or strong vibration.
- Avoid a place with drastic temperature changes.
- Install the unit in a horizontal and stable position. Do not place anything directly on top or bottom of the unit. Depending on your external devices, noise or disturbance of the picture and / or sound may be generated if the unit is placed too close to them. In this case, please ensure enough space between the external devices and the unit.
- Depending on the environment, the temperature of this unit may increase slightly. This is not a malfunction.
- Be sure to unplug the AC power cord from the AC outlet before carrying the unit.
Trademark Information

HIGH-DEFINITION MULTIMEOS INTERFACE
- HDMI, the HDMI Logo, and High-Definition Multimedia Interface are trademarks or registered trademarks of HDMI Licensing LLC in the United States and other countries.
DOLBY.
DIGITAL
- Manufactured under license from Dolby Laboratories. Dolby and the double-D symbol are trademarks of Dolby Laboratories.

ENERGY STAR
- ENERGY STAR ® is a joint program of the U.S. Environmental Protection Agency and the U.S. Department of Energy helping us all save money and protect the environment through energy efficient products and practices.
Consumer Notice:
This TV has been set to maximize energy efficiency while delivering the best possible picture using the factory installed home mode settings.
Changing or enabling other features in this TV (e.g. brightened backlighting) will possibly increase energy consumption beyond the original ENERGY STAR ® qualified limits.
• The American Academy of Pediatrics discourages television viewing for children younger than two years of age.
INTRODUCTION
Contents
Important Safety Instructions 3
Trademark Information 4
INTRODUCTION
| Features | 5 |
| Supplied Accessories 6 | |
| Symbols Used in this Manual 6 | |
| Attaching the Base 6 | |
| Fixing the Unit on Your Furniture | 6 |
| Control Panel | 7 |
| Terminals | 7 |
| Remote Control Function | 8 |
| Installing the Batteries | 8 |
PREPARATION
| Antenna Connection | 9 |
| Connection to Cable Receiver or Satellite Box | 9 |
| External Device Connection | 10 |
| Cable Management | 14 |
| Plug In the AC Power Cord | 14 |
| Initial Setup | 15 |
WATCHING TV
| Sleep Timer | 16 |
| Switching Each Input Mode | 16 |
| Freeze Mode | 16 |
| Channel Selection | 16 |
| TV Screen Display Mode | 17 |
| Sound Functions | 17 |
| TV Screen Information | 18 |
| Reducing the Brightness | 18 |
| Fun-Link Options | 18 |
OPTIONAL SETTING
| Main Menu | 19 |
| Autoprogram | 19 |
| Channel List | 20 |
| Add Channels | 20 |
| Antenna Confir rmation | 21 |
| Language Selection | 21 |
| Picture Adjustment | 22 |
| Sound Adjustment | 22 |
| Closed Caption | 24 |
| Child Lock | 27 |
| Fun-Link | 29 |
| Energy Saving Mode | 30 |
| Location | 30 |
| Current Software Info | 30 |
| MP3/JPEG Playback | 31 |
TROUBLESHOOTING
| Troubleshooting Guide | 32 |
| FAQ | 34 |
INFORMATION
| Glossary | 35 |
| Maintenance | 35 |
| General Specifications | 36 |
| Electrical Specification 36 | |
| Other Specifications | 36 |
| Limited Warranty | 37 |
Features
- DTV/ TV/CATV
You can use your remote control to select channels which are broadcast in digital format and conventional analog format. Also, cable subscribers can access their cable TV channels.
• Information Display (ATSC only)
You can display the title, contents and other information of the current DTV program on the TV screen.
- Autoprogram
This unit automatically scans and memorizes channels available in your area, eliminating difficult setup procedures.
- Child Lock
This feature allows you to block children's access to inappropriate programs.
• Closed Caption Decoder
Built-in closed caption decoder displays text for closed caption supported programs.
- MTS/SAPTuner
Audio can be selected from the remote control.
- Auto Standby
If there is no input signal and no operation for 15 minutes, the unit will go to the standby mode automatically.
- Sleep Timer
You can set the unit to go to the standby mode after a specific amount of time.
• Choices for On-screen Language
Select your on-screen language: English, Spanish or French.
- Stereo Sound Function
• PLL Frequency Synthesized Tuning
Provides free and easy channel selection and lets you tune directly to any channel using the number and decimal point "•" buttons on the remote control.
• Various Adjustment for Picture and Sound
Customizes image quality suitable for your room and sets your sound preference.
• Fun-Link via HDMI Link
(HDMI Cable not Included)
Fun-Link allows your other HDMI link devices (such as Magnavox DVD) to be controlled by the HDMI cable connected to your TV.
- HDMI Input
When using HDMI1 Input, you can enjoy this unit as a PC monitor if your PC has a DVI output terminal.
- Component Video Input
- S-Video Input
- AV Input
- USB Terminal
The MP3 music and the JPEG picture files stored on a USB flash memory device can be played back on this unit.
• Digital Audio Output
• Analog Audio Output
© 2010 Funai Electric Co., Ltd.
All rights reserved. No part of this manual may be reproduced, copied, transmitted, disseminated, transcribed, downloaded or stored in any storage medium, in any form or for any purpose without the express prior written consent of Funai. Furthermore, any unauthorized commercial distribution of this manual or any revision hereto is strictly prohibited. Information in this document is subject to change without notice. Funai reserves the right to change the content herein without the obligation to notify any person or organization of such changes.
FUNAI with the design is a registered trademark of Funai Electric Co., Ltd. and may not be used in any way without the express written consent of Funai. All other trademarks used herein remain the exclusive property of their respective owners. Nothing contained in this manual should be construed as granting, by implication or otherwise, any license or right to use any of the trademarks displayed herein. Misuse of any trademarks or any other content in this manual is strictly prohibited. Funai shall aggressively enforce its intellectual property rights to the fullest extent of the law.
Supplied Accessories
Owner's Manual (1EMN27481)

Remote Control
(NF804 UD)

Batteries
(AAA, 1.5V × 2)

Quick Start Guide (1EMN25860)

natural_image
Simple 3D illustration of a rectangular panel with two horizontal cutouts (no text or symbols)Registration card (1EMN25026)
AC power cord
(WAV0162LW001) or
(WAV0162LTE03) or
(WAV152ZHN001)

Screw kit
for attaching the base
(1ESA24365)

- If you need to replace these accessories, please refer to the part No. with the illustrations and call our toll free customer support line found on the cover of this manual.
Note
- If you lose the screws, please purchase M5 ×12 Phillips head screws at your local store.
Symbols Used in this Manual
The following is the description for the symbols used in this manual. Description refers to:

: Digital TV operation

: Analog/Cable TV operation
- If neither symbol appears, the operation is applicable to both.
Attaching the Base
You must attach the base to the unit to have it as a table top unit. Be sure the front and rear of the base match the proper direction.
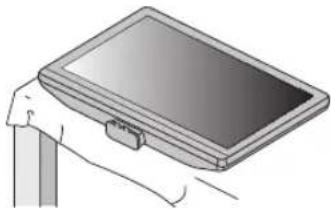
1 Spread a thick and soft cloth over a table as shown.
Place the main unit face up onto it. Make sure not to damage the screen. At least 2 people are required for this step.
natural_image
Illustration of a tablet device with a handle and cable, no text or symbols present2 Insert 2 hooks under the bottom of the main unit into base holes. (shown by arrow ①), then move the base in the direction as shown by arrow ② until it stops and the 6 mounting holes are aligned.
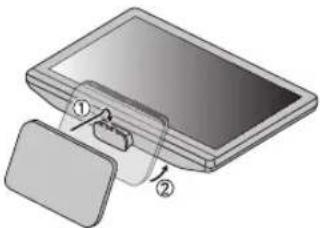
natural_image
Diagram of a device with two labeled parts, one showing a handle and the other a clip (no text or symbols present)3 Drive Phillips head screws into the 6 threaded holes at the bottom of the base until they are tight.

natural_image
Illustration of a rectangular electronic device with wires attached to its side (no text or symbols)To remove the base from this unit
- Unscrew the Phillips head screws on step 3. After the screws are removed, move the base in the opposite direction as shown by arrow ② on step 2, then pull the base up toward the front of the unit. Be careful not to drop the base when you remove it.
Note
- When attaching the base, ensure that all screws are tightly fastened. If the base is not properly attached, it could cause the unit to fall, resulting in injuries as well as damage to the unit.
- Make sure to use a table which can support the weight of this unit and is larger than this unit.
• Make sure the table is in a stable location. - When attaching the base, ensure that FRONT↑ written on the base is upward. If it's not upward, the 2 hooks don't fit in the base.
Fixing the Unit on Your Furniture
Screw this unit on your furniture tightly using wood screws (not supplied) in the 2 holes at the back of the base as shown.
• Recommended screw dimension : 5.1 × 20 mm

Note
- When you remove this unit make sure to unscrew the wood screws from your Wood Stand, Furniture and other wood item.
Control Panel

Terminals

Note for USB terminal
- User should not connect any devices to the USB terminal such as digital camera, keyboard, mouse, etc. (because these will not work).
- The software update is, in most cases, handled by an authorized service person or in some circumstances the user may be asked to do the software update themselves.
1 VOLUME +/- p.17
Press to adjust the volume or move right (+) / left (−) through the main menu items.
2 MENU ○ p.19
3 CHANNEL +/- p.16
Press to select channels or move up (+) / down (−) through the main menu items.
4 POWER ⏻ p.15
Press to turn the unit on and go to the standby mode. To completely turn off the unit, you must unplug the AC power cord.
5 Infrared sensor window
Receives infrared rays transmitted from the remote control.
6 POWER indicator
Lights up green when power is on.
7 STAND BY indicator
Lights up red when the unit goes to standby mode.
Side Panel
8 HDMI 3 Input jack p. 9, 10
9 USB terminal p. 14
Use this terminal only to play back the MP3 music and the JPEG picture files stored on a USB flash memory device, or when software update is needed.
10 S-Video/Composite Video/Audio (L/R)
Input jacks for VIDEO 2 p.11, 12
Rear Panel
11 Cable management p.14
12 AC power cord Inlet p.14
13 HDMI 2 Input jack p.9, 10
14 HDMI 1 Input jack p.9, 10, 13
HDMI connection for HDMI or DVI device. When you connect your PC that has a DVI terminal, you can enjoy this unit as a PC monitor.
15 Antenna Input jack p. 9
16 S-Video/Composite Video/Audio (L/R)
Input jacks for VIDEO 1 p.11, 12
17 Component Video and Audio (L/R) Input jacks
p. 9, 11
18 Digital Audio Output jack p.12
19 Analog Audio (L/R) Output jacks
p.12
20 Analog Audio (L/R) Input jacks for HDMI 1
p.10, 13
Audio cable connection from a DVI device. When you connect your PC that has a DVI terminal, use a stereo mini plug conversion cable as well. (For HDMI 1 Input jack only)
Remote Control Function
| 1 | |
| 2 | 10 |
| 3 | 11 |
| 12 | |
| 4 | 13 |
| 5 | |
| 6 | |
| 7 | 14 |
| 15 | |
| 16 | |
| 8 | 17 |
| 18 | |
| 19 | |
| 9 | |
| 20 |
When using a universal remote control to operate this unit.
- Make sure the component code on your universal remote control is set to our brand. Refer to the manual accompanying your remote control for more details.
- We do not guarantee 100% interoperability with all universal remote controls.
Note
- Buttons in gray background ( ) are not available unless you are connected to devices that are compatible with Fun-Link function.
- We do not guarantee 100% interoperability with other brands of HDMI link compliant devices.
Battery Precautions:
- Be sure to follow the correct polarity as indicated in the battery compartment. Reversed batteries may cause damage to the device.
- Do not mix different types of batteries together (e.g. Alkaline and Carbon-Zinc, or rechargeable batteries like ni-cad, ni-mh, etc) or old batteries with fresh ones.
- If the device is not to be used for a long period of time, remove the batteries to prevent damage or injury from possible battery leakage.
- Do not try to recharge batteries; they can overheat and rupture.
1 (power) p.15 Press to turn the unit on and go to the standby mode. To completely turn off the unit, you must unplug the AC power cord.
2 SAP p.17
3 SOURCE p.16
4 FREEZE p.16
Press to freeze screen image.
5 OK p.15
6 ▲/▼/◄/► (cursor) p.15
7 BACK p.18
Press to return to the previous menu operation.
8 VOL +/- p.17
9 PREV CH p.16
Press to return to previously viewed channel.
10 SLEEP p.16
11 FORMAT p.17 Press to select aspect ratio available for the TV screen.
12 RED/GREEN/BLUE/YELLOW p.29 Functionally useful for Fun-Link.
13 MENU p.19
14 INFO p.18
15 REV ◀◀/FWD ▶▶ p.29 Press to search backward or forward through the disc.
PLAY ▶ p.29
Press to begin the disc playback.
SKIP |◀◀/SKIP ▶▶▶▶ p.29
Press to skip backward or forward chapters, titles or tracks of the disc.
PAUSE II p.29
Press to pause the disc playback.
STOP ■ p.29
Press to stop the disc playback.
16 MUTE p.17
17 CH +/- p.16
18 ECO p.18
Press to reduce the brightness.
19 Number buttons p.16
• (dot)
Press to shift the subchannel from the main channel.
20 FUN-LINK OPTIONS p.18, 29
Press to call up various menu from your Fun-Link device connected through an HDMI cable.
Installing the Batteries
Install the batteries (AAA, 1.5V × 2) matching the polarity indicated inside battery compartment of the remote control.

PREPARATION
No supplied cables are used with these connections:
Please purchase the necessary cables at your local store. Use an HDMI cable with the HDMI logo (a certifi ed HDMI cable) High Speed HDMI cable (also known as HDMI category 2 cable) is recommended for the better compatibility.
Before you connect:
Be sure your antenna or other device is connected properly before plugging in the AC power cord.
Antenna Connection
Connect the RF coaxial cable on your home outlet to the antenna input jack of this unit.
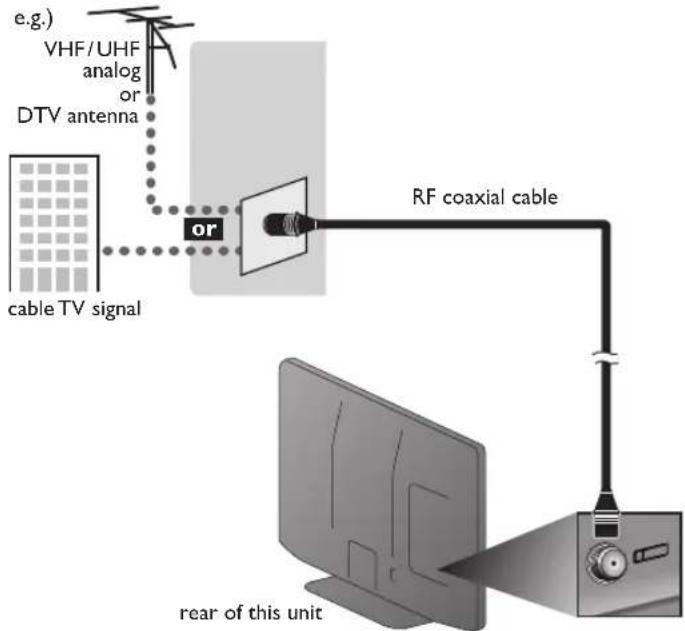
Once connections are completed, turn on the unit and begin initial setup. Channel scanning is necessary for the unit to memorize all available channels in your area. [Initial Setup] p.15
Note
- If you have any question about the DTV's antenna, visit www.antennaweb.org for further information.
- Depending on your antenna system, you may need different types of combiners (mixers) or separators (splitters). Contact your local electronics store for these items.
- For your safety and to avoid damage to this unit, please unplug the RF coaxial cable from the antenna input jack before moving the unit.
- If you did use an antenna to receive analog TV, it should also work for DTV reception. Outdoor or attic antennas will be more effective than a set top or inside antenna.
- To switch your reception source easily between antenna and cable, install an antenna selector.
- If you are not receiving a signal from your cable service, contact the Cable provider.
Connection to Cable Receiver or Satellite Box
Use an HDMI or component video cables to connect the HDMI or the Component Video Input jacks of the unit to the HDMI or the component video output jacks of the cable receiver/satellite box.
If you connect to the unit's Component Video Input jacks, connect audio cables to the Audio L/R Input jacks right beside the Component Video connector.

flowchart
graph TD
    A["Satellite dish"] --> B["RF coaxial cable"]
    B --> C["Ant In"]
    D["cable TV signal including PPV"] --> E["or"]
    E --> F["cable receiver satellite box"]
    F --> G["HDMI OUT"]
    F --> H["HDMI cable"]
    G --> I["+"]
    H --> J["or"]
    I --> K["AUDIO OUT L R Y (2000) Pb/Cb (2000)"]
    J --> L["+"]
    K --> M["component video cables (red/blue/green) and audio cables"]
    L --> N["+"]
    M --> O["+"]
    N --> P["+"]
    Q["side or rear of this unit"] --> R["+"]
You can also connect this unit to the cable receiver or satellite box other than the HDMI or the component video output jacks because they might have different output jacks.
Required cables and connecting methods of the cable receiver / satellite box, or the availability channel for the clear QAM may differ depending on the cable / satellite provider. For more information, please contact your cable / satellite provider.
External Device Connection
HDMI Connection
HDMI connection offers the highest picture quality.
HDMI (High-Definition Multimedia Interface) transports high definition video and multi-channel digital audio through a single cable. e.g.)

side or rear of this unit
HDMI-DVI Connection
Use an HDMI-DVI conversion cable to connect the unit to external video devices equipped with DVI output jack.
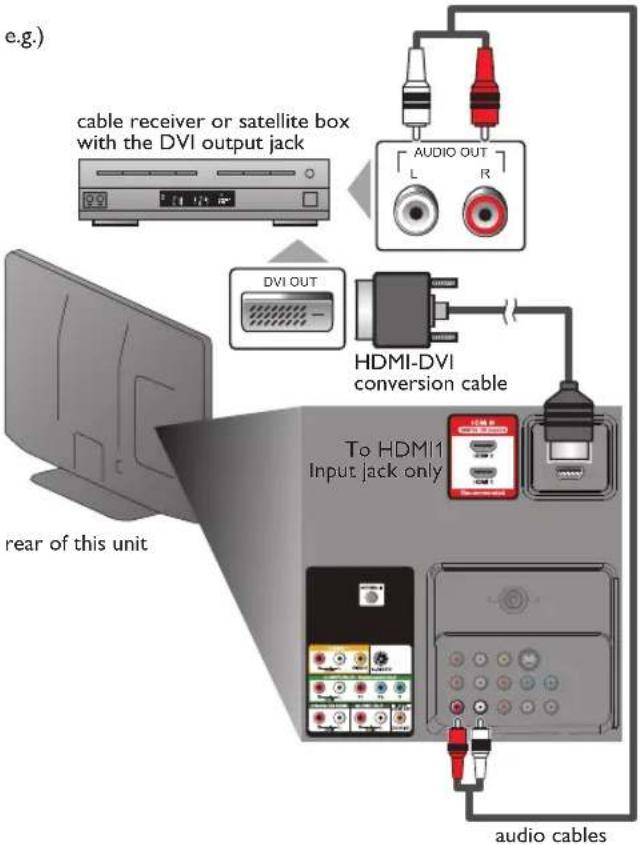
flowchart
graph TD
    A["cable receiver or satellite box with the DVI output jack"] --> B["DVI OUT"]
    B --> C["HDMI-DVI conversion cable"]
    C --> D["To HDMI1 Input jack only"]
    D --> E["audio cables"]
    style A fill:#f9f,stroke:#333
    style B fill:#ccf,stroke:#333
    style C fill:#cfc,stroke:#333
    style D fill:#fcc,stroke:#333
    style E fill:#cff,stroke:#333
Note
For HDMI connection
- The unit accepts 480i, 480p, 720p, 1080i and 1080p 24/30/60Hz of video signals, and 32kHz, 44.1kHz and 48kHz of audio signals.
• This unit accepts only 2 channel audio signal (LPCM). - You need to select "PCM" for the digital audio of the device you connected or check the HDMI audio setting. There may be no audio output if you select "Bitstream", etc.
• This unit accepts only signals in compliance with ElA861.
For HDMI-DVI connection
• The unit accepts 480i, 480p, 720p, 1080i and 1080p video signals.
- HDMI-DVI connection requires separate audio connections as well and the audio signals are converted from digital to analog.
- DVI does not display 480i image which is not in compliance with EIA/CEA-861/861B.
Component Video Connection
Component Video connection offers better picture quality for video devices connected to the unit.
If you connect to the unit's Component Video Input jacks, connect audio cables to the Audio L/R Input jacks right beside the Component Video connector.
e.g.)
BD/DVD recorder with the component video output jack

Note
- The unit accepts 480i / 480p / 720p and 1080i of video signals for this connection.
S-Video Connection
S-Video connection offers good picture quality for video devices connected to the unit. If you connect to the unit's S-Video Input jack, connect audio cables to the Audio L/R Input jacks right beside the Composite Video connector. e.g.)
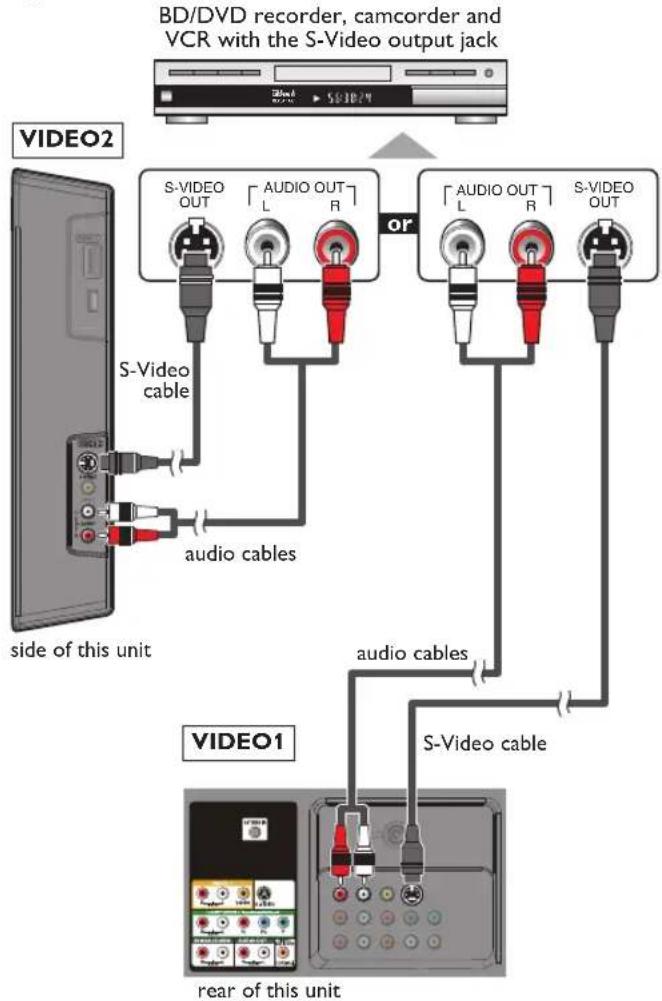
Composite Video Connection
Composite Video connection offers standard picture quality for video devices connected to the unit. If you connect to the unit's Composite Video Input jack, connect audio cables to the Audio L/R Input jacks right beside the Composite Video connector. When the audio jack of the video device is monaural, connect an audio cable to the Audio L Input jack.
e.g.)

camcorder

[Non-Text]

VCR

Note
- If you connect to the S-Video Input jack and the Composite Video Input jack at the same time, the S-Video connection will have priority.
Audio Output Connection
* Digital (for digital broadcasting only)
If you connect this unit to an external digital audio device, you can enjoy multi-channel audio like 5.1ch digital broadcasting sound.
Use a digital audio coaxial cable to connect the unit to external digital audio devices.
* Analog (for both analog and digital broadcasting)
If you connect this unit to an external analog audio device, you can enjoy stereo (2-channel) audio.
Use audio cables to connect the unit to external analog audio devices.
e.g.)

flowchart
graph TD
    A["stereo system"] --> B["AUDIO IN L R"]
    C["Dolby Digital decoder"] --> D["DIGITAL AUDIO COAXIAL IN"]
    B --> E["rear of this unit"]
    D --> E
    E --> F["audio cables"]
    E --> G["digital audio coaxial cable"]
PC Connection
This unit can be connected to your PC that has a DVI terminal. Use an HDMI-DVI conversion cable for this connection and it requires stereo mini plug conversion cables as well. If you connect this unit to your PC, you can use this unit as a PC monitor.

flowchart
graph TD
    A["personal computer"] --> B["stereo mini plug conversion cables"]
    B --> C["HDMI-DVI conversion cable"]
    C --> D["HDMI-DVI conversion cable should be with ferrite core."]
    E["rear of this unit"] --> F["To HDMI1 Input jack only"]
    G["DVI OUT"] --> C
    H["Computer"] --> I["Computer"]
The following video signals can be displayed:
| Format Resolution Refresh rate | ||
| VGA 640 × 480 | 60Hz | |
| SVGA 800 × 600 | ||
| XGA 1, 024 × 768 | ||
| WXGA | 1, 280 × 768 | |
| 1, 360 × 768 | ||
| FHD | 1, 920 × 1, 080 | |
Other formats or non-standard signals will not be displayed correctly.
Note
- Please purchase the HDMI-DVI conversion cable that has a ferrite core.
• The following operations may reduce noise. - Attach a ferrite core to the AC power cord of your PC.
- Unplug the AC power cord and use the built-in battery of your PC.
USB Flash Memory
This unit offers easy playback MP3 music and JPEG picture fi les. Insert the USB fi ash memory into the USB terminal shown below. [MP3/JPEG Playback] p.31
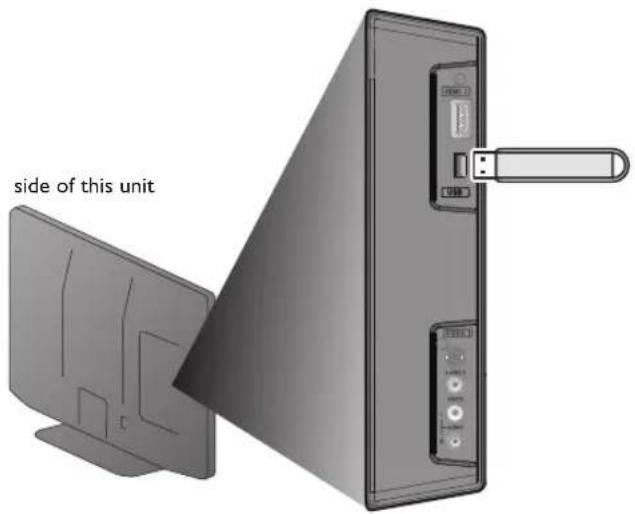
Note
• The USB flash memory is not supplied with this unit.
- Do not use an extension cord between the USB flash memory and the unit. Always insert the USB flash memory to this unit directly.
- We do not guarantee the all USB flash memory can be supported on this unit.
- Be sure to keep a backup copy of the original files on your device before you play them back on this unit. We have no responsibilities for damage or loss of your stored data.
- When you are ready to remove a USB II ash memory device, you must let the unit go to the standby mode first to avoid any damage for your data and the unit.
- If the USB flash memory left behind in the USB terminal and the unit goes to the standby mode, the "USB"(main menu) will appear automatically when you turn on the unit again.
Cable Management
Keep the cables through this holder to avoid tangling them.

natural_image
Technical diagram showing a rear view of a vehicle chassis with cables and components, no text or symbols presentUse the following accessory with this connection:
- AC power cord x 1
Plug In the AC Power Cord
Make sure that the AC power cord must be plugged to an AC outlet after all the necessary connections are completed.
rear of this unit
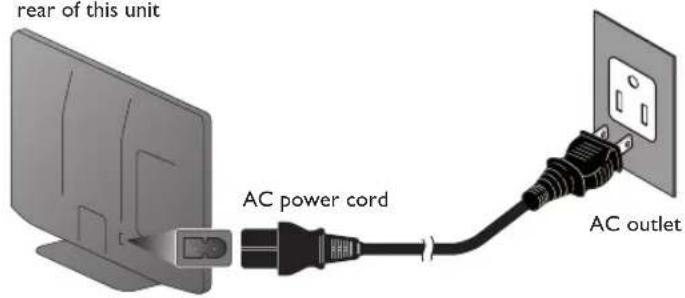
Caution:
- Do not connect the AC power cord to a power supply outside the indicated voltage of this unit (AC 120V).
Connecting the AC power cord to a power supply outside of this range may result in fire or electrical shocks.
Note
- Each time you plug in the AC power cord, no operations will be performed for a few seconds. This is not a malfunction.
These operations are accessible by remote control. Some may also be accessible by controls on the main unit.
Initial Setup
This section will guide you through the unit's initial setting which includes selecting a language for your on-screen menu and autoprogram, which automatically scans and memorizes viewable channels.
Before you begin:
Make sure the unit is connected to antenna or cable.
1 After making all the necessary connections, press ⏻ to turn on the unit.
- It may take a few moments to turn on the unit for the first time.
- [Initial Setup] menu appears automatically after the unit is turned on.
2 Use ▲/▼ to select the on-screen language from the choices (English / Español / Français) on the right side of the TV screen.
3 Use ▲/▼ to select [Antenna] for TV channels or [Cable] for CATV channels, then press OK.

flowchart
graph LR
    A["Antenna Cable"] --> B["Antenna IN"]
    B --> C["Back"]
    C --> D["Select"]
    style A fill:#f9f,stroke:#333
    style B fill:#ccf,stroke:#333
    style C fill:#cfc,stroke:#333
    style D fill:#fcc,stroke:#333
• [Autoprogram] will begin.

4 Use ◀/▶ to select the desired location setting, then press OK.

- Select [Retail] store, the unit will be set up with predefined setting for retail displays. In this setting, the power consumption may possibly exceed the limited requirement of the ENERGY STAR® qualification.
- Select [Home], the unit is set to maximize the energy efficiency for home setting and it can be adjusted through a choice of picture and sound quality according to your preference.
- When the initial setup is completed, the lowest memorized channel with the confirmation message of the location setting will be displayed on the TV screen.
Note
- If you are not receiving a signal from your cable service, contact the Cable provider.
- If you press ⏻ or MENU during autoprogram, this setting will be canceled.
- The initial autoprogram function can be executed for either [Antenna] or [Cable] only once. When you change the connection (Antenna / Cable), set [Autoprogram] again. p.19
- If there is no signal input from the antenna terminal and no operation for several seconds after you turn on the unit, [Helpful Hints] appears. Follow the instructions listed on the TV screen.
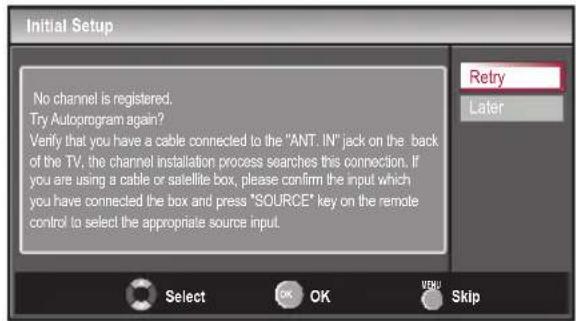
- You must set [Home] in step 4. Otherwise, [Picture] and [Sound] settings you adjusted will not be memorized after the unit goes to the standby mode.
After an initial setup is completed...
- If you want to scan the channels automatically again. [Autoprogram] p.19
-
You can add the desired cable and analog channels unmemorized by autoprogram.
[Add Channels] p.20 -
If you want to change to another language. [Language Selection] p.21
- If you want to change the location setting. [Location] p.30
WATCHING TV
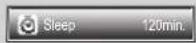
Sleep Timer can be set the unit to go to the standby mode after an incremental period of time.
Press SLEEP repeatedly to change the amount of time (increases the time by 30 minutes up to 120 minutes).
Press SLEEP once to call up the display for checking the remaining time.
- To cancel sleep timer, press SLEEP repeatedly until [Sleep Off] is displayed.

Switching Each Input Mode can easily switch with the remote control
between TV (ATSC or NTSC) and external devices when they are connected to the unit.
Press SOURCE or CH + repeatedly to cycle through the input modes.

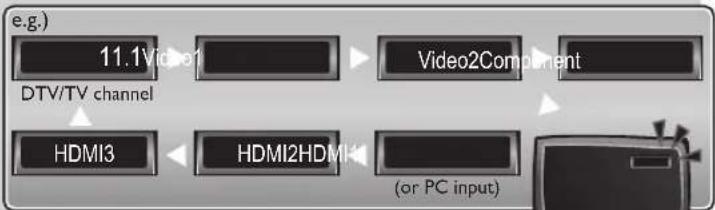
flowchart
graph LR
    A["11.1Vide1"] --> B["Video2Component"]
    C["HDMI3"] --> D["HDMI2HDMI"]
    D --> E["(or PC input)"]
- Pressing CH – reverses the direction of the input modes.
Freeze Mode can freeze the image shown on the TV screen for 5 minutes.
Press FREEZE to freeze the image.

• The sound output will not be paused.
- To cancel freeze mode, press any buttons except
Channel Selection
Select channels by using CH +/- or the Number buttons.
• To select the memorized channels, use CH +/− or the Number buttons.
- To select the non-memorized channels, use the Number buttons.
To use the Number buttons
ATSC
- When selecting digital channel 11.1 Be sure to press • before entering the subchannel number.

flowchart
graph LR
    A["1"] --> B["1"]
    B --> C["."]
    C --> D["1"]
    D --> E["OK"]
NTSC
- When selecting cable or analog channel 11

Press PREV CH to return to the previously viewed channel.
Note
• [No Signal] will appear on the TV screen after the subchannel broadcast is over.
- [Audio only program] message will appear on the TV screen, when you receive only sound signal.

TV Screen Display Mode
5 types of display modes can be selected when the broadcasting station is sending 16:9 or 4:3 video signal. And 3 types of display modes can be selected for PC input signal.
Press FORMAT repeatedly to switch the TV aspect ratio.
For 16:9 video signal
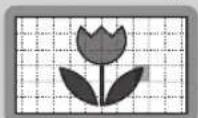
Normal
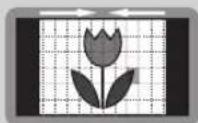
4:3 Movie Expand
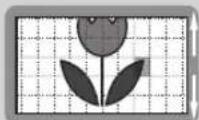

Wide
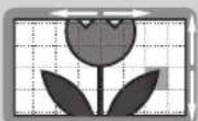
Zoom
For 4:3 video signal
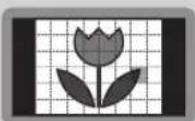
Normal
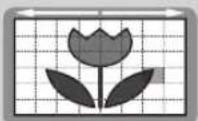
16:9 Movie Expand

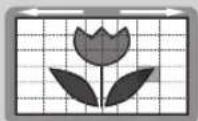
Wide

Zoom
For PC input signal through HDMI1 Input mode

Normal Dot By DotFull
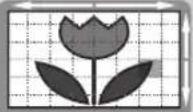
Input mode
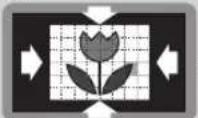
Normal displays a 16:9 picture at its original size.
4:3 displays a 16:9 picture at a 4:3 size; the picture is shortened horizontally. Sidebars appear on both edges of the screen.
Movie Expand displays a 16:9 picture that is vertically stretched to fill the screen. This only crops out the top of the picture.
Zoom displays a 16:9 picture at its maximum size without changing its horizontal and vertical ratio.
Wide displays a horizontally stretched picture. This crops out the left and right sides of the picture.
Normal displays a 4:3 picture at its original size. Sidebars appear on both edges of the screen.
16:9 displays a 4:3 picture at a 16:9 size; the picture is stretched horizontally to fill the screen.
Movie Expand displays a 4:3 picture at a 16:9 size; the picture is stretched more vertically at the top of the screen. This crops out the top of the picture.
Zoom displays a 4:3 picture at a 16:9 size; at its maximum size that is more vertically stretched to fill the screen. This crops out the top and bottom of the picture.
Wide displays the picture with its center at the original size and the edges stretched horizontally to fill the screen.
Normal displays a proportionately stretched picture. Sidebars appear on both edges of the screen.
Full displays a picture that is stretched out of proportion horizontally to fill the screen.
Dot By Dot displays a picture in its original size.
Sound Functions
describe how to change the audio or the audio language as well as the volume.

Silence Mode
Press MUTE to turn off the sound temporarily.

will be displayed for a few seconds.
- Press MUTE again or VOL +/− to recover the original volume.
Switching Audio Mode
ATSC
Press SAP repeatedly to cycle through the available audio languages.
• Available languages differ depending on the broadcast.
- [Other] is displayed when the audio language cannot be acquired, or the acquired languages are other than English, Spanish or French.
Volume Adjustment
Use VOL + / - to adjust the volume.

will be displayed for a few seconds when adjusting the volume.

natural_image
Illustration of a computer monitor with musical notes floating above it, no text or symbols present.
NTSC
Press SAP to display the currently selected audio mode.
While receiving an MTS broadcast, press repeatedly to cycle through the available audio channel.
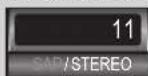
e.g.) When all audio are available

STEREO : Outputs stereo-audio
SAP : Outputs second audio program
MONO : Outputs mono-audio
TV Screen Information
You can display the currently selected channel or other information such as the audio mode on the TV screen. In the digital mode, the detailed broadcasting information for the current channel such as program title, program guides are displayed.
Press INFO.
ATSC

NTSC
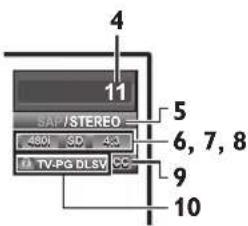
1 program title
2 program guide
(The program guide added to broadcasting information is displayed to a maximum of 4 lines.)
3 broadcast station
4 channel number
5 audio language (ATSC) / audio mode (NTSC) [Switching Audio Mode] p.17
6 effective scanning lines and scan mode
7 TV format
8 program aspect ratio
9 CC (not available if closed caption is set to [Off])
10 child lock rating
• To clear the display, press INFO again. You can also press BACK ↩.
Note
- When the program guide consists of more than 4 lines, use ▲/▼ to scroll.
- [No description provided.] is displayed when the program guide is not provided.
- While the program guide is displayed, the closed caption function is interrupted.
- In external input mode, the following screen is displayed; e.g.) When an external device is connected to Video1 Input jack.

• The information display will automatically disappear in 1 minute.
Reducing the Brightness
Backlight brightness can be reduced which may save on power consumption more than you just set [On] in [Energy Saving Mode]. p.30
Press ECO once to reduce the brightness. Press ECO again to increase the brightness.
Note
- Even if this function is in effect, the brightness will be increased when you change [Energy Saving Mode] on or off due to the energy saving mode has priority.
- You must set [Home] in [Location]. p.30 Otherwise, the settings you adjusted will not be memorized after the unit goes to the standby mode.
Fun-Link Options
If you have our brand products such as BD player or DVD recorder that are compatible with Fun-Link functions, connect them to this unit via an HDMI cable so you can simply operate various items from this unit's remote control.
Before you begin:
You must set [On] in [Device Control] and [Fun-Link Control]. p.29
Otherwise, FUN-LINK OPTIONS ● does not work even if you connected our brand devices to this unit.
To enjoy Fun-Link, verified and recommended devices are as follows;
MAGNAVOX
NB530MGX
NB500MG1F
MBP1100/F7
SYLVANIA
NB530SLX
NB500SL1
1 Press FUN-LINK OPTIONS to display [Fun-Link Options] menu.
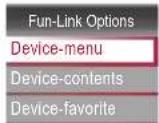
| Device-menu | This function allows you to control the menu of your connected Fun-Link device. |
| Device-contents | This function allows you to control the top menu of your DVD or Blu-ray discs. |
| Device-favorite | This function allows you to control the pop-up menu of your Blu-ray discs. |
2 Use ▲/▼/◄/►/OK on this unit's remote control to operate the desired functions for your devices.
Note
- Some of Fun-Link functions may not be available depending on your Fun-Link devices or discs.
- We do not guarantee 100% interoperability with other brands of HDMI link compliant devices.
OPTIONAL SETTING
Main Menu
This section describes the overview of the main menu displayed when you press MENU. The main menu consists of the function setting items below.
Press MENU.

Picture [Picture Adjustment] p.22
Sound [Sound Adjustment] p.22
Setup [Autoprogram] p.19
- You can automatically scan the viewable channels.
[Channel List] p.20 - The Channels that were autoprogrammed are in this Channel list, use CH +/− to access them.
[Add Channels] p.20
- You can add TV channels that were not found by the autoprogram scan.
Features [Closed Caption] p.24
- You can change the display closed caption format which displays the dialogue of a TV program or other text information across the TV screen.
[Child Lock] p.27
- You can set viewing limitations.
[Fun-Link] p.29
- You can set Fun-Link options.
[Energy Saving Mode] p.30
[Location] p.30
- Switch setting from [Retail] to [Home] to allow the desired [Picture] and [Sound] mode to be kept in memory.
[Current Software Info] p.30
Language [Language Selection] p.21
- Change the Main Menu language.
- You can listen to MP3 music and view JPEG picture files stored on a USB flash memory device.
USB [MP3/JPEG Playback] p.31
Note
*[USB] will appear only when a USB flash memory device is inserted into this unit.
Autoprogram
If you switch wires (e.g. between antenna and CATV) or if you move the unit to a different area after the initial setting, or if you restore the DTV channels you deleted, it is recommended to use Autoprogram to perform a new channel search.
Before you begin:
Make sure the unit is connected to antenna or cable.
1 Press MENU to display the main menu.
2 Use ▲/▼ to select [Setup], then press OK.
3 Use ▲/▼ to select [Autoprogram], then press OK.
4 Use ▲/▼ to select an appropriate option, then press OK.

- When connected to VHF /UHF antenna, select [Antenna].
- When connected to CATV, select [Cable].
• [Autoprogram] will begin.
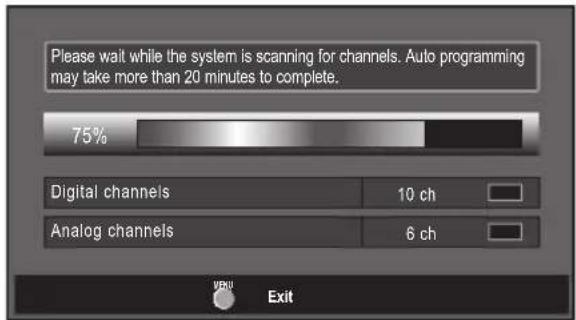
- When the scanning and memorizing are completed, the lowest memorized channel will be displayed.
Note
- After setting [Autoprogram], using CH +/- on the remote control skips unavailable programs automatically.
- If you are not receiving a signal from your cable service, contact the Cable provider.
- If you press ⏻ or MENU during autoprogram, the setting will be canceled.
- Even if [Autoprogram] is completed, the channel setting will be lost if the AC power cord is unplugged before the unit goes to the standby mode by pressing 🔒.
- The PIN code will be required once you set a PIN code in the [Child Lock] p.27
- If you want to change your PIN code, follow the instruction of [Change PIN]. p.28
Channel List
The channels selected here can be skipped when selecting the channels using CH + /-.
Those channels can still be selected with the Number buttons.
1 Press MENU to display the main menu.
2 Use ▲/▼ to select [Setup], then press OK.
3 Use ▲/▼ to select [Channel List], then press OK.
4 Use ▲/▼ to select the channel you want to remove, then press OK.

- The channel display for the removed channel darkens. You will not be able to select the channel again using CH + /-.
• To reactivate a removed channel, use ▲/▼ and press OK. The registered channels are highlighted. - When you remove a main channel, its subchannels are removed as well.
5 Press MENU to exit.
Note
- The channel with the [DTV] indicated on the display is ATSC. Otherwise the channel is NTSC.
Add Channels
This function lets you add the channels that were not added by the autoprogram due to reception conditions at the initial setting.
1 Press MENU to display the main menu.
2 Use ▲/▼ to select [Setup], then press OK.
3 Use ▲/▼ to select [Add Channels], then press OK.
4 Use the Number buttons to enter the number of the channel you want to add, then press OK.

5 Press MENU to exit.
Note
- If setup completes successfully, [Added to the channel list] is displayed.
- If external input is used, it is not possible to register the channel and [Unavailable] will be displayed on the TV screen.
- By using CH + / - , you can select the memorized channels only.
Antenna Confir rmation
ATSC
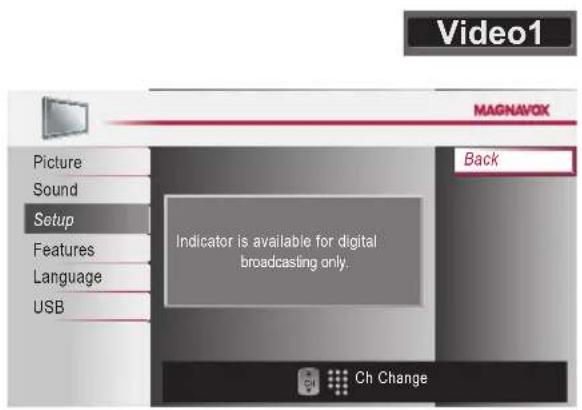
This function lets you check the digital signal strength of each channel.
1 Press MENU to display the main menu.
2 Use ▲/▼ to select [Setup], then press OK.
3 Use ▲/▼ to select [Antenna], then press OK.
4 Use the Number buttons or CH +/- to select the channel for which you want to check the digital signal strength.

- If the channel is set to analog (cable) channel or external input, you cannot confirm the antenna condition.
5 Press MENU to exit.
Language Selection
You can choose English, Spanish, or French as your on-screen language.
1 Press MENU to display the main menu.
2 Use ▲/▼ to select [Language], then press OK.
3 Use ▲/▼ to select [English], [Español] or [Français], then press OK.

4 Press MENU to exit.
Note
- If you need the English menus instead of the Spanish or French menus, press MENU. Use ▲/▼ to select [Idioma] or [Langue], then press OK.
Use ▲/▼ to select [English], then press OK.
Press MENU to exit the main menu.
Picture Adjustment
You can adjust picture mode, or customize the picture quality as your preference.
Before you begin:
You must set [Home] in [Location]. p. 30
Otherwise, the settings you adjusted will not be memorized after the unit goes to the standby mode.
1 Press MENU to display the main menu.
2 Use ▲/▼ to select [Picture], then press OK.
3 Use ▲/▼ to select the item you want to adjust, then press OK.

4 Adjust the following items.
Smart Picture
Use ▲/▼ to select the desired setting, then press OK. ([Personal], [Standard], [Sports], [Movie], and [Game])
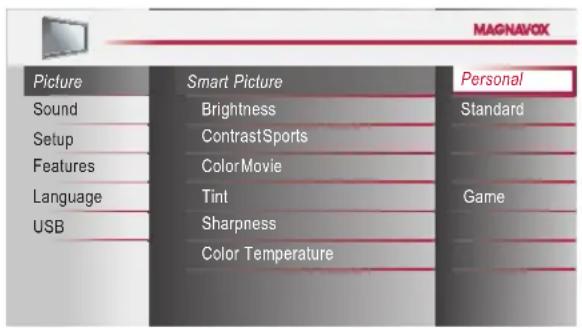
Brightness, Contrast, Color, Tint, Sharpness, Color Temperature
You can only adjust the following options when you set to [Personal] in [Smart Picture]. Use ▲/▼ to select the desired setting, then use ◀/► to adjust.
| Brightness | Press ◀ to decrease brightness | Press ▶ to increase brightness |
| Contrast | Press ◀ to decrease contrast | Press ▶ to increase contrast |
| Color | Press ◀ to decrease color intensity | Press ▶ to increase color intensity |
| Tint | Press ◀ to add red | Press ▶ to add green |
| Sharpness | Press◀ to soften | Press▶ to sharpen |
| Color Temperature | Press◀ to add warm colors | Press▶ to add cool colors |
5 Press MENU to exit.
Sound Adjustment
You can adjust the sound mode, equalizer and some other sound functions.
Before you begin:
You must set [Home] in [Location].→ p.30
Otherwise, the settings you adjusted will not be memorized after the unit goes to the standby mode.
1 Press MENU to display the main menu.
2 Use ▲/▼ to select [Sound], then press OK.
3 Use ▲/▼ to select the item you want to adjust, then press OK.

4 Adjust the following items.
Smart Sound
Use ▲/▼ to select the desired setting, then press OK. ([Personal], [Standard], [Movie], [Music], and [News])

Equalizer
Adjust tonal quality for each frequencies. Use ◀/▶ to select the specific frequency and use ▲/▼ to adjust the level, then press OK.

Virtual Surround Sound
Virtual surround sound gives you the stereo phonic virtual space through your existing 2-channel stereo system. Use ▲/▼ to select the desired option, then press OK.

| On | Emphasized effect. |
| Off | Natural effect. |
Auto Volume Leveling
This function keeps a constant loudness differential between the TV commercials and the programs. Use ▲/▼ to select the desired option, then press OK.
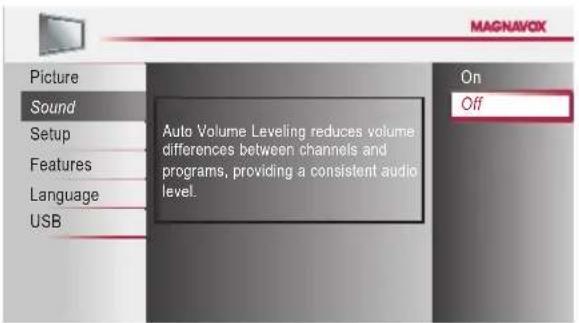
| On | Reduces volume differences between the TV commercials and the programs. |
| Off | Removes the auto volume leveling. |
TV Speakers
Select the audio output from the unit's speakers, or not. If your amplifier is HDMI link function compatible and connected by an HDMI cable to this unit, some sound operations such as volume up can be changed by using this unit's remote control. Make sure [Fun-Link Control] is set to [On]. p.29
Use ▲/▼ to select the desired option, then press OK.

| On | The sound will be output from the unit's speakers. |
| Off | The sound will not be output from the unit's speakers. |
| Ext. Amp | You can control audio output from your connected HDMI link devices by using this unit's remote control. |
Note
- We do not guarantee 100% interoperability with other brands of HDMI link compliant devices.
Primary MTS
You can set the output mode as a default for the sound mode (NTSC only).
This setting is not interlocked when you change the output mode by pressing SAP. [Sound Functions] → p.17 Use ▲/▼ to select the desired option, then press OK.
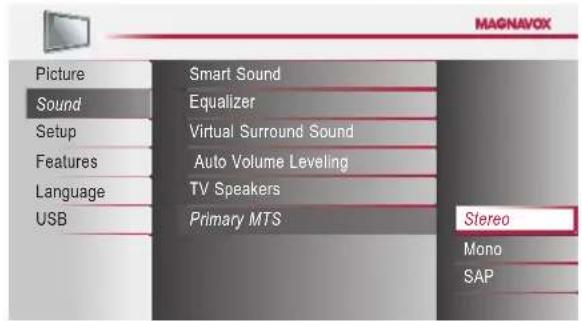
| Stereo | Outputs stereo-audio. |
| Mono | Outputs mono-audio. |
| SAP | Outputs second audio program. |
5 Press MENU to exit.
Closed Caption
You can view closed captioning (CC) for TV programs, movies and news. Closed caption refers to text of dialogue or descriptions displayed on-screen.
1 Press MENU to display the main menu.
2 Use ▲/▼ to select [Features], then press OK.
3 Use ▲/▼ to select [Closed Caption], then press OK.
See the following description for setting each item.
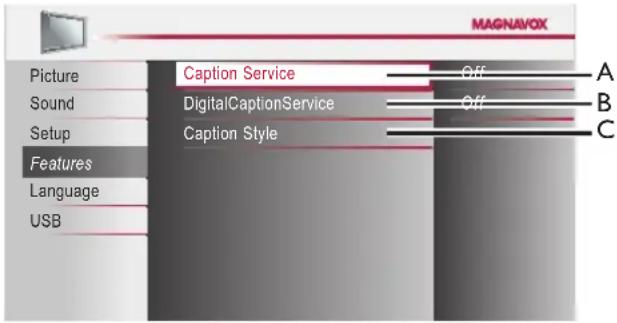
A. Caption Service
4 Use ▲/▼ to select [Caption Service], then press OK.
5 Use ▲/▼ to select the desired closed caption, then press OK.
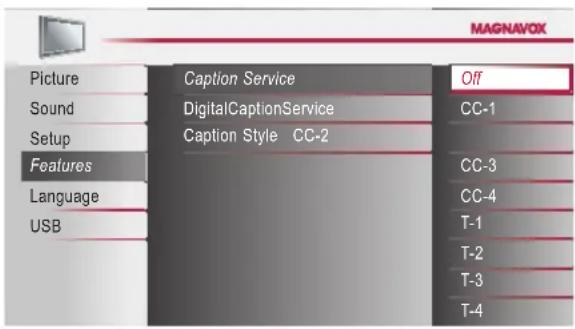
| CC-1 and T-1 | The primary caption and text services. The captioning or text is displayed in the same language as the program's dialogue (up to 4 lines of script on the TV screen, where it does not obstruct relevant parts of the picture). |
| CC-3 and T-3 | Serve as the preferred data channels.The captioning or text is often a secondary language. |
| CC-2, CC-4,T-2 and T-4 | Rarely available and broadcasters use them only in special conditions, such as when [CC-1] and [CC-3] or [T-1] and [T-3] are not available. |
• There are 3 display modes according to programs:
| Paint-on mode | Displays input characters on the TV screen immediately. |
| Pop-on mode | Once characters are stored in memory, they are displayed all at once. |
| Roll-up mode | Displays the characters continuously by scrolling (max. 4 lines). |
6 Press MENU to exit.
B. Digital Caption Service
ATSC
In addition to the basic closed caption, DTV has its own closed caption called digital caption service. Use this menu to change the settings for digital caption service.
4 Use ▲/▼ to select [Digital Caption Service], then press OK.
5 Use ▲/▼ to select the desired digital caption service, then press OK.
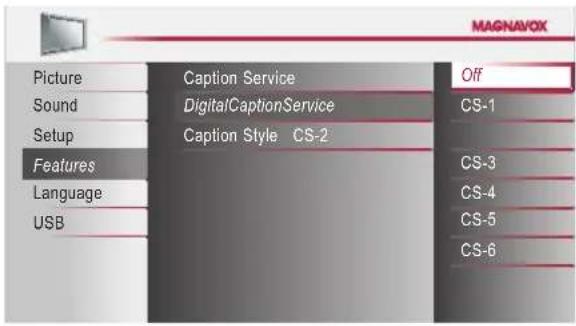
| Off | Select if you do not want digital caption service. |
| CS-1 to CS-6 | Select one of these before changing any other item in [Closed Caption] menu. Choose [CS-1] under normal circumstances. |
6 Press MENU to exit.
Note
- [Digital Caption Service] that you can switch differs depending on the broadcast description.
C. Caption Style
ATSC
You can change the caption style such as font, color or size, etc.
4 Use ▲/▼ to select [Caption Style], then press OK.
5 Use ▲/▼ to select [User Setting], then press OK.

6 Use ▲/▼ to select [On], then press OK.
7 Use ▲/▼ to select an item, then press OK. Then use ▲/▼ to select the desired setting and press OK.

- The setting description for each item is shown on the next page.
- Review your setting choice made on the next page by looking in the upper right corner of the displayed setting box (not all selections show the differences selected).
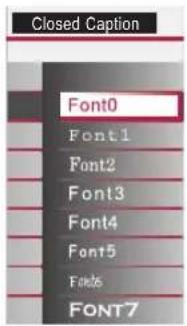
Font Style
Closed Captioning font style can be changed as illustrated.
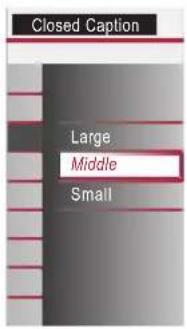
Font Size
Font size of the displayed caption can be switched as illustrated.
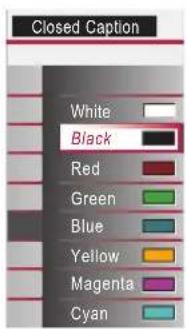
Font Color
Font color of the displayed caption can be switched as illustrated.
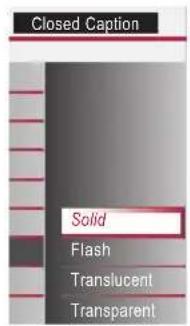
Font Opacity
Font opacity of the displayed caption can be switched as illustrated.
Background Color
Background color of the displayed caption can be switched as illustrated.


Background Opacity
Background opacity of the displayed caption can be switched as illustrated.
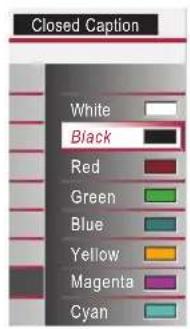
Edge Color
Edge color of the displayed caption can be switched as illustrated.
Edge Type
Edge type of the displayed caption can be switched as illustrated.
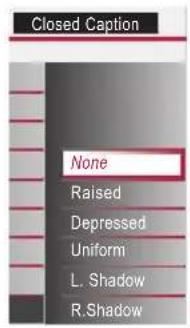
8
Press MENU to exit.
Note
- Closed caption will not be displayed when you are using an HDMI connection.
- To show the closed caption on your TV screen, broadcast signal must contain the closed caption data.
- Not all TV programs and commercials have the closed caption or all types of the closed caption.
- Captions and texts may not exactly match the TV voice.
- Changing channels may delay the closed caption for a few seconds.
- Adjusting or muting the volume may delay the closed caption for a few seconds.
- Abbreviations, symbols and other grammatical shortcuts may be used in order to keep pace with the on-screen action. This is not a malfunction.
- The caption or text characters will not be displayed while the main menu or functions display is shown.
- If a black box appears on the TV screen, this means that the closed caption is set to the text mode. To clear the box, select [CC-1], [CC-2], [CC-3], [CC-4] or [Off].
- If the unit receives poor quality television signals, the captions may contain errors, or there might be no captions at all. Some possible causes of poor quality signals are:
- Automobile ignition noise
- Electric motor noise
- Weak signal reception
- Multiplex signal reception (ghosts or screen flutter)
- Data dropout and Pixelation (for DTV only)
- The unit retains the closed caption setting if the power fails.
- When the unit receives special effects playback signal (e.g. Search, Slow and Still) from a VCR's video output channel (ch3 or ch4), the unit may not display the correct caption or text.
Child Lock
Child lock reads the ratings for programs, then denies access to the programs which exceed the rating level you set. With this function, you can block certain programs inappropriate for children and any channels or external input modes can be invisible.
1 Press MENU to display the main menu.
2 Use ▲/▼ to select [Features], then press OK.
3 Use ▲/▼ to select [Child Lock], then press OK.

4 Use the Number buttons to enter the 4-digit numbers for your PIN code.

- When you have not set up your PIN code, enter 0, 0, 0, 0.
- When the PIN code is correct, [Child Lock] menu is displayed.
See the following description for setting each item.

Note
- When you select a rating and set it to [Block], the higher ratings will be blocked automatically. The lower ratings will be available for viewing.
- When you set the highest rating to [View], all ratings turn to [View] automatically.
- To block any inappropriate programs, set your limits in [US Movie Ratings Lock], [USTV Ratings Lock] and [Region Ratings Lock].
- The child lock setting will be retained after a power failure (except the PIN code reverts to 0000).
- If the rating is blocked, will appear.
- [Region Ratings Lock] will be available when the unit receives a digital broadcast using the new rating system.
- For the United States, the unit may download the Region Ratings Lock Table, if required.
- The Canadian rating systems on this unit are based on CEA-766-A and CRTC policy.
A. Channel Lock
Particular channels or external input modes can be invisible in this function.
5 Use ▲/▼ to select [Channel Lock], then press OK.
6 Use ▲/▼ to select the desired rating, then press OK repeatedly to switch between [View] and [Block].
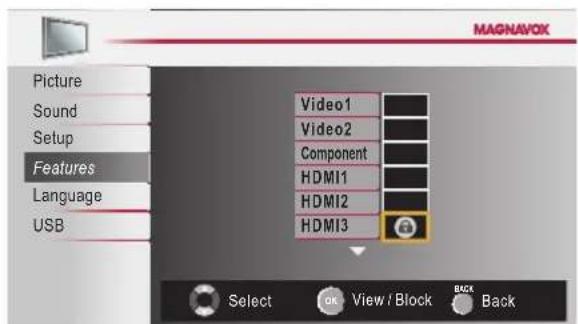
7 Press MENU to exit.
B. Setting US Movie ratings
US Movie ratings lock is the rating system created by MPAA.
5 Use ▲/▼ to select [US Movie Ratings Lock], then press OK.
6 Use ▲/▼ to select the desired rating, then press OK repeatedly to switch between [View] and [Block].

| Rating | Category |
| X | Mature audience only |
| NC-17 | No one under 17 admitted |
| R | Restricted; under 17 requires accompanying parent or adult guardian |
| PG-13 | Unsuitable for children under 13 |
| PG | Parental guidance suggested |
| G | General audience |
| NR | No rating |
7 Press MENU to exit.
C. Setting TV ratings
5 Use ▲/▼ to select [US TV Ratings Lock], then press OK.
6 Use ▲/▼/◄/► to select the desired rating, then press OK repeatedly to switch between [View] and [Block].

| Rating Category | ||
| TV-MA Mature audience only higher |  | |
| TV-14 Unsuitable for children under 14 | ||
| TV-PG Parental guidance suggested | ||
| TV-G General audience | ||
| TV-Y7 | Appropriate for all children 7 and older | |
| TV-Y Appropriate for all children lower | ||
7 Press MENU to exit.
To set the sub ratings
As for TV-MA, TV-14, TV-PG, or TV-Y7, you can further set the sub ratings to block specific elements of programming. To set the sub ratings, follow the step below.
Use ▲/▼/◄/► to select the desired rating, then press OK repeatedly to switch between [View] and [Block].

| Sub Rating | Category | Rating |
| FV | Fantasy Violence | TV-Y7 |
| V | Violence | TV-MATV-14TV-PG |
| S | Sexual Situation | |
| L | Coarse Language | |
| D | Suggestive Dialogue | TV-14,TV-PG |
Note
- Blocked sub rating will appear beside the main rating category in [US TV Ratings Lock] menu.
- You cannot block a sub rating (D, L, S or V) if the main rating is set to [View].
- Changing the category to [Block] or [View] automatically changes all its sub ratings to the same ([Block] or [View]).
D. Change PIN
Although the default PIN code (0000) is supplied with the unit, you can set your own PIN code.
5 Use ▲/▼ to select [Change PIN], then press OK.
6 Press the Number buttons to enter the new 4-digit PIN code.
- Enter PIN code again in [Confirm PIN.] entry field.

7 Press MENU to exit.
Note
- Make sure new PIN code and confirm PIN code must be exactly the same. If they are different, the space is cleared for reentering.
- Your PIN code will be erased and return to the default (0000) when a power failure occurs. If you forget the PIN code, unplug the AC power cord while turning the unit on, wait for 10 seconds to plug the AC power cord again. The unit will restore the PIN code to 0000 as the factory default.
Fun-Link
This function allows you to operate the linked functions between our brand devices with a Fun-Link feature and this unit connecting through an HDMI cable.
1 Press MENU to display the main menu.
2 Use ▲/▼ to select [Features], then press OK.
3 Use ▲/▼ to select [Fun-Link], then press OK.

4 Use ▲/▼ to select the desired setting, then press OK.
5 Adjust the following items.
Fun-Link Control
Set the Fun-Link [On] or [Off].
The following additional settings will be grayed out when you set to [Off].
Use ▲/▼ to select the desired setting, then press OK.

| On | Selects if you have connected an external device that is compatible with the Fun-Link function. |
| Off Disables all Fun-Link | |
Auto Device Off
You can set your device to turn off by interlocking from this unit's power.
Use ▲/▼ to select the desired setting, then press OK.

| On | Your connected Fun-Link device turns off automatically when the unit goes to the standby mode. |
| Off | Your connected Fun-Link device stays on even if the unit goes to the standby mode. |
Auto TV On
This unit will turn on detected when the power on signal is sent from your connected Fun-Link device.
Use ▲/▼ to select the desired setting, then press OK.

| On | This unit turns on automatically when you turn on your connected Fun-Link device. |
| Off | This unit stays the standby mode even if you turn on your connected Fun-Link device. |
Device Control
You can operate some functions such as disc playback or call up the menu of the connected devices, by using this unit's remote control.
Use ▲/▼ to select the desired setting, then press OK.

Device List
This function lets you see the product model number or name of connected devices.
Use ▲/▼ to select the desired HDMI device listed on the TV screen, then press OK.

6 Press MENU to exit.
Energy Saving Mode
You can set whether the power consumption is saved or not.
1 Press MENU to display the main menu.
2 Use ▲/▼ to select [Features], then press OK.
3 Use ▲/▼ to select [Energy Saving Mode], then press OK.
4 Use ▲/▼ to select the desired mode, then press OK.
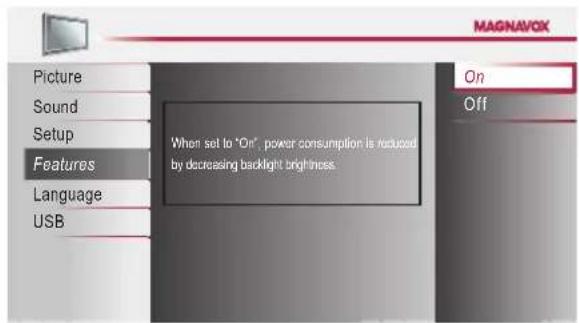
| On Reduces the power consumption. | |
| Off | The power consumption may possibly exceed the limited requirement of the ENERGY STAR® qualification. |
5 Press MENU to exit.
Location
When you select [Retail] store, the power consumption may possibly exceed the limited requirement of the ENERGY STAR® qualification.
1 Press MENU to display the main menu.
2 Use ▲/▼ to select [Features], then press OK.
3 Use ▲/▼ to select [Location], then press OK.
4 Use ▲/▼ to select the desired location, then press OK.

5 Press MENU to exit.
Current Software Info
This function shows what version of the software currently used.
1 Press MENU to display the main menu.
2 Use ▲/▼ to select [Features], then press OK.
3 Use ▲/▼ to select [Current Software Info], then press OK.
4 Confirm the version of the software currently used.
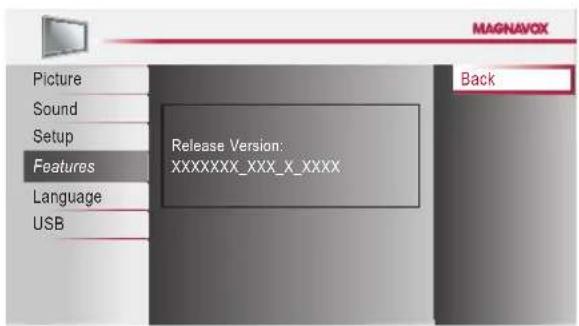
5 Press MENU to exit.
MP3/JPEG Playback
This unit can play MP3 music and JPEG picture files. Use the USB flash memory device contains those files.
1 Insert the USB flash memory device to the USB terminal of this unit.
• The main menu appears automatically.
2 Use ▲/▼ to select [USB] and press OK. The highlight will move to the name of your USB flash memory device, then press OK again.
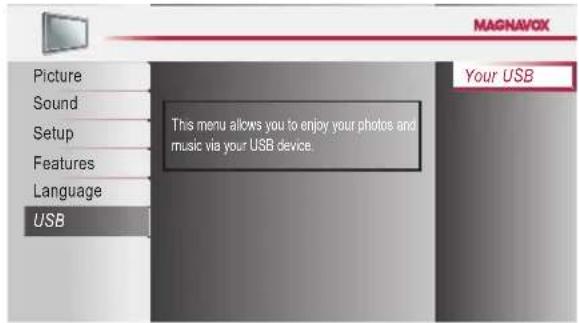
3 Use ▲/▼ to select [Picture] or [Music], and then press OK or ▶ (cursor).
Music
Use ▲/▼ to select the desired file, and then press OK or ▶(cursor).

- Playback will begin from the file you choose. To pause/begin the playback, press OK.
- You can use the Number buttons (between 1 and 3) to see the file detail (①) or change the following settings (② or ③).
| Item | Detail |
| 1More detail | Press 1 to display file details below.[Title], [Artist], [Album], [Duration] and [Year].Press 1 again to remove file details. |
| 2Repeat | Press 2 to play back the desired file repeatedly.Press 2 to play back the all files in the folder repeatedly.To cancel the repeat playback, press 2 until [A] or [1] disappears. |
| 3Shuffle | Press 3 to play back the music randomly.To return to the normal playback, press 3 again. |
Picture
Use ▲/▼ to select the desired file, and then press OK or ▶(cursor).
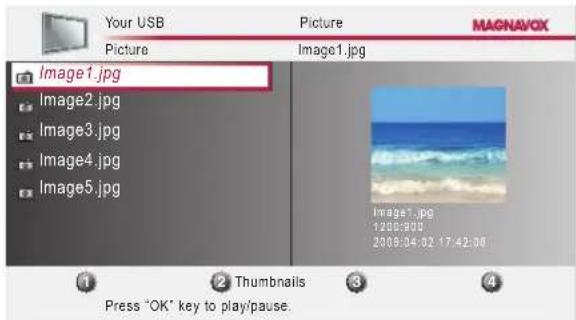
- To toggle between [List] and [Thumbnails], press the Number 2 button.
- The unit goes to the slide show automatically. To pause/begin the slide show, press OK.
- You can use the Number buttons (between 1 and 4) to see the file detail (①) or change the following settings (②\~④).
| Item | Detail |
| 1More detail | Press 1 to display file details below.[Name], [Album], [Date], [Size] and [Next].Press 1 again to remove file details. |
| 4Start show | Press 4 or OK to start the slide show.While the slide show is on, the following 2 settings will be displayed. |
| 2Transitions | Press 2, then use ▲/▼ to select the way of the transition mode choosing from;[None], [Dissolve], [Wipe right], [Wipe left],[Wipe up], [Wipe down], [Box in] and [Box out]. |
| 3Slide time | Press 3, then use ▲/▼ to change the display time choosing from; [Short], [Medium] and [Long]. |
| 4Stop show | Press 4 or OK to stop the slide show.While the slide show is off, the following 2 settings will be displayed. |
| 2Rotate | Every press on 2 will turn the picture clockwise by 90 degrees. |
| 3Zoom | Press 3, then use ▲/▼ to select the zoom factor (1x, 2x or 4x). Press OK to set the zoom factor. |
4 Press MENU to exit.
Note
- To go back to the previous screen (except when the [List] is displayed), press ◀.
• The USB flash memory device is not supplied with this unit. - We do not guarantee all USB flash memory devices can be supported by this unit.
- Be sure to keep a backup copy of the original files on your device before you play them back on this unit. We have no responsibilities for damage or loss of your stored data.
- When you are ready to remove a USB flash memory device, you must let the unit go to the standby mode first to avoid any damage for your data and the unit.
It is recommended that files to be played back in this unit are recorded under the following specifications:
• Sampling frequency : 32 kHz or 44.1 kHz or 48 kHz
• Constant bit rate : 32 kbps - 320 kbps
• Upper limit : 24 Mpixel
TROUBLESHOOTING
Troubleshooting Guide
If the unit does not perform properly when operated as instructed in this manual, check the following chart and all connections once before calling for service.
| Symptom Remedy | |
| No power | Make sure the AC power cord is plugged in.Make sure that the AC outlet supplies the proper voltage, plug another electrical appliance into the AC outlet to ensure that AC outlet operates normally.If a power failure occurs, unplug the AC power cord for 1 minute to allow the unit to reset itself. |
| Control button does not work. | Press only one button at a time. Do NOT press more than one button at the same time.Ensure that no buttons on the remote are depressed and move freely. |
| Power is ON but no screen image. | Check whether the connection of the antenna, cable receiver or satellite box is connected correctly.Check whether all the cables to the unit are connected to the correct output jack of your device like BD / DVD recorder.Make sure that the selected input mode is connected to the working input jack.Check if your computer is NOT in sleep mode when the input mode of this unit is in PC mode. Tap any key on the keyboard to wake up your computer. |
| No picture or sound | Check if the power is on.Check if the right input mode is selected.Check whether all the cables to the unit are connected to the correct output jack of your device like BD / DVD recorder.View other TV channels. The problem might be limited to the broadcasting station or weak signal strength.Unplug the AC power cord and wait for about 1 minute, then plug the AC power cord and turn on the unit again.Check whether the connection of the antenna, cable receiver or satellite box is connected correctly.Make sure that the selected input mode is connected to the working input jack.Check if your computer is NOT in sleep mode when the input mode of this unit is in PC mode. Tap any key on the keyboard to wake up your computer.Make sure that the sound is not muted. Press MUTE so that the volume bar and current volume level will appear on the TV screen.Make sure that the volume is NOT set to [0] or [Mute]. If so, use VOL +/-to adjust the desired volume. |
| No color | View other TV channels. The problem might be limited to the broadcasting station.Adjust [Color] in the main menu. |
| Adjusted [Picture] or [Sound] settings are not effective every time the unit is turned on. | You must set [Home] in [Location]. p.30Otherwise, the settings you adjusted will not be memorized after the unit goes to the standby mode. |
| Sound OK, picture poor | Electrical interference from nearby appliances may affect picture quality.Adjust [Contrast] and [Brightness] in the main menu.View other TV channels. The problem might be limited to the broadcasting station or weak signal strength.For the best picture quality, watch "High Definition" wide screen programs.If the HD content is not available, watch "Standard Definition" programs instead. |
| Picture OK, sound poor | View other TV channels. The problem might be limited to the broadcasting station or weak signal strength.Check if the audio cable is connected in correctly. |
| You see a distorted picture or hear an unusual sound. | You may be getting interference from electrical appliances, automobiles, motorcycles or fl fluorescent lights.Try moving the unit to another location to see if this is the cause of the problem. |
| Ghosts, lines or streaks in picture | Electrical interference from nearby appliances may affect picture quality.View other TV channels. The problem might be limited to the broadcasting station. |
| You see "noise" or "trash" on the screen. | When the capabilities of the unit exceed the capabilities of the digital broadcasting, the signal will be increased to match the capabilities of the display of the unit. This may cause noise or trash. |
| Different color marks on the TV screen | View other TV channels. The problem might be limited to the broadcasting station, missing data or pixelation. |
| You switch to a different input and the volume changes. | This unit will memorize the volume level from the last time you adjusted it.If the volume of the sound from another device is higher or lower, then the loudness will change. |
| You switch to a different input and the screen size changes. | This unit will memorize the viewing mode from the last time you used the particular input modes. |
| The display image does not cover the entire screen. | If you are watching TV or using the Composite Video, S-Video, Component Video or HDMI with 480i Input, press FORMAT repeatedly to switch various screen modes. |
| Captions are displayed as a white box.No caption is displayed in the Closed Caption-supported program. | Interference from buildings or weather conditions may cause captioning to be incomplete.Broadcasting station may shorten the program to insert advertisement.The closed caption decoder cannot read the information of the shortened program. |
| Black box is displayed on the TV screen. | The text mode is selected for caption. Select [CC-1], [CC-2], [CC-3], [CC-4] or [Off]. |
Note
- The LCD panel is manufactured to provide many years of useful life. Occasionally a few non active pixels may appear as a fixed point of blue, green or red. This is not to be considered a defect in the LCD screen.
- Some functions are not available in specific modes, but this is not a malfunction. Read the description in this manual for more details on correct operations.
FAQ
| Question Answer | |
| My remote control does not work.What should I do? | Check the antenna or cable connection to the main unit.Check the batteries of the remote control.Check if there is an obstacle between the infrared sensor window and the remote control.Test the signal output. If OK, then possible infrared sensor trouble.[IR Signal Check] p.35Aim the remote control directly at the infrared sensor window on the front of the unit.Reduce the distance to the unit.Re-insert the batteries with their polarities (+/- signs) as indicated.When there is an infrared-equipped device such as PC near this unit, it may interrupt the remote control signal of this unit.Move the infrared-equipped device away from this unit, change the angle of the infrared sensor or turn off the infrared communication function. |
| How come the Initial setup appears every time I turn on this unit? | Connect the RF coaxial cable to the unit directly and run the initial setup.Make sure to complete the channel scan before the unit goes to the standby mode. |
| Why I cannot watch some RF signal TV programs. | Make sure [Autoprogram] has been completed.p.19Autoprogram must be completed when you set up the unit for the first time or move it to a location where previously unavailable channels are broadcast.The selected channel may not be broadcasting.When [Autoprogram] is interrupted and not completed, some channels will not be received. Make sure to complete.p.19The selected channel cannot be viewed by the [Child Lock] setting. p.27The unit requires some kind of antenna input. An indoor antenna (VHF /UHF), an external antenna (VHF /UHF) or an RF coaxial cable from your wall cable/satellite box needs to be plugged into the unit. |
| How come there is no image from the connected external devices? | Check if the right input mode is selected by pressing SOURCE or using CH +/-.[Switching Each Input Mode] p.16Check the antenna or cable connection to the unit.When using the Component Video Connection check that the Green (Y), Blue (Pb/Cb) and Red (Pr/Cr) connectors are connected to their corresponding colored jacks on the unit. |
| Whenever I entered channel number,it changes automatically. | Many digital channels have alternate channel numbers.The unit changes the numbers automatically to the ones signifying the broadcasting station channel number.These basic numbers used for previous analog broadcasts.(e.g., input ch#30 auto change to ch#6.1) |
| Why are captions not displayed entirely?Or, captions are delayed behind the dialogue. | Captions that are delayed a few seconds behind the actual dialogue are common for live broadcasts. Most captioning production companies can display a dialogue to maximum of 220 words per minute. If a dialogue exceeds that rate, selective editing is used to insure that the captions remain up-to date with the current TV screen dialogue. |
| How can I set the clock? | There is no clock function on this unit. |
INFORMATION
Glossary
ATSC
Acronym that stands for Advanced Television Systems Committee and the name of the digital broadcasting standards.
Aspect Ratio
The width of a TV screen relative to its height. Conventional TVs are 4:3 (in other words, the TV screen is almost square); widescreen models are 16:9 (the TV screen is almost twice as wide as its height).
Component Video
This is a video signal format that conveys each of 3 principal colors of light (red, blue and green) through different signal lines. This allows the viewers to experience picture colors as original as it is. There are several signal formats, including Y/Pb/Pr and Y/Cb/Cr.
Dolby Digital
The system developed by Dolby Laboratories to compress digital sound. It offers stereo sound (2ch) or multi-channel audio.
HDMI (High-Definition Multimedia Interface)
Interface that supports all uncompressed, digital audio / video formats including set-top box, BD / DVD recorder or digital television, over a single cable.
HDTV (High Definition TV)
Ultimate digital format that produces high resolution and high picture quality.
NTSC
Acronym that stands for National Television Systems Committee and the name of analog broadcasting standards. Off the air NTSC signals are no longer being sent by major broadcasting stations in the USA.
PIN code
A stored 4-digit number that allows access to parental control features.
SAP (Secondary Audio Program)
Second-audio channel delivered separately from main-audio channel. This audio channel is used as an alternate in bilingual broadcasting.
SDTV (Standard Definition TV)
Standard digital format that is similar to the NTSC picture quality.
S-Video
Offers higher quality images by delivering each signal, color (c) and luminance (y) independently of each other through a single cable.
Maintenance
Cabinet Cleaning
- Wipe the front panel and other exterior surfaces of the unit with a soft cloth.
- Never use a solvent or alcohol. Do not spray insecticide liquid near the unit. Such chemicals may cause damage and discoloration to the exposed surfaces.
Panel Cleaning
Wipe the panel of the unit with a soft cloth. Before cleaning the panel, disconnect the AC power cord.
Servicing
Should your unit become inoperative, do not try to correct the problem yourself. There are no user serviceable parts inside. Call our toll free customer support line found on the cover of this manual to locate an authorized service center.
IR Signal Check
If the remote control is not working properly, you can use a digital camera (including a cellular phone with built-in camera) to see if it is sending out an infrared signal.

natural_image
Illustration of a remote control with wireless signal and a digital camera (no text or symbols)With a digital camera (including built-in cell phone cameras): Point the Digital Camera towards the remote control infrared diode at the front of the remote control. Press any button on the remote control and look through the camera display. If the infrared pulsating light appears through the camera, the remote control is sending out an IR signal.
General Specifications
TV format ATSC/NTSC-M TV standard
Closed caption system
§15.122/FCC (digi
§15.119/FCC (analog CC)
Channel coverage (ATSC / NTSC)
Terrestrial DTV (ATSC)
VHF 2\~13
UHF 14\~51 each channel has e.g.)
2.1\~2.9, 3.1\~3.9, etc.
Terrestrial Analog (NTSC)
VHF 2\~13
UHF 14\~69
CATV
2\~13, A\~W,
W+1\~W+94 (analog W+1\~W+84),
A-5\~A-1, 5A
Tuning system
Channel frequency synthesized tuning
system
Channel access Direct access keyboard,
Programmable scan, and up / down
Electrical Specification
Audio Output
10W, 8Ω × 2
Other Specifications
Terminals
Antenna Input VHF/UHF/CATV 75 Ω unbalanced (F-type)
Audio Input RCA jack (L/R) × 8 500mV rms
Composite Video Input
RCA jack × 2
S-Video Input Mini DIN 4 pin jack x 2 Y 1V p-p (75Ω)
C 286mV p-p (75 Ω)
Component Video Input
RCA jack × 3
HDMI Input HDMI 19 pin x 3
USB Input USB × 1
Digital Audio Output (coaxial)
RCA jack x 1
Analog Audio Output
RCA jack (L/R) × 2
Y 1V p-p (75 Ω)
Pb/Cb 700 mV p-p (75Ω)
Pr/Cr 700 mV p-p (75Ω)
500mV p-p (75 Ω)
500 mV rms
Remote control
Digital encoded infrared light system
Operating temperature
41 °F (5 °C) to 104 °F (40 °C)
Power requirements
120V\~ AC +/- 10%, 60 Hz +/ - 0.5%
Power consumption (maximum)
228W
LCD 46 inches full HD panel
Dimensions
Width 44.3 inches(1125.0mm) 44.3 inches(1125.0mm)
Height 28.4 inches(719.0 mm) 30.4 inches(770.5 mm)
Depth 4.4 inches(109.5 mm) 11.7 inches(295.0 mm)
Weight 48.15 lbs. (21.84kg) 53.58 lbs. (24.30kg)
- Designs and specifications are subject to change without notice and without our legal obligation.
- If there is a discrepancy between languages, the default language will be English.
LIMITED WARRANTY
NINETY (90) DAY LABOR / ONE (1) YEAR PARTS
WARRANTY COVERAGE:
This warranty obligation is limited to the terms asset forth below.
WHO IS COVERED:
Thisproductwarrantyisissuedtotheoriginalpurchaserorthe personreceivingtheproductasagiftagainstdefectsinmaterials andworkmanshipasbasedonthedateoforiginalpurchase ("WarrantyPeriod")fromanAuthorizedDealer.Theoriginal salesreceiptshowingtheproductnameandthepurchasedate fromanauthorizedretailerisconsideredsuchproof.
WHAT IS COVERED:
Thiswarrantycoversnewproductsifadefectinmaterialor workmanshipoccursandavalidclaimisreceivedwithinthe WarrantyPeriod.Atitsoption,thecompanywilleither(1) repairtheproductatnocharge,usingneworrefurbished replacementparts,or(2)exchangetheproductwithaproduct thatisneworwhichhasbeenmanufacturedfromnew,orserviceableusedpartsandisatleastfunctionallyequivalentormost comparabletotheoriginalproductincurrentinventory,or(3) refundtheoriginalpurchasepriceoftheproduct. Replacementproductsorpartsprovidedunderthiswarrantyare coveredagainstdefectsinmaterialsandworkmanshipfromthe dateofthereplacementorrepairforninety(90)daysorforthe remainingportionoftheoriginalproduct'swarranty,whichever provideslongercoverageforyou.Whenaproductorpartis exchanged,anyreplacementitembecomesyourpropertyandthe replaceditembecomescompanyproperty.Whenarefundis given,yourproductbecomescompanyproperty.
Note: Any product sold and identified as refurbished or renewed carries a ninety (90) day limited warranty.
Replacement product can only be sent if all warranty requirements are met. Failure to follow all requirements can result in delay.
WHAT IS NOT COVERED - EXCLUSIONS AND LIMITATIONS:
This Limited Warranty applies only tonew company manufac- tured products that can be identified by the trademark, trade name, or logo affixed to it. This Limited Warranty does not apply toanyhardwareproductoranysoftware, even if packagedor sold with the product, as manufacturers, suppliers, or publishers may provide a separate warranty for their own product package with the bundled product.
The company is not liable for any damage to or loss of any programs, data, or other information stored on any media contained within the product, or other additional product part not covered by this warranty. Recovery or installation of programs, data or other information is not covered under this Limited Warranty.
Thiswarrantydoesnotapply(a)todamagecausedbyaccident, abuse,misuse,neglect,misapplication,ornon-suppliedproduct, (b)todamagecausedbyserviceperformedbyanyoneotherthan companyapprovedAuthorizedServiceLocation,(c)toaproduct
or a part that has been modified without written company permission, or (d) if any serial number has been removed or defaced, or (e) product, accessories or consumable sold "ASIS" without warranty of any kind by including refurbished products sold "AS IS" by someretailers.
This Limited Warranty does not cover:
• Shippingchargestoreturndefectiveproduct.
- Laborchargesforinstallationorsetupoftheproduct,adjustmentofcustomercontrolsontheproduct,andinstallationor repairofantenna/signalsourcesystemsoutsideoftheproduct.
- Productrepairand/orpartreplacementbecauseofimproper installationormaintenance,connectionstoimpropervoltage supply,powerlinesurge,lightningdamage,retainedimagesor screen markings resulting from viewing fixed stationary contentforextendedperiods,productcosmeticappearanceitems duetonormalwearandtear,unauthorizedrepairorother causenotwithinthecontrolofthecompany.
- Damageorclaimsforproductsnotbeingavailableforuse,or forlostdataorlostsoftware.
• Damage from mishandled shipments or transit accidents when returning product.
- A product that requires modification or adaptation to enable ittooperateinanycountryotherthanthecountryforwhich itwasdesigned,manufactured,approvedand/orauthorized,or repair of products damaged by these modifications.
• Aproductusedforcommercialorinstitutionalpurposes (includingbutnotlimitedtorentalpurposes).
- Product lost in shipment and no signature verification receipt can be provided.
•FailuretooperateperOwner'sManual.
TO OBTAIN ASSISTANCE...
ContacttheCustomerCareCenterat: 1-866-341-3738
REPAIRORREPLACEMENTASPROVIDEDUNDERTHIS WARRANTYISTHEEXCLUSIVEREMEDYFORTHECON- SUMER, WITHTHEISSUINGCOMPANYNOTLIABLEFOR ANYINCIDENTALORCONSEQUENTIALDAMAGESFOR BREACHOFANYEXPRESSORIMPLIEDWARRANTYON THISPRODUCT.EXCEPTTOTHEEXTENTPROHIBITEDBY APPLICABLELAW, ANYIMPLIEDWARRANTYOFMER- CHANTABILITYORFITNESSFORAPARTICULARPURPOSE ONTHISPRODUCTISLIMITEDINDURATIONTOTHE DURATIONOFTHISWARRANTY.
Somestatesdonotallowtheexclusionsorlimitationofincidentalorconsequentialdamages,orallowlimitationsonhowlonganimpliedwarrantylasts,sotheabovelimitationsorexclusionsmaynotapplytoyou.
This warranty gives you specific legal rights. You may have other rights which vary from state/province to state/province.
FUNAI CORPORATION, Inc. 19900 Van Ness Avenue, Torrance, CA 90501
- Need help fast?
- Return your Product Registration Card or register online at www.magnavox.com/support today to get the very most from your purchase.
- \*Proof of Purchase \* Product Safety
- Notification
- \*Additional Benefits
- MAGNAVOX
- Dear MAGNAVOX product owner:
- CAUTION
- IMPORTANT SAFETY INSTRUCTIONS
- Read before operating equipment
- FCC WARNING
- RADIO-TV INTERFERENCE
- DECLARATION OF CONFORMITY
- This Class B digital apparatus complies with Canadian ICES-003. Standard Television Receiving Apparatus, Canada BETS-7/NTMR-7
- NOTE ABOUT RECYCLING
- WHEN CARRYING THIS UNIT
- TO AVOID THE HAZARDS OF ELECTRICAL SHOCK AND FIRE
- LOCATION AND HANDLING
- Trademark Information
- DOLBY.
- Consumer Notice:
- INTRODUCTION
- Contents
- Features
- - DTV/ TV/CATV
- • Information Display (ATSC only)
- - Autoprogram
- - Child Lock
- • Closed Caption Decoder
- - MTS/SAPTuner
- - Auto Standby
- - Sleep Timer
- • Choices for On-screen Language
- - Stereo Sound Function
- • PLL Frequency Synthesized Tuning
- • Various Adjustment for Picture and Sound
- • Fun-Link via HDMI Link
- - HDMI Input
- - Component Video Input
- - S-Video Input
- - AV Input
- - USB Terminal
- • Digital Audio Output
- • Analog Audio Output
- Supplied Accessories
- Note
- Symbols Used in this Manual
- Attaching the Base
- To remove the base from this unit
- Fixing the Unit on Your Furniture
- Note for USB terminal
- Infrared sensor window
- POWER indicator
- STAND BY indicator
- Side Panel
- Rear Panel
- Remote Control Function
- When using a universal remote control to operate this unit.
- Battery Precautions:
- Installing the Batteries
- PREPARATION
- No supplied cables are used with these connections:
- Before you connect:
- Antenna Connection
- Connection to Cable Receiver or Satellite Box
- External Device Connection
- HDMI Connection
- HDMI-DVI Connection
- For HDMI connection
- For HDMI-DVI connection
- Component Video Connection
- S-Video Connection
- Composite Video Connection
- Audio Output Connection
- PC Connection
- USB Flash Memory
- Cable Management
- Plug In the AC Power Cord
- Caution:
- Initial Setup
- Before you begin:
- After an initial setup is completed...
- WATCHING TV
- Channel Selection
- ATSC
- NTSC
- TV Screen Display Mode
- Sound Functions
- Silence Mode
- Switching Audio Mode
- Volume Adjustment
- TV Screen Information
- Reducing the Brightness
- Fun-Link Options
- OPTIONAL SETTING
- Main Menu
- Autoprogram
- Channel List
- Press MENU to exit.
- Add Channels
- Antenna Confir rmation
- Language Selection
- Picture Adjustment
- Smart Picture
- Brightness, Contrast, Color, Tint, Sharpness, Color Temperature
- Sound Adjustment
- Adjust the following items.
- Smart Sound
- Equalizer
- Virtual Surround Sound
- Auto Volume Leveling
- TV Speakers
- Primary MTS
- Closed Caption
- Caption Service
- Digital Caption Service
- Caption Style
- Font Style
- Font Size
- Font Color
- Font Opacity
- Background Color
- Background Opacity
- Edge Color
- Edge Type
- Child Lock
- Channel Lock
- Setting US Movie ratings
- Setting TV ratings
- To set the sub ratings
- Change PIN
- Fun-Link
- Fun-Link Control
- Auto Device Off
- Auto TV On
- Device Control
- Device List
- Energy Saving Mode
- Location
- Current Software Info
- MP3/JPEG Playback
- Music
- Picture
- Press MENU to exit.
- TROUBLESHOOTING
- Troubleshooting Guide
- FAQ
- INFORMATION
- Glossary
- Aspect Ratio
- Component Video
- Dolby Digital
- HDMI (High-Definition Multimedia Interface)
- HDTV (High Definition TV)
- PIN code
- SAP (Secondary Audio Program)
- SDTV (Standard Definition TV)
- S-Video
- Maintenance
- Cabinet Cleaning
- Panel Cleaning
- Servicing
- IR Signal Check
- General Specifications
- Electrical Specification
- Other Specifications
- LIMITED WARRANTY
- NINETY (90) DAY LABOR / ONE (1) YEAR PARTS
- WARRANTY COVERAGE:
- WHO IS COVERED:
- WHAT IS COVERED:
- WHAT IS NOT COVERED - EXCLUSIONS AND LIMITATIONS:
- This Limited Warranty does not cover:
- TO OBTAIN ASSISTANCE...
Brand : MAGNAVOX
Model : 46MF401B
Category : Television