USER MANUAL F24V86C HISENSE
F24V86C 24" LCD Television Owners Manual
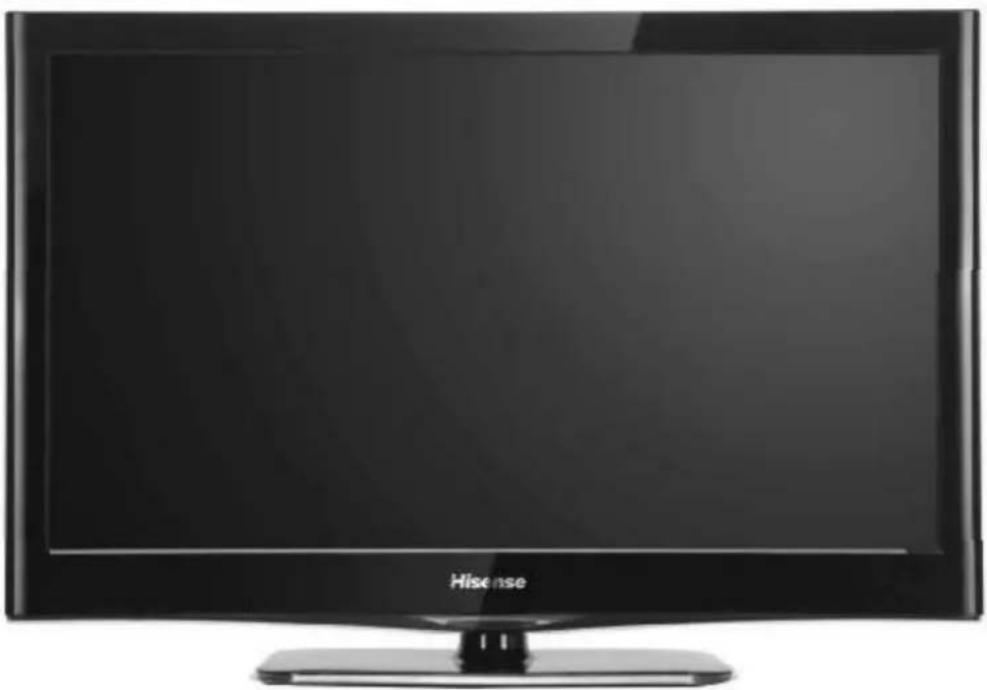
natural_image
Black-framed television monitor with 'Hisense' branding on front (no additional text or symbols visible)
A PREMIUM DISPLAY PRODUCT
PARTNO. ES-J111108
Federal Communications Commission Statement
NOTE
The manufacturer is not responsible for any radio or TV interference caused by unauthorized modifications to this equipment. Such modifications could void the user's warranty.
NOTE
This equipment has been tested and found to comply with the limits for a class B digital Device, pursuant to part 15 of the FCC Rules. These limits are designed to provide reasonable protection against harmful interference in a residential installation. This equipment generates, uses and can radiate radio frequency energy and, if not installed and used in accordance with the instructions, may cause harmful interference to radio communications. However, there is no guarantee that interference will not occur in a particular installation. If this equipment does cause harmful interference to radio or television reception, which can be determined by turning the equipment off and on, the user is encouraged to try to correct the interference by one or more of the following measures:
- Reorient or relocate the receiving antenna.
- Increase the separation between other electronic equipment and the receiver.
- Connect the equipment to an outlet on a circuit different from that to which the receiver is connected.
- Consult the dealer or an experienced radio/TV technician for help.
Important safety instructions....3
Preparation for using your new TV....5
Base installation instructions....5
Learning about your TV....6
View the front connection panel....6
View the back connection panel....6
Selecting a location for the TV....7
Connection to other devices....7
The side panel connection....7
The back panel connection....7
Connecting your TV....8
Connecting to an antenna....8
Connecting to A/V equipment 8
Service jack....8
Connecting component devices (DVD/DVR)....8
Connecting HDMI....9
Connecting computer....9
Connecting audio....9
Connecting to a cable converter box....9
Using the remote control....11
Preparing the remote control for use....11
Learning about the remote control....12
Understanding the TV features....13
Basic operation....13
Menu operation....13
Video mode adjustment....16
Audio mode adjustment....16
Setup....17
Parental control....18
Appendix....20
Cleaning and care....20
Troubleshooting....21
Wall-mounting bracket installation 22
Specifications....23
SAFETY CLASS :This is an IEC safety class II product.
natural_image
Black triangular warning sign with a lightning bolt symbol and downward arrow (no text)
CAUTION
RISK OF ELECTRIC SHOCK DO NOT OPEN!

natural_image
Black triangular warning symbol with exclamation mark (no text or numbers)

The lightning flash with arrowhead symbol, within an equilateral triangle, is intended to alert the user to the presence of un-insulated "dangerous voltage" within the product's enclosure that may be of sufficient magnitude to constitute a risk of electric to persons.

The exclamation point within an equilateral triangle is intended to alert the user to the presence of important operating and maintenance (servicing) instructions in the literature accompanying the appliance.
CAUTION: USE OF ANY CONTROLS, ADJUSTMENTS, OR PROCEDURES OTHER THAN THOSE SPECIFIED HEREIN MAY RESULT IN HAZARDOUS RADIATION EXPOSURE.
Important safety instructions
Note:
- Read these instructions.
- Keep these instructions.
- Heed all warnings.
- Follow all instructions.
- Do not use near water.
- Clean only with dry cloth.
- Do not block any ventilation openings.
- Install in accordance with the manufacturer's instructions.
- Do not install near any heat sources such as radiators, heat registers, stoves, or other apparatus (including amplifiers) that produce heat.
Important safety instructions
- Do not defeat the safety purpose of the polarized or grounding-type plug. A polarized plug has two blades with one wider than the other. A grounding type plug has two blades and a third grounding prong. The wide blade or the third prong are provided for your safety. If the provided plug does not fit into your outlet, consult an electrician for replacement of the obsolete outlet.
- Protect the power cord from being walked on or pinched particularly at plugs, convenience receptacles, and the point where they exit from the apparatus.
- Only use attachments / accessories specified by the manufacturer.
- Use only with the cart, stand, tripod, bracket, or table specified by the manufacturer, or sold with the apparatus. When a cart is used, use caution when moving the cart / apparatus combination to avoid injury from tip-over.
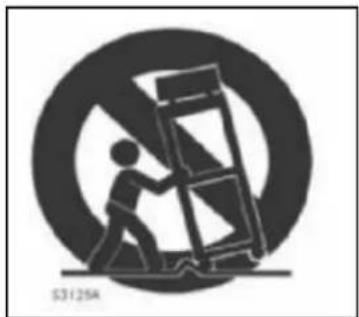
natural_image
Silhouette of a person climbing a ladder inside a circular frame, with no visible text or symbols.
- Unplug this apparatus during lightning storms or when unused for long periods of time.
- Refer all servicing to qualified service personnel. Servicing is required when the apparatus has been damaged in any way, such as power-supply cord or plug is damaged, liquid has been spilled or objects have fallen into the apparatus, the apparatus has been exposed to rain or moisture, does not operate normally, or has been dropped.
- Apparatus shall not be exposed to dripping or splashing. No objects filled with liquids, such as vases, shall be placed on the apparatus.
- WARNING: To reduce the risk of fire or electric shock, do not expose this apparatus to rain or moisture.
- Mains plug or appliance coupler is used as the disconnect device, shall be readily operable.
19.CAUTION: Danger of explosion if battery is incorrectly replaced.
Replace only with the same or equivalent type.
-
This product is only used in moderate climate.
-
Warning that excessive sound pressure from earphones and headphones can cause hearing loss
- ATTENTION: This device complies with Part 15 of the FCC rules. Operation is subject to the following two conditions: (1) this device may not cause harmful interference, and (2) this device must accept any interference received, including interference that may cause undesired operation.
Preparation for using your new TV
Base installation instruction
- Lay a cloth or other soft material on a flat surface to avoid damage to the LCD screen.
- Put the TV back upward and the LCD screen downward and keep it flat on the surface.
- Take out the base and insert it into the installing slot in the lower part of the TV in the arrow direction as illustrated in the figure.

natural_image
Back view of a flat-screen TV monitor with control panel and indicator lights (no visible text or symbols)
Preparation for using your new TV
Learning about your TV
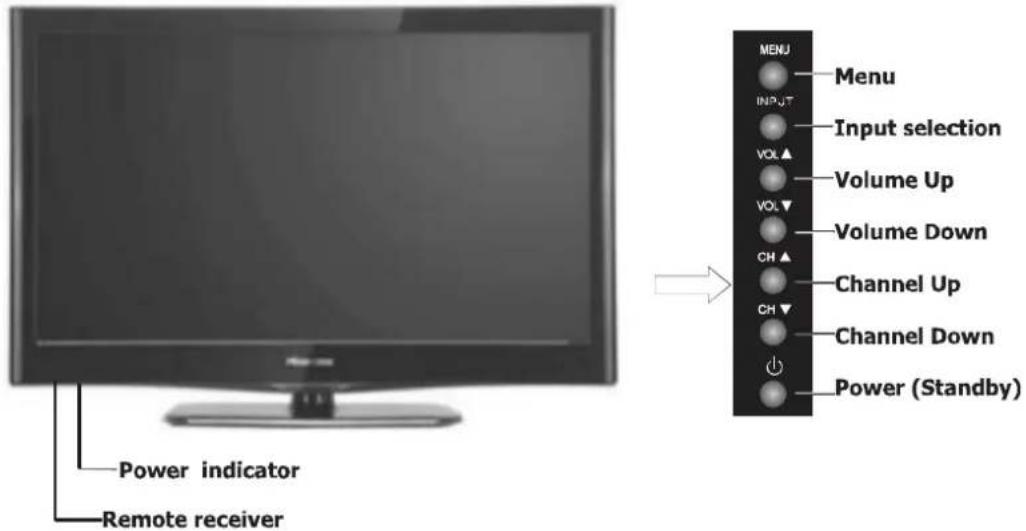
You can operate your TV via the buttons on the front cabinet or the remote control. The input terminals on the back cabinet provide all the connections from other equipments to your TV.
View the front connection panel
View the back connection panel

natural_image
Back view of a flat-screen monitor with labeled component A, showing internal wiring and buttons (no readable text or symbols beyond label)
Preparation for using your new TV
Selecting a location for the TV
- Place the TV on an open surface in a location where light does not directly hit the screen.
- Place the TV far enough from the walls to allow proper ventilation. Inadequate ventilation may cause overheating, which may damage the TV.
NOTE: Please contact a local dealer for wall mounting.
Connection to other devices
The back panel connection

Connecting your TV
Caution: Do not plug in the TV until you have finished connecting all of your equipment.
Connecting to an antenna
To enjoy the television programs transmitted by your local TV stations, you need an indoor or outdoor antenna (not supplied). An outdoor antenna is necessary for picture quality. If you are a subscriber of your local CATV net, the outdoor or indoor antenna is not needed. Connect the equipment as shown below.

flowchart
graph TD
    A["ANT 75Ω"] --> B["Plug (not supplied)"]
    B --> C["COAXIAL CABLE (75Ω)"]
    C --> D["TWIN-LEAD FEEDER (300Ω)"]
    D --> E["Adaptor (not supplied)"]
    E --> F["1. Loosen the screw"]
    E --> G["2. Insert the feeder in"]
    E --> H["3. Tighten the screw"]
Connecting to A/V equipments
To enjoy the multimedia features, you can connect your TV to A/V equipment such as DVD, Satellite receiver, Camcorder, Audio amplifier etc., and select signal source using your remote control. Connect audio cables to "R -AUDIO - L" on the rear of your set and the other ends to corresponding audio out connectors on the A/V device.
NOTE: 1. Headphones are not included.
- No sound will be heard from the main unit speakers when a headphone mini-plug is connected into the headphone jack.
Service jack
Connector for service only (do not connect any equipment here).
Connecting component devices (DVD/DVR)
Connect Component video and audio cables to Component inputs ("PR/CR", "PB/CB", "Y") on the rear of your set and the other ends to corresponding component video out connectors on the DVR or DVD.
The Y, PB/CB and PR/CR" connectors on your component devices (DVR or DVD) are sometimes labeled Y, B-Y and R-Y or Y, CB and CR (Colors for inputs and cables must correspond to both devices).
NOTE: Some devices such as DVD players require 'Component/YPBPR' signal to be set via output in the devices settings. Please consult your device user manual for instructions.
Preparation for using your new TV
Connecting HDMI
Supports digital connections between HDMI - enabled AV devices such as (DVRs, DVD, BluRay, HDDVD, AV receivers and digital devices). No separate sound connection is needed for an HDMI to HDMI connection.
NOTE: Some devices such as a DVR or DVD players require a HDMI signal to be set via the output in the devices' settings. Please consult your device user manual for instructions.
What is HDMI?
HDMI, or high-definition multimedia interface, is a next-generation interface that enables the transmission of digital audio and video signals using a single cable without compression.
"Multimedia interface" is a more accurate name for it because it allows multiple channels of digital audio (5.1 channels). The difference between HDMI and DVI is that the HDMI device is smaller in size, has the HDCP (High Bandwidth Digital Copy Protection) coding feature installed, and supports multi-channel digital audio.
Use the HDMI terminal for HDMI connection to a compatible device.
If your external device has DVI only, you should use a DVI-to-HDMI cable( or adapter) for the connection, and the "R -AUDIO - L" terminal on DVI for sound output.
Connecting Computer
Connect the VGA cable to "VGA (VGA IN)" on the rear of your set and the other end to your computer.
Connect the stereo audio cable to "VGA AUDIO IN" on the rear of your set and the other end to "Audio Out" on your computer.
This device may not be compatible with all PC video/graphic cards.
Connecting AUDIO
Connect audio cables to "R-AUDIO - L" on the rear of your set and the other ends to corresponding audio in connectors on the Amplifier or DVD Home Theater.
Connecting to a cable converter box
This television has an extended tuning range and can tune most cable channels without using a cable converter box. Some cable companies offer premium pay channels in which the signal is scrambled. Descrambling these signals for normal viewing requires the use of a descrambler device which is generally provided by the cable company.
Preparation for using your new TV
• For subscribers to Basic Cable TV Service
For basic cable service not requiring a Converter/Descrambler box, connect the CATV 75 ohm Coaxial Cable directly into the Antenna Jack on the back of the television.
• For subscribers to Scrambled Cable TV Service
If you subscribe to a cable service which requires the use of a Converter/Descrambler box, connect the incoming cable to the Converter/Descrambler box and connect the output of the box to the Antenna Jack on the back of the television. Follow the connections as shown below. Set the television to the output of the Converter/Descrambler box (usually channel 3 or 4) and use the Converter/Descrambler box to select channels.
• For Subscribers to Unscrambled Basic Cable with Scrambled Premium Channels
If you subscribe to a cable service in which basic cable channels are unscrambled and premium channels require the use of a Converter/Descrambled box, you may wish to use a two-set signal splitter (sometimes referred to as a two-set coupler) and an A/B Switch box from the cable installer or an electronics supply store. Follow the connections shown below. With the switch in the B position, you can directly tune any unscrambled channels on your TV. With the switch in the A position, tune your TV to the output of the Converter/Descrambler box (usually channel 3 or 4) and use the box to tune scrambled channels.
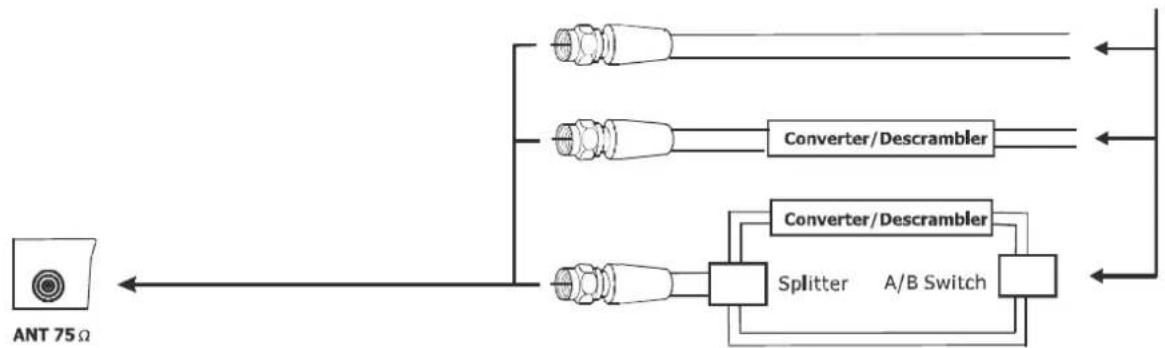
flowchart
graph LR
    A["ANT 75Ω"] --> B["Converter/Descrambler"]
    A --> C["Converter/Descrambler"]
    A --> D["Splitter"]
    D --> E["A/B Switch"]
    B --> F["Output"]
    C --> F
    D --> F
    E --> F
Note:
When you use a converter box with your TV, there may be features that you cannot program when using the remote control.
Preparing the remote control for use
Installing the remote control batteries
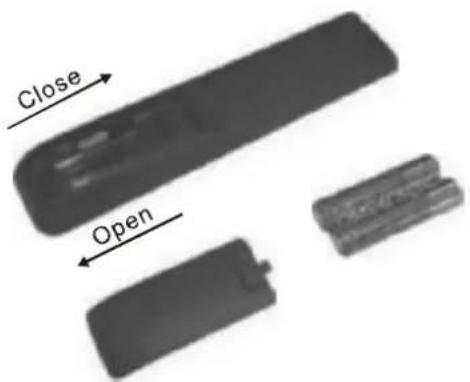
- Open the battery cover on the back of the remote control.
-
Install two AAA size(1.5V) batteries. Match the + and - signs on the batteries to the signs on the battery compartment.
-
Close the battery cover.
Note:
- Dispose of your batteries in a designated disposal area. Do not throw batteries into fire.
- Do not mix battery types or combine used batteries with new ones.
- Remove dead batteries immediately to prevent battery acid from leaking into the battery compartment.
- If you do not use the remote control for a long time, remove the batteries.
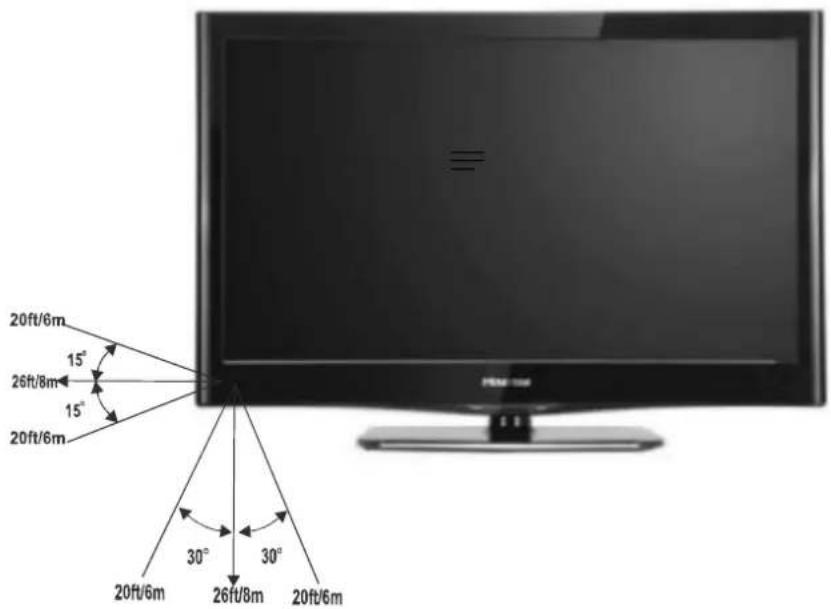
- The effective range of the remote control is demonstrated by the following figure:
Using the remote control

Note:
1. Please refer to the practicality.
2. Red/Green/Yellow/Cyan buttons are used for special function.
Understanding the TV features
- Multimedia - All in one TV receiver, Video Monitor and PC display.
- Wider viewing angle for 16:9 and 4:3 display screens - over a 160 degree viewing angle and a 16:9 display panel.
- Digital display device - Irrespective of magnetic or geomagnetic effects, this device accurately reproduces images without any distortion or blur.
- Closed caption decoder - You may view specially labeled (cc) TV programs, movies, news, prerecorded tapes, etc. with either a dialogue caption or text display added to the program.
● V-chip - Enables parents to prevent their children from watching inappropriate programs on TV.
- User adjustable Sleep timer
• Multi-language capabilities
Basic Operation
Power ON/OFF
- Connect the TV to a power outlet. If the power indicator is red, it means that the TV is switched off. Press the Power button on the front control or on the remote control to switch on the TV. Once the Power button is switched on, the power indicator will be displayed. Several seconds later, the TV picture will be displayed on the screen.
- Press the Power button on the front control or on the remote control to turn the TV off temporarily.
- Always remove the AC power plug from the outlet when not using this TV for a long period of time.
Signal source selection
Press the [INPUT] button to select TV, AV, Component, VGA and HDMI inputs. There are two ways to select the source: One is to press the [INPUT] button continuously, while the other is to use the [ARROW] and [ENTER]
buttons to confirm the source.
TV Settings
- Press MENU to open the OSD option
- Press ▲ or ▼ to highlight TV, then press ▶ to enter the TV menu.
- Press ▲ or ▼ to highlight an option, then press ◀ or ▶ to adjust the option. You can adjust:

- Tuner Mode - Select the TV signal source. You can select Antenna or Cable.
- Channel Scan - Scans for channels that have signals and stores the channels information in memory. When you press ◀ or ▶, your TV skips any channels that do not have a signal.
- Channel Skip - Deletes a channel stored in memory. When you press CH+ or CH-, your TV skips the channel you deleted. You can still tune to the channel using the number buttons on the remote control.
• MTS - Selects the sound mode. You can select Mono, Stereo, or SAP (second audio program).
• Audio Language-Selects the audio language for a program.
Select channels
Use the [CH+/CH-] button on the remote to select channels. [CH+] indicates channel number up; [CH-] indicates channel number down. Press [CHA/CHV] button on the side panel of the TV to select the channels. If you want to choose any of the skipped channels, press the number directly on the remote.
Press the [Mute] button to mute the sound. Press the [Mute] button again to resume the sound.
Select picture modes
Press the [PICTURE] button to select the picture mode from four options: Standard, Cinema, User and Vivid. In the "User" mode you can adjust the picture mode based upon your personal preference.
Select sound modes
Press the [sound] button to select sound modes from Standard, Speech, User, and Music. In the User Mode, you can adjust the audio mode based upon your personal preference.
Select screen modes
Press the [ASPECT] button to select the aspect ratio between picture width and picture height (High Definition 16:9 pictures will be displayed in original format 16:9, named Wide). The options for SD (Standard Definition 4:3) are Normal, Wide, Zoom and Cinema
1 Normal
The original 4:3 aspect ratio (1.33:1 signal) is preserved, so black bars are added to the left and right of the image. Standard TV broadcasts are displayed with a 4:3 aspect ratio.

natural_image
Black and white photo of assorted vegetables in a basket, no visible text or symbols
2 Wide
When watching a standard broadcast or full-frame movie in this mode, the display image is stretched proportionately to fill the TV screen.
When watching a widescreen (1.78:1 signal) program or movie, the display image fills the TV screen.

natural_image
Black-and-white photo of assorted tomatoes in a basket, no visible text or symbols
3 Zoom
Stretches the 4:3 aspect ratio image vertically and horizontally to fill the screen at 1:1.78 aspect ratio.
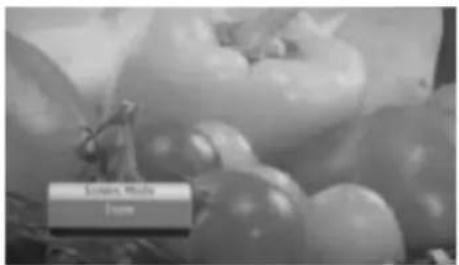
4 Cinema
Stretches the 4:3 aspect ratio image vertically and horizontally to fill the screen at 1:2.35 aspect ratio.

natural_image
Black and white photo of assorted tomatoes with a small electronic device labeled 'Ecoxon Mobil Company' (no other text or symbols visible)
Press the [GUIDE] button to display features of the ATSC program and the EPG function.
Press the [DISPLAY] button to view current source information.
Press the [EXIT] button to exit the OSD menu.
Select channels by numbers
To select a channel: Press the channel number you would like to go to. For example, to select channel number 120, press buttons 1, 2 and 0, respectively.
Press the [MENU] button to display the TV OSD menu.
Press the [LAST] button to return to the previous channel.
Press the [ENTER] button to select a particular item.
Adjust Volume
Press [VOL+/VOL-] button to adjust the volume.
Press the [CCD] button to change the CCD mode. Using this button will set the Closed Caption mode when viewing a DTV or TV channel.
Note: For DTV the options are CC1, CC2, CC3, CC4, Service1 or Service2. For TV and AV, the options are On or Off. Additionally, this button stops the CD, DVD or VCR when the component is activated with the remote control.
Press the [MTS/SAP] button to change the sound mode (Mono, Stereo, SAP). This button will select the MTS options of Stereo, SAP, or Mono in TV mode, alternate audio channels, and when available, in DTV mode.
Press the [SLEEP] button repeatedly to set the sleep time, which can be set to: 10 Mins, 20 Mins, 30 Mins, 40 Mins, 50 Mins, 60 Mins, 90 Mins, 120 Mins, and Off.
Press the [TIME] button to obtain the current time.
Video mode adjustment
- Press MENU to open the OSD option
- Press ▲ or ▼ to highlight Video, then press ▶ to enter the Video menu.
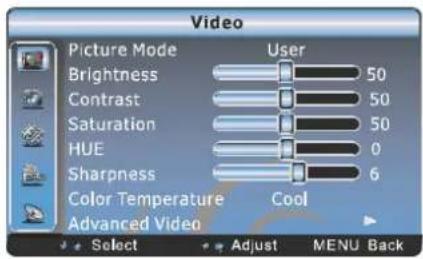
- Press ▲ or ▼ to highlight an option, then press ◀ or ▶ to adjust the option. You can adjust:
• Picture Mode - Adjusts the Picture Mode. You can select Standard, Movie, User, or Vivid.
- Brightness - You can increase or decrease the brightness of the picture. Increasing the brightness can add more light to dark areas of the picture, while decreasing the brightness can add more darkness to light areas of the picture.
- Contrast - You can increase or decrease the contrast of the picture. Increase the contrast to adjust the white areas of the picture or decrease the contrast to adjust the black areas of the picture.
- Saturation - Adjusts the intensity of the colors,
• HUE - Adjusts the overall color of the picture.
- Sharpness - You can increase the sharpness level for clearer images or decrease the sharpness level for smoother images.
- Color temperature - Changes the color temperature. You can select the color temperature from three options: Cool, Standard or Warm.
- Advanced Video - Accesses advanced video settings such as DNR, Black Level Extender, White Peak Limiter and Flesh Tone.
Audio mode adjustment
- Press MENU to open the OSD option
- Press ▲ or ▼ to highlight Audio, then press ▶ to enter the Audio menu.

- Press ▲ or ▼ to highlight an option, then press ◀ or ▶ to adjust the option. You can adjust:
• Balance - Adjusts the volume of the left and right speakers.
- Equalizer -You can select the frequency you want to adjust and change its value.
• Surround Sound-Turns the surround sound effect on or off.
- Auto Volume Control - Turns automatic volume control on or off. The option keeps the audio in a preset range to eliminate large spikes in volume.
Setup
- Press MENU to open On Screen Display (OSD) option
- Press ▲ or ▼ to highlight Setup, then press ▶ to enter the Setup menu.

-
Press ▲ or ▼ to highlight an option, then press ◀ or ▶ to adjust the option. You can adjust:
-
OSD Language - Use the right or left arrow button to choose the OSD Language among English, Spanish and French.
- Screen Mode - Use the arrow button to choose the aspect ratio between picture width and picture height (High Definition 16:9 pictures will be displayed in original format 16:9, named Wide). The options for SD (Standard Definition 4:3) are Normal, Wide, Zoom and Cinema.
- DPMS - This is a good function for a computer monitor. When DPMS is on, the computer will control the screen off or on. For example, if the computer is in sleep mode, the screen will be switched off. If the computer is activated, the screen also is activated.
- Time Setup - You can set up the exact time by yourself. You can also set up Sleeper Time and Auto Sleep Time.
• Caption: You can select between the following three options:
Analog Closed Caption: CC1, CC2, CC3, CC4, TEXT1, TEXT2, TEXT3, TEXT4,
Digital Closed Caption: Service1, Service2, Service3, Service4, Service5, Service6.
Digital Caption Style: There are two Caption Styles. One is the automatic function set as the broadcaster, while the other is the custom style where you can adjust the font size, color, background color etc., accordingly.
- Reset Default - Every TV has its original setting before leaving the factory. So this function helps you restore these settings.
Parental Control
- Press MENU to open On Screen Display (OSD) option
- Press ▲ or ▼ to highlight Parental, then press ▶ to enter the Parental menu.

When you first use this function, the default password is [0000]. Once you input this password, you can:
-
Press ▲ or ▼ to highlight an option, then press ◀ or ▶ to adjust the option. You can adjust:
-
Channel Block - This function will let you block any channel you want.
• Program Block - A. Rating Enable is on
B. U.S. TV Ratings: You can choose TV ratings according to the illustration on the screen.
C. The settings for U.S. Movie Ratings, Canada (English) Ratings and Canada (French) Ratings follow Step B.
If you want to block the unrated program, please turn on this function.
Following is the description of these ratings.
About TV PG Rating:
The TV ratings are divided into two groups: age-based and content-based.
| Age | Defined as |
| TV-Y | All children |
| TV-Y7 | Directed to older children |
| TV-G | General audience |
| TV-PG | Parental Guidance suggested |
| TV-14 | Parents Strongly cautioned |
| TV-MA | Mature Audience only |
| Contents | Defined as |
| FV | Fantasy Violence |
| D | Suggestive dialogue |
| L | Strong language |
| S | Sexual situations |
| V | Violence |
About MPAA Rating:
The Motion Picture Association of America(MPAA) uses a rating system to qualify motion picture content. Television broadcasters employ a rating system to qualify the content of television programs as well. The MPAA and TV ratings work with the V-CHIP feature and allow you to block out programming above the rating limits you determine.
| Rating | Defined as |
| G | General audience |
| PG | Parental Guidance suggested |
| PG-13 | Parents strongly cautioned |
| R | Restricted |
| NC-17 | No one 17 and under admitted |
| X | Adult audience only |
About Canada (French)
| Rating | Description |
| G | General |
| 8 ans+ | 8+General; Not recommended for young children |
| 13 ans+ | Programming may not be suitable for children under the age of 13 |
| 16 ans+ | Programming is not be suitable for children under the age of 16 |
| 18 ans+ | Programming restricted to adults |
About Canada (English)
| Rating | Description |
| C | Children |
| C8+ | Children eight years and older |
| G | General Programming, suitable for all audiences |
| PG | Parents Guidance |
| 14+ | Viewers 14 years and older |
| 18+ | Adult programming |
NOTE: As you block rating, all rating higher than the ones you select are blocked as well. For example, if you choose to block the MPAA rating R, the higher ratings, NC-17 and X, are automatically blocked too.
Basic operation
- Input Block - You can block the input source with this function. For example, if you want to block AV input, just highlight [AV] and press [ENTER]. The AV input will not be seen in the screen.
- Change Password - The first time you use this function, use the default password. If you want to change it, first enter the new password then enter the same password again.
- Clean All - This function will let you clean all the channels stored on this TV. Note: If you choose this function, all the programs you preset will be lost.
Appendix
Cleaning and Care
WARNING: Do not try to remove the cabinet from the back. Refer servicing to qualified service technicians.
To clean the TV screen:
- Unplug the TV to avoid possible shock hazard.
- Use a clean cellulose sponge or chamois cloth dampened with a solution of mild detergent and warm water to clean the TV screen and trim. Do not use too much water as water spilled into the cabinet can cause damage to the TV.
- Wipe off any excess moisture with a clean dry cloth.
- Polish the cabinet with a quality furniture polish to maintain the finish and appearance of the cabinet.
Caution: Never use strong solvents such as thinner, benzene, or other chemicals on or near the cabinet. These chemicals can damage the finish of the cabinet.
Troubleshooting
Before calling a service technician, please check the following table for a possible cause of the problem and some solutions.
Customer important notice: If the TV functions cannot be operated, unplug the AC cord from AC power source, wait at least 1 minute, then re-plug AC cord. This will reset the TV settings and should restore TV to normal operation.
| Symptoms | Possible Solutions |
| TV will not turn on | Make sure the power cord is plugged in, then pressPower.The remote control batteries may be dead. Replace the batteries.Unplug the VGA wire and plug the power wire again.Plug another electrical device into AC outlet to confirm the outlet is working properly. |
| No picture, no sound | Check if you have set the timer off.Check the antenna/cable connections.Press [Display] to see if you have selected the right signal source. |
| No sound, picture OK | The sound may be muted. Press [VOL+] on the remote control.The station may have broadcast difficulties. Try another channel.Check the speakers cable connections.Make sure headphones are not connected. |
| Poor sound, picture OK | The station may have broadcast difficulties. Try another channelCheck the speakers cable connections. |
| Poor picture, sound OK | Check the antenna connections.The station may have broadcast difficulties. Try another channel.Adjust the picture from the menu. |
| Unable to select a certain channel | The channel may be skipped. Choose this channel by directly selecting the buttons from the remote control. |
| Poor color or no color | The station may have broadcast difficulties. Try another channel.Adjust Saturation in the Video settings menu. |
| The remote control does not operate | There may be an obstruction between the remote control and the remote control sensor.The batteries may be installed with a wrong polarity.The remote control batteries may be dead. Replace the batteries. |
| Disorder display at power on | This may be caused because of a very short interval between POWER OFF and ON.Unplug the power and restart. |
| Remote control programming | Cable and Satellite content providers control the remote codes, and we apologize for any confusion during the remote programming. Please try the following codes 10019, 0178, 10178, 0030, 10030, 0835, 10835, or for Dish Network try 627, 659 or 505. For Fios TV (Verizon), try the code 3264. These codes may not work on some universal remotes. If there is another code listed for Element Electronics in your universal remote control guide, please try that code. Refer to the Remote Control Guide under your TV's model number for more information. |
Wall-mounting Bracket Installation
| Unit Dimension(unit: mm) | Screw Diameter |
| 100x100 | M4 |
Remark: The specification of screw is just used on the back cabinet.
NOTE: Wall mount bracket is not included with TV and mounting of wall mount bracket to wall may vary depending on brand and size of bracket. Customer should consult bracket mounting instructions that came with wall mount for specific information on how to mount bracket to wall.
Removing TV Stand
- Cover the surface of the table with soft cloth to avoid damage to LCD panel.
- Lay the TV on a plane table which could bear a weight enough.
- Remove the 4 bolts fixing the stand and remove the stand from TV.

Before reading the installing instruction, please notice:
A. The wall mount is not contained in the accessories sold with television. We only provide the installing specifications but not the wall mount itself. If you need the mount, please consult with the local dealer for the assorted fitting parts.
B. We strongly suggest to set the wall mount with equipment of specification we ordered. If not, inappropriate installation may cause damage to both the device and yourself.
Specifications
| Model | F24V86C |
| Diagonal display size | 23.6 Inches |
| Television system | American TV standard ATSC /NTSC system |
| Audio multiplex | BTSC system |
| Channel coverage | VHF: 2~13 UHF: 14~69 CATV:1~125Digital Terrestrial Broadcast (8VSB): 2~69Digital cable (64/256 QAM): 1~135 |
| PC mode | 640×480/60Hz,800×600/60Hz,1024×768/60Hz |
| YPbPr/YCbCr mode | 480I/60Hz,480P/60Hz,720P/60Hz,1080I/60Hz |
| HDMI mode | 480I/60Hz,480P/60Hz,720P/60Hz,1080I/60Hz,1080P/60Hz |
| Resolution | 1920X1080 |
| Power source | AC 120 V , 60 Hz |
| Power consumption | 51W |
| Audio power | 2W+2W |
| Connection Interface | RF input | Cable/ Antenna ×1 |
| Video input | VideoX1ComponentX1HDMIX1 |
| Graphic input | Analog RGB 15pin ×1 |
| Audio input | AV Audio X 1Component Audio X 1VGA Audio Input X 1 |
| Audio output | Headphone audio out x 1 |
| Dimensions | Length: 23.3 inchesWidth: 6.6 inchesHeight: 16.5inches |
| Weight | 12.3 lbs |
| Environmental conditions | Temperature 5°C~35°C (41F~95F) Humidity:20%-80%RH, Atmospheric pressure:86kPa-106kPa |
| Supplied accessories | Remote control, Batteries, User Manual, Warranty Card |
Design and specifications are subject to change without notice.
CUSTOMER NOTICE: Use carefully when operating to prevent damage to the screen.

This product contains electrical or electronic materials. The presence of these materials may, if not disposed of properly, have potential adverse effects on the environment and human health. Presence of this label on the product means it should not be disposed of as unsorted waste and must be collected separately. As a consumer, you are responsible for ensuring that this product is disposed of properly.

Manufactured under license from Dolby Laboratories.
"Dolby" and the double-D symbol are trademarks of Dolby Laboratories.
Confidential unpublished works. © 1992 -1997 Dolby Laboratories, Inc. All rights reserved.

This TV incorporates High-Definition Multimedia Interface (HDMI ^™ ) technology. HDMI, the HDMI logo and High-Definition Multimedia Interface are trademarks or registered trademarks of HDMI Licensing LLC.


