
DFT-714M - Portable DVD Player DENVER - Free user manual and instructions
Find the device manual for free DFT-714M DENVER in PDF.


| Product Type | Portable DVD Player |
| Model | DFT-714M |
| Brand | Denver |
| Display Size | 7 inches (17.8 cm) |
| Display Resolution | 480 x 234 pixels (16:9 aspect ratio) |
| Disc Formats Supported | DVD, DVD±R/RW, CD, CD-R/RW, MP3, JPEG |
| Power Supply | Built-in rechargeable battery (Lithium-ion, 1800 mAh) and AC adapter (100-240V, 50/60Hz) |
| Battery Life | Up to 3 hours of playback |
| Dimensions | Approx. 20 x 16 x 4 cm (7.9 x 6.3 x 1.6 inches) |
| Weight | Approx. 0.8 kg (1.76 lbs) |
| Audio Output | Headphone jack (3.5mm), built-in stereo speakers |
| Video Output | AV out (composite) via included cable |
| Region Code | Region 2 (may be adjustable, refer to manual) |
| Card Slot | SD/MMC card slot for photo viewing |
| USB Port | USB 2.0 for playback of media files |
| Included Accessories | Remote control, AC adapter, car adapter, AV cable, user manual |
| Swivel Screen | 180° or 270° rotation for flexible viewing |
| Parental Control | Yes, with password protection |
| Languages | Multiple OSD languages (English, French, Spanish, etc.) |
| Cleaning | Wipe with a soft dry cloth; do not use solvents |
| Safety | Do not expose to moisture, heat, or direct sunlight; use only supplied charger |
| Spare Parts & Repairability | Battery and remote available; service by qualified technician recommended |
Frequently Asked Questions - DFT-714M DENVER
User questions about DFT-714M DENVER
0 question about this device. Answer the ones you know or ask your own.
Ask a new question about this device
Download the instructions for your Portable DVD Player in PDF format for free! Find your manual DFT-714M - DENVER and take your electronic device back in hand. On this page are published all the documents necessary for the use of your device. DFT-714M by DENVER.
USER MANUAL DFT-714M DENVER
natural_image
Simple line drawing of a rectangular device with a circular button on the top right corner (no text or symbols)USER'S MANUAL DFT-714M
PORTABLE DVB-T PLAYER
CE

www.facebook.com/denverelectronics Before connecting, operating or adjusting this product, please read this user's manual carefully and completely.
Important Safety Instructions
- Warning: There are no user-serviceable parts inside. Refer servicing to qualified personnel.
- Warning: To prevent fire or electric shock hazard, do not expose the unit to rain or moisture.
- Do not expose the Adaptor and portable DVB-T to water (dripping or splashing) and no objects filled with liquids, such as vases, should be placed on the unit.
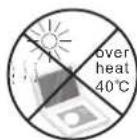
- Keep the portable DVB-T away from direct sunlight and heat source such as radiators or stoves.
- Do not block the ventilation openings. Slots and openings on the unit are provided for ventilation. The openings should never be blocked by placing your portable DVB-T on a cushion, sofa or other similar surface.
- Do not place the portable DVB-T on unstable cart, stand, tripod, bracket or table. The unit may fall, resulting in possible damage or injury.
- Never place heavy or sharp objects on the LCD panel or frame.
- Only use the AC adapter included with portable DVB-T. Using any other adapter will void your warranty.
- The plug of AC adaptor is used as the disconnect device, the disconnect device shall remain readily operable.
- Unplug the power from the outlet when the unit is not in use.
-
Attention should be drawn to the environmental aspects of battery disposal.
-
CAUTION: Danger of explosion if battery is incorrectly replaced. Replace only with the same or equivalent type.
- WARNING: The battery (battery or batteries or battery pack) shall not be exposed to excessive heat such as sunshine, fire or the like.
- WARNING: Excessive sound pressure from earphones or headphones can cause hearing loss.
- WARNING: Only use attachments/accessories specified provided by the manufacturer, the portable DVB-T is supplied by AC adapter, the AC adapter is used as disconnect device, the disconnect device shall remain readily operable.
- Caution: Danger of explosion if battery is incorrectly replaced, replaced only with the same or equivalent type (Lithium battery)
This marking indicates that this product should not be disposed with other household wastes throughout the EU. To prevent possible harm to the environment or human health from uncontrolled waste disposal, recycle it responsibly to promote the sustainable reuse of material resources. To return your used device, please use the return and collection systems or contact the retailer where the product was purchased. They can take this product for environmental safe recycling.

Safety Precautions
WARNING
RISK OF ELECTRIC SHOCK DO NOT OPEN
-
Warning: Never stare directly into the laser beam.
-
Caution: Do not install this product in a confined space such as a book case or similar unit.
-
Warning: when the unit using by child, parents must make sure to let the child understand all contents in Instruction book how battery using to guarantee using battery correctly all the time.
-
Warning: when find battery overheat, swell or dour, please stop using battery and contact service centre for getting replacement.
-
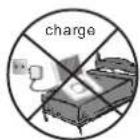
Warning: do not charging battery on the place of insufficient ventilation such as: mattress, sofa, cushion, soft mat.....
-
Warning: we will not take any responsibility if user incorrectly use battery, not following our warning instruction label on the battery case.
-
Warning: more than 250mm USB extension cord is prohibited to use for USB port
Notes on Copyrights:
It is forbidden by law to copy, broadcast, show,broadcast via cable, play in public, or rent copyrighted material without permission.
This product features the copy protection function developed by Macrovision.Copy protection signals are recorded on some discs. When recording and playing the pictures of these discs picture noise will appear.This product incorporates copyright protection technology that is protected by method claims of certain U.S. Patents and other intellectual property rights owned by Macrovision Corporation and other rights owners.Use of this copyright protection technology must be authorized by Macrovision Corporation, and is intended for home and other limited viewing uses only unless otherwise authorized by macrovision Corporation. Reverse engineering or disassembly is prohibited.
SERIAL NUMBER:
You can find the serial number on the back of the unit. This number is unique to this unit and not available to others. You should record requested information here and retain this guide as a permanent record of your purchase.
Model No.
Serial No.
Date of Purchase


Safety Precautions Safety Precautions
Always read the safety instructions carefully
- Keep this User \$ Manual for future reference
- Keep this equipment away from humidity
- Lay this equipment on a reliable flat surface before setting it up.
Do not stand it on soft furnishings.
- If any of the following situation arises, get the equipment checked by a service technician:
1. The equipment has been exposed to moisture.
2. The equipment has been dropped and damaged.
3. The equipment has obvious sign of breakage.
4. The equipment has not been working well or you cannot get it work according to User's Manual.
Warning
To prevent the risk of electric shock, do not open the cover or the back of the receiver.
Do not block the ventilation holes of the device. Leave appropriate gap above and around it to allow for adequate ventilation.
Do not place the device in an unventilated cabinet or on top of a unit which emits heat.
Copyright Statement
No part of this publication may be reproduced in any form by any means without the prior written permission. Other trademarks or brand names mentioned here in are trademarks or registered trademarks of their respective companies.
Before Use(Continued)
Disclaimer
Information in this document is subject to change without notice. The manufacturer does not make any representations or warranties (implied or otherwise) regarding the accuracy and completeness of this document and shall in no event be liable for any loss of profit or any commercial damage, including but not limited to special, incidental, consequential, or other damage.
Introduction
This DVB-T player is a Free-To-Air digital terrestrial receiver, allowing you to access free-to-air digital terrestrial TV channels and radio broadcasts. Its digital reception covers VHF & UHF band.
Features
1.Mpeg-2&Mpeg-4 DVB T receive
2.PVR function (record TV programs to USB)
3. Teletext function
4. Multiple-language OSD
5.Supports subtitle
6.Bandwidth of 7/8MHz supported
7. Automatic/manual channel search
Identification of Controls Main Unit
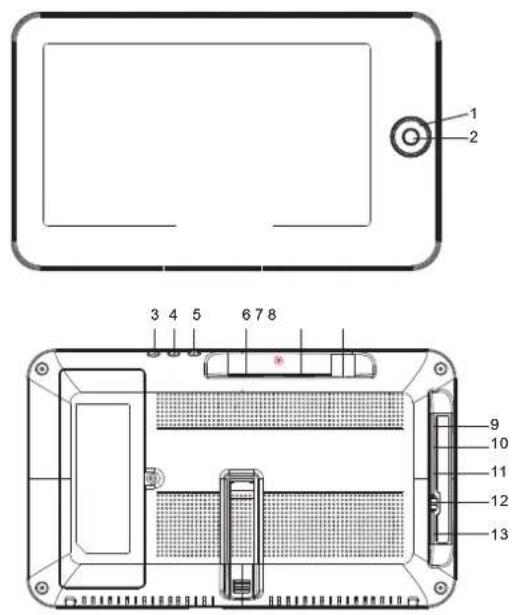
- ◀/ ▶/ ▲/ ▼ Left/Right/Up/Down
2.OK
Used to confirm a selection within a menu.
-
MEDIA
-
MENU
Used to open the main menu window.
- EXIT
used to return to the previous screen or menu.
- HDMI
7.USB
USB jocks
8.ANT
Extra antenna connector
-
COAXIAL
-
AV OUT
-
Headphone out jacks
-
OFF/ON
-
DC IN 9-12V
Identification of Controls
Remote control unit
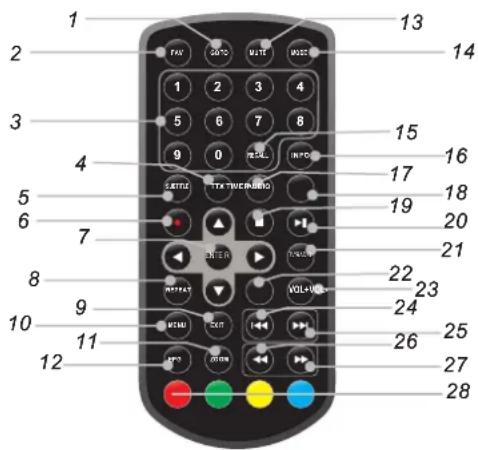
- GOTO
Selects the play time of media. - FAV
Turns on Favourite Menu. - 0-9 (Numeric Buttons)
Selects a channel or setting. - TTX
Displays Teletext Information.
5.SUBTITLE
Press SUBTITLE repeatedly during playback to hear a different subtitle languages. - Record
Record Video Image. - ENTER
Confirms menu selection.
8.REPEAT
Press REPEAT during playback to select a desired repeat mode. - EXIT
Exits the current Menu or returns to the previous Menu.
10.MENU
turns on setup menu.
11 Zoom
Enlarges Video image. - EPG
(Electronic Program Guide)Turns the program guide on. - MUTE
Disable Audio output.
14.MODE
Set LCD parameter(adjust bightness, contrast, and saturation).
15. RECALL
Used to switch between the last two viewed channels.
16. INFO
Displays additional channel information.
17. AUDIO
DVB:Press AUDIO repeatedly during playback to hear a different audio language or audio track, if available.
18.TIMER
Turns on Timer menu.
19.STOP
When this button is pressed once, the unit records the stopped point, from where playback will resume if ENTER is pressed after wards. But if STOP button is pressed again instead of ENTER button, there will be no resume function.
20.PLAY/PAUSE
Press PLAY/PAUSE once to pause playback, pressing PLAY/PAUSE second time will resume the playback.
21. TV/RADIO
Switches from TV function to Radio function and from Radio to TV.
22.VOL -
Adjust VOLUME.
23. VOL +
Adjust VOLUME.
24. Reverse Skip
DVB: Red key in Teletext.
25. Forward Skip
DVB: Green key in Teletext.
26. ◀ BUTTON
Press ◀ BUTTON allow skipping back at 5-level speed (X2->X4->X8->X20), press ENTER button return to normal playback.
27. ➤ ➤ BUTTON
Press ▶▶BUTTON allow skipping ahead at 5-level speed (X2->X4->X8->X20), press ENTER button return to normal playback.
28.COLOUR BUTTONS
Used to switch between the last two viewed channels. Switch the product to on or standby. Operate different function in TEXT screen.
First Time Installation
After all connections have been made properly, switch on TV and make sure the receiver is connected to the Main Power. Press Power Button to switch receiver on. If you are using the receiver for the first time or restored to Factory Default, the Main Menu will appear on your TV screen.
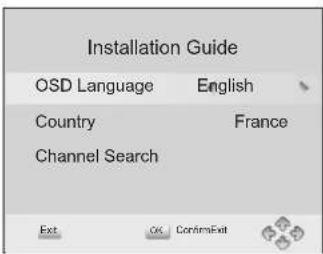
(1) Select [OSD Language] and press RIGHT/LEFT key to select an language
(2) Select [Country] and press RIGHT/LEFT key to select your country of residence
(3) Select [Channel Search] and press RIGHT or OK key to begin
Automatic
channel search
(4) Once channel tuning is complete, you are now ready to watch TV
Basic Operation
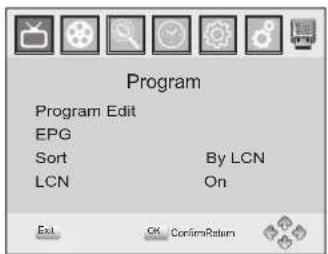
(1) Program Manage Settings
To access the Menu, press the MENU button and select [Program]. The Menu provides options to adjust the Program Manage Settings. Select an option and press OK or RIGHT to adjust that setting. Press the EXIT button to exit the Menu.
(2) Program Edit
To edit your program preferences (lock, skip, favourite, move or delete), you will need to enter the Program Edit Menu. This Menu requires a password to access. Enter the default password '000000'.
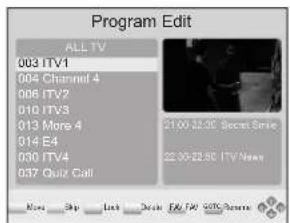
Set Favourite Program/s
You can create a shortlist of favourite programs that you can easily access. Set Favourite TV or Radio program:
-
Select the preferred program then press the FAVOURITE button. A heart-shaped symbol will appear and the program is marked as a favourite
-
Repeat the previous step to select more Favourite programs
-
To confirm and exit the Menu, press the EXIT key
Disable Favourite TV or Radio Program:
Press the FAV button on the Remote Control with the heart-shaped symbol
View Favourite Programs:
- Press the Fav button and the Favourite Menu will appear
- Press UP/DOWN to select your Favourite Programs
- Press OK to select your favourite program
Delete a TV or Radio Program/s
- Select the Program and then press the BLUE button. A message will appear. Press OK to delete the prog
- Repeat the previous step to select more programs to delete
Skip TV or Radio Program/s
- Select the program you would like to skip and press the GREEN button. A skip symbol is displayed. The program is marked as a skip
- Repeat the previous step to select more programs
- To confirm and exit the menu, press EXIT key
Disable a skip TV or Radio Program:
Press the GREEN button on the skip program with the skip symbol
Move a TV or Radio Program/s
- Select the preferred program then press the RED button. A move symbol will appear
- Press UP/DOWN to move the program
- Press OK to confirm
- Repeat the above steps to move more channels
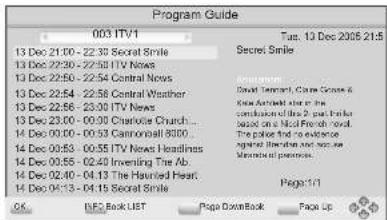
You can use the UP/DOWN key to select the preferred program. If there is more than one page of information, use the BLUE button for page up and the YELLOW button for page down.
(4) Sort
Sort your channels from the following options:
[LCN] - Sort the channels in ascending order
[Name] - Sort the channels in alphabetical order
[Service ID] - Sort the channels according to the station
(5) LCN (Logical channel number)
Set LCN on or off.
(6) Video Setting
To access the Menu, press MENU then select [Picture]. The Menu provides options to adjust the video settings. Press UP/DOWN to select an option and press RIGHT/LEFT to adjust that setting.
Press EXIT to exit the menu.
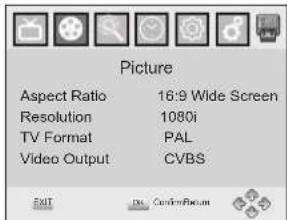
(1). Aspect Ratio
You must set the display format to either 4:3 PanScan, 4:3 Letter Box,
16:9 Full Screen or Auto to get the maximum display when watching TV.
(2). Resolution
If the video does not appear correctly, change the setting. This setting is to match the most common setting for HDMI.
[480i]: for NTSC system TV.
[480P]: for NTSC system TV.
[576i] for PAL system TV.
[576P]: for PAL system TV
[720P]: for NTSC or PAL system TV.
[1080I]: for NTSC or PAL system TV.
(3). TV format
If the video does not appear correctly, you need to change the settings.
This should match the most common setting for TVs in your country.
[NTSC]: for NTSC system TV. [RAL]: for RAL system TV.
(7) Channel Search
To access the menu, press MENU and select [Search Channel]. The Menuprovides options to adjust the Search Channel settings. Select an option and press RIGHT/LEFT to adjust the settings. Press EXIT to exit the Menu.
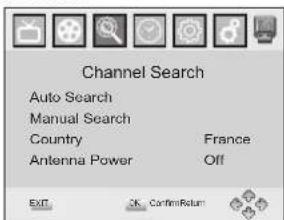
1. Auto Search
Search and install all channels automatically. This option overwrites all preset channels.
-
Select [Auto Search] and press OK or RIGHT to start channel search.
-
To cancel channel search, press EXIT.
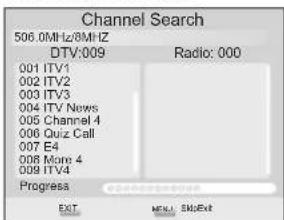
2. Manual Search
Install new channels manually. This option adds new channels without changing the current channels list.
- Select [Manual Search] then press OK or RIGHT. The channel search screen will appear
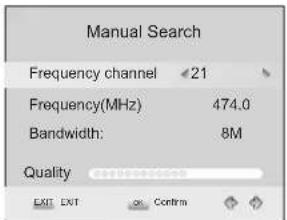
- Press the RIGHT/LEFT key to select the channel frequency
- Press OK to start searching channels
If a channel is found, it is saved and added to the channels list. If channels can't be found, then exit the menu.
(3) Country
Select your country of residence.
(4) Antenna power
Enable Antenna Power if an external active antenna is connected.
(8) Time Setting
To access the Menu, press MENU then select [Time]. The Menu provides options to adjust the time settings.
Press UP/DOWN to select an option and press RIGHT/LEFT to adjust thesettings. Press EXIT to exit the menu.
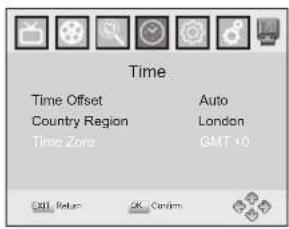
(1) Time offset
Select auto or manual for GMT offset adjustments.
(2) Country Region
Select the Country Region when [Time Offset] is set to Auto.
(3) Time Zone
Select the Time Zone Offset when [Time Offset] is set to Manual.
(9) Option
To access the Menu, press MENU and select [Option]. The menu provides options to adjust the OSD Language, Subtitle Language and Audio Language.
Select an option and press RIGHT/LEFT to adjust the setting. Press EXIT to exit The Menu.
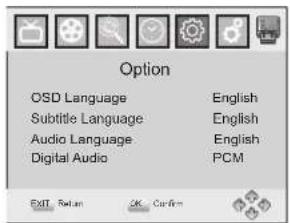
(1). OSD Language
Select an OSD language
(2). Audio Language
Select the preferred audio language for watching TV channels. If the language is not available, the default program language will be used.
(3). Subtitle Language
Select the preferred subtitle language.
(10) System Setting
To access the Menu, press MENU and select [System]. The menu Provides options to adjust the system settings.
Press the UP/DOWN key to select an option and press RIGHT/LEFT to adjust the setting.
Press EXIT to exit the Menu.
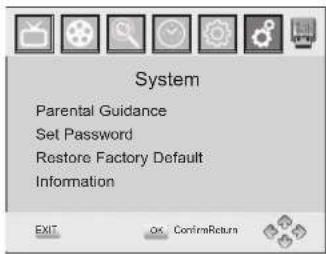
(1) Parental Guidance
You can restrict access to channels that are unsuitable for children. To restrict/lock the channel you will need to enter either the default password '000000' or your own password.
(2) Set Password
Set or change the password for Locked programs. Enter your old Password or the default password '000000'. You will then be asked to enter your new password. To confirm re-enter your new password. Once it is confirmed, press EXIT to exit the Menu.
Reset your Set Top Box to the Default Factory Settings. In Main Menu select [Restore Factory Default] and press OK or RIGHT to select. Enter your password or the default password '000000' and press OK to confirm. This option will delete all preset channels and settings.
(4) Information
View model, hardware and software information.
(5) Software update
If the status is set "ON", it will begin searching for new software from broadcast according to your preferred time in "Start Time".
(11)USB
To access the Menu, press the Menu button and select USB.
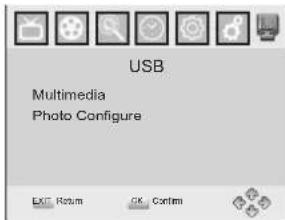
Multi-Media
Switch to USB mode and plug in USB to view files.
SLAVE TFT MENU SETTING
PICTURE Page
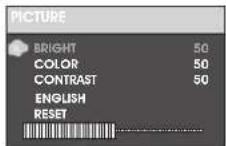
Brightness
Adjust screen Bright Setting (level 0-100).
Contrast
Adjust screen Contrast Setting (level 0-100).
Color
Adjust screen Color Setting (level 0-100).
ENGLISH
Adjust Menu OSD Language.
Reset
Reset to default level. Press the top right button to go to default setting.
OPTION Page
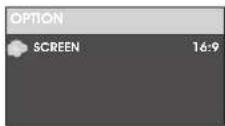
SCREEN
Adjust screen ZOOM 16:9 or 4:3
Press Mode button twice for Screen Option.
Press top right button for 4:3 ratio.
Press top left button for 16:9 ratio.
TROUBLESHOOTING
| Problem | Potential Reasons | What to do |
| No picture | Power isn't connected | Connect the power |
| The power switch is not on | Switch on the power | |
| Screen shows “No Signal” | DVB-T cable not connected | Plug in the DVB-T cable |
| Incorrect setting | Reset setting | |
| No sound from speaker | No or incorrect connection with audio cable | Connect the audio cable correctly |
| Sound on mute | Turn off mute function | |
| Incorrect sound track | Try another sound track | |
| Only sound, no image on the screen | No or incorrect connection with AV cable | Make sure cables are connected correctly |
| The program is a radio program | Presskey to shift into TV mode | |
| Remote Control is not responding | The battery is exhausted | Change battery |
| Remote Control is not facing or close enough to the Set Top Box | Adjust the position of the Remote Control and move closer to the unit | |
| The image stopped suddenly or mosaic | The signal is too weak | Strengthen the signal |
Identification of Controls
Technical Specifications
| Item | Sub Item | Parameter |
| Tuner | Input Frequency | 170~230MHz470~860MHz |
| RF Input level | -25~-82dBm | |
| IF Bandwidth | 7MHz and 8MHz | |
| Modulation | QPSK,16QAM,64QAM | |
| Video | Decoder Format | MPEG4 AVC/H.264 HP@L4MPEG2 MP@ML.HL |
| Output Format | PAL/NTSC | |
| Output Port | CVBS | |
| Audio | Decoder Format | MPEG-1 (layer1&2)&3 |
| Audio output | Stereo | |
| Power | Voltage | DC 9V (1.0A) |
| Working Power | ≤10W |
Please fill the blank with the model number of this player for future reference
Model no.:
ALL RIGHTS RESERVED, COPYRIGHT DENVER ELECTRONICS A/S
DENVER®
www.denver-electronics.com


Electric and electronic equipment and included batteries contains materials, components and substances that can be hazardous to your health and the environment, if the waste material (discarded electric and electronic equipment and batteries) is not handled correctly.
Electric and electronic equipment and batteries is marked with the crossed out trash can symbol, seen below. This symbol signifies that electric and electronic equipment and batteries should not be disposed of with other household waste, but should be disposed of separately.
As the end user it is important that you submit your used batteries to the appropriate and designated facility. In this manner you make sure that the batteries are recycled in accordance with legislature and will not harm the environment.
All cities have established collection points, where electric and electronic equipment and batteries can either be submitted free of charge at recycling stations and other collection sites, or be collected from the households.
Additional information is available at the technical department of your city.
Please fill the blank with the model number of this player for future reference
Imported by:
Inter Sales A/S
Stavneagervej 22,8250 Egaa,Denmark
www.facebook.com/denverelectronics
- Important Safety Instructions
- Safety Precautions
- WARNING
- Notes on Copyrights:
- SERIAL NUMBER:
- Safety Precautions Safety Precautions
- Copyright Statement
- Before Use(Continued)
- Disclaimer
- Introduction
- Features
- Identification of Controls Main Unit
- 14.MODE
- RECALL
- INFO
- AUDIO
- 18.TIMER
- 19.STOP
- 20.PLAY/PAUSE
- TV/RADIO
- 22.VOL -
- VOL +
- Reverse Skip
- Forward Skip
- ◀ BUTTON
- ➤ ➤ BUTTON
- 28.COLOUR BUTTONS
- First Time Installation
- Basic Operation
- Program Manage Settings
- Program Edit
- Set Favourite Program/s
- Disable Favourite TV or Radio Program:
- View Favourite Programs:
- Delete a TV or Radio Program/s
- Skip TV or Radio Program/s
- Disable a skip TV or Radio Program:
- Move a TV or Radio Program/s
- Sort
- LCN (Logical channel number)
- Video Setting
- Channel Search
- Auto Search
- Manual Search
- Time Setting
- SLAVE TFT MENU SETTING
- PICTURE Page
- Brightness
- ENGLISH
- OPTION Page
- SCREEN
- Identification of Controls
- Technical Specifications
- DENVER®
Brand : DENVER
Model : DFT-714M
Category : Portable DVD Player