KADVCAAA30A - Camcorder Kogan - Free user manual and instructions
Find the device manual for free KADVCAAA30A Kogan in PDF.


| Product Type | Camcorder |
| Brand | Kogan |
| Model | KADVCAAA30A |
| Recording Resolution | Full HD 1080p (1920x1080) |
| Sensor Type | CMOS |
| Optical Zoom | 10x |
| Digital Zoom | 120x |
| Display | 3.0-inch LCD |
| Storage Media | SD/SDHC card (up to 32GB) |
| Battery Type | Rechargeable lithium-ion (NP-120 compatible) |
| Dimensions (W x H x D) | 12.5 x 7.0 x 5.5 cm |
| Weight | 250 g (with battery) |
| Power Source | AC adapter (5V 1A) or battery |
| Connectivity | USB 2.0, HDMI mini |
| Image Stabilization | Electronic |
| Night Mode | Yes (infrared LED) |
| Special Features | Face detection, time-lapse, slow motion |
| Care & Maintenance | Clean lens with soft cloth; store in dry environment; remove battery when not in use |
| Safety | Use only specified charger and battery; keep away from water and heat |
| Spare Parts | Battery, charger, USB cable, remote control (not included) |
| Repairability | Service through Kogan authorized centers; user-replaceable battery and SD card |
| General Information | Includes user manual, warranty card, and software CD |
Frequently Asked Questions - KADVCAAA30A Kogan
User questions about KADVCAAA30A Kogan
0 question about this device. Answer the ones you know or ask your own.
Ask a new question about this device
Download the instructions for your Camcorder in PDF format for free! Find your manual KADVCAAA30A - Kogan and take your electronic device back in hand. On this page are published all the documents necessary for the use of your device. KADVCAAA30A by Kogan.
USER MANUAL KADVCAAA30A Kogan
natural_image
Silver hard disk digital camera with a black strap and colorful app icons on the cover (no visible text or symbols on body)Table of Contents
Safety information 3
Components of the video camera 3
Preparations before taking pictures 4
Installing the batteries 4
Inserting the memory card 4
Formating the memory card 4
Setting the anguage 4
LCD screen 5
Video recording mode 5
Picture taking mode 5
Audio recording mode 5
Playback mode 5
Basc operations 6
Turning video camera on and off 6
Mode change 6
Video recording 6
How to use the self-timer and continuous shooting functions .... 6
Taking pictures 7
Audio recording....7
Setting the video camera 7
Menu for picture shooting mode 7
Menu fo' picture shooting 7
Menu for video recording mode 8
Setting menu 9
Playback....10
Video playback....10
Picture playback....10
Audio payback....10
Th umb na Mode....10
Deeting Fies 0
Menu under payback mode 10
Connections 12
Connecting the video camera to TV 12
Downloading the images to the computer 12
Using the card reader ....2
Connecting the video camera to the computer through USB line .....12
Software installations (PC Only) 13
Software installation....13
Installing PC camera function 13
How to use PC camera drive 13
Technica parameters 14
Thank you for purchasing this Kogan digital video camera.
Before using please read this Manual carefully and keep: handy for future reference
Safety information
Before operating the video camera, please make sure that you have perused and understand the following safety measures.
- Please do not try to open the outer casing of the camera or change the camera in any way. Only authorized Kogan technicians may repair this video camera.
- When operating, please keep the camera away from water or other liquids do not use the camera with wet hands. Never use this unit in rain or snow Wetness may lead to electric shock.
- Only use the recommended power auxiliaries. The use of non-recommended power sources may lead to overheating equipment deformation, fire and electric shock etc.
Components of the video camera
: Display key
2: LED key
3: Mode key
4 Power key
5 Menu key
6: Up key
7: Work ind cating light
8: SD card slot
9 Shutter key
10 USB interface
AV Interface
12: Right/self-timer key
13 OK key
14 Down key
15 Left key
16: Loudspeaker
17: LCD screen
18: Wrist belt
19: Tripod
20: Battery cover
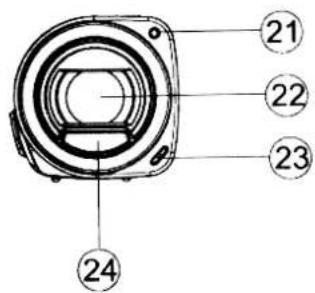
21: Self-t mer indicating light
22 Lens
23: Microphone
24: Compensation light


Preparations before taking pictures
Installing the batteries
-
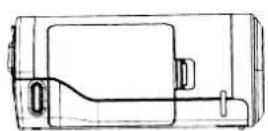
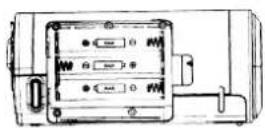
Open the battery cover.
-
Install three No.7 alkaline batteries in the battery cabin; pay attention to the positive and negative ends of the batteries.
-
After installing the batteries, close the battery cover
Inserting the memory card
There is no built-in memory in this camera and no pictures and image files can be saved. If you want to shoot the files for storing, please use SD or MMC card.
Before inserting or taking out the card please turn the camera off first.
Before inserting the card, please ensure the memory card direction is correct. If you feel there is resistance, please do not forcibly insert the card. The memory card is provided with a write protection switch to avoid accidental deletion of the data. Therefore if you want to save or delete files, please place the write protection in off status.
-
Pace the camera n off status.
-
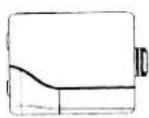
At the end of the camera, there is a rubber cover for SD card; open this cover you will see the SD card slot.
-
Insert the memory card as shown in the sketch.
-
Close the SD rubber cover

natural_image
Line drawing of a mechanical device with a clamped handle and housing (no text or symbols)• To take out the memory card, slightly press the edge of the memory card, then release, the card will be ejected out.
Formatting the memory card
When operating this camera for the first time, remember to format the memory card. By doing so, all the data already saved on the card will be deleted. Prior to formatting, please backup any important files.
-
Turn on the video camera, set the camera to setting menu.
-
Press [up] or [down] key to choose [format], then enter the sub-menu for this function.
-
Press [up] or [down] key to choose [yes] then press [OK] key to format.
Setting the language
Before the first use of this video camera, you must select a language.
-
Turn on the camera, set the camera to setting menu.
-
Press [up] or [down] key to choose [language], then enter the sub-menu for this function.
-
Press [up] or [down] key to choose the language you want, then press [OK] key to confirm.
-
Finally press [menu] key to escape the setting interface
LCD screen
Video recording mode

Picture taking mode
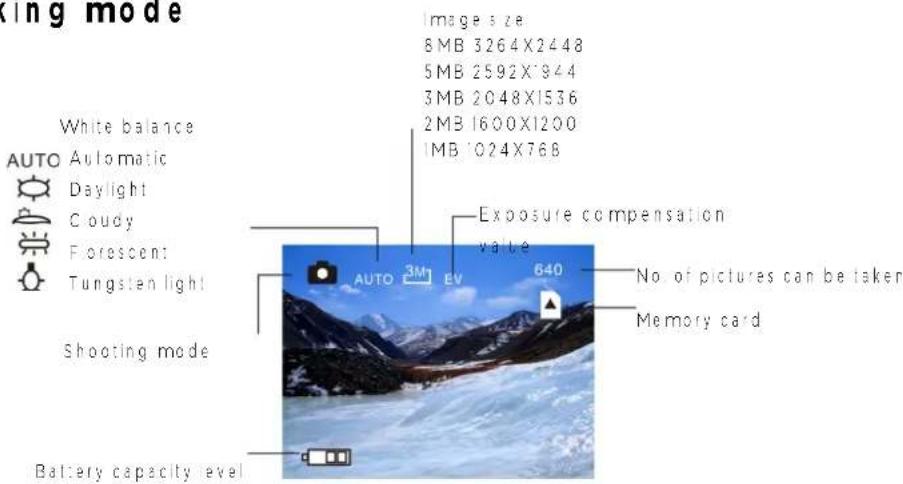
Audio recording mode

Playback mode

Basic operations
Turning video camera on and off
- Turn on the LCD screen, press [power] key to turn on the camera
- Turn off the screen, turn off the video camera or press [power] key to turn off the video camera.
To save the electricity, within due time after the last operation is done, the video camera powers off automatically.
Only by pressing [power] key, you can turn on the camera. You can also set the automatic power off time by using the [automatic power off] function.
Mode change
- Press [power] key to turn on the video camera
2 Press [mode] key to change the recording mode of this camera; each time you press the key, the mode of the video camera will change for once.
| can Mode Desription | ||
| Video recording mode Recording video file | ||
| Picture shooting mode Shooting the still picture | ||
| Audio recording mode Recording the audio file | ||
| Playback mode Preview the recorded files | ||
Video recording
- Turn on the camera, set the video camera to video recording mode
- Press [shutter] to start recording the video and [right] key to pause press [right] key again to resume the video recording
- Press [up] and [down] to zoom n and out.
- Press [shutter] key again to stop the recording. In the event of the memory card becoming full, the camera will automatically stop the recording.
How to use the self-timer and continuous shooting functions
Use self-timer to set the delayed time between the pressing of the shutter and shooting the picture.
- Turn on the video camera, set the camera to self-timer mode.
- Press [menu] key to show the picture shooting menu
- Press [up] or [down] key to select [shooting mode], then, press [right] or [OK] key to enter the sub-menu:
Turn off: norma shooting without time delay. Self-timer 2 seconds: the release of shutter is delayed by 2 seconds. Self-timer 10 seconds: the release of shutter is delayed by 10 seconds. Continuous shooting press the shutter once, three pictures will be taken continuously
- Press [up] or [down] key to select the shooting mode you want
5 Press [up] key to confirm the setting and press [menu] key to escape - Press [shutter] key to take picture
- You can directly press [right] key to change the shooting mode of the video camera. Each time you press [right] key, the shooting mode of the camera will change for once.
Taking pictures
- Turn on the video camera.
- Set the video camera to picture shooting mode (
- Take the image you need through the LCD screen, press [shutter] key to take picture.
-
Press [up] and [down] keys to zoom in and out
-
After each shooting, the number of shooting shown on the LCD screen will reduce by 1 automatically. For instance, if the number shown on the LCD screen is 18, then, after next shooting, the number shown will be 17. If the memory of the memory card is full, then "insufficient memory" will be shown on the LCD screen.
- Do not shut out the ens with finger or wrist belt when shooting.
• In case the light is insufficient, press [LED switch] key to turn on the LED light
Audio recording
- Turn on the camera, set the video camera to audio recording mode
- Press [shutter] to start recording the audio and [right] key to pause; press [right] key again to resume the audio recording.
- Press [shutter] key again to stop the recording. In case the memory of the memory card is full, the camera will automatically stop the recording
• There is no menu for audio recording.
Setting the video camera
When the menu is shown, use [up], [down], [left] and [right] keys to set. There is no menu for audio recording mode.
Menu for picture shooting mode
- Turn on the video camera and set the camera to picture shooting mode.
- Press [menu] key to show the picture shooting mode menu
- Press [up] or [down] key to select the item to be set.
- Press [right] or [OK] key to enter the sub-menu for the selected item
- Press [up] or [down] key to set and confirm by pressing [OK] key.
- Press [menu] key to escape.
Menu for picture shooting
| Menu item Av | available options and functions |
| Image size Set | the size of the image and there are 5options for selection:8M[3264X2448]/5M[2592X1944]/3M[2048×536]/2M[1600X1200]/1M[1024X768]; |
| Image quality | The low quality image reduces the memory space used, meaning that more pictures may be taken. There are three options for image quality:[excellent], [good] and [normal]. |
| Photometry mode | There are three photometry modes:[Central photometry]: taking the central part as the keystone to carry out photometry.[Mult-point photometry]: carry out the photometry for many points to make a comprehensive judgement.[Point photometry]: only carry out photometry for the central part then make the judgement |
| White balance | Adjust the white balance to adapt to various light sources. There are 5 options for white balance: [automatic],[daylight][cloudy],[florescent light],[tungsten light] |
| Exposure Manually set the exposure compensation value to make compensation under special light such as indoor light condition, back to the light or strong light condition. The exposure compensation on range is between -2.0 and 2.0 | |
| Shooting mode | There are 4 shooting modes for this video camera:[close]/[self-timer 2s]/[self-timer 10s]/[continuous shooting] |
| Special effect | Select a kind of special effect for the pictures.[Normal]/[black and white]/[rev val]/[negative]/[red]/[green]/[blue]. |
Menu for video recording mode
- Under the video recording mode, press [menu] key to show the video menu
- Press [up] or [down] key to select an option, press [right] or [OK] key to enter the sub-menu for such option.
- Press [up] or [down] key to set, press [OK] key to confirm the setting.
- Press [menu] key to escape
| Menu item Available options and functions | |
| Video format | Selecting lower resolutions will result in the recording time being longer due to memory restrictions. There are 4 options:['280X720]/[720X480]/[640X480]/[320X240]. |
| Frame rate With the same memory space, selecting a lower frame rate will result in the recording time being onger. There are 2 options: [high]/[ow]. | |
| Photometry mode | For details, please refer to page 16. |
| White balance | For details, please refer to page 16. |
Setting menu
You may set the system items by setting menu
- Turn on the video camera, press [menu] key to show the menu
- Press [right] key to select
- Press [up] or [down] key to select the option to be set.
- Press [right] or [OK] key to enter the sub-menu for this item
- Press [OK] key to confirm, press [menu] key to close the menu
| Menu item Available options and functions | |
| Sound There are 4 options for this function:[Shutter]: press [right] key to turn on/off the shutter sound.[Turn on sound] press [right] key to set the sound for turning on. There are 4 options:[1]/[2]/[3]/[no].[Key pressing sound]: press [right] key to turn on/off the key pressing sound.[Volume]: press [right] key to set the sound volume. There are 4 options:[0]/[1]/[2]/[3] | |
| Power frequency | Based on the region you live, the power frequency shall be set to 60 HZ or 50HZ accordingly. |
| Automatic power off | To save electricity, this video camera will automatically power off if it is not actively used within a certain time. There are 4 options for this function:[1 minute]/[3 minutes]/[5 minutes]/[power off] |
| Language Select a language from the following to show the menu and other information:[English], [s mplified Chinese]. | |
| TV The mage displayed on the screen of the video camera may also be displayed on TV screen. Based on the location you live, the TV output shall be set to NTSC or PAL.[NTSC]: For use within the US, Japan and others.[PAL]: Australia, New Zealand, China, Europe and others. | |
| USB When connected to the computer, this video camera can be used as a portable hard disc or PC camera. [movable hard disc]/[PC camera]. | |
| Formatting Formatting will permanently delete all the data in the memory card or built-in memory, including the locked files. Before formatting, please backup the important files. [Yes]/[no]. | |
| Restoring the initia setting | The entire menu and key setting will be restored to the initial status.[Yes]/[no]. |
Playback
Video playback
- Set the video camera to playback mode
- Press [left] or [right] key to select the video file you want to play
- Press [shutter] key to play. Press [up] key to pause and press t again to resume. Press [right] key to quick forward and [left] key to quick back the video.
Picture playback
- Set the video camera to playback mode. The lastly recorded file will be shown on the LCD screen. If there is no file in the memory card, "no file" will be shown on the LCD screen.
- Press [left] or [right] key to browse the previous or next image.
Audio playback
- Set the video camera to playback mode
- Press [left] or [right] key to select the audio file you want to play.
- Press [shutter] key to start the playing. Press [up] key to pause and press it again to resume. Press [right] key to quick forward and [left] key to quick back the audio.
- Press [menu] key to stop the playing.
Thumbnail Mode
Under playback mode, press [down] key to thumbnail file browsing mode. Press [up]/[down]/[e:t]/[right] key to select the file. Press [OK] key to the full screen browsing mode
Deleting Files
Delete file by using the delete function in the playback menu
- Under playback mode, press [menu] key to enter the menu interface
- Press [up] or [down] key to select [file deletion].
- Press [right] key to enter the sub-menu: [Delete single file]: delete the current file; [delete all]: delete all the files
- Press [up] or [down] key to select the option you want
- Press [OK] key to enter the corresponding dialogue box for deletion press [up] or [down] key to select [yes].
- Press [OK] key to confirm the deletion
Menu under playback mode
- Press [menu] key under playback mode to show the playback menu.
- Press [up] or [down] key to select the item you want and make the setting
- Press [right] key or [OK] key to enter the sub-menu for the item.
- Press [OK] key to confirm the setting
- Press [menu] key to escape.
| Menu item Avai | able options and functions |
| File locking Use | this function to prevent the accidental file deletion.[Locking/unlocking single]: lock or unlock the current file.[Locking al]: lock all the files.[Un ocking all]: unlock all the locked f les. |
| File deletion For details, please refer to page 21. | |
| Slide playing Use | this function to automatically play f les.[Start]: After setting the image playing d rection and t me interval, select to start the playing. Press [right] key to set the time interval between playing two files.[Interval]: ls -'O s.[C rculating]: press [ right] key to start or close circulating. |
| Special effect Select one specia effect for the images:[black and white]/[reviva]/[negative]/[red]/[green]/[blue]/[two value]/[sun set]/[warm color]/[cold co or]/[com par ison]. | |
| Sw vel Use this | function to swivel the images.[Sw vel]: press [OK] key to select picture, each time you press, the picture will sw vel for 90 degree in cockwise direction. [Save]: press [OK] to save the picture after swivelling[Escape]: escape to the main menu. |
| Picture reducing | Use this function to reduce the size of picture thus reducing the memory occupied. t provides three options:[2048X1536]/[1024X768]/[640X480]. Note: the picture quality of large sized pictures may be reduced to smaller sizes; however the picture of small sized pictures cannot be enhanced to bigger sizes. |
| Audio memorandum | Use this function to add audio memorandum to pictures.[Add]: press [OK] key to start audio recording, press [shutter] key to stop.[Delete]: press [OK] key to delete the audio memorandum. |
Connections
Connecting the video camera to TV
Upon being connected to TV, the LCD screen of the video camera will turn off and TV will play the function of the LCD screen of the camera.
- Use the attached AV line to connect the TV with video camera.
- Turn on video camera and TV, set the TV to "AV" mode.
- When camera is set to picture shooting/video recording mode, you can browse the object to be shot on TV
- When the video camera is in playback mode, you can browse and play the recorded images, video and audio files.
Downloading the images to the computer
There are two ways to download the images from the memory card of the video camera to the computer:
- Insert the SD card to the flash card reader
- Use the attached USB line to connect the video camera to the computer
Using the card reader
- After the memory card is ejected from the video camera, insert the same to the card reader of the computer.
-
Open [my computer] or the windows resource manager, then double click the movable icon representing the memory card.
-
Copy the image from the memory card to the folder you selected in your computer.

Connecting the video camera to the computer through USB line
- Connect the video recorder to the computer with USB line, turn on the camera. On the LCD screen, "MSDC" (movable hard disc" or "PC CAM" (PC camera) will be displayed. Press [mode] key to switch between "MSDC"/"PCCAM" modes.
- Open [my computer] or the windows resource manager, then double click the movable icon representing the memory card. At the files are saved in a file named "DCIM".
- Copy the image from the folder of "DCM" to the folder you selected in your computer.
Software installations (PC Only)
Software installation
In the included CD, there are driver programs and software for the video camera. Upon inserting the CD into the CD drive, the installation interface for software will appear automatically.
If the automatic installation interface does not appear, open [my computer] or the CD drive of the browser, double click [autorun.inf], the automatic installation interface will appear. You can also click "operation", then input the route; for instance "D:\autorun.exe" (supposing D is your CD drive), then click "OK".
Installing PC camera function
- Insert the CD into the CD drive. The automatic installation on interface will appear on the screen. Click "driver".
- Copy the "PCCAM.exe" in CD-ROM to the desktop or a root directory you want.
How to use PC camera drive
- First, install the PC camera drive in the attached CD, use the USB line attached to connect the video camera to the computer, turn on the camera.
- Press [mode] key to set the camera to "PC CAM" mode.
- Double click "Amcap" icon on the desktop
- If it is the first time you use PC camera, please click "preview" under "options" menu, then you can normally use the PC camera function.
- Select "Video Capture Pin" under "Options" menu, the size of PC camera window may be set.
Technical parameters
| Photoreceptor 3 milli | pn pxe CMOS |
| Display 27"TFT LCD | screen |
| Focus range 150cm | m~infinitude |
| Aperture F: 3MM f=6.5mm | |
| Shutter 1/6 000-1/20 | second |
| Definition Still picture | 8M(3264X2448);5M(2592x1944);3M(2048 1536);2M(1600 200);1M(1024 76××8)Video:1280X720;720X480;640X480;320X240 |
| Sensitivity Automatic | |
| White balance | Automatic/daylight/cloudy/florescentlight/tungsten light |
| Exposurecompensation | -2.0-2.0, taking 0.3 as interval |
| Continuousshooting | Included |
| Picture effect | [Black and white]/[revival]/[negative]/[red]/[green]/[blue]/[two value]/[sunset]/[warm color]/[cold color]/[comparison] |
| Self-timer | 2 seconds, 10 seconds |
| Memory | External SD card, MMC card |
| TV system | NTSC/PAL |
| Power | 3 Alkaline batteries |
| Ambienttemperature | Operating temperature: °Cto 40°Cstorage temperature: 20°C to 60°C |
| Microphone | Built-in |
| Loudspeaker | Built-in |
| Size | 118X55X55(mm) |
| Weight Without batteries | 190g, with batteries 220g |
- Table of Contents
- Safety information
- Components of the video camera
- Preparations before taking pictures
- Installing the batteries
- Inserting the memory card
- Formatting the memory card
- Setting the language
- LCD screen
- Basic operations
- Turning video camera on and off
- Mode change
- Video recording
- How to use the self-timer and continuous shooting functions
- Taking pictures
- Audio recording
- Setting the video camera
- Menu for picture shooting mode
- Menu for picture shooting
- Menu for video recording mode
- Setting menu
- Playback
- Video playback
- Picture playback
- Audio playback
- Thumbnail Mode
- Deleting Files
- Menu under playback mode
- Connections
- Connecting the video camera to TV
- Downloading the images to the computer
- Using the card reader
- Connecting the video camera to the computer through USB line
- Software installations (PC Only)
- Software installation
- Installing PC camera function
- How to use PC camera drive
- Technical parameters
Brand : Kogan
Model : KADVCAAA30A
Category : Camcorder