
654XI - Car radio KICKER - Free user manual and instructions
Find the device manual for free 654XI KICKER in PDF.


| Product Type | Car Stereo |
| Brand | KICKER |
| Model | 654XI |
| Dimensions (W x H x D) | Approximately 180mm x 50mm x 100mm (Standard DIN) |
| Weight | Approximately 1.5 kg |
| Power Supply | 12V DC (Negative Ground) |
| Max Power Output | 4 x 50 Watts (Peak) |
| Continuous Power Output (RMS) | 4 x 20 Watts |
| Tuner Bands | AM / FM |
| Playback Media | CD, CD-R/RW, MP3 via USB |
| Audio Inputs | AUX (3.5mm), USB, Front RCA Input (Optional) |
| Audio Outputs | Preamp RCA Outputs (Front, Rear, Subwoofer) |
| Display | LCD with White Backlight |
| Remote Control | Included (IR Remote) |
| Additional Features | Detachable Faceplate, Clock, Equalizer (Preset + Custom) |
| Cleaning and Maintenance | Clean with a soft dry cloth; avoid solvents |
| Safety Features | Fuse Protection (10A), Reverse Polarity Protection |
| Spare Parts / Repairability | Contact authorized KICKER service centers; no user-serviceable parts |
| General Information | Designed for 12V vehicles; ensure proper installation by a professional |
Frequently Asked Questions - 654XI KICKER
User questions about 654XI KICKER
0 question about this device. Answer the ones you know or ask your own.
Ask a new question about this device
Download the instructions for your Car radio in PDF format for free! Find your manual 654XI - KICKER and take your electronic device back in hand. On this page are published all the documents necessary for the use of your device. 654XI by KICKER.
USER MANUAL 654XI KICKER
Designed as the perfect compliment to the highly popular KICKER® IMPULSE line of moderately-priced speakers, IMPULSE Amplifiers allow you to build a high performance car audio system on a budget.
The myriad of features on the IMPULSE Amplifiers make it possible for you to use any source unit to control a single amp or bi-amp system with or without rear fill.
Features and Controls
Your IMPULSE four-channel amplifier is 2 Ohm stable in stereo mode and will operate as low as 4 Ohms in bridged mono. For connection to the source you have the option of high level input for use with radios that don't have RCA outputs.
An electronic crossover is built in for convenience and allows you to select high pass for satellite speakers, low pass for subwoofers, or bypass for full range operation. In full range configuration the Impulse amps will operate stereo and mono at the same time.
Separate KICKEQ™ bass and treble controls give you the ability to boost low and high frequencies to tailor the music to your taste.
Auto-resetting short circuit and overthermal protection circuits are incorporated to protect the amplifier from failure due to extreme conditions.
State of the art circuitry including a MOSFET power supply and glass epoxy circuit boards are used to ensure many years of trouble free operation.
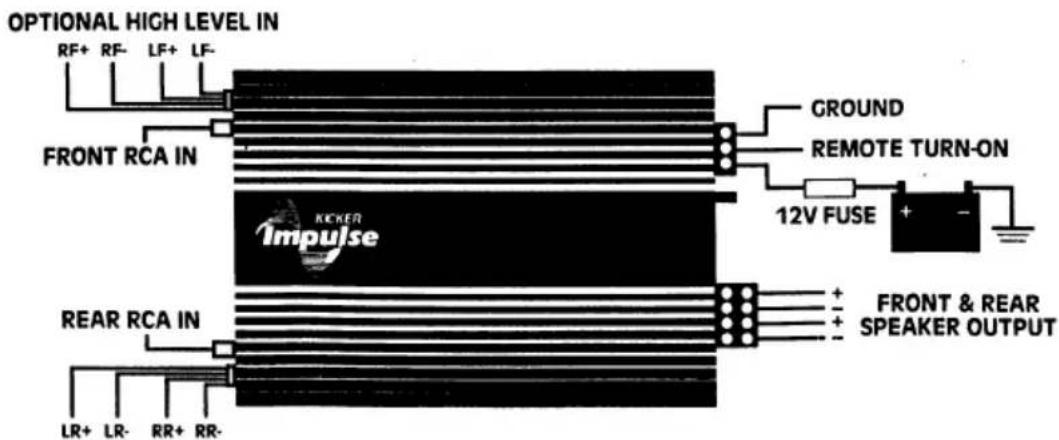
Wiring Instructions
The preferred method of bringing input signal in to the amplifier is with RCA cables from a quality tape or CD player. A high level (speaker) input signal may also be used if your factory deck or aftermarket source does not have low-level RCA jacks.
Some of the system possibilities are shown in the System Diagrams section of this manual.
When working with power connections always hook up the ground wire first and disconnect the ground wire last. Never make any wiring changes with the amplifier powered up.
The in-line fuse on the positive battery connection is to protect the wire in the event of a short circuit. Install a fuse of at least as high of a value as the amplifier requires within 18 inches of the battery connection. An in-line fuse valued at 30A with 10 gauge wire are recommended for the 354xi, a 60A fuse with 8 gauge wire for the 654xi. Note: if the wire run is much longer than 10 feet and the amplifier is being used either in 2 Ohm stereo or bridged to 4 Ohms, it is recommended to use 8 gauge wire for the 354xi and 4 gauge wire for the 654xi. This may require a power distribution block near the amp to adapt the wire size back down to the recommended gauge to make connection at the amp easier.
Any time that a power wire goes through a metal panel such as the firewall, or if there is any chance of abrasion, it is necessary to use a grommet or other suitable form of protection to avoid shorts.
The ground wire should be as short as possible and attached to the body of the vehicle. The ground point must be clean and free from paint and corrosion.
To reduce the chance of noise entering the system it is recommended that the RCA cables be run through the vehicle separate from any power wires.
Mounting the IMPULSE Amplifier
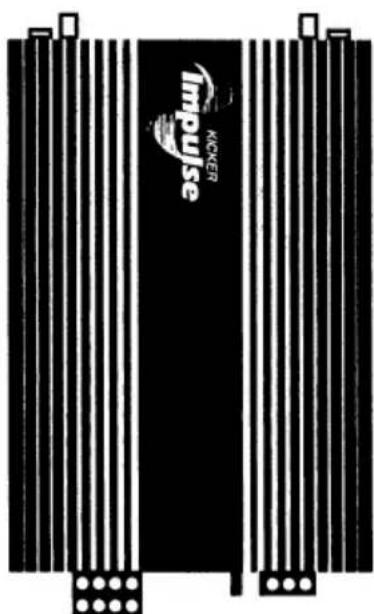
After determining an appropriate mounting location which provides good air circulation and access to the end panel controls, use the supplied screws and washers to firmly mount the amplifier. The amplifier chassis may be used as a template for the screw locations. Check to make sure that the mounting screws will not damage any components on the back side of the chosen panel.
If a vertical mounting surface is chosen, it is recommended that the heatsink fins run vertically as shown at right.
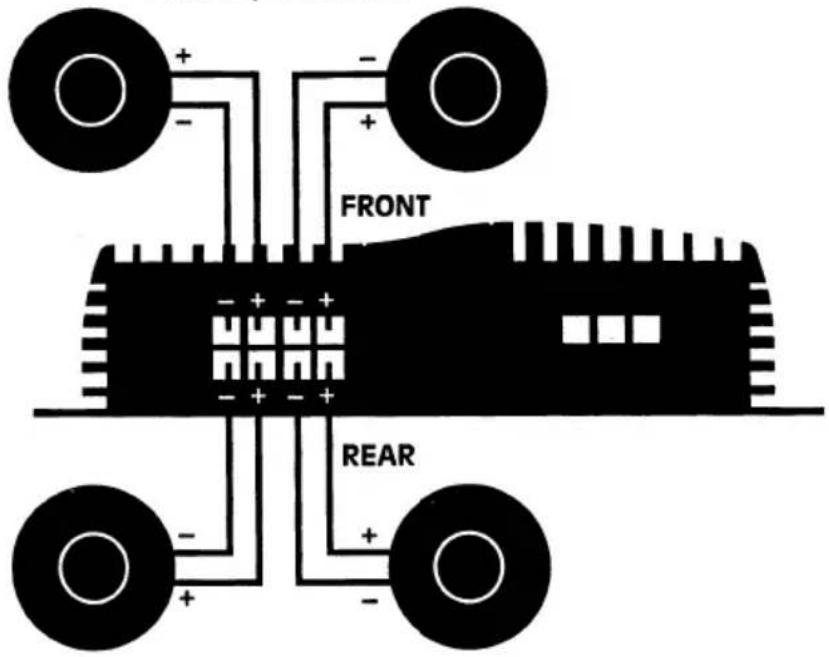
Basic Systems for the IMPULSE Four-Channel Amplifier
Stereo Four Channel Internal Crossovers Off
FULL RANGE SPEAKERS
2Ω MIN/CHANNEL
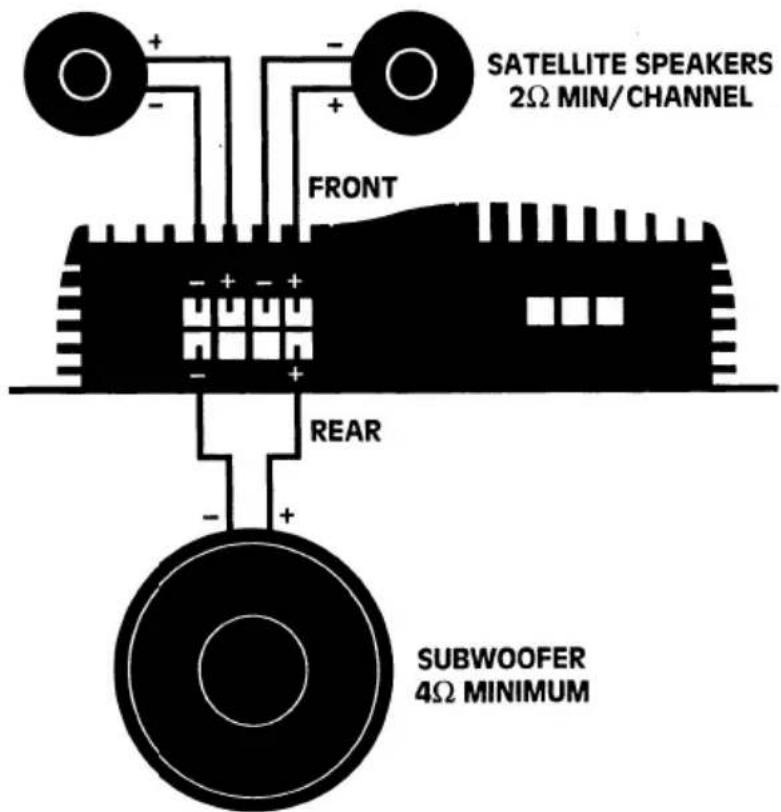
Bi-Amp Hookup using Internal Crossovers
FRONT CROSSOVER SET TO HIGH PASS, 70 or 110 Hz REAR CROSSOVER SET TO LOW PASS, 70 or 110 Hz
BI-AMP SYSTEM WITH FOUR-CHANNEL AND TWO-CHANNEL AMPS
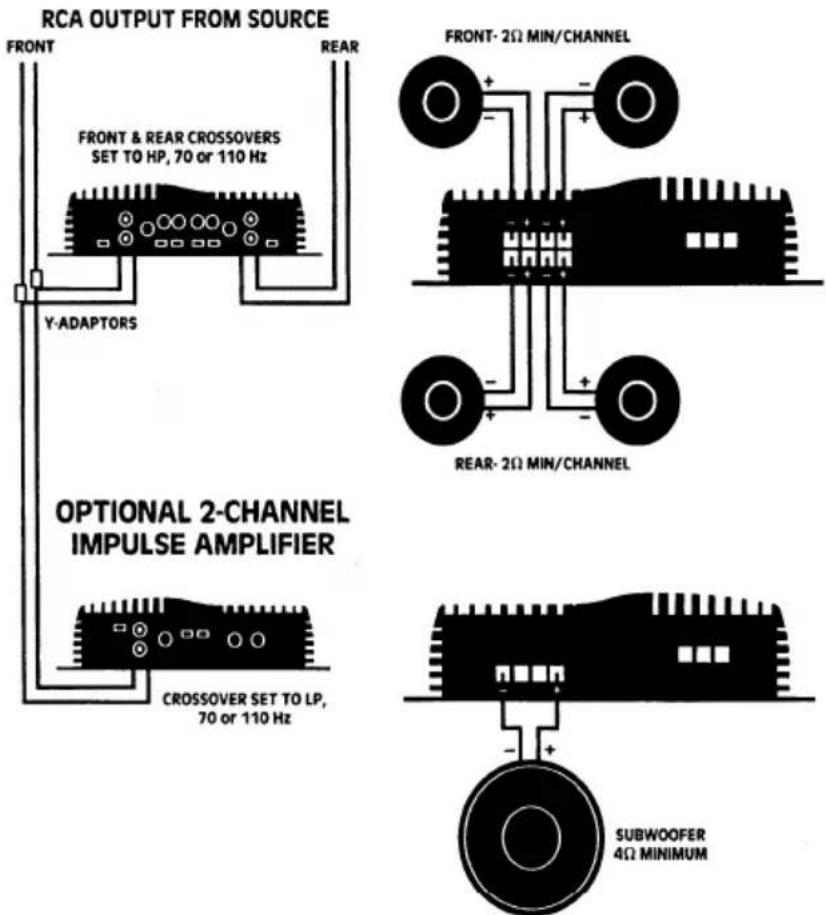
BI-AMP SYSTEM WITH TWO FOUR-CHANNEL AMPS
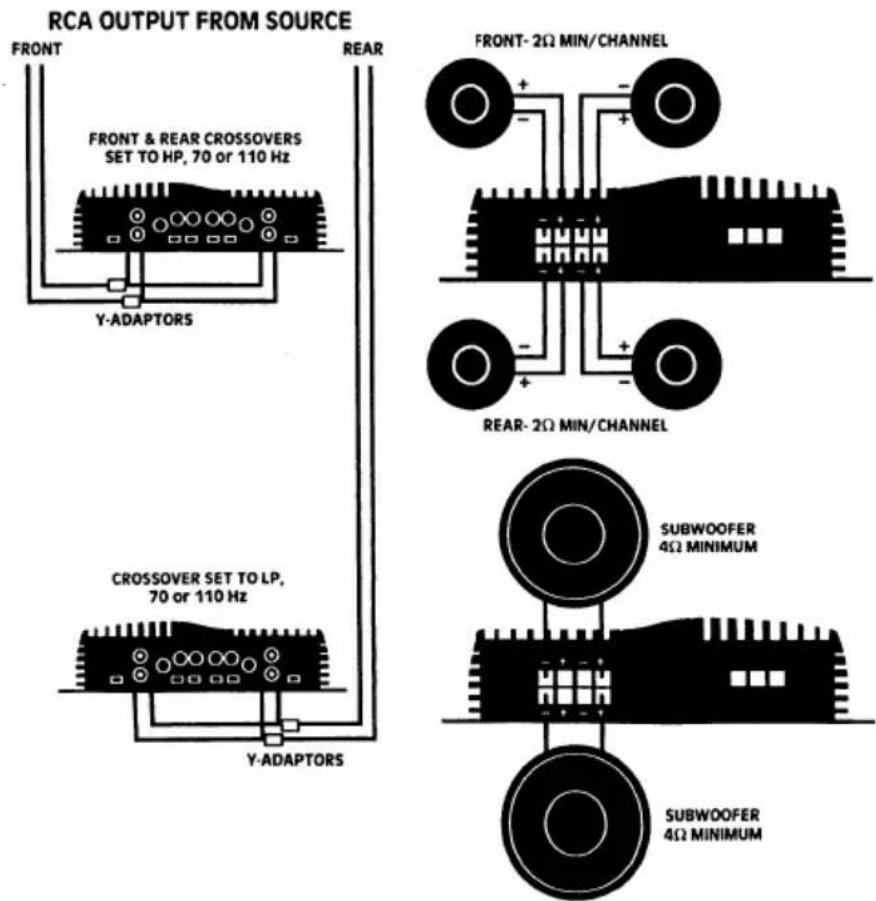
Adjustments and Controls
Setting Gain Control
The gain control is provided for level matching purposes. The control does not give the amplifier any more power by turning it up. Its purpose is to adjust the sensitivity of the amplifier in relation to the output level provided by the source.
Start with the amp gain set to minimum by turning the control counterclockwise. Turn the source level up until distortion is barely audible. Then turn it down slightly. This will typically be at about 85% to 95% of full volume. Raise the amplifier gain until distortion is just audible. The gain is now set correctly. Check the level with cd/tape and tuner to make sure the adjustment is correct for all sources.
Setting KICKEQ™ Controls
The Bass and Treble controls on your Impulse Amplifier are provided to help tune your system for ideal sound quality. After the system is installed and the vehicle is put back together, do a listening test with music that is typical of the type you normally listen to.
Initially set the tone controls on the source unit to flat and turn the KICKEQ™ controls fully counter-clockwise. Depending on your personal taste and the speakers used in the system, you may want to increase the high or low frequencies by turning the KICKEQ™ controls clockwise. Remember that once the vehicle is in motion there will be an apparent loss of bass due to the masking effect of road noise. Do not attempt to make adjustments while the vehicle is in motion. It is safer to pull off the road to make changes.
Never change the crossover settings while the amplifier is on. A loud pop will result which could destroy speakers or cause hearing loss.
Specifications
| RMS Power(watts/channel) @ 12.5V | 4Ω stereo, 0.085% THD, all channels driven | 2Ω stereo,0.2% THD, all channels driven | 4Ω bridged mono, 0.2% THD |
| 354xi | 35 x 4 | 50 x 4 | 100 x 2 |
| 654xi | 65 x 4 | 95 x 4 | 190 x 2 |
| Dynamic Power(watts/channel) @ 14.4V | 4Ω stereo, 0..085% THD, all channels driven | 2Ω stereo, 0.2% THD, all channels driven | 4Ω bridged mono, 0.2% THD |
| 354xi | 50 x 4 | 70 x 4 | 140 x 2 |
| 654xi | 90 x 4 | 130 x 4 | 260 x 2 |
| Frequency ResponseInput Sensitivity | 20Hz-20kHz ±0.5dBHigh level 1V-10VLow level 150mV-3.0V | ||
| Signal-to-Noise RatioActive Electronic Crossover | >90dB, a-weighted, re: rated power18dB/octave, selectable @ 70Hz or 110 Hz; selectable high pass, low pass, all passVariable to +18dB, centered @ 40Hz | ||
| KICKEQTM Bass Boost | Variable to +12dB, centered @ 12kHz | ||
| KICKEQTM Treble Boost | |||
Troubleshooting
Red power indicator off, no output:
• With Volt Ohm Meter (VOM) check:
1. +12V power terminal
2. Ground terminal
3. Remote turn-on lead
Red power indicator on, no output:
- Check RCA and connections
• Test speaker outputs with known good speaker - Check function of source unit
- With VOM in AC volts position check RCA for signal
No output from one channel:
- Check RCA and speaker connections for that channel
- Swap RCA connections from left to right
- Swap speaker connections between channels
Yellow LED protection indicator is lit and there is no output:
Case 1: Amp is very hot
- Thermal protection is engaged. Check for proper impedance at speaker terminals. Also check location of amplifier to ensure proper air flow around heatsink.
Case 2: Output resumes momentarily when system is turned off and back on.
- Short circuit protection is engaged. With VOM check for short between speaker positive and negative, and between speaker terminals and ground.
Alternator noise (a whining that varies with engine RPM)
- Make sure that the ground for the source is as short as possible and connected to bare chassis metal. The stock radio ground may not be sufficient.
- Check RCA cable routing and condition. Keep RCA cables away from all power wires.
Amplifier Limited Warranty
Stillwater Designs warrants this product to be free from defects in material and workmanship under normal use for a period of three (3) years from date of original purchase when installed by an Authorized KICKER Dealer or one (1) year from date of original purchase if not installed by an Authorized KICKER Dealer. If this product is labeled "B Stock", it is warranted for one (1) year from date of purchase, regardless of place of installation. Should service be necessary under this warranty for any reason due to manufacturing defect or malfunction during the warranty period, Stillwater Designs will replace or repair (at its discretion) the defective merchandise at no charge.
This warranty is valid only for the original purchaser and is not extended to owners of the product subsequent to the original purchaser. Any applicable implied warranties are limited in duration to a period of the express warranty as provided herein beginning with the date of the original purchase at retail, and no warranties, whether express or implied, shall apply to this product thereafter. Some states do not allow limitations on implied warranties, therefore these exclusions may not apply to you.
This warranty gives you specific legal rights; however you may have other rights that vary from state to state.
What To Do If You Need Warranty or Service
Defective merchandise must be returned to your local Authorized Stillwater Designs (Kicker/Impulse) Dealer for warranty. Assistance in locating an Authorized Dealer can be obtained by writing or calling Stillwater Designs direct. You can confirm that a dealer is authorized by asking to see a current authorized dealer window decal.
If it becomes necessary for you to send defective merchandise, package all defective items in the original container or in a package that will prevent shipping damage, and return to
Stillwater Designs, 5021 North Perkins Road, Stillwater, OK 74075
Return only defective components. Non-defective items received will be returned freight collect.
Include a dated proof-of-purchase from an Authorized Dealer. Warranty expiration on items returned without proof-of-purchase will be determined from the manufacturing date code. Coverage may be invalidated if this date is greater than one (1) year previous to the date item is sent in. Freight must be prepaid; items received freight collect will be refused.
Failure to follow these steps may void your warranty. Any questions can be directed to the Warranty Department at (405)624-8510.
What Is Not Covered?
This warranty is valid only if the product is used for the purpose for which it was designed. It does not cover:
- Products purchased from an unauthorized dealer.
• Damage due to improper installation - Damage caused by exposure to water, excessive heat, chemical cleaners, and/or UV radiation.
- Damage through negligence, misuse, accident or abuse. Repeated returns for the same damage may be considered abuse.
- Freight damage.
• The cost of shipping product to Stillwater Designs Service. - Items previously repaired or modified by any unauthorized repair facility.
- Items returned from unauthorized individuals or dealers.
- Return shipping on non-defective items.
- Products with tampered or missing barcode labels.
How Long Will It Take?
Stillwater Designs maintains a goal of 24-hour service for all returns. Delays may be incurred if lack of replacement inventory or parts is encountered.
International Warranty
Contact Your international Stillwater Designs dealer or distributor concerning specific procedures for your country's warranty policies.
WARNING:
KICKER components are capable of producing sound levels that can permanently damage your hearing. Turning up a system to a level that has audible distortion is more damaging to your ears than listening to an undistorted system at the same volume level. The threshold of pain is always an indicator that that sound level is too loud and may permanently damage your hearing. Please use common sense when controlling volume!
- Features and Controls
- Wiring Instructions
- Mounting the IMPULSE Amplifier
- Basic Systems for the IMPULSE Four-Channel Amplifier
- Adjustments and Controls
- Setting Gain Control
- Setting KICKEQ™ Controls
- Troubleshooting
- Amplifier Limited Warranty
- What To Do If You Need Warranty or Service
- What Is Not Covered?
- How Long Will It Take?
- International Warranty
- WARNING:
Brand : KICKER
Model : 654XI
Category : Car radio