
Shelf System CR3012A - Radio Crosley - Free user manual and instructions
Find the device manual for free Shelf System CR3012A Crosley in PDF.


| Product Type | Audio Shelf System |
| Brand | Crosley |
| Model | CR3012A |
| Power Source | AC 120V ~ 60Hz, 30W |
| Radio Frequency Range | FM: 87.5-108.5 MHz, AM: 525-1710 kHz |
| Antenna | External FM Antenna, Built-in Ferrite AM Antenna |
| Playback Media | CD, iPod/iPhone/iPad, External audio via Aux In |
| Controls | Volume, Tuner, Mode, Playback buttons, Remote control |
| Display | LED Tuning Display |
| Dimensions | Approximately 12 × 8 × 6 inches (main unit) |
| Weight | Approximately 5.5 lbs (main unit) |
| Cleaning | Unplug before cleaning; use dry cloth only |
| Safety Features | Polarized plug, do not expose to water, no user-serviceable parts |
| Warranty | 1 year limited manufacturer's warranty |
| Included Accessories | Remote control, AC adapter, iPod/iPhone/iPad support, 3.5mm auxiliary cable |
Frequently Asked Questions - Shelf System CR3012A Crosley
User questions about Shelf System CR3012A Crosley
0 question about this device. Answer the ones you know or ask your own.
Ask a new question about this device
Download the instructions for your Radio in PDF format for free! Find your manual Shelf System CR3012A - Crosley and take your electronic device back in hand. On this page are published all the documents necessary for the use of your device. Shelf System CR3012A by Crosley.
USER MANUAL Shelf System CR3012A Crosley
-
Read Instructions-All the safety and operating instruction should be read before the product is operated.
-
Retaininstructions-Thesafety and operating instruction should be retained for further reference.
-
HeedWarnings-AllwarningsontheproductandintheoperatingInstructionsshouldbeadheredto.
-
Follow Instructions-Alloperating and use instruction should be followed.
-
Cleaning - Unplug this product from the wall outlet before cleaning. Do not use liquid cleaners or aerosol cleaners. Use a dry cloth for cleaning.
-
Attachments-Donotuseattachmentsnotrecommendedbytheproductmanufacturerastheymaycausehazards.
-
Water and Moisture-Donotus this product near water - forexample, near abathtub, washbowl, kitchensink, or laundry tub; in a wet basement; or near as swimming pool; and the like. the apparatus shall not be exposed to dripping or plashing and that no objects filled with liquids, such as vases, shall be placed on apparatus.
-
A product and cart combinations should be removed with care. Quick stops, excessive force, and unevensurfaces may cause the product and cart combination to overturn.
-
Ventilation-Slotsandopeningsinthecabinetareprovidedforventilationandtoensurereliableoperationofthe productandtoprotectitfromoverheating,andtheseopeningsmustnotbeblockedorcovered,Theopeningsshould neverbeblockedbyplacingtheproductonabed,sofa,rug,orothersimilarsurface.Thisproductshouldnotbeplaced inabuilt-ininstallationsuchasabookcase
orrackunlessproperventilationisprovidedorthemanufacturer'sinstructionshavebeenadheredto.
-
Power Sources - This product should be operated only from the type of power source indicated on the marking label, if you are not sure of the type of power supply to your home. Consult your product dealer or local power company. For products intended to operate from batterypower, or othersources, refertotheoperating instructions.
-
Groundingor Polarization-Thisproduct may be equipped with apolarized alternating-currentline plug (aplug having one bladewider than the other). This plug will fit into the power outlet only on one way. This is a safety feature. If you are unable to insert the plug fully into the outlet try reversing the plug, if the plug should still fail to fit, contact you electrician to replace your obsolete outlet. Donot defeat the safety purpose of the polarized plug.
-
Power-CordProtection-Power-supplycordsshouldberoutedsothattheyarenotlikelytobewalkedonor pinchedbyitemsplaceduponoragainstthem, payingparticularattentiontocordsatplugs,convenience receptacles,andthepointwheretheyexitfromtheproduct.
-
Lightning-Foradded protection forth this product during alightning storm, or when it is left unattended and unused for long periods of time, unplug it from the wall outlet and disconnect the antenna or cable system. This will prevent damage to the product duetolightning and power-lines surges.
-
Power Lines - An outside antenna system should not be located in the vicinity of overhead power lines or other electric light or power circuits, or where it can fall into such power lines or circuits. When installing an outside antenna system, extreme care should be taken to keep from touching such power lines or circuits as contact with them might be fatal. Mains plug is used as the disconnect device. It shall remain readily operable and should not be obstructed during intended use. to be completely disconnected the apparatus from supply mains, themainplugoftheapparatusshallbedisconnectedfromthemainssocketoutletcompletely.
-
Overloading - Do not overload wall outlets, extension cords, or integral convenience receptacles as this can result in a risk of fire or electricshock.
16.Object and Liquid Entry - Never push objects of any kind into this product through openings as they may touch dangerous voltage points or short – out parts that could result in a fire or electric shock. Never spill liquid of any kind on the product.
-
Servicing - Do not attempt to service this product yourself as opening or removing covers may expose you to dangerous voltage or other hazards. Referallservicingtoqualifiedservicepersonnel.
-
Damage Requiring Service - Unplug this product from the wall outlet and refer servicing to qualified service personnel under the following conditions;
a. Whenthepower-supplycordorplugisdamaged.
b. If liquid has been spilled, or object have fallen into the product.
c. If the product has been exposed for or in water.
d. If the product does not operate normally by following the operating instructions. Adjust only those controls that are covered by the operating instructions as an improper adjustment of other controls may result in damage and will often require extensive work by a qualified technician to restore the product to its normal operation.
e. If the product has been dropped, it is damaged in any way.
f. Whentheproductexhibitsadistinctchangeinperformance—thisindicatesaneedforservice.
- Replacement Parts - When replacement parts are required, be sure the service technician has used replacement parts specified by the manufacturerorhavethesamecharacteristicsastheoriginalpart.Unauthorizedsubstitutionsmayresult
infire,electricshock,orotherhazards.
-
Safety Check - Upon completion of any service or repairs to this product, ask the service technician to perform safety checks to determinethattheproductisinproperoperatingcondition.
-
Wall or ceiling Mounting - The product should be mounted to a wall or ceiling only as recommended by the manufacturer.
-
Heat - The product should be situated away from heat sources such as radiators. Heat registers, stoves, or other products (including amplifiers) that produce heat. Batteriesshallnotbeexposed to excessive heats such as sunshine, fireorthelike.
WARNING: Changes or modifications to this unit not expressly approved by the party responsible for compliance could voidtheuser'sauthoritytooperatetheequipment.
NOTE: This equipment has been tested and found to comply with the limits for a Class B digital device, pursuant to Part 15 of the FCC Rules. These limits are designed to provide reasonable protection against harmful interference in a residential installation. This equipment generates, uses, and can radiate radio frequency energy and, if not installed and used in accordance with the instructions, may cause harmful interference to radio communications. However, there is no guarantee that interference will not occur in a particular installation. If this equipment does cause harmful interference to radio or television reception, which can be determined by turning the equipment off andon,theuserisencouragedtotrytocorrecttheinterferencebyoneormoreofthefollowingmeasures:
-Reorientorrelocatethereceivingantenna.
-Increasetheseparationbetweentheequipmentandreceiver.
-Connecttheequipmentintoancircuitdifferentfromthattowhichthereceiverisconnected.
-ConsultthedealeroranexperiencedradioTVtechnicianforhelp.

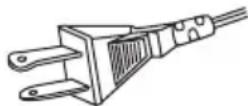
AC
PolarizedPlug
WARNING:
TOPREVENTFIREORSHOCKHAZARD, DONOTEXPOSETHISAPPLIANCE TORAINORMOISTURE.DONOTREMOVECOVER.PILOTLAMPSSOLDERED INPLACE.NOUSERSERVICEABLEPARTSINSIDE.REFERSERVICINGTO QUALIFIEDSERVICEPERSONNEL.
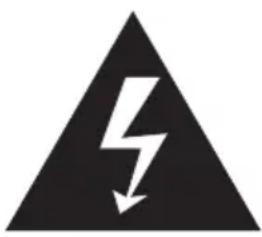
natural_image
Black triangular warning symbol with a white lightning bolt inside, indicating electrical hazard (no text)Thelightingflashwitharrowhead symbol, withinanequilateraltriangle, isintendedtoalertusertothe presenceofuninsulated"dangerous voltage"withintheproduct's enclosurethatmaybeofsufficient magnitudetoconstituteriskof electricshocktopersons.
CAUTION
RISK OF ELECTRIC SHOCK DO NOT OPEN
CAUTION:
TOREDUCETHERISKOF ELECTRICSHOCK, DONOT REMOVECOVER(ORBACK). NOUSER-SERVICEABLE PARTSINSIDE. REFER SERVICINGTOQUALIFIED SERVICEPERSONNEL.

natural_image
Black triangular warning symbol with exclamation mark (no text or numbers)Theexclamationpointwithinan equilateraltriangleisintendedto alertusertothepresenceof importantoperatingand maintenance(servicing) instructionintheliterature accompanyingtheappliance.
Specification
FrequencyRange:FM87.5-108.5MHz
:AM525-1/10MHz
PowerSource: AC120V\~60Hz
PowerConsumption:30W
Antennas: External FM Antenna
:Built-inFerriteAmBar
*DESIGNANDSPECIFICATIONSSUBJECTTOCHANGEWITHOUTNOTICE.
iPhone,iPod,iPodclassic,iPodnano,iPodtouchandiPadaretrademarksof
AppleInc., registered in the U.S. and other countries.

Welcome
Thank you for purchasing the Crosley Audiophile Shelf System. Before operating this unit, please read this manual thoroughly and retain it for future reference.
Features
PortableAudioReady- Your Crosley Audiophile Shelf System comes ready to play portable audio products, including mp3 play satellite radio, gaming devices, CD players, walkmans - basically anything with a headphone jack!
Table of Contents
| Getting Started |
| Control Locators 4 |
| Connector Locators 5 |
| Unpacking 6 |
| Set Up 6 |
| Basic Operation |
| AM/FM Radio 7 |
| CD Player 7 |
| iPod/iPhone/iPad 8 |
| Portable Audio Ready 8 |
| General | |
| Troubleshooting | Guide 9 |
| Warranty 10 | |
Getting Started

Control Locators
- Tuner Knob
- iPod/iPhone/iPad Support
- iPod/iPhone/iPad Dock
- Tuning LED Display
- CD Player
- Tuning Dial
- Volume Knob
- Mode Button
- Play/Pause Button
- Back Skip
- Forward Skip
- Stop
- Eject
- Power
Getting Started

CONNECTOR LOCATORS
- FM Antenna
- Power Input
- Aux In
REMOTE LOCATORS
- Open / Eject 12. Power
- Mute 13. FM Tuner
- Select Up 14. AM Tuner
- Volume Down 15. Volume Up
- Enter 16. CD
- Shuffle 17. Repeat
- Select Down 18. iPod
- Backward Skip 19. Forward
- Play/Pause 20. Auxiliary
- Stop
- Menu
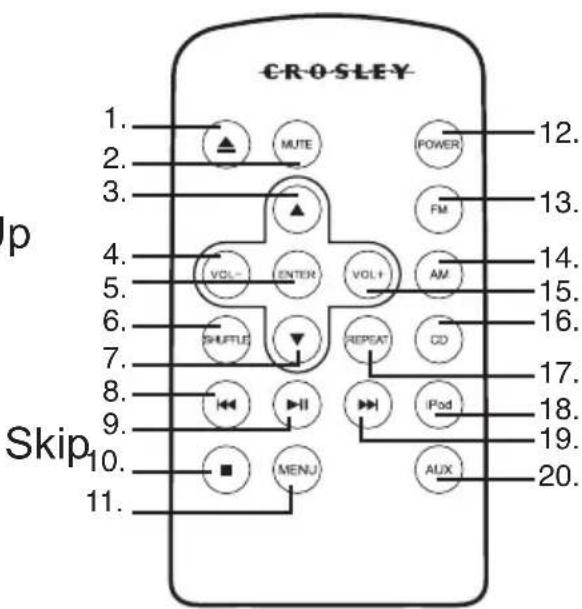
Getting Started
Unpacking
- Remove packing materials from unit.
Note: Save all packing materials. - Remove plastic bags covering main unit and speakers.
- Remove ties from AC power adaptor.
- Remove plastic bag covering iPod/iPhone/iPad support.
- Locate remote control in foam packing and remove ren
Set Up
- Unwind the cord on the AC power adaptor.
- Plug AC end of the power cord into the appropriate wall outlet.
- Plug the small end of the power adaptor into the Power Jack Input in the back of the unit.
- Place the speakers to the right and left of the main Note: The speakers are noted as Right and Left on the back of the man unit.
- Place the iPod/iPhone/iPad support on the top of the iPad and install thumb screw.
- Position your iPod, iPhone or iPad on the dock and a the support as necessary to provide a solid support. Tighten the thumb screw to hold the support into place
Basic Operation
POWER
The POWER button on the unit serves dual functions; turning on/off and dimming the display. To turn the unit on or off, pre the POWER button for 2 seconds. When the power is turned on the Mode Indicators will light up. Quickly pressing the POWER once will toggle the display brightness between normal and dim.
AM/FM RADIO
- Press and hold the POWER button for 2 seconds to turn unit on.
- Continuously press the MODE button until either AM or F indicator is lit.
- Rotate the TUNER knob to adjust the tuning dial to your desired listening station.
- Position the antenna for optimum FM reception.
- Adjust volume to your desired level by rotating the VOLUME knob.
Note: This unit features an internal AM antenna. For best reception, it may be necessary to reposition the main unit slightly.
CD PLAYER
- Press and hold the POWER button for 2 seconds to turn unit on.
- Continuously press the MODE button until the CD indicator is lit.
- Insert a CD into the CD player with the label side facing
- Press the PLAY/PAUSE button to begin playback.
- Press the FORWARD SKIP or BACK SKIP buttons to adv to the next or previous track.
- Press and hold the FORWARD SKIP or BACK SKIP button to fast forward or rewind the track you are listening to.
Basic Operation
CD PLAYER cont.
- Adjust volume to your desired level by rotating the VOLUME
- To eject CD, press the EJECT button
iPod/iPhone/iPad
- Press and hold the POWER button for 2 seconds to turn
- Continuously press the MODE button until the iPod indicator is lit.
- Making sure the iPod/iPhone/iPad support is properly adjusting place your iPod, iPhone or iPad onto the dock.
- Begin playback on your iPod, iPhone or iPad.
- Adjust volume to your desired level by rotating the VOLU knob.
PORTABLE AUDIO READY
- Press and hold the POWER button for 2 seconds to turn unit on.
- Continuously press the MODE button until the Aux indicate
- Using the supplied 3.5mm stereo cable, connect one end AUX IN jack on the back of the main unit.
- Plug the other end into an output or headphone jack on external device.
- Begin playback on your external device.
- Adjust volume to your desired level by rotating the VOLU knob.
Note: You may need to adjust the volume on your external device to achieve the best sound.
General
Troubleshooting Guide
There is no power
- Press and hold the POWER button for 2 seconds to turn unit on.
- Check the power adaptor to make sure it is plugged in unit and into a working wall outlet.
- Make sure the unit is in the correct mode by pressing MODE button.
There is no sound
- Press the MUTE button on the remote control to make the sound is not muted.
- Make sure the unit is in the correct mode.
CD will not play
- Press the PLAY/PAUSE button to make sure the CD is not paused.
- Eject the CD and check that the surfaces of the CD a clean and not scratched.
- Make sure the CD is an audio CD and does not contain MP3 files.
The sound is distorted
- In AM or FM mode, adjust the tuner and/or antenna to improve signal strength. Under certain circumstances, the reception may be improved by relocating the unit.
- In iPod mode, check the EQ settings on the iPod, iPhone or iPad.
- In Aux mode, turn off any EQ setting on the portable Check that the volume setting on the portable device is turned all the way up.
LIMITED MANUFACTURERS WARRANTY
Crosley Radio, Inc. warrants the product to be free from defects in material and workmanship under normal use for a period of one year from the original date of purchase. This warranty is not transferable. If the product is determined to be def during the warranty period, the unit will be repaired or replaced at Crosley Radio's discretion. This warranty covers manufacturing defects and normal consumer use and does NOT cover damage or failure as a result of abuse, accident, alterations, mis neglect, abnormal wear and tear, inadequate maintenance, commercial or unreasonable use, damage caused by power surges, mishandling, accident, acts of God or atter repair by an unauthorized service agent. Also not covered are cosmetic damages, and antennas. Should this product fail to function in a satisfactory manner, it is first return it to the store or retailer where it was originally purchased. If additional is still needed, the original purchaser must FIRST contact our offices to obtain an (Return Authorization) Number.
TO OBTAIN AN RA NUMBER
CALL:
(1.888.276.7539)
Send the unit prepaid to the address below in the original packaging (or reasonable substitute to prevent damage). Clearly mark your RA number on the outside package and include the original sales receipt (or a copy) indicating date of purchase, amount paid, and place of purchase. You must also include your full name, shipping address and daytime contact number. Please include a check or money order in the amount of \$19.95, made payable to Crosley Radio, to cover handling and return shipping charges. Returned products will not be shipped to PO Boxes. Crosley Radio will be responsible for delays or unprocessed claims resulting from a purchaser's failure to provide any or all of the necessary information.
ATTN: RETURNS DEPT
2001 PRODUCTION DRIVE
Louisville, KY 40299
Foradditionalsupport:Crosley Radio Consumer Service Department
24 hours a day / 7 days a week
Telephone: 1.888.CROSLEY (1.888.276.7539)
There are no express warranties except as listed above.
The purchaser's bill of sale is the only proof of warranty entitlement.
This warranty gives the purchaser specified legal rights in addition to any rights which may vary from state to state.
In accordance with the “Moss-Magnuson Warranty Act” of July 10, 1975, this is termed a “limited warranty” which in no way compromises Crosley Radio’s high standards of quality and workmanship.

- WARNING:
- CAUTION
- CAUTION:
- Specification
- Welcome
- Features
- Getting Started
- Control Locators
- CONNECTOR LOCATORS
- REMOTE LOCATORS
- Unpacking
- Set Up
- Basic Operation
- POWER
- AM/FM RADIO
- CD PLAYER
- CD PLAYER cont.
- iPod/iPhone/iPad
- PORTABLE AUDIO READY
- General
- Troubleshooting Guide
- There is no power
- There is no sound
- CD will not play
- The sound is distorted
- LIMITED MANUFACTURERS WARRANTY
Brand : Crosley
Model : Shelf System CR3012A
Category : Radio