ARC-10WB - Air conditioner Whynter - Free user manual and instructions
Find the device manual for free ARC-10WB Whynter in PDF.


| Product Type | Portable Air Conditioner |
| Brand | Whynter |
| Model | ARC-10WB |
| Cooling Capacity | 10,000 BTU (ASHRAE) / 6,000 BTU (DOE) |
| Power Supply | 115 V / 60 Hz |
| Current | 9.2 A |
| Dimensions (H x W x D) | 32.1 x 17.5 x 19.6 in (81.5 x 44.5 x 49.8 cm) |
| Weight | 74 lbs (33.6 kg) |
| Refrigerant | R-410A |
| Noise Level | 48 dB (low), 54 dB (high) |
| Functions | Cooling, Dehumidifying, Fan, Auto Mode |
| Coverage Area | Up to 450 sq. ft. (41.8 m²) |
| Installation Type | Window sliding kit included |
| Drain Method | Continuous drain option via hose |
| Filter Type | Washable foam filter |
| Timer | 24-hour programmable timer |
| Remote Control | Included |
| Auto Restart | Yes, after power outage |
| Anti-Freeze Protection | Yes |
| Maintenance | Clean filter every 30 days |
| Warranty | 1 year limited warranty |
Frequently Asked Questions - ARC-10WB Whynter
User questions about ARC-10WB Whynter
0 question about this device. Answer the ones you know or ask your own.
Ask a new question about this device
Download the instructions for your Air conditioner in PDF format for free! Find your manual ARC-10WB - Whynter and take your electronic device back in hand. On this page are published all the documents necessary for the use of your device. ARC-10WB by Whynter.
USER MANUAL ARC-10WB Whynter
WHYNTER ECO-FRIENDLY 10,000 BTU PORTABLE AIR CONDITIONER
MODEL#: ARC-10WB
Instruction Manual

natural_image
White industrial air conditioner unit with black ventilation slots (no visible text or labels)Congratulations on your new WHYNTER product. Please read this Instruction Manual carefully before using this product to ensure proper operation. Keep this manual in a safe place for future reference.
TABLE OF CONTENTS
| INTRODUCTION | 3 |
| SAFETY PRECAUTIONS | 4-5 |
| IDENTIFICATION OF ACCESSORIES | 6 |
| IDENTIFICATION OF PARTS | 7 |
| OPERATING YOUR AIR CONDITIONER | 8 |
| INSTALLATION INSTRUCTIONS | 9-12 |
| AIR FILTERS INSTALLATION | 13 |
| OPERATION INSTRUCTIONS | 14-15 |
| WATER DRAINAGE | 16 |
| REMOTE CONTROL | 17 |
| CARE AND MAINTENANCE | 18 |
| TECHNICAL DATA | 19 |
| TROUBLESHOOTING | 20-21 |
| WARRANTY INFORMATION | 22 |
Thank you for choosing the Whynter portable air conditioner. Please follow the instructions provided in this user guide to obtain the very best performance from your portable air conditioner and take full advantage of the many features your portable air conditioner offers you. We trust that your Whynter air conditioner will provide the performance and reliability that we stand for.
Please keep this user manual in a safe place for future reference.
DISPOSAL

natural_image
Symbol of a trash bin with crossed x and y lines, no text or numbers presentThis symbol on the product or its packaging indicates that the appliance cannot be treated as normal domestic trash, but must be handed in at a collection point for recycling electric and electronic appliances. Your contribution to the correct disposal of this product protects the environment. Further information about the recycling of this product can be obtained from your local municipal authority.
Your safety and the safety of others are very important to us.
To reduce the risk of fire, electrical shock or injury when using your appliance, follow these basic precautions.
SAFETY PRECAUTIONS

Before the appliance is used, it must be properly positioned and installed as detailed in this manual.

DANGER

- Do not under any circumstances cut or remove the third (ground) prong from the power cord.
- Make sure this unit is connected to a correctly grounded power supply outlet. Do not use an extension cord or power strip.
- The power cord is UL listed. It has a built-in L.C.D.I. (leakage, current, detection, interruption) circuit breaker for added safety. If the power supply is interrupted, press the reset button to reconnect the unit to power source.
- It is recommended to use a separate circuit that its size should be 15 Amps for the air conditioner.
- Do not use an excessively wet cloth, industrial solvents, oil-based products to clean this portable air conditioner.
- To avoid the risk of shock, the product should never be used in bathrooms, shower rooms, or in any other steamy or wet areas.
- Do not store or use gasoline or other flammable vapors and liquids in the vicinity of this or any other appliances.
- Do not repair, disassemble and/or modify the unit by yourself.
• Always turn off the portable air conditioner when cleaning the air filter, and transporting. - Do not turn this unit on and off by plugging and unplugging. Always use the ON/OFF switch.

WARNING

- Transport the unit in an upright position only, or leave it in an upright position for at least 2 hours before first use.
- Ensure curtains or other objects are not obstructing the air inlet filters.
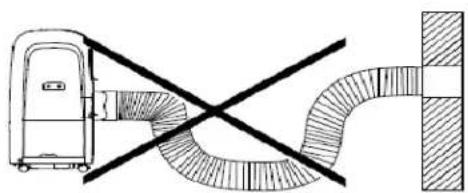
- Do not bend or crush the exhaust hose while in use.
- Always allow at least 20" of clearance around the unit for ventilation. Do not use this unit inside closets, cabinets and/or cramped spaces between furniture.
- This unit is optimized to operate in an ambient temperature of 64^ - 90^ .
- This unit must be installed in an area protected from the element, such as wind, rain, water spray or drips.
- The unit should not be located next to ovens, grills or other sources of high heat.
- Always place the unit on even and hard and level surface.
-
Do not sit or place objects on the unit.
-
Do not allow children to climb, stand or hang on the appliance. The air conditioner could tip over and get damaged and/or seriously injure somebody.
- Keep fingers out of the air intakes and air outlets.
- The appliance is an electrical appliance. To avoid injury from electrical shock do not operate it with wet hands, while standing on a wet surface or while standing in water. Do not use it in outdoors or in wet conditions.
- When positioning or moving the appliance, ensure it is not turned upside down or greater than 45^ or more off level.
- This appliance is designed for household, non-commercial use only. Any other use will void the warranty.
- Do not plug into the power outlet before set up is completed.
- Do not operate this unit without the air filter(s).
- Do not use harsh chemicals to clean the filter(s). Dry thoroughly before inserting the filter(s) into the unit.
- Do not add extra length to the exhaust hose by more than a total length of 9'. This will reduce the cooling efficiency of the portable air conditioner.
- At the end of each season, all water must be drained from the unit and filter(s) must be cleaned before storage.
THE MANUFACTURER DISCLAIMS ANY RESPONSIBILITY IF THE ABOVE INSTRUCTIONS ARE NOT FOLLOWED.
OPERATING CONDITION
| MODE | ROOM TEMPERATURE |
| COOL | Higher than 62°F / 17°C |
| DRY | Higher than 54°F / 13°C |
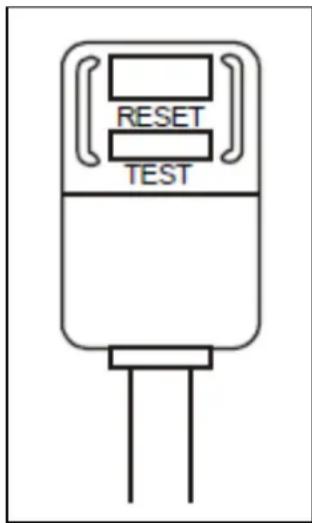
Your portable air conditioner is supplied with a Leakage-Current Detection and Interruption (LCDI) plug. This plug reduces the risk of fire due to arcing faults in the power supply cord. Please follow the instructions below to ensure that LCDI plug works properly.
-
Plug the power cord to a grounded wall outlet. Do not plug to a power strip or extension cord.
-
Press the TEST button on the plug. This should trip the plug and cut the power to the air conditioner. If the plug does not trip and the unit comes on, please contact technical support.
-
Press the RESET button to start the air conditioner.
-
Do NOT use the TEST and RESET buttons to turn the air conditioner on and off.
IDENTIFICATION OF ACCESSORIES
| IMAGE | ACCESSORY NAME | QUANTITY |
 | Exhaust hose and Adaptor (flat mouth) | 1 set |
 | Round adaptor | 1 set |
 | Wall exhaust adaptor | 1 pc |
 | Expansion plug and wooden screw | 4 pcs |
 | Window slider kit | 1 set |
 | Foam seal | 3 pcs |
 | Remote control & Batteries | 1 set |
 | Drain hose | 1 pcs |
IDENTIFICATION OF PARTS Front

Rear

- Control Panel
- Front Air Vent / Louvers
- Caster (four)
-
Handle (both sides)
-
Upper air filter
- Air outlet (hot air exhaust)
- Power cord outlet
- Upper air intake
- Upper drain port
- Lower air intake (Compressor)
- Lower air filter
- Lower drain port
OPERATING YOUR AIR CONDITIONER
Before you begin, thoroughly familiarize yourself with the control panel, remote control and all of the functions. Follow the symbol for the desired function. The unit can be controlled by the unit control panel alone or with the remote control.
CONTROL PANEL
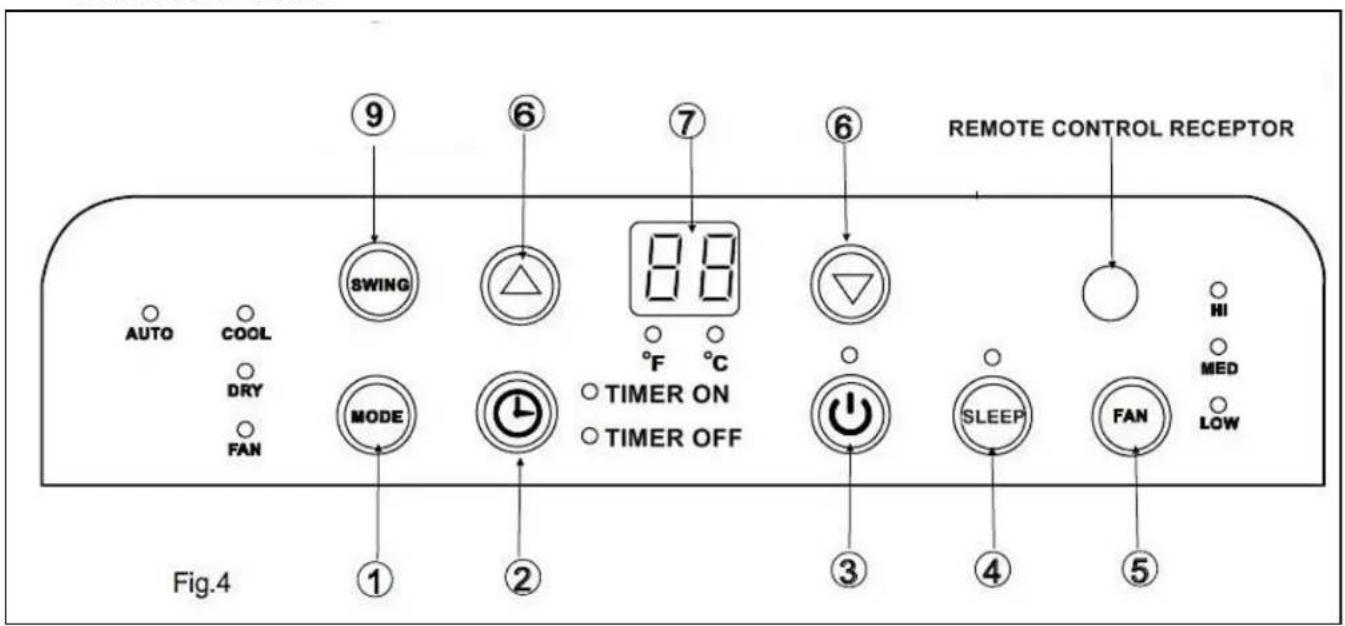
| 1. MODEControls the 4 function modes: COOL, AUTO, Fan only & DRY. | 6. UP & DOWNAdjusts set temperature ( 1^/2^ increments) or timer hours (0 – 24 hours).NOTE: This unit is capable of displaying set temperature in Fahrenheit or in Celsius. To convert from one to the other, press and hold the Up and Down buttons for 3 seconds. |
| 2. TIMERTurns the timer function on and off. To cancel the timer, press the Power button or set the timer to 0.0. | 7. LED DISPLAYIn Cool mode: shows set temperature in ^ or ^ and AUTO timer setting.In DRY and FAN only modes: shows room temperature.Error Codes:E1, E2 & E4: Unplug unit and restart in 5 minutes.P1: Bottom water tank is full; drain water from the unit |
| 3. POWERTurns the unit on and off. | |
| 4. SLEEPTurns the sleep function on and off. | |
| 5. FANControls the 4 fan speeds: HI, MED, LOW & AUTO. The fan speed indicator lights illuminates to show the set fan speed. When the AUTO speed is selected, none of the fan speed indicator illuminates. | |
| 9. SWINGTurns on the auto swing function. |
INSTALLATION INSTRUCTIONS
Location
The air conditioner should be placed on a hard and level surface strong enough to support the unit. The unit has casters and it should only be rolled on smooth, flat surfaces. Use caution when rolling on carpet surfaces. Do not attempt to roll the unit over objects.
Never place any obstacles around the air inlet or outlet and allow at least 20 inch of clearance for efficient air-conditioning.

Fig.18a

Fig.18b
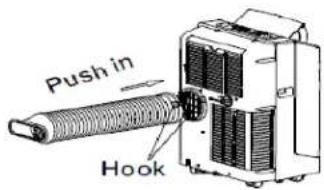
Fig.19
natural_image
Diagram of a mechanical device with a spring and handle, no text or symbols presentFig.20

Fig.21
natural_image
Diagram showing a device connected to a curved pipe with a diagonal line crossing through it (no text or symbols present)Fig.22
Exhaust hose Installation
When you use this air conditioner unit, hot air must be exhausted out of the room to complete the air exchange of the condenser. When the unit is operating in DRY or FAN only mode, no exhaust is required.
- Pull out about 6" of one end of the exhaust hose.
- Install the flat mouth exhaust connector on the exhaust hose. See Fig. 18a and 18b
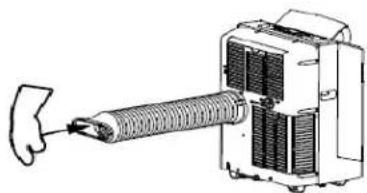
- Push in the exhaust hose into the air outlet port at the back of the unit. Fig. 19 and Fig. 20.
- Only extend the exhaust hose to the necessary length. We do not recommend extending the exhaust hose more than 9' long. If you are interested in purchasing an additional 5' exhaust hose please contact info@whynter.com for retail sales information.
Wall Installation
- Prepare an adequate sized hold in the wall.
- Install the wall exhaust adaptor A into the wall opening and hold it into place using the 4 expansion plugs and wooden screws. (See Fig.21)
- Attach the exhaust hose to wall exhaust adaptor A.
NOTE: When the air conditioner is not in use, cover the wall exhaust adaptor with the cap.
IMPORTANT:
Do not bend or crush the exhaust hose while in use. (Fig.22)
Window kit Installation
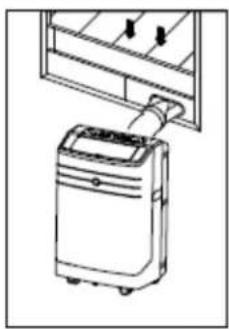
When you use this air conditioner unit, hot air must be exhausted out of the room to complete the air exchange of the condenser. When the unit is operating in fan-only mode, no exhaust is required.

Window Slider Kit
Minimum:67.5cm(2.22ft).
Maximum: 123cm(4.04ft).
natural_image
Line drawing of an air conditioner unit with a piping bag attached to the front panel (no text or symbols)Fig.8

Window Slider Kit
Minimum:67.5cm(2.22ft).
Maximum:123cm(4.04ft).

natural_image
Line drawing of a portable air conditioner unit with airflow direction arrows (no text or symbols)Fig.9
Your window kit has been designed to fit most standard vertical and horizontal windows.
However, it may be necessary for you to modify the installation procedures for your window. Please refer to Fig. 8 & Fig.9 for minimum and maximum window openings.
NOTE: If your window opening is less than the mentioned minimum length of the window slider kit, cut the slide bar with hole to fit window opening. Never cut out the hole on the window slide bar.
NOTE: When using the window kit on a window or sliding door it will cause the window or sliding door not to be properly closed and locked. Additional security measurements maybe needed.
The window slide bars can be fixed with a bolt. Fig. 9a

Window kit Installation in a double-hung window
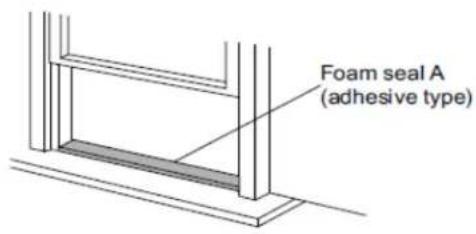
Fig.10

Fig.11

Fig.12
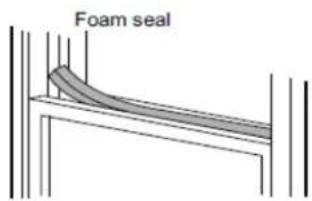
Fig.13
- Open window or sliding door for approximately 5"
- Cut the foam seal (adhesive type) to the proper length and attach it to the bottom of the window. Fig.10.
- Adjust the length of the window bars to the same length and width of the opening of the window. Cut the window piece if necessary to fit the length of your window. Fig. 11.
- Close the window on the window slide bars. For long term installation, you may screw the window kit into your window frame. Fig. 12.
- Cut the foam seal to the length and seal the open gap between the top window sash and outer window sash. Shown in Fig.13.
Window kit Installation in a sliding door/ window

Fig.14
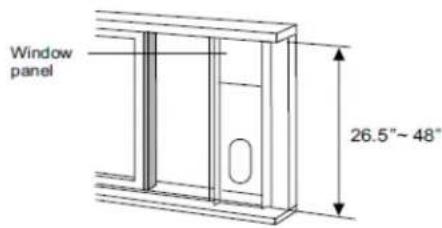
Fig.15

natural_image
Line drawing of a cabinet or cabinet with an open door and side panel (no text or symbols)Fig.16

Fig.17
- Open window or sliding door for approximately 5"
- Cut the foam seal (adhesive type) to the proper length and attach it to the bottom of the door / window. Fig.14.
- Adjust the length of the window bars to the same length and width of the opening of the window. Cut the window piece if necessary to fit the length of your window. Fig. 15.
- Close the door/ window on the window slide bars. For long term installation, you may screw the window kit into your window frame. Fig. 16.
- Cut the foam seal to the length and seal the open gap between the top window sash and outer window sash. Show in Fig.17.
AIR FILTERS INSTALLATION
Your Whynter portable air conditioner is equipped with a washable Pre-Filter and a Silver Ion Filter. The washable Pre-Filter removes large particles such as dust, pet hair and dander. The Silver Ion air filter which is designed to kills bacteria in the air and controls the growth of microbes, such as virus, fungi and spores. It is recommended you replace the Silver Ion Filter every two to three months or as needed. Follow the steps below to install the filters.
WARNING: NEVER OPERATE THE AIR CONDITIONER WITHOUT THE PRE-FILTER
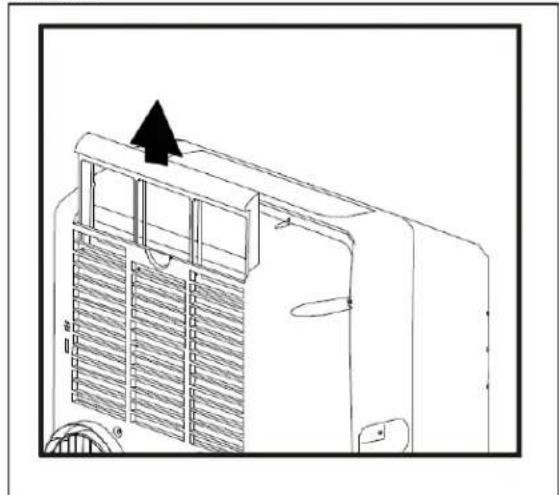
- Pull up the pre-filter frame
natural_image
Line drawing of a server rack with ventilation grilles and a black arrow indicating airflow direction (no text or symbols)- Remove the Pre-Filter from the filter frame.
- Place the Silver Ion Filter on the Pre-Filter.
- Reattached the filter frame.
- Insert the assembled filter frame into the unit.

OPERATION INSTRUCTIONS
BEFORE USING YOUR APPLIANCE
- Remove the exterior and interior packing.
- Before connecting the appliance to the power source, let it stand upright for approximately 4 hours. This will reduce the possibility of a malfunction in the cooling system from handling during transportation.
SWITCHING ON/OFF THE AIR CONDITIONER
- The appliance can be switched ON or OFF by pressing the Power button on the control panel or the Power button on the remote control.
COOLING MODE
- In this mode, the air conditioner cools and dehumidifies the room. To activate this function mode, press the MODE button until the COOL indicator light comes on. When the cooling mode is set, the compressor will start in approximately 3 minutes. In cooling mode, hot air is exhausted from the outdoor exhaust port and the exhaust hose must be connected to exhaust out the hot air.
- The temperature setting range of this air conditioner is from 62°F / 17°C to 88°F / 30°C. To set the temperature, press the ▲ or ▼ buttons. This air conditioner has a 5°F temperature cushion which if the set temperature is within 5°F of the ambient temperature, the unit runs on fan only mode. This saves energy and prolongs the life of the compressor of the air conditioner.
- To set the fan speed, press the FAN button. In cooling mode, the difference in noise level between the 3 fan speeds is not very noticeable when the compressor is on. Try setting the unit to Fan only mode, you should be able to hear the difference between high and low fan speed settings.
- In this mode, the air conditioner only dehumidifies the room, the compressor will activate intermittently depending on the ambient temperature and the fan speed is set to LOW. To activate this function mode, press the MODE button until the DRY indicator light comes on. Please note that when switching function mode, there will be an approximately 3 minute transition time. In dehumidifying mode, do not connect the exhaust hose and let the warm air return to the room.
AUTOMATIC MODE
- When you set the air conditioner in AUTO mode, it will automatically select cooling or fan only operation depending on what temperature you have selected and the room temperature is close to the unit. The fan speed is automatically selected and cannot be changed.
- To operate the unit in Auto mode when the unit is on, press the Mode button until the indicator for "Auto" is lit.
FAN ONLY MODE
- In this mode, only the fan of the air conditioner runs and circulates the air in the room. To activate this function mode, press the MODE button until the FAN indicator light comes on. In this function mode, the temperature cannot be set. Subsequently, set the desired fan speed by pressing the FAN button. Fan Only mode requires that the exhaust hose be removed.
TIMER (DELAYED SWITCH ON / OFF) FUNCTION
- This function mode enables a delayed switch ON or delayed switch OFF of the air conditioner. The time (hours) delay can be set, enabled and disabled.
SETTING SWITCH OFF TIMER
With the air conditioner operating in any function mode, press the TIMER button. The TIMER OFF light will come on. Then set the desired time delay OFF hours by pressing the UP and DOWN buttons. The time increments are at 0.5 hour to up to 10 hours, followed by 1 hour increment up to 24 hours. When the delay time set has elapsed, the air conditioner switches off. To cancel the delayed switch off function, turn off the air conditioner or adjust the time setting to 0.0.
SETTING DELAYED SWITCH ON TIMER
With the air conditioner is off, press the TIMER button. The TIMER ON light will come on. Then set the desired time delay ON hours by pressing the UP and DOWN buttons. The time increments are at 0.5 hour to up to 10 hours, followed by 1 hour increment up to 24 hours. When the delay time set has elapsed, the air conditioner switches on. To cancel the delayed switch on function, turn on the air conditioner or adjust the time setting to 0.0.
SLEEP MODE
In this mode, the air conditioner gradually increases the set temperature in cooling mode, decreases the noise level and conserves energy. In Sleep & cooling mode, the set temperature is increased by 1^ C/ 2^ C in the first 30 minutes. The temperature will then increase by another 1^ C/ 2^ C after an additional 30 minutes. This new temperature will remain the same for 7 hours. To activate this function mode, press the SLEEP button until the sleep indicated light comes on.
AUTO RESTART
In the event of a power outage, the air conditioner restarts at the previously set function mode and settings when power is restored.
CONTROLLING THE AIR FLOW DIRECTION
The louvers can be adjusted manually or automatically.
To adjust the air flow direction, manually move the louvers to the desired position. The maximum setting angle is about 60^ .
NOTE: Keep the louver fully opened during operation.
To adjust the air flow direction automatically, press the SWING button to set the louvers at the desired angle. The louvers move up to an angle of 6^ when the SWING button is pressed once. By pressing the SWING button for more than 2 seconds, the auto swing feature is activated.
NOISE LEVEL
Portable air conditioners may make sounds that are not familiar to you. The sounds listed below are normal. Noise reflecting off hard surfaces such as a floor or wall can make the sounds seem louder than they actually are.
- The compressor may make a pulsating or high-pitched sound.
• Water running from the evaporator to the water tank may make a splashing sound. - Refrigerant flowing may make a gurgling sound.
- Fan sound may come from front and back air vents.
WATER DRAINAGE

Fig.23

Fig.24

natural_image
Diagram of a heat exchanger with cooling fins and cooling unit, showing airflow direction (no text or symbols)Fig.25
When the water level of the bottom tray reaches maximum level, the unit will beep 8 times and the digital display will show P1 symbol. Also, the cooling or dehumidifying function will stop and the fan only function will start.
Manual drainage
To drain the water from the bottom try, carefully move the unit to a drain location, remove the bottom drain plug and let the water drain (Fig.25). The P1 symbol will disappear and the cooling or dehumidifying function can be started.
Continuous drainage
In COOL or DRY modes, remove the upper drain plug from the back of the unit and install the drain water hose (5/8 universal female mender) with 34 " hose. Place the open end of the hose to a drain area. (Fig.23 & 24).
REMOTE CONTROL
The portable air conditioner can be switched on by the remote control. To transmit signals from the remote control to the air conditioner, point the front part of the remote handset towards the control panel on the air conditioner. Reception of the signal is confirmed by a beep. The maximum signal transmission distance is approximately 8 meters / 26 feet.
NOTE:
- Other appliances in the same room controlled by a remote control (TV, radio, stereo, etc.), may cause interferences.
- Electronic and fluorescent lamps may interfere with the signal transmissions between the remote control and the air conditioner.
- Remove the batteries if the remote control is not used for long periods.
INSTALLING BATTERIES
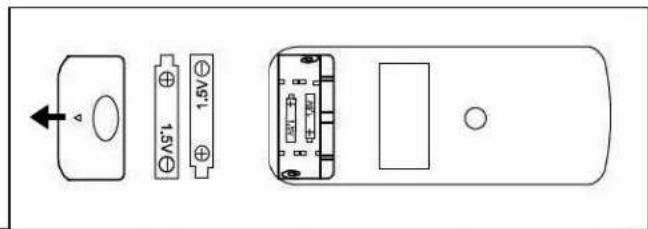
- Only use two dry LR03 AAA 1.5V Batteries (included) in the remote control.
• Always change both batteries at the same time.
To insert the batteries, open the flap on the back of the remote control by sliding if off. Strictly adhere to the polarity signs on the bottom of the battery housing, close the flap once the batteries have been inserted.
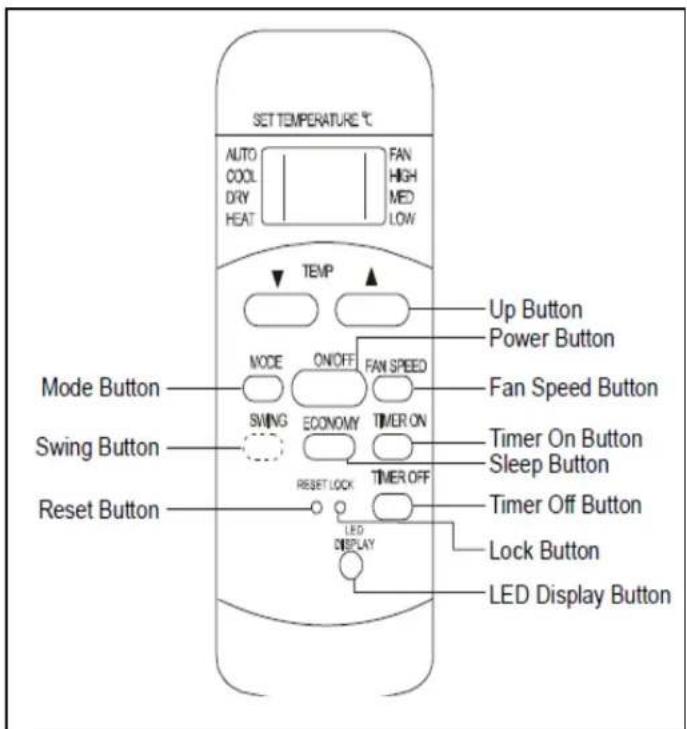
| Button | Function |
| On/Off | Turns the unit on and off. |
| Mode | Controls the 4 function modes: Auto, Cool, Dry & Fan. |
| Fan Speed | Controls the 3 fan speeds: Auto High, Medium & Low. |
| Timer On | Enables the On timer & set timer hours. |
| Timer Off | Enables the Off timer & set timer hours. |
| Temp Up | Increases set temperature. |
| Temp Down | Decreases set temperature. |
| Swing | Starts or stops louver movement and set louver angle. |
| Economy | Enables sleep mode. |
| Reset | Cancels all settings. |
| Lock | Locks all settings |
| LED Display | Turns on the display light. |
CARE AND MAINTENANCE

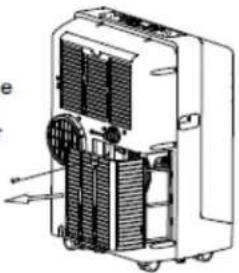
Remove the screw and take the air inlet grille down
natural_image
Technical diagram of a mechanical device with internal components and heat flow arrows (no text or labels)Fig.27
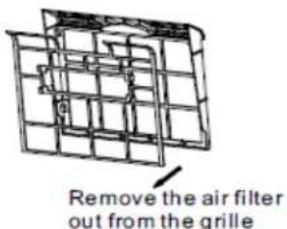
Fig.28

natural_image
Diagram of a mechanical device with a coiled cylindrical component and directional arrows indicating motion (no text or symbols)Fig.30
IMPORTANT:
- Switch off the air conditioner and disconnect the plug from the power outlet
- Drain water by removing the drain plug.
- Always transport the air conditioner in an upright position only.
CLEANING THE AIR FILTERS
- To ensure the air intake is filtered properly and to assure that your air conditioner runs efficiently, it is recommended to clean the air filters at least once every two weeks.
- This unit has two air filters; the upper and the lower filters.
- Switch off the air conditioner and pull out the upper air filter from the unit (Fig 26).
- Remove the lower filter by loosening the screw and taking down the air inlet grille. (Fig.27 & 28).
- Use a vacuum cleaner or tap lightly to remove loose dust and dirt from the filters. Then rinse them thoroughly under warm or cold running water (no hotter than 100F.)
- Dry thoroughly before re-inserting the filters.
WARNING! Never operate the air conditioner without the filter in place.
CLEANING THE AIR CONDITIONER
- Always switch off the air conditioner and disconnect the plug from the power supply outlet before cleaning the air conditioner.
- Use a soft damp cloth to wipe the body of the unit.
- Never use harsh chemicals, oil-based products, detergents, chemically treated cloths or other cleaning solutions. These could possibly damage the body of the air conditioner.
END OF SEASON STORAGE
- Switch off the air conditioner and disconnect the power plug from the power supply outlet before cleaning the air conditioner.
- Clean the air filters.
- Drain the condensed water COMPLETELY.
- On a warm day, turn on the Fan only mode for half a day so that the inside can dry out completely.
- Wrapped the power cord and bundle it with the tape (Fig.29).
- Remove the batteries from the remote controller.
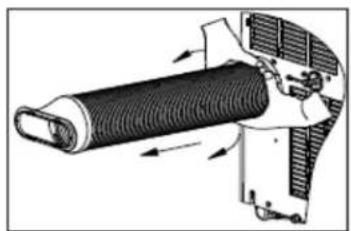
- Disconnect the exhaust hose and cover the window / wall hole with the adaptor cap. (Fig.30)
- It is recommended that the air conditioner be put back into its original carton for storage.
TECHNICAL DATA
| Cooling capacity | 10,000 BTU |
| Power supply | 115v/ 60Hz |
| Maximum power input | 1170 Watts |
| Maximum input | 10.1 Amps |
| Dehumidifying capacity | 55 Pts / Day |
| Thermostat | 62°F / 17°C to 88°F / 30°C |
| Refrigerant | R-410A |
| Air flow (max.) | 380 m3/ Hour |
| Fan speeds | 3 (Auto, H, M, L) |
| Exhaust hose length | 48" / 4' |
| Unit Dimensions | 17" W x 13.6" D x 28" H |
| Unit Weight | 64 lbs |
TROUBLESHOOTING
| Problem | Possible Causes | Solutions |
| The portable air conditioner does not turn on | Power failure / outage.The automatic switch, line fuse, or breaker has been tripped.The power supply voltage is too low.The power cord is damaged.The L.C.D.I. power plug for the unit is tripped.The internal water reservoir is full and ‘P1” appears on display. | Restore the power supply.Flip the switch / change the fuse / turn the breaker back on. Also note that you may have too many appliances drawing power on one circuit, you may need to move the other appliances to another circuit.Move the unit onto another circuit with the correct voltage.Call for service. Only authorized personnel should replace damaged power cord or power plug.Press the Reset button on the L.C.D.I. power plug.Drain water from the air conditioner. |
| The unit turns on but the compressor does not turn on (the fan runs but the unit is not cooling) | The room temperature is outside of the operational tolerances of the unit.The Cooling mode is not on.The compressor has not turned on yet because of its time delay.The set temperature is too high.The internal water reservoir is full and ‘P1” appears on display. | This unit is designed to work in ambient temperatures of 63°F to 90°F.Press the MODE button until the COOL light is shown on the display.Give the compressor 3 minutes to turn on after the Cooling mode has been selected.Set the air conditioner to a lower temperature. It is recommended to set the temperature to at least 5°F of the ambient temperature.Either manually drain the water by removing the drain plug or allow the unit to exhaust the water itself by running the fan only mode. Then cooling will resume. |
| The air coming out of the unit is not very cold, or the airflow volume is weak | The filters are dirty or obstructed.The air intake or exhaust is obstructed.The unit is set in DRY or FAN mode.The unit is set to low fan speed. | Clean the air filters.Make sure there is at least 20" of clearance from the air intake. Make the length of the exhaust hose is as short as possible.Set the unit to the cooling mode.Set the unit to a higher fan speed. |
| The unit has worked for a long time, but the room is not cold enough | Windows or doors are open.There are too many people in the room.There is direct sunshine into the room.The room is a kitchen or with many heat-producing appliancesThere is a server in the room.The room is too large. | Close all windows and doors.You may need additional cooling or another air conditioner.Close curtains or blinds and try to minimize the amount of direct sunlight into the room.You may need additional cooling or another air conditioner.You may need additional cooling or another air conditioner. |
| The unit is very noisy | The unit is not level.The surface underneath the unit is uneven.Low power voltage. | Make sure the unit is on hard, level and stable surface.Move the unit to a location with a level and hard floor.Make sure the wall outlet and support the required power consumption of the air conditioner and do not use an extension cord. |
| The unit leaks water | The unit is tilted or not leveledThe water tank is full. | Make use the unit is leveled.Drain water from the drain plug at the back of the air conditioner. |
| Fan speed cannot be changed | Fan speed differences are not very noticeable | The fan speed difference is not very noticeable when the compressor is on. Try setting the unit to Fan only mode, you should be able to hear the difference between high and low fan speed settings. |
ONE YEAR LIMITED WARRANTY & THREE YEAR WARRANTY ON COMPRESSOR
This WHYNTER portable air conditioner is warranted, to the original owner within the 48 continental states, for one year from the date of purchase against defects in material and workmanship under normal use and service. Should your WHYNTER portable air conditioner prove defective within one year from the date of purchase, return the defective part or unit, freight prepaid (within two months of purchase; after two months to one year, customer will be responsible for freight cost to Whynter's service department), along with an explanation of the claim to Whynter LLC. Please package the portable air conditioner carefully in its original packaging material to avoid damage in transit. Please retain the original box and packaging material. Under this warranty, Whynter will repair or replace any parts found defective. This warranty is not transferable. After the expiration of the warranty, the cost of labor and parts will be the responsibility of the original owner of the unit.
THIS WARRANTY DOES NOT COVER:
- Acts of God, such as fire, flood, hurricanes, earthquakes and tornadoes.
- Damage, accidental or otherwise, to the air conditioner while in the possession of a consumer not caused by a defect in material or workmanship;
- Damage caused by consumer misuse, tampering, or failure to follow the care and special handling provisions in the instructions.
- Damage to the finish of the case, or other appearance parts caused by wear.
- Damage caused by repairs or alterations to the product by anyone other than authorized by the manufacturer.
- Freight and Insurance cost for the warranty service.
DISCLAIMER OF IMPLIED WARRANTIES; LIMITATION OF REMEDIES
CUSTOMER'S SOLE AND EXCLUSIVE REMEDY UNDER THIS LIMITED WARRANTY SHALL BE PRODUCT REPAIR OR REPLACEMENT AS PROVIDED HEREIN. CLAIMS BASED ON IMPLIED WARRANTIES, INCLUDING WARRANTIES OF MERCHANTABILITY OR FITNESS FOR A PARTICULAR PURPOSE, ARE LIMITED TO ONE YEAR OR THE SHORTEST PERIOD ALLOWED BY LAW, BUT NOT LESS THAN ONE YEAR. WHYNTER SHALL NOT BE LIABLE FOR CONSEQUENTIAL OR INCIDENTAL DAMAGES SUCH AS PROPERTY DAMAGE AND INCIDENTAL EXPENSES RESULTING FROM ANY BREACH OF THIS WRITTEN LIMITED WARRANTY OR ANY IMPLIED WARRANTY. SOME STATES AND PROVINCES DO NOT ALLOW THE EXCLUSION OR LIMITATION OF INCIDENTAL OR CONSE- QUENTIAL DAMAGES, OR LIMITATIONS ON THE DURATION OF IMPLIED WARRANTIES, SO THESE LIMITATIONS OR EXCLUSIONS MAY NOT APPLY TO YOU. THIS WRITTEN WARRANTY GIVES YOU SPECIFIC LEGAL RIGHTS. YOU MAY ALSO HAVE OTHER RIGHTS THAT VARY FROM STATE TO STATE.
To obtain service or information, contact
Whynter LLC via email at service@whynter.com or call
866-WHYNTER.
Product contents and specifications may change without notice.
Copyright © 2010 Whynter LLC
www.Whynter.com
- WHYNTER ECO-FRIENDLY 10,000 BTU PORTABLE AIR CONDITIONER
- Instruction Manual
- TABLE OF CONTENTS
- DISPOSAL
- SAFETY PRECAUTIONS
- DANGER
- WARNING
- IDENTIFICATION OF PARTS Front
- OPERATING YOUR AIR CONDITIONER
- INSTALLATION INSTRUCTIONS
- Location
- Exhaust hose Installation
- Wall Installation
- IMPORTANT:
- Window kit Installation
- Window kit Installation in a double-hung window
- Window kit Installation in a sliding door/ window
- AIR FILTERS INSTALLATION
- WARNING: NEVER OPERATE THE AIR CONDITIONER WITHOUT THE PRE-FILTER
- OPERATION INSTRUCTIONS
- BEFORE USING YOUR APPLIANCE
- SWITCHING ON/OFF THE AIR CONDITIONER
- COOLING MODE
- AUTOMATIC MODE
- FAN ONLY MODE
- TIMER (DELAYED SWITCH ON / OFF) FUNCTION
- SETTING SWITCH OFF TIMER
- SETTING DELAYED SWITCH ON TIMER
- SLEEP MODE
- AUTO RESTART
- CONTROLLING THE AIR FLOW DIRECTION
- NOISE LEVEL
- WATER DRAINAGE
- Manual drainage
- Continuous drainage
- REMOTE CONTROL
- NOTE:
- INSTALLING BATTERIES
- CARE AND MAINTENANCE
- CLEANING THE AIR FILTERS
- CLEANING THE AIR CONDITIONER
- END OF SEASON STORAGE
- ONE YEAR LIMITED WARRANTY & THREE YEAR WARRANTY ON COMPRESSOR
- THIS WARRANTY DOES NOT COVER:
- DISCLAIMER OF IMPLIED WARRANTIES; LIMITATION OF REMEDIES
Brand : Whynter
Model : ARC-10WB
Category : Air conditioner