
D467SLG - Monitor HYUNDAI - Free user manual and instructions
Find the device manual for free D467SLG HYUNDAI in PDF.


| Product Type | Infrared Touch Screen Monitor |
| Model | D467SLG |
| Brand | Hyundai |
| Touch Technology | Infrared (IR) |
| Supported Input | Finger or Pen |
| Interface | USB or Serial (RS-232) |
| Operating System | Microsoft Windows |
| Driver Software | Hyundai IT Touch Driver |
| Touch Modes | Touchdown, Lift-up, Drawing, Touch Only |
| Sound Feedback | Configurable tone and duration |
| Double-Click Speed | Adjustable speed and area |
| Right Button Simulation | Right Button tool for right-click |
| Calibration | Manual and automatic per resolution |
| Fine Coordinate Correction | Cursor offset and zoom adjustment |
| Multi-Monitor Support | Mapping, clone, stretch modes |
| Drawing Test Tool | Built-in for testing touch accuracy |
Frequently Asked Questions - D467SLG HYUNDAI
User questions about D467SLG HYUNDAI
0 question about this device. Answer the ones you know or ask your own.
Ask a new question about this device
Download the instructions for your Monitor in PDF format for free! Find your manual D467SLG - HYUNDAI and take your electronic device back in hand. On this page are published all the documents necessary for the use of your device. D467SLG by HYUNDAI.
USER MANUAL D467SLG HYUNDAI
Hyundai IT Driver's User Guide

natural_image
Hand pointing at a screen interface (no visible text or symbols)Contents
Chapter 1
Introduction 3
Chapter 2
Installing Hyundai IT 5
Uninstalling Hyundai IT 7
Control Panel 7
Chapter 3
Hyundai IT Device Setting & Information 8
Chapter 4
Setup 10
Option/Tools 12
Multi Monitor Display 15
Chapter 1
Introduction
Hyundai IT Touch Driver is the software for the Infrared Touch Screen of Hyundai IT Co, Ltd. It provides full touch screen functionality for all software applications running under Microsoft Windows.
This version of Hyundai IT Touch Driver software for your Hyundai IT touch screen supports Serial, USB controllers.
Once you install Hyundai IT Touch Driver, you can select, launch, and drag objects using the touch screen. To make a selection, you simply touch the screen. It's that easy and natural – just touch to select.
Hyundai IT Touch Driver includes :
Hyundai IT Touch Driver
Hyundai IT Touch Driver is the software that the system uses to communicate with the touch screen. The driver enables you to use the Hyundai IT touch screen with applications running in Windows environments. You can run Windows programs and use touch (finger or pen) input without any program modifications.
(Touch screen Control Panel)
You can use the touch screen control panel to set your preferences for the touch screen. For example, you can define the following preferences:
- Whether the touch action occurs when you touch the screen or when you lift your finger (or pen) off the screen.
- Whether you hear a sound when you touch the screen
- How fast you need to touch to produce a double-click
You can also use the control panel to calibrate the touch screen, to stabilize the cursor, and define where the cursor appears relative to your touch(an offset).
Touch Click Control
Touch Click Control has the same function of Windows right mouse button. Any touch on the monitor on which Right Button is running will produce a right button click.
Uninstalling Hyundai IT Touch Driver
The Uninstall utility automatically deletes all Hyundai IT Touch Driver components from your computer and removes all Hyundai IT entries from the system files.
Chapter 2
Installing
Uninstalling
Control Panel
Installing Hyundai IT Touch Driver
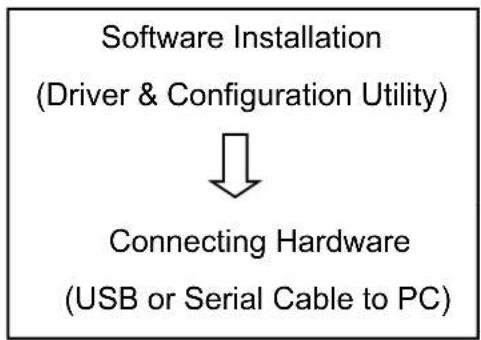
flowchart
graph TD
    A["Software Installation\n(Driver & Configuration Utility)"] --> B["Connecting Hardware\n(USB or Serial Cable to PC)"]
- Insert the Driver CD-ROM into your PC.
- Browse to the folder and double-click the "Setu p.exe" file.
- Follow the onscreen instructions to begin the installation.
- Connect Touch screen monitor cable(USB or Serial) into your PC

flowchart
graph TD
    A["Start Copying File"] --> B{Hardware Installation: This software you are installing for this hardware.
    Note: IP Touch Device Driver
    has not passed Windows Logs testing to verify its compatibility with Windows XP. [Call one where this testing is important.]
    Continuing your installation of this software may impair or destabilize the correct operation of your system either immediately or in the future. Microsoft strongly recommends that you stop this installation now and contact the hardware vendor for software that has passed Windows Logo testing.
    Continue Any say STOP Installation}
    B --> C{Hardware Installation: This software you are installing for this hardware.
    Note: IP Touch Device Driver
    has not passed Windows Logs testing to verify its compatibility with Windows XP. [Call one where this testing is important.]
    Continuing your installation of this software may impair or destabilize the correct operation of your system either immediately or in the future. Microsoft strongly recommends that you stop this installation now and contact the hardware vendor for software that has passed Windows Logo testing.
    Continue Any say STOP Installation}
    C --> D{Hardware Installation: This software you are installing for this hardware.
    Note: IP Touch Device Driver
    has not passed Windows Logs testing to verify its compatibility with Windows XP. [Call one where this testing is important.]
    Continuing your installation of this software may impair or destabilize the correct operation of your system either immediately or in the future. Microsoft strongly recommends that you stop this installation now and contact the hardware vendor for software that has passed Windows Logo testing.
    Continue Any say STOP Implementation}

flowchart
graph TD
    A["Connecting Hardware\n(USB/Serial Cable to PC)"] --> B["Software' Installation\n(Driver & Configuration Utility)"]
- Upon your system's reboot, the 'Found New Hardware Wizard' appears. Select [Advanced] installation - Click [Next].
2 Follow the onscreen instructions to begin the installation. - Double-click "Setup.exe" file in the install CD as described on the previous page.

flowchart
graph TD
    A["Welcome to the Found New Hardware Wizard"] --> B["Choose to install software for Research Touch Device Drive"]
    B --> C{Search to install software: Web or Open Web?}
    C -->|Yes| D["Select the folder that contains drivers for your hardware."]
    C -->|No| E["Include this file"]
    D --> F["Browse For Folder"]
    F --> G{To confirm any subfolders, click a plus sign above.}
    G -->|Yes| H["Find New Hardware Wizard"]
    G -->|No| I["Back"]
    H --> J["Search to install software for Research Touch Device Drive"]
    J --> K{Use the switch to install software for Research Touch Device Drive.}
    K -->|Yes| L["Local Disk (C)"]
    K -->|No| M["Local Disk (D)"]
    K -->|No| N["Remote (E)"]
    K --> O["Importing the device 2.0.3.0"]
    K --> P["Shared Documents"]
    K --> Q["Previse Documents"]
    P --> R["Browse For Folder"]
    R --> S{Choose to install software for Research Touch Device Drive.}
    S -->|Yes| T["Find New Hardware Wizard"]
    S -->|No| U["Back"]
    T --> V["Search to install software for Research Touch Device Drive"]
    V --> W{Use the switch to install software for Research Touch Device Drive.}
    W -->|Yes| X["Local Disk (C)"]
    W -->|No| Y["Local Disk (D)"]
    W --> Z["Remote (E)"]
    W --> AA["Remote (E)"]
    W --> AB["Importing the device 2.0.3.0"]
    W --> AC["Shared Documents"]
    W --> AD["Previse Documents"]
    X --> AE["Browse For Folder"]
    AE --> AF{Choose to install software for Research Touch Device Drive.}
    AF -->|Yes| AG["Find New Hardware Wizard"]
    AF -->|No| AH["Back"]
    AH --> AI["Search to install software for Research Touch Device Drive"]
    AI --> AJ{Use the switch to install software for Research Touch Device Drive.}
    AJ -->|Yes| AK["Local Disk (C)"]
    AJ -->|No| AL["Local Disk (D)"]
    AJ --> AM["Remote (E)"]
    AJ --> AN["Remote (E)"]
    AJ --> AO["Importing the device 2.0.3.0"]
    AJ --> AP["Shared Documents"]
    AJ --> AQ["Previse Documents"]
    AP --> AR["Browse For Folder"]
    AR --> AS{Choose to install software for Research Touch Device Drive.}
    AS -->|Yes| AT["Find New Hardware Wizard"]
    AS -->|No| AU["Back"]
    AU --> AV["Search to install software for Research Touch Device Drive"]
    AV --> AW{Use the switch to install software for Research Touch Device Drive.}
    AW -->|Yes| AX["Local Disk (C)"]
    AW -->|No| AY["Local Disk (D)"]
    AW --> AZ["Remote (E)"]
    AW --> BA["Remote (E)"]
    AW --> BB["Importing the device 2.0.3.0"]
    AW --> BC["Shared Documents"]
    AW --> BD["Previse Documents"]
    BC --> BE["Browse For Folder"]
    BE --> BF{Choose to install software for Research Touch Device Drive.}
    BF -->|Yes| BG["Find New Hardware Wizard"]
    BF -->|No| BH["Back"]
    BH --> BI["Search to install software for Research Touch Device Drive"]
    BI --> BJ{Use the switch to install software for Research Touch Device Drive.}
    BJ -->|Yes| BK["Local Disk (C)"]
    BJ -->|No| BL["Local Disk (D)"]
    BJ --> BM["Remote (E)"]
    BJ --> BN["Remote (E)"]
    BJ --> BO["Importing the device 2.0.3.0"]
    BJ --> BP["Shared Documents"]
    BJ --> BQ["Previse Documents"]
    BJ --> BR["Browse For Folder"]
    BR --> BS{Choose to install software for Research Touch Device Drive.}
    BS -->|Yes| BT["Find New Hardware Wizard"]
    BS -->|No| BU["Back"]
    BU --> BV["Search to install software for Research Touch Device Drive"]
    BV --> BW{Use the switch to install software for Research Touch Device Drive.}
    BW -->|Yes| BX["Local Disk (C)"]
    BW --> BY["Local Disk (D)"]
    BW --> BZ["Remote (E)"]
    BW --> CA["Remote (E)"]
    BW --> CB["Importing the device 2.0.3.0"]
    BW --> CC["Shared Documents"]
    BW --> DC["Previse Documents"]
    BW --> DD["Browse For Folder"]
    DD --> DE["Search to install software for Research Touch Device Drive"]
    DE --> DF{Use the switch to install software for Research Touch Device Drive.}
    DF -->|Yes| DG["Local Disk (C)"]
    DF --> DH["Local Disk (D)"]
    DF --> DI["Remote (E)"]
    DF --> DJ["Remote (E)"]
    DF --> DK["Importing the device 2.0.3.0"]
Uninstalling Hyundai IT Touch Driver
- Click on Start - Programs - Hyundai IT - Uninstall Hyundai IT Touch Driver
- Select [Remove] and click [Next]

Control Panel
- Double-click the 'Touch Driver' icon on the screen or Click on Start - Programs - Hyundai IT - Hyundai IT Touch Driver

Chapter 3
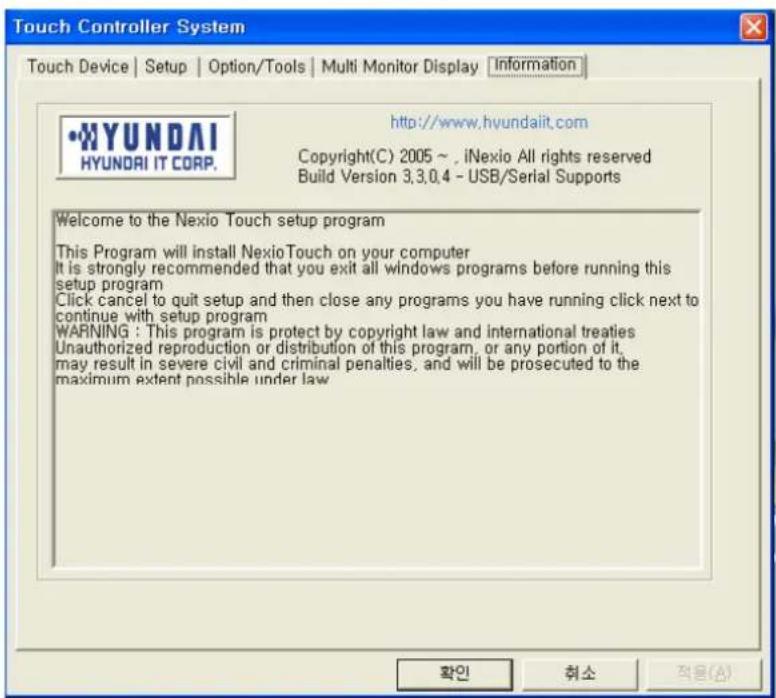
Nexio Device Setting & Information
Shows the Port No., Firmware Version, Device name, Comm. Device

Chapter 4
Control Panel
Setup
Option/Tools
Multi Monitor Display
Setup

Sound effect
No Sound No Sound
Touch down Sound occurs when you touch down
Lift up Sound occurs when you lift up
Touch down Mode
Touchdown Mode enables you to create an immediate button action as soon as you touch the screen. In Touchdown Mode, you cause a button down at the cursor location, with a short pause and then a button up. You can leave your finger on the screen but only a single touch is 'règîsteréd until you lift your finger off the screen and touch down again.
Touching the screen is equivalent to pressing and releasing the mouse button. The action occurs as soon as you touch the screen. This mode is best for button based applications(like a calculator)
Lift up Mode
Lift up Mode enables you to position the cursor where you want before creating a button action. In Lift up Mode, the cursor will follow your finger for more accurate touch. When you want to select an item, lifting your finger off the screen will cause a button down, short pause, and then a button up to occur.
Touching the screen is equivalent to moving the mouse position. The button down/button up action occurs when you remove your finger from the screen. This mode is useful for applications requiring greater accuracy because it lets you carefully position the cursor prior to acting on it.
Sound Tone/Sound The frequency (Tone) and the Duration of the sound can be adjusted by moving the appropriate slider with the touch screen or mouse, or by using the keyboard arrow keys.
Double Click Speed & Area Define how fast you need to touch and the space in which you must touch in order to produce a double-click.
Double Click Test Enables you to test the double-click speed and area.
Touch Action
Drawing Mode Drawing mode is most useful for draw, paint, illustrator, and graphics applications. In Drawing Mode, a touch is equivalent to pressing and holding down the mouse button. This is considered the easiest mode to use with immediate reaction to touch. Lifting off is equivalent to releasing the mouse button.
Touch Only Mode Drawing or dragging is not supported in this mode.
Touch Rotation In case of putting the touch screen not properly on the display(e.g. upside down), you can select proper degree to adjust the touch(cursor) position.
Option/Tools
1)

2)

3)


1) Right Button
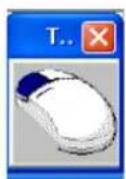

Right Button tool allows a Windows right mouse button simulation on the touch screen. A representation of a typical two-button mouse is displayed in a small window on the desktop, when this application is run. The Right Button shows the left button shaded, indicating that the left button is active. Any touch on the desktop or an application will produce a left button click consistent with the Button settings in the Control Panel.
A touch in the Right Button will change the shading to show the right mouse button active. Now any touch on this monitor on which Right Button is running will produce a right button click.
2) Touch Calibration
The calibration process aligns the touch screen with the underlying video. Specifically, calibration defines the dimensions of the active area of the touch screen and locates the center of the touch screen. If the screen is not calibrated, the active area of the touch screen may not be aligned properly or may be unnecessarily small in size.
Once calibrated, the information is saved by the touch screen for each video resolution. Therefore, you only need to recalibrate the touch screen the first time you change to a particular video resolution.
Calibration process is running automatically based on the resolution. For more accuracy, follow the below instruction and also refer to Fine Coordinate Correction function 4)-2.
- Click [Calibration] button. Calibration targets appear on the screen. A circle guides you through the calibration process pointing to the appropriate target.
- Touch the touch screen and position your fingertip to the center of the circle
- Repeat for additional calibration target(s).
- If you accidentally touched the screen in the wrong place during calibration, you will distort the touch screen calibration. Test to make sure you are satisfied with the calibration results.

3) Drawing Test Tool
Slide your finger on the screen and test drawing(Drawing Mode only).

4)-1 Fine Coordinate Correction
After you calibrate the touch screen, the cursor should be located directly underneath your finger when you touch the screen. However, you may prefer to offset the cursor slightly above your touch so you can see the cursor and point more easily and precisely to small objects.
Touch Cursor Shift option lets you define the distance between your fingertip and the position of the cursor on the screen.
Offsetting the cursor is helpful when selecting small items, such as single letters in word processing, check boxes, or radio buttons.
Click [Up][Down][Left][Right] to make X or Y offset.

natural_image
Diagram showing a tool interacting with a shaded rectangular area, with arrows pointing to the center (no text or symbols present)Optical Point
Touch(Cursor) Point
4)-2
Sometimes the screen image extends beyond the edge of the monitor bezel. In these cases, it may be difficult to touch items at the left and right edges of the screen. Normally monitor has auto scaling function itself. 4)-2 function is required to adjust the auto scaled image for more accuracy.
Click [X Zoom -(or +)][Y Zoom -(or +)] to adjust the screen image.
Multi Monitor Display
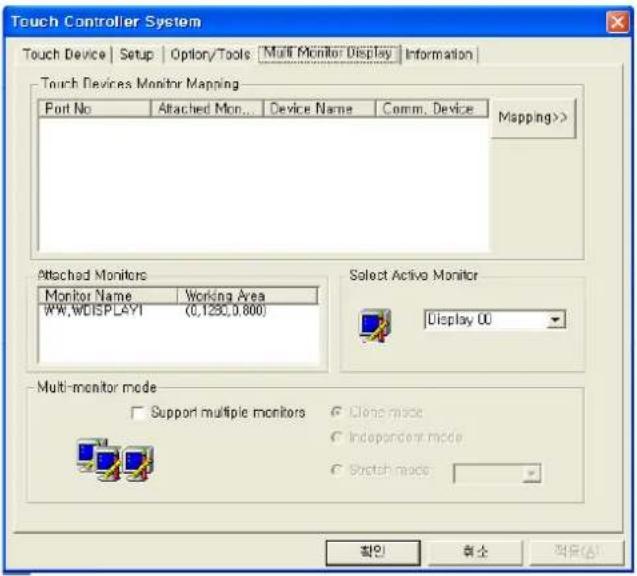
Mapping Multiple Monitors
You must map each touch screen to a monitor using the [Mapping] button. You must do this in order to individually calibrate and configure each touch screen connected to your system. Once you have properly mapped the touch screens, you set the current touch screen by selecting the icon of the desired monitor.
Clone mode & Independent mode
In the clone mode, one of the monitor is selected as the primary one. All other monitors usually have the same image as the primary monitor.
In the clone and independent mode, all screens show same image and the touch screen on each monitor functions independently.

Stretch mode
The stretch mode makes all screens combine for a single image. In this mode the touch screen on each monitor functions as a single image.




- Hyundai IT Driver's User Guide
- Contents
- Chapter 1
- Chapter 2
- Chapter 3
- Chapter 4
- Introduction
- Hyundai IT Touch Driver
- Touch Click Control
- Uninstalling Hyundai IT Touch Driver
- Installing Hyundai IT Touch Driver
- Control Panel
- Nexio Device Setting & Information
- Setup
- Touch down Mode
- Option/Tools
- 2) Touch Calibration
- Multi Monitor Display
- Mapping Multiple Monitors
- Clone mode & Independent mode
- Stretch mode
Brand : HYUNDAI
Model : D467SLG
Category : Monitor