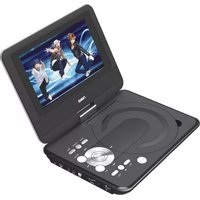
NPD-952 - Portable DVD Player Naxa - Free user manual and instructions
Find the device manual for free NPD-952 Naxa in PDF.


| Product Type | Portable DVD Player |
| Brand | Naxa |
| Model | NPD-952 |
| Screen Size | 9 inches (diagonal) |
| Display Type | LCD TFT |
| Disc Compatibility | DVD, DVD±R/RW, CD, CD-R/RW |
| Video Formats Supported | MPEG-4, AVI, DIVX |
| Audio Formats Supported | MP3, WMA, PCM |
| Photo Formats Supported | JPEG |
| Battery Type | Rechargeable lithium-ion |
| Battery Life | Up to 3 hours |
| Power Supply | AC 100-240V 50/60Hz adapter, DC 12V car adapter |
| Dimensions (L x W x H) | 21.5 x 17.5 x 4.5 cm (8.5 x 6.9 x 1.8 in) |
| Weight | 1.0 kg (2.2 lbs) |
| Built-in Speakers | 2 x 0.5W stereo |
| Headphone Jack | 3.5mm stereo |
| AV Output | Composite video + stereo audio (RCA) |
| Remote Control | Included (IR) |
| Region Code | 1 (NTSC) or multi-region (check manual) |
| Accessories Included | AC adapter, car adapter, AV cable, remote control, user manual |
| Cleaning | Wipe with a soft dry cloth; do not use liquids |
| Safety | Do not expose to moisture or extreme temperatures |
| Repairability | No user-serviceable parts; contact support |
Frequently Asked Questions - NPD-952 Naxa
User questions about NPD-952 Naxa
0 question about this device. Answer the ones you know or ask your own.
Ask a new question about this device
Download the instructions for your Portable DVD Player in PDF format for free! Find your manual NPD-952 - Naxa and take your electronic device back in hand. On this page are published all the documents necessary for the use of your device. NPD-952 by Naxa.
USER MANUAL NPD-952 Naxa
natural_image
Black foldable TV device displaying a football game with a red football player in the background (no visible text or symbols on screen)9" Portable DVD Player With
USB/SD/MMC Inputs
Contents
Important Safety Instructions....2-3
Location of Controls.... 4
Remote Controller Button Introduction.... 5
Remote Battery Information....6
Handling Discs....6
Basic Connection.... 7
Basic Operation....8
For DVD Program....9
About Discs....9
Settings Menu.... 10-11
Ordinary Problem & Troubleshooting.... 11
Technology Parameter.... 12
Annex table.... 12


CAUTION: TO REDUCE THE RISK OF ELECTRIC SHOCK, DO NOT REMOVE COVER (OR BACK). NO USER-SERVICEABLE PARTS INSIDE, REFER SERVICING TO QUALIFIED SERVICE PERSONNEL.

The symbol for Class II (Double Insulation)

The lighting flash with arrowhead symbol, within an equilateral triangle, is intended to alert the user to the presence of uninsulated "dangerous voltage" within the product's enclosure that may be of sufficient magnitude to constitute a risk of electric shock to persons.

The exclamation point within an equilateral triangle is intended to alert the user to presence of important operating and maintenance (servicing) instructions in the literature accompanying the appliance.
CAUTION
This digital video disc player employs a laser system. to ensure proper use of the product, please read this user manual carefully and retain for future reference. should the unit require maintenance, contact customer service (details on the last page of this manual). if passing on the product to someone else, please pass on this instruction manual.
Use of the control, adjustments or the performance of procedures other than those specified in this manual may result in hazardous radiation exposure.
To prevent direct exposure to laser beams do not open the enclosure. visible laser radiation may be present when the enclosure is opened. do not look into the beam.
warning:
to reduce the risk of fire or electric shock and other interferences, use manufacturer recommended accessories only.
DANGER

INVISIBLE LASER RADIATION WHEN OPEN AND INTERLOCK FAILED OR DEFEATED. AVOID DIRECT EXPOSURE TO LASER BEAM.
LASER SAFETY
This unit employs an optical laser beam system in the DVD mechanism, designed with built-in safeguards. Do not attempt to disassemble, refer to qualified service personnel. Exposure to this invisible laser light beam may be harmful to the human eye.
THIS IS A CLASS-1 LASER PRODUCT. USE OF CONTROLS, OR ADJUSTMENTS OR PROCEDURES OTHER THAN THOSE SPECIFIED HEREIN, MAY RESULT IN HAZARDOUS LASER LIGHT BEAM EXPOSURE
WARNING:
To prevent fire or shock hazards, do not expose this item to any liquid, water, rain or moisture, dripping or splashing of any kind. To avoid accidental hazards, keep away from objects filled with liquids such as vases, sinks or baths.
Do not block any air inlets or ventilation openings. Do not impede ventilation openings with newspaper, tablecloths, curtains or other like material
Keep away from sources of direct heat such as direct sunlight, radiators, ovens or other apparatus (including amplifiers) that produce heat. Do not place on hot surfaces.
Keep away from high levels of humidity.
Keep away from sharp objects.
Read all instructions before use and save these instructions in a safe place. If passing on this appliance to someone else, please pass on these instructions with it. Remove the disc before moving the unit. If the player is moved with the disc loaded, the disc may be damaged.
For you own safety, read the following instructions carefully before attempting to connect this DVD Player to the mains.
This unit is designed to operate on:
- 120V\~60Hz AC/DC Adaptor (included) – (DC Input 12V)
• Re-chargeable Li-ion Battery (battery included). This battery is non-replaceable. - Car Adaptor (included) – plugs into the cigarette lighter of your car
NOTES ON HANDLING
- When shipping this DVDs player, always use the original shipping carton and packing materials. For maximum protection, re-pack the unit as it was originally packed at the factory.
- Do not use volatile liquids such as insect sprays near this item. Do not let rubber or plastic products come into contact with this item for long periods of time as they will leave marks on the item.
- The DVD Player may become warm after extended periods of use, this is normal and not a malfunction.
- When the DVD Player is not is use, remove the disc and turn off the power.
• To ensure your DVD Player is in good working order, its advisable to use it from time to time rather than leaving it unused for long periods of time.
CLEANING AND CARE:
- Use a soft, dry cloth for cleaning.
- Do not use any liquids or solvents to clean, this may damage the unit
- Wipe any moisture off with a soft, dry cloth, and be sure discs are fully dry before using.
- Do not store discs in high temperature or high-humidity locations. The discs may become warped and get corrupt.
- Wipe any moisture off with a soft, dry cloth, and be sure discs are fully dry before using.
- Handle discs carefully so that fingerprints and dust do not get onto the surface of the disc.
To clean off, use a soft cloth.
Do not use a hard cloth since these will mark the disc.
TO OBTAIN A CLEAR PICTURE:
The DVD Player is a high technology, precision driven device. If the optical pick-up lens and disc drive parts are dirty or worn down, the picture quality becomes poor. To obtain a clear picture, we recommend regular inspection and maintenance.
NOTES ON MOISTURE CONDENSATION:
Moisture condensation could damage your DVD player. Moisture condensation occurs for example when you pour a cold drink into a glass on a warm day. Drops of water form on the outside of the glass. In the same way, moisture may condense on the optical pick-up lens inside the unit, one of the most crucial parts of the DVD Player.
Moisture condensation occurs in the following cases:
- When you bring the DVD Player directly from a cold place to a warn place.
- When you use the DVD Player in a room where you just turned on the heater, or a place where the cold wind from an air conditioner directly hits the unit.
• In summer, when you use the DVD Player in a hot and humid place just after you moved the unit from an air conditioned place. - When you use the DVD Player in a humid place.
Do not use the DVD Player when moisture condensation may occur.
If you use the unit in such a situation, it may damage discs and internal parts. Remove the disc, connect the mains power cord of the DVD Player adaptor to the mains power outlet and leave it ON for 2 to 3 hours so it will warm up and cause any moisture to evaporate. This DVD Player is set up to play Region 0 DVDs

- SETUP: setup button; press once to enter into DVD system setup function and press once more to exit.
- LCD ON/OFF: Turn on or off the display.
- MENU: To return to the disc's menu interface
- PREV Button (I◄◄): To skip to the previous title /chapter / track
- SOURCE: system working mode shift button; press this button to shift the modes of DVD/CARD/USB.
- F.FWD Button (▶▶) To perform fast forward playback.
- OK or Enter Key.
- PLAY/PAUSE: play/pause button.
- NEXT Button (▶▶1): To skip to the next title / chapter / track
- VOL+ : increase volume by degree.
- STOP (■): stop button; press once for ready stopping; press twice to stop.
- VOL- : decrease volume by degree.
- F.RWD Button (◀◀): To perform fast reverse playback.
- Remote: Controller reception Indication/ recharge Indication light/ Power indication light.
- OPEN: open/close DVD lid; press this button to open the lid of DVD.

- USB : USB jack.
- CARD: SD/MMC jack.
- EARPHONE: earphone jack.
-
AV OUT: Audio/video output.
-
AV IN: Conector de salida de Audio/Video
- POWER: switch on/ off power
- DC IN: DC input jack.
REMOTE CONTROL:
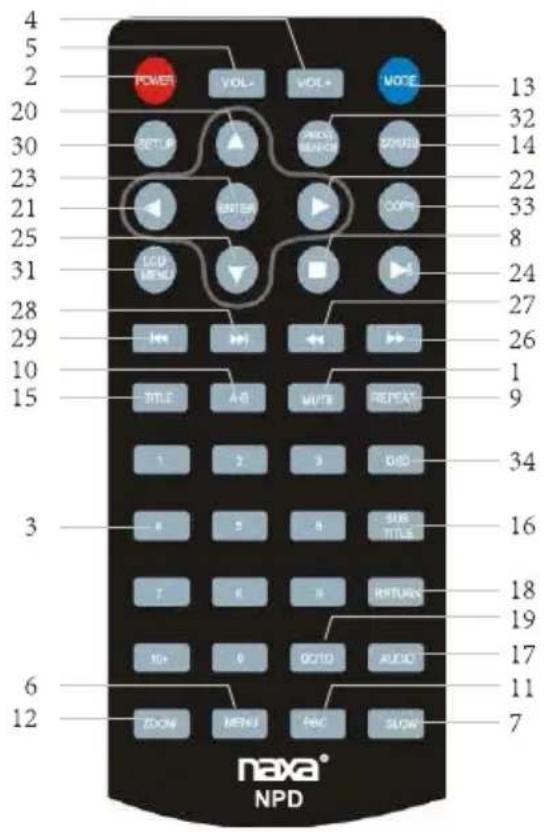
- MUTE 18. RETURN
- POWER 19. GOTO
- 0-9, 10+ NUMBERS 20. UP ▲
- VOL + 21. LEFT
- VOL - 22. RIGHT ▶
- MENU 23. PLAY ENTER
- SLOW 24. PAUSE II
- STOP 25. DOWN ▼
- REPEAT 26. FWD
- A-B 27. REV
- PBC 28. NEXT
- ZOOM 29. PREV
- MODE 30. SETUP
- SD/USB 31. LCD MENU
- TITLE 32. PROG SEARCH
- SUBTITLE 33. COPY
- AUDIO 34. OSD
Remote control
Battery Installation and replacement
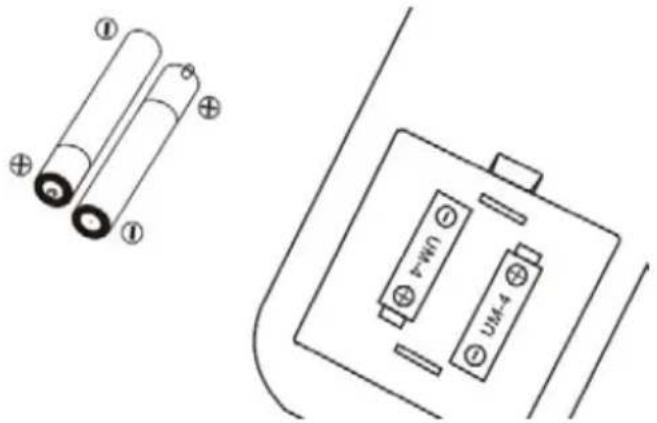
* Unscrew battery cover and remove.
* Properly dispose of exhausted batteries.
* Insert 2 new AAA batteries.
* Be sure the positive(+) and negative (-) ends of the batteries are facing the correct direction.
* Replace the battery cover.
* Do not mix old and new batteries.
* Do not mix alkaline, standard (carbon-zinc) or rechargeable (nickel-cadmium) batteries.
natural_image
Diagram showing two cylindrical batteries and a battery pack with labeled terminals (no text or symbols beyond labels)Handling Discs
- Do not touch the playback side of the disc.
- Do not attach paper or tape to the disc.

Cleaning Discs
- Fingerprints and dust on the disc cause picture and sound deterioration. Wipe the disc from the centre outwards with a soft cloth. Always keep the disc clean.
- If you cannot wipe off the dust with a soft cloth, wipe the disc lightly with a slightly moistened soft cloth and finish with a dry cloth.
- Do not use any type of solvent such as thinner, benzine, commercially available cleaners or antistatic spray. They may damage the disc.
Storing Discs
- Do not store discs in places subjected to direct sunlight or near heat sources.
- Do not store discs in places subjected to moisture and dust such as a bathroom or near a humidifier.
- Storing discs vertically in a case, stacking discs or placing objects on discs outside of their cases may cause warping.
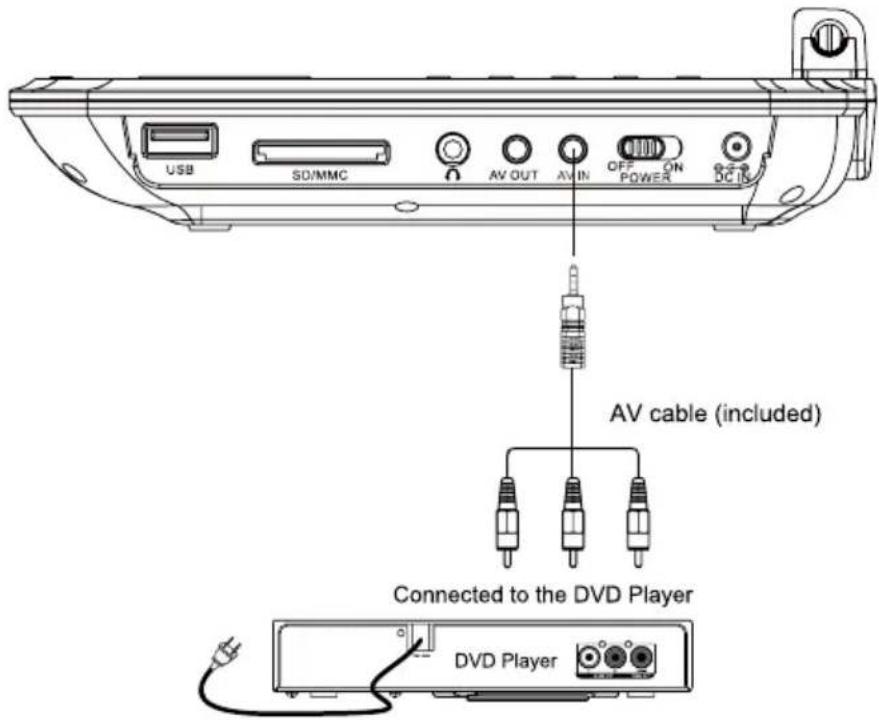
Connection to TV through AV out Jacks:

Connection to the external audio amplifier (with build-in digital audio decoder):
Basic operation
POWER
Plug in the AC/DC ADAPTOR, the POWER ON INDICATOR will light up in red.
Slide the POWER ON/OFF KEY towards the right to switch the unit on. The POWER ON INDICATOR will turn to GREEN showing that the unit is in working mode.
"No Disc" will show up on the LCD SCREEN if no disc has been loaded.
When a disc is loaded "Loading" will indicate on the LCD SCREEN.
MUTE
When a disc is playing, press this key to turn off the volume completely. Press the key again to turn on the volume.
NUMBER KEYS ON THE REMOTE CONTROL UNIT
Press any one of these keys or, for 10, press a combination, to select the desired track to be played.
For example, to select track 25, first press 2, then within 2 seconds press 5.
SETUP
Refer to the "Features Setup section" of this manual
MENU
When playing DVDs, press this key to show the Root menu of the DVD disc.
TITLE
Use this key to select the desired title to be played. Note, this feature can only be used on DVDs that are set up with title or chapters.
FF (FAST FORWARD)
Press to fast forward 2x, 4x, 8x or up to 20x speed. Press PLAY/PAUSE to resume normal playback speed.H
FB (REWIND)
Press to rewind 2x, 4x, 8x or up to 20x speed. Press PLAY/ PAUSE to resume normal playback speed.
PREV
During playing, press the PREV button to go back to the start of the previous chapter. Each press of this button will skip a chapter until the start of the disc.
NEXT
Each press of the NEXT button during playing will skip the current chapter and play the next one.
REPEAT
Press to repeat a specified title, chapter, track or to repeat the entire disc.
AUDIO (LANGUAGE / CHANNEL)
When playing DVD discs, press AUDIO to switch languages.
When playing CD discs, press AUDIO to switch between Stereo/Right Channel/Left Channel/Mixed Channels
PROGRAM
This function only works on CD or JPEG.
The CD must be in stop mode. Go to EDIT MODE, then tick the order in which you want your tracks to play. Once selected, go to PROGRAM VIEW, then press PLAY/PAUSE to play the program selection.
ANGLE
During playback mode, use this key to switch between different angles of the same image, Note, this feature works only on discs that have multi-angle encoding.
SUBTITLE
Use this key to select subtitle display on a DVD or VCD.
The subtitles will automatically be displayed if its not in the player's list of subtitles supported.
Note: this function will only work if the disc been played supports subtitles.
SOURCE
Press source Key switch DVD/AV IN/CARD/USB when reading disc.
DVD
Program playback
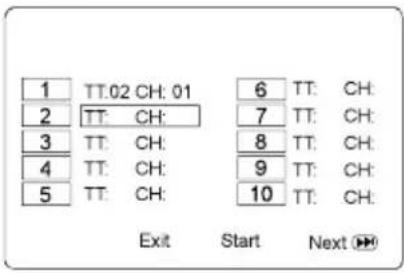
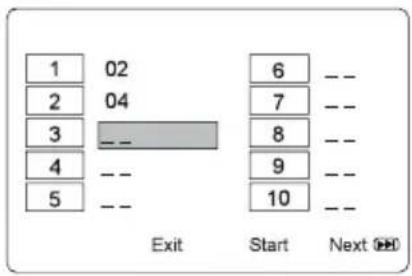
With this option, you choose and program the playback order. You can store up to 20 tracks.
- Insert a disc.
- In playing or stop mode, press the PROG button. The Program menu appears.
- Use the number buttons to enter the title number and then the chapter number (DVD) or the track number (CD).
- Use ←,→, ↑, ↓ button moving to the next input. Repeat step 3 until programming is completed. Note: press ▶ to go to next page for programming track 11 to 20.
- Highlight the "START" icon, press ENTER button to start the program play.
- Press the ■ button to stop the program playback and clear the program memory.
CD
About discs
The region number for this DVD player is: Region 0.
See the following page for information regarding region nubber.
DISC TYPES:
DVD
Data on most DVDs is divided into sections called titles and then into subsections called chapters, each of which is giver a title or chapter number. Some eatures of this DVD Player will not operate with some DVD discs as they are preset. if a function you selected does not run as desired, refer to the manual accompanying the DVD disc.
AUDIO CD
Data on an audio CD is divided into sections called tracks each of which us given a track number.
JPEG PICTURE CD
Data on a Jpeg picture CD is usually not divided into separate folders, they should appear in the root directory.

flowchart
graph LR
    A["Chapter 1"] --> B["Chapter 2"]
    B --> C["Chapter 3"]
    C --> D["Chapter 4"]
    D --> E["Chapter 5"]
    E --> F["Chapter 6"]
    style A fill:#f9f,stroke:#333
    style F fill:#f9f,stroke:#333

flowchart
graph TD
    A["Track 1"] <--> B["Track 2"]
    B <--> C["Track 3"]
    C <--> D["Track 4"]
    D <--> E["Track 5"]
    E <--> F["Track 6"]
    G["Center Circle"] --> H["Arrow pointing inward"]
Settings Menu
In stop playback, press the SETUP button on the Remote Control, the setting menu will appear on the screen. Using the Numeric; Direction and ENTER buttons to set or reset the selected functions.
General Setup Page

- Tv Shape: To set the aspect ratio of the screen to match the current movie.
- Angle Mark: To turn ON/OFF the angle mark. When turn on, if multi-angle is available in the current disc. The angle mark will appear on the screen.
- Osd Lang: To set the language of on screen display.
- Screen Saver: To turn ON/OFF the screen saver. If set to on, when the disc stop playback couple minutes, the screen saver will appear on the screen.
- Last Memory: To turn ON/OFF the last memory. When set to on, if playback the current disc. It will start playback at the point you were stopped last time.
- Text To Speech: Enter this option to set text to speech function.
Speaker Setup Page

- Downmix
Set the rear audio channels to stereo (hearing the rear-left channel in Dolby 5.1 disc in left speaker; rear-right channel in right channel) or Lt/Rt mode (hearing rear-right and rear-left channel in both right and left speakers).
Video Setup Page:


- Panel Quality:
Allows adjustment of Sharpness, Brightness, Contrast, Hue & Saturation to suit your personal preference.
Preference Page
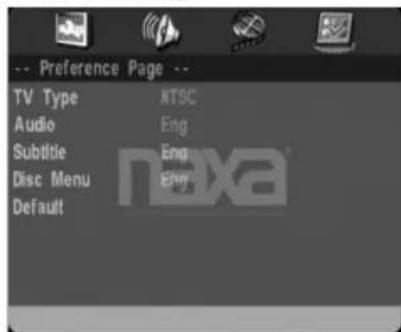
- Tv Type: Set the color system to NTSC; PAL or AUTO. (The color system in US; Canada and Mexico is NTSC).
• Audio: Select and set the priority of the available language. - Subtitle: Select and set the priority of the available language of the subtitle.
- Disc Menu:
Select and set the priority of the available language of the disc menu.
- Default: To reset all the setting to factory default settings.
Ordinary problem &troubleshooting
1. Can not play discs
(1). Check whether the disk is placed correctly or clamped well
(2). Should make the disc side which has label on upside.
(3). If there is dirt on the discs, please clean it first;
(4). check disc whether have deformation or rupture or not serious scratch;
5). Disc format is whether supported type by the player.
2. Remote control does not work
(1). Move the block way between the remote control and the player
(2). Remote control aim at the local window of the remote control receiver;
(3), Check the battery of the remote control whether should be replaced.
3. Can not Open drive
(1). Check the location of power switch is hit in the "ON";
(2). Whether caused by low battery power, automatic shutdown protection testing machine. (Refer to the basic functions operation part of "discharge")
4. Rolling or color images (with the TV connection)
(1). AV output cable connections are correct, as well as the contact plug in place;
(2). The local color by setting the standard TV format with the same, please choose your color TV standard.
5. mosaic, lock play and stop, no response to key
(1). Check whether the disc exist scratches, dirt or deformation;
(2). Whether caused by low battery power;
(3). Please reboot and operate on the normal way.
Technology Parameter
AC/DC adapter Input 120V\~60Hz Output DC 9-12V/1A.
Power consumption: 12W
Video Standard: PAL/NTSC/AUTO
Video Output: 1.0V(P-P) / Impedance 75Ω
Audio Output: 1.8V(RMS) / Impedance 10KΩ
Audio Power AMP: 1.0 W(RMS) X 2
Use temperature: 0-40°C
Play time(Lithium battery inside): About 120 min
Disc Compatibility: DVD+R/WDVD-R/W. DVD CD-R. CD-RW. PHOTO-CD. JPEG, MP3.
Annex table:
| Manual: | 1PC |
| Remote control: | 1PC |
| AC/DC adapter: | 1PC |
| Car adapter: | 1PC |
| A/V Cable: | 1PC |
FCC NOTICE
Note: This equipment has been tested and found to comply with the limits for a Class B digital device, pursuant to part 15 of the FCC Rules. These limits are designed to provide reasonable protection against harmful interference in a residential installation. This equipment generates, uses and can radiate radio frequency energy and, if not installed and used in accordance with the instructions, may cause harmful interference to radio communications. However, there is no guarantee that interference will not occur in a particular installation. If this equipment does cause harmful interference to radio or television reception, which can be determined by turning the equipment off and on, the user is encouraged to try to correct the interference by one or more of the following measures:
--Reorient or relocate the receiving antenna.
--Increase the separation between the equipment and receiver.
--Connect the equipment into an outlet on a circuit different from that to which the receiver is connected.
--Consult the dealer or an experienced radio/TV technician for help.


- 9" Portable DVD Player With
- USB/SD/MMC Inputs
- Contents
- CAUTION
- warning:
- DANGER
- LASER SAFETY
- NOTES ON HANDLING
- CLEANING AND CARE:
- TO OBTAIN A CLEAR PICTURE:
- NOTES ON MOISTURE CONDENSATION:
- Moisture condensation occurs in the following cases:
- Do not use the DVD Player when moisture condensation may occur.
- Remote control
- Battery Installation and replacement
- Handling Discs
- Cleaning Discs
- Storing Discs
- Connection to TV through AV out Jacks:
- Connection to the external audio amplifier (with build-in digital audio decoder):
- Basic operation
- POWER
- MUTE
- NUMBER KEYS ON THE REMOTE CONTROL UNIT
- SETUP
- MENU
- TITLE
- FF (FAST FORWARD)
- FB (REWIND)
- PREV
- NEXT
- REPEAT
- AUDIO (LANGUAGE / CHANNEL)
- PROGRAM
- ANGLE
- SUBTITLE
- SOURCE
- Program playback
- About discs
- DISC TYPES:
- DVD
- AUDIO CD
- JPEG PICTURE CD
- Settings Menu
- - Downmix
- - Panel Quality:
- Preference Page
- Ordinary problem &troubleshooting
- Can not play discs
- Remote control does not work
- Can not Open drive
- Rolling or color images (with the TV connection)
- mosaic, lock play and stop, no response to key
- Technology Parameter
- FCC NOTICE
Brand : Naxa
Model : NPD-952
Category : Portable DVD Player